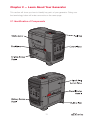
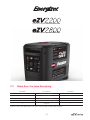
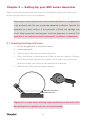
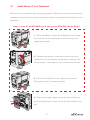
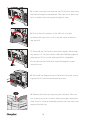
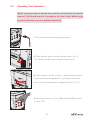
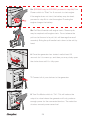
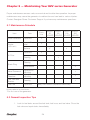
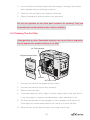
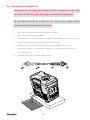
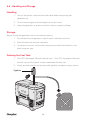
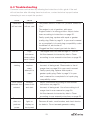
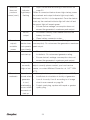
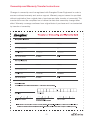
1
2000W GAS POWERED INVERTER GENERATOR
2600W GAS POWERED INVERTER GENERATOR
1
©2013 Energizer Power Equipment. All Rights Reserved.
Licensed by Energizer Corporation, United States of America.
EZVseries-06.2014-01
2
Let's get started.
You're excited to power up, so we'll keep this brief!
3
Thank you for
purchasing your
EZV series inverter
generator.
Remember to register! Take a minute to register this product
online at www.energizergenerators.com. This will allow you to
request warranty support in the future.
This manual will show you how to use the great features that
sets the EZV2200 and EZV2800 apart from the crowd.
4
We've got you covered!
Contact us at 1-887-528-3772
or at [email protected]
if you have any questions
This user guide covers the safety, operation and
maintenance procedures for the EZV2200 and EZV2800.
All information in this publication is based on the latest
product information available at the time of print. Visit
www.energizergenerators.com for user guide updates
and operation notices.
No part of this publication may be reproduced
without written permission.
It is important that anyone operating this product read and
understand the manual prior to use.
5
Warranty Information
Warranty support, operation assistance and product support
is provided by Midland Power Inc., a licensed manufacturer of
Energizer Power Equipment. Please contact us directly for any
warranty service questions.
1-877-528-3772
[email protected]
www.energizergenerators.com
6
Safety First
Safety while using your generator
8
Understanding AC safety
9
Safety while maintaining your generator
9
Other safety tips
10
Learn About Your New Generator
Identification of Components
11
Making Sure You Have Everything
13
Setting Up Your Generator
Checking the Engine Oil Level
14
Checking the Air Filter
15
Using Your EZV2200 generator
Initial Startup of Your Generator
17
Operating Your Generator
19
Shutting Off Your Generator
21
Using the EZV2200 with your Appliance
22
Using the EZV2200 to charge automotive Batteries
22
Maintaining your Generator
Maintenance schedule
24
General inspection tips
24
Cleaning the air filter
25
Changing the engine oil
26
Replacing and cleaning the spark plug
27
Handling and storage
28
Troubleshooting
29
Specifications
32
Wiring Diagram
33
Warranty
34
7
Chapter 1 — Safety First
Playing it safe when working with power equipment is always a good idea. Here are some
important precautions to make sure you stay safe.
1.1 Safety while Operating Your Generator
Always perform an oil, fuel, and air filter check before starting the engine.
•
Properly clean and maintain the equipment.
•
Operate the generator according to instructions for safe and dependable
service.
•
Before operating the generator, read the user manual carefully. Otherwise
generator use may result in personal injuries or equipment damage.
•
Never run the generator in an enclosed area to avoid harm from exhaust
emissions of a poisonous carbon monoxide gas.
•
Be careful not to touch the exhaust system or discharge tubing during
operation due to risk of burns.
•
Pay attention to the warning labels. The engine exhaust system will
become heated during operation and remain hot for an extended period
after the engine is stopped.
•
Gasoline is a highly flammable and explosive liquid. Refuel in a well
ventilated area with the engine stopped.
•
When refueling the generator, keep it away from cigarettes, open flames,
smoke and/or sparks.
•
Connections for standby power to a building’s electrical system must be
done by a qualified electrician and must comply with all applicable laws
and electrical codes. Improper connections may cause serious injuries to
electrical workers during a power outage, and when the utility power is
restored, the generator may explode or cause fires.
•
Place the generator at least 3 feet away from buildings or other equipment
during operation.
•
Run the generator on a level surface. Tilting the generator may result in fuel
spills.
8
•
Know how to stop the generator quickly and understand operation of all
the controls. Never permit anyone to operate the generator without proper
instructions.
•
Keep children, pets and machinery with moving parts away during
operation.
•
Do not operate the generator in rain or snow.
•
Do not allow any moisture to come in contact with the generator.
•
Do not touch the spark plug while the engine is operating or shortly after
the engine has been shut down.
1.2 Understanding AC Safety
Before connecting the generator to an electrical device or power cord:
•
Make sure that everything is in proper working order. Faulty devices or
power cords can lead to an electrical shock.
•
Turn off the generator immediately if the device begins to operate
abnormally. Then disconnect the device and investigate the problem, see
Troubleshooting on page 29.
•
Make sure that the electrical rating of the device(s) does not exceed that of
the generator. If the power level of the device(s) is between the maximum
output power and the running power of the generator, the generator should
not be used for more than 30 minutes.
1.3 Safety while Maintaining Your Generator
After any maintenance is performed, wash immediately using soap and clean water
because repeated exposure to lubricant may cause skin irritation.
•
Do not clean the filter element with flammable liquids like gasoline because
an explosion may occur.
9
•
Turn off the engine before performing any maintenance. Otherwise it can
cause severe personal injury or death.
•
Allow the generator set to cool down before performing any maintenance.
•
Always wear safety glasses when cleaning the generator set with air.
•
Do not clean the generator set with a pressure washer because it can
cause damage to the generator set.
•
Before working with batteries, ventilate the area, wear safety glasses, do
not smoke and always disconnect the negative cable first and reconnect it
last.
•
Use rubber gloves when coming into contact with engine oil.
•
Always stop the generator set before removing the oil filler cap.
•
Only qualified maintenance personnel with knowledge of fuels, electricity,
and machinery hazards should perform maintenance procedures.
•
Lubricate all exposed metal parts regularly.
1.4 Other Safety Tips
•
If the generator set is running in a partially enclosed space, adequate
ventilation should be provided to avoid breathing in poisonous carbon
monoxide from the exhaust gases.
•
If the generator set is stored outdoors, check all the electrical components
on the control panel before each use. Moisture can damage the generator
and can lead to an electric shock.
•
If you start to feel sick, dizzy, or weak after the generator has been running,
move to fresh air RIGHT AWAY. See a doctor. You could have carbon
monoxide poisoning.
10
Chapter 2 — Learn About Your Generator
This section will show you how to identify key parts of your generator. Going over
the terminology below will make sure we're on the same page.
2.1 Identification of Components
11
12
2000W GAS POWERED INVERTER GENERATOR
2600W GAS POWERED INVERTER GENERATOR
2.2
Make Sure You Have Everything
Number
Part Name
Quantity
1
EZV series Generator
1
2
User Guide
1
3
DC Charging Cables
1
4
450mL 10W30 Oil with Funnel
1
5
Tool Kit
1
Make sure your generator set has everything in the table above.
13
Chapter 3 — Setting Up your EZV series Generator
Setup should be done everytime you start up your generator, these quick checks will
ensure you get the most out of your generator.
Exhaust gas contains poisonous carbon monoxide. Never run the generator
in an enclosed area. Be sure to provide adequate ventilation. Operate the
generator on a level surface. If the generator is tilted, fuel spillage may
result. Keep away from moving parts while the generator is running. The
generator is air-cooled and may be damaged if ventilation is inadequate.
3.1 Checking the Engine Oil Level
1. Ensure the generator is on a level surface.
2. Inspect engine oil:
3. Take out the oil filler cap and clean the dipstick.
4. Check the oil level by reinserting the oil filler cap without rotating it. Remove
the oil filler cap and examine the oil level. If the oil level is at or below the
minimum oil level, refill the oil to the maximum oil level mark.
5. Reinsert the oil filler cap and tighten securely.
Maximum Oil Level
Minimum Oil Level
Engine oil is a major factor affecting engine performance and service life.
Non-detergent or vegetable oils are not recommended.
14
Gasoline substitutes are not recommended. They may be harmful to the
fuel system components.
Gasoline is highly flammable and explosive under certain conditions. Refuel
in a well-ventilated area with the engine stopped. Do not smoke or allow
open flames or sparks in the area where the generator is being refueled or
where gasoline is stored. Do not overfill the tank. Be careful not to spill fuel
when refueling. Wipe up any spilled gasoline and let the area dry before
starting the engine.
3.3 Check the Air Filter
1. Unscrew and remove the engine access panel. Remove the air filter
element and observe for cleanliness.
2. Clean the air filter element with soap and water or solvent. Squeeze dry
and then soak in clean engine oil.
3. Squeeze out all excess oil and reinstall. Replace the filter if it is damaged.
Check the air filter using the maintenance schedule. Always inspect air
filter before using the generator. Clean Air Filter every 3 months or after
50hrs of operation according to Section 5.3 Cleaning the Air Filter.
Air Filter Sponge
Engine Access Panel
Screws
Air Filter Cover
15
Chapter 4 — Using Your EZV series Generator
DANGER - CARBON MONOXIDE
Using a generator indoors WILL KILL YOU IN MINUTES.
Generator exhaust contains high levels of carbon monoxide (CO), a poisonous gas
you cannot see or smell. If you can smell the generator exhaust you are breathing
CO. But even if you cannot smell the exhaust, you could be breathing CO. NEVER
use a generator inside homes, garages, crawlspaces, or other partly or fully enclosed
areas. Deadly levels of carbon monoxide can build up in these areas. Using a fan or
opening windows and doors does NOT supply enough fresh air. ONLY use a generator
outdoors and far away from open windows, doors, and vents. These openings can pull
in generator exhaust. Even when you use a generator correctly, CO may leak into the
home. ALWAYS use a battery-powered or battery-backup CO alarm in your home. If
you start to feel sick, dizzy, or weak after the generator has been running, move to fresh
air RIGHT AWAY. See a doctor. You could have carbon monoxide poisoning.
16
4.1
Initial Setup of Your Generator
We know you're excited to get using your generator. Please be sure to follow the setup,
operation, and shut off instructions below thoroughly to ensure the best lifespan for your
generator.
Steps 1-3 are for the EZV2800 only. If you have an EZV2200 start on Step 4.
1. Setup the Battery: Remove the Battery Access Panel
from the unit by unscrewing the screw at the top and
releasing the panel.
2. Connect the Battery: locate and connect the loose
connectors from the battery wiring harness and the main
wiring harness. The battery is now connected to the unit.
3. Re-install the Battery Access Panel onto the unit.
Ensure the screw is fastened properly.
4. Remove the main engine access panel from the unit
by unscrewing the (4) screws at the top and middle of the
unit.
17
5. Locate, unscrew, and remove the Oil Dipstick, exposing
the internal engine compartment. Be sure not to allow any
dust or debris near the engine during this time.
6. Pour in the full contents of the 450 mL oil bottle
provided with your unit, or fill to the full mark located on
the dipstick.
7. Re-install the Oil Dipstick and fasten tightly. Wipe away
any excess oil. For best results, drain and refill the engine oil
after the first 20 hrs of use, and every 50 hrs thereafter.
Do not remove the Oil Dipstick when the engine is warm
from prior use.
8. Re-install the Engine Access Panel onto the unit, ensuring that all (4) screws are fastened properly.
9. Remove the fuel cap, exposing the fuel tank . Be sure
not to allow any dust or debris near the engine during this
time. Pour 91 octane unleaded gasoline into fuel tank, and
replace the fuel cap.
18
4.2
Operating Your Generator
Before using generator, a ground wire must be connected to the ground
terminal. The Ground terminal is located on the Front Panel. Before using
the ground terminal consult a qualified electrician.
1. Disconnect all devices from the generator.
2. Open the fuel valve: turn the fuel valve from "off" to
"on". Make sure the valve is turned all the way on.
3. Turn choke to "closed" position. Leave the choke in the
"Open" position if the generator is still warm from recent
use, or if the air temperature is higher than 50°F (10°C).
4. Turn Power switch to "On". Make sure EcoMode switch
is set to "Off".
19
5a. (EZV2800 only, for EZV2200 proceed to step 5b) Turn
Power switch to "Start" for 5 seconds to start engine.
If the engine does not start, the battery may be dead,
proceed to step 5b to start the engine. Running the
engine charges the battery.
5b. Pull Recoil handle until engine starts. Several pulls
may be required until engine starts. Do not release the
pull cord at the end of a pull, this will damage the recoil
assembly. Bring the pull handle back down to the unit by
hand.
6. Once the generator has started, wait at least 30
seconds for it to warm up, and then you may slowly open
the choke lever until it is fully open.
7. Connect all of your devices to the generator.
8. Turn EcoMode switch to "On". This will reduce the
output to a level where the generator will only produce
enough power for the connected devices. The reduction
of extra, unused power saves fuel.
20
4.3
Shutting Off Your Generator
1. Disconnect all devices from the generator.
2. Turn EcoMode switch to "Off". Let generator run with
EcoMode off for 2 minutes.
3. Turn Power switch to "Off".
4. Close the fuel valve by turning it to "Off".
To stop the engine in an emergency, turn the engine switch “OFF”. Always
connect the ground terminal at the front panel to the ground (earth) to
prevent electrical shock.
21
4.4 Using an EZV series generator with your Devices
After starting your generator you can connect your devices to it. Before starting, make
sure that you know what you are able to power with your Generator. Here's how you
can find out: Add the watt ratings of all the loads that the generator set will be powering
at the same time. Make sure that total wattage will not exceed the generator rating.
For example: A generator set rated 5000W can power two 1500W heaters, a 900W
circular saw, a 500W drill and a 100W light at the same time (4500W combined).
However, to operate a second 900W saw, it will be necessary to disconnect one of the
1500 W heaters.
1. Turn off all devices before connecting them to your
generator.
2. Insert the plug of the device into your generator
based on its voltage requirements. Your EZV series
generator includes two 120V AC outlets, one 5V USB
outlet, and one 12V DC outlet for charging automotive
batteries. See Section 4.5 before using the DC outlet.
3. You can now turn your devices on and use them.
4.5 Using an EZV series generator to Charge Automotive Batteries
You can use 12V 8.3A DC output to charge automotive batteries. Be sure
to monitor the battery charge time. Over-chargeing may cause explosion,
injury, and damage to the generator.
22
1. Connect the positive (red) terminal of the battery to
the red (positive) terminal, the 12V 8.3A DC Output
Terminal on the front panel of your generator.
2. Connect the negative (black) terminal of the battery
to the black (negative) terminal, the 12V 8.3A DC
output terminal on the front panel of your generator.
DO NOT REVERSE THE POLARITY OF THESE
CONNECTIONS.
3. Insert the DC plug into the DC receptacle. The
generator should be running, and with EcoMode off.
After insertion EcoMode may be turned on.
An explosive hydrogen gas is discharged through vent holes in the battery
during charging. Do not allow sparks or open flames around the generator
or battery during the charging process.
Electrolyte fluid can burn eyes and clothing. Be extremely careful to avoid
any contact. If injured, wash the affected area immediately with large
amounts of water and seek medical attention immediately.
When charging a large capacity battery or totally discharged battery,
excessive current may force the DC breaker to turn off. In this case, use a
battery charger.
23
Chapter 5 — Maintaining Your EZV series Generator
Proper maintenance ensures safe, economical and trouble-free operation. Improper
maintenance may cause the generator to malfunction and can lead to serious injuries.
Contact Energizer Power Customer Support if you have any maintenance questions.
5.1 Maintenance Schedule
Item
Task
Entire Generator
Engine
Lubricants
Each
Use
Inspection
•
Inspect Oil
Level
•
Replace
Inspection
EVERY EVERY EVERY EVERY
20
50
100
300
HOURS HOURS HOURS HOURS
•*
•
•
Air Filter
Cleaning
•
Inspection &
Cleaning
Spark Plug
•
Replacement
•
Valve Clearance
Inspection &
Adjusting
•
Combustion
Chamber
Inspection &
Adjusting
•
Fuel Tank and
Strainer
Cleaning
•
Fuel Line
Inspection
every two months (replace if necessary)
Hours refer to in-use hours.
*For first use of the generator.
5.2 General Inspection Tips
1. Look for fuel leaks around the fuel tank, fuel hose, and fuel valve. Close the
fuel valve and repair leaks immediately.
24
2. Look and listen for exhaust leaks while the engine is running. Have all the
leaks repaired before continuing operation.
3. Check for dirt and debris and clean as necessary .
4. Check the engine oil level and add oil as necessary.
Do not use gasoline or low flash point solvents for cleaning. They are
flammable and could explode under certain conditions.
5.3 Cleaning The Air-Filter
Using gasoline or other flammable solvents can cause a fire or explosion.
Do not operate this product without an air filter.
Air Filter Sponge
Engine Access Panel
Screws
AirF ilter Cover
1. Unscrew and remove the engine access panel.
2. Unscrew and remove the air filter assembly.
3. Remove the foam filter.
4. If the foam element is dirty, clean it in warm soapy water, rinse, and allow it
to dry thoroughly, or clean in non-flammable solvent and allow to dry.
5. Dip the foam element in clean engine oil, then squeeze out all excess oil.
The engine will smoke when started if too much oil is left in the filter.
6. Wipe dirt from the air filter unit and cover using a moist rag.
25
5.4 - Changing the Engine Oil
Used motor oil can cause skin irritations if left in long-term contact with
skin. Wash hands thoroughly with soap and water after handling oil.
Do not dispose of used oil in drains or soil. Local service shops provide
environmentally-friendly disposal methods.
1. Stop the engine and remove the oil access panel.
2. Place a pan beside the generator.
3. Remove the oil drain screw and, using the oil drainage spout (found in your
tool kit) allow the oil to completely drain into the pan.
4. Reinstall drain screw before filling the engine with fresh oil. Do not
overfill oil reservoir. Use a funnel to prevent spillage. See chart below for
reccomended oil.
5. Reinstall the oil filler cap and tightly fasten.
26
5.5 - Replacing and Cleaning the Spark Plug
Do not rinse spark plug in water. Follow guidelines and be careful not to
overtighten the spark plug.
Tighten ½ turn when installing a new spark plug.
Tighten ¼ turn when re-installing an old spark plug.
1. Unscrew and remove spark plug access panel and screws.
2. Remove ignition coil from spark plug and remove spark plug with spark
plug wrench.
3. Inspect the spark plug and clean any dirt from the electrodes with a wire
brush. If electrodes are worn or show signs of wear, replace spark plug.
4. Measure the electrode gap with a spark plug gauge and adjust as
necessary by bending the side electrodes. Ensure that the gap is between
0.7 and 0.9mm
5. Reinsert the plug carefully. Tighten with a spark plug wrench.
Spark Plug
Ignition Coil
27
5.6 - Handling and Storage
Handling
1. Turn off the power switch and the fuel valve when transporting the
generator set.
2. Do not touch engine until the engine has cooled down.
3. Keep the generator at a level position in order to prevent spillage.
Storage
Before storing the generator set for an extended period:
1. Ensure that the storage area is free of excess humidity and dust.
2. Drain the fuel tank and the carburetor.
3. To prevent corrosion, coat screws and exposed metal with antirust oil at
least twice per year.
Draining the Fuel Tank
1. Turn OFF the engine. Remove the fuel cap 1. Turn OFF the engine. Remove
the fuel cap and the debris screen underneath the fuel cap.
2. Empty the fuel tank into an an approved gasoline container using a siphon.
Syphon
28
6.0 Troubleshooting
Common issues can be fixed by following the instructions in this guide. If the unit
will not function after following these instructions, contact technical support before
attempting to use or repair the product.
PROBLEM
SYMPTOMS
Generator
Generator
will not start
will not start
CORRECTION
1.
The power switch is in the “Off” position. Switch to
“On.”
2.
The engine is out of gasoline, add more.
3.
Engine choke is in wrong position. Adjust choke
lever according to instructions on page 20.
4.
Faulty spark plug, replace with equal or greater
quality plug. Refer to page 31 in your user’s manual
for a complete list of spark plug compatibility codes.
5.
Insufficient oil, add more oil.
6.
Clogged fuel line, inspect gas tank for debris.
High
1.
The engine does not have enough oil - add oil.
resistance
2.
Air filter element obstructed by debris. Clean
when pulling
according to user manual instructions on page 25.
recoil starter.
Difficulty
Engine
1.
Disconnect load before starting.
starting
requires
2.
Incorrect oil being used. Please refer to the oil
many
attempts to
usage chart on page 26 in your user’s manual.
3.
start
Faulty spark plug, replace with equal or
greater quality plug. Refer to page 31 in your
user’s manual for a complete list of spark plug
compatibility codes.
Thick smoke
Exhaust
released from
fumes thick
exhaust
and dark
1.
Adjust choke lever according to user manual
instructions on page 20.
2.
Incorrect oil being used. Use oil according to oil
usage chart in user manual on page 26.
3.
Air filter element obstructed by debris. Clean
according to user manual instructions on page 25.
Generator
No indicator
1.
Generator circuit breaker off or tripped
does not
lights or
2.
Remove all loads, reset breaker, and check device
produce
display on
power
front panel
for defects. Do not exceed generator rating.
29
Generator
Overload
does not
indicator
produce
light keeps
power (cont.)
flashing
1.
Adjust choke lever according to instructions on
page 20
*When a connected device draws high startup power
the overload and output indicator light may briefly
illuminate, but this is to be expected. Once the device
starts up the overload indicator light will shut off and
the output light will remain green.
2.
Ensure device wattage consumption does not
exceed the generator’s maximum peak output.
No DC
1.
output
Disconnect battery, reset breaker and test the
battery for shorts.
2.
Clean battery connector nodes.
Generator
Connected
Verify device start up requirements (Wattage
outputs
device does
consumption). Do not exceed the generators maximum
unstable
not operate
peak output.
power
consistently
Device will
1.
not start up
Remove all loads, reset breaker, and check device
for defects. Do not exceed generator rating.
2.
Ensure device’s wattage consumption does not
exceed the generator’s maximum peak output.
Engine idle
unusually
high or low
Carburetor in need of tuning. For details on how to
adjust correctly please contact your local service
centre, or contact Midland Power Inc. at 1-877-5283772.
Generator
Operation is
1.
Atmospheric temperature high (excess of 35°C).
overheats
normal when
2.
Insufficient air circulation in vicinity of generator.
generator
3.
Low oil viscosity. Use oil according to oil usage
is cool,
overheating
occurs within
chart in user manual on page 26.
4.
Fouled spark plug, replace with equal or greater
quality plug.
moments of
start up.
30
Engine idle
1.
fluctuates
Carburetor in need of tuning. For details on how to
adjust correctly please contact your local service
centre, or contact Midland Power Inc. at 1-877528-3772. Missing ground reference on return side
of differential analog output (external).
2.
Air filter element obstructed by debris. Clean
according to user manual instructions on page 25.
Engine stops
Engine idles
1.
The power switch is in the “Off” position.
down and
2.
The engine is out of gasoline. Add regular
shuts off
unleaded gasoline.
3.
Air filter element obstructed by debris. Clean
according to user manual instructions on page 25.
4.
Adjust choke lever according to user manual
instructions on page 20.
5.
Incorrect oil being used or insufficient oil level.
Always ensure high oil levels, and use oil according
to oil usage chart in user manual on page 26.
6.
Fouled spark plug, replace with equal or greater
quality plug. Refer below for a complete list of
spark plug compatibility codes.
SPARK PLUG COMPATIBILITY
BRAND
EZV SERIES
NGK
CR7HS
DENSO
U20FPR
CHAMPION
RZ10YC
BOSCH
U24BC
31
Chapter 7- Specifications
EZV2200
EZV2800
60
60
Rated AC Output Power (W)
2000
2600
Max AC Output Power (W)
2200
2800
1-Phase Rated AC Voltage (V)
120
120
Power Factor
1.0
1.0
Max DC Output Power (W)
100
100
Rated DC Voltage (V)
12
12
3.80 HP, Single Cylinder,
forced air cooling, 4-stroke,
OHV
5.3 HP, Single Cylinder,
forced air cooling, 4-stroke,
OHV
125
150
Ignition mode
Transistor Controlled
Ignition
Transistor Controlled
Ignition
Starting mode
Recoil Start
Electric and Recoil Start
Max. Output (W/rpm)
3000/5000
4000/5000
2 / 7.0
2 / 7.0
450mL (10W30)
450mL (10W30)
91 Oct. Unleaded Gasoline
91 Oct. Unleaded Gasoline
Max. Running (Rated) Volume
(dB (at 7m))
64
65
Running Time Per Tank (hours)
6.5hrs with 75% load
5.8hrs with 75% load
L x W x H (mm)
565 x 350 x 510 mm
565 x 350 x 510 mm
35.5/33.5
38/36
GENERATOR
Rated frequency (Hz)
Type
ENGINE
Displacement (cm3or cc)
Fuel tank capacity (Gal/Litres)
Oil capacity
BOX
Fuel Type
Packaging/Product Weight (kg)
32
Chapter 8- Wiring Diagram
33
Chapter 9 - Learn About your Warranty
Energizer Power Equipment Customer Support Center
Toll Free: 1-877-528-3772
E-mail: [email protected]
Online: www.energizergenerators.com
ENERGIZER POWER EQUIPMENT PRODUCTS ARE DISTRIBUTED BY:
Midland Power Inc
376 Magnetic Drive, Toronto, ON M3J 2C4, Canada
This product is warranted to be free of defects in material and workmanship for two
years from date of purchase. This warranty guarantees that any defective parts will be
repaired or replaced at no cost, including diagnosis and replacement parts.
LIMITED WARRANTY PERIODS
Recreational and Residential use: Two Years Limited
•
1st Year: Parts and Labor
•
2nd Year: Parts only
Commercial use: 6 months limited, parts and labor
This limited warranty begins at the initial time of retail purchase and covers
manufacturer’s defects caused by a defect in components or workmanship during
the three (3) Year period. The warranty coverage is continual from the initial date
of purchase and does not restart at anytime under any circumstances. This limited
warranty is valid for residential or recreational applications only and only when the
generator receives all necessary preventative maintenance as described in the Energizer
Generators User Guide. The repair or replacement of a generator will take place within
a reason- able period of time during normal business hours. All repair and replacement
parts shall be warranted for (90) days after the initial date of installation or purchase.
LIMITATION OF REMEDIES AND DISCLAIMERS
Midland International Inc. disclaims any responsibility for loss of time or use of the
generator in a recreational vehicle or any vehicle in which the generator is installed,
transportation, commercial loss, or any other incidental or consequential damage.
Any implied warranties are limited to the duration of this written warranty. THE
FOREGOING LIMITED WARRANTY IS EXCLUSIVE OF AND IN LIEU OF ALL
34
OTHER WARRANTIES OF MERCHANTABILITY, FITNESS FOR A PARTICULAR
PURPOSE AND OF ANY OTHER WARRANTY WHETHER EXPRESS OR
IMPLIED. Consumable parts, such as oil or fuel filters, fuel cut off valve, brushes, fuel
injection nozzle valve, lubricant, or ignition plug, are not covered under this warranty.
All expenses incurred in maintaining and replacing parts for generator shall fall on the
purchaser. This warranty coverage does not include parts affected by accident and/
or collision, corrosion or rust, normal wear, incorrect fuel type or fuel contamination,
use in an application for which the product was not intended, unauthorized service,
or any other misuse, neglect, incorporation or use of unsuitable attachments or parts
Damage to voltage regulators caused by failure to ground, shorting or overloading will
not be covered under this warranty. Under this Warranty, we do not have the obligation
to bear any transportation fees of any product to/from an authorized Warranty Center.
Unauthorized alteration, installation or any cause other than defects in material or
workmanship of the product will not be covered under the warranty.
EXCLUSIONS NOT COVERED BY THIS LIMITED WARRANTY
1. Normal engine/alternator wear.
2. Damage caused by lack of maintenance as described in the Energizer User
Guides, or negligence by using improper or impure motor oil, coolant, or fuel.
3. Damage caused by accidents, improper installation or storage.
4. Damage caused by water ingestion, submersion, or external water damage.
5. Damage or non-performance caused by operation of the generator set in a
marine application.
6. Damage caused by operation with improper fuel, or at speeds, loads,
conditions, or modifications contrary to published specifications.
7. Items not supplied by Energizer, including, but not limited to, starting
batteries, battery cables, external wiring, fuel lines, filters, etc; (refer to
exclusions).
8. Repairs made during the warranty period, without first obtaining a case
number from Energizer.
Batteries supplied with any generator product should be considered a bonus item and
not covered by warranty. Batteries can be damaged by shock, shorting terminals, heat,
acid spillage and a number of other factors that cannot be controlled after they have left
our facility. It is the customer’s responsibility to take great care when handling a battery
so no spillage of acid will occur and cause corrosion; damage caused by battery acid is
not covered under this warranty.
35
Warranty Claim Procedure:
Warranty service must be performed by one of our authorized service dealers. If you feel
your generator is malfunctioning due to a defect or misuse, simply contact our customer
support center for technical advice, a warranty claim or general information.
Warranty service, operation assistance and product support is provided by Energizer.
Contact us at the following numbers.
PRODUCT REGISTRATION
Product registration is required for product support and warranty coverage. The owner’s
registration found in the user manual can be completed and mailed. You can also
register Online at www.energizergenerators.com.
Proof of purchase may be required for warranty claims. Keep a copy of the original
receipt, UPC code and serial number with this manual.
Customer Service
1-877-528-3772 (toll-free)
[email protected]
EMISSION CONTROL SYSTEM WARRANTY
Your new Midland Power Inc. engine complies with the U.S. EPA(Environmental
Protection Agency) regulations, State of California emission regulations (models certified
for sale in California only) and Canada EPA regulations. Midland Power Inc. provides the
emission warranty coverage for engines in the United States and its territories. Midland
Power Inc. provides the emission warranty for engines in the 13 provinces and territories
of Canada. In the remainder of this Emission Control System Warranty, Midland Power
Inc. will be referred to as Midland Power Inc.
YOUR WARRANTY RIGHTS AND OBLIGATIONS:
California: The California Air Resources Board and Midland Power Inc. are pleased
to explain the emission control system warranty on your Midland Power Inc. engine. In
California, new spark-ignited small off-road equipment engines must be designed, built,
and equipped to meet the State's stringent anti-smog standards.
Other States, U.S. territories, and Canada: In other areas of the United States and
in Canada, your engine must be designed, built, and equipped to meet the U.S. EPA
and Environment Canada emission standards for spark-ignited engines at or
below 19 kilowatts.
36
All of the United States and Canada: Midland Power Inc. must warrant the emission
control system on your power equipment engine for the period of time listed below,
provided there has been no abuse, neglect, or improper maintenance of your power
equipment engine. Where a warrantable condition exists, Midland Power Inc. will repair
your power equipment engine at no cost to you including diagnosis, parts, and labor.
Your emission control system may include such parts as the carburetor or fuel injection
system, the ignition system, and catalytic converter. Also included may be hoses,
connectors, and other emission-related assemblies.
EMISSION CONTROL SYSTEM WARRANTY PARTS:
SYSTEMS COVERED IN
WARRANTY
PARTS DESCRIPTION
Fuel Metering
Carburetor assembly (includes starting enrichment system),
Engine temperature sensor, Engine control module, Fuel regulator,
Intake manifold
Evaporative
Fuel Tank, Fuel Cap, Fuel Hoses, Vapor Hoses, Carbon Canister,
Canister Mounting Brackets, Fuel Strainer, Fuel cock, Fuel Pump,
Fuel Hose Joint, Canister Purge Hose Joint
Exhaust
Catalyst, Exhaust Manifold
Air Induction
Air filter housing, Air filter element
Ignition
Flywheel magneto, Ignition pulse generator,
Crankshaft position sensor, Power coil, Ignition coil assembly,
Ignition control module, Spark plug cap, Spark plug
Crankcase Emission Control
Crankcase breather tube, Oil filler cap
Miscellaneous Parts
Tubing, fittings, seals, gaskets, and clamps associated with these
listed systems
Note: This list applies to parts supplied by Midland Power Inc. and does not cover
parts supplied by the equipment manufacturer. Please see the original equipment
manufacturer’s emissions warranty for non-Midland Power Inc. parts.
**Consumable parts are covered up to a maximum of 30 days. See the Maintenance
Schedule in the owner’s manual.
37
38
Warranty Registration Instructions:
Ownership must be registered with Energizer Power Equipment in order to ensure
continued warranty and service support.
Please fill out the registration card below and mail it along with a copy of your receipt,
and the original UPC barcode from your product packaging. The store, date of
purchase and product purchase should be clearly visible on the receipt copy.
YOU MAY ALSO REGISTER ONLINE BY VISITING OUR WEBSITE:
WWW.ENERGIZERGENERATORS.COM
If you wish, you can confirm your registration by calling customer service at or by email
at [email protected]. Please allow one week for mail delivery and
processing.
PLEASE MAIL ALL ITEMS TO:
Midland Power Inc. Product Registration
376 Magnetic Drive
Toronto, ON M3J 2C4
Canada
39
40
Ownership and Warranty Transfer Instructions:
Changes in ownership must be registered with Energizer Power Equipment in order to
ensure continued warranty and service support. Warranty support cannot be provided
without registration (from original date of purchase and after transfer of ownership) This
transfer form must be completed on or before the date that ownership change takes
effect. Warranty coverage continues from original date of purchase and is not extended
by transfer of ownership.
41
Enjoy!
Be sure to check energizergenerators.com monthly for updates regarding your generator.
42
43
TM
44