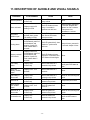
1
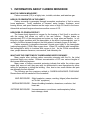
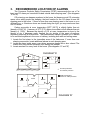
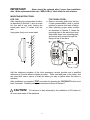
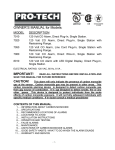
E196731 UL DE SI GN R R LISTED CE RTI F I ED IAS 6-96-2nd EDITION CO ALARM US OWNER’S MANUAL for Models: 7030SL 7035/7035SL 9 Volt Battery CO Alarm, Single Station 9 Volt Battery CO Alarm with LCD Digital Display and Peak Level Memory, Single Station IMPORTANT! READ ALL INSTRUCTIONS BEFORE INSTALLATION AND SAVE THIS MANUAL FOR FUTURE REFERENCE. ! CAUTION! THIS ALARM WILL ONLY INDICATE THE PRESENCE OF CARBON MONOXIDE GAS AT THE SENSOR. CARBON MONOXIDE GAS MAY BE PRESENT IN OTHER AREAS. THIS CARBON MONOXIDE ALARM IS DESIGNED TO DETECT CARBON MONOXIDE GAS FROM ANY SOURCE OF COMBUSTION. IT IS NOT DESIGNED TO DETECT SMOKE, FIRE OR ANY OTHER GAS. THIS DEVICE IS DESIGNED TO PROTECT INDIVIDUALS FROM THE ACUTE EFFECTS OF CARBON MONOXIDE EXPOSURE. IT WILL NOT FULLY SAFEGUARD INDIVIDUALS WITH SPECIFIC MEDICAL CONDITIONS. IF IN DOUBT, CONSULT A MEDICAL PRACTITIONER. CONTENTS OF THIS MANUAL 1…. 2…. 3…. 4…. 5…. 6…. 7…. 8…. 9…. 10…. 11…. 12…. INFORMATION ABOUT CARBON MONOXIDE SPECIFICATIONS RECOMMENDED LOCATIONS OF ALARMS LOCATIONS TO AVOID INSTALLATION INSTRUCTIONS FEATURES AND OPERATION TESTING AND MAINTENANCE WHAT TO DO WHEN THE ALARM SOUNDS LIMITATIONS OF CARBON MONOXIDE ALARMS GOOD SAFETY HABITS DESCRIPTION OF AUDIBLE AND VISUAL SIGNALS SERVICE AND WARRANTY ! WARNING! DISCONNECTING THE BATTERY OR A BATTERY WITH LOW VOLTAGE WILL RENDER THIS UNIT INOPERATIVE. Do not try to repair this carbon monoxide alarm yourself. Refer to instructions in Section 12 for service. -1- 1. INFORMATION ABOUT CARBON MONOXIDE WHAT IS CARBON MONOXIDE? Carbon monoxide (CO) is a highly toxic, invisible, odorless, and tasteless gas. HOW IS CO GENERATED IN THE HOME? Carbon monoxide is generated through incomplete combustion of fuel in various home appliances. Faulty ventilation of furnaces, water heaters, fireplaces, wood burning stoves, and space heaters are the major cause of high CO levels in the home. Automobile and small engine exhaust are another source of CO. HOW DOES CO POISON PEOPLE? The human body depends on oxygen for the burning of fuel (food) to provide us with the energy that allows our cells to live and function. Oxygen makes up approximately 21% of the atmosphere and enters our lungs when we breathe. In our lungs the oxygen combines with the hemoglobin in the blood (oxyhemoglobin), and is carried in the blood stream throughout the body where it releases oxygen to the cells. Carbon monoxide is dangerous because it bonds more tightly to the hemoglobin (carboxyhemoglobin, COHb) than oxygen does. When CO combines with hemoglobin, the hemoglobin's ability to combine with oxygen is lost. As the COHb concentration rises, people become nauseous, unconscious, and ultimately die. WHAT ARE THE SYMPTOMS OF CARBON MONOXIDE POISONING? Many people often confuse carbon monoxide poisoning with the flu, the initial symptoms being very similar. Different concentrations of CO over various lengths of time cause different symptoms. Many cases of carbon monoxide poisoning indicate that while the victims were aware they were not well, they were also too disoriented to save themselves by either calling for assistance or exiting the building. Also, due to size, small children and pets are generally the first affected. The following are the symptoms related to CARBON MONOXIDE POISONING. Discuss them with all members of the household. MILD EXPOSURE: Slight headache, nausea, vomiting, fatigue (often described as “flu-like” symptoms) MEDIUM EXPOSURE: Severe throbbing headache, drowsiness, confusion, fast heart rate EXTREME EXPOSURE: Unconsciousness, convulsions, cardiorespiratory failure, brain damage, death -2- CO GAS EXPOSURE VERSUS TIME (400 PPM EXPOSURE) 140 SYMPTOMS 50% NONE NONE SLIGHT HEADACHE HEADACHE HEADACHE AND NAUSEA DROWSY VOMITING COLLAPSE COMA AND PERMANENT BRAIN DAMAGE PERMANENT BRAIN DAMAGE – DEATH 45% 40% COHb 100% MINUTES 8 15 25 35 45 60 75 90 110 400 PPM EXPOSURE 35% 30% 25% 20% 15% 10% 5% 0% 8 15 25 35 45 60 75 90 110 140 Minutes 2. SPECIFICATIONS CO RESPONSE TIME 70 PPM 150 PPM 400 PPM 60-240 MINUTES 10-50 MINUTES 4-15 MINUTES POWER SOURCE 9V BATTERY SENSOR TYPE ELECTROCHEMICAL OPERATING TEMPERATURE 40oF (4.4oC) TO 100oF (37.8oC) AUDIBLE ALARM 85 dB AT 10 FEET VISUAL ALARM FLASHING RED LED DETECTION FREQUENCY SAMPLES FOR CO EVERY MINUTE LCD DISPLAY: MODELS 7035/7035SL: 1. DIGITAL READ-OUT OF CURRENT CO DETECTED AND PEAK LEVEL MEMORY 2. PEAK LEVEL TIME RECORD (THE TOTAL TIME CO IS DETECTED WITHIN 10% OF THE PEAK LEVEL) 3. DISPLAY TOLERANCE @ 50% RH, 72°F±5° (22°C±3°) DISPLAYS CO LEVELS FROM 10 PPM TO 600 PPM. LIFE MONITOR ACTIVATES SENSOR EXPIRATION SIGNAL AFTER FIVE YEARS BATTERY TYPE LONG-LIFE ULTRALIFE U9VL-J LITHIUM POWER CELL (SUPPLIED) DISPLAYS TIME FROM 0 TO 999 MINUTES. ± 15% FROM 40-600 PPM -3- 3. RECOMMENDED LOCATION OF ALARMS The Consumer Products Safety Commission (CPSC) recommends the use of "at least one CO alarm per household located outside each sleeping area." (See diagrams "A" and “B”) CO poisoning can happen anywhere in the home, but because most CO poisoning cases occur while people are sleeping, the best location for the CO alarm is near the sleeping area in the home. If there is more than one sleeping area in the home or on a different floor, or if bedroom doors are closed during the night, you may need more than one CO alarm. Carbon monoxide at room temperature [68oF (20°C)] is slightly lighter than air (density of 0.96716). However, at 32oF (0°C) carbon monoxide is much heavier than air (density of 1.250). Because the density of CO at room temperature is close to the density of air, it disperses easily through the air, similar to the scent of perfume dispersing uniformly in all directions. This characteristic makes it possible for CO alarms to be mounted anywhere in the room or hallway, including both wall and ceiling areas. 1. Locate the first alarm in the immediate area of the bedrooms. If more than one sleeping area exists, locate additional alarms in each sleeping area. 2. Locate an alarm inside every room where someone sleeps with a door closed. The closed door may prevent the alarm from waking the sleeper. 3. Locate an alarm on every level of the home. (See diagrams “A” and “B”) DIAGRAM “A” BEDROOM + TV ROOM + BEDROOM DR K + + BEDROOM + BR BR BEDROOM + CO alarm placement for minimum protection. Additional CO alarm location for added protection. KITCHEN BEDROOM BEDROOM DINNING + LIVING ROOM BEDROOM -4- DIAGRAM “B” 4. ! WARNING! LOCATIONS TO AVOID NEAR THE COOKING AREA: Do not install the alarm within 5 feet of cooking appliances. CO may be generated in the cooking process and cause nuisance alarms. Also, cooking grease can build up on the alarm and cause alarm failure. CLOSE TO A FURNACE, WATER HEATER, OR SPACE HEATER: These devices often spill out small amounts of CO when they first turn on. IN GARAGES: Automobile exhaust contains CO and will activate alarm. IN DUSTY AREAS: Dust can build up on alarm and prevent it from working properly. IN CLEANING SUPPLY ROOMS: Chemicals used in household cleaning and painting supplies can cause nuisance alarms. IN VERY HOT OR COLD AREAS: Do not install unit on any outside wall or in areas which are below 40oF (4.4°C) or above 100oF (37.8°C). IN DEAD AIR SPACE: Do not install alarm within 1’ of where wall meets ceiling or floor. IN HAZARDOUS LOCATIONS: This alarm is not suitable for installation in a hazardous location, as defined in the National Electrical Code. NEAR WIRELESS DEVICES: Do not install the alarm within 1 foot of wireless devices. Radio Frequencies (RF) may interfere with the CO alarm’s proper operation. 5. INSTALLATION INSTRUCTIONS NOTE: Review Section 3, RECOMMENDED LOCATIONS OF ALARMS, And Section 4, LOCATIONS TO AVOID, Prior To Installing Your Alarm. The proper power for the 7030SL and 7035/7035SL CO alarms is a 9V battery. Only use Ultralife U9VL-J Lithium or Duracell MN1604 Alkaline batteries. Constant exposures to high or low temperature, or high humidity, may shorten battery life. BATTERY INSTALLATION AND REPLACEMENT - 7035: 1. Open the battery door to install original battery or replace old battery, and attach a new 9V battery to the battery cable. Battery must snap firmly onto both connectors. 2. Press the battery reminder lever down, place the battery on top of the lever and into the battery compartment, and close the battery door. 3. Press the TEST/RESET button to verify activation. (See TESTING in Section 7) BATTERY ACTIVATION AND REPLACEMENT - 7030SL/7035SL: 1. Pull the Power Tab completely out of the unit to activate the alarm. Press the TEST/RESET button to verify activation. (See TESTING in Section 7) 2. To replace battery, loosen the security screw on the battery door with the ProTech driver bit (enclosed in box). 3. Open the battery door, remove and disconnect old battery, and attach a new 9V battery to the battery cable. Battery must snap firmly onto both connectors. 4. Press the battery reminder lever down, then place the battery on top of the lever and into the battery compartment. 5. Close the battery door, and drive the security screw through the door into the alarm backplate. (Keep the ProTech driver bit for future use) 6. Press the TEST/RESET button to verify activation. (See TESTING in Section 7) ! WARNING! DO NOT USE RECHARGEABLE BATTERY, OR ANY OTHER TYPE OF BATTERY, EXCEPT AS SPECIFIED IN THIS MANUAL. ! CAUTION! IF THE BATTERY DOES NOT HOLD DOWN THE REMINDER LEVER IN THE BATTERY COMPARTMENT, THE BATTERY DOOR WILL NOT CLOSE, AND THE ALARM CANNOT BE SECURED TO MOUNTING PLATE. -5- IMPORTANT! Alarm should be replaced after 5 years from installation date. Write replacement date onto “REPLACE by” label affixed to side of alarm. MOUNTING INSTRUCTIONS: FOR 7035: After selecting the proper alarm location as described in Section 3, drive a screw into the wall at eye level, leaving the screw-head about ¼ inches from the wall. Hang alarm firmly onto screw-head. FOR 7030SL/7035SL: Remove mounting plate from the box. If plate preassembled, slide to unlock position to remove from back of alarm. After selecting proper alarm location as described in Section 3, fasten the mounting plate to the wall at eye level. Slide alarm down onto mounting plate, and secure with a screw through the flange on top of the alarm. 1/4” Add the telephone numbers of the local emergency service provider and a qualified technician to the self-adhesive labels provided. Place one label next to the alarm, and the other label near a source of fresh air where you plan to gather when the alarm is activated. After installation is completed, TEST your alarm by pressing the TEST/RESET button for at least 2 seconds. Detailed testing instructions are outlined in Section 7. ! CAUTION! CO detection is best achieved by the installation of CO alarms in all rooms and areas of the residence. -6- 6. FEATURES AND OPERATION OPERATION: The CO alarm is operational once a battery is installed and testing is complete. The green LED will blink once per minute. For models 7035/7035SL, the LCD will also continuously display “ On” to indicate that the CO alarm has power. LOW BATTERY CONDITION: When the battery voltage drops below an acceptable level, the alarm will chirp once per minute and the green LED will blink for 5 seconds at the same time. For models 7035/7035SL, the LCD will also continuously display “bAt”. The battery should be replaced immediately for uninterrupted protection. Please see Section 5 for information regarding battery replacement. SERVICE (TROUBLE) CONDITION: An internal microcontroller continuously monitors the sensor function and other critical components. If an internal failure of any of these components should occur, the alarm will chirp twice per minute and the red LED will blink for 5 seconds at the same time. For models 7035/7035SL, the LCD will also continuously display “Err”. The trouble condition indicates a problem with the unit. Please see Section 12 for information regarding service. LIFE MONITOR (END-OF-LIFE) CONDITION: The electrochemical sensor has an estimated life expectancy of five years. Once the battery is installed or activated, a microcontroller monitors the total time that the alarm is under power. After five years of service, the “End-of-Life” signal will be activated; the alarm will chirp once per minute and the red LED will glow for 1 second at the same time. For models 7035/7035SL, the LCD will also continuously display “End” to indicate that the sensor life has expired and the alarm should be replaced. ALARM CONDITION: When CO gas is detected at a level and duration specified in Section 2 CO RESPONSE TIME, the horn will sound and the red LED will flash. The alarm signal will sound 4 short beeps every 6 seconds for 5 minutes, and thereafter 4 short beeps every minute until manually or automatically reset. The red LED will flash 4 times every 6 seconds until the CO gas which caused an alarm activation has cleared. See Section 8 for information about manual and automatic alarm reset. TEST/RESET BUTTON: The TEST/RESET button is used to check the alarm for proper operation and to temporarily mute horn for 5 minutes when alarm is activated, for 24 hrs. during the first week of a “Low Battery” signal activation, or for 60 hrs. during the first month of an “End-of-Life” signal activation. LCD DISPLAY FUNCTION (FOR MODELS 7035/7035SL): When alarm is operating normally, the LCD will continuously display “On”. If room temperature exceeds 120°F (48°C), the LCD will display “On” for 1 second every minute. If a CO level of 40 ppm or more is detected, or alarm is activated, the LCD will display current CO level detected up to 600 ppm. The LCD will display 600 ppm for CO levels detected above 600 ppm. MEMORY RETRIEVAL OF CO LEVELS DETECTED (FOR MODELS 7035/7035SL): To display the current and highest CO level detected, tap the TEST/RESET button. The LCD will display the recorded data in the following order: 1. The current CO level detected from 10-600 ppm, 2. The peak or highest CO level detected from 10-600 ppm, and 3. The total length of time the alarm has detected the peak CO level from 0-999 minutes. Each reading will appear for five seconds. To erase the record in memory, press and hold the TEST/RESET button until all three readings have been displayed, the alarm bursts a long beep, and the display reads "Clr". Disconnecting the battery from the alarm for 1 minute will also erase memory. -7- 7. TESTING AND MAINTENANCE ! WARNING! TEST YOUR CO ALARM AT LEAST ONCE A WEEK: To test your alarm, press the TEST/RESET button on the cover and hold it down for a minimum of 2 seconds until the red LED glows, then release. This test will simulate a CO concentration of approximately 150 ppm CO gas. The alarm will sound 4 short beeps, followed by a 5 second pause, and then 4 more short beeps if all of the electronic circuitry and buzzer are working correctly. The current and peak CO levels, and peak duration, will also be automatically displayed for models 7035 and 7035SL. See Section 6 Memory Retrieval. To mute the audible signal during a “low battery” condition, press the TEST/RESET button. The green LED will blink for the first 5 seconds, the models 7035/7035SL will display “OFF” at the same time, and the horn will be temporarily silenced for 24 hours. When the audible signal reactivates, you can continue to mute the horn for an additional 24 hour period by again pressing the TEST/RESET button. The horn can only be turned off during the first 7 days of the “low battery” signal activation. After 7 days, the alarm will return to its normal “low battery” condition; 1 chirp per minute, green LED blinks for 5 seconds at the same time, and models 7035/7035SL continuously display “bAt”. See Section 5 for information regarding battery replacement. To test your alarm during a “low battery” condition, press and hold TEST/RESET button for minimum 2 seconds when the audible signal is not sounding. To mute the audible signal during an “End-of-Life” condition, press the TEST/RESET button. The red LED will glow for the first second, the models 7035/7035SL will display “OFF” at the same time, and the horn will be temporarily silenced for 60 hours. When the audible signal reactivates, you can continue to mute the horn for an additional 60 hour period by again pressing the TEST/RESET button. The horn can only be turned off during the first 30 days of the “End-of-Life” signal activation. After 30 days, the alarm will return to its normal “End-of-Life” condition; 1 chirp per minute, red LED glows for 1 second at the same time, and the models 7035/7035SL continuously display “End”. To test your alarm during an “End-of-Life” condition, press and hold TEST/RESET button for minimum 2 seconds when audible signal is not sounding. The audible signal cannot be muted when alarm is in “trouble” condition; chirps twice per minute, red LED blinks for 5 seconds at the same time, and models 7035/7035SL continuously display “Err”. See Section 12 for information regarding service. ! WARNING! The loudness of the alarm sound may cause you to feel uncomfortable. Cover the horn opening with the palm of your hand to reduce the loudness while testing unit. ! WARNING! TEST YOUR CO ALARM IMMEDIATELY AFTER YOUR HOME HAS BEEN VACANT. DO NOT TRY TO TEST THIS ALARM IN ANY OTHER WAY: If no alarm sounds or low or erratic sound emits from the alarm during a test, check battery power. If alarm still does not sound properly, the unit may be defective and should be returned for service. (See Section 12) -8- CLEANING YOUR ALARM: You can clean your alarm by using a vacuum cleaner brush to vacuum around the openings on the alarm. The outside of the alarm may be wiped with a damp cloth. AFTER CLEANING, CONFIRM THAT THE GREEN POWER LED BLINKS ONCE PER MINUTE, AND TEST YOUR ALARM BY OPERATING THE TEST/RESET BUTTON. DO NOT PAINT YOUR ALARM: The paint will block the vents and affect the alarm function. DO NOT SPRAY AIR REFRESHER, HOUSEHOLD CLEANER, OR INSECT KILLER ON OR NEAR YOUR ALARM: Certain kinds of aerosol chemicals will damage the sensor and cause improper operation. The dwelling must be well ventilated when using household cleaning supplies or similar contaminants. 8. WHAT TO DO WHEN THE ALARM SOUNDS ! WARNING Actuation of this device indicates the presence of carbon monoxide (CO) which can KILL YOU. If alarm signal sounds: 1) Operate reset/silence button; 2) Call your emergency services (tel. no. _______________________________) [fire department or 911]; 3) Immediately move to fresh air - outdoors or by an open door or window. Do a head count to check that all persons are accounted for. Do not re-enter the premises or move away from the open door/window until the emergency services responders have arrived, the premises have been aired out, and your alarm remains in its normal condition. 4) After following steps 1- 3, if your alarm reactivates within a 24 hour period, repeat steps 1-3 and call a qualified appliance technician (tel. no. ________________________________) to investigate for sources of CO from fuel burning equipment and appliances, and inspect for proper operation of this equipment. If problems are identified during this inspection, have the equipment serviced immediately. Note any combustion equipment not inspected by the technician and consult the manufacturers' instructions, or contact the manufacturers directly, for more information about CO safety and this equipment. Make sure that motor vehicles are not, and have not been, operating in an attached garage or adjacent to the residence. MANUAL RESET: You can temporarily silence an audible alarm signal by pressing the TEST/RESET button. The red LED will flash 4 times, and the models 7035/7035SL will display “OFF” for 5 seconds and then continue to display CO levels detected for 40 ppm or more. If 70 ppm or more continues to be detected, the audible and visual alarm signals will be automatically reactivated within 5 minutes. Do not wait to see if the alarm is reactivated; follow above instructions immediately. -9- AUTOMATIC RESET: If a CO alarm activation is not manually reset, the horn will sound for at least 5 minutes. After 5 minutes, the alarm will automatically reset itself and return to normal operation if the CO which caused the alarm activation has cleared. IF YOU HAVE BEEN AWAY FROM HOME and you return to find your alarm(s) sounding, DO NOT ENTER YOUR HOME. Call the Fire Department from a neighbor's home. DO NOT RE-ENTER YOUR HOME FOR ANY REASON UNTIL YOU HAVE BEEN ASSURED THAT IT IS SAFE TO DO SO. Conditions which can result in transient CO situations: 1) Excessive spillage or reverse venting of fuel burning appliances caused by outdoor ambient conditions, such as: i) Wind direction and/or velocity, including high gusts of wind. Heavy air in the vent pipes (cold/humid air with extended periods between cycles). ii) Negative pressure differential resulting from the use of exhaust fans. iii) Simultaneous operation of several fuel burning appliances competing for limited internal air. iv) Vent pipe connections vibrating loose from clothes dryers, furnaces, or water heaters. v) Obstructions in or unconventional vent pipe designs which can amplify the above situations. vi) Poorly designed or maintained chimneys and/or vents. 2) Extended operation of unvented fuel burning devices (range, oven, fireplace, etc.). 3) Temperature inversions which can trap exhaust gases near the ground. 4) Car idling in an open or closed attached garage, or near a home. If “service” (trouble) signal activates (chirps twice every minute, red LED blinks for 5 seconds at same time), see Section 12 for service and return instructions. 9. LIMITATIONS OF CARBON MONOXIDE ALARMS ! WARNING! This product is intended for use in ordinary indoor locations of family living units. It is not designed to measure compliance with Occupational Safety and Health Administration (OSHA) commercial or industrial standards. Individuals with medical problems may consider using warning devices which provide audible and visual signals for carbon monoxide concentrations under 30 ppm. Carbon monoxide alarms respond to the presence of CO. They do not detect smoke. If the alarm does activate, follow instructions in Section 8 WHAT TO DO WHEN THE ALARM SOUNDS. - 10 - Carbon monoxide alarms are devices that can provide an early warning of the presence of CO gas at a reasonable cost. However, alarms have sensing limitations and may not always sound a warning in the presence of CO. The alarm will not operate if the battery power is low or dead, or if the battery is missing. CO alarms must be tested regularly to ensure that they are receiving power and operating properly. Carbon monoxide alarms cannot sense CO that does not reach the alarm, and therefore CO alarms may not detect CO which is in another area of the home. Furthermore, if the alarm is located on a different level of the home, or on the other side of a closed door, it may not waken a sound sleeper. The use of drugs and alcohol may impair ones ability to hear the alarm. If you have a multi-level home, install CO alarms on each level of the home. If the alarm is installed in a hallway and the bedroom doors are kept closed at night, install a CO alarm within each bedroom. Although CO alarms can help save lives by providing an early warning to the presence of carbon monoxide, they are not a substitute for an insurance policy. Homeowners and renters should have adequate insurance to protect their lives and property. 10. GOOD SAFETY HABITS DEVELOP AND PRACTICE A PLAN OF ESCAPE: Make a floor plan indicating all doors and windows and at least two escape routes from each room. Second story windows may need a rope or chain ladder. Have a family meeting to discuss your escape plan, and show everyone what to do in case an alarm sounds. Determine a place outside your home where you can all meet if an alarm sounds. Familiarize everyone with the sound of the alarm and train them to leave the home when they hear it. Practice a CO fire drill at least once every six months. Practice allows you to test your plan before an emergency. You may not be able to reach your children. It is important that they know what to do. Discuss the symptoms related to CARBON MONOXIDE POISONING with all members of the household. (See Section 1 WHAT ARE THE SYMPTOMS OF CARBON MONOXIDE POISONING?) - 11 - 11. DESCRIPTION OF AUDIBLE AND VISUAL SIGNALS Condition LCD Readout LEDs Horn Displays “On” continuously Green LED blinks once every minute Silent Alarm activation Displays current CO reading in PPM Red LED flashes 4 times every 6 seconds in synchronous with horn Beeps 4 times, pauses for 5 seconds. Repeats this pattern for first 5 minutes. Then pause time increases to 1 minute Mute alarm audible signal Displays “OFF” for 5 seconds, then current CO reading in PPM Red LED flashes 4 times, then Green LED blinks once per minute Silent Testing alarm Displays Current CO level detected, peak CO level detected, and duration of peak CO. Each readout lasts 5 seconds Red LED glows briefly, then flashes in synchronous with horn Beeps 4 times, pauses for 5 seconds, beeps 4 times Memory retrieval of CO levels Displays current CO level detected, peak CO level detected, and duration of peak CO. Each readout lasts 5 seconds Red LED flashes 4 times, pauses for 5 seconds, Red LED flashes 4 times again Silent Low battery power Displays “bAt” continuously Green LED blinks for 5 seconds every minute Chirps once per minute when green LED starts to blink Mute “low battery” audible signal Displays “OFF” for 5 seconds Green LED blinks for 5 seconds Silent Low battery in silent mode Displays “bAt” continuously Green LED blinks for 5 seconds every minute Silent for 24 hrs during first week “End-of-Life” Displays “End” continuously Red LED glows for 1 second every minute Chirps once per minute Mute “End-ofLife” audible signal Displays “OFF” for 5 seconds Red LED glows for 5 seconds Silent “End-of-Life” in silent mode Displays “End” continuously Red LED glows for 1 second every minute Silent for 60 hrs during first month Trouble/Service Displays “Err” continuously Red LED blinks for 5 seconds every minute Chirps twice per minute when red LED starts to blink Normal operation - 12 - 12. SERVICE AND WARRANTY IMPORTANT! SAFETY INSTRUCTIONS: The alarm should be replaced after 5 years from the date of installation. When the date written on the “REPLACE by” label is reached, or the sensor expiration signal is activated, the CO alarm should be replaced immediately. In the event of any trouble with the unit, do not attempt to repair it. This product should be serviced by a qualified service technician. Return the unit for servicing to the appropriate address listed on the last page of this Owner’s Manual. FIVE-YEAR LIMITED WARRANTY The manufacturer, PPI, warrants to the original consumer purchaser that this CO alarm shall be free from defects in materials and workmanship from the date of purchase for five years, and that the Ultralife U9VL-J lithium battery included will power the alarm for five years. If this CO alarm is determined to be defective in original materials or workmanship, or the Ultralife battery does not last five years, return the alarm to the address indicated below with delivery costs prepaid. Do not attempt to repair this product yourself. If determined to be defective in original materials or workmanship, the CO alarm, or battery, will be repaired or replaced, at the sole discretion of the manufacturer. This warranty is void if the CO alarm’s plastic case has been opened or the product has been damaged by accident, modification of the unit, unreasonable use, neglect, tampering or other cause not arising from defects in original materials or workmanship. The liability of the manufacturer, or of any of its parent or subsidiary corporations, arising from the sale of this product or under the terms of this limited warranty shall not in any case exceed the cost of the replacement of the CO alarm. In no case shall the manufacturer or any of its parent or subsidiary corporations be liable for consequential loss or damages resulting from the failure of the CO alarm to activate or for the breach of this or any other warranty, expressed or implied, even if the loss or damage is caused by the manufacturer’s negligence or fault. These limitations or exclusions may not apply in some states where limitations on the duration of an implied warranty or exclusions or limitations of incidental or consequential damages are not allowed. This warranty extends to the original consumer purchaser only and may not be altered by any agents, representatives, dealers, distributors or employees. To return this product for service, pack carefully in a padded container. Ship prepaid along with your original sales receipt, an explanation of the problem and your return address to: Pro-Tech Safety Products P.O. Box 493727 Redding, CA 96049 Tel: 1-877-955-TECH (8324) http://www.protechsafety.com 240-1087-06 4/15/09 - 13 -