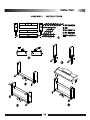
1
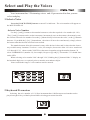
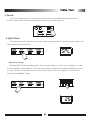
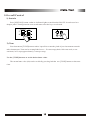
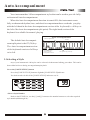
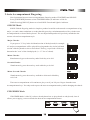
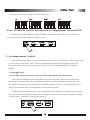
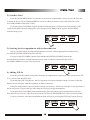
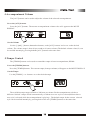
Thanks for using our digital piano
This instrument is a high-quality digital piano with 88 standard size touch sensitivity keyboard and combines the most advanced PCM tone generation technology. This
instrument has 100 accompaniment styles that can be used to provide fullyorchestrated Auto Accompaniment. The multi-functional LED (MULTI DISPLAY)
makes your operation more conveniently. The REGISTRATION MEMORY can be
used to store four sets of VOICE and AUTO ACCOMPANIMENT settings which can
be recalled at the touch of a button and they can be kept forever even the POWER is
turned OFF.
In order to obtain maximum performance and enjoyment, please read this manual
thoroughly while trying out the various features described.
Contents
Panel controls .................................................................................................................
Precaution ..............................................................................................................
Preparation ................................................................................................................
2
4
5
Power Supply ............................................................................................................
Using Headphones or an External Sound System ..........................................................
5
The Sustain Pedal ....................................................................................................
The MIDI OUT Connector....................................................................................................
Listen to the Demo .....................................................................................................
Turn the Power ON and Set the Volume. ......................................................................
Press DEMO to start .................................................................................................
5
Press CZERNY to start ............................................................................................
Press DEMO to stop .................................................................................................
................................................................................
Select and Play the Voices
Select a Voice .......................................................................................................
Keyboard Percussion .................................................................................................
7
7
Touch .................................................................................................
Split Mode .........................................................................................
9
Overall Control ........................................................................................................
Sustain .................................................................................................................
Tune .....................................................................................................................
Auto Accompaniment ...............................................................................................
10
10
10
11
.......................................................................................................
11
Auto Accompaniment Fingering ...............................................................................
Accompaniment Control ...........................................................................................
12
13
Accompaniment Volume ...........................................................................................
Tempo Control ...........................................................................................
Registration Memory ...........................................................................................
15
Memorizing the settings ...........................................................................................
Recalling the settings ...........................................................................................
16
16
Recording Functions ...........................................................................................
Record ...........................................................................................
17
Select a Style
Play ...................................................................................................
Appendix ...................................................................................................
Percussion Kit List .................................................................................................................
Voice List ............................................................................................................
Style List ............................................................................................................
Specifications ............................................................................................................
Draft ............................................................................................................
1
5
6
7
7
7
8
8
8
9
15
16
17
17
18
18
19
20
21
22
Panel controls
Top Panel Controls
1.POWER Button
11.NUMBER [0]-[9], [+],[-] Buttons
2.MASTER VOLUME Control
12.TUNE Button
3..ACC[+/-] Button
13.RECORD AND PLAY Button
4.TEMPO[+/-] Button
14.DEMO Button
15.MEMORY
5.KEYBOARD MODE
STORE Button
NORMAL
M1-M4 SELECT
S.FINGER
FINGERED
SPLIT
6.ACCOMPANIMENT CONTROL SELECT
SYNCHRO Button
START/STOP Button
INTRO/ENDING Button
Rear Panel Controls
FILL IN Button
16.MIDI(IN/ OUT) Jack
7.TOUCH Button
17.PEDAL(SUSTAIN/SOFT) Jack
8.MULTI DISPLAY
18.LINE OUT Jack
9.[VIOCE/STYLE] SELECT
19.PHONE Jack
10.SUSTAIN Button
20.POWER Jack
2
MIDI OUT
MIDI IN
SUSTAIN LINE OUT
PHONE
DC 12V
Precaution
Thank you for purchasing this digital instrument.For perfect operation and security,please
read the manual carefully and keep it for future reference.
Safety Precautions
CAUTION
RISK OF ELECTRIC SHOCK
DO NOT OPEN
The lightning flash with arrowhead symbol within an equilateral triangle is in
tended to alert the user to the presence of uninsulated dangerous voltage
within the product s enclosure that may be of sufficient magnitude to constitute a
risk of electric shock to persons.
The exclamation point within an equilateral triangle is intended to alert the user
to the presence of important operating and maintenance(servicing) instructions in
the literature accompanying the product.
Important Safety Instructions
1) Read these instructions.
2) Keep these instructions.
3) Heed all warnings.
4) Follow all instructions.
5) Do not use this apparatus near water.
(Figure 1)
6) Clean only with dry cloth.
7) Do not block any ventilation openings,install in accordance with the manufacturer s instructions.
8) Do not install near any heat sources such as radiators, heat registers,stoves,or other apparatus (including am
plifiers) that produce heat.
9) Do not defeat the safety purpose of the polarized or grounding-type plug.A polarized plug has two blades
with one wider than the other.A grounding type plug has two blades and a third grounding prong.The wide blade
or the third prong are provided for your safety,if the provided plug does not fit into your outlet.consult an elec
trician for replacement of the obsolete outlet.
10) Protect the power cord from being walked on or pinched particularly at plugs.convenience receptacles,and
the point where they exit from the apparatus.
11) Only use attachments/accessories specified by the manufacturer.
12) Use only with the cart,stand,tripod,bracket,or table specified by the manufacturer,or sold with the
apparatus.When a cart is used,use caution when moving the cart/apparatus combination to avoid injury from
tip-over (Figure 1).
13) Unplug this apparatus during lightning storms or when unused for a long period of time.
14) Refer all servicing to qualified service personnel.Servicing is required when the apparatus has been dam
aged in any way,such as power-supply cord or plug is damaged,liquid has been spilled or objects have fallen
into the apparatus,the apparatus has been exposed to rain or moisture,does not operate normally,or has been
dropped.
WARNING:To reduce the risk of fire or electric shock,do not expose this apparatus to rain or
moisture.
CAUTION:Apparatus shall not be exposed to dripping or splashing and no objects filled with
liquids,such as vases,shall be placed on the apparatus.
4
Preparation
This section contains information about setting up your instrument and preparing
to play. Be sure to go through this section carefully before using your instrument .
1.Power Supply
Your instrument will run from a power .Plug the power plug into a convenient wall AC power socket.
2 .Using Headphones or an External Sound System
A standard pair of stereo headphones can be plugged into the PHONES jack which under the left
keyboard for private practice or late-night playing. The internal speaker system is automatically shut
off when a pair of headphones is plugged into the PHONES jack.
The LINE OUT jack can be used to deliver the output of the piano to a keyboard amplifier, stereo
sound system, mixing console or tape recorder.
LINE OUT
PHONE2
PHONE1
Stereo
System
3 .The Foot Pedal
A footswitch can be plugged into the rear-panel
PEDAL jack. The Sustain Pedal functions as a
damper pedal controlling sustain. Press the pedal
SUSTAIN PEDAL
to sustain notes after the keys are released. Don't
press the pedal while inserting the plug into the
PEDAL jack or while turning the power on.The
Soft Pedal controling the sound volume .Pressing
the pedal to decrease the output sound volume.
5
5 .THE MIDI IN/ OUT CONNECTOR
The MIDI OUT connector transmits MIDI data
generated by your instrument .Most MIDI keyboards (including your instrument, of course)
MIDI OUT
Tone Generator
MIDI OUT
transmit note information via this connector. If the
YOUR INSTRUMENT
MIDI OUT connector is connected to the MIDI IN
connector of a second keyboard. The result is that
you can effectively play two instruments at once.
6
Listen to the Demo
Once you've set up your instrument , try listening to the pre-programmed demonstration songs - they'll give you a good idea of what the digital piano could do.
1.Turn the Power ON and Set the Volume.
Before playing the demo turn the power on by pressing the POWER switch (the panel indicators
and MULTI DISPLAY will light) and set the MASTER VOLUME about half way between the "MIN"
and "MAX" settings. You can adjust the volume to accommodate your playing.
MAIN VOLUME
POWER
ON
OFF
MIN
2.Press DEMO to start
Press DEMO button to start playback and use the MASTER VOLUME control to set the ideal
listening level. The [d01] will appear on the MULTI DISPLAY .Now all demonstrations will play in
sequence repeatedly.
Press down the any within the left side 30 keys of
keyboard, pressDEMO button again at the same time . The
[L01] -[L30]will appear on the MULTI DISPLAY .Now
all demonstrations will play in sequence repeatedly. Your
instrument has total 5 demonstrations. You can select any
demonstration by press [+]or[-]buttons or number
buttons[0]-[4].
4.Press DEMO to stop
Press DEMO button again to stop demo playback.
7
Select and Play the Voices
Your instrument has 128 stunning voices and 61 percussion kits that you can
select and play.
1.Select a Voice
.Press the [VOICE/STYLE] button to turn off its indicator .The voice number will appear on
the MULTI DISPLAY.
.Select a Voice Number
Use the [+] and [-] buttons or the number buttons to select the required voice number (01-129).
The [+] and [-] buttons can be used to increment (increment by one) or decrement (decrement by one)
the current selected voice number. Press the [+] button briefly to increase the value , or the [-] button to
decrease. If you hold the [+] or [-] button down , the value will inc or dec continuously -simply release
the button when the desired value has been reached.
The number buttons allow direct numeric entry of the desired value, and it's therefore the fastest
way to edit in many situations. To select a voice ,for example , choose one of the 129 voice - numbered
"01" through "129" -shown on the VOICE list, then enter its number using the number buttons. To
select "HARMONICA"(number 23),for example, first press [2] and [3]. The number "23" should show
on the LED.
When selecting voice number "100" through "129 " , Holding the [1] button till the "1" display on
the hundreds digit area, as required, prior to enter the tens and ones digits.
Values outside the range of voice number can't be entered.
VOICE/STYLE
SUSTAIN
2.Keyboard Percussion
Selecting the voice number of 129,Your instrument has 61 different percussions that can be
played on right 61 keys of the keyboard while selecting percussion function.
8
3.Touch
Press [TOUCH] button ,you can turn ON/OFF the touch function.When the touch function is
ON,the volume will be varied according to how hard you play on the keyboard.
TEMPO +
TOUCH
4.Split Mode
Your keyboard can be split into two sections which means different voices can be played with the left
and right hands at the same time.
NORMAL
SPLIT
S.FINGER
FINGERED
.Split Point Change
Holding [SPLIT] button simultaneously, Press any key among A1 to C9 to select split point , so that
its indicator lights to turn Split ON . The split voice number will appear on the MULTI DISPLAY. u se the
[+] and [-] buttons or the number buttons to select the left split voice ,The right split voice should be
selected at the NORMAL mode.
NORMAL
SPLIT
S.FINGER
FINGERED
9
5.Overall Control
1).Sustain
Press [SUSTAIN] button so that its indicator lights to turn Sustain ON/OFF. It can be used as a
damper pedal. Turning Sustain on to sustain notes after the keys are released.
VOICE/STYLE
TUNE
SUSTAIN
µ¥¸ð
2).Tune
Your instrument [TUNE] buttons makes it possible to tune the pitch of your instrument to match
other instruments. Tune can be accomplished over a 50-cents range(that's 100 cents total ,or one
semitone) in 35 steps(approximately 3 cents per step).
Use the [TUNE] buttons to set the desired tune value.
The normal tune value (00) can be recalled by pressing both the two [TUNE] buttons at the same
time.
10
Auto Accompaniment
Your instrument has 100 accompaniment styles that can be used to provide fullyorchestrated Auto Accompaniment.
When the Auto Accompaniment function is turned ON, this instrument create
fully-orchestrated rhythm, bass, and chord accompaniment base on chords you play
with the left hand in the Auto Accompaniment section of the keyboard(i.e. all keys to
the left of the Auto Accompaniment split point).The right-hand section of the
keyboard is available for normal playing.
Auto Accompaniment
The default Auto Accompani-
Auto Accompaniment
Normal
ment split point is the G3(34) key.
The Auto Accompaniment section
of the keyboard consists of all keys
to its left .
Left hand fingering
specifies the auto
accompaniment chords.
The right hand plays normally
1.Selecting a Style
Any of your instrument's 100 styles can be selected via the normal editing procedure. This can be
done either before or during accompaniment playback.
.Press the [VOICE/STYLE] button
Press the [VOICE/STYLE] button to light the [VOICE/STYLE] indicator.
You don't need to do this if the [VOICE/STYLE] indicator was lit.
VOICE/STYLE
SUSTAIN
.Select a Style Number
Refer to the STYLE list , use the [+] and [-] buttons or the number buttons to select the required
style number(00 through 99).
11
2.Auto Accompaniment Fingering
Your instrument has two Auto Accompaniment fingering modes: FINGERED and SINGLE.
Press [FINGERED] button to select FINGERED mode,its indicator will be lit.
While Pressing [SINGLE] button to select SINGLE mode and light its indicator.
.SINGLE Mode
SINGLE Mode fingering makes it simple to produce beautiful orchestrated accompaniment using
major , seventh , minor and minor-seventh chords bypressing a minimum number of keys in the Auto
Accompaniment section of the keyboard . The accompaniment produced is perfectly matched to the
current selected accompaniment style.
.Major Chords:
If you press a "C" key in the left-hand section of the keyboard,for example ,
C
a C-major accompaniment will be played.Pressing another key in the left hand
section of the keyboard to select a new chord. The key you pressed will always
determine the "root" of the chord played (i.e. "C" for a C chord).
Cm
.Minor Chords:
Simultaneously press the root key and a black key to its left.
C7
.Seventh Chords:
Simultaneously press the root key and a white key to its left.
Cm7
.Minor-Seventh Chords:
Simultaneously press the root key and both a white and a black key
to its left.
The Auto Accompaniment will continue to play even if you lift your fingers from the Auto
Accompaniment keys. You only need to press the Auto Accompaniment keys while changing the chords.
.FINGERED Mode
FINGERED Mode is ideal if you have already know how to play chords on a keyboard, since it
allows you to supply your own chords for the Auto Accompaniment feature.
NORMAL
12
SPLIT
S.FINGER
FINGERED
The digital paino will accept the following chord type:
C
Cm7
Cm
C7
( )
( )
.Press [NORMAL] button to turn Auto Accompaniment function OFF.
The [SPLIT] and [FINGERED] AND [S.FINGER] indicators are unlit .There is only ONE voice
over the entire keyboard, the piano is in SOLO status.
NORMAL
SPLIT
S.FINGER
FINGERED
3.Accompaniment Control
Your instrument provides a range of accompaniment "sections" - introduction, fill-in,ending -that
you can select to control the "flow" of the accompaniment to achieve the desired musical results.
Accompaniment start/stop and sections are controlled by the ACCOMPANIMENT CONTROL
buttons.
1).Straight Start
.The [START/STOP] button starts the selected accompaniment style immediately.
Press the [FINGERED] button or the [SINGLE] button so that the indicator will light before
starting the accompaniment. The accompaniment will start with the rhythm sound only when the
[START/STOP] button is pressed, then the bass and chord parts will play as soon as the first note or
chord is played on the Auto Accompaniment section of the keyboard.
A different accompaniment style can be selected at any time while the accompaniment is playing.
The style number on the MULTI DISPLAY will change as soon as the selection was made. The tempo
will not change when the new style begins playing.
SYNCHRO
START/STOP
FILL IN
INTRO/ENDING
13
2).Synchro Start
Press the [SYNCHRO] button if you want to start the accompaniment when you play the first note
or chord on the AUTO ACCOMPANIMENT section of the keyboard(It's still valid while the AUTO
ACCOMPANIMENT function is OFF).
If you press the [SYNCHRO] button, the BEAT indicator dots will flash at the current tempo. The
synchro start mode can be disengaged by pressing the [SYNCHRO] button again so that the BEAT
indicator dots go out.
SYNCHRO
START/STOP
FILL IN
INTRO/ENDING
3).Starting the Accompaniment with an Introduction
Any of your instrument accompaniment patterns can start with an appropriate introduction by
pressing the [INTRO/ENDING] button directly.
If you press the [SYNCHRO] button first and then the [INTRO/ENDING] button, the
accompaniment will start from the introduction as soon as a chord is detected in the AUTO
ACCOMPANIMENT section of the keyboard.
SYNCHRO
START/STOP
FILL IN
INTRO/ENDING
4).Adding Fill-In
Press the [FILL IN] button at any time while the accompaniment is playing to add a one-measure fillin or return to the MAIN section.
If you hold the [FILL IN] button , the fill-in pattern will repeat until the button is released , then the
MAIN section will play from the beginning of the next measure.
If the [FILL IN] button is pressed at the last beat of a measure , the fill-in will begin at the first beat of
the next measure . If pressed at any other time the fill-in will begin immediately.
If you press the [SYNCHRO] button and then the [FILL IN] button, the accompaniment will start
from the fill-in as soon as a chord is detected in the AUTO ACCOMPANIMENT section of the keyboard.
It's also possible to start the accompaniment with a fill-in by pressing the [FILL IN] button directly.
SYNCHRO
14
START/STOP
FILL IN
INTRO/ENDING
4.Accompaniment Volume
The [ACC] buttons can be used to adjust the volume of the selected accompaniment .
.Press the [ACC] buttons
Press the [ACC] buttons. The current accompaniment volume value will appear on the MULTI
DISPLAY.
- ACC +
- TEMPO +
TOUCH
.Set the Volume
Use the [+] and [-] buttons,the number buttons, or the [ACC] buttons itselves to set the desired
volume . The volume range is from 01 (no sound) to 16 (max volume).The default volume value (12) can
be recalled instantly by pressing both the [ACC] buttons at the same time.
5.Tempo Control
The [TEMPO] buttons can be used to control the tempo of Auto Accompaniment, DEMO.
.Press the [TEMPO] buttons
Press the [TEMPO] buttons. The current tempo (beats per minute) will appear on the MULTI DISPLAY.
.Set the Tempo
Use the [TEMPO] + or - buttons to set the desired tempo.
- ACC +
- TEMPO +
TOUCH
The available tempo ranges from 40 to 280 beats per minute. Each accompaniment style has a
different "default" tempo which is automatically set whenever a new style is selected(but not when a
new style is selected while the accompaniment is playing) . The default tempo for the current selected
style can be recalled instantly by pressing both of the two [TEMPO] buttons at the same time.
15
Registration Memory
Your instrument REGISTRATION MEMORY can be used to store four sets of
VOICE and AUTO ACCOMPANIMENT settings that can be recalled during you
playing at the touch of one single button.
The REGISTRATION MEMORY stores the following parameters:
Voice numbers
Split point
Style number
Accompaniment volume
Fingering Mode
1.Memorizing the settings
The panel settings listed above can be stored to
any one of the four REGISTRATION MEMORY
buttons by pressing the button-[M1] ,[M2] , [M3] ,
or [M4] while holding the [STORE] button . The
TUNE
[S-1]-[S-4] will appear on the MULTI DISPLAY .
REC
PLAY
DEMO
STORE
M1
M2
Please note that anytime you store to a
REGISTRATION MEMORY button, all settings
M3
M4
previous stored in that button will be erased and
replaced by the new settings.
2.Recalling the settings
The settings stored to a REGISTRATION MEMORY button can be recalled simply by pressing the
appropriate button.The [E-1]-[E-4] will appear on the MULTI DISPLAY .
TUNE
REC
PLAY
DEMO
STORE
M1
M2
M3
M4
Holding the [STORE] button simultaneously, press [+] button, the default REGISTRATION
MEMORY settings can be recalled. The [CAE] will appear on the MULTI DISPLAY.
16
Recording Functions
Your instrument allows you to record and play back song including chord
sequences created using the Auto Accompaniment feature and melody like you play on
the keyboard.
1. Record
.Press the [RECORD] button
Press the [RECORD] button ,the [rEC]
will appear on the MULTI DISPLAY.
.Start Recording
TUNE
Press any key on the keyboard , will
start recording.If you press SYNCHRO
button,the accompaniment will start at the
REC
PLAY
DEMO
STORE
M1
M2
M3
M4
same time.
.Stop Recording
Press the [RECORD] button again will stop recording . The voice number will be shown on the
MULTI DISPLAY after recording was stopped.
2. Play
Playback will begin as the [PLAY] button is pressed,
the [PLy] will appear on the MULTI DISPLAY. Play along
on the keyboard if you like. You can also change the tempo
during the playback.
The maximum polyphony is 16. If more than 16 notes
are played at the time, some notes may be truncated.
TUNE
Accompaniment and melody playback will stop
REC
PLAY
DEMO
STORE
M1
M2
automatically when all recorded datas have been played
M3
M4
back.You can alse stop playback at any time by pressing
the [PLAY] button again . The voice number will be shown
on the MULTI DISPLAY after playback is stopped.
Holding the [STORE] button simultaneously, press [-] button, the record is erased . The [CAS] will
appear on the MULTI DISPLAY.
17
Appendix
1.Percussion list
Value
C4
C#4
D4
D#4
E4
F4
F#4
G4
G#4
A4
A#4
B4
C5
C#5
D5
D#5
E5
F5
F#5
G5
G#5
A5
A#5
B5
C6
C#6
D6
D#6
E6
F6
F#6
Name
Value
G6
G#6
A6
A#6
B6
C7
C#7
D7
D#7
E7
F7
F#7
G7
G#7
A7
A#7
B7
C8
C#8
D8
D#8
E8
F8
F#8
G8
G#8
A8
A#8
B8
C9
Click(Square Wave)
Brush Tap
Brush Swirl
Brush Slap
Brush Swirl W/Attack
Snare Roll
Castanet
Snare H Soft
Sticks
Bass Drum H Soft
Open Rim Shot
Bass Drum L
Bass Drum H Hard
Closed Rim Shot
Snare L
Hand Clap
Snare H Hard
Floor Tom L
Hi-Hat Closed
Floor Tom H
Hi-Hat Pedal
Low Tom
Hi-Hat Open
Mid Tom L
Mid Tom H
Crash Cymbal 1
High Tom
Ride Cymbal 1
Chinese Cymbal
Ride Cymbal Cup
Tambourine
18
Name
Splash Cymbal
Cowbell
Crash Cymbal 2
Vibraslap
Ride Cymbal 2
Bongo H
Bongo L
Conga H Mute
Conga H Open
Conga L
Timbale H
Timbale L
Agogo H
Agogo L
Cabasa
Maracas
Samba Whistle H
Samba Whistle L
Guiro Short
Guiro Long
Claves
Wood Block H
Wood Block L
Cuica Mute
Cuica Open
Triangle Mute
Triangle Open
Shaker
Jingle Bell
Bell Tree
Appendix
2. Tone list
NO MIDINO
TONE NAME
Channel
NO MIDINO
TONE NAME
19
Channel
NO MIDINO
TONE NAME
Channel
Appendix
3.Style list
NO
Rhythm Name
Rhythm
NO
Rhythm Name
20
Rhythm
NO
Rhythm Name
Rhythm
Appendix
4.Specifications
Keyboard:
Setup:
88 standard-size touch sensitivity
power:ON/OFF
keys(A1 through C9)
master volume:MIN-MAX
Midi control:
Display:
Midi out
multi-function LED
Overall controls:
Number Buttons:
demo :5 songs
[0]-[9],[+],[-]
record, play
Voice:
store, m1-m4
PCM voice:01-128
Main Amplifiers:
polyphony:16
20W x 2 ,2W x2
percussion:61
PHONES output
voice control:
Dimensions(W x D x H)
Sustain,tune,touch
Box A:1435mm x 548mm x 250mm
Auto accompaniment:
Box B:1385mm x 300mm x 180mm
Weight
100 styles
Box A:33kg
Box B:17kg
Accompanimet control:
Synchro,start/stop,intro,ending,fill in,tempo,acc Supplied Accessories:
.Music Stand
Keyboard modes:
.User's Manul
Normal,s.finger,fingered,split
21
ASSEMBLY
INSTRUCTIONS
22
1 0 5 0 5 3 4 1