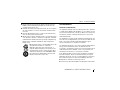
1
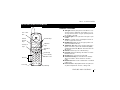
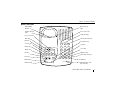
2.
User Manual
4
G
H
z
D271
Copyright © 2001 Cidco Communications Corporation. All Rights Reserved.
Part No. 105510-01 Rev. D
No part of this publication may be reproduced, copied, transcribed, stored in a retrieval system, or translated into any
language in any form, by any means without the prior written permission of Cidco Communications Corporation.
TABLE OF CONTENTS
■
INTRODUCTION
1
D271 Features . . . . . . . . . . . . . . . . . . . . . . . . . . . . . . . . . . . . . . . . . . . . . . . . 1
■
■
INSTALLING THE D271
2
Check the Contents. . . . . . . . . . . . . . . . . . . . . . . . . . . . . . . . . . . . . . . . . . . . .
Install the Handset Battery . . . . . . . . . . . . . . . . . . . . . . . . . . . . . . . . . . . . . . .
Choose a Location for the Base Unit . . . . . . . . . . . . . . . . . . . . . . . . . . . . . . . .
Plug in the Adapter . . . . . . . . . . . . . . . . . . . . . . . . . . . . . . . . . . . . . . . . . . . . .
Install the Telephone Line Cord and Base Wedge . . . . . . . . . . . . . . . . . . . . . .
Spare Battery . . . . . . . . . . . . . . . . . . . . . . . . . . . . . . . . . . . . . . . . . . . . . . . . .
Attach the Belt Clip. . . . . . . . . . . . . . . . . . . . . . . . . . . . . . . . . . . . . . . . . . . . .
Attach Headset (Optional) . . . . . . . . . . . . . . . . . . . . . . . . . . . . . . . . . . . . . . .
2
2
2
3
3
3
4
4
FEATURES AND CONTROLS
5
Handset Functions . . . . . . . . . . . . . . . . . . . . . . . . . . . . . . . . . . . . . . . . . . . . . 5
Base Functions . . . . . . . . . . . . . . . . . . . . . . . . . . . . . . . . . . . . . . . . . . . . . . . . 7
Personalizing your Phone . . . . . . . . . . . . . . . . . . . . . . . . . . . . . . . . . . . . . . . . 9
■
USING THE D271
14
Answering Calls . . . . . . . . . . . . . . . . . . . . . . . . . . . . . . . . . . . . . . . . . . . . . .
Using Voicemail . . . . . . . . . . . . . . . . . . . . . . . . . . . . . . . . . . . . . . . . . . . . . .
Using Voicemail Message Screening. . . . . . . . . . . . . . . . . . . . . . . . . . . . . . .
Clearing the Voicemail Light. . . . . . . . . . . . . . . . . . . . . . . . . . . . . . . . . . . . .
Using Call Waiting ID (CWID) Options . . . . . . . . . . . . . . . . . . . . . . . . . . . .
Using Caller ID Paging . . . . . . . . . . . . . . . . . . . . . . . . . . . . . . . . . . . . . . . . .
Using Transfer to Voicemail . . . . . . . . . . . . . . . . . . . . . . . . . . . . . . . . . . . . .
14
14
14
14
15
16
16
TABLE OF CONTENTS
i
■
Using Network Services . . . . . . . . . . . . . . . . . . . . . . . . . . . . . . . . . . . . . . . .
Dialing . . . . . . . . . . . . . . . . . . . . . . . . . . . . . . . . . . . . . . . . . . . . . . . . . . . . .
Pre-Dialing . . . . . . . . . . . . . . . . . . . . . . . . . . . . . . . . . . . . . . . . . . . . . . . . . .
Convenience Dialing . . . . . . . . . . . . . . . . . . . . . . . . . . . . . . . . . . . . . . . . . .
Adjusting the Volume . . . . . . . . . . . . . . . . . . . . . . . . . . . . . . . . . . . . . . . . . .
Using the Speakerphone . . . . . . . . . . . . . . . . . . . . . . . . . . . . . . . . . . . . . . . .
Using the Intercom . . . . . . . . . . . . . . . . . . . . . . . . . . . . . . . . . . . . . . . . . . . .
Using Hold . . . . . . . . . . . . . . . . . . . . . . . . . . . . . . . . . . . . . . . . . . . . . . . . . .
Timing Calls . . . . . . . . . . . . . . . . . . . . . . . . . . . . . . . . . . . . . . . . . . . . . . . . .
Temporary Tone Service . . . . . . . . . . . . . . . . . . . . . . . . . . . . . . . . . . . . . . . .
Locating a Lost Handset . . . . . . . . . . . . . . . . . . . . . . . . . . . . . . . . . . . . . . . .
Low Battery . . . . . . . . . . . . . . . . . . . . . . . . . . . . . . . . . . . . . . . . . . . . . . . . .
Using Mute . . . . . . . . . . . . . . . . . . . . . . . . . . . . . . . . . . . . . . . . . . . . . . . . . .
Caller ID Records . . . . . . . . . . . . . . . . . . . . . . . . . . . . . . . . . . . . . . . . . . . . .
Directory Records . . . . . . . . . . . . . . . . . . . . . . . . . . . . . . . . . . . . . . . . . . . . .
Reading Display Messages . . . . . . . . . . . . . . . . . . . . . . . . . . . . . . . . . . . . . .
17
17
17
17
18
19
19
19
19
19
20
20
20
20
21
24
TROUBLESHOOTING
25
Problem/Solution . . . . . . . . . . . . . . . . . . . . . . . . . . . . . . . . . . . . . . . . . . . . . 25
■
ii
WARRANTY & SAFETY INSTRUCTIONS
29
Telephone Wiring and Jack Installation. . . . . . . . . . . . . . . . . . . . . . . . . . . . .
Batteries . . . . . . . . . . . . . . . . . . . . . . . . . . . . . . . . . . . . . . . . . . . . . . . . . . . .
FCC Requirements . . . . . . . . . . . . . . . . . . . . . . . . . . . . . . . . . . . . . . . . . . . .
Warranty . . . . . . . . . . . . . . . . . . . . . . . . . . . . . . . . . . . . . . . . . . . . . . . . . . .
30
30
31
33
TABLE OF CONTENTS
D271 - 2.4GHz Cordless
INTRODUCTION
The D271 is a 2.4GHz cordless phone that incorporates your telephone company’s calling features, such as Caller ID, Voicemail and
Call Waiting ID, to provide a powerful full function cordless telephone.
D271 F EATURES
■ 2.4 GHz
■ Caller ID/Call Waiting ID
■ Speakerphone
■ Works in the event of a power failure
(when spare battery is installed and charged)
■ Intercom
■ New Message Indicator
■ Backlit keypad on handset
■ Adjustable Ringer, Speakerphone and Handset
Volume Control
■ Hearing-aid Compatible
■ English and Spanish
■ Headset Jack
■ Call timer
■ Single key redialing
■ 50 Caller ID Records
■ 50 Directory records
■ Dedicated Keys on the Base: Hold, Mute,
Speakerphone, Voicemail, Redial/Pause,
7-10-11, Caller ID and Directory
INTRODUCTION
1
D271 - 2.4GHz Cordless
INSTALLING THE D271
C HECK
THE
C ONTENTS
Check to see that the following items are enclosed:
■
■
■
■
■
■
■
■
■
■
■
Telephone Base and Handset
Long Line Cord
Short Line Cord for Wall Mounting (optional)
Charging Cradle with Cord (optional)
Charger Mounting Plate (optional)
Base Wedge
AC Adapter
Two battery packs
Belt Clip
User Manual
Quick Start Card
I NSTALL
THE
H ANDSET B ATTERY
Use this procedure to install or replace the battery in the
handset. Be sure to follow the battery specifications and
safety instructions. See “WARRANTY & SAFETY
INSTRUCTIONS” on page 29.
Use only 3.6V, 1.0 Ah Nickel Cadmium (Ni-Cad) battery
pack in this phone.
a. Press down on the battery cover and slide the
cover down to expose the battery
compartment.
2
INSTALLING THE D271
b. Locate the battery terminals inside the battery
compartment and the corresponding
terminals on the battery pack. Align the
battery pack terminals with the terminals in
the battery compartment and press down.
c. To replace the battery cover, slide the cover
upwards until the tab engages and the cover
snaps into place.
NEED TO KNOW
Prior to first use, place the handset in the cradle
and charge the battery for at least 12 hours
before hooking up the telephone line. The
handset charge light on the base comes on to
tell you that the handset is charging.
C HOOSE
A
L OCATION
FOR THE
B ASE UNIT
The base should be away from all other electronic equipment
such as a personal computer, microwave, stereo, or
television. It is also a good idea to place the unit away from
noisy areas, or from heat sources such as a radiator or
direct sunlight.
D271 - 2.4GHz Cordless
PLUG
IN THE
A DAPTER
a. Plug the adapter into the round jack on the
base and the other end into an electrical
outlet.
b. Thread the cord through the clip on the
housing to prevent the cord from pulling
loose.
I NSTALL
WEDGE
THE
TELEPHONE LINE C ORD
AND
NEED TO KNOW
The phone jack for the TEL LINE is located on the
bottom of the base. If the base wedge is
installed on the top portion of the base, it must
be removed in order to install the TEL LINE.
a. Plug the long line cord into the phone jack
marked TEL LINE.
b. Press the line cord in the slot provided.
c. Place the wedge over the upper portion of the
base so the arrow points away from the
phone. Install the wedge by aligning it over
the holes and pressing down until it snaps
into place.
B ASE
d. Plug the other end of the line cord into the wall
jack.
S PARE B ATTERY
When the spare battery is in the base and charged, it
provides operational backup for two hours during a power
failure. The handset will continue to operate during a power
failure but the base will not. Place the spare battery pack in
the charger located in the base of the D271. Remove the
cover below the handset cradle by pressing the battery door
release. Align the battery pack terminals with the terminals
in the battery compartment and press the battery in place.
Replace the cover and verify the spare charge LED is lit.
INSTALLING THE D271
3
D271 - 2.4GHz Cordless
A TTACH H EADSET (O PTIONAL )
NEED TO KNOW
Install the spare battery after plugging in the
adapter.
Battery Door Release
Spare Battery Charger
ATTACH
THE
BELT C LIP
You can use the belt clip to hang the handset from your belt.
a. Place the belt clip on the back of the handset.
b. Align the tabs on the belt clip with the slots on
the handset.
c. Press the belt clip to the handset to snap the
tabs into the slots.
Make sure both tabs are securely snapped into the handset
slots.
4
INSTALLING THE D271
A headset with a standard 2.5 mm plug may be used in the
headset jack on the side of the handset.
D271 - 2.4GHz Cordless
FEATURES AND CONTROLS
H ANDSET F UNCTIONS
■ Talk Light indicates your phone is off hook or in use.
Line in Use
Icon
■
Volume
Control
Keys
Function Keys
2:40 PM 7/12
Talk Key &
Light
DELETE
7-10-11
CALLS
Exit/Menu
Key
EXIT
REVIEW
Dial Pad
1
ABC
2
DEF
3
Review Key
(Calls and Dir)
4
JKL
5
MNO
6
Headset Jack
7
TUV
8
WXYZ
*
OPER
PQRS
FLASH
Flash Key
Voicemail
Light
0
■
SAVE
DIR
TALK
GHI
■
CALLS
1-408-555-1234
SMITH JOHN
■
MENU
■
■
■
■
9
■
#
HOLD
■
Hold Key
The light remains solid when the handset is in use.
This light will flash when using the speakerphone or
the handset is on hold.
Voicemail Light flashes if you have messages in your
mailbox.
Talk Key is used to access the telephone line or to
answer a page from the base.
Exit/Menu Key allows you to setup your phone and
utilize the Network Services.
Review Key allows you to scroll through menu
options and access your Caller ID Records (Calls)
and Directory Records (Dir) with one touch from the
idle screen.
Dial Pad numeric keys are used for dialing.
Flash Key allows Call Waiting subscribers to switch
between two calls.
Hold Key places the existing call on hold.
Volume Control Keys (on the side of the handset)
adjust the loudness of the handset or handset
ringer.
Headset Jack allows use of a headset with a standard
2.5mm plug.
Line in Use Icon is displayed whenever this phone, or
any other telephone on the line, is being used.
FEATURES AND CONTROLS
5
D271 - 2.4GHz Cordless
Depending on the handset’s mode, the functions of the 3
buttons below the display vary.
IDLE M ODE
2:40 PM 7/12
NEED TO KNOW
Idle mode is the default display when the phone
is at rest. To return to the idle display from the
other modes, press the Exit/Menu key.
C ALLER ID MODE
CALLS
3 NEW CALLS
REDIAL/P VOICEMAIL
■ Redial/P Key recalls and dials the last phone number
dialed or adds a pause.
2:40 PM 7/12
CALLS
1-408-555-1234
SMITH JOHN
DELETE
7-10-11
SAVE
■ Voicemail Key allows you to access your voice
mailbox if you subscribe to this service through your
local telephone company.
DIRECTORY MODE
2:40 PM 7/12
■ Delete Key is used to erase digits on the display. It
can also delete single or multiple entries from the
Caller ID log and Directory.
■ 7-10-11 Key allows you to modify the format of a
number in a Call Record so that it will be in the
correct format to dial from your phone.
■ Save Key allows you to save information to the
directory.
6
FEATURES AND CONTROLS
DIR
1-408-555-1234
SMITH JOHN
DELETE
EDIT
■ Delete Key is used to erase digits on the display. It
can also delete single or multiple entries from the
Caller ID log and Directory.
■ Edit Key allows you to edit information in the
directory.
D271 - 2.4GHz Cordless
B ASE FUNCTIONS
Battery Door
Release
Spare Charge
Light
Handset Charge
Light
Line In Use Light
Page/Find Key
SPARE
CHARGE
HANDSET
CHARGE
Line in Use Icon
Save Key
Volume Control Keys
LINE IN USE
Edit Key
PAGE/FIND
Exit/Menu Key
VOLUME
7-10-11 Key
Play Key
Delete Key
Dir Key
Calls Key
CALLS
2:40 PM 7/12
Select Key
GHI
1-408-555-1234
SMITH JOHN
SELECT
DELETE
CALLS
7-10-11
1
ABC
2
DEF
3
4
JKL
5
MNO
6
Flash Key
7
TUV
8
WXYZ
9
Redial/P Key
*
OPER
#
Mute Key and Light
PQRS
SAVE
EDIT
DIR
FLASH
REDIAL/P
0
MUTE
HOLD
EXIT
REVIEW
Review Keys
VOICEMAIL
Hold Key
MENU
PLAY
SPEAKERPHONE
Voicemail Key
TALK
Speakerphone/Talk
Key and Light
FEATURES AND CONTROLS
7
D271 - 2.4GHz Cordless
LIGHTS
■ Voicemail flashes if you have messages in your
■
■
■
■
■
mailbox.
Line in Use comes on whenever this phone, or any
other telephone on the line, is being used. The Line
in Use Icon is also displayed.
Handset Charge comes on when the handset is in
the base.
Spare Charge comes on when the spare battery is in
the charger.
Speakerphone/Talk comes on when the
speakerphone is in use and flashes when on hold.
Mute flashes indicating that the speakerphone
microphone is muted.
K EYS
■ Volume Control Keys adjust the loudness of the
speakerphone or the ringer.
■ Dial Pad numeric keys are for dialing.
■ Flash Key allows Call Waiting subscribers to switch
between two calls.
■ Redial/P Key recalls and dials the last phone number
dialed or adds a pause.
■ Mute Key mutes the speakerphone microphone.
■ Hold Key places the existing call on hold.
■ Speakerphone/Talk Key allows you to turn the
speakerphone on or off and also dials the number on
the display.
8
FEATURES AND CONTROLS
■ Select Key allows you to select the displayed option
when displaying menu options.
■ Delete Key is used to erase digits on the display. It
■
■
■
■
■
■
■
■
■
■
can also delete single or multiple entries from the
Caller ID log and Directory.
7-10-11 Key allows you to modify the format of a
number in a Call Record so that it will be in the
correct format to dial from your phone.
Edit Key allows you to edit information in the
directory.
Save Key allows you to save information to the
directory.
Calls Key provides one touch access to your Caller
ID Records from the idle screen.
Dir Key provides one touch access to your Directory
Records from the idle screen.
Exit/Menu Key allows you to setup your phone and
utilize the Network Services.
Review Keys allow you to scroll through menu
options and access your Caller ID and Directory
Records.
Voicemail Key allows you to access to your voicemail
if you subscribe to this service through your local
telephone company.
Play Key is used to play the messages in your voice
mailbox once you have entered voicemail.
Page/Find Key is a homing system for finding the
handset.
D271 - 2.4GHz Cordless
PERSONALIZING
YOUR
P HONE
You can personalize your phone by pressing the EXIT/MENU
key. - MENU OPTIONS - is displayed on the screen. Using
the REVIEW key, scroll through the options. Press
SELECT or enter the menu number to select the option. The
specific number for each option is listed in the following
table.
- MENU OPTIONS -
NETWORK S ERVICES
The Network Services option allows you easy access to the
network services you subscribe to through your telephone
company. To activate a specific Network Service, press
EXIT/MENU and press 1 for NETWORK SERVS. Scroll through
the options available and press TALK to activate the
displayed Network Service.
For a list of the features that are programmed into your
phone, please refer to your Quick Start insert.
1=NETWORK SERVS
NEED TO KNOW
2=MSG SCREENING
If you would like to have access to a feature that
you do not currently subscribe to, please
contact your local telephone company.
3=CALL ID PAGING
4=INTERCOM
5=CLR VMAIL LITE
6=RING ON/OFF
MESSAGE S CREENING
Message Screening allows you to screen your voicemail
messages as they are left. Feature may not be available in
all areas. Please see your Quick Start card.
7=VMAIL SETUP
NEED TO KNOW
8=MISC OPTIONS
To use this feature, you must subscribe to your
local telephone company’s Voicemail and 3-Way
Calling services. Please contact your local
telephone company to activate these services. If
you have not subscribed to 3-Way Calling and
9=TRANSFER VMAIL
FEATURES AND CONTROLS
9
D271 - 2.4GHz Cordless
you turn Message Screening on, per use
charges for 3-Way Calling will apply for each call
screened.
To setup Message Screening, press EXIT/MENU and then
press 2 for MSG SCREENING. Press 3 for setup and SCREEN
ALL CALLS? is displayed. Select one of the following options
by entering the indicated number.
■
■
1 = ALL
2 = PRIVATE AND UNAVAILABLE
Enter your home phone number as directed and then press
SAVE. SAVED is displayed and then SAVE PARTIAL
MESSAGES LEFT IF YOU ANSWER DURING SCREENING?
is displayed. Select one of the following
■
■
1 = SAVE
2 = ERASE
Message Screening Test
Some voicemail systems operate differently and require a
pause to be entered after your telephone number. We
recommend placing a test call to ensure a proper
connection. If the test call does not connect, a pause is
required. Complete the following steps to enter a pause.
a. Enter the setup mode by pressing the
EXIT/MENU key.
b. Press REVIEW until you see MSG
SCREENING. Press 3 to select SETUP.
10
FEATURES AND CONTROLS
c. Select what calls are to be screened.
d. You will see your telephone number on the
screen. To add the pause, use the
REVIEW to move to the field after your
phone number. Press the REDIAL/P key on
the base once.
e. Press SAVE and SAVED is displayed.
f. Press EXIT/MENU.
CALLER ID PAGING
Caller ID Paging sends a numeric message to your pager
showing you the phone number of the incoming call. The
numbers 55 appear at the end of the phone number
displayed to indicate it is a Caller ID paging call.
The Caller ID paging feature may not work with all paging
systems. Feature may not be available in all areas. Please
see your Quick Start card.
To setup Caller ID paging, press EXIT/MENU and then press
3 for CALL ID PAGING. Press 3 for setup and SETUP
PAGING...ENTER PAGER NUMBER THEN PRESS SAVE is
displayed. Enter your pager number and then press SAVE.
SAVED is displayed in the screen.
NEED TO KNOW
You should enter your pager number as you
would dial it from your phone (including a leading
“1” and the area code only if you would normally
dial that to reach your pager).
D271 - 2.4GHz Cordless
SEND CALLER ID PAGE FOR ALL CALLS? appears in the
RING O N/O FF
screen. Select one of the following by pressing the indicated
number.
To turn the ringer on and off for both the handset and the
base, press EXIT/MENU and then press 6 for RING ON/OFF.
■
■
1 = ALL
2 = ONLY UNANSWERED CALLS
Once the calls to be paged have been setup, SECONDS OF
DELAY AFTER DIALING PAGER NUMBER BEFORE CALLER
ID IS SENT is displayed. The delay can be increased/
decreased to accommodate individual paging systems. Use
REVIEW to adjust the delay and then press SAVE.
SAVED is displayed. PAGING ON is displayed when the phone
is in Idle mode.
NEED TO KNOW
The D271 will not page a call that has no phone
number in the Caller ID record.
INTERCOM
In addition to the normal telephone functions, your D271
can also be used as an intercom. To use the intercom, see
“Using the Intercom” on page 19.
C LEAR V OICEMAIL LITE
To clear the voicemail light, see “Clearing the Voicemail
Light” on page 14.
Select either the handset or base.
■
■
1 = HANDSET
2 = BASE
Select ON or OFF
■
■
1 = ON
2 = OFF
V MAIL S ETUP
If you subscribe to your local telephone company’s Voicemail
service, the VOICEMAIL key can be used to automatically
access your mailbox.
To setup your Voicemail access number, press EXIT/MENU
and then press 7 for VMAIL SETUP. Enter your access
number and then press SAVE. SAVED is displayed in the
screen. Enter your password and then press SAVE. SAVED
is displayed.
Voicemail systems operate differently and some require
additional pauses to be entered. After setting up the
Voicemail access number and password, the screen
prompts IS PASSWORD BEING DIALED TOO SOON OR TOO
LATE? The choices are:
FEATURES AND CONTROLS
11
D271 - 2.4GHz Cordless
■
■
Press EXIT/MENU and then press 8 to setup these options.
1 = YES
2 = NO/NOT SURE
Pressing 1 allows pauses to be added or removed. Press
REDIAL/P to add a pause. Press DELETE to remove a
pause. When enough pauses have been added/removed,
press SAVE. SETUP COMPLETE is displayed. Two to three
pauses are suggested and the default is two.
M ISC O PTIONS
Misc Options allows you to setup the following:
Selecting a Language
Press 1 to select the language. Your telephone displays in
either English or Spanish.
■
■
Selecting a Dialing Method
Press 2 to select the dialing method. Your phone can dial in
either tone or pulse/rotary mode.
1=Language
■
2=Dialing Method
■
3=Answer Method
4=Call Wait ID
- MISC OPTIONS 1=LANGUAGE
DEFAULT
1=ENGLISH
12
1=TONE
3=ANSWER METHOD
1=PRESS TALK TO
ANSWER
4=CALL WAIT ID
see Quick Start card
for default
FEATURES AND CONTROLS
1 = TONE
2 = PULSE
Selecting an Answering Method
Press 3 to select the way you answer the phone. The phone
can automatically answer incoming calls when the handset
is removed from the cradle, or the phone will only answer
after pressing the TALK or SPEAKERPHONE/TALK key.
■
■
2=DIALING METHOD
1 = ENGLISH
2 = ESPANOL
1 = PRESS TALK TO ANSWER
2 = ANSWER ON PICKUP
Call Waiting ID Options Setup
Call Waiting ID options allow you to disposition incoming calls
when you are on another call. Feature may not be available
in all areas. Contact your local phone company.
D271 - 2.4GHz Cordless
NEED TO KNOW
Caller ID, Call Waiting ID and CWID Options are
required from your local telephone company.
Please contact your local telephone company to
activate these services.
To setup Transfer to Voicemail, press EXIT/MENU and then
press 9 for TRANSFER VMAIL. Press 3 for setup and SETUP
TRANSFER is displayed. Enter your phone number and press
SAVE. SAVED is displayed on the screen.
Press 4 to setup Call Waiting ID Options. You can turn Call
Waiting ID (CWID) Options ON or OFF.
■
■
1 = ON
2 = OFF
TRANSFER TO V OICEMAIL
Transfer to Voicemail allows you to transfer the person you
are talking to directly to your voicemail system. Feature may
not be available in all areas. Please see your Quick Start
card.
NEED TO KNOW
To use this feature, you must subscribe to your
local telephone company’s Voicemail and 3-Way
Calling services. Please contact your local
telephone company to activate these services. If
you have not subscribed to 3-Way Calling and
you use Transfer to Voicemail, per use charges
for 3-Way Calling will apply for each call
transferred.
FEATURES AND CONTROLS
13
D271 - 2.4GHz Cordless
USING THE D271
ANSWERING CALLS
You can answer a call four ways:
■
■
■
■
Press TALK on the handset or base.
Press any key on the handset.
Press FLASH to answer Call Waiting calls.
Set the telephone to Answer on Pickup. The
telephone is automatically answered when the
handset is lifted from the cradle. See “Selecting an
Answering Method” on page 12.
USING VOICEMAIL
If you subscribe to your local telephone company’s Voicemail
Service, you can use your VOICEMAIL key to automatically
access your mailbox. (To setup your Voicemail, see“Vmail
Setup” on page 11.)
When your VOICEMAIL light flashes, or you see the screen
display MESSAGE WAITING, press the VOICEMAIL key to
access your Voicemail.
USING VOICEMAIL M ESSAGE S CREENING
Incoming calls can be screened when Message Screening is
activated. You can listen to the Voicemail message as it is
being left and take the call if desired. Feature may not be
available in all areas. Please see your Quick Start card.
■ If Message Screening is activated, the caller hears
the message “Please hold while we complete your
call.”
14
USING THE D271
■ The caller then hears your voicemail prompt (outgoing
message) asking them to leave a message.
■ While the caller is leaving a message, you can either
take the call by pressing the TALK key or
SPEAKERPHONE/TALK key on the base. If you do
nothing, the message will be left in your voice
mailbox.
NEED TO KNOW
Network Voicemail and 3-Way Calling are
required from your local telephone company in
order to use Message Screening. Please
contact your local telephone company to
activate these services. If you have not
subscribed to 3-Way Calling and you turn
Message Screening on, per use charges for
3-Way Calling may apply for each call screened.
C LEARING
THE
VOICEMAIL LIGHT
The Voicemail light may remain on after reviewing your
messages remotely even when there are no messages. To
clear the light, press EXIT/MENU and then press 5 for CLR
VMAIL LITE to turn the light off. VMAIL LITE OFF is
displayed.
D271 - 2.4GHz Cordless
USING C ALL WAITING ID (CWID) OPTIONS
When a new call comes in while you are talking, you will hear
a tone. The new caller’s name and phone number, if
available, will be displayed. You can either alternate between
calls or disposition the call. Feature may not be available in
all areas. Contact your local phone company.
NEED TO KNOW
Caller ID, Call Waiting ID and CWID Options are
required from your local telephone company.
Please contact your local telephone company to
activate these services.
Alternating Between Calls
■ Press or to scroll through the options.
or
■ Press one of the 5 digits listed below to go directly
to the corresponding option.
NEED TO KNOW
You must disposition the call within 25 seconds
of the Call Waiting tone.
- MENU OPTIONS 1=VM
Sends the new caller to voicemail to leave a message.
2=TELL BUSY
Plays a pre-recorded message from your phone company that you are on the
telephone and will call them
back.
3=3WAY
Connects the new caller with
the existing call to form a 3
way conference call.
4=PLS HOLD
Places the new call on hold,
plays a pre-recorded
message from your phone
company that you are on the
phone and will be with them
shortly.
5=DROP & ANSWER
Drops the existing call and
answers the new call.
When you receive a Call Waiting call and want to connect,
press FLASH. The active call will be placed on hold and the
new call will be active.
■ Press FLASH to alternate between calls.
■ Press TALK to end the call.
Dispositioning Calls
When you hear the Call Waiting tone, you can apply a
disposition to the call.
USING THE D271
15
D271 - 2.4GHz Cordless
USING C ALLER ID PAGING
You can turn your Caller ID Paging feature on and off as
desired. Press the EXIT/MENU key on the handset or base.
Enter 3 for CALL ID PAGING or scroll through the menu
options. CURRENTLY ON(OFF) indicates the feature’s
status. Feature may not be available in all areas. Please
see your Quick Start card.
■ Press 1 to select
ON.
■ Press 2 to select OFF.
■ Press 3 for setup.
While your Caller ID Paging feature is turned on, you will
receive the Caller ID telephone number(s) of the calls you
have directed to be paged (only calls with numbers are
paged). You have the option of receiving notification of all
calls, or just unanswered calls. If you would like to change
the current setting on this feature, see “Caller ID Paging” on
page 10.
If you change your pager number, you will need to program
the new number into your phone. To enter your new pager
number see “Caller ID Paging” on page 10.
NEED TO KNOW
The Caller ID paging feature may not work with
all paging systems. If you subscribe to a
“privacy” service from your local telephone
company, the “privacy” calls will not be sent to
your pager.
16
USING THE D271
U SING TRANSFER
TO
VOICEMAIL
Transfer to Voicemail allows you to transfer the person you
are talking to directly to your voicemail system. Feature may
not be available in all areas. Please see your Quick Start
card.
When you want to transfer the person you are talking to:
a.
Press the EXIT/MENU key on the handset or
base twice.
b.
Enter 9 for TRANSFERVMAIL or scroll
through the menu options.
c.
The screen display will alternate between
TRANSFERRING and the Caller ID
information.
d.
The TALK key flashes while the message is
being left.
e.
After the message is left, the Talk light will
turn off and a new call can be made.
NEED TO KNOW
This feature will not work with a Call Waiting
Call.
D271 - 2.4GHz Cordless
USING N ETWORK S ERVICES
Your phone is programmed so that you can easily use all of
the convenient network services that you subscribe to
through your telephone company. To use any of these
features, press the EXIT/MENU key on either the handset or
base and select 1 = NETWORK SERVICES or enter 1.
For a list of the features that are programmed into your
phone, please refer to your Quick Start insert.
a. Press REVIEW to scroll through the
features until the desired feature is
displayed.
b. Press the TALK key on the handset or the
SPEAKERPHONE/TALK key on the base to
activate the feature.
NEED TO KNOW
If you would like to have access to a feature that
you do not currently subscribe to, please
contact your local telephone company.
DIALING
a.
b.
Press TALK on the handset or
SPEAKERPHONE/TALK on the base.
Use the keypad to dial the phone number.
a.
Use the keypad to enter a telephone number.
b.
Check the number on the display. If the
number is wrong, press DELETE to delete
the entry digit-by-digit.
c.
Press TALK on the handset or
SPEAKERPHONE/TALK on the base to place
the call.
C ONVENIENCE DIALING
You can quickly dial directly from:
■ Caller ID Records
■ Directory Records
■ Last Number Redial
NEED TO KNOW
There is a key on both the handset and base labeled 7•10•11.
This key allows you to modify the format of a number in a call
record so that it will be in the correct format to dial from
your phone. For example:
■ 7 digits = 555-1234
■ 10 digits = 408-555-1234
■ 11 digits = 1-408-555-1234
You must choose the correct format to dial the area code
and number of the call record chosen.
PRE -DIALING
Pre-dialing allows you to enter the number and verify it
before placing the call.
USING THE D271
17
D271 - 2.4GHz Cordless
D IALING FROM C ALLER ID RECORDS
A DJUSTING
VOLUME
a.
Press the CALLS key.
ADJUSTING THE H ANDSET VOLUME
b.
Use the REVIEW keys to find the call
record desired.
a.
Press the TALK key.
b.
c.
Use the 7•10•11 key to change between the
different formats and choose the right
format to dial the number from your phone.
Press the or VOLUME key on the side of
the handset while the phone is off hook to
increase or decrease the volume. There are
four volume levels.
d.
Press TALK or SPEAKERPHONE/TALK to
place the call.
ADJUSTING THE H ANDSET RINGER VOLUME
a.
Press the or VOLUME key on the side of
the handset while the phone is not in use.
b.
You hear the sound of the ringer as you
adjust the volume. The ringer volume can be
set at high or low.
D IALING FROM D IRECTORY R ECORDS
a.
Press the DIR key.
b.
Use the REVIEW keys to find the
directory record desired. See “Creating Your
Directory List” on page 21. Also, see
“Looking up Records in the Directory” on
page 21.
c.
Press TALK or SPEAKERPHONE /TALK to
place the call.
L AST N UMBER R EDIAL
Press REDIAL/P on the handset or base.
18
THE
USING THE D271
ADJUSTING THE S PEAKERPHONE VOLUME
Press the or VOLUME key on the base
while the phone is in Speakerphone mode to
increase or decrease the speakerphone/
intercom volume. There are 16 volume
levels.
ADJUSTING THE BASE RINGER VOLUME
Press the or VOLUME key on the base
when the phone is not in use to increase or
decrease the ringer volume. There are 8
volume levels.
D271 - 2.4GHz Cordless
USING
THE
S PEAKERPHONE
Press SPEAKERPHONE/TALK to turn the speakerphone on
or off.
Be careful switching from handset to speakerphone mode.
If you press SPEAKERPHONE/TALK while talking on the
handset, you may hear feedback. You can stop the feedback
by pressing TALK on the handset again.
USING
THE INTERCOM
The intercom feature allows you to conduct a conversation
between the base and the handset when the phone is in idle
mode or when you are on a call.
I DLE M ODE
To activate, press EXIT/MENU and select 4 for INTERCOM.
INTERCOM ACTIVE is displayed. The base or handset beeps
twice to indicate intercom is active. To deactivate, press
TALK or SPEAKERPHONE/TALK.
O N A C ALL
When you are on the handset and want to transfer it to the
base or vice versa, press EXIT/MENU and select 4 for
INTERCOM. This activates the intercom feature and places
the caller on hold. The base or handset beeps and the Talk
and Speakerphone lights flash. Your voice will be heard when
you speak. The other person can take the call by pressing
TALK or SPEAKERPHONE/TALK. Once TALK or
SPEAKERPHONE/TALK is pressed, the other goes idle. To
participate in the call, press TALK or
SPEAKERPHONE/TALK.
U SING H OLD
You can place a call on hold by pressing the HOLD key. The
Talk and Speakerphone lights flash slowly while calls are on
hold.
There are three ways to take a call off hold:
a.
Press TALK or SPEAKERPHONE/TALK to
resume the call.
b.
Pick up the call on another extension.
c.
The caller hangs up.
T IMING C ALLS
When you are on a call, the clock on your display changes
to a call timer. The timer counts the entire length of the time
you are on the phone. When the timer goes past 99
minutes and 59 seconds, it starts over at 0:00.
TEMPORARY TONE S ERVICE
If your phone is set to Pulse and you need Tone service for
interacting with bank and other automated services, you can
temporarily change your dial setting to Tone. Press * during
the call and the phone switches to temporary Tone service
for the duration of the call. The phone returns to Pulse
service when you hang up. See “Selecting a Dialing Method”
on page 12.
USING THE D271
19
D271 - 2.4GHz Cordless
L OCATING
A
L OST H ANDSET
Should you misplace your handset, you can locate it quickly
and easily by pressing the PAGE/FIND key on the base. The
handset beeps for 15 seconds, or until you either
■ Press the PAGE/FIND key again
or
■ Press any key on the handset except TALK. (If you
press TALK, you enter intercom mode.)
If the handset does not beep, it is either turned off, out of
range, or the battery needs recharging.
C ALLER ID R ECORDS
R EVIEWING CALLER ID R ECORDS
a.
b.
c.
NEED TO KNOW
An asterisk (* ) in front of the caller’s name in
the Caller ID records indicates the call has been
received since the last review of the log.
L OW BATTERY
When the handset battery charge becomes low you will hear
an audible tone and will see the display message HANDSET
BATT LOW. You have approximately 5 minutes to conclude
your call or switch phones before your call is dropped.
NEED TO KNOW
Prior to first use, place the handset in the cradle
and charge the battery for at least 12 hours.
The charge light on the base comes on to tell
you that the handset is charging.
USING M UTE
The mute function allows you to block your side of a
conversation. Mute is only available on the base
speakerphone.
Press MUTE to turn mute ON/OFF. The mute light flashes
when mute is ON.
20
USING THE D271
Press the CALLS key. The newest call is
displayed.
Use the REVIEW keys to move through
the call log.
Press EXIT/MENU to return to the idle mode.
S AVING C ALLER ID R ECORDS
See “Copying a Caller ID Record” on page 21.
DELETING INDIVIDUAL C ALLER ID RECORDS
a.
b.
c.
Press the CALLS key.
Use the REVIEW keys to find the record
you want to delete.
Press DELETE. DELETED appears.
DELETING ALL C ALLER ID R ECORDS
a.
b.
Press CALLS.
Press and hold DELETE. DEL ALL?
1=Y 2=N appears.
- Press 1 for YES (or press DELETE again).
- Press 2 for NO.
D271 - 2.4GHz Cordless
DIRECTORY R ECORDS
L OOKING UP R ECORDS IN THE D IRECTORY
Looking Up Records Using REVIEW
a.
Press the DIR key on the handset or base.
b.
Use the REVIEW keys to find the
directory record desired.
c.
When the end of the directory list is
reached, TO ADD A NEW ENTRY PRESS
EDIT is displayed. See “Creating Your
Directory List” below.
d.
Press EXIT/MENU to return to the idle mode.
Looking Up Records Alphabetically
a.
Press the DIR key on the handset or base.
b.
Press a number key associated with the
letter of the directory record.
For example, if you want to find the directory
record for Red Riding Hood, press 7 until the
first record starting with the letter “R” is
displayed.
c.
Press REVIEW to see additional records
starting with the letter “R.”
d.
Press TALK to call the name/number
displayed.
C REATING YOUR DIRECTORY L IST
You can create a personal phone directory containing up to
50 names and numbers. Once you create your personal
phone directory, you can automatically dial from the
directory.
You can create your directory in two ways:
■ Copy a Caller ID record to the directory.
■ Create a new directory record.
Copying a Caller ID Record
a.
Press the CALLS key.
b.
Use the REVIEW keys to find the call
record desired.
c.
Use the 7•10•11 key to change between the
different formats and choose the right
format to dial the number from your phone.
d.
Press SAVE. SAVING TO DIR is displayed.
NEED TO KNOW
To edit the name and number field, you must be
in Directory mode. For details see “Creating or
Editing” below.
USING THE D271
21
D271 - 2.4GHz Cordless
Creating or Editing
You can enter up to 16 characters in the name field and 32
characters in the number field.
a.
b.
c.
d.
Press the DIR key.
- To edit a record press the REVIEW keys
until the desired record is displayed.
- To create a new record press the REVIEW
key until TO ADD A NEW ENTRY PRESS EDIT
is displayed.
Press the EDIT key. Enter or edit the number.
- Use the number key pad to enter in characters
(See “Special Symbols” on page 22).
- Use the REVIEW keys to move back and
forth along the field line.
- Use the DELETE key to erase a letter or
number.
Press the SAVE key. Enter or edit the name.
- Use the number key pad to enter in characters.
- Use the REVIEW keys to move back and
forth along the field line.
- Use the DELETE key to erase a letter or
number.
Press the SAVE key. The message -SAVEDappears on the display.
Optional Method for Creating a New Record
a.
22
From the idle screen, enter the phone
number.
USING THE D271
b.
Press the SAVE key. Enter or edit the name.
- Use the number key pad to enter in characters.
- Use the REVIEW keys to move back and
forth along the field line.
- Use the DELETE key to erase a letter or
number.
Entering Alphanumeric Characters
Each number is assigned a set of letters. Press the
corresponding number until the desired letter is displayed.
For example: to enter JOHN: press 5 once; press 6 three
times; press 4 two times. Finally, press 6 two times. If the
next desired letter is on the same key as the current letter,
press the REVIEW key to move to the next position. Press
REVIEW to enter a blank space.
Special Symbols
When you edit a name, you can also use the * and
select the following symbols in the name field:
* / @ & ‘
(
)
,
-
.
# keys to
#
Adding Special Characters
You can add special characters by:
■ Pressing REVIEW to add a space in the name field.
■ Pressing FLASH to add a flash in the number field.
■ Pressing REDIAL/P adds a three second delay
(pause).
The phone dials the number exactly as it is stored in the
directory.
D271 - 2.4GHz Cordless
D ELETING D IRECTORY R ECORDS
Deleting an Individual Directory Record
a.
Press DIR.
b.
Use the REVIEW keys or look up
alphabetically (see “Looking up Records in the
Directory” on page 21) to locate the record
you want to delete.
c.
Press DELETE. You are prompted with
DELETE? 1=Y 2=N
- Press 1 for YES (or press DELETE again).
- Press 2 for NO.
d.
DELETED is displayed.
Deleting All Directory Records
a.
Press DIR.
b.
Use the REVIEW keys to locate any
record.
c.
Press and hold DELETE. You are prompted
with DEL ALL? 1=Y 2=N
- Press 1 for YES.
- Press 2 for NO.
d.
50 AVAILABLE is displayed.
USING THE D271
23
D271 - 2.4GHz Cordless
R EADING DISPLAY M ESSAGES
■
■
END OF LIST
■
INCOMPLETE DATA
The Caller ID information sent from the telephone
company is incomplete for this caller. There is no
problem with the phone.
■
INTERCOM ACTIVE
■
LONG DISTANCE
The message sent is a long distance call.
■
MESSAGE WAITING
You have a message in your voice mailbox.
■
NAME UNAVAILABLE
The person is calling from an area that provides
number-only Caller ID service, or you can be in a
service area which only shows the number.
■
NO CALLS
There are no call records stored in memory.
24
USING THE D271
PRIVATE
The caller has purposely chosen to block his/her caller
ID information.
■
HANDSET BATT LOW
The handset battery is getting low. Place the handset
in the base in order to recharge.
The intercom between the base and handset is active.
■
PAGING
This indicates find mode. The base is paging the handset or the handset is paging the base. Press any key
other than the TALK key to terminate paging. (Pressing TALK activates the intercom.)
You have reached the end of the directory or call
records. Press either REVIEW key to see other
records.
■
NO DATA SENT
The phone did not receive Caller ID information from
the phone company.
The D271 informs you of status by displaying the following
messages:
■
UNAVAILABLE
Caller ID information is not available from the caller’s
area.
■ No Name Shows
The person is calling from an area that provides number-only Caller ID service, or you could be in a service
area which only shows the number.
D271 - 2.4GHz Cordless
TROUBLESHOOTING
PROBLEM/SOLUTION
■ Handset or Base Lockup (Handset or Base does not
respond to any key press; display on LCD will not
change; no dial tone present)
- Reset the phone by removing the batteries
from the handset and base. Unplug the power
adapter. After 30 seconds, first plug the power
adapter back in and then reinstall the batteries
in the handset and base.
another call is being received.
- Check the AC adapter. Be sure that the adapter
is not damaged and that it is securely plugged
into a working outlet. Also check that the wall
plug is not controlled by a wall switch.
■ Blank or faint screen
- Place the handset in the cradle for several
seconds. Ensure the handset is making contact
in the cradle.
- Check the AC adapter. Be sure that the
adapter is not damaged and that it is securely
plugged into a working outlet. Also check that
the wall plug is not controlled by a wall switch.
- Recharge or replace the battery. See “Install
the Handset Battery” on page 2 for details.
■ Caller ID/Call Waiting ID doesn’t work properly
- Verify that Caller ID service is active. Call your
local telephone company’s business office to
ensure that your services are active. You can
verify that your Call Waiting ID is active by
listening for a double tone which indicates that
TROUBLESHOOTING
25
D271 - 2.4GHz Cordless
■ Call was received and recorded in Call Record but
number was not forwarded to pager
- Phone was answered but number was not
forwarded to pager. To set your feature so that
all Caller ID numbers are forwarded to your
pager whether they are answered or not, see
“Caller ID Paging” on page 10 to reprogram
your phone.
- Call Waiting was not turned off for this call and
the Caller ID Page sent was interrupted by a
Call Waiting tone. You must enter *70 and a
pause before you enter your pager number to
temporarily cancel Call Waiting for the number
to be sent to the pager.
- Press *70.
- To program a pause, press REDIAL/P
once.
- Enter the numbers needed to dial your
pager.
- Press REVIEW to proceed.
■ Caller ID page was sent but incomplete Caller ID
information was received.
- The programmed delay was too short or too
long. To adjust the delay, see “Caller ID Paging”
on page 10.
26
TROUBLESHOOTING
■ Charges for 3-Way Calling appear on phone bill
- Network Voicemail and 3-Way Calling are
required from your local telephone company in
order to use Message Screening. Please
contact your local telephone company to
activate these services. If you have not
subscribed to 3-Way Calling and you turn
Message Screening on, per use charges for 3Way Calling will apply for each call screened.
■ Message Screening fails to connect caller to Voice
Message system
- There may not be enough pauses programmed
in. To add pauses, follow the procedure for
“Message Screening Test” on page 10.
- If you block incoming calls which have
unidentified Caller ID numbers, you will need to
program your phone to disable this feature on
Message Screening calls. To do this:
- Press the MENU key.
- Press REVIEW until you see MSG
SCREENING. Press 3 to select SETUP.
- Select what calls are to be screened.
- You will see your telephone number on
the screen. Delete your old telephone
number by pressing the DELETE key
until no numbers are left on the
screen.
D271 - 2.4GHz Cordless
- Press *82, press REDIAL/P to enter a
pause, and then reenter your
telephone number.
- If you have determined that you need to
add a pause after your telephone
number, press the REDIAL/P key
(located on the bottom of the handset)
once for each 3 second pause needed.
- Press SAVE and SAVED is displayed.
- Press EXIT/MENU.
■ Handset charge light does not work
- Check whether the handset is making contact
in the cradle.
- Check the AC adapter. Be sure that the
adapter is not damaged and that it is securely
plugged into a working outlet. Also check that
the wall plug is not controlled by a wall switch.
- Verify that the handset battery has been
installed correctly. See “Install the Handset
Battery” on page 2.
■ Base charge light does not work
- Check the AC adapter. Be sure that the
adapter is not damaged and that it is securely
plugged into a working outlet. Also check that
the wall plug is not controlled by a wall switch.
- Verify that the spare battery has been installed
correctly. See “Spare Battery” on page 3.
■ Handset lights do not work
- Press the TALK key to test. The talk light
should come on.
- Recharge or replace the battery. See “Install
the Handset Battery” on page 2 for more
details.
■
INCOMPLETE DATA
- Call information was distorted before reaching
the unit. Normal static on the telephone line
can cause an INCOMPLETE DATA message. If
this condition persists, check with your local
telephone company to ensure that there is not
a problem with your phone line.
■ Phone does not ring
- Verify that the telephone line cord is connected,
secure and inserted in the proper jack.
- Verify the handset ringer is On. See “Ring On/
Off” on page 11.
- Verify that the ring volume control on the base
is turned on.
- Check the AC adapter.
- If the phone still does not ring, you might have
too many communication devices hooked to a
single line. A communication device can be a
phone, modem, or facsimile (FAX) machine.
Contact your your local telephone company
Business Office for help calculating the limit for
your residence or business.
TROUBLESHOOTING
27
D271 - 2.4GHz Cordless
- Move the handset closer to the base.
■ VOICEMAIL key dials my passcode before the system
is ready for it.
- Add more pauses to the dialing number. See
“Vmail Setup” on page 11.
■ No dial tone
- Verify that the line cord is connected, secure
and inserted in the proper jack.
- Check that the handset is fully charged.
- Move the handset closer to the base.
■ PAGE/FIND key does not page the handset
- The handset is not communicating with the
base. The handset is either out of range or the
battery needs recharging.
- Check the AC adapter.
■ Handset does not work
- Check the AC adapter. Be sure that the
adapter is undamaged and that it is securely
plugged into a working outlet. Also check that
the wall plug is not controlled by a wall switch.
- Place the telephone in the cradle for several
seconds. Ensure the handset is making contact
in the cradle.
- Recharge or replace the battery. See “Install
the Handset Battery” on page 2 for more
details.
■ Voicemail light is on when there are no messages in
the mailbox
- Turn the light off manually by following the steps
in “Clearing the Voicemail Light” on page 14.
28
TROUBLESHOOTING
■
NO DATA SENT
- Check your service. Call your local telephone
company to ensure that you have Caller ID or
Call Waiting ID service.
- Check the answering machine. Ensure that
your answering machine is set to answer after
two rings.
- Ensure you answer the call after two rings.
- Check Call Forwarding. Ensure that Call
Forwarding is turned off.
- Contact your local telephone company’s Service
Department if the problem continues for more
than 24 hours. Your your local telephone
company central office may be temporarily
experiencing an overload.
D271 - 2.4GHz Cordless
WARRANTY & SAFETY INSTRUCTIONS
■ Take the phone to a qualified technician when it requires
CAUTION
To reduce the risk of fire or injury to persons, read
and follow these instructions:
■ Read and understand all instructions.
■ Follow all warnings and instructions marked on the unit and in
■
■
■
■
■
■
■
the User Manual(s).
Use only the battery type recommended in this manual.
Unplug this telephone from the wall outlet before cleaning. Do
not use liquid or aerosol cleaners, just use a damp cloth for
cleaning.
Do not place this telephone on an unstable cart, stand, or
table. It could fall, causing serious damage or impeding
operation.
Never place this telephone near or over a radiator or heat
register.
Only operate this telephone using the type of power source
listed on the marking label. If you are not sure of the power
supply of your home, consult your dealer or local power
company.
Do not overload wall outlets and extension cords as this can
result in the risk of fire or electrical shock.
Never push objects of any kind into this telephone as they can
touch dangerous voltage points or short out parts that could
result in a risk of fire or electrical shock.
S- SAVE THESE INSTRUCTIONS -
repair work or service.
■ To reduce the risk of electrical shock, do not disassemble the
■
■
■
■
telephone. Opening or removing covers can expose you to
dangerous voltages or other risks. Incorrect re-assembly can
cause electrical shock during subsequent use.
Unplug this telephone from the wall outlet and refer servicing
to qualified service personnel under the following conditions:
- If the power supply cord or plug is damaged or
frayed.
- If liquid is spilled into the unit.
- If the unit is exposed to water.
- If the unit does not operate normally by following the
operating instructions.
- If the unit is dropped or the casing is damaged.
- If the unit exhibits a distinct change in performance.
Avoid using the telephone during an electrical storm. There
can be a slight risk of electrical shock from lightning.
Do not use the telephone to report a gas leak if the leak is in
the vicinity of the phone
Ultimate disposal of this product should be handled according
to all national laws and regulations.
WARRANTY & SAFETY INSTRUCTIONS
29
D271 - 2.4GHz Cordless
WARNINGS
WARNING
To prevent fire or shock hazard, do not expose this
product to rain or moisture.
CAUTION
To reduce the risk of electric shock, DO NOT remove
cover or back. No user serviceable parts inside.
Refer servicing to qualified personnel.
This symbol is intended to alert you to the presence of
uninsulated dangerous voltage within the product's
enclosure that might be of sufficient magnitude to
constitute a risk of electric shock. Do not open the
product's case.
This symbol is intended to inform you that important
operating and maintenance instructions are included
in the literature accompanying this product.
Important: Although cordless phones generally require AC power
to operate, your D271 phone can provide operational backup in
the case of the power failure IF the spare battery is charged in
the base.
30
WARRANTY & SAFETY INSTRUCTIONS
CAUTION
Changes or modification to this device not expressly
approved by Cidco Communications could void the
user’s authority to operate this equipment.
TELEPHONE WIRING AND JACK INSTALLATION
■ Use caution when installing or modifying telephone lines.
■ Never install telephone wiring during an electrical storm.
■ Never install telephone jacks in wet locations unless the jack is
specifically designed for wet locations.
BATTERIES
■ Disconnect the telephone when replacing the battery pack.
■ Use only 3.6V 1.0 Ah Nickel Cadmium (Ni-Cad) cordless
telephone replacement battery pack.
■ Do not dispose of the battery pack in a fire as it will explode.
Check with local codes for proper battery disposal
regulations.
■ Do not open or mutilate the battery pack. Released electrolyte
is corrosive and can cause damage to the eyes or skin. It can
be toxic, if swallowed.
■ Avoid contact with rings, bracelets, keys or other metal
objects, when handling batteries. These objects could short
out the battery or cause the conductor to overheat resulting
in burns.
S- SAVE THESE INSTRUCTIONS -
D271 - 2.4GHz Cordless
■ Do not attempt to recharge the battery pack by heating it.
Sudden release of battery electrolyte can cause burns or
irritation to the eyes or skin.
■ Remove the battery pack if you do not plan to use the phone
for several months at a time. The batteries could leak over
that time.
■ Discard “dead” battery packs as soon as possible because
they are likely to leak into the phone.
■ Do not store this phone or battery pack in a high temperature
area. Batteries stored in a freezer or refrigerator should be
protected from condensation during storage and defrosting.
Battery packs should be stabilized at room temperature
before using.
■ Your battery pack is rechargeable and can be
recycled once it outlives its usefulness.
Depending upon your local and state law, it
might be illegal to dispose of this battery into a
municipal waste system. Check with your local
solid waste company or call 1-800-8-BATTERY
for information on Ni-Cd battery recycling and
disposal restrictions in your area.
FCC REQUIREMENTS
FCC PART 15 INFORMATION
This equipment complies with Part 15 of the FCC rules. Operation
is subject to the following two conditions: (1) This device may not
cause harmful interference, and (2) this device must accept any
interference received, including interference that may cause
undesired operation.
This equipment has been tested and found to comply within the
limits for a Class B digital device, pursuant to Part 15 of the FCC
Rules. These limits provide reasonable protection against
harmful interference in a residential installation.
This equipment generates, uses and can radiate radio frequency
energy. If not installed and used in accordance with the
instructions, the equipment might cause harmful interference to
radio communications. However, there is no guarantee that
interference will not occur in a particular installation.
If this equipment does cause harmful interference to radio or
television reception, which can be determined by turning the
equipment off and on, the user is encouraged to try to correct
the interference by one or more of the following measures:
■ Reorient or relocate the receiving antenna.
■ Increase the separation between the equipment and receiver.
WARRANTY & SAFETY INSTRUCTIONS
31
D271 - 2.4GHz Cordless
■ Connect the equipment into an outlet on a circuit different
from that to which the receiver is connected.
■ Consult the dealer or an experienced radio/TV technician for
help.
CAUTION
Changes or modification to this device not expressly
approved by Cidco Communications could void the
user’s authority to operate this equipment.
FCC PART 68 I NFORMATION
This telephone is hearing aid compatible.
This equipment complies with Part 68 of the FCC rules. The FCC
Part 68 label is located on the bottom of the product. This label
contains the product’s FCC Registration Number and Ringer
Equivalence Number (REN). You must give this information to
your telephone company if they request it from you.
Only use standard modular telephone jacks to connect to the
telephone network. The appropriate outlet or jack is a USOC
RJ11C or RJ11W, which complies with FCC Part 68 Rules.
The REN is useful when trying to determine the maximum
number of devices you can connect to your telephone line and still
have those devices ring when called. In most, but not all areas,
the sum of the RENs of all devices connected to one line should
not exceed five (5.0). To be certain of the number of devices you
32
WARRANTY & SAFETY INSTRUCTIONS
can connect to your line, as determined by the REN, contact your
local telephone company to determine the maximum REN for
your calling area.
If this device causes harm to the telephone network, the
telephone company will give you advance notice if temporary
discontinuance of service is required. But if advance notice isn’t
practical, the telephone company will notify you as soon as
possible. Also, you will be advised of your right to file a complaint
with the FCC if you believe it is necessary.
The telephone company may make changes in its facilities,
equipment, operation, or procedures that could affect the proper
functioning of your equipment. If they do, you will receive
advanced notice in order for you to make necessary changes to
maintain uninterrupted service.
This equipment may not be used on coin service provided by the
telephone company. Connection to party lines is subject to state
tariffs.
Repairs to this equipment can only be made by the manufacturer
and its authorized agents. If it appears that this device is causing
harm to the telephone network, the telephone company might
request that the device be unplugged until the problem is fixed.
DO NOT DISASSEMBLE THIS EQUIPMENT.
D271 - 2.4GHz Cordless
WARRANTY
If your telephone is defective in material or workmanship and you
return it within one year from the date of purchase, we will repair
it, or, at our option, we will replace it. If we repair it, we might
use reconditioned replacement parts or materials. If we choose
to replace it, we might substitute a reconditioned unit. The
repaired/replaced unit is warranted for either (a) ninety days, or
(b) the remainder of your phone’s original one year warranty,
whichever is longer.
service calls, or any other incidental or consequential damages.
C. STATE LAW RIGHTS
Some states do not allow limitations on how long an implied
warranty lasts, or the exclusion of limitation of incidental or
consequential damages, so the above exclusions might not apply
to you. This warranty gives you specific rights; you may also have
other rights, which can vary from state to state.
A. WHAT YOU NEED TO DO
To receive warranty service, you must provide proof of purchase
(your sales receipt) and date of purchase.
B. WHAT THIS WARRANTY DOES NOT COVER
This warranty does not cover defects resulting from accidents,
alterations, failure to follow this manual’s instructions, battery
leakage, misuse, fire, flood, and Acts of God.
We do not warrant this product to be compatible with party lines,
with all types of telephone equipment, or with your specific
customer premises equipment. Shipping costs to and from
authorized service centers are not covered.
We are not responsible for implied warranties, including those of
fitness for a particular purpose and merchantability after the
initial one year period. We do not pay for loss of time,
inconvenience, loss of use of the product, or property damage
caused by this product or its failure to work, telephone company
WARRANTY & SAFETY INSTRUCTIONS
33