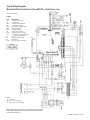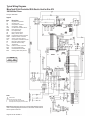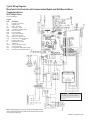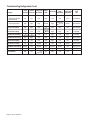
1
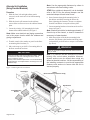
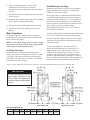
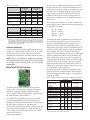
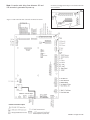
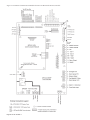
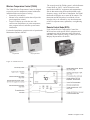
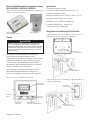
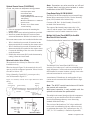
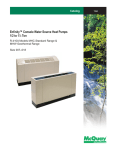
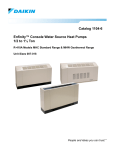
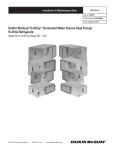
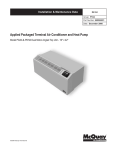
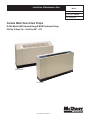
Installation & Maintenance Data IM 985-1 Group: WSHP Part Number: 669544301 Date: January 2010 Console Water Source Heat Pumps R-410A Models MHC Standard Range & MHW Geothermal Range Flat Top & Slope Top – Unit Sizes 007 – 018 Slope Top Unit Flat Top Unit ® ©2010 McQuay International Table of Contents LonWorks Communication Module Placement . . . . . . 20 Typical Wiring Diagrams . . . . . . . . . . . . . . . . . . . . . . . . 22-23 Start-up . . . . . . . . . . . . . . . . . . . . . . . . . . . . . . . . . . . . . . . . 24 Additional Accessories (General) . . . . . . . . . . . . . . . . . . . . . 24 Thermostats . . . . . . . . . . . . . . . . . . . . . . . . . . . . . . . 24-29 Motorized Isolation Valve & Relay . . . . . . . . . . . . . . . . 29 Pump Restart Kit . . . . . . . . . . . . . . . . . . . . . . . . . . . . . . 29 Multiple Unit Control Panel (MUCP) for Use With MicroTech® III Unit Controller . . . . . . . . . . . . . . . . . . 29 Outside Air Dampers . . . . . . . . . . . . . . . . . . . . . . . . . . . 30 Troubleshooting . . . . . . . . . . . . . . . . . . . . . . . . . . . . . . . 31-34 The in and outs of R-410A . . . . . . . . . . . . . . . . . . . . . . 31 Lubrication . . . . . . . . . . . . . . . . . . . . . . . . . . . . . . . . . . . 31 General Maintenance . . . . . . . . . . . . . . . . . . . . . . . . . . . 31 Troubleshooting Refrigeration Circuit . . . . . . . . . . . . . 32 Cooling Refrigeration Circuit . . . . . . . . . . . . . . . . . 33 Heating Refrigeration Circuit . . . . . . . . . . . . . . . . . 33 Troubleshooting The WSHP Unit Operation . . . . . . . . 34 Troubleshooting the MicroTech III Unit Controller . . . 35 LED Status & Faults Troubleshooting Reference . . . . . . . . . . . . . . . . . . 35 ModelNomenclature . . . . . . . . . . . . . . . . . . . . . . . . . . . . . . . 2 Receiving and Storage . . . . . . . . . . . . . . . . . . . . . . . . . . . . . . 3 Pre-Installation . . . . . . . . . . . . . . . . . . . . . . . . . . . . . . . . . . . . 3 Physical Data . . . . . . . . . . . . . . . . . . . . . . . . . . . . . . . . . . . . . 3 Unit Installation . . . . . . . . . . . . . . . . . . . . . . . . . . . . . . . . 4-13 Piping . . . . . . . . . . . . . . . . . . . . . . . . . . . . . . . . . . . . . 7-11 Cleaning & Flushing Water System . . . . . . . . . . . . . . . 11 Electrical Connections . . . . . . . . . . . . . . . . . . . . . . . 12-22 Mechanical (Compressor) Heating Override to Electric Heat Operation . . . . . . . . . . . . . . . . . . . . . . . . . 13 Electrical Data (General) . . . . . . . . . . . . . . . . . . . . . 12-13 Operating Voltages . . . . . . . . . . . . . . . . . . . . . . . . . . . . . 13 Operating Limits . . . . . . . . . . . . . . . . . . . . . . . . . . . 13-14 MicroTech III Unit Controller . . . . . . . . . . . . . . . . . 14-25 I/O Expansion Module . . . . . . . . . . . . . . . . . . . . . . . . . 15 MicroTech III Controller with Lon Module . . . . . . . . . 16 MicroTech III Controller with BACnet Module . . . . . . 17 MicroTech III Unit Controller Terminal Locations & Descriptions . . . . . . . . . . . . . . . . . . . . . . . . . . . . . . . . . . 18 MicroTech III Unit Controller Terminal Locations . . . . 19 Model Nomenclature NOTE: For illustration purposes only. Not all options available with all models. Please consult McQuay Sales Representative for specific availability. W MHC 1 009 B E H B T 01 F2 Cabinet Type Product Category F = Flat Top S = Slope Top W = WSHP Product Identifier Discharge Grille MHC = Standard Range Console WSHP MHW = Geothermal Range Console WSHP 2 = Standard Stamped Louver 3 = Multi-Directional Grille Design Series 1 = A Design 2 = B Design 3 = C Design 4 = D Design Blower Motor 01 = Standard Nominal Capacity Discharge Air 007 = 7,000 BTU/h 009 = 9,000 BTU/h 012 = 12,000 BTU/h 015 = 15,000 BTU/h 018 = 18,000 BTU/h T = Top Return Air B = Bottom Return (High Sill) F = Front Return (Low Sill) Controls B = MicroTech III Unit Controller C = MicroTech III Unit Controller w/LonWorks Communication Module D = MicroTech III Unit Controller w/BACnet Communication Module Cabinet Height H = High Sill L = Low Sill Voltage A =115/60/1 E = 208-230/60/1 J = 265/60/1 WARNING This Installation and Maintenance bulletin is intended to provide the proper procedures for installing a McQuay Console Water Source Heat Pump. Failure to follow these procedures can cause property damage, severe personal injury or death. Additional, failure to follow these procedures can cause premature failure of this equipment or cause erratic unit operation, resulting in diminished unit performance. Disregarding these directions may further lead to suspension or revocation of the manufacturer's warranty. Page of 36 / IM 985-1 Pre-Installation Receiving and Storage Upon receipt of the equipment, check carton for visible damage. Make a notation on the shipper’s delivery ticket before signing. If there is any evidence of rough handling, immediately open the cartons to check for concealed damage. If any damage is found, notify the carrier within 48 hours to establish your claim and request their inspection and a report. The Warranty Claims Department should then be contacted. WARNING The installer must determine and follow all applicable codes and regulations. This equipment presents hazards of electricity, rotating parts, sharp edges, heat and weight. Failure to read and follow these instructions can result in property damage, severe personal injury or death. This equipment must be installed by experienced, trained personnel only. Do not stand or transport the machines on end. For storing, each carton is marked with “up” arrows. 1. To prevent damage, do not operate this equipment for supplementary heating and cooling during the construction period. Doing so will void the warranty. In the event that elevator transfer makes up-ended positioning unavoidable, do not operate the machine until it has been in the normal upright position for at least 24 hours. 2. Inspect the carton for any specific tagging numbers indicated by the factory per a request from the installing contractor. At this time the voltage, phase and capacity should be checked against the plans. Temporary storage at the job site must be indoor, completely sheltered from rain, snow, etc. High or low temperatures naturally associated with weather patterns will not harm the units. Excessively high temperatures, 140°F (60°C) and higher, may deteriorate certain plastic materials and cause permanent damage. 3. Check the unit size against the plans to verify that the unit is being installed in the correct location. 4. Before installation, check the available dimensions where the unit be installed versus the dimensions of the unit. IMPORTANT 5. Note the location and routing of water piping, condensate drain piping, and electrical wiring. The locations of these items are clearly marked on submittal drawings. This product was carefully packed and thoroughly inspected before leaving the factory. Responsibility for its safe delivery was assumed by the carrier upon acceptance of the shipment. Claims for loss or damage sustained in transit must therefore be made upon the carrier as follows: VISIBLE LOSS OR DAMAGE Any external evidence of loss or damage must be noted on the freight bill or carrier’s receipt, and signed by the carrier’s agent. Failure to adequately describe such external evidence of loss or damage may result in the carrier’s refusal to honor a damage claim. The form required to file such a claim will be supplied by the carrier. CONCEALED LOSS OR DAMAGE Concealed loss or damage means loss or damage which does not become apparent until the product has been unpacked. The contents may be damaged in transit due to rough handling even though the carton may not show external damages. When the damage is discovered upon unpacking, make a written request for inspection by the carrier’s agent within fifteen (15) days of the delivery date and file a claim with the carrier. 6. The installing contractor will find it beneficial to confer with piping, sheet metal, and electrical foremen before installing any unit. Note: Check the unit data plate for correct voltage with the plans before installing the equipment. Also, make sure all electrical ground connections are made in accordance with local code. 7. The contractor shall cover the units to protect the machines during finishing of the building. This is critical while spraying fireproofing material on bar joists, sandblasting, spray painting and plastering. Damage to the unit due to a failure to protect it during finishing of the building is not covered by the warranty. Table 1. Physical Data Unit Size Fan Wheel - D x W (In.) Fan Motor Horsepower Coil Face Area (Sq. Ft.) Coil Rows 007 4.33 x 27.24 Weight, Shipping (Lbs.) 012 015 018 4.33 x 35.43 4.33 x 35.43 1/30 1/30 1/30 1/18 1/18 1.67 1.67 1.67 2.22 2.22 2 Refrigerant Charge (Oz.) 18.2 Low Sill Filter, (Qty.) Size (In.) High Sill Water Connections, Female NPT (In.) Condensate Connections, Female NPT (In.) Weight, Operating (Lbs.) 009 4.33 x 27.24 4.33 x 27.24 2 3 2 3 19.2 22 29.9 32 (1) 23.75 x 8.75 (1) 31.75 x 8.75 (1) 29.25 x 9.75 (1) 37.25 x 9.75 5/8 O.D. 5/8 O.D. 5/8 O.D. 5/8 O.D. 5/8 O.D. 3/4 I.D. 3/4 I.D. 3/4 I.D. 3/4 I.D. 3/4 I.D. 138 144 146 166 171 158 164 166 196 201 IM 985-1 / Page of 36 Unit Installation (Recommended) WARNING Installation and maintenance are to be performed by qualified personnel who are familiar with local codes and Regulations, and experienced with this type of equipment. CAUTION Sharp edges can cause personal injury. Avoid contact with them. 1. Consult job blueprints for unit location. Clean area where unit is to be installed, removing all construction dirt and debris. 2. Remove the unit from the shipping carton and save the carton to be used as a protective cover after the installation is complete. 3. Remove the screws (numbered 1) shown in Figure 1, securing the right and left side /corner panels to the subbase. Lift the panels up and out until the bottom tab clears the slot in the subbase. Note: Set the unit panels aside where they will not be damaged. 4. Remove the two screws (numbered 2) in Figure 1 securing the front panel to the subbase and remove the panel by lifting up and tilting out until the panel tabs clear the slots in the subbase. Note: If using the Alternate Unit Installation procedure (Using Mounting Brackets, page 6) it is not necessary to remove the top section. Continue with step 5 if using the recommended method of installation. 5. Open the control door and remove the four screws that hold the top panel and control pad in place (numbered 3) in Figure 1. On the opposite end of the cabinet top lift off the blank-off plate to the right and remove the last two mounting screws (numbered 4) in Figure 1. Lift the top panel off, turning the control pad so that it fits down through the opening in the top panel. Note: After removing the panels, set aside in a safe area where they will not be damaged. STOP! If an outside air damper kit is to be installed, refer to IM 974 for the manual damper and the motorized damper kit and install it now. 6. Position the chassis/subbase against the wall where the unit is to be installed. Remove any mouldings at the floor or wall (see letter A in Figure 2). Allow adequate room for piping and electrical connections in the subbase by checking the electrical connection end of the subbase and chassis. Note: Make sure electrical and piping connections are in the proper location within the subbase end piping compartment. Figure 1. Cabinet Panel Screw locations and Panel Removal Control Door Blockoff Plate Left Corner Panel Front Panel Right Corner Panel Subbase Page of 36 / IM 985-1 7. Remove the filter and locate the existing 1/4" mounting holes in the bottom of the subbase labeled (5) in Figure 2 subbase detail. 11.Use a carpenters square and level to check that the unit is level and 90-degrees to the wall and floor (see letters C & D in Figure 2). 8. Be sure the subbase is tight to the wall. Transfer a mark with a marker or pencil to the floor at mounting hole locations (5). 12.The chassis back panel has a series of slots on the back flange to mount the assembly to the wall. It is the installing contractor’s responsibility to select the correct fasteners for each unit to meet local codes (see letter E in Figure 2). 9. Move unit away to pre-drill 1/4" mounting holes in the floor at marked locations. IMPORTANT Clean unit mounting area of all construction debris. Check that the floor is level and at 90 degrees to the wall as shown in Figure 2. McQuay recommends the placement of a sound absorbing mat beneath the unit footprint before continuing to the next installation step. Note: Use the appropriate fasteners by others in accordance with local building codes. 10.Insert fasteners through the mounting holes in the subbase and secure the subbase to the floor, tightening the fasteners. Do not over-tighten fasteners and distort or warp the subbase plate. Note: Use a minimum of three fasteners to secure the unit (field supplied). Secure two fasteners into wall studs. At location(s) where no stud is present, secure with a Toggle bolt or equivalent (by others) (see letter F in Figure 2). 13.Reinstall the panels in reverse order as performed in steps 3 through 5 on page 4. 14.Cut out one side and the bottom of the shipping carton, leaving the top and three sides to place over the unit for protection during construction. Figure 2. Unit Mounting Details IM 985-1 / Page of 36 Alternate Unit Installation (Using Provided Brackets) Note: Use the appropriate fasteners by others in accordance with local building codes. Procedure 1. With the front, left and right cabinet panels removed, set the entire unit in its final mounting position. 2. With the chassis still mounted on the subbase, remove filter to allow access to the subbase bottom plate. 3. Locate the existing 1/4" mounting holes in the bottom of the subbase labeled (5) in Figure 3. Note: Make sure electrical and piping connections are in the proper location within the subbase end piping compartment. 4. Transfer a mark with a marker or pencil to the floor at mounting hole locations (5). 5. Move unit away to pre-drill 1/4" mounting holes in the floor at marked locations. STOP! If an outside air damper kit is to be installed, refer to IM 974 for the manual damper and the motorized damper kit and install it now. 6. Insert fasteners through the mounting holes in the subbase and finish securing the unit to the floor, tightening the fasteners. Do not over-tighten fasteners and distort or warp the subbase plate. 7. Locate mounting brackets at locations at the wall as shown in Figure 3. Note: Brackets should be located approximately 3" from the top of the chassis, or lower if clearance is necessary to fasten bracket. 8. Mark the position of the bracket mounting holes onto the wall. Remove the brackets and using a preset depth drill, pre-drill holes to accept a wall anchor (by others). WARNING Failure to use a pre-set depth drill could result in serious injury or death. IMPORTANT Clean unit mounting area of all construction debris. Check that the floor is level and at 90 degrees to the wall as shown in Figure 2, page 5 McQuay recommends the placement of a sound absorbing mat beneath the unit footprint before continuing to the next installation step. Figure 3. Mounting Bracket Installation Left End View Note: It is preferred that the brackets are screwed directly into a stud where available. However, drywall anchors can be utilized when studs are absent at bracket locations. It is the responsibility of the installing contractor to provide the appropriate fasteners and anchors to ensure that the unit is secured properly. Chassis (Shown removed from subbase for clarity) Right End View Provided Mounting Brackets Approximately 3" Subbase 5 Page of 36 / IM 985-1 Piping 1. Connect units to supply and return piping in a twopipe reverse return configuration (Figure 4). A reverse return system is inherently self-balancing and requires only trim balancing where multiple quantities of units with different flow and pressure drop characteristics are connected to the same loop. A simple way to check for proper water balance is to take a differential temperature reading across the water connections when in the cooling mode. To achieve proper water flow, the differential should be 10°F to 14°F (-5°C to -8°C). A direct return system may also be acceptable, but proper water flow balancing is more difficult to achieve and maintain. 2. The piping can be steel, copper or PVC, but must comply with local codes. 3. Supply and return run outs are typically connected to the unit by short lengths of high pressure flexible hose which are sound attenuators for both unit operating noise and hydraulic pumping noise. Note: Be sure that one end of the hose has a swivel fitting to facilitate removal for service. Hard piping to the unit can result in added operating noise. 4. If sealant compound is not provided for flexible hose fittings, apply Teflon tape to the connections to help prevent leaks. 5. Supply and return shutoff valves are required at each unit. The return valve is used for balancing and should have a “memory stop” so that it can always be closed off, but can only be re-opened to the proper position for the flow required. 6. Do not connect a unit to the supply and return piping until the water system has been cleaned and flushed completely. After this is done, the initial connection should have all valves wide open in preparation for water system flushing. 7. Condensate piping can be steel, copper, or PVC. Each unit is supplied with a clear vinyl condensate hose. Figure 4. Typical 2-Pipe Reverse Return Configuration IM 985-1 / Page of 36 8. Units are internally trapped. Copper or PVC condensate lines can be used. A means of disconnection must be furnished to facilitate chassis removal. Shutoff/Balancing Valve Piping Each heat pump requires a shutoff valve on both the supply and return lines for easy serviceability and removal if it becomes necessary. 9. No point of the drain system may be above the drain pan of any unit. 10.Automatic flow control devices must not be installed prior to system cleaning and flushing. 11.A high point of the piping system must be vented. 12.Check local code for any requirement for electric fittings. Water Connections We suggest using our combination shutoff/balancing valves installed in the field between the contractor’s piping and the heat pump unit. The valve installed on the return line acts as a balancing valve to adjust the proper water flow. An automatic flow limiting device is also available as a factory installed option. Each shutoff/balancing valve has 1/2" FPT and 1/2" FPT threaded connections. Attach the field installed combination shut/off balancing valve to the building water supply and return piping. All piping connections should be made using good plumbing practices and in accordance with any and all local codes that may apply. Note: On left-hand piping units the water supply connection is on the top. Right hand piping units the water supply is at the bottom location. Unit Piping Connection Each heat pump is supplied with extended copper tubing on the water-to-refrigerant coil and 5/8" (16mm) O.D. tubing. The connections are for both the supply and return water connections. See Figure 5 for left and right hand connections locatons. Add the female pipe adapter connection to unit supply and return coil connection by sweating them in place using silver solder. Using the specified hoses, screw the fixed end into the shut-off/balancing valve. Remove the 1/2" adapter from the other end of the hose. Insert the adapter into the female fitting. Using two crescent wrenches, one to hold the pipe connection and the second to tighten the adapter, insert the swivel end of the hose on the adapter and tighten. This completes the hose connection to standard heat pump equipment. Figure 5. Supply and Return Connections Locations for Left- Hand and Right Hand Units (Flat Top and Slope Top) IMPORTANT On left-hand piping units the water supply connection is on the top. Right-hand piping units the water supply is at the bottom location. Dimensions (High Sill Units) Unit Size 007-018 J 6⅞" (175mm) K 51/5" (132mm) Page of 36 / IM 985-1 Right-Hand Piping View Left-Hand Piping View L 6¾" (172mm) M 3½" (90mm) P 10¼" (260mm) Q 13/5" (41mm) R 5¼" (134mm) S 7½" (192mm) Optional Factory-Installed Motorized & Hand Valve Assemblies Console water source heat pumps can be configured with factory-installed motorized valves. Valves should be mounted on the return water line. All valve assemblies terminate with 1/2"-NPT threaded connections and will also accommodate factory supplied hose kits. When installing the hoses on valve assemblies, use the method as outlined in "Shutoff/Balancing Valve Piping" on page 8. Figure 7. Typical Piping Package Configurations (Left- Hand Unit Piping Connections Shown) Note: Make sure the pipes fit the confines of the piping compartment of the heat pump unit (Figure 6 & 7). Figure 6. Typical Motorized Valve Piping Left End Piping (Back) View Right End Piping View = Field-Installed Left End Piping View Right End Piping (Back) View Note: McQuay International offers a wide variety of piping packages. Consult your local sales rep for more information. 1. 2. 3. 4. 5. Measureflow Device 2-Way Motorized Isolation Valve Air Bleed Vent Supply-Bypass Hand Valve Inlet, Outlet Flexible, Braided-Stainless Steel Hoses (Field-Installed Accessories) Note: On left hand piping units, the water supply connection is at the top location. On right-hand piping units, the water supply connection is at the bottom location. IM 985-1 / Page of 36 Motorized Isolation Valve The 2-way motorized valve kit is available as a factoryinstalled and wired option or may be ordered as a fieldinstalled accessory. Wired as shown in Figure 8, the motorized valve will open on a call for compressor operation. Valves for unit sizes 007 to 018 are 1/2". Figure 8 illustrates the wiring for a Normally Closed (NC), power open motorized valve. Figure 8. Normally Closed, Power Open Motorized Valve Wiring Actuator & Valve Assembly Anti-short Bushing Anti-short Bushing Connector Conduit Connector Pin(s), female connect to terminal H8 Note: Connectors on valve must be cut off and stripped back and the wires twisted to make connections to the H8 (IV/PR) terminals on the MicroTech III controller. Note: All plumbing connections are made the same, whether or not the unit has valve packages. Plumbing connections must conform with local piping and building codes. The ability to remove the unit in order to perform repairs is imperative. Condensate Hose Connection Each unit is supplied with a 3/4" (19mm) I.D. clear vinyl condensate hose internally trapped within the chassis. The hose extends 3½" (89mm) out of the chassis within the piping compartment to reach the floor or the back wall. Field condensate piping must enter within the confines of the cabinet (back wall or floor) similar to the supply and return piping. Slide the vinyl hose over the condensate pipe and clamp it. Table 2. Antifreeze Correction Factors Ethylene Glycol Cooling Capacity Heating Capacity Pressure Drop Propylene Glycol Cooling Capacity Heating Capacity Pressure Drop Methanol Cooling Capacity Heating Capacity Pressure Drop Ethanol Cooling Capacity Heating Capacity Pressure Drop Page 10 of 36 / IM 985-1 10% 0.9950 0.9910 1.0700 20% 0.9920 0.9820 1.1300 30% 0.9870 0.9770 1.1800 40% 0.9830 0.9690 1.2600 50% 0.9790 0.9610 1.2800 10% 0.9900 0.9870 1.0700 20% 0.9800 0.9750 1.1500 30% 0.9700 0.9620 1.2500 40% 0.9600 0.9420 1.3700 50% 0.9500 0.9300 1.4200 10% 0.9980 0.9950 1.0230 20% 0.9720 0.9700 1.0570 30% – – – 40% – – – 50% – – – 10% 0.9910 0.9950 1.0350 20% 0.9510 0.9600 0.9600 30% – – – 40% – – – 50% – – – Cleaning & Flushing Water System CAUTION Prior to first operation of any unit, the water circulating system must be cleaned and flushed of all construction dirt and debris. If the unit is provided with water shutoff valves, either electric or pressure operated, the supply and return run outs must be connected together at each unit location. This will prevent the introduction of dirt into the water circulating system. Additionally, pressure operated valves only open when the compressor is operating. 1. Prior to first operation of any unit, the water circulating system must be cleaned and flushed of all construction dirt and debris. If the units are equipped with water shutoff valves, either electric or pressure operated, the supply and return run outs must be connected together at each unit location. This will prevent the introduction of dirt into the unit. See Figure 9. 3. Shut off supplemental heater and circulator pump and open all drains and vents to completely drain down the system. Short circuited supply and return run outs should now be connected to the unit supply and return connections. Do not use sealers at the swivel flare connections of hoses. 4. Flush system with water for 2 hours or longer until water is clean. 5. Refill the system with clean water. Test the water using litmus paper for acidity, and treat as required to leave the water slightly alkaline (pH 7.5 to 8.5). The specified percentage of antifreeze may also be added at this time. Use commercial grade antifreeze designed for HVAC systems only. Do not use automotive grade antifreeze (See Table 2 on page 10 for Antifreeze Correction Factors). Figure 9. Connections for flushing system piping Once the system has been filled with clean water and antifreeze (if used), precautions should be taken to protect the system from dirty water conditions. NOTICE It is McQuay International’s policy not to make recommendations on water treatment. It is the responsibility of the user to check that the water supply to the units is free of contaminants or corrosive agents, chemicals or minerals. The general contractor or owner should contact a local water treatment company regarding water treatment. A fouled closed loop water system will lead to premature component failure. Return Runout Supply Runout Mains Flexible Hose Runouts Initially Connected Together 2. Fill the system at the city water makeup connection with all air vents open. After filling, close all air vents. The contractor should start main circulator with the pressure reducing valve open. Check vents in sequence to bleed off any trapped air, ensuring circulation through all components of the system. Power to the heat rejector unit should be off, and the supplementary heat control set at 80°F (27°C). While circulating water, the contractor should check and repair any leaks in the unit and surrounding piping. Drains at the lowest point(s) in the system should be opened for initial flush and blow-down, making sure city water fill valves are set to make up water at the same rate. Check the pressure gauge at pump suction and manually adjust the makeup to hold the same positive steady pressure both before and after opening the drain valves. Flush should continue for at least two hours or longer until the drain water is clean and clear. Note: Contact a local water treatment company to confirm water clarity prior to unit operation. Dirty water will result in system wide degradation of performance and solids may clog system-wide valves, strainers, flow regulators, etc. Additionally, the heat exchanger may become clogged which reduces compressor service life or causes premature failure. 6. Set the loop water controller heat add setpoint to 70°F (21°C) and the heat rejection setpoint to 85°F (29°C). Supply power to all motors and start the circulating pumps. After full flow has been established through all components including the heat rejector (regardless of season) and the vented air and loop temperatures have been stabilized, each of the units will be ready for check, test and start-up, air balancing, and water balancing. CAUTION Units must be checked for water leaks upon initial water system start-up. Water leaks may be a result of mishandling or damage during shipping. Failure by the installing contractor to check for leaks upon start-up of the water system could result in property damage. IM 985-1 / Page 11 of 36 Electrical Connections Note: Installation and maintenance must be performed only by qualified personnel who are familiar with local codes and regulations, and are experienced with this type of equipment. WARNING Hazardous Voltage! The installer must determine and follow all applicable codes and regulations. This equipment presents hazards of electricity, rotating parts, sharp edges, heat and weight. Failure to read and follow these instructions can result in property damage, severe personal injury or death. Standard Electrical Connection Each chassis comes with a junction box mounted on the side of the chassis and contains the field electrical connection (Figure 10). Figure 10. Junction Box Location Control Enclosure Page 12 of 36 / IM 985-1 Junction Box Note: If electrical wiring or conduit comes through the floor, all wires or conduit should be sealed at this point. It will prevent any condensation or water leakage that may occur due to lack of preventive maintenance. Each unit has an internal condensate trap but will require cleaning. Note: Wiring coming through the wall should be sealed to stop cold air infiltration through the wall cavity which could affect unit thermostat operation. Remove the junction box cover, selecting the proper knockout and remove it. Install a strain relief and pass the wires through the strain relief into the junction box making the connection and reinstall the junction box cover. Note: Check the local code concerning correct electrical connection. Cord & plug electrical connection (field installed) Cord connected equipment comes with a box and appropriate voltage receptacle. However, a disconnect switch and fuses can also be provided in the box. As an option, the box comes factory mounted and is ready to be field wired to the incoming power. The box is mounted on the same side as the piping. It is the responsibility of the installing contractor to make the proper electrical connection to the electrical box, using the same method as described in the standard electrical connection. Mechanical (Compressor) Heating Override to Electric Heat Operation Note: Only with units equipped with the electric heat feature In the event of a compressor failure or, electric heat is desired over mechanical (compressor) heating, a factory certified service technician may reconfigure the male and female plugs to enable electric heat. This option allows emergency electric heat when mechanical heating is not available. Electric heat can be disabled and the unit can be returned to mechanical (compresssor) heating operation when desired (Figure 11). Note: In electric heat mode, unit will not run compressor on a call for heating. The electric heater will be utilized instead. WARNING Before disconnecting or connecting plugs, be sure power to unit is off and power disconnect switch is in the off position. Switching Mechanical (Compressor) Heating to Electric Heat Operation 1. Disconnect wires 70 and 71 plug located on outside of control box from socket that connects to the Entering Water Temperature (EWT) Sensor (Figure 11). 2. Reconnect wires 70 and 71 plug into the Electric Heat (EH) socket located on the back of the hinged control box (Figure 11). 3. Coil the disconnected Entering Water Temperature Sensor wire and store in safe location for later use. Figure 11. Switching to Electric Heat Detail Table 3. Electric Heater Current and Power Sizes 007, 009, 012 Sizes 015, 018 2.5kW 3.5kW Nominal Voltage Power (kW) Current (Avg) Power (kW) Current (Avg) 208 2.01 9.67 2.71 13.02 230 2.46 10.70 3.31 14.40 240 2.68 11.16 3.61 15.03 265 3.27 12.33 4.40 16.59 277 3.57 12.88 4.80 17.35 Electrical Data General 1. Be sure the available power is the same voltage and phase as that shown on the unit serial plate. Line and voltage wiring must be done in accordance with local codes or the National Electrical Code, whichever is applicable. 2. Apply correct line voltage to the unit. A disconnect switch near the unit is required by code. Power to the unit must be sized correctly and have dual element (Class RK5) fuses or HACR circuit breaker for branch circuit overcurrent protection. See the nameplate for correct ratings. 3. All 208-230V single phase units are factory wired for 208 volt operation unless specified for 230 volts. Operating Voltages 115/60/1 . . . . . . . . . 208-230/60/1 . . . . . 265/60/1 . . . . . . . . 230/50/1 . . . . . . . . 104 197 238 197 volts volts volts volts min.; min.; min.; min.; 127 253 292 253 volts volts volts volts max. max. max. max. Note: Voltages listed are to show voltage range. However, units operating with over voltage and under voltage for extended periods of time will experience premature component failure. Operating Limits Environment This equipment is designed for indoor installation only. Sheltered locations such as attics, garages, etc., generally will not provide sufficient protection against extremes in temperature and/or humidity, and equipment performance, reliability, and service life may be adversely affected. IM 985-1 / Page 13 of 36 Table 4. Air Limits Min. Ambient Air Normal Ambient Air Max. Ambient Air Min. Entering. Air Normal Entering Air, db/wb Max. Entering Air db/wb Standard Range Units Cooling Heating 50˚F/10˚C 50˚F/10˚C 80˚F/27˚C 70˚F/21˚C 100˚F/38˚C 85˚F/29˚C 50˚F/10˚C 50˚F/10˚C 80˚F/67˚F 70˚F 27/19˚C 21˚C 100/83˚F 80˚F 27˚C 38/28˚C Geothermal Range Units Cooling Heating 40˚F/5˚C 40˚F/5˚C 80˚F/27˚C 70˚F/21˚C 100˚F/38˚C 85˚F/29˚C 50˚F/10˚C 40˚F/5˚C 80˚F/67˚F 70˚F 27/19˚C 21˚C 100/83˚F 80˚C 38/28˚C 27˚C Table 5. Water Limits Standard Range Geothermal Range Units Units Cooling Heating Cooling Heating Min. Entering. Water 55°F/13°C 55°F/13°C 30°F/-1°C 20°F/-6°C Normal Entering. Water 85°F/29˚C 70˚F/21°C 77°F/25˚C 40˚F/5°C Max. Entering. Water 110°F/43˚C 90°F/32°C 110°F/43˚C 90°F/32°C At ARI flow rate. Maximum and minimum values may not be combined. If one value is at maximum or minimum, the other two conditions may not exceed the normal condition for standard units. Extended range units may combine any two maximum or minimum conditions, but not more than two, with all other conditions being normal conditions. Additional Information Units are designed to start and operate with entering air at 40°F (4°C), with entering water at 70°F (21°C), with both air and water at the flow rates used in the ARIStandard 320-86 rating test, for initial start-up in winter. Note: This is not a normal or continuous condition. It is assumed that such a start-up is for the purpose of bringing the building space to occupancy temperature. MicroTech® III Unit Controller The 24 volt low voltage terminal strip is set up so R-G energizes the fan, R-Y1 energizes the compressor for cooling operation, R-W1 energizes the compressor and reversing valve for heating operation. The reversing valve is energized in the heating mode. The circuit board has a fan interlock circuit to energize the fan whenever the compressor is on if the thermostat logic fails to do so. The output to the wall stat is AC current. Terminal (R) on the wall stat can be connected to terminal (R) on the PC board for AC voltage. R = AC current R to G = fan only R to Y1 = cooling R to W1 = heat The MicroTech III unit controller has a lockout circuit to stop compressor operation if any one of its safety devices is triggered (high pressure switch and low temperature sensor). If the low temperature sensor is triggered, the unit will go into the cooling mode for 60 seconds to defrost any slush in the water-to-refrigerant heat exchanger. After 60 seconds the compressor is locked out. If the condensate sensor detects a filled drain pan, the compressor operation will be suspended only in the cooling mode. The unit is reset by opening and closing the disconnect switch on the main power supply to the unit in the event the unit compressor operation has been suspended due to low temperature sensor or high pressure switch. The unit does not have to be reset on a condensate overflow detection. The MicroTech III unit controller fault output sends a signal to an LED on a wall thermostat. Table 6 shows for which functions the fault output is “on” (sending a signal to the LED). Table 6. MicroTech III Unit Controller LED & Fault Outputs The MicroTech III Unit Controller includes built-in features such as random start, compressor time delay, shutdown, condensate overflow protection, defrost cycle, brownout, and LED/fault outputs. Table 6 shows the LED and fault output sequences. The unit has been designed for operation with either a unit mounted thermostat or a microelectronic wall thermostat, selected by the manufacturer. Do not operate the unit with any other type of wall thermostat. Each unit has a printed circuit board control system. The low voltage output from the low voltage terminal strip is AC voltage to the wall thermostat. R is A/C voltage output to the wall stat. Page 14 of 36 / IM 985-1 Status LED’s Thermostat Alarm Light Mode / Fault Output-Terminal “A” Yellow Green Red Occupied, Bypass, Off On Off Energized Standby, or Tenant Override Unoccupied On On Off Energized Condensate Overflow On Off Off De-engergized High Pressure 1 Fault Off Off Flash De-energized Low Pressure 1 Fault Off Off On De-energized Low Temperature 1 Fault Flash Off Off De-energized Brownout Off Flash Off De-energized Emergency Shutdown Off Flash Off De-energized Room/Return Air or Low Flash Flash On De-engergized Temp Sensor 1 Failure Service Test Mode Enabled 1 On On Off De-energized Serial EEPROM Corrupted On On On De-energized Network “Offline” Received Off Off Off De-enegized 1Compressor relay/compressor terminal is labeled COMP, switched line of the same electric input as any of the L1 terminals. Table 8. I/O Expansion Module Configuration Jumper Settings I/O Expansion Module Jumper This manual covers the installation of a McQuay Console Unit - Model MHC, MHW Water Source Heat Pump. For installation and operation information on MicroTech III unit controller and other ancillary components, see: • IM 927 - MicroTech III LonWorks Communication Module • IM 928 - MicroTech III BACnet Communication Module • OM 931 - MicroTech III Unit Controller for Water Source Heat Pumps Operation and Maintenance Manual The I/O Expansion Module is a factory installed option. It is an extension of the MicroTech III unit controller and provides extra functionality. The I/O Expansion Module has 2 main purposes: Description JP1 Number of Compressors Hot Gas/ JP2 Water Reheat JP3 Supplemental & JP4 Heat Type JP5 Fan Speed & JP6 Selection Compressor JP7 Speed Type JP8 Future Spare Options Open for single compressor Shorted for dual compressor Open to disable reheat Shorted to enable reheat JP3 and JP4 open for no supplemental heat JP3 open, JP4 shorted for boilerless electric heat JP3 and JP4 shorted is an invalid setting JP5 and JP6 open for single-speed fan JP5 open, JP6 shorted for three-speed fan JP5 shorted and JP6 open for two-speed fan JP 5 and JP6 shorted is an invalid setting Open for single-speed compressor Shorted for two-speed compressor = Not used with Console Water Source Heat Pump unit. Figure 12. I/O Expansion Module Configuration Jumper Terminals • The I/O Expansion Module has outputs to control electric heat on a standard Water Source Heat Pump. • The I/O Expansion Module has an independent LED annunciator to identify operational fault conditions for the electric heater. Jumper Terminals Table 7 . I/O Expansion Module LED & Fault Outputs Status LED's Mode / Fault Red Yellow Green Invalid Configuration Flash Flash Jumper Setting Base Board Communication Fail Off Thermostat Alarm Light Output Terminal “A” Off De-energized Flash Flash N/A High Pressure #2 Fault Off Off Flash De-energized Low Pressure #2 Fault Off Off On De-energized Off Off De-energized Low Suction Temp #2 Fault Flash Sensor Failures Low Suction Low Suction Temp #2, 1 EWT (w/ Boilerless EH only) Flash Flash On De-energized Flash Flash Flash De-energized Unoccupied Mode 2 Service Test Mode Enabled On On Off Energized Occupied, Bypass, Standby, or Tenant Override Modes Off On Off Energized Normal Operation Off On Off De-energized Adding an I/O Expansion Module (with an interconnect cable) to the unit controller allows the operation of boilerless electric heat with the Console Water Source Heat Pump. Features Standard Heat Pumps / Single Circuit Units • Monitors entering water temperature for boilerless electric heat control Note: Mode / Faults are listed in order of priority. 1Boilerless electric heat only LED indications take precedence over service test mode LED indication. The controller shall use service test mode if the service test mode jumper is installed, even if the LED’s indicate an alarm/fault. 2Alarm/fault = Not used with Console Water Source Heat Pump unit. IM 985-1 / Page 15 of 36 MicroTech III Unit Controller with LonWorks® Communication Module This manual covers the installation of a McQuay Console Water Source Heat Pump. For installation and operation information on LonWorks Communication Module and other ancillary control components, see: • IM 927 - MicroTech III Unit Controller for Water Source Heat Pumps (LonWorks). MicroTech III Unit Controller with LonWorks Communication Module orchestrates the following unit operations: Enable heating and cooling to maintain setpoint based on a room sensor Enable fan and compressor operation • IM 933 - LonMaker Integration Plug-in Tool: For use with the MicroTech III Unit Controller. Monitors all equipment protection controls • IM 955 - MicroTech III Wall Sensor For use with Microtech III Unit Controller Monitors leaving water temperature • OM 931 - MicroTech III Unit Controller for Water Source Heat Pumps Operation and Maintenance Manual Each McQuay water source heat pump can be equipped with a LonWorks communication module that is LonMark 3.4 certified. The controller is microprocessorbased and is designed to communicate over a LonWorks communications network. It can be factory or field-installed. The unit controller is programmed and tested with all the logic required to monitor and control the unit. An optional wall sensor may be used with the communication module to provide limited local control of the Water Source Heat Pump. The unit controller monitors water and air temperatures and passes information to the communication module. The module communicates with the BAS, to provide network control of the Water Source Heat Pump. Figure 13. LonWorks Communication Module Page 16 of 36 / IM 985-1 Monitors room and discharge air temperatures Relays status of all vital unit functions An amber, on-board status LED indicates the status of the MicroTech III LonWorks module. The MicroTech III unit controller includes: A unit-mounted return air sensor A unit-mounted discharge air sensor A leaving water temperature sensor The communication module provides access to setpoints for operational control Available wall sensors include: Room sensor Room sensor with LED status and tenant override button Temperature sensor with LED status, timed-override button, and ±3°F setpoint adjustment Room sensor with LED status, timed-override button, 55° to 90°F setpoint adjustment MicroTech III Controller with BACnet MS/TP Communication Module For installation and operation information on MicroTech III unit controller and other ancillary components, see: Figure 14. MicroTech III BACnet Water Source Heat Pump Snap-in Communication Module • IM 928 - MicroTech III BACnet Communication Module • OM 931 - MicroTech III Unit Controller for Water Source Heat Pumps Operation and Maintenance Manual • IM 955 - MicroTech III Wall Sensor For use with Microtech III Unit Controller McQuay water source heat pumps are available with McQuay BACnet communication module The module is programmed and tested with all the logic required to control the unit, and is designed to communicate over a BACnet MS/TP communications network to a building automation system (BAS). It can be factory or fieldinstalled. The unit controller is programmed and tested with all the logic required to monitor and control the unit. An optional wall sensor may be used with the communication module to provide limited local control of the Water Source Heat Pump. The unit controller monitors water and air temperatures and passes information to the communication module. The module communicates with the BAS, to provide network control of the Water Source Heat Pump. The module makes operational data and commands available on a communications network using BACnet objects and properties: The network cable is a shielded twisted-pair cable Network communications run at 76.8 Kbps. DIP switches on the controller enable the MS/TP MAC address to be set in the range 0-127. A status LED on the communication module indicates communication activity on the MS/TP communication network. MicroTech III Unit Controller with BACnet Communication Module orchestrates the following unit operations: Enable heating and cooling to maintain setpoint based on a room sensor Enable fan and compressor operation Monitors all equipment protection controls Monitors room and discharge air temperatures Monitors leaving water temperature Relays status of all vital unit functions An amber, on-board status LED indicates the status of the MicroTech III BACnet module. The MicroTech III unit controller includes: A unit-mounted return air sensor A unit-mounted discharge air sensor A leaving water temperature sensor The communication module provides access to setpoints for operational control Available wall sensors include: Room sensor Room sensor with LED status and tenant override button Room temperature sensor with LED status, timedoverride button, and ±3°F setpoint adjustment Room temperature sensor with LED status, timedoverride button, 55° to 90°F setpoint adjustment IM 985-1 / Page 17 of 36 MicroTech® III Unit Controller Terminals Locations and Descriptions H7 - 6 Red-Green-Yellow LED Common 24 VAC Common H8 - 1 1 Isolation Valve/Pump Request Relay N/O Fan Output - Switched L1 H8 - 2 Isolation Valve/Pump Request Relay N/C H2 - 2 Blank Terminal H8 - 3 24 VAC Common H2 - 3 Fan Neutral H9 - 1 Return Air Temperature Signal H1 - 1 24 24 VAC Power Input H1 - 2 C H2 - 1 SL1 N 1 H3 - 1 HP1-1 High Pressure Switch 1 Input Terminal 1 H9 - 2 Return Air Temperature Common H3 -2 HP1-2 High Pressure Switch 1 Input Terminal 2 TB1 - 1 1 Room Sensor LED Output H4 - 1 Discharge Air Temp Common TB1 - 2 2 Fan Mode / Heat-Cool-Auto Input H4 - 2 Discharge Air Temp Signal TB1 - 3 3 Setpoint Adjust Input H4 - 3 Leaving Water Temp Common TB1 - 4 4 Room Temperature Sensor / Tenant Override H4 - 4 Leaving Water Temp Signal TB1 - 5 5 DC Signal Common H5 - 1 24 VAC 1 I/O Exp Module Common (Gnd) Test-1 R H5 - 2 I/O Exp Module Common (Gnd) Test-2 W2 Heat Stage 2 Input H5 - 3 I/O Exp Module +5 VDC Test-3 W1 Heat Stage 1 Input H5 - 4 I/O Exp Module SPI CE1 Test-4 Y2 Cool Stage 2 Input H5 - 5 I/O Exp Module SPI CLK Test-5 Y1 Cool Stage 1 Input H5 - 6 I/O Exp Module SPI OUT Test-6 G Fan H5 - 7 I/O Exp Module SPI IN TB2 - 1 R 24 VAC H5 - 8 I/O Exp Module +12 VDC TB2 - 2 A Alarm Output H5 - 9 I/O Exp Module 24 VAC TB2 - 3 W2 Heat Stage 2 Input H5 - 10 I/O Exp Module 24 VAC TB2 - 4 W1 Heat Stage 1 Input H5 - 11 Spare TB2 - 5 Y2 Cool Stage 2 Input H5 - 12 Spare TB2 - 6 Y1 Cool Stage 1 Input H6 - 1 Condensate Overflow Signal Input TB2 - 7 G Fan Input H6 - 2 1 Low Temp 1 Sensor Common TB2 - 8 O Tenant Override Input H6 - 3 Low Temp 1 Sensor Signal TB2 - 9 C 24 VAC Common H6 - 4 Low Pressure Switch 1 Source Voltage TB3 - 1 E Mark IV Emergency Shutdown Input H6 - 5 Low Pressure Switch 1 Signal TB3 - 2 U Mark IV Unoccupied/Occupied Input H6 - 6 Reversing Valve 1 Common L1 - 1 L1 - 1 Line Voltage Terminal 1 H6 - 7 Reversing Valve 1 Output L1 - 2 L1 - 2 Line Voltage Terminal 2 H7 - 1 1 Dummy Terminal L1 - 3 L1 - 3 Line Voltage Terminal 3 H7 - 2 Dummy Terminal N1 N1 Neutral Terminal 1 H7 - 3 Red LED Output N2 N2 Neutral Terminal 2 H7 - 4 Green LED Output N3 N3 Neutral Terminal 3 H7 - 5 Yellow LED Output Table 9. – Configuration Jumper Settings Jumper Description Options Open for normal operation mode JP1 Mode Shorted for service/test operation mode JP2 Fan operation only applies to Open for continuous fan operation network controls Shorted for cycling fan operation Open for water freeze protection JP3 Freeze protection Shorted for antifreeze protection JP4 Future spare Future spare JP5 Set point adjustment range only Open for adjustment range of -3.0° to +3.0° F applies to network controls with a Shorted for 50° to 90° F adjustment range room temperature sensor Open for thermostatic room control JP6 Room control type Shorted for room temperature sensor control, MicroTech III only JP7 Future spare Future spare JP8 Future spare Future spare Page 18 of 36 / IM 985-1 Note: A random start delay time between 180 and 240 seconds is generated at power up. Location of Configuration Jumpers on the MicroTech III Unit Controller Figure 15. MicroTech III Unit Controller Terminal Locations IM 985-1 / Page 19 of 36 Figure 16. LonWorks Communication Module Placement on MicroTech III Unit Controller Page 20 of 36 / IM 985-1 Typical Wiring Diagrams MicroTech III Unit Controller for Sizes 007-015 – 208/230/60Hz/1-Phase Drawing No. 669539003A Legend Item Description C1 C2 UMT CM COS DPG FSR HP SLTS OVL RV T1 X1 LED1 Capacitor-Compressor Capacitor-Fan Unit-Mounted Thermostat Compressor - Motor Condensate Overflow Sensor Drain Pan Ground Fan Speed Relay High Pressure Switch Suction Line Temp Sensor Compressor Overload Protector Reversing Valve Solenoid EG2UPC Terminal Strip Transformer LED Annunciator / Harness Table B 208V RED 230V ORG Notes: 2. Transformer: Unused wire to be capped. Unit wired for 208V, see Table “B” Note: Wiring diagrams are typical. For the latest drawing version refer to the wiring diagram located on the inside of the controls access panel of the unit. IM 985-1 / Page 21 of 36 Typical Wiring Diagrams MicroTech III Unit Controller With Electric Heat for Size 018 208/230/60Hz/1-Phase Drawing No. 669539006A Legend Item Description C1 C2 CC CM COS DPG FSR HP R2 IOEXP LED2 SLTS OVL RV T1 X1 LED1 FHS UMT EWT Capacitor-Compressor Capacitor-Fan Compressor Contactor Compressor - Motor Condensate Overflow Sensor Drain Pan Ground Fan Speed Relay High Pressure Switch Relay - Electric Heat I/O Expansion Board / Harness LED Annunciator / Harness Suction Line Temp Sensor Compressor Overload Protector Reversing Valve Solenoid EG2UCP Terminal Strip Transformer LED Annunciator / Harness Fan High Speed Relay Unit-Mounted Thermostat Entering Water Temp Sensor Table B 208V RED 230V ORG Notes: 2. 3. Transformer: Unused wire to be capped. Unit wired for 208V, see Table “B” I/O Expansion board jumper JP4 shorted. Note: Wiring diagrams are typical. For the latest drawing version refer to the wiring diagram located on the inside of the controls access panel of the unit. Page 22 of 36 / IM 985-1 Typical Wiring Diagrams MicroTech III Unit Controller with Communication Module and Wall-Mounted Room Temperature Sensor 265/277/60Hz/1-Phase Drawing No. 669542001 Legend Item Description C1 C2 R1 CM COS DPG FSR PTB HP SLTS OVL RV T1 X1 LED1 CR LWT DAT Capacitor-Compressor Capacitor-Fan Relay - Fan Motor Compressor - Motor Condensate Overflow Sensor Drain Pan Ground Fan Speed Relay Power Terminal Block High Pressure Switch Suction Line Temp Sensor Compressor Overload Protector Reversing Valve Solenoid EG2UCP Terminal Strip Transformer LED Annunciator / Harness Compressor Relay Leaving Water Temperature Sensor Discharge Air Temperature Sensor CAUTION When the optional wall-mounted room temperature sensor is connected to the unit controller, the Return Air Temperature (RAT) sensor must not be installed. The wallmounted room temperature sensor and return air sensor must not be connected simultaneously or the unit will not operate properly. Note: Wiring diagrams are typical. For the latest drawing version refer to the wiring diagram located on the inside of the controls access panel of the unit. IM 985-1 / Page 23 of 36 Start-up Table 10. LED Fault Indicators LEDs Indication Yellow Normal Mode Off High Pressure Fault Off Low Temperature Fault* Flash Condensate Overflow On Brownout Off Load Shed Off Unoccupied Mode On Unit Shutdown Off CAUTION Units must be checked for water leaks upon initial water system start-up. Water leaks may be a result of mishandling or damage during shipping. Failure by the installing contractor to check for leaks upon start-up of the water system could result in property damage. Cooling or Heating – Manual Operation The Microtech III unit controller has built-in features such as random start, compressor time delay, night setback, load shed, shutdown, condensate overflow protection, defrost cycle, brownout, and LED/fault outputs. Table 10 shows the LED and fault output sequences. The 24 volt low voltage terminal strip is set so R-G energizes the fan. R-W1 energizes the fan and compressor and reversing valve for heating operation. The reversing valve is set up to be energized in the heating mode. The circuit board has a fan interlock circuit to energize the fan whenever the compressor is on. The Microtech III unit controller has a lockout circuit to stop compressor operation if any one of its safeties opens (high pressure or suction line sensor). If the suction line low temperature sensor opens, the unit will go into the cooling mode for 60 seconds to defrost any slush in the water-to-refrigerant heat exchanger. After 60 seconds, the compressor is locked out. If the condensate sensor detects a filled drain pan, the compressor operation will be suspended only in the cooling mode. The unit is reset by opening and closing the disconnect switch on the main power supply to the unit in the event the unit compressor operation has been suspended due to low suction line sensor reaching its set point, or a high pressure switch. The Microtech III unit controller has a fault output signal to an LED on a wall thermostat. Table 10 shows in which function the fault output is “on” (sending a signal to the LED). Page 24 of 36 / IM 985-1 Fault Green On Off Off Dim Flash Off On Flash Red Off Flash Off Off Off On Off Off Output Off On On On On Off Off On IMPORTANT Each water source heat pump unit has a compressor and blower motor. Each component part has and internal temperature and amperage sensitive overload. If the overload opens it will suspend unit operation. Check component parts by measuring the winding resistance and looking for an open circuit. Additional Accessories – General Thermostats and Wall Sensors Easy-to-operate comfort command centers provide a complete range of deluxe features. Wall-Mounted Programmable Electronic Thermostat (P/N 668811301) 1 Heat/1 Cool, Auto Changeover, Hardwired • • • • • • • • • • • 7-Day, 5-2-Day 5-1-1 Day Programmable Configurable Single-Stage Heat/Cool Systems Single-Stage Heat Pump Systems Large Display With Backlight Selectable Fahrenheit or Celsius SimpleSet™ Field Programming Status Indicator Light Relay Outputs (minimum voltage drop in thermostat) Remote Sensor Compatible Ideally Suited for: – Residential (New Construction/Replacement) – Light Commercial Specifications–668810301 Specifications–668811201 Electrical rating: • 24 VAC (18-30 VAC) • 1 amp maximum per terminal • 3 amp maximum total load Electrical rating: • 24 VAC (18-30 VAC) • 1 amp maximum per terminal • 3 amp maximum total load Temperature control range: 45°F to 90°F (7°C to 32°C) Accuracy: ± 1°F (± 0.5°C) Temperature control range: 45°F to 90°F (7°C to 32°C) Accuracy: ± 1°F (± 0.5°C) System configurations: 1-stage heat, 1-stage cool, heat pump System configurations: 1-stage heat, 1-stage cool, heat pump Timing:Anti-short Cycle: 4 minutes Backlight Operation Timing:Anti-short Cycle: 4 minutes Backlight Operation Terminations: S1, S2, Y, W/O/B, G2, G1, RC, RH, C Terminations: S1, S2, Y, W/O/B, G2, G1, RC, RH, C For detailed installation, operation and application refer to Operation & Application Guide LIA303 For detailed installation, operation and application refer to Operation & Application Guide LIAF014 Figure 17. Thermostat Parts Diagram - Part No. 668811301 Figure 18. Thermostat Parts Diagram - Part No. 668811201 Up button Up button Down button Down button Right (fan) button Right (fan) button Left (system) button Left (system) button Field programming pins Configuration switch Reset switch RC/RH Jumper Fan switch RC/RH Jumper Field programming pins Reset Configuration switch switch Reset switch Non-Programmable Electronic Thermostat (P/N 668811201) 1 Heat/1 Cool, Auto Changeover, Fan Speed Control, Hardwired • • • • • • • • • • • Configurable Single-Stage Heat/Cool Systems Single-Stage Heat Pump Systems Fan Speed Control Large Display With Backlight Selectable Fahrenheit or Celsius SimpleSet™ Field Programming Status Indicator Light Relay Outputs (minimum voltage drop in thermostat) Remote Sensor Compatible Ideally Suited for: – Residential (New Construction/Replacement) – Light Commercial IM 985-1 / Page 25 of 36 Programmable Electronic Thermostat (P/N 668811101) 7-Day Programmable, Auto Changeover, Fan Speed Control, Hardwired Non-Programmable Electronic Thermostat (P/N 668811001) Non-Programmable, Auto Changeover, Fan Speed Control, Hardwired • • • • • • • • • • • • • • • • • • • • • • • • 7-Day Programmable Single Stage Heat Pump/Non-Heat Pump Systems Backlit Display Single Stage Heat/Cool Systems Field Calibration Auto Changeover Button Lockout Function Two Speed Fan Control SimpleSet™ Programming Remote Temperature Sensor Capability Title 24 Compliant / No Batteries Required Relay Outputs (minimum voltage drop in thermostat) Ideally Suited for: – Residential (New Construction/Replacement) – Light Commercial Specifications–668811101 Electrical rating: • 24 VAC (18-30 VAC) • 1 amp maximum per terminal • 3 amp maximum total load Temperature control range: 45°F to 90°F (7°C to 32°C) Accuracy: ± 1°F (± 0.5°C) System configurations: 1-stage heat, 1-stage cool, heat pump Timing:Anti-short Cycle: 5 minutes Backlight Operation: 10 seconds Terminations: C, RH, RC, W, Y, B, O G1, G2, S1, S2 For detailed installation, operation and application refer to Operation & Application Guide LIAF015 Page 26 of 36 / IM 985-1 Single Stage Heat Pump/Non-Heat Pump Systems Backlit Display Single Stage Heat/Cool Systems Field Calibration Auto Changeover Button Lockout Function Two Speed Fan Control Remote Temperature Sensor Capability Title 24 Compliant / No Batteries Required Relay Outputs (minimum voltage drop in thermostat) Ideally Suited for: – Residential (New Construction/Replacement) – Light Commercial Specifications–668811001 Electrical rating: • 24 VAC (18-30 VAC) • 1 amp maximum per terminal • 3 amp maximum total load Temperature control range: 45°F to 90°F (7°C to 32°C) Accuracy: ± 1°F (± 0.5°C) System configurations: 1-stage heat, 1-stage cool, heat pump Timing:Anti-short Cycle: 5 minutes Backlight Operation: 10 seconds Terminations: C, RH, RC, W, Y, B, O G1, G2, S1, S2 For detailed installation, operation and application refer to Operation & Application Guide LIAF016 Wireless Temperature Control (T9000) The T9000 Wireless Temperature Control is designed to provide precision temperature control without the installation labor and expense of wiring. • Powered by AA batteries • Mounts in any suitable location that will provide good temperature control. • Large LCD display provides the user with current room temperature, set point temperature, time, program interval, and other system status information. For detailed installation, operation refer to Operation & Maintenance Bulletin OM 897. Programmable The second part of the T9000 system is called a Remote Control Node or “RCN”. An RCN interfaces with specific desired HVAC equipment, and communicates with its thermostat using unlicensed 900 MHz, radio frequency energy. At the time of installation, the T9000 thermostat is linked to one or more RCN controls. The thermostat and RCN that have been linked will not interfere with, or be affected by, any other thermostat or RCN in adjacent rooms, apartments, or neighboring homes. Remote Control Node (RCN) Used with the Wireless Temperature Control, the RCN interfaces with specific HVAC equipment, and communicates with its thermostat using unlicensed 900 MHz, radio frequency energy. Contact your local McQuay Representative for details. Non-programmable Figure 19. T9000 Overview IM 985-1 / Page 27 of 36 MicroTech III Wall-Mounted Room Temperature Sensors (Kit P/N 669529101, 669529201, 669529001) Figure 20. MicroTech III Wall-Mounted Room Temperature Sensors (669529201 Not Shown) Specifications Thermistor resistance (10kΩ) (Conforms to advance thermal products curve 2) Ambient Temperature Limits: Shipping and Storage: 40°F to 160°F (–40°C to 71°C) Operating: 40°F to 140°F (4°C to 60°C) Humidity: 5 to 95% RH, non-condensing Locations: NEMA Type 1, Indoor only Connections: Color Coded Leads Sensor 669529101 Sensor 669529201 Not Shown Sensor 669529001 Wiring Sensors to the MicroTech III Unit Controller Figure 22. Temperature Sensor Wiring to MicroTech III Unit Controller (Kit Part No.s 669529101, 669529201) General CAUTION When the optional wall-mounted room temperature sensor is connected to the unit controller, the Return Air Temperature (RAT) sensor must not be installed. The wallmounted room temperature sensor and return air sensor must not be connected simultaneously or the unit will not operate properly. Temperature Sensor Terminals Microtech III Wall-Mounted Room Temperature Sensors provide electronic sensing of room temperatures at wall locations. All sensor models feature a thermistor (10kΩ) and a green LED for unit status. Tenant override, setpoint adjustment potentiometer, thermometer, and a communications port are optional features available in any combination This manual provides general information for the Microtech III Wall-Mounted Room Temperature Sensors. For installation instructions refer to IM 955 MicroTech III Unit Controller TB1 Terminals Figure 21. MicroTech III Wall Sensor Details Figure 22. Temperature Sensor Wiring to MicroTech III Unit Controller (669529001) 0 to 10 K ohm Potentiometer Temperature Sensor Terminals 4.59" Status LED (Green) Fan Control Slide Switch Mode Control Slide Switch Page 28 of 36 / IM 985-1 Tenant Override Momentary Push Button Switch MicroTech III Unit Controller TB1 Terminals Optional Remote Sensor (P/N 66720401) The fast, easy solution for temperature sensing problems. • For tamper prone areas • Poor airflow areas • Troubled applications • Foam gasket prevents drafts through wall opening • Mounts to standard 2" x 4" outlet box • 2¾"W x 4½"H 1. Remove cover from remote sensor housing. 2. Select an appropriate location for mounting the remote sensor. 3. Mount remote sensor unit using hardware provided. 4. Install two strand shielded wire between remote sensor and thermostat. Shielded wire must be used. Do not run remote sensor wire in conduit with other wires. Note: Connectors on valve must be cut off and stripped back and the wires twisted to make connections to the IV/PR Terminals Pump Restart Relay Kit P/N 061419001 The MicroTech III unit controller has an internal Pump Restart Relay connected to H8, Pin 2 for the Normally Open (N/O) terminal of the internal relay. Connect to H8, Pin 1 for the Normally Closed (N/C) terminal of the internal relay. The output of the internal pump restart relay is 24volts AC and the output is not available when the H8 connection is used to control a motorized valve. Multiple Unit Control Panel (MUCP) for Use With MicroTech® III Unit Controller For detailed installation instructions refer to IM 952 • Wire 1 should run between the S1 terminal on the thermostat and the S1 terminal on the remote sensor • Wire 2 should run between the S2 terminal on the thermostat and the S2 terminal on the remote sensor • Connect the shielding of the wire to the S2 terminal on the thermostat 5. Disable the main sensor (R12) on the thermostat by cutting it from the circuit board. Motorized Isolation Valve & Relay The motorized valve kit may be ordered as a fieldinstalled accessory. Wired as shown in Figure 23, the motorized valve will open on a call for compressor operation. Valves for unit sizes 007 to 018 are 1/2". Using a Normally Closed (N/C), power open valve, wire as illustrated in Figure 23. Figure 23. Normally Closed, Power Open Motorized Valve Wiring Actuator & Valve Assembly Anti-short Bushing Anti-short Bushing Connector Conduit Connector Pin(s), female plug into receptacle The Multiple Unit Control Panel (MUCP) is an accessory used when up to 3-units are controlled from a single thermostat. Console units must have the MUCP field-installed in a remote location, typically close to the units and convenient for service access. A maximum of 2 boards may be used together if up to 6-units must be connected and controlled from a single thermostat. Note: The MUCP control board does not fit inside the console unit control box. Multi-speed operation is only available with the optional unit-mounted fan speed switch. The multiple unit control board provides the components necessary to protect the MicroTech III unit controller from electrical damage that may occur when using standard off-the-shelf relays. This version of the board uses VAC relays and should not be used in combination with any other accessories or equipment that require VDC connections to the “G”, “W1”, or “Y1” terminals (i.e. Boilerless System Kit). IM 985-1 / Page 29 of 36 Outside Air Damper – Field-installed Option CAUTION To prevent infiltration of ambient conditions, it is the responsibility of the contractor to assure that factory installed gasketing matches up with the wall opening, or that additional material is used to assure a positive seal. Cold Weather Operation Console water source heat pumps may experience erratic operation during cold ambient conditions with the outside air damper in the open position. See “Operating Limits,” pages 13 and 14, for guidelines. Figure 24. Manual Outside Air Damper Assembly (See IM 974 for detailed installation instructions) Seal Manual Outside Damper Assembly Subbase Figure 25. Motorized Outside Air Damper Assembly (See IM 974 for detailed installation instructions) Seal Motorized Outside Damper Assembly Subbase Page 30 of 36 / IM 985-1 Troubleshooting The in and outs of R-410A R-410A is a non-ozone depleting blend of two refrigerants - HFC-125 and HFC-32 in a fifty percent mixture. R-410A exhibits higher operating pressure and refrigeration capacity than R-22. R-410A is intended for use in new air conditioning applications that have traditionally used HCFC-22 (R-22). Due to higher capacity and pressure of R-410A, it must not be used in existing R-22 systems. Although R-410A is non-flammable at ambient temperature and atmospheric pressure, it can become combustible under pressure when mixed with air. Note: R-410A should not be mixed with air under pressure for leak testing. Pressure mixtures of dry nitrogen and R-410A can be used for leak testing. Lubrication R-410A should be used only with polyester (POE) oil. The HFC refrigerant components in R-410A will not be compatible with mineral oil or alkylbenzene lubricants. R-410A systems will be charged with the OEM recommended lubricant, ready for use with R410A. Charging Due to the zeotropic nature of R-410A, it should be charged as a liquid. In situations where vapor is normally charged into a system, a valve should be installed in the charging line to flash the liquid to vapor while charging. ake certain that the recycle or recovery equipment M used is designed for R-410A. The pressure of R-410A refrigerant is approximately 60 percent greater than that of R-22. Pressure gauges require a range up to 800 PSIG high side and 250 PSIG low side. Recovery cylinders require a 400 PSIG rating – do not put R410A in a 300 PSIG rated cylinder. WARNING Recycle/recovery equipment must be designated for R410A. R-410A pressure is greater than R-22. Improper equipment can cause severe injury or death. Note: Because a water source heat pump operates under a wide range of water and air temperatures, the values printed below are to be taken as suggested pressure and temperatures. All McQuay water source heat pumps are designed for commercial use. The units are designed for the cooling mode of operation and fail safe to cooling. The reversing valve is energized for the heating mode of operation. Superheat Head Pressure Water Delta T 8 to 14 degrees 335-355 PSIG 10° to 14° All information above is based on ISO standard 13256-1 and tested at these conditions. General Maintenance 1. Normal maintenance on all units is generally limited to filter changes. Units are provided with permanently lubricated motors and require no oiling even though oil caps may be provided. 2. Filter changes are required at regular intervals. The time period between changes will depend upon the project requirements. Some applications such as motels produce a lot of lint from carpeting and linen changes, and will require more frequent filter changes. Check filters at 60-day intervals for the first year until experience is acquired. If light cannot be seen through the filter when held up to sunlight or a bright light, it should be changed. A more critical standard may be desirable. 3. The condensate drain pan should be checked annually and cleaned and flushed as required. 4. Record performance measurements of volts, amps, and water temperature differences (both heating and cooling). A comparison of logged data with start-up and other annual data is useful as an indicator of general equipment condition. 5. Periodic lockouts almost always are caused by air or water problems. The lockout (shutdown) of the unit is a normal protective result. Check for dirt in the water system, water flow rates, water temperatures, airflow rates (may be a dirty filter), and air temperatures. If the lockout occurs in the morning following a return from night setback, entering air below machine limits may be the cause. IM 985-1 / Page 31 of 36 Troubleshooting Refrigeration Circuit Air Water Head Suction Compressor Super Temp (loops) Temp Subcooling Pressure Pressure Amp Draw Heat Symptom Differential Differential Charge Undercharge System (Possible Leak) Low Low Low High Overcharge System High High High Normal Low Air Flow Heating High High Low Air Flow Cooling Low Low Low Low Low Water Flow Heating Normal Normal High High Normal Low Low Normal Low Low Normal High Low Safety Lock Out Low Low Pressure Normal High Pressure Low High Low High Pressure High High Low Low Temp Low Low High Low High Low Temp Low Water Flow Cooling High High High High Low Low High High Pressure High Air Flow Heating Low Low Low Low High Low Low Low Temp High Air Flow Cooling Low High Normal High Low Low Normal High Pressure High Water Flow Heating Normal Low Normal High Normal Normal Low High Pressure High Water Flow Cooling Low Low Low High Normal Low Low Temp TXV Restricted High High High Low Low Page 32 of 36 / IM 985-1 Low Normal Low Low Typical Cooling and Heating Refrigeration Cycles Figure 26. Cooling Mode Return Air Thermal Expansion Valve Coaxial Heat Exchanger Water In Coil – Air to Refrigerant Heat Exchanger Water Out Sensing Bulb and Capillary Tube Compressor Blower Reversing Valve Conditioned Air (Cooling) Cooling Refrigeration Cycle When the wall thermostat is calling for COOLING, the reversing valve directs the flow of the refrigerant, a hot gas, leaving the compressor, to the water-to-refrigerant heat exchanger. Here the heat is removed by the water and the hot gas condenses to become a liquid. The liquid then flows through a thermal expansion metering system to the air-to-refrigerant heat exchanger coil. The liquid then evaporates becoming a gas, at the same time absorbing heat and cooling the air passing over the surfaces of the coil. The refrigerant then flows as a low pressure gas through the reversing valve and back to the suction side of the compressor to complete the cycle. Figure 27. Heating Mode Return Air Thermal Expansion Valve Coaxial Heat Exchanger Water In Coil – Air to Refrigerant Heat Exchanger Water Out Sensing Bulb and Capillary Tube Compressor Blower Reversing Valve Conditioned Air (Heating) Heating Refrigeration Cycle When the wall thermostat is calling for HEATING, the reversing valve directs the flow of the refrigerant, a hot gas, leaving the compressor, to the air-to-refrigerant heat exchanger coil. Here the heat is removed by the air passing over the surfaces of the coil and the hot gas condenses to become a liquid. The liquid then flows through a capillary thermal expansion metering system to the water-to-refrigerant heat exchanger. The liquid then evaporates becoming a gas, at the same time absorbing heat and cooling the water. The refrigerant then flows as a low pressure gas through the reversing valve and back to the suction side of the compressor to complete the cycle. IM 985-1 / Page 33 of 36 Troubleshooting the Water Source Heat Pump Unit Figure 28. Troubleshooting Guide - Unit Operation Low voltage, check power supply voltage Fuse may be blown, circuit breaker is open Wire may be loose or broken. Replace or tighten wires Check wiring - loose or broken and check for faulty connection Check relays and contacts, also capacitor and wiring Check high pressure switch, low pressure switch and low temperature switch to see if unit is cycling on the safety Check capacitor Neither fan, nor compressor runs and all LED lights are off Compressor runs in short cycle Unit Fan operates, compressor does not Check wiring - loose or broken and check for bad connection High or Low pressure lockout A. Cool mode, check water flow B. Heating mode, check air flow C. Check reversing valve for proper valve position Check compressor overload make sure it is closed Check to see if the reversing valve is not hung up and is operating correctly Check compressor to ground, or for internal short to ground Check condensate overflow switch in cool mode of operation Compressor winding may be open. Check continuity with ohm meter Check thermostat for proper location Compressor attempts to start but does not Insufficient cooling or heating Check compressor wiring for defective wiring or loose connection Check for defective compressor internal windings with ohm meter Check thermostat for improper location Check for faulty compressor capacitor Check blower assembly for dirt or faulty fan motor capacity Check for lock rotor amp draw Check for low refrigerant charge Check for proper air flow filter could be dirty Check amp draw on blower assembly Check for proper water flow and delta T (°F) Page 34 of 36 / IM 985-1 Unit control, check thermostat for correct wiring or faulty thermostat Troubleshooting the MicroTech III Unit Controller Figure 29. MicroTech III Unit Controller LED Status and Faults Troubleshooting Reference DANGER Read Outputs To avoid electrical shock, personal injury or death, be sure that field wiring complies with local and national fire, safety, and electrical codes, and voltage to the system is within the limits shown in the job-specific drawings and unit electrical data plate(s). Check Timers Power supply to unit must be disconnected when making field connections. To avoid electrical shock, personal injury or death, be sure to rigorously adhere to field wiring procedures regarding proper lockout and tagout of components. General Use and Information The Microtech III unit controller is provided with two drive terminals, R(24VAC) and C(0 VAC) that can be used by the end user to drive the thermostat inputs (G, Y1, Y2, W1, and W2) and control inputs (U, E, and O). Any combination of a single board drive terminal (R or C) may be used to operate the MicroTech III unit controller’s control or thermostat inputs. However, only one drive terminal (R or C) can be connected to any individual input terminal or damage may result. Some control inputs are not accessible to the end user (for example, HP, LP, SLTS, and COF). Typically the Microtech III unit controller’s R (24VAC) terminal is used to drive the board’s thermostat inputs and control inputs by connecting it to the R terminal of an industry standard thermostat. The control outputs of the standard thermostat are then connected to the Microtech III unit controller thermostat inputs and control inputs as needed. Any remaining board input(s) may be operated by additional thermostat outputs or remote relays (dry contacts only). All Microtech III unit controller inputs must be operated by dry contacts powered by the control board’s power terminals. No solid state devices (Triacs) may be used to operate the Microtech III unit controller inputs. No outside power source may be used to operate the Microtech III unit controller inputs. Yes Brownout No Yes High Pressure Yes Low Pressure No Start Compressor No Yes Yes Yes Yes 30 Second Time Delay Low Suct Temp Sensor No Low Suct Temp Request for Water Flow No Room Temp Sensor Failure No R-W1 No Yes R -Y 1 No Condensate Overflow Stop Compressor Flash Green LED Stop Compressor Flash Red LED Stop Compressor Flash Yellow LED Flash Green LED Solid Red LED Stop Compressor Heating Mode No Yes Flash Yellow LED Run in Cooling Mode for 1 Min. Cooling Mode No Yes Turn on Yellow LED Stop Compressor Reversing Valve On Time Delay IM 985-1 / Page 35 of 36 McQuay Training and Development Now that you have made an investment in modern, efficient McQuay equipment, its care should be a high priority. For training information on all McQuay HVAC products, please visit us at www.mcquay.com and click on training, or call 540-248-9646 and ask for the Training Department. Warranty All McQuay equipment is sold pursuant to its standard terms and conditions of sale, including Limited Product Warranty. Consult your local McQuay Representative for warranty details. Refer to Form 933-43285Y. To find your local McQuay Representative, go to www.mcquay.com. This document contains the most current product information as of this printing. For the most up-to-date product information, please go to www.mcquay.com. Products Manufactured in an ISO Certified Facility. ® ©2010 McQuay International • 800.432.1342 • www.mcquay.com IM 985-1 / Page 36 of 36 / (1-10)