1
PCMCIA
Portable HARD DISK PLUS
Installation Manual
HD Traveler
EXP COMPUTER, INC.
EXP MEMORY PRODUCTS.
NON-TRANSFERABLE LIMITED WARRANTY
EXP COMPUTER INC., AND EXP MEMORY PRODUCTS ("EXP") warrants that the HD Traveler Plus (“products”)
manufactured or distributed by EXP to be free from failures due to defects in materials or workmanship for a full one year
from the date of purchase of the products.
This warranty is void if the product is damaged by abnormal or improper use or by accident, abuse or if any attempt to
repair or modify the product without authorization from EXP. Your sales receipt or invoice, showing the date of purchase
and the name of the authorized reseller, is your proof of the date of purchase. During the warranty period, EXP will at its
option, replace or repair, at no charge, the product that in its opinion is defective.
Before you return the failed products, contact EXP. You will need to obtain a Return Merchandise Authorization (RMA)
number by calling EXP’s Technical Support Department at (516) 496-7629. The RMA number should be displayed on the
outside of the returning package and on the accompanying packing list. EXP cannot be held responsible for any
package returned without the RMA number. You are responsible for packaging, providing proof of the date of purchase
and the shipping cost of the failed product to EXP Computer, Inc. You are responsible for mailing the warranty
registration card. The warranty claims may not be honored if there is no corresponding registration card on file at EXP.
IN NO EVENT WILL EXP BE LIABLE FOR ANY DIRECT, INDIRECT, SPECIAL, INCIDENTAL OR CONSEQUENTIAL
DAMAGE, INCLUDING LOSS OF PROFIT, LOSS OF SAVINGS; OR ANY OTHER DAMAGES CAUSED BY PRODUCT
OR FAILURE OF THE PRODUCT TO PERFORM.
THIS LIMITATION OF LIABILITY APPLIES EVEN IF EXP HAS BEEN ADVISED OF THE POSSIBILITY OF SUCH
DAMAGES. SOME SATES DO NOT ALLOW THE EXCLUSION OR LIMITATION IN INCIDENTAL OR
CONSEQUENTIAL DAMAGES, SO THE ABOVE EXCLUSION OR LIMITATION MAY NOT APPLY TO YOU.
EXP WEB SITE:
WWW.EXPNET.COM
TECHNICAL SUPPORT: 516-496-7629
TECHNICAL SUPPORT E-MAIL: [email protected]
INTRODUCTION
The HD Traveler PLUS is a portable compact hard disk drive, which consists of a low-power hard
disk drive, a Parallel port (printer port) connector, and a PCMCIA interface card. It is compatible
with both computer’s Parallel Port and PC CARD (PCMCIA) 2.1 Type II or I slot. The HD
Traveler PLUS has an external power jack in case your notebook’s PCMCIA slot cannot supply
enough power needed by the unit. The external power is required for a parallel port connection.
The HD Traveler PLUS dual connection gives user flexibility to add more storage space or
transfer data between your notebook and/or your desktop computer.
SYSTEM REQUIREMENTS
1. Notebook or desktop computer with a PC Card (PCMCIA) 2.1 Type I or II slot or a Parallel
port (Printer port)
2. Windows 95/98, Windows NT 3.51/4.0
FEATURES
§
§
§
§
Complies with PC Card (PCMCIA) 2.1 specification
Windows 95/98, Windows NT Ready
Hard disk size - 2.1 GB, 3.2 GB or 5 GB
Power sources requirement
PC Card interface :
PC slot or AC adapter
Parallel port interface:
AC Adapter required
§ Low power consumption; 250 mA (Standby), 800 mA (Peak value accessing)
§ Ultra slim PCMCIA Card
85.6 x 54.0 x 3.3 mm (Type I)
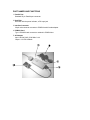
PART NAMES AND FUNCTIONS
1. Parallel Port
Standard 25 pin Parallel port connector.
2. Hard Disk
Hard disk with the power indicator, a DC input jack
3. Interface Connector
26-pin male connector connects to PCMCIA card’s female adapter
4. PCMCIA Card
Type 1 PCMCIA card connects to notebook’s PCMCIA slot
5. AC Adapter
Input: 100-240 VAC, 50-60 Mhz. 0.4A.
Output: +12 VDC/1000mA.
INSTALLATION
The installation procedures have two sections for each type of interface.
1. PCMCIA interface
2. Parallel Port interface
The procedure includes hardware and software installation. Just follow along the interface of your
choice.
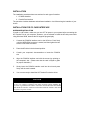
INSTALLATION FOR PC CARD INTERFACE
HARDWARE INSTALLATION
If install on a NT station, make sure you turn OFF all power to your system before connecting the
HD Traveler Plus to your computer. However, you are allowed to install the HD with power while
using Windows 95/98, because the OS supports plug-and-play.
1.
Connect the PCMCIA interface card to the HD drive. Push firmly
until the HARD DISK connector is seated, and then tighten the two
screws on the cable connector.
2.
Place the HD drive in the horizontal position.
3.
Consult your computer’s documentation to locate the PCMCIA
slot.
4.
Align the PCMCIA interface card with the arrow sign pointing to
the computer’s slot. (Please note that the card is keyed to guide
for proper orientation.)
5.
Slowly insert the PCMCIA interface card into the slot and press
firmly until the card is seated.
6.
You are now ready to install the HD Ttaveler Plus device driver.
CAUTION
The hard disk and electronic components installed on the Hard disk Traveler
Plus are very sensitive to damage from static electricity. Before handling the
unit, touch a grounded metal surface. DO NOT connect/disconnect the HARD
DISK PCMCIA interface connector to/from the PCMCIA interface card when
the system is in power-on state.
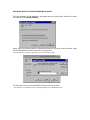
SOFTWARE INSTALLATION FOR WINDOWS 95 AND 98
The “New Hardware Found” dialog box* will appear when you insert the HD Traveler Plus under
Windows 95 for the very first time.
Select “Driver from disk provided by hardware manufacturer” and click on the OK button. Insert
the HD TRAVELER device driver disk into your floppy drive.
(If the dialog box does not appear, please refer to the “Trouble Shooting section.)
If a dialog box come up select the EXP HD Traveler Plus, then click OK.
* Your dialog box may be different from the one shown depending on your Windows 95 version
For user with a newer revision, “Update Device Driver Wizard” box * will appear. Click on “Next”
button, let Windows 95 search for driver. Make sure to insert the HD Traveler device driver
diskette into your floppy drive.
(If the dialog box does not appear, please refer to the “Trouble Shooting section.)
Click on the “Finish” button.
VERIFY YOUR INSTALLATION
From “Desk Top” click on “My Computer” icon.
There should be addition drive’s icon displayed.
(You may have to manually set Disk Drive setting as
a removable icon).
SOFTWARE INSTALLATION FOR WINDOWS NT 4.0
PC Card Interface
Currently there is no Plug and Play support for PC Card (PCMCIA) on the Windows NT 4.0. User
can install the device driver without the HD PC Card, however after you finishing the installation
you should insert the HD PC Card before restart the computer.
Follow the instructions to install the HD PC device driver:
Click on My Computer > Control Panel > SCSI Adapters.
Choose Drivers tab and the click on “Add”. From the Install Driver click “Have Disk” button.
Install from disk dialog box will prompt for device driver diskette.
Either using “Browse” button or type in the path A:\winnt the click OK to finishing the installation.
Make sure to insert the HD PC Card into the PC Card slot before restart the computer.
VERIFY YOUR INSTALLATION
After computer boot up go to My Computer icon, you should have
an addition hard disk icon. You may have to manually set Disk Drive
setting as a removable icon. (See “Changing drive letter assigned to
HD Traveler”)
INSTALLATION FOR PARALLEL PORT INTERFACE
HARDWARE INSTALLATION
Before you begin, make sure you turn OFF all power to your system before connecting the HD
TRAVELER to your computer.
1. Connect the DC Input adapter cable to the EXP Hard Disk Traveler drive assembly.
2. Connect one end of the Parallel cable to EXP Hard Disk (25 pin connector), and connect the
other end to computer parallel port.
3. Plug-in the AC adapter to a working AC receptacle.
Note: The EXP hard disk will start to spin up immediately. Be careful, do not move the EXP
hard disk while it is spinning.
CAUTION
The hard disk and electronic components installed on the Hard disk Traveler
Plus are very sensitive to damage from static electricity. Before handling the
unit, touch a grounded metal surface. DO NOT connect/disconnect the HARD
DISK PCMCIA interface connector to/from the PCMCIA interface card when
the system is in power-on state.
SOFTWARE INSTALLATION FOR WINDOWS 95/98
Check all the connection as states in the “Hardware Installation” section.
From the Desktop Click ‘My Computer’ icon, ‘Control Panel’ and then ‘Add New Hardware’
1. Click "Next>" to begin.
2. When prompted whether to search for your new hardware,
Select "No" and click "Next>".
3. Open "Other devices" or "SCSI controllers". Click "Have Disk...".
4. Insert Installation Diskette into the drive selected,
then click "OK". If you're installing from a directory
containing downloaded installation files, specify the full
path of the directory and click "OK".
5. Select "F.I.T. Parallel-Port Trans-Series Win95 Driver",
and click "Next>".
6. Click "Finish" to complete installation.
7. Remove Installation Diskette, if there is one.
8. Restart system, when prompted.
VERIFY YOUR INSTALLATION
From “desk top” click on “my computer”
icon. There should be addition drive’s icon
displayed. You may have to manually set
Disk Drive setting as a removable icon.
(See “Changing drive letter assigned to
HD Traveler”)
SOFTWARE INSTALLATION FOR WINDOWS NT 4.0
Due to user interface similarity of the Windows 95 and the Windows NT 4.0. The installation
procedure is identical to the one for Windows 95.
TROUBLE SHOOTING
PCMCIA INTERFACE
Symptom: No “New Hardware Found” dialog box display.
Solution:
1. The EXP card is NOT fully inserted.
The card status will show empty if Windows PCPCIA driver did not detect any card.
Some time, there is other dialog box displayed, and the PC Card Properties still
show empty. You may need to disable such a program (i.e. CardWork, CardWiz)
consult your notebook User Manual.
2. The 32-bit card support is NOT enabled.
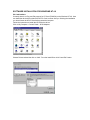
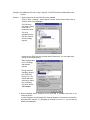
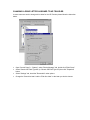
To enable the 32-bit support, click on “Start”, “Settings”, “Control Panel” from the
“Control Panel” folder Click on PC Card (PCMCIA)
If you see the screen below, it means the PCMCIA device driver is not using 32-Bit
Card Support. Follow on screen instructions by except all the default setting. At the
end of the installation, you will be asked to restart the computer.
After the computer restart, you can insert the EXP HD card, at this time the “New
Hardware Found” or “Update Device Driver Wizard” dialog box will be displayed.
3. No PC Card (PCMCIA) icon in Control Panel
If the PCMCIA Socket is not found, then you must add a PCMCIA socket to your
system. Please click on the “Add New Hardware” icon in the Control Panel folder and
select “PCMCIA socket”. Select the appropriate type of PCMCIA Controller that
matches yours (call your notebook manufacturer for detail) and follow the on-screen
instruction.
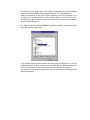
Symptom: No additional drive icon in “My Computer”. The EXP HD driver installed without any
incident.
Solution: 1. System resources for the EXP HD are not available.
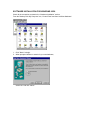
Click on “Start”, “Settings”, “Control Panel” from the “Control Panel” folder Click on
“System” then “Device Manager”
The EXP entry
may have a yellow
circle with an
exclamation point.
This is an
indication that the
EXP HD Traveler
did not working
properly.
Double click on EXP entry line and then select “Resources” You can make some
change to the following entry:
‘Basic Configuration
xxxx’, I/O Range,
and Interrupt
request.
During resources
changing, observe
the “Conflicting
Device List”. You
should select the
resource(s), which
the “Conflicting
device list” shows
“No Conflict ”
2. Device Manager shows resource for the EXP HD is available and there is no
conflicting device.
In some computer, the I/O Range XXX, Interrupt Request 15 may be use by a built-in
secondary IDE controller. Try changing the interrupt to 9,10 or 11. You can also try
different I/O addresses.
3. The EXP entry may have a yellow circle with an exclamation point. Device Manager
shows resource for the EXP HD is available and there is no conflicting device.
Check all connection to the EXP HD drive assembly, such as AC Adapter. Your
notebook PC Card sockets may not have enough power for the EXP HD. If you
already connect the AC adapter, make sure to secure all connectors and the adapter
plug into a good AC out let.
4. The EXP HD and the ‘Standard IDE/ESDI Hard Disk Controller’ entry have a yellow
circle with an exclamation point.
Your notebook may have been infected with some kind of computer virus. The virus
disabled Windows 95 32-bit device driver for the hard disk. The EXP HD requires the
driver for its operation. Check the “Performance” tab to confirm the symptom.
You need to run an anti-virus program first, once the 32-bit driver is running the EXP
HD will be installed.
TROUBLE SHOOTING
PARALLEL PORT INTERFACE
Symptom:
No additional drive icon in “My Computer”. The EXP HD driver installed without any
incident.
Solution: 1. Check your cable connection, along with the AC adapter at the wall receptacle make
sure there is no lose connection. The green LED on the top of EXP HD assembly
should lit up.
2. Check your computer CMOS or BIOS setup. Some computer allows user to set
printer type to be: Standard, EPP Only or Bi-directional. A setting to “EPP Only” is
preferred for a better performance.
3. Check if other hardware devices are connected to the same parallel port. Daisychaining with other hardware devices is NOT recommended. Other devices include
but not limited to the following: security device (key, lock), audio port, parallel-to
SCSI device, tape backup device, network device, A/B switch, printer-sharing
device.
4. If you connect the equipment in daisy-chain fashion, always turn on the device
farthest away from the computer first (in this case the EXP HD), then turn on the
device next on the chain. Turn the computer last.
Symptom:
The EXP HD starts to become excessively slow or behave differently on a batterypowered notebook computer.
Solution:
If you are using a notebook or laptop computer, without the AC adapter. The
performance of the parallel port may become sluggish and unreliable if the battery
runs low. Try reconnecting the AC adapter to your computer or recharging the
battery.
Symptom:
The EXP HD starts to become excessively slow or does not work at all.
Solution:
The parallel port on your machine may be able to a number of different modes,
standard, Bi-directional, EPP or ECP. These different setting can effect performance
of the EXP HD. In some cases, the standard setting will even shut off signals the
EXP HD needs, while if the same port is set to Bi-directional or EPP produce an
excellent performance.
REMOVING OR RE-INSTALLING THE DRIVER
PCMCIA Interface
If you need to remove or reinstalling the driver, make sure the EXP hard disk card is
inserted.
•
Go to “My Computer” icon, “Control Panel”, “System”,“ Device Manager” Click on “Hard
Disk Controller”. The EXP Hard disk should be listed
To remove EXP Hard disk.
•
Click on the EXP entry line then click “Remove” button. You may need to restart the
computer to complete the task.
To reinstall EXP Hard disk.
•
Click on “Refresh” button, either the “New Hardware Found” or “Update Device Driver
Wizard” will be displayed.
Follow the instruction on “Installation for PCMCIA Interface” section.
PARALLEL PORT INTERFACE
Go to “My Computer” icon, “Control Panel”, “System”,“ Device Manager” Click on “SCSI
Controller ”. The EXP Hard disk should be listed
To remove EXP Hard disk.
•
Click on the EXP entry line then click “Remove” button. You may need to restart the
computer to complete the task.
To reinstall EXP Hard disk.
•
Either click on “Refresh” button, the “New Hardware Found” or “Update Device Driver
Wizard” will be displayed.
Follow the instruction on Installation for “Parallel Port Interface” section.
CHANGING A DRIVE LETTER ASSIGNED TO HD TRAVELER
In some case user need to change a drive letter for the HD Traveler please follow the instruction
below.
•
•
•
•
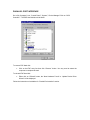
Open "Control Panel" -> "System", select "Device Manager" tab, double click "Disk Drives".
Select "Generic IDE Disk Type 80" (or "Generic IDE Disk Type 00") then click "Properties"
button.
Select "Settings" tab, check the "Removable" under options.
Change the "Start drive letter" and the "End drive letter" to the letter you wish to choose.
APPENDIX A
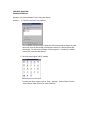
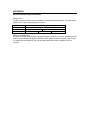
Hard Disk partitioning consideration
Partition size
The HD Traveler PLUS has been preformatted and partitioned from the factory. The table shows
partition size for the current shipping HD Traveler.
HD Capacity
2 GB
3.2 GB
5.0 GB
Partition size
2 GB
2.0 GB
2.0 GB
2.0 GB
1.2 GB
1.0 GB
FDISK or similar program
Currently the FDISK program will not recognize the HD Traveler. If you need to repartition the HD
traveler, we recommend sending the HD back to EXP. Another solution is install the HD Traveler
in a notebook with Windows NT 4.0 and use Disk Administrator utility to repartition the HD
Traveler.
APPENDIX B
FCC COMPLIANCE STATEMENTS
This equipment has been tested and found to comply with the limits for a Class B digital device,
pursuant to Part 15 of the FCC Rules. These limits are designed to provide reasonable
protection against harmful interference in a residential installation. This equipment generates,
uses and can radiate radio frequency energy and, if not installed and used in accordance with the
instructions, may cause harmful interference to radio communications. However, there is no
guarantee that interference will not occur in a particular installation. If this equipment does cause
harmful interference to radio or television reception, which can be determined by turning the
equipment off and on, the user is encouraged to try to correct the interference by one or more of
the following measures:
Reorient or relocate the receiving antenna.
Increase the Distance between the equipment and receiver.
Connect the equipment into an outlet on a circuit different from that to which the receiver is
connected.
Consult the dealer or an experienced radio/TV technician for help.
CAUTION
CHANGE OR MODIFICATIONS NOT EXPRESSLY APPROVED BY
PARTY RESPONSIBLE FOR COMPLIANCE COULD VOID THE USER’S
AUTHORITY TO OPERATE THE EQUIPMENT.