1
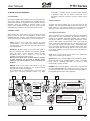
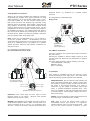
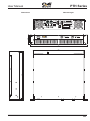
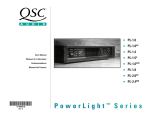
r
PTH Series
Professional Power Amplifiers
PTH
PTH
PTH
PTH
3
5
7
9
2 x 300 W
2 x 500 W
2 x 700 W
2 x 900 W
User manual
Bedienungsanleitung
PTH Series
User Manual
Explanation of graphical symbols
This symbol is intended to alert the user of presence of uninsulated dangerous voltage
within the products enclosure that may be of sufficient magnitude to constitute risk of
electric shock to persons.
!
This symbol is intended to alert the user of presence of important operating and
maintenance (servicing) instructions in the literature accompanying the appliance
CAUTION: To reduce the risk of
electric shock, do not remove covers.
No user serviceable parts inside. For
servicing,
refer
to
qualified
personnel.
C A UT ION
R IS K OF E L E C T R IC
S HOC K
!
WARNING: To prevent fire or
electric shock, do not expose
this appliance to rain or
moisture.
Explication des symbole graphiques
Ce symbole doit alerter l'utilisateur du danger provenant d'un voltage dangereux et non
protégé à l'intérieur de l'appareil, voltage suffisamment fort pour représenter en réel
danger d'électrocution.
!
Ce symbole doit attirer l'attention de l'utilisateur sur les instructions importantes qui
concernent le service et la maintenance et qui accompagnent tout appareil.
ATTENTION: Pour éviter les
r i s q u e s d e choc électrique, ne pas
enlever le couvercle. L'appareille ne
contient aucun pièce pouvant être
réparée par l'utilisateur. Confiez la
maintenance a un technicien qualifié.
A T T E NT ION
R IS QUE DE C HOC
E L E C T R IQUE NE P A S
!
AVERTISSEMENT: Pour éviter
les risques de choc électrique
ou d'incendié, n'exposez jamais
cet appareille à l'humidité
excessive ou à la pluie.
Erklärung der bildsymbole
Dieses Symbol warnt den Benutzer vor nicht-isolierter gefährlicher Spannung im inneren
das Gerätes. Diese Spannung ist hoch genug, um Personen durch elektrischen schlag zu
gefährden.
!
Dieses Symbol weist den Benutzer auf wichtige bedienungs- und Wartungsanweisungen
hin, die in dieser Bedienungsanleitung aufgeführt sind.
ACHTUNG: Um Gefährdung durch
elektrischen Schlag zu vermeiden, darf
das Gehäuse nicht geöffnet werden. Es
befinden
sich
keine
Benutzer
reparierbaren teile im inneren das
Gerätes.
Überlassen Sie jegliche
Reparatur einem qualifizierten Fachmann.
A C HT UNG
G efahr fü r elektris c hen
s c hlag
!
WARNUNG: Um die Gefahr eines
Brandes bzw. eine Verletzung
durch elektrischen Schlag zu
vermeiden, Sollte das Gerät
niemals Regen oder Feuchtigkeit
ausgesetzt werden.
Explicación de símbolos
Este símbolo indica la presencia de voltaje peligro no aislado dentro del aparato.
Estas voltaje son lo suficientemente altas como para constitutuir un riesgo de
descarga eléctrica para el usuario.
!
Este símbolo indica al usuario de la presencia de instrucciones importantes de
funcionamiento y mantenimiento en la Manuel de funcionamiento.
PRECAUCIÓN: Para reducir el riesgo de
descarga eléctrica, no quite la tapa. El
usuario no debe ajustar los componentes
internos. En caso de avería, solicite la
ayuda de personal técnico cualificado
P R E C A UC IÓ
N
P eligro por des c arga
elé
c tric a
!
AVISO: Para evitar el peligro de
incendio o descarga eléctrica, no
exponga este equipo a la lluvia o
humedad.
2
User Manual
PTH Series
Table of Content
Page
Explanation of graphical symbols ............................................................................................................... 2
Table of contents ........................................................................................................................................... 3
Safety instructions ........................................................................................................................................ 4
Introduction ................................................................................................................................................... 5
General notes
Features of the PTH serie amplifiers
The PTH serie models
Setting up the amplifier ............................................................................................................................... 6-7
Installation
Mode switch
Connections
Input connections
Speaker connections
Mains connections
Operation ...................................................................................................................................................... 7-8
Grounding ..................................................................................................................................................... 8
Technical specifications .............................................................................................................................. 9
Dimensions ................................................................................................................................................... 16
Warranty ........................................................................................................................................................ 17
Service request form .................................................................................................................................... 18
3
User Manual
PTH Series
Safety Instructions
1.
Read Instructions - All safety and operation instructions should be read before this unit is operated.
2.
Keep instructions - The operating instructions should be retained to serve for future reference.
3.
Observe Warnings - All warnings on the appliance and in this operation manual should be strictly followed.
4.
Water and Moisture - This unit should not be used near water - for example, near bathtub, washbowl, kitchen sink, laundry
tub, in a wet basement or near a swimming pool, etc.
5.
Heat - This unit should be placed away from heat sources, such as radiators or other devices which produce heat.
6.
Power cord protection - The power supply cords should be routed so that it is not likely to be stepped on or pinched by
objects placed on or against them.
7.
Non-use periods - The power cord of the unit should be unplugged from the outlet when the unit is not used for a longer
period.
8.
Object and liquid entry - Care should be taken so that objects do not fall and liquids are not spilled into the inside of the unit.
9.
Damage requiring service - Unplug the unit and refer servicing to qualified service personnel under the following conditions:
* Objects have fallen, or liquid has spilled into the unit; or
* The unit has been exposed to rain; or
* The unit does not appear to operate normally or exhibits a marked change in performance; or
* The unit has been dropped, or its chassis damaged; or
* When the power cord or plug is damaged.
10. Servicing - The user should not attempt to service the unit beyond those means described in this operating manual. All other
servicing should be referred to qualified personnel.
11. To prevent electric shock - Do not use the polarised plug with an extension cord, receptacle or other outlet unless the
prongs can be fully inserted to prevent contact exposure.
12. Grounding or polarisation - Precautions should be taken so that the grounding or polarisation means of the unit is not
defeated.
13. Internal voltage selector and fuse - The internal line voltage selector and the appropriate fuse should only be reset and
reequipped for alternate voltage by a qualified service technician. For more information, contact your authorised dealer.
14. Ventilation - Slots and openings in the unit are provided for ventilation, to ensure reliable operation and to
prevent overheating of the unit. These openings should not be blocked or covered!
4
PTH Series
User Manual
PTH Series
Professional Power amplifiers
3 Speakon output connectors for stereo and bridge mode.
Soft-start anti surge circuitry for maximum fuse protection at
startup.
1. Introduction
Heavy duty relay in the output stage for speaker DC
protection.
1.1 General notes
'PT' stands for Power Transfer, which expresses exactly what
the PT series power amplifiers do: they 'transfer' a few
milliwatts of electrical signal power at the inputs into a couple
of hundred watts at the speakers outputs, without changing
the shape of the signal and adding as little noise or other
spurious signals as possible. We put this signal transfer
under the command of one of the most technically advanced
control systems, including NLR (Non-Linearity Restoration)
and TCL (Temperature Control by Limiting). The 'H' in 'PTH'
indicates that this is the 'Heavy' version of PT. It is build with
a conventional power supply which includes a toroidal
transformer, responsible for the extra weight.
High efficiency class H output stage for lowest possible
internal power dissipation on PTH 5,7 and 9.
Protection circuitry against clipping, over temperature,
mismatched loads, open/short outputs and DC voltage at
output.
Current feedback input stage with ultra-fast internal-loop
slew rate.
1.3 PTH series models
PTH series amplifiers are available in 4 models:
1.2 Features of the PTH series amplifiers
Model
Rated output power per channel
into 4 Ohms
into 8 Ohms
All PTH series power amplifiers are equipped with:
High efficiency 'flow through' cooling system with 2
proportional to temperature controlled fans and a large
surface hybrid heatsink.
LED indicators for ready/protect, signal, NLR (distortion
limiter) and TCL (Temperature Controlled Limiter).
PTH 3
330 W
220 W
PTH 5
540 W
330 W
PTH 7
720 W
450 W
PTH 9
920 W
600 W
Electronically balanced inputs, equipped with Neutrik
Combo sockets and parallel XLR outputs for easy setup
of multiple amplifier systems.
Oversized, non-compromise power supply with low-flux,
magnetically screened toroidal transformer.
12
POWER
10
8
12
6
14
18
24
PTH 9
Input
1 = SIGNAL GROUND
2 = SIGNAL +
3 = SIGNAL 2
MODE
1
1
DIRECT
OUT
2
SPEAKER OUT 2
1+ = SIGNAL CH. 2
1 - = GROUND CH. 2
SPEAKER OUT
8
6
18
PROTECT
2
NLR
TCL
READY
SIGNAL
LIMITER
4
24
2
PROTECT
NLR
TCL
0
CH 2 • dB
2
MIN.
2 OHM
SPEAKER OUT 1
1+ = SIGNAL CH. 1
1 - = GROUND CH. 1
2+ = SIGNAL CH. 2
PARALLEL
BRIDGED
3
10
14
LIMITER
CH 1 • dB
INPUT
1
SIGNAL
0
2 x 900W PROFESSIONAL POWER AMPLIFIER
DUAL
READY
4
C A UT ION
R IS K OF E L E C T R IC
S HOC K
!
WARNING
THIS APPARATUS MUST BE EARTHED TO REDUCE
THE RISK OF ELECTRIC SHOCK. DO NOT EXPOSURE
THIS APPLIANCE TO RAIN OR MOISTURE.
CAUTION
NO USER SERVICEABLE PARTS INSIDE.
REFER SERVICING TO QUALIFIED PERSONNEL.
AVIS
RISQUE DE CHOC ELECTRIQUE. NE PAS OUVRIR
r
BRIDGED OUT
1+ = SIGNAL CH. 1
1 - = SIGNAL CH. 2
2+ = GROUND CH. 1
PTH9-01BB
SERIAL NR: PTH9-01BB-0001
MADE IN BELGIUM
DATE OF MANUFACTURE: 28.06.01
POWER REQUIREMENTS:
210-244V AC 50/60Hz 4100W MAX
BRIDGED MONO OPERATION: INPUT SELECTOR SWITCH TO BRIDGED
POSITION. INPUT SIGNAL TO CH. 1 ONLY. CONNECT SPKR TO 1+ AND 1- OF
BRIDGED OUT CONNECTOR. MATCH CH. 1 AND CH. 2 GAINS ON THE FRONT
PANEL AND REGULATE LEVEL WITH BOTH GAIN CONTROLS SIMULTANEOUSLY.
BRIDGED
OUT
MIN. 4 OHM
WARNING!
HAZARDOUS ENERGY!
MAKE PROPER SPEAKER CONNECTIONS.
5
PTH Series
User Manual
2. Setting up the amplifier
subwoofers. In addition to that, any PTH amplifier working
in BRIDGE mode can be directly connected to an
unisolated 100V-line (70V-line) constant voltage sound
system.
2.1 Installation
PTH series amplifiers are equipped with two cooling fans with
rear to front airflow. When installing the amplifier, allow for
ample space behind the amplifier to ensure sufficient airflow,
especially when the amplifier is operated inside a rack
system. This enables the amplifier to get rid of its heat and
avoids limiting or shut-off by the thermal protection circuit.
2.2 Mode switch
DUAL mode: in this mode both channels and their
corresponding in- and outputs work totally independent
from eachother. This is the mode for normal stereo (twochannel) operation.
PARALLEL (MONO) mode: in this mode, both inputs of
the PTH amplifier are internally connected in parallel.
Using the input 1 gives identical signals on both
SPEAKER OUT 1 and 2 outputs (4 + 5) with the
possibility of individual volume control.
Warning: this mode does not mean that the outputs
of both channels can be wired in parallel. Never
attempt to wire them together! This will damage the
amplifier.
BRIDGE mode: mono bridge mode allows to use the
amplifiers full output capacity for one single monaural
channel. (See Chapter 5 for details).
This configuration is recommended to produce high
power for a monaural speaker system, e.g. Bass
3
The input sockets (3) are mixed XLR/phone jack receptacles,
which allow the use of microphone or instrument cables to
connect to the amplifier. Whenever possible, use 2-conductor
microphone cable for a balanced signal transmission, which
gives the best results and the lowest noise. The inputs are
wired in standard configuration with pin 1 as signal ground, pin
2 as signal "hot" and pin 3 as signal "cold". You may also refer
to the input wiring diagram on the amplifier's back panel. Two
'Direct Out' male XLR sockets (7) below to the input sockets
are wired in parallel to the inputs and provide easy linking to
other amplifiers.
DUAL mode: connect each channel input to the appropriate
output of the preceding audio device.
PARALLEL mode: use only input 1 of the amplifier to obtain
identical signals on both speaker outputs 1 and 2. The output
levels can be adjusted individually by means of their
corresponding volume controls.
BRIDGE mode: use only input 1. Both volume controls must
be used simultaneously for output level control. Under any
circumstance, keep both volume controls at the same value or
the amplifier will shut down during operation.
4
Input
1 = SIGNAL GROUND
2 = SIGNAL +
3 = SIGNAL -
INPUT
2
MODE
3
1
5
1
2
MIN.
2 OHM
SPEAKER OUT 1
1+ = SIGNAL CH. 1
1 - = GROUND CH. 1
2+ = SIGNAL CH. 2
PARALLEL
DUAL
All input and output sockets are on the rear panel of the
amplifier. The rear panel also holds the mains cord (2) and the
mode switch (1). For maximum safety, it is recommended to
stick to the order given below when wiring the PA system.
2.3.1 Input connections
Before making any connections, you have to decide in which
mode you want to use your PTH amplifier. All PTH series
amplifiers are able to work in three operational modes which
can be selected by the mode switch (1) on the back panel.
1
2.3 Connections
1
DIRECT
OUT
2
SPEAKER OUT 2
1+ = SIGNAL CH. 2
1 - = GROUND CH. 2
SPEAKER OUT
C A UT ION
WARNING
THIS APPARATUS MUST BE EARTHED TO REDUCE
THE RISK OF ELECTRIC SHOCK. DO NOT EXPOSURE
THIS APPLIANCE TO RAIN OR MOISTURE.
CAUTION
NO USER SERVICEABLE PARTS INSIDE.
REFER SERVICING TO QUALIFIED PERSONNEL.
AVIS
RISQUE DE CHOC ELECTRIQUE. NE PAS OUVRIR
PTH9-01BB
BRIDGED OUT
1+ = SIGNAL CH. 1
1 - = SIGNAL CH. 2
2+ = GROUND CH. 1
BRIDGED
!
R IS K OF E L E C T R IC
S HOC K
SERIAL NR: PTH9-01BB-0001
MADE IN BELGIUM
DATE OF MANUFACTURE: 28.06.01
POWER REQUIREMENTS:
210-244V AC 50/60Hz 4100W MAX
BRIDGED MONO OPERATION: INPUT SELECTOR SWITCH TO BRIDGED
POSITION. INPUT SIGNAL TO CH. 1 ONLY. CONNECT SPKR TO 1+ AND 1- OF
BRIDGED OUT CONNECTOR. MATCH CH. 1 AND CH. 2 GAINS ON THE FRONT
PANEL AND REGULATE LEVEL WITH BOTH GAIN CONTROLS SIMULTANEOUSLY.
7
BRIDGED
OUT
MIN. 4 OHM
6
WARNING!
HAZARDOUS ENERGY!
MAKE PROPER SPEAKER CONNECTIONS.
2
6
PTH Series
User Manual
additional device, e.g. feedback for a speaker system
processor.
2.3.2 Speaker connections
Warning: All PTH series amplifiers are capable of producing
dangerously high voltages at the output terminals! To avoid
cable overheating, do not use speaker cables under 1.5 mm2
cross-section (AWG 15). The use of thicker cables helps to
keep power loss down and damping high, especially if long
distances have to be bridged. After insertion, make sure that
every speakon connector has been twisted clockwise before
locking it with the swivel nut to ensure proper contact. The pin
configurations for the three speaker connectors are printed on
the amplifier's back panel. The speaker outputs are wired so
they can be used in different ways, depending on the setting of
the mode switch. Before connecting the speakers, make sure
that your speaker cables are properly wired.
DUAL mode: use the SPEAKER OUT 1 and 2 outputs to
connect the speaker systems. The BRIDGED OUT also
carries both output signals and can be used to feed the output
signal to an additional device, e.g. feedback for a speaker
system processor. Minimum total speaker impedance per
channel is 2 ohms.
Pin configuration for SPEAKON plugs
Dual (stereo)/Parallel (mono) mode:
1
Pin configuration for SPEAKON plugs
Bridge mode:
1
2
MIN.
2 OHM
SPEAKER OUT
BRIDGED
OUT
MIN. 4 OHM
signal signal +
Speaker Out 1
(feedback for
optional processor)
Bridged Out
2.3.3 Mains connection
For mains connection, use only three-prong mains connectors
with earth contact.
Switching the amplifier to different voltage systems is done
from the inside and should only be performed by a qualified
technician.
The mains cable conductors have the following color code:
YELLOW/GREEN = earth (PE)
BROWN = live (L)
BLUE = neutral (N)
2
MIN.
2 OHM
SPEAKER OUT
BRIDGED
OUT
MIN. 4 OHM
3. Operation
2
2
1
Speaker Out 1
(may also be used as
a 4-pole stereo output)
Each channel is controlled from the front panel by a level
control potentiometer and 4 status LED's. The status LED's
indicate the following operational states of the amplifier:
Speaker Out 2
channel 1 ground
channel 2 signal
channel 2 ground
channel 1 signal
Bridged Out
(feedback for optional processor)
READY/PROTECT: this two-coloured LED indicates the
state of the output protection relay. It lights up green when
the amplifier is working normally, and turns red whenever
the output is disconnected internally as a result of
malfunction, e.g. DC voltage at the output, output stage
defect, or heatsink temperature exceeding 90°C. After
turning the amplifier on, this LED will remain red for about
5 seconds until the internal supply voltages have set to
their normal values.
PARALLEL mode: same wiring as DUAL mode, but with
identical signals on all outputs. Minimum total speaker
impedance per channel is 2 ohms.
SIGNAL: a lit LED indicates an audio signal present at the
channel's output. Threshold level is +10 dBV.
BRIDGE mode: BRIDGED OUT speaker connection is done by
using standard Speakon cables. Make sure that there is no
ground connection for pins 2+ and 2- on your Speakon plug.
The OUT 1 socket can be used to feed the output signal to an
NLR: lights up when the internal limiter needs to
automatically reduce gain because of a significant
deviation between input and output signal shape. This
way the NLR limiter prevents occurrence of gross
7
PTH Series
User Manual
nonlinearity conditions inside the amplifier caused by
overdrive, overload or defect and keeps the signal shape
unaltered under any circumstances.
The NLR circuit keeps signal shape distortion under 5%
and thus guarantees a clean sound and effective speaker
protection.
TCL: indicates signal limiting as a result of heat sink over
temperature (above 80°C). This helps to prevent the
triggering of the internal thermal shut-off circuit, which
would step in at 90°C heat sink temperature as a final
safeguarding measure. TCL becomes only active when
the regular cooling mechanism fails to work properly, e.g.
by a dirty heat sink, or obstructed air-flow. A lit TCL LED
should always be taken as a sign to check for sufficient
cooling air supply.
connected to chassis ground. In a perfect world it would be
possible to simply connect the sleeves of the signal cables to
pin 1 at both ends of the cable. This would in effect make the
cable screen an extension of the chassis between the two
interconnected pieces of equipment and provide for perfect LF
and HF screening of the audio signals.
Problem however is that some equipment use badly organised
internal grounding and will generate hum and buzz because of
earth currents flowing through the internal signal ground. In
such case it is necessary to stop the earth currents from
flowing by disconnecting pin 1 from the sleeve. Use the
figures below as a guidance to solve problems with hum or
buzz.
4. Grounding
For maximum performance we recommend the use of two
conductor shielded cable for making input connections.
Because the shield does not carry audio signal, interference
between signal current and audio current is minimised in this
way. While wiring up your system take following important
points into consideration:
1. Never use a ground lift adapter on the mains feed. The
isolation system of this product takes into account that the
chassis is connected to earth at all times. This product will
become unsafe if the chassis is disconnected from earth.
2. Most installations
use a mix of balanced and
unbalanced connections with a variety of equipment being
connected. In case you experience a hum or buzz
problem, do not be afraid to experiment.
Pin 1 of the input connectors (and direct out connectors) is
Unbalanced
Balanced
Floating
Floating
Source
Output
Amplifier
Input
2-wire mains cord
3-wire mains cord
Amplifier
Input
2-wire mains cord
Grounded
Source
Output
Source
Output
Grounded
Amplifier
Input
Source
Output
Amplifier
Input
3-wire mains cord
8
PTH Series
User Manual
5. Technical specifications
Model
PTH 3
PTH 5
PTH 7
PTH 9
Min. cont. output power per channel into 2 ohms
400 W
680 W
980 W
1.150 W
330 W
540 W
720 W
920 W
220 W
330 W
450 W
600 W
Min. output power in bridge mode into 8 ohms
1x600 W
1x1.000 W
1x1.400 W
1x1.800W
Min. output power in bridge mode into 16 ohms
1x380 W
1x600 W
1x900 W
1x1.180W
1 KHz sine wave, THD < 1%, both channels driven
Min. output power per channel into 4 ohms
1 KHz sine wave, THD < 1%, both channels driven
Min. output power per channel into 8 ohms
1 KHz sine wave, THD < 1%, both channels driven
Frequenty range
+ 0 dB / - 0.3 dB
20 Hz - 20 KHz at nom. output power
SMPTE intermodulation distortion
< 0.1%
60 Hz - 7 KHz 4:1
Pulse intermodulation distortion
< 0.1%
30 KHz bandwidth at nom. output power
Slew rate
> 50V / µs
Input low pass filter defeated
Damping factor
> 200 : 1
1 KHz referred to 8 ohms
Max voltage gain
32 dB
Noise interference
< -106 dBV
< -108 dBV
< -110 dBV
< - 112 dBV
22 Hz - 22 KHz rms unweighted, reffered to nom. output power
Crosstalk
> -70 dB
1 KHz / 8 ohms
Input CMRR 100 Hz
> -80 dB
Output DC voltage
< ±5 mV
Input impedance
10 Kohms unbalaced / 20 Kohms balanced
Input connectors
1/4" phone jack / XLR compound receptacle, parallel XLR male per input
Output connectors
1 x 4-pole Speakon per channel / 1 x 4-pole Speakon for bridge output
Cooling
Forced cooling with 2 vari-speed fans / rear to front airflow
Mains supply
Dimensions
Net weight
Shipping weight
115 / 230 V AC (-20% / +5%) 50/60Hz
Width: 482 mm, Height: 88.5 mm, Depth: 450 mm
17.5 Kg
18.3 Kg
20.5 Kg
21.7 Kg
20 Kg
20.8 Kg
23 Kg
24.2 Kg
9
PTH Series
User Manual
Dimensions
Abmessungen
Input
1 = SIGNAL GROUND
2 = SIGNAL +
INPUT
2
MODE
DUAL
3
1
1
2
C A UT ION
R IS K OF E L E C T R IC
S HOC K
MIN.
2 OHM
WARNING
REDUCE
SPEAKER OUT 1
1+ = SIGNAL CH. 1
1 - = GROUND CH. 1
2+ = SIGNAL CH. 2
PARALLEL
1
DIRECT
OUT
BRIDGED
2
SPEAKER OUT 2
1+ = SIGNAL CH. 2
1 - = GROUND CH. 2
SPEAKER OUT
CAUTION
THE RISK OF ELECTRIC SHOCK. DO NOT
NO USER SERVICEABLE PARTS INSIDE.
REFER SERVICING TO QUALIFIED PERSONNEL.
AVIS
RISQUE DE CHOC ELECTRIQUE. NE PAS OUVRIR
r
BRIDGED OUT
1+ = SIGNAL CH. 1
1 - = SIGNAL CH. 2
2+ = GROUND CH. 1
!
THIS APPARATUS MUST BE EARTHED TO
PTH9-01BB
SERIAL NR: PTH9-01BB-0001
MADE IN BELGIUM
DATE OF MANUFACTURE: 28.06.01
POWER REQUIREMENTS:
210-244V AC 50/60Hz 4100W MAX
BRIDGED MONO OPERATION: INPUT SELECTOR SWITCH TO BRIDGED
POSITION. INPUT SIGNAL TO CH. 1 ONLY. CONNECT SPKR TO 1+ AND 1- OF
BRIDGED OUT CONNECTOR. MATCH CH. 1 AND CH. 2 GAINS ON THE FRONT
BRIDGED
OUT
WARNING!
HAZARDOUS ENERGY!
MAKE PROPER SPEAKER CONNECTIONS.
MIN. 4 OHM
12
POWER
10
8
12
6
14
18
24
2
0
2 x 900W PROFESSIONAL POWER AMPLIFIER
CH 1 • dB
88.9
55
PTH 9
READY
SIGNAL
LIMITER
4
10
8
6
14
18
PROTECT
NLR
TCL
READY
SIGNAL
LIMITER
4
24
2
PROTECT
NLR
TCL
0
CH 2 • dB
482
4
437
450
445
16
PTH Series
User Manual
Warranty
Garantie
SUMMARY
The Q4AUDIO division of Summit Engineering nv Tongersesteenweg 190 3800 Sint-Truiden Belgium, the creators and
manufacturers of the Q4AUDIO product line warrants to you, the original purchaser and any subsequent owner of this Q4AUDIO
product, for a period of 2 (two) years (warranty period) from the date of purchase by the original purchaser that the product is free
of defects in components and factory workmanship. The date of purchase is the date appearing on the first end-user's sales
receipt or other proof of original purchase from an authorised Q4AUDIO dealer.
ITEMS EXCLUDED FROM WARRANTY
This Q4AUDIO warranty does not cover product failure caused by misuse, accident or neglect. Nor shall it be applicable to any
product on which the serial number has been defaced, altered or removed. This warranty shall be considered void if this product
is subjected to repair work or alteration by persons other than authorised by Q4AUDIO in such a manner as to injure, in the sole
judgment of Q4AUDIO, the performance, stability, reliability or safety of this product. This warranty does not apply to finish or
appearance items. This warranty is in effect only during the warranty period.
OUR COMMITMENT
During the warranty period, Q4AUDIO will remedy any defect (except as excluded) by repair or at its option replacement or refund.
In case of refund the defective or malfunctioning product shall be made available to us free and clear of all lies or other
encumbrances. The refund will be equal to the original purchase price less a reasonable depreciation of 10% per year from the
date of purchase. The refund will not include interests, insurance, closing costs, loss of profit or other financial costs that may be
the result of the product's defect.
OBTAINING WARRANTY SERVICE
You must notify us of your need for warranty service, preferably by filling out the service request form in this manual and returning it
to us. We will give you notice of the authorised service center to whom you may deliver the product or we will give you an
authorisation to return it to the factory. All components must be shipped in a factory pack, shipping prepaid. Repairs and
replacement parts provided under the terms of this warranty shall carry only the unexpired portion of this warranty.
DISCLAIMER
Q4AUDIO is not liable for any damage to other products such as speakers, amplifiers or any other equipment that is caused by
using this Q4AUDIO product.
PRODUCT CHANGES
We reserve the right to change the design on any product without prior notice and with no obligation to make corresponding
changes in products previously manufactured.
Summit Engineering nv
Q4AUDIO division
Tongersesteenweg 190
3800 Sint-Truiden
Belgium
tel: +32 11 69.42.59
fax: +32 11 69.45.92
www.q4audio.com
email: [email protected]
17
Service Request Form
Owner information
Name/Company: ..............................................................................................................................
Shipping address:
..........................................................................................................................................................
Country: ...........................................................................................................................................
Telephone: ........................................................... Fax: ...................................................................
Product information
Model: ..............................................................................................................................................
Serial number: .................................................................................................................................
Purchased from: ..............................................................................................................................
Purchase date: .................................................................................................................................
Problem description Be sure to explain the circumstances under which the problem occurred.
..........................................................................................................................................................
..........................................................................................................................................................
..........................................................................................................................................................
..........................................................................................................................................................
..........................................................................................................................................................
..........................................................................................................................................................
..........................................................................................................................................................
..........................................................................................................................................................
Attempts to solve the problem
..........................................................................................................................................................
..........................................................................................................................................................
..........................................................................................................................................................
..........................................................................................................................................................
..........................................................................................................................................................
Send this service request form together with the unit to your authorised Q4audio dealer,
or to following address:
Summit Engineering nv
Q4audio division
Tongersesteenweg 190
3800 Sint-Truiden Belgium
Tel: (+32) (0)11 69 42 59
Fax: (+32) (0)11 69 45 92