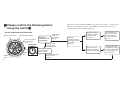
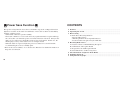
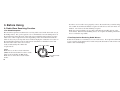
1
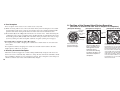
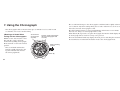
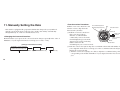
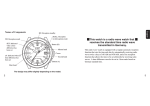
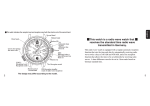
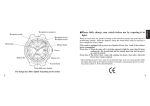
Request to Customers
All repairs performed on this watch, excluding repairs involving the
band, are to be performed at the CITIZEN. When desiring to have your
watch repaired or inspected, place contact the Citizen Service Center
either directly or through the store where you purchased your watch.
3
RX: Reception standby
NO: Reception result
24 hour hand
60
RX
NO
70
80 75
H
0
250
10
18
90
ON
ON/OFF
(alarm/daylight
savings time)
W This watch is a radio wave watch that receives the
standard time radio wave transmitted in Germany W
H, M, L:
Reception level/reception
result
This radio wave watch is equipped with a regular automatic reception function that sets
the time and date by automatically receiving radio waves at 3:00 AM or 4:00 AM, and a
free reception function that allows the time to be set arbitrarily at any time by receiving
radio waves.
· This watch is unable to receive radio waves of countries other than Germany.
Button (A)
M
Second hand
L
ER
ET
Hour hand
TAC
HY
M
Function hand (day,
chronograph minutes,
chronograph 1/20 seconds)
0
OF
F
R ADIO
CONTROLLED
120
0
14
Minute hand
Crown
Date
Button (B)
Mode hand (time, chronograph,
local time, reference position,
alarm, date)
* The illustrations shown in this manual may differ from the actual watch you have purchased.
4
W Please use this watch after charging sufficiently by
placing in light W
If the second hand of the watch is moving at two-second intervals while the watch is in
use, this indicates that the watch is insufficiently charged. Use the watch after first
recharging by referring to the section entitled, "15. General Reference for Charging
Times of Solar-Powered Watches".
Since it may be difficult for light to shine on the watch as a result of being covered by
clothing during the winter months in particular, it is recommended to charge the watch
by exposing to direct sunlight once a month. To ensure that your watch is used
comfortably, it is recommended to try to keep the watch fully charged at all times.
5
(The mode can be switched by pulling the crown out to Position 1. Set the mode
hand to one of the three locations of the TME mode. Return the crown to its
original position after switching the mode.)
* Set the mode hand to the TME mode.
RX: Reception standby
NO: Reception result
60
RX
NO
TAC
HY
M
0
250
18
90
ON
10
0
OF
F
R ADIO
CONTROLLED
120
Mode
hand
6
[TME mode]
H
80 75
M
ER
ET
70
L
H, M, L: Reception
level/reception
result
0
14
Button
(B)
Check the
movement of the
second hand.
Second hand
moving at
one-second
intervals
Second hand
moving at twosecond intervals
Recharge the watch
by placing under
direct sunlight
Check the
reception result by
pressing button (B)
at the 4:00
position.
When the second
hand has pointed to
reception result
(H, M or L)
The standard time
radio wave has been
received properly.
The watch can now
be used.
When the second
hand has pointed to
reception result (NO)
Perform radio wave
reception by referring
to the section entitled,
"Free Reception" on
the next page.
Please confirm the following before
using the watch
W Please confirm the following before
using the watch W
Second hand moving
at one-second
intervals
7
90
ON
NO
RX
60
L
TAC
HY
140
ER
ET
M
M
H
250
18
0
· In the case of free reception, press button (B) at the 4:00 position for about 2 seconds or
more and after hearing a confirmatory tone, release your finger when the second hand
begins to move to the RX: Reception Standby position (12:00).
· It is not necessary to press button (B) in the case of regular automatic reception.
· It may be difficult to receive radio waves around the times of dawn and dusk. It is
recommended to receive radio waves while avoiding these times. Refer to the section
entitled, "4. Receiving Radio Waves" for further information on the procedure for
receiving radio waves.
<Confirmation of Reception Result>
Important Points Regarding Radio
Wave Reception
70
O CONTROLLED
8
120
[Free Reception]
The free reception function lets you receive radio waves at any time. Use this function
when the reception environment has changed or in other cases when radio waves are
unable to be received by Regular Automatic Reception. Do not move the watch during
free reception to ensure that radio waves are reliably received. (It may take up to about
15 minutes to receive radio waves.)
80 75
RADI
[Regular Automatic Reception]
The watch sets the time (including daylight savings time) and date by automatically
receiving radio waves at 3:00 AM or 4:00 AM each day. (Radio waves are not received
at 4:00 AM if they have been successfully received at 3:00 AM.)
Remove the watch from your wrist and place it in a
stable location where radio waves are able to be
received easily such as near a window with the 6:00
position of the watch facing a radio wave transmitter
station.
OF
F
· Radio waves are received in the Time Mode (TME/3 locations) or Local Time Mode
(L-TM). Radio waves cannot be received in other modes.
<Reception Procedure>
10
0
W Important Points Regarding Radio Wave
Reception W
Check the reception result to determine whether or not radio waves have been received
properly by pressing button (B) located at the 4:00 position following reception. If the
second hand points to H, M or L, this indicates that radio waves have been received
properly. The watch can now be used.
If the second hand points to NO, this means that radio waves were unable to be received.
If this happens, try receiving radio waves again at a different location.
9
W Power Save Function W
This power saving function causes the second hand to stop at the 12:00 position when
light does not shine on the watch for 30 minutes or more such as when it is blocked by
clothing or during storage.
· Other hands continue to operate normally.
· The watch continues to receive radio waves by regular automatic reception and keep
the correct time even when the power save function has been activated. It may not be
able to receive radio waves depending on the storage environment. In this case, the
timekeeping accuracy of the watch is ±15 seconds per month.
· When the watch is exposed to light, the power save function is canceled and the
second hand begins to move normally again.
* Refer to the section entitled, "14. A. Power Save Function" for further information on
the power save function.
10
CONTENTS
1. Features.................................................................................................................... 14
2. Operating the Crown .............................................................................................. 15
3. Before Using ............................................................................................................ 16
A. Radio Wave Receiving Function
<For Good Reception>
<Time Required for Receiving Radio Waves>
<Locations where Reception may be Difficult>
4. Receiving Radio Waves .......................................................................................... 19
A. Position of the Second Hand During Reception
B. Confirmation of Reception Result
C. Reception Level and Reception Result
D. General Reference for Receiving Areas
5. List of Functions Assigned to Mode Hand............................................................ 26
6. Switching the Mode................................................................................................. 30
7. Using the Chronograph .......................................................................................... 32
11
8. Setting Local Time and Daylight Savings Time ................................................... 36
9. Using the Alarm ...................................................................................................... 40
10. Manually Setting the Time and Daylight Savings Time...................................... 42
A. Setting the Time
B. Setting Daylight Savings Time
11. Manually Setting the Date...................................................................................... 46
12. Checking and Correcting the Reference Position ................................................ 52
A. Checking the Reference Position
B. Correcting the Reference Position
13. Photoelectric Power Generation Function............................................................ 57
<For Optimum Use of this Watch>
<Try to Keep the Watch Charged at all Times>
12
14. Unique Functions of Solar-Powered Watches ...................................................... 58
A. Power Save Function
<Power Save>
<Canceling Power Save>
B. Insufficient Charge Warning Function
C. Overcharging Prevention Function
15. General Reference for Charging Times of Solar-Powered Watches.................. 63
16. Solar-Powered Watch Handling Precautions....................................................... 65
Charging Precautions
Handling the Secondary Battery
Replacing the Energy Storage Cell
17. Using the Tachymeter (When Provided) .............................................................. 67
18. Troubleshooting ...................................................................................................... 68
19. Precautions .............................................................................................................. 70
20. Specifications ........................................................................................................... 76
13
1. Features
(Continuously Moving the Hands)
Rapidly turning the crown continuously to the left or right (by two clicks) causes the
hands (hour hand, minute hand or second hand) to move continuously. Click the crown
once to the right or left to interrupt hand movement.
H
M
L
R
A
IO
D
This watch is a radio wave watch that automatically corrects the time (including daylight
savings time) and date by receiving standard time radio waves (time data) transmitted in
Germany. In addition, this watch is also an Eco-Drive radio wave watch provided with a
photoelectric power generation function that converts light energy into electrical energy
to drive the watch. It is also equipped with the features listed below.
(1) Chronograph Function
· This function is able to measure time up to 59 minutes 59.95 seconds in 1/20 second
units.
(2) Local Time Function
· This function allows the watch to be set to the time in another country or city.
· Local time can be corrected in one hour units.
· Daylight savings time can be switched on and off.
(3) Alarm Function
· The alarm time can be set based on a 24-hour clock.
· The alarm sounds for 15 seconds when the watch reaches the set time.
(4) Perpetual Calendar Function
· The date (elapsed years, month, date and day) does not have to be corrected through
February 28, 2100 even if radio waves are not received.
14
2. Operating the Crown
CO
NT
RO
L
LED
Rapidly turn the crown continuously (by
two clicks) with the side of your Finger.
Click Click
15
3. Before Using
A. Radio Wave Receiving Function
<For Good Reception>
This watch incorporates an antenna for receiving radio waves inside the watch case (at
the 6:00 position). For good reception, it is recommended to have the 6:00 position of
the watch facing in the direction of the radio wave transmitter station when receiving
radio waves. The reception level varies depending on the environment in which the
watch is used. Try receiving radio waves while changing the orientation or location of
the watch while referring to the reception level of H, M or L. Find the location and
direction where radio waves are received
easily as indicated by H or M for the
Time mode (TME)
reception level.
[Note]
Radio waves can be received in the time
(TME) mode found at three locations on the
watch or the local time (L-TM) mode.
Radio waves cannot be received in other
modes.
16
· In order to receive radio waves properly, remove the watch from your wrist and place
it in a stable location that facilitates reception of radio waves such as in front of a
window. Do not move the watch during reception.
· Radio waves may be hard to receive due to blockage by metallic objects or the
environment. When inside a building and so on, reception should be performed as
close to a window as possible.
<Time Required for Receiving Radio Waves>
It takes from about 2 to 15 minutes to receive radio waves. If reception has failed due to
a poor reception environment and so forth, it may take about 60 seconds for the watch to
return to the normal display.
Local time mode
(L-TM)
17
<Locations where Reception may be Difficult>
It may not be possible to properly receive radio waves at locations susceptible to
generation of radio wave noise or under environmental conditions that cause difficulty in
receiving radio waves.
j Locations subject to extremely high or low temperatures
j Inside a reinforced concrete building, between tall buildings or in valleys between
mountains or underground
j In a car, train or airplane
j Near a cellular telephone in use
j Near high-tension wires (power lines), railroad overhead wires or airports
(communication facilities)
j Near household electric appliances or OA equipment such as TV sets, refrigerators,
personal computers, fax machines, etc.
18
4. Receiving Radio Waves
· There are three ways to receive radio waves consisting of regular automatic reception,
free reception and recovery automatic reception. The time (including daylight savings
time) and date are corrected automatically when radio waves have been properly received.
[Note] Do not move the watch until reception is completed.
1. Regular Automatic Reception
· The watch automatically begins to receive radio waves at 3:00 AM or 4:00 AM each day.
(Radio waves are not received at 4:00 AM if they have been successfully received at 3:00
AM.)
(1) When receiving radio waves, remove the watch from your wrist and place it in a stable
location where radio waves can be received easily such as by a window with the 6:00
position of the watch facing in the direction of the radio wave transmitter station.
(2) After the second hand has moved to the reception standby (RX) position, it moves to H,
M or L to indicate that reception of radio waves is in progress after which the watch
begins to receive radio waves.
(3) reception is completed, the second hand automatically moves from H, M or L to the
correct time.
19
14
0
Button (B)
The second hand
moves to the RX
position and stops.
The second hand
moves to either the H,
M or L reception level.
Although the second
hand may turn to
correct the time during
reception, this does not
mean that reception is
completed.
0
0
18
CONTROLLED
120
250
R ADIO
18
70
80 75
H
250
F
Reception
level
250
H
OF
M
M
10
0
L
H
L
Reception
standby
Reception
level
[Completion of Reception]
CH
YM
M
NO
TAC
HY
M
RX
R
TE
RX
[Reception
A in Progress]
ER
ET
60
ER
ET
3. Recovery Automatic Reception
· When the watch has stopped as a result of being insufficiently charged, radio waves are
then received once automatically. However, charge the watch for about 30 minutes under
direct sunlight to initiate recovery automatic reception. Try to keep the watch charged at
all times so that it does not become insufficiently charged.
20
(movement of second hand from start of reception to completion)
[Reception Standby]
90
<Tone Indicating Completion of Free Reception>
· If reception is successful, a beeping tone sounds twice and the watch is corrected to the
correct time.
· If reception has failed, a beeping tone sounds once and the watch returns to the time
display prior to radio wave reception.
A. Position of the Second Hand During Reception
ON
2. Free Reception
· Free reception can be used to receive radio waves at any time.
(1) When receiving radio waves, remove the watch from your wrist and place it in a stable
location where radio waves can be received easily such as by a window with the 6:00
position of the watch facing in the direction of the radio wave transmitter station.
(2) Press button (B) at the 4:00 position for about 2 seconds or more. After the hearing the
confirmatory tone, release your finger after checking that the second hand has moved to
the standby position (RX) (12:00). The remainder of the procedure is the same as steps
(2) and (3) of the procedure for regular automatic reception (on the previous page).
When radio waves have been
received properly, the second
hand returns to one-second
interval movement and each
hand is automatically corrected to
the correct time. If radio waves
were unable to be received, the
watch returns to the time prior to
radio wave reception. Never
move the watch until the second
hand returns to one-second
interval movement.
21
B. Confirmation of Reception Result
· When button (B) is pressed once, the second hand moves to H, M, L or NO to enable
confirmation of the reception result.
[Note] Since the second hand moves to the 12:00 (RX) position and free reception
begins if button (B) is depressed continuously for 2 seconds or more, do not
press button (B) for 2 seconds or more. In the case of having mistakenly
begun free reception, press button (B) for 2 seconds and to cancel radio wave
reception.
· The reception is indicated for 10 seconds after which the watch automatically returns
to the current time. In addition, the watch can also be returned to the current time by
pressing button (B) while the reception result is indicated.
22
C. Reception Level and Reception Result
· During the time radio waves are being received, the second hand waits at the
reception position corresponding to the reception state to indicate the reception level.
Following reception, the reception result can be confirmed by pressing button (B).
Reception
level
Position of
second hand
Reception level during reception
H
12 seconds
position
· When the radio wave reception
environment is extremely good
M
9 seconds
position
· When the radio wave reception · When radio waves were received in
a good reception environment
environment is good
L
6 seconds
position
· When the radio wave reception
environment is somewhat good
NO
55 seconds
position
--------------------
Reception result after reception
· When radio waves were
received in an extremely good
reception environment
· When radio waves were
received in a somewhat good
reception environment
When reception has failed
23
D. General Reference for Receiving Areas
The following provides a general reference for those areas where the watch is able to
receive standard time radio waves. These areas may vary as a result of changes in radio
rave reception conditions depending on the time period, seasonal variations and weather.
Since this map only provides a general reference of the areas where radio waves can be
received, there may be locations where radio waves cannot be received even if they are
within the range shown on the map.
Standard time radio wave
transmitter station
DCF77
Location of transmitter
station
Mainflingen, Germany (25
km southeast of Frankfurt)
General reference for areas where radio
waves can be received
Radius of about 900 km from radio wave
transmitter station (radio waves may not
be able to be received in the vicinity of
Lake Leman, Switzerland)
Although the standard time radio waves used by radio wave watches are transmitted
nearly continuously 24 hours a day, transmission may be interrupted for reasons such as
maintenance and inspections. This watch will continue to keep the correct time at an
accuracy of within ±15 seconds per month even if it is unable to receive standard time
radio waves.
24
Oslo
Hamburg
Hamb
Warsaw
Berlin
Paris
Budapest
Marseilles
Rome Belgrade
Barcelona
Naples
25
5. List of Functions Assigned to Mode Hand
Name
Function hand
Date
Hour hand/
minute hand
Crown position
Normal position
Position 1
Position 2
Normal position
Position 1
Position 2
Normal position
Position 1
Position 2
Normal position
Second hand
Position 1
Position 2
24 hour hand
26
Normal position
Position 1
Position 2
Please read this section while referring to the watch illustration found at the beginning of
this manual.
*1: The same time is displayed at three locations of the TME mode.
TME (*1)
CHR
L-TM
a0b
ALM
CAL
Displays day
Stops at chronograph
0 minutes position
Displays day of local
time
Stops at chronograph
30 minutes position
Stops at chronograph
0 minutes position
Displays day
Displays date
Displays date
Displays date of local
time
Displays 31/1
Displays date
Displays date
Displays hours/minutes
Displays hours/minutes
Displays hours/minutes
of local time
Stops at 12:00 position
Displays alarm
hours/minutes
Displays hours/minutes
Displays seconds
Stops at 0 position
Mode switching (stops at Mode switching (stops at
30 seconds position)
30 seconds position)
Displays daylight savings
Stops at 0 position
time ON or OFF
Displays time
(24 hour clock)
Displays time
(24 hour clock)
Displays elapsed
years/month
Mode switching (stops at Mode switching (stops at Mode switching (stops at Mode switching (stops at
30 seconds position)
30 seconds position)
30 seconds position)
30 seconds position)
Displays elapsed
Displays daylight savings
Displays alarm
Stops at 12:00 position
years/month
time ON or OFF
ON or OFF
Displays seconds
Displays local time
(24 hour clock)
Stops at 12:00 position Displays alarm ON or OFF
Stops at 24:00 position
Displays alarm time
(24 hour clock)
Displays time (24 hour
clock)
27
*1: The same time is displayed at three locations of the TME mode.
Name
Button (A)
Crown position
TME (*1)
CHR
L-TM
a0b
Normal position
Confirms whether daylight
savings time ON or OFF
Start/stop/reset
Confirms whether
daylight savings time
ON or OFF
No change
Switches daylight savings
time ON and OFF
No change
Switches daylight
savings time ON and
OFF
Selects location for
reference position
correction
Position 1
Position 2
Normal position
Button (B)
28
Reception result/
Reception standby
CAL
No change
Switches alarm
ON and OFF
Selects location for date
correction
Alarm tone monitor
No change
No change
No change
Zeroes second hand to
12:00 position (by pressing
for 2 seconds)
No change
No change
Normal position
No change
No change
No change
No change
No change
No change
Position 1
Mode switching
Mode switching
Mode switching
Mode switching
Mode switching
Mode switching
Position 2
Time correction (after
pressing button (B) for
2 seconds)
No change
Local time correction
Reference position
correction
Alarm time correction
Date correction
Position 1
Position 2
Crown
Reception result/Reception
Displays 1/20 seconds
standby
when chronograph stopped
ALM
No change
29
6. Switching the Mode
[Mode Names]
Time mode
· This watch is equipped with six modes consisting of a time (displayed at three locations),
chronograph, local time, reference position, alarm and calendar mode.
· The same time is displayed at all three locations in the time (TME) mode.
<Procedure for Switching the Mode>
When the crown is pulled out to Position 1 (mode switching position), the second hand
advances (clockwise rotation) and stops at the 30 second position.
If the second hand does not stop at the 30 seconds position, refer to the section entitled,
"Checking and Correcting the Reference Position" and correct the reference position.
(1) Turn the crown and align the mode hand at
each mode.
60 TAC
Mode switching
HY
M
· The mode hand can be aligned by turning the
position
crown to the right or left. Each mode can be
selected by moving the mode hand.
(2) Pull the crown out further to Position 2 (mode
correction position) to enter the correction state
Mode correction
10
0
position
of each mode.
40
120 1
· Read the correction procedures for each mode
Second hand
for details on correcting each mode.
Mode hand
Chronograph mode
Calendar mode
Time mode
Time mode
Alarm mode
Local time mode
Reference position mode
[Switching the Mode]
RX
NO
70
H
80 75
M
ER
ET
CHR
Chronograph
Mode
TME
Time Mode
L-TM
Local Time
Mode
CAL
Calendar Mode
TME
Time Mode
ALM
Alarm Mode
a0b
Reference
Position Mode
0
250
18
90
ON
OF
F
R ADIO
30
TME
Time Mode
L
CONTROLLED
31
7. Using the Chronograph
· The chronograph is able to measure time up to 59 minutes 59.95 seconds in 1/20
second units. It is reset to 0 after timing.
Second hand
(chronograph
seconds)
Function hand (chronograph
minutes/chronograph 1/20
seconds)
60
RX
NO
Mode switching
position
H
80 75
M
ER
ET
70
L
0
250
18
90
10
0
OF
F
R ADIO
CONTROLLED
120
32
TAC
HY
M
ON
<Meanings of Hands When
Timing with the Chronograph>
Pull the crown out to Position 1 and
then turn the crown to align the
mode hand at [CHR] (chronograph).
Then return the crown to the normal
position.
· The second hand and function
hand are rapidly advanced to the
0 position and the watch enters
the chronograph mode.
· The second hand changes to the chronograph second hand and is rapidly advanced by
one revolution only when starting timing at 0 seconds. It then moves at one-second
intervals to measure chronograph seconds.
· The function hand changes to chronograph minutes and advances at one minute
intervals or it changes to chronograph 1/20 seconds.
· When button (B) is pressed to stop the chronograph, the function hand displays time
in chronograph 1/20 seconds for as long as it is pressed.
· The hour and minute hands may display the mode prior to switching the mode when
the watch has been switched from another mode to the chronograph mode.
0
14
Button (B)
33
Button (A)
Reset
Button (A)
Timing
Stop
Button (A)
Recall of 1/20
seconds
display
While button (B)
is pressed
Button (A) depressed
continuously
M
ER
ET
<Chronograph Timing>
Pull the crown out to Position 1 and turn to align the mode hand at [CHR]
(chronograph), and then push it in to the normal position.
(1) The chronograph is repeatedly started and stopped and a confirmatory tone sounds
each time button (A) is pressed.
(2) If button (B) is pressed while the chronograph is stopped, the function hand displays
the time in chronograph 1/20 seconds for as long as it is pressed. Releasing button
(B) returns the function hand to
displaying chronograph minutes.
Chronograph second hand
(3) If button (A) is depressed continuously
CH
RX
YM
while the chronograph is stopped, the
L
chronograph second hand and
chronograph minute hand are reset to the
Chronograph
1/20 second
0 position.
H
display
Function hand (chronograph
minutes/chronograph 1/20 seconds)
34
35
70
H
80 75
M
18
0
250
36
L
90
[Note] The times cannot be set beyond the above ranges. In addition, daylight
savings time must be switched on and off manually. It cannot be switched
automatically by receiving radio waves.
RX
NO
ON
· The local time function lets you set the watch to a time in a different area from the
time set in the time mode [TME].
· The time difference can be made in 1 hour units.
· The local time can be set over a range of ±26 hours based on the time mode [TME].
· Daylight savings time can also be set. The time in this case can be set over a range of
-25 to +27 hours.
<Procedure for Setting Local Time>
60 TAC
Pull the crown out to Position 1 and turn
HY
Button (A)
M
to align the mode hand to [L-TM] (local
Mode switching
time).
position
(1) Pull the crown out to Position 2
(local time correction position).
Local time correction
10
0
· The second hand turns continuously
position
40
120 1
and stops at the daylight savings time
Mode hand
ON or OFF position.
Daylight savings time
(2) Turn the crown to set the hour and
ON/OFF position
minute hands to the local time.
A Turning the crown to the right (by 1 click) causes the hour and minute hands and
the 24 hour hand to advance by 1 hour.
B Turning the crown to the left (by 1 click) causes the hour and minute hands and 24
hour hand to go back by 1 hour.
· Turning the crown continuously (rapidly by 2 clicks or more) causes the hour and
minute hands and the 24 hour hand to move continuously.
· Turn the crown to the left or right to interrupt continuous movement of the hands.
· The date and day also change corresponding to the calendar and local time.
ER
ET
8. Setting Local Time and Daylight Savings
Time
OF
F
R ADIO
CONTROLLED
37
[Note] Set the local time correctly by checking AM and PM with the 24 hour hand.
(3) Return the crown to the normal position. This completes the procedure for
correcting the local time.
8
<Procedure for Setting Daylight Savings Time>
Perform the following steps while the local time is already displayed.
(1) Pull the crown out to Position 2 (local time correction position).
· The second turns continuously, and then stops at the daylight savings time ON or
OFF position.
(2) Press button (A) to change the daylight
[Daylight Savings Time
savings time setting.
ON/OFF Setting]
· Each time button (A) is pressed, a
Second
confirmatory tone sounds and ON or OFF
hand
can be selected for daylight savings time.
The time advances by 1 hour if daylight
savings time has been set to ON.
10
(3) Return the crown to the normal position.
0
This completes the procedure for setting
120
ON
OFF
daylight savings time.
<Checking Daylight Savings Time ON/OFF Setting>
The daylight savings time setting is displayed for about 10 seconds as either ON or OFF
when the crown is returned to the normal position or when button (A) is pressed while
the crown is at Position 1 in the local time mode (L-TM).
· The second hand indicates ON when daylight savings time has been set.
· The second hand indicates OFF when daylight savings time has not been set.
ON
90
OF
F
R ADIO
38
CONTROLLED
1
39
9. Using the Alarm
· The alarm function uses a 24 hour clock. Once the alarm has been set, the alarm
sounds for 15 seconds when the set time is reached once a day.
· The alarm can be used in the time mode as well as the local time and calendar modes.
The alarm does not sound when the watch is in another mode.
Furthermore, press button (A) or (B) to stop the alarm tone from sounding before 15
seconds have elapsed.
60
RX
NO
Button (A)
TAC
HY
M
ER
ET
70
L
Mode switching
position
H
80 75
M
0
250
10
18
90
ON
<Setting the Alarm Time>
Pull the crown out to Position 1 and
turn to align the mode hand at [ALM]
(alarm).
· The hour hand and minute hand
display the previously set alarm
time.
0
OF
F
R ADIO
CONTROLLED
120
0
14
Button (B)
Alarm time
correction
position
Mode hand
Alarm ON/OFF position
40
(1) When the crown is pulled out to Position 2 (alarm time correction position), the
second hand stops at the ON or OFF position.
· Press button (A) to move the second hand to the alarm ON position.
· Each time button (A) is pressed, a confirmatory tone sounds and the alarm setting
switches between ON and OFF.
The setting can be changed while the crown is in the normal position or when pulled
out to Position 1.
(2) Turn the crown to set the correct alarm time while checking AM and PM with the 24
hour hand.
A Turning the crown to the right (by 1 click) causes the minute hand and hour hand
to advance by 1 minute.
B Turning the crown to the left (by 1 click) causes the minute hand and hour hand to
go back by 1 minute.
· Turning the crown continuously (rapidly by 2 clicks or more) causes the hour and
minute hands to move continuously.
· Turn the crown to the left or right to interrupt continuous movement of the hands.
(3) Push in the crown to Position 1 to return the watch to previously used mode.
(4) Return the crown to the normal position. This completes the procedure for setting
the alarm time.
41
10. Manually Setting the Time and Daylight
Savings Time
· The time can be set manually when radio waves are unable to be received.
· Daylight savings time is switched on or off automatically when radio waves have been
received. Furthermore, remove the watch from your wrist before receiving radio waves to
ensure that the time is set correctly.
A. Setting the Time
(The same time is displayed at the three locations of the TME mode. It is only necessary
to set the time at one of these locations.)
RX
NO
0
70
0
0
18
18
80 75
80 75
120
0
14
250
CONTROLLED
H
R ADIO
M
OF
F
90
0
Mode
switching
position
Button (A)
L
ON
10
TAC
HY
M
ER
ET
250
120
0
14
90
CONTROLLED
ON
R ADIO
H
250
OF
F
RX
NO
L
M
H
90
0
60
TAC
HY
M
ER
ET
M
ER
ET
70
L
ON
10
42
60
TAC
HY
M
10
18
RX
[Time Correction]
Crown at Position 2
70
60
NO
[Mode Correction]
Crown at Position 1
80 75
[Normal Hand Movement]
Crown at normal position
0
OF
F
R ADIO
CONTROLLED
120
0
14
Time
correction
Button position
(B)
<Time Correction Procedure>
Pull the crown out to Position 1 and turn to align the mode hand to [TME] (time).
(1) Pull the crown out to Position 2 (time correction position).
· The second hand turns continuously and stops at the daylight savings time ON or OFF
position.
(2) Press button (B) for about 2 seconds.
· When button (B) has been pressed for 2 seconds or more, the second hand advances
(clockwise direction) to the 0 seconds position. Release your finger from button (B)
once the second hand has stopped at the 0 seconds position.
(3) Turn the crown to align the minute hand, hour hand and 24 hour hand at the current time.
A Turning the crown to the right (by one click) causes the minute hand, hour hand and 24
hour hand to advance by one minute.
B Turning the crown to the left (by one click) causes the minute hand, hour hand and 24
hour hand to go back by one minute.
· Turning the crown continuously (rapidly by two clicks or more) causes the minute
hand, hour hand and 24 hour hand to move continuously.
· Turn the crown to the left or right to interrupt continuous movement of the hands.
· Check AM and PM with the 24 hour hand to set the time correctly.
(4) Return the crown to the normal position in synchronization with a telephone time signal
or other time service. This completes the time correction procedure.
43
B. Setting Daylight Savings Time
<Checking Daylight Savings Time ON/OFF Setting>
The daylight savings time setting is displayed for about 10 seconds as either ON or OFF
when the crown is returned to the normal position or when button (A) is pressed while
the crown is at Position 1 in the time mode (TME).
· The second hand indicates ON when daylight savings time has been set.
· The second hand indicates OFF when daylight savings time has not been set.
8
<Procedure for Setting Daylight Savings Time>
Perform the following steps while the time mode is already displayed.
(1) Pull the crown out to Position 2 (time correction position).
· The second turns continuously, and then stops at the daylight savings time ON or
OFF position.
(2) Press button (A) to change the daylight savings time setting.
· Each time button (A) is pressed, a confirmatory tone sounds and ON or OFF can be
selected for daylight savings time. The time
[Daylight Savings Time
advances by 1 hour if daylight savings time
ON/OFF Setting]
has been set to ON.
(3) Return the crown to the normal position.
Second
This completes the procedure for setting
hand
daylight savings time.
ON
90
10
ON
44
0
OF
F
OFF
R ADIO
CONTROLLED
120
1
45
46
Button (A)
Button (A)
70
18
0
250
Button (A)
Day
H
Date
M
Month/No. of years elapsed
from most recent leap year
90
[Change in Corrected Location]
L
ON
<Changing the Corrected Location>
Each time button (A) is pressed, the corrected location changes repeatedly in the order of
Month/No. of years elapsed from most recent leap year c Date c Day.
RX
NO
ER
ET
· This watch is equipped with a perpetual calendar that changes the year (number of
elapsed years from the most recent leap year), month, date and day automatically
through February 28, 2100 once the date has been set.
<Date Correction Procedure>
Second hand (month
Day
Pull the crown out to Position 1 and display/elapsed years)
Function hand
turn the crown to align the mode
hand at CAL (calendar).
60 TAC
HY
Button (A)
M
(1) Pull the crown out to Position 2
Mode switching
(date correction position).
position
· After the second hand turns
Date correction
continuously, it moves from the
10
position
0
40
month display/leap year from the
1
120
Date
elapsed years position, indicating
Mode hand
that the watch is in the
month/elapsed years correction mode.
(2) Turn the crown to the right to align the second hand at the month and number of
years elapsed from the most recent leap year. The second hand cannot be aligned by
turning the crown to the left.
A Turn the crown to the right (by one click) to align the second hand at the position
corresponding to the month and number of years elapsed from the most recent leap
year.
80 75
11. Manually Setting the Date
OF
F
R ADIO
CONTROLLED
47
:
:
dy
ea
y
r
r
yea
ap
Le
ar
e
y
1st
year
2nd
ar
3rd ye
February
zone
ril
ar
ye
Ap
Lea
py
ear
1s
t
2n yea
r
dy
ea
r
d
48
3r
3r
Position of the second hand that
indicates April in the second year from
the most recent leap year
nu
ar
y
ruar
Feb
December zone :
Between 12:00 and 1:00
January zone
Ja
Le
ap
yea
1s
t
2n yea r
d
r
ye
ar
<Reading the Month and No. of Elapsed Years>
[Reading the Month]
January zone : Between 1:00 and 2:00
February zone : Between 2:00 and 3:00
April zone
[Reading the Number of Elapsed Years]
Leap year: Starting point of each month zone
1st year after most recent leap year : 1st graduation of each month zone
2nd year after most recent leap year :2nd graduation of each month zone
3rd year after most recent leap year :3rd graduation of each month zone
<Quick Reference Chart for Number of Years Since Leap Year>
Year
2004
2005
2006
2007
Elapsed year
Leap year
1st year
2nd year
3rd year
Year
2008
2009
2010
2011
Elapsed year
Leap year
1st year
2nd year
3rd year
Examples:
· January of current leap year : Align the second hand to the 5 seconds position.
· April of 3rd year from most recent leap year : Align the second hand to the 23 seconds
position.
49
(3) Press button (A).
· The function hand moves back and forth for one revolution after which the watch
enters the date correction mode.
(4) Turn the crown to the set the date.
A When the crown is turned to the right (by one click), the function hand makes five
revolutions in the clockwise direction and the date advances by one day.
B When the crown is turned to the left (by one click), the function hand makes five
revolutions in the counter-clockwise direction and the date goes back by one day.
· Turning the crown continuously (rapidly by two clicks or more) causes the date to be
corrected continuously.
· Turn the crown to the left or right to interrupt continuous correction of the date.
(5) Press button (A).
· The function hand moves back and forth for half a revolution and stops at the day
position indicating that the watch is in the day correction mode.
(6) Turn the crown to set the day.
A Turning the crown o the right (by one click) causes the day to change in the order
of SUN c MON c · · · FRI c SAT and then back to SUN.
B Turning the crown to the left changes the day in the reverse order of SUN c SAT
c · · · TUE c MON and then back to SUN.
50
(7) Return the crown to the normal position. This completes the correction procedure.
<Setting to a Non-Existent Date>
The date is automatically changed to the first day of the following month when the
crown is returned to the normal position from the date correction mode. The date is
displayed as shown below if the date should happen to be mistakenly set to a nonexistent date.
Examples:
Regular year : February 29, 30 or 31 c March 1
Regular year : April 31
c May 1
Leap year : February 30 or 31
c March 1
Furthermore, since the set day will be displayed for the day, correct the day as
necessary.
51
12. Checking and Correcting the Reference
Position
The reference position may shift if the watch is placed in environment in which it is
subject to strong impacts or magnetism from the outside. If the watch is used while
shifted from the reference position, the time, calendar, alarm and other modes will not
function properly. If this happens, check the reference position and correct as necessary.
A. Checking the Reference Position
(2) Return the crown to the normal position.
· The second hand moves to the reference position (0:00) and stops.
If the reference positions of each hand are properly displayed as described above, pull
the crown out to Position 1 and return the watch to the mode in which it was previously
being used.
<Reference Position of Each Hand>
[Correct Reference Position of Each Hand]
· 24 hour hand: 24 hours 0 minutes
· Hour hand, minute hand: 0 hours 0
60 TAC
Button (A)
HY
M
minutes
Mode switching
· Second hand: 0 seconds
position
· Function hand: MON
· Date: Between 31st and 1st
Reference
RX
NO
70
H
80 75
M
ER
ET
0
250
10
18
90
52
L
ON
(1) Pull the crown out to Position 1 and turn the crown to align the mode hand at a0b
(reference position).
· The second hand advances (clockwise direction) to the 30 seconds position.
· The 24 hour hand, hour hand and minute hand move forward (clockwise) or
backward (counter-clockwise) to the reference position (0 hours 0 minutes 0
seconds) and stop.
· The date displays an intermediate location between the 31st and 1st, and the function
hand moves to MON and stops.
0
OF
F
40
* If the display of the watch is not as
120 1
shown above, perform Reference
Position Correction described in the following section.
R ADIO
CONTROLLED
Button (B)
position
correction
position
53
B. Correcting the Reference Position
· The reference position is corrected by repeatedly changing the corrected location in
the order of seconds c hour/minute hands c date (function hand turns) each time
button (A) is pressed.
[Change in Corrected Location]
Hour /
minute hands
Seconds
Button (A)
Date
(function hand)
Button (A)
Button (A)
54
M
Pull the crown out to Position 1 and turn to align the mode hand at a0b (reference
position). When the crown is then pulled out to Position 2, the second hand advances
continuously and then stops to indicate that the watch has entered the reference position
correction mode.
(1) Turn the crown to align the second hand at the reference position (0:00).
A Turning the crown to the right (by one click) causes the second hand to advance by one
second.
· Turning the crown continuously (rapidly by two clicks or more) causes the second hand
to move continuously.
· Turn the crown to the left or right to interrupt continuous movement of the second hand.
· The second hand cannot be aligned at the reference position by turning the crown to the
left.
(2) Press button (A).
· After the hour and minute hands move back and forth, the hour hand and minute hand
enter the correction mode.
(3) Turn the crown to align the hour hand and minute hand at "0 hours 0 minutes". Since the
24 hour hand moves in coordination with the hour hand, align the 24 hour hand at 24
hours (12:00 AM).
A Turning the crown to the right (by one click) causes the hour hand and minute hand to
advance by 1/4 minute (turning by four clicks causes it to advance by one minute).
B Turn the crown to the left (by one click) to turn back the hour hand and minute hand
by 1/4 minute (turning by four clicks causes it to go back by
Date changes to the 1st
one minute).
after the function hand
· Turning the crown continuously (rapidly by two clicks or
makes five revolutions
more) causes the hour hand and minute hand to move
continuously.
· Turn the crown to the left or right to interrupt continuous
movement of the hands.
55
[Position of
(4) Press button (A).
Date Display]
· The function hand moves back and forth and then enters the date
correction mode.
(5) Turn the crown to rotate the function hand and align the date between
the 31st and 1st, and then turn the crown to align the function hand at
MON.
A Turn the crown continuously to the right (rapidly by two clicks or
more).
· The function hand makes five revolutions in the clockwise
[Position of
direction and the date changes to the 1st.
Function Hand]
B Continue to rotate the function hand until the date reaches the 31st.
C Turn the crown to the left or right by one click to interrupt
movement of the function hand when the date has changed to the
31st.
D Rotate the function hand while turning the crown to the right one
click at a time, and after confirming that the date has reached an
intermediate location between the 1st and 31st, always make sure to
then align the function hand at the MON position.
(6) Return the crown to the normal position. This completes the reference position
correction procedure.
· After correcting the reference position, always make sure to set the mode to the TME
(time) mode and reset the watch to the correct time by Free Reception.
56
13. Photoelectric Power Generation
Function
This watch uses a secondary battery to store electrical energy. Once fully charged, it will
continue to keep the correct time for about 6 months during normal use (when the Power
Save function is not activated). Furthermore, the watch will keep the correct time for about
1 year when the Power Save function is activated.
<For Optimum Use of this Watch>
In order to use this watch comfortably, try to keep the watch charged at all times. Charge
the watch by exposing the watch dial (containing the solar cell) to direct sunlight or light
from a fluorescent lamp.
<Try to Keep the Watch Charged at all Times>
· If you usually wear long sleeves, the fabric may cover the watch and prevent it from being
exposed to light resulting in the watch becoming insufficiently charged. Try to kept the
watch charged especially during winter months.
· When the watch is removed, try to place it next to a window or other location that allows
the dial to be exposed to sunlight. This will enable charging to continue and allow the
watch to continue to run properly at all times.
57
60
60
RX
0
80 75
18
0
18
0
14
NO
TAC
HY
M
L
Two-second
interval
movement
Second hand
begins twosecond interval
movement
250
CONTROLLED
120
RX
H
OF
F
R ADIO
60
M
0
Watch stops
due to being
insufficiently
charged
If insufficient charge
warning (second hand
two-second interval
movement) continues
for 4 days or more
ER
ET
10
When sufficiently
charged by exposing
the dial (solar cell) to
light*1
90
0
Radio waves are
automatically
received once
ON
14
250
CONTROLLED
120
90
R ADIO
ON
OF
F
L
H
250
0
NO
M
H
90
ON
10
When reception
is successful*2
ER
ET
M
ER
ET
70
L
TAC
HY
M
70
NO
TAC
HY
M
80 75
RX
[Insufficient Charge Warning Display]
0
[Recovery Automatic Reception]
10
18
[Normal Display]
When the watch becomes insufficiently charged
due to not exposing the dial (solar cell) to light
70
When the watch becomes insufficiently charged, the display changes as shown below.
*1: If the watch has stopped as a result of being insufficiently charged, a minimum of about 30 minutes
are required until recovery automatic reception even if the watch is exposed to light.
*2: If recovery automatic reception has failed, the watch begins to run after returning to the time when
the watch stopped as a result of being insufficiently charged. In this case, although the second hand
moves at one second intervals, since the time is incorrect, first set the time manually or by free
reception before using the watch.
80 75
14. Unique Functions of Solar-Powered Watches
0
OF
F
R ADIO
CONTROLLED
120
14
0
When charged
58
59
TAC
HY
M
L
H
80 75
M
18
0
250
90
ON
OF
F
R ADIO
CONTROLLED
120
0
14
RX
M
H
250
Two-second interval
movement
L
ER
ET
The second hand changes from one-second interval
movement to two-second interval movement. After about
4 days have passed since the start of two-second interval
movement, the watch stops as a result
of being insufficiently charged.
TAC
HY
M
90
60
60
NO
ON
<Canceling Power Save>
The power save function is canceled automatically when the solar cell is exposed to
light.
· When the power save function is canceled, the second hand advances to return to the
current time and begins one-second interval movement.
B. Insufficient Charge Warning Function
0
0
10
0
18
10
70
RX
· Two-second interval movement begins if the watch is insufficiently charged. When
this happens, sufficiently charge the watch so that it returns to one-second interval
movement.
[Note]
· Although regular automatic reception is performed while the watch is in the Power
Save mode, radio waves may not be able to be received depending on the storage
environment. Check the reception result by pressing button (B) after the Power Save
function has been canceled. If the reception result is "NO", perform free reception
before using.
80 75
60
NO
ER
ET
<Power Save>
When the solar cell is continuously not exposed to light
for 30 minutes or more, the second hand stops at the 12:00
position and the watch enters the Power Save mode (to
reduce power consumption).
· Other hands continue to move normally.
· Regular automatic reception is still performed at 3:00
AM or 4:00 AM.
· The watch enters the power save mode if it is not
exposed to light even while the insufficient charge
warning function is activated (two-second interval movement).
[Power Save Mode]
70
A. Power Save Function
OF
F
R ADIO
CONTROLLED
120
0
14
61
[Note] During two-second interval movement:
(1) The time cannot be corrected by regular automatic or free reception, and the time
cannot be corrected manually.
(2) Only the time mode is displayed, and other modes cannot be used.
C. Overcharging Prevention Function
When the secondary battery becomes fully charged by exposing the solar cell to light,
the overcharging prevention function is activated automatically to prevent the battery
from being charged further. There is no effect on the secondary battery, timekeeping
accuracy, watch functions or performance no matter how much the watch is charged.
15. General Reference for Charging Times
of Solar-Powered Watches
The time required for charging varies according to the model of the watch (color of the
dial, etc.). The following times are shown below to serve only as a reference.
· Charging time refers to the amount of time the watch is continuously exposed to light.
Charging time
Illuminance
(lx)
500
1,000
3,000
10,000
100,000
62
Charging time for
1 day of operation
Charging time
from stopped state
to one-second
interval movement
Charging time to
fully charged
4 hours
45 hours
······
2 hours
20 hours
······
40 minutes
6.5 hours
150 hours
Outdoors, cloudy
12 minutes
2.5 hours
45 hours
Outdoors, summer, under
direct sunlight
2 minutes
45 minutes
9 hours
Environment
Interior lighting
60-70 cm (24-28 in.) under a
fluorescent lamp (30 W)
20 cm (8 in.) under a
fluorescent lamp (30 W)
63
Charging time for 1 day of operation: Time required for charging the watch to run for 1
day with normal hand movement.
Charging time to fully charged: Time required for charging the watch from the stopped
state when insufficiently charged to fully charged
16. Solar-Powered Watch Handling
Precautions
CAUTION Charging Precautions
[Note]
Once fully charged, the watch has a continuous operating time of about six months
without further charging. When the Power Save function has been activated, the watch
will continue to keep time for about one year. However, if the watch stops running as a
result of being insufficiently charged, since a considerable amount of time is required to
charge so that it starts running again as is indicated in the table, try to charge the watch
everyday. It is recommended to charge the watch at least once a month by exposing to
direct sunlight.
64
· Charging the watch at high temperatures can cause deformation or discoloration of
external components as well as a malfunction of the components of the movement.
· Avoid charging the watch at high temperatures (about 60°C / 140°F or higher).
Examples:
· Charging by placing the watch too close to a light source that may become
hot such as an incandescent lamp or halogen lamp.
· Charging by placing the watch on an automobile dashboard that can easily
reach a high temperature.
· When charging the watch with an incandescent lamp, halogen lamp or other light
source that may reach a high temperature, always make sure to place the watch at
least 50 cm (20 in.) away from the light source to prevent the watch from reaching a
high temperature.
65
WARNING Handling the Secondary Battery
· Never attempt to remove the energy storage cell from the watch. If the energy
storage cell must unavoidably be removed, store it out of the reach of small children
to prevent accidental swallowing.
· If the energy storage cell should happen to be swallowed, consult a physician
immediately and seek medical attention.
WARNING Replacing the Energy Storage Cell
The tachymeter feature is used to measure traveling speed such as that of an automobile.
In the case of this watch, the average speed can be approximately determined for a
certain distance by measuring how many seconds it takes to travel 1 kilometer
(measuring range: maximum 60 seconds). To determine average speed, start the
chronograph simultaneous to the start of measurement. Stop the chronograph when the
vehicle has traveled 1 kilometer. An approximation of the average speed over that
distance can be determined by the position of the chronograph second hand at that time.
Chronograph
second hand
Y
80
120
66
Tachymeter
60 TAC
H
ER
ET
M
· Although it is not usually necessary to replace the secondary battery, there may be
rare cases in which it becomes necessary due to a problem with the secondary
battery. If it becomes necessary to replace the secondary battery, please have it
replaced promptly.
17. Using the Tachymeter (When Provided)
Example:
If it takes 45 seconds to travel 1
kilometer, then the average
speed over that distance is 80
kilometers/hour.
67
18. Troubleshooting
<Radio Wave Reception Function>
Try checking the following when you think a problem has occurred.
Problem
Watch does not begin
reception
Unable to receive radio
waves (even within a
receivable area)
68
Check Items
· Is the watch in the time mode
(TME) or local time mode (LTM)?
· Does the second hand move to
"RX: Reception standby"?
Corrective Actions
· Pull the crown out to Position 1 and
turn to set the mode to the time mode or
local time mode.
· Continuously depress button (B) and
release when the second hand points to
the RX position.
· Are there objects that block
· Try receiving radio waves while facing
radio waves or generate noise
the 6:00 position of the watch towards a
nearby?
window while avoiding objects that
· Are radio waves attempted to be block radio waves or generate noise.
received away from a window?
Try changing the direction, location
and angle of the watch several times so
that the second hand points to a
reception level to find the location at
which radio waves are received easily.
(Refer to the sections entitled, "For
Good Reception" and "Locations where
Reception may be Difficult" of this
manual.
Unable to receive radio
waves even though
second hand points to
RX
· Is the second hand indicating a
reception level of H, M or L
even during reception?
· Wait until reception is completed (until
the second returns to one-second
interval movement)
Time does not match
telephone time service
even though radio
waves can be received
· Has the reference position been
set correctly?
· Check the reference position. If the
reference position is not correct, refer
to the section entitled, "Correcting the
Reference Position" of this manual and
reset the reference position.
69
19. Precautions
For correct use within the design limits of the watch, confirm the level of waterresistance of your watch, as indicated on the dial and case, and consult the table.
WARNING: Water-resistance performance
There are several types of water-resistant watches, as shown
in the following table.
Examples of use
The unit "bar" is roughly equal to 1 atmosphere.
* WATER RESIST(ANT) xx bar may also be indicated as
W.R. xx bar.
Indication
70
Dial
Case
(case back)
Specifications
Minor exposure to water
(washing face, rain, etc.)
Moderate exposure to
water (washing, kitchen
work, swimming, etc.)
Marine sports
(skin diving)
Scuba diving
(with air tank)
Operation of the
crown or button
with moisture visible
WATER RESIST
or no indication
WATER
RESIST(ANT)
Water-resistant to
3 atmospheres
OK
NO
NO
NO
NO
WR 50 or WATER
RESIST 50
WATER
RESIST(ANT) 5 bar or
WATER RESIST(ANT)
Water-resistant to
5 atmospheres
OK
OK
NO
NO
NO
WR 100/200 or
WATER RESIST
100/200
WATER RESIST(ANT)
10bar/20 bar or
WATER RESIST(ANT)
Water-resistant to
10/20 atmospheres
OK
OK
OK
NO
NO
71
WARNING: Water-resistance performance
• Water-resistance for daily use (to 3 atmospheres): This type of watch is water-resistant to
minor exposure to water. For example, you may wear the watch while washing your face;
however, it is not designed for use underwater.
• Upgraded water-resistance for daily use (to 5 atmospheres): This type of watch is waterresistant to moderate exposure to water. You may wear the watch while swimming;
however, it is not designed for use while skin diving.
• Upgraded water-resistance for daily use (to 10/20 atmospheres): This type of watch may be
used for skin diving; however, it is not designed for scuba or saturated diving using helium
gas.
• If seawater enters the watch, place the watch in a box or plastic bag and immediately take it
in for repair. Otherwise, pressure inside the watch will increase, and parts (crystal, crown,
buttons, etc.) may come off.
CAUTION: Keep your watch clean.
• Leaving dust and dirt deposited between the case and crown may result in difficulty in
pulling the crown out. Rotate the crown while in its normal position, from time to time, to
loosen dust and dirt and then brush it off.
• Dust and dirt tend to be deposited in gaps in the back of the case or band.
Deposited dust and dirt may cause corrosion and soil your clothing. Clean the watch
occasionally.
CAUTION
• Be sure to use the watch with the crown pressed in (normal position). If your watch has a
screw-lock type crown, be sure to tighten the crown completely.
• Do NOT operate the crown or button with wet fingers or when the watch is wet. Water may
enter the watch and compromise water-resistance.
• If the watch is used in seawater, rinse with fresh water afterward and wipe with a dry cloth.
• If moisture has entered the watch, or if the inside of the crystal is fogged up and does not
become clear within a day, immediately take the watch to your dealer or Citizen Service
Center for repair. Leaving the watch in such a state will allow corrosion to form inside.
72
Cleaning the Watch
• Use a soft cloth to wipe off dirt, perspiration and water from the case and crystal .
• Use a soft, dry cloth to wipe off perspiration and dirt from the leather band.
• To clean a metal, plastic, or rubber watchband, wash away dirt with mild soap and water.
Use a soft brush to remove dust and dirt jammed in the gaps in the metal band. If your
watch is not water-resistant, take it to your dealer.
NOTE: Avoid using solvents (thinner, benzine, etc.), as they may damage the finish.
73
CAUTION: Operating environment
• Use the watch within the operating-temperature range specified in the instruction manual.
Using the watch where temperatures are outside the specified range, may result in
deterioration of functions or even stoppage of the watch.
• Do NOT use the watch in places where it is exposed to high temperature, such as in a sauna.
Doing so may result in a skin burn.
• Do NOT leave the watch in a place where it is exposed to high temperature, such as the
glove compartment or dash-board of a car.
Doing so may result in deterioration of the watch, such as deformation of plastic parts.
• Do NOT place the watch close to a magnet.
Timekeeping will become inaccurate if you place the watch close to magnetic health
equipment such as a magnetic necklace or a magnetic latch of a refrigerator door or handbag
clasp or the earphone of a mobile phone. If this has occurred, move the watch away from the
magnet and reset the time.
• Do NOT place the watch close to household appliances that generate static electricity.
Timekeeping may become inaccurate if the watch is exposed to strong static electricity, such
as is emitted from a TV screen.
• Do NOT subject the watch to a strong shock such as dropping it onto a hard floor.
• Avoid using the watch in an environment where it may be exposed to chemicals or corrosive
gases.
74
If solvents, such as thinner and benzine, or substances containing such solvents come in
contact with the watch, discoloration, melting, cracking, etc. may result. If the watch comes
in contact with mercury used in thermometers, the case, band or other parts may become
discolored.
Periodical inspections
Your watch needs inspection once in every two or three years for safety and long use.
To keep your watch water-resistant, the packing needs to be replaced regularly.
Other parts need to be inspected and replaced if necessary.
Ask for Citizen geuine parts upon replacement.
75
20. Specifications
1. Model: E67*
2. Type: Analog solar-powered watch
3. Timekeeping accuracy: Within ±15 seconds per month on average (when worn at
normal temperatures of +5°C to +35°C / 41°F to 95°F and
when not receiving radio waves)
4. Operating temperature range: -10°C to +60°C / 14°F to 140°F
5. Display functions:
• Time: Hours, minutes, seconds, daylight savings time
• Calendar: Years elapsed from most recent leap year, month, date, day
6. Additional functions:
• Radio wave receiving function (regular automatic reception, free reception, recovery
automatic reception)
• Reception status display function (RX)
• Reception level display function (H, M, L)
• Reception result confirmation function (H, M, L, NO)
• Chronograph function (60 minute timing, 1/20 second units)
76
• Local time function (time difference correction: 1 hour units, daylight savings time
ON/OFF function)
• Reference position confirmation function
• Alarm function (24 hour clock alarm)
• Photoelectric power generation function
• Power save function
• Insufficient charge warning function
• Overcharging prevention function
7. Continuous operation times:
• Time until watch stops without charging after being fully charged
: Approx. 1 year (when power save function is operating)
: Approx. 6 months (when power save function is not operating)
• Insufficient charge warning display to stopped: Approx. 4 days
(Continuous operation times may vary depending on the conditions of use.)
8. Battery: Secondary battery, 1 pc.
* Specifications are subject to change without notice.
77