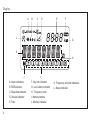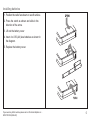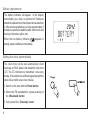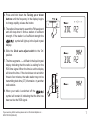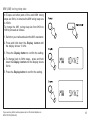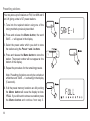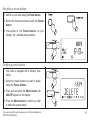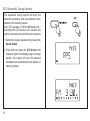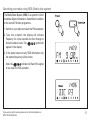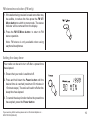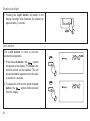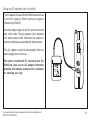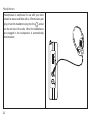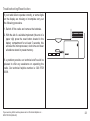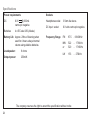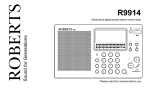
1
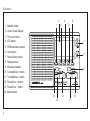
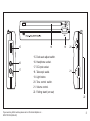
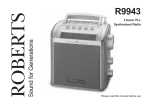
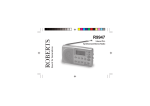
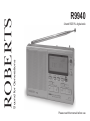
3-band RDS PLL digital radio
Sound for Generations
ROBERTS
R9940
Please read this manual before use
Contents
Features ..................................................... 1
FM mono/stereo button ............................ 19
Control locations ..................................... 2
Setting the sleep timer ............................. 19
Display information ................................. 4
Display back light ...................................... 20
Installing batteries .................................. 5
Lock button ................................................ 20
Battery replacement ............................... 6
AC adaptor ................................................. 21
Setting the clock automatically ............. 6
Headphones ............................................... 22
Setting the clock manually .................... 8
Troubleshooting/reset button .................. 23
Setting the buzzer alarm ....................... 9
Specifications ............................................ 24
Setting the radio alarm .......................... 10
Guarantee .................................................. 25
Search tuning ........................................... 11
Manual tuning .......................................... 12
MW (AM) tuning step size .................... 13
Presetting stations ................................ 14
Recalling a preset station ..................... 15
Deleting a preset station ...................... 15
ATS (Automatic Tuning System) ......... 16
Operating your radio using RDS .......... 17
Display modes ......................................... 18
Features
z
Large easy to read Liquid Crystal Display (LCD)
showing station name, frequency, time, memory
location and function status.
z
RDS station name display.
z
Twenty seven memory presets offer instant
access to your favourite stations on LW, MW
and FM.
z
Automatic time set via RDS signal.
z
ATS (Auto Tuning System) - scans LW, MW
and FM bands, automatically storing stations
in preset memories.
z
Scanning circuit allows you to search for
active stations.
z
Wake to radio or buzzer alarms.
z
Humane wake system - buzzer alarm gradually
increases in volume.
If you need any further advice, please call our Technical Helpline on :020 8758 0338 (Mon-Fri)
z
Adjustable sleep timer allows you to fall asleep
to music.
z
Snooze function - turns off alarm for five
minutes.
1
Controls
2
1
1. Standby button.
4
3
6
5
2. Liquid crystal display.
3. Time set button.
4. ATS button.
7
5. FM Stereo/Mono button.
6. Lock button.
8
7. Power/Sleep button.
8. Display button.
9. Waveband button.
9
10. Tuning/Minute + button.
11. Tuning/Minute - button.
12. Preset/Hour + button.
13. Preset/Hour - button.
14. Memo button.
14
2
10
12
13
11
18
15
19
20
15. Clock auto adjust switch.
16
16. Headphone socket.
17
18. Telescopic aerial.
17. DC input socket.
21
19. Light button.
20. Tone control switch.
21. Volume control.
22. Folding stand (on rear)
22
If you need any further advice, please call our Technical Helpline on :020 8758 0338 (Mon-Fri)
3
Display
A
B
C
D
E
F
L
G
K
H
J
4
I
A. Alarm indicators
F. Key lock indicator.
K. Frequency and text indicators.
B. RDS indicator.
G. Low battery indicator.
L. Stereo indicator.
C. Sleep time indicator.
H. Frequency units.
D. Snooze indicator.
I. Memory number.
E. Time.
J. Memory indicator.
Installing batteries
1. Position the radio face down on a soft surface.
2. Press the catch as shown and slide in the
direction of the arrow.
3. Lift out the battery cover
4. Insert 4 x LR6 (AA) size batteries as shown in
the diagram.
5. Replace the battery cover.
If you need any further advice, please call our Technical Helpline on :020 8758 0338 (Mon-Fri)
5
Battery replacement
The battery indicator will appear in the display
immediately your radio is switched off. Batteries
should be replaced when the indicator shows less than
3. After removing batteries you have approximately 3
minutes to replace the batteries after which clock and
memory information will be lost.
When the low battery indicator
display replace batteries immediately.
appears in
Setting the clock automatically
The clock time can be set automatically when
receiving an RDS station that transmits clock time
(CT). The CT information is transmitted once every
minute. If the station has sufficient signal strength the
clock will set within one or two minutes.
1. Switch on the radio with the Power button.
2. Select the FM waveband by repeat pressing of
the Waveband button.
3. Fully extend the Telescopic aerial.
6
4. Press and hold down the Tuning up or down
buttons until the frequency in the display begins
to change rapidly, release the button.
5. The radio will now start to search the FM waveband
and will stop when it finds a station of sufficient
strength. If the station is of sufficient strength the
symbol will light up in the liquid crystal
display.
6. Slide the Clock auto adjust switch to the ‘On’
position.
7. The time segments --:-- will flash in the liquid crystal
display indicating that the radio is waiting for the
RDS time signal. When the time is set the display
will show the time. If the clock does not set within
three to four minutes, the radio station may not be
transmitting clock time (CT) information - try another
radio station.
8. When your radio is switched off the
symbol will remain lit indicating that the time has
been set via the RDS signal.
If you need any further advice, please call our Technical Helpline on :020 8758 0338 (Mon-Fri)
7
Setting the clock time manually
When batteries are installed for the first time the
display will show - - : - -.
Time can be manually set with the radio switched on
or off. The clock uses the 24 hour system e.g. 2:00pm
is shown as 14:00.
1. Slide the Clock auto adjust switch to the ‘Off’
position
2. Press and release the Time set button , the display
will show ‘TIME SET’
.
3. The clock uses the 24 hour system e.g. 2:00pm is
shown as 14:00. Set the correct hour using the Hour
+ and - buttons.
4. Set the correct minute using the Minute + and buttons.
5. Press and release the Time set button to complete
time setting.
6. The display will show the correct time.
8
Setting the buzzer alarm
Note: Clock uses 24 hour system.
1. Repeatedly press and release the Standby
button until the display shows ‘Buzzer’.
symbol
2. Whilst the display
and alarm time are flashing set the required
hour using the Hour + and - buttons.
3. Set the required minute using the Minute +
and - buttons. Press and release the Standby
button to complete alarm setting.
4. At the preselected time the alarm will sound.
The alarm may be turned off for 24 hours by
pressing the Power button.
5. Pressing any other button (except Standby or
) whilst the alarm is sounding will activate
the snooze function. The alarm will be silenced
for 5 minutes.
6. To permanently cancel the alarm repeatedly
press and release the Standby button until the
symbol is removed from the
display.
If you need any further advice, please call our Technical Helpline on :020 8758 0338 (Mon-Fri)
9
Setting the radio alarm
Note: Clock uses 24 hour system.
1. Repeatedly press and release the Standby
button until the display shows ‘Last CH’.
2. Whilst the display
symbol
is flashing set the required hour using the Hour
+ and - buttons.
3. Set the required minute using the Minute +
and - buttons. Press and release the Standby
button to complete alarm setting.
4. At the preselected time the radio will switch
on to the last station listened to. The alarm
may be turned off for 24 hours by pressing
the Power button.
5. Pressing any other button (except Standby or
) whilst the alarm is sounding will activate
the snooze function. The alarm will be silenced
for 5 minutes.
6. To permanently cancel the alarm repeatedly
press and release the Standby button until the
symbol is removed from the
display.
10
Search tuning
1. Switch on your radio by pressing the Power
button.
2. Select the required waveband by repeat
pressing of the Waveband button. The
waveband selected will appear in the display.
On FM fully extend the Telescopic aerial. On
MW and LW rotate your radio for best reception.
3. Press and hold down either the Tuning + or buttons until the frequency in the display begins
to change rapidly. Release the button.
4. Your radio will scan the selected waveband,
stopping each time it finds a station of sufficient
strength. Adjust the Volume and Tone controls
to the required settings.
If you need any further advice, please call our Technical Helpline on :020 8758 0338 (Mon-Fri)
11
Manual tuning
1. Switch on your radio by pressing the Power
button.
2. Select the required waveband by repeat
pressing of the Waveband button. The
waveband selected will appear in the display.
On FM fully extend the Telescopic aerial. On
MW and LW rotate your radio for best reception.
3. A single press on either the Tuning + or buttons will change the frequency up or down.
The frequency steps are:- FM 50kHz, MW 9kHz
or 10kHz and LW 1kHz. Adjust the Volume
and Tone controls to the required settings.
12
MW (AM) tuning step size
In Europe and other parts of the world MW tuning
steps are 9kHz, in America the MW tuning step size
is 10kHz.
To change the MW tuning step size from 9KHz to
10KHz proceed as follows:1. Switch on your radio and select the MW waveband.
2. Press and hold down the Display button until
the display shows 10 kHz.
3. Press the Display button to confirm the setting.
4. To change back to 9kHz steps - press and hold
down the Display button until the display shows
9 kHz.
5. Press the Display button to confirm the setting.
If you need any further advice, please call our Technical Helpline on :020 8758 0338 (Mon-Fri)
13
Presetting stations
You may store up to 9 stations on FM, 9 on MW and 9
on LW giving a total of 27 preset stations.
1. Tune into the required station using one of the
tuning methods previously described.
2. Press and release the Memo button, the word
SAVE - -> will appear in the display.
3. Select the preset under which you wish to store
the station using the Preset + and - buttons.
4. Press and release the Memo button to store the
station. The preset number will now appear at the
bottom of the display.
5. Repeat the procedure for the remaining presets.
Note: Presetting of stations can only be carried out
whilst the word SAVE - -> is showing in the display
(5 seconds).
6. If all the preset memory locations are full pushing
the Memo button will cause the display to show
‘FULL. If you still want to store a new station press
the Memo button and continue from step 3.
14
Recalling a preset station
1. Switch on your radio using the Power button.
2. Select the desired waveband using the Bands
button.
3. Press either of the Preset buttons to cycle
through the available preset stations.
Deleting a preset station
Your radio is equipped with a Memory scan
facility.
1. Select the preset location you wish to delete
using the Preset buttons.
2. Press and hold down the Memo button until
DELETE appears in the display.
3. Press the Memo button to confirm you wish
to delete the preset station
If you need any further advice, please call our Technical Helpline on :020 8758 0338 (Mon-Fri)
15
ATS (Automatic Tuning System)
The automatic tuning system will scan the
selected waveband and automatically store
stations in the memory presets.
note: ATS operates on FM an MW bands only activating the ATS function will overwrite any
stations previously stored in the memory presets
1. Select the required waveband by pressing the
Bands button.
2. Press and hold down the ATS button until
frequency digits in the display begin to change
rapidly. Your radio will scan the selected
waveband and automatically store stations in
memory presets.
16
Operating your radio using RDS (Radio data system)
The Radio Data System (RDS) is a system in which
inaudible digital information is transmitted in addition
to the normal FM radio programme.
1. Switch on your radio and select the FM waveband.
2. Tune into a station, the display will indicate
frequency for a few seconds and then change to
show the station name. The
symbol will
appear in the display
3. If the station does not carry RDS information only
the station frequency will be shown.
indicator will flash if the signal
Note: the
is too weak for RDS operation.
If you need any further advice, please call our Technical Helpline on :020 8758 0338 (Mon-Fri)
17
Display Modes (FM only)
1. Whilst tuned to a station displaying its RDS station
name, you can change between station name and
frequency by pressing and releasing the Display
button.
2. The display will show the stations frequency for
approximately 5 seconds before reverting to
showing station name
18
FM stereo/mono button (FM only)
1. If the station being received is weak some hiss may
be audible, to reduce the hiss press the FM ST/
Mono button to switch to mono mode. The stereo
indicator will be removed from the display.
2. Press the FM ST/Mono button to return to FM
stereo operation.
Note: FM stereo is only available when using
earphone/headphones
Setting the sleep timer
Your radio can be set to turn off after a preset time
has elapsed.
1. Ensure that your radio is switched off.
2. Press and hold down the Power button until the
desired time is reached (maximum 90 minutes in
15 minute steps). The radio will switch off after the
sleep time has elapsed.
3. To cancel the sleep function before the preset time
has expired, press the Power button.
If you need any further advice, please call our Technical Helpline on :020 8758 0338 (Mon-Fri)
19
Display backlight
1. Pressing the Light button will switch on the
display backlight and illuminate the display for
approximately 7 seconds.
Lock button
The Lock button is used to prevent
unintentional operation.
1. Press the Lock button , the
symbol
will appear in the display. The Power and
all other buttons will be disabled. This will
prevent accidental operation when the radio
is packed in a suitcase.
2. To release the lock function press the Lock
symbol will be removed
button, the
from the display.
20
Using an AC adaptor (not included)
The AC adaptor for use with the R9940 should provide
6 volts DC output at 300mA centre pin negative
(Roberts type PU6-B).
Insert the adaptor plug into the DC socket on the left
side of the radio. Plug the adaptor into a standard
13A mains socket outlet. Whenever the adaptor is
used the batteries are automatically disconnected.
The AC adaptor should be disconnected from the
mains supply when not in use.
We would recommend for economy that the
R9940 be used via an AC adaptor whenever
possible with battery operation for occasional
or stand-by use only.
If you need any further advice, please call our Technical Helpline on :020 8758 0338 (Mon-Fri)
21
Headphones
Headphones or earphones for use with your radio
should be stereo and fitted with a 3.5mm stereo jack
plug. Insert the headphone plug into the
socket
on the left side of the radio. When the headphones
are plugged in the loudspeaker is automatically
disconnected.
22
Troubleshooting/Reset button
If your radio fails to operate correctly, or some digits
on the display are missing or incomplete carry out
the following procedure.
1. Switch off the radio and remove the batteries.
2. With the aid of a suitable implement (the end of a
paper clip) press the reset button located in the
battery compartment for at least 5 seconds, this
will reset the microprocessor, clock time and clear
all stations stored in preset memory.
If a problem persists our technical staff would be
pleased to offer any assistance on operating the
radio. Our technical helpline number is: 020 8758
0338.
If you need any further advice, please call our Technical Helpline on :020 8758 0338 (Mon-Fri)
23
Specifications
Power requirements
Sockets
DC
6.0V
@ 300mA
centre pin negative
Headphone socket
3.5mm dia stereo.
DC input socket
6.0 volts centre pin negative.
Batteries
4 x IEC size LR6 (AAsize)
Frequency Range
FM
87.5
- 108.0MHz
MW
or
522
520
- 1710kHz
- 1710KHz
LW
153
- 279kHz
Battery Life Approx. 20hrs of listening when
used for 4 hours a day at normal
volume using alkaline batteries.
Loudspeaker:
8 ohms
Output power:
250mW.
The company reserves the right to amend the specification without notice.
24
Guarantee
This radio is guaranteed for twelve months from the date of delivery to the original owner against failure due to faulty
workmanship or component breakdown, subject to the procedure stated below. Should any component or part fail
during this guarantee period it will be repaired or replaced free of charge.
The guarantee does not cover:
1. Damage resulting from incorrect use.
2. Consequential damage.
3. Receivers with removed or defaced serial numbers.
N.B. Damaged or broken telescopic aerials will not be replaced under guarantee.
Procedure: Any claim under this guarantee should be made through the dealer from whom the radio was
purchased. It is likely that your Roberts' dealer will be able to attend to any defect quickly and efficiently but
should it be necessary the dealer will return the instrument to the company’s service department for attention.
In the event that it is not possible to return the instrument to the Roberts' dealer from whom it was purchased,
please contact Roberts Radio service department at the address shown on the rear of this manual before taking
further action.
These statements do not affect the statutory rights of a consumer.
If you need any further advice, please call our Technical Helpline on :020 8758 0338 (Mon-Fri)
25
ROBERTS RADIO TECHNICAL SERVICES
Issue 1
97-99 Worton Road
Isleworth Middlesex
TW7 6EG
Technical Helpline :- 020 8758 0338 (Mon-Fri during office hours)