1
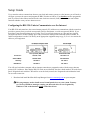
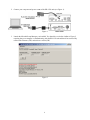
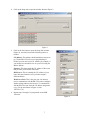
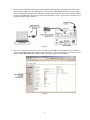
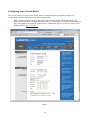
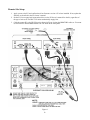
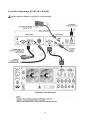
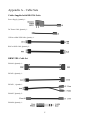
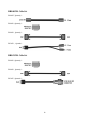
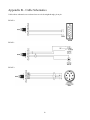
ELECRAFT K3-Remote (including K3/0) OWNER’S MANUAL Revision A, April 4, 2012 Copyright © 2012, Elecraft, Inc. All Rights Reserved Contents Introduction............................................................................................................................................... 3 Terms Used in the Manual ........................................................................................................................ 3 In the Box ................................................................................................................................................. 3 What You Will Need ................................................................................................................................ 4 Finding Your Network Information .................................................................................................................... 4 Setup Guide .............................................................................................................................................. 5 Configuring the RR-1256 Units to Communicate over the Internet ................................................................... 5 Configuring Your Network Router ................................................................................................................... 10 Remote Site Setup ............................................................................................................................................. 12 Local Site Setup Using a K3/0 .......................................................................................................................... 13 Local Site Setup using a K3 (K3/10 or K3/100) ............................................................................................... 14 Operation ................................................................................................................................................ 15 Sending CW ...................................................................................................................................................... 15 Controlling a Remote KPA500 from the Local Site ......................................................................................... 15 Customer Service and Support ............................................................................................................... 16 Appendix A – Cable Sets ........................................................................................................................ 17 Cables Supplied with RR-1256 Units ............................................................................................................... 17 RRMTCBL Cable Set ....................................................................................................................................... 17 RRK0CBL Cable Set ........................................................................................................................................ 18 RRK3CBL Cable Set ........................................................................................................................................ 18 Appendix B – Cable Schematics ............................................................................................................ 19 i Elecraft manuals with color images may be downloaded from www.elecraft.com. 2 Introduction On behalf of our entire design team, we’d like to thank you for choosing the Elecraft K3 Remote system. The K3/0, or a regular a K3 in ‘terminal mode’, provides a unique real time remote control experience for operating a K3 located in the next room, or across the country. The latest K3 and K3/0 firmware supports a compact remote control serial protocol that provides a 100% recreation of the remote K3 on the controlling K3. All local front panel VFO knobs, other controls and button actions are immediately reflected on the remote K3, and all display functions from the remote K3’s LCD and LEDs are immediately displayed on the controlling K3. When paired with the RemoteRig internet control system (also sold by Elecraft) this K3 Remote system can connect your local K3 or K3/0 to a remote K3 over the internet, including transmit and receive audio, without the need or complexity of setting up computers on each end. The K3 Remote system provides a real radio feel with immediate control feedback and very fast response times. The K3/0 connects to the RemoteRig unit through its rear connectors. It uses its internal speaker and front headphone jack for receive audio, and its front microphone connector for your mic input. The result is a faithful recreation of your remote K3 on the local K3 that is hard to distinguish from operating the actual radio. With K3 Remote, you’ll enjoy a high degree of operating convenience, along with world-class performance from wherever you may chose to operate from. Have fun! 73, Eric, WA6HHQ Wayne, N6KR Terms Used in the Manual Remote The site where the K3 and antenna system used to transmit and receive is located. Local The site from which an operator controls the remote K3 using a K3 or K3/0. In the Box What is included in your shipment depends upon the configuration you selected when ordering. This may include: 1. Two RRC-1258MkII units that provide the interface to the internet; one for the remote location and one for the local (control) location 2. RRMTCBL cable set to connect the remote RRC-1258 unit to the remote K3. 3. K3/0 Remote control Head. 4. RRK0CBL cable set to connect a local K3/0 as the controller. 5. RRK3CBL cable set to connect a local K3 as the controller. See Appendices A and B for details about the cables included in each set. If anything is missing, contact Elecraft as shown on page 16. 3 What You Will Need To operate a K3 remotely through your local area network (LAN) without communicating over the internet, you need: Suitable cables to connect the RRC-1258 units to your router. A personal computer to configure the RRC-1258 units. To operate a K3 remotely through an internet connection, in addition to the above you will need the following. See Finding Your Network Information below if you need help determining I.P and DNS server information: Internet service at both the local and remote locations with a router at the remote location that can be configured for port forwarding (see pg 10). Note that some cable or DSL modems include routers, avoiding the need for an additional router. URL and login information of the router used at the remote location. The public (external) IP Address of your remote site. Most internet service providers (ISP) supply a dynamic IP address. A dynamic IP address may change each time the modem is powered up or restarted, requiring you to determine the new public address and to re-configure your control RR-1258 unit accordingly. It is recommended that you set up a static domain name with your dynamic IP using a free service such as NO-IP (http://www.no-ip.com/services/managed_dns/free_dynamic_dns.html). Once this static domain is set up, you may use it as your Public (External) IP Address. The private I.P. address. The DNS address assigned to your service. Finding Your Network Information If needed, you can locate the following information using your computer connected to your LAN and the internet: Internal (Private) I.P. (Default Gateway): _____________________________________ DNS Servers: ____________________________________________________________ External (Public) I.P.: ______________________________________________________ At your computer, open the Command prompt window by clicking on START and typing cmd in the search window (on Windows Xp click on START, then RUN and enter cmd in the window that opens. Hit enter to launch the Command prompt window. Some text will appear in the window with a blinking cursor at the end. Type ipconfig/all then hit Enter. A stream of data will appear on the window. One of the first groups of data will be titled something like “LAN Adapter” or “Wireless Local Network” (if you are using a wireless connection to your router). Look under it for “Default Gateway” and copy that information exactly as shown in the space above. That is your internal or private I.P. address. Locate DNS Servers and do the same. With your computer connected to the internet, open your browser and go to: checkip.dyndns.org. Your current (public) I.P. address will be shown on the screen. Copy it into the space provided above. 4 Setup Guide If you want the units to communicate between your local and remote systems over the internet, you will need to configure your network routers and program the RR-1256 units as follows. You should not need to program the units if you have both of them connected to the same local area network (LAN) such as a home network that functions whether or not you have internet access. Configuring the RR-1256 Units to Communicate over the Internet Your RR-1256 units must have the correct internet protocol (I.P.) addresses to communicate with the router that provides a gateway from your local area network (LAN) to the internet, or wide area network (WAN). If you don’t know your network settings turn to Finding Your Network Information on pg 4.The units are supplied configured as follows. It these settings agree with your network settings at the local and remote locations, no further configuration is needed. Go directly to the appropriate equipment setup on pg 12,13 or 14 to connect the cables to your equipment. Local (Control) RR-1256 Remote RR-1256 Private I.P.: 192.168.1.169 192.168.1.170 Subnet Mask: 255.255.255.0 255.255.255.0 Gateway: 192.168.1.1 192.168.1.1 DNS Server: 192.168.1.1 192.168.1.1 You will need a windows computer with an internet connection to program the units with the correct internet protocol (I.P.) addresses. Note that the RR-1256 Units are not identical. One has a knob marked CW on the front panel. Program the unit with the CW knob for use at the local (control) site. Program the unit without the knob for use at the remote site. 1. Download and install the Microbit Setup Manager from www.remoterig.com on your computer. This program may need to install several virtual port drivers on your system. You may see a series of Windows messages warning you that each driver is not recognized by Windows. Click on the button to install each of the drivers. 5 2. Connect your computer and power to one of the RR-1256 units (see Figure 1). Figure 1 3. Launch the Microbit Setup Manager you installed. You should see a window similar to Figure 2 reporting that your computer is communicating with the RR-1256 unit and that it has successfully retrieved the firmware (FW) and software version (SW). Figure 2 6 4. Click on the Setup tab to open the window shown in Figure 3. Figure 3 5. Click on the Get button to open the Setup Info window (Figure 4), check and correct the following entries as needed: I.P. address: This address should match those shown on pg 5 for the RR-1256 unit you are programming. If needed, you can enter a new I.P. address (for example, if you already have another device on your LAN using the address shown) Gateway: This must match the I.P. address of the router that provides your network connection. DNS Server: This is normally the I.P. address of your router but some internet service providers assign a different address. Web Server Port: This is the port your web browser uses to communicate with the RR-1256 unit to configure further settings without your browser. To communicate with the RR-1256 unit, enter the I.P. address assigned to it (e.g. for the unit shown in Figure 4, enter 192.168.1.170). 6. Repeat steps 1 through 5 to program the second RR1256 unit. Figure 4 7 7. Disconnect the USB cable between and connect both the RR-1256 Local (Control) unit with the CW knob and the computer to your LAN (Figure 5). Note that the PWR light on the RR-1256 unit’s front panel stops blinking and remains on, indicating communications with the router. If it continues to blink, check to ensure the cable connectors are fully inserted and that you have a good cable. You must have a steady green PWR light to proceed. Figure 5 8. Open your computer browser and enter the I.P. address of the RR-1256 unit on the browser’s address bar to open the Microbit program window shown in Figure 6. Unless you changed it in step five, the I.P. address is 192.168.1.169. Click on Radio in the left menu to open the screen shown. Figure 6 8 9. Check or enter the following data in the Radio Settings window. Note that some are selected using dropdown menus: Program Mode 14 Elecraft K3-twin Sip Password (Optional: No entry required) Sip Contact (Enter the Public I.P. of your remote router.) Auto Connect No Audio Quality 2 – Linear 18 bits 8 kHz Codec Out Gain 255 Codec Inp Gain 18 Coded Inp preamp 163 Com0 baudrate 9600 Com0 data bits 8 Com0 parity 0 - off Com0 program mode 3 char timeout 2 Use USB Com port as Com0 No Note: If you want to customize any of these settings, refer to the RemoteRig manual at www.remoterig.com. button and then on the 10. When all the above entries are complete, click on the button when it appears. You will see the message “Settings saved, restarting device” appear in the window. You can click on the Radio button on the side menu to reinstate the screen showing all the settings to confirm that the changes were made properly. 11. Disconnect the RR-1256 unit from power and your LAN and connect the RR-1256 remote unit (the one without the CW knob) to the power supply and LAN. 12. Enter the I.P. address of the RR-1256 unit on the browser’s address bar to open the Microbit program window. Unless you changed it in step five, the I.P. address is 192.168.1.170. 13. Click on Radio to open the Radio settings window for the Remote RR-1256 unit. Set Audio dual-rx as follows: No: mixes the two audio channels (when separate channels present) so the same audio is heard in each earphone. Yes: provides stereo audio, for example to listen to the sub receiver in the remote K3 in one earphone and the main receiver in the remote K3 in the other earphone. Note: This setting doubles the bandwidth required for communications between the local and remote RR-1256. This may exceed that available in some DSL internet connections. 9 Configuring Your Network Router The network router used at the remote location must be configured for port forwarding as follows. No configuration is required at the router used at the control location. 1. With a computer connected to the remote LAN router, open the browser and enter the router’s I.P. address to open the router’s configuration page (Figure 7). Various makes of routers will show different pages. The examples here show the Linksys router’s configuration pages. If you have a Linksys router, the default URL is http://192.168.1.1. Figure 7 10 2. Locate the port forwarding page. On the Linksys router, this is under Applications and Gaming. With other routers, likely it will be under a similar heading. Enter the following data as shown in Figure 8. Be sure to check Enable for each entry, and then click on Save Settings to save the changes. Application Start End Protocol IP Address RRIG_radio 12000 12000 Both (UDP and TCP) 192.168.1.170 RRIG_radio 11000 11000 Both (UDP and TCP) 192.168.1.170 RRIG_sip 5060 5060 Both (UDP and TCP) 192.168.1.170 Figure 8 3. Close the window and restart your router. 11 Remote Site Setup 1. Apply power to the K3 and confirm that it has firmware version 4.47 or later installed. If not, update the firmware as described in the K3 Owner’s manual. 2. Set the K3 for rear panel mic input and no bias (see the K3 Owner’s manual for details), regardless of the type of mic used. The RRC-1256 units automatically supply bias. 3. Cable the remote K3 to the RR1256 unit as shown in Figure 9 using the RRMTCBL cable set. You must use the RR1256 unit that does not have the CW knob on the front panel. Figure 9 12 Local Site Setup Using a K3/0 Figure 10 13 Local Site Setup using a K3 (K3/10 or K3/100) The K3 must have firmware version 4.47 or later installed. 14 Operation When you press the POWER switch on the K3 or K3/0 front panel, you should hear a beep and see frequency data displayed on the LCD, indicating that your local equipment is communicating with the K3 at the remote site. Operation is identical to sitting at the remote K3. All the controls and menus at the local K3 or K3/0 control the remote K3, except for sending CW. Note that changing CONFIG:SPKRS+PH menu only affects the remote K3. The K3/0 is designed to mute the speaker automatically when phones are plugged in. If you do not get stereo reception on your phones when using a sub receiver, ensure you set dual-rx on the remote RR-1256 unit to Yes (see pg 9). Sending CW You must plug your paddles into the RR-1256 unit PAD jack as shown on the setup cabling diagrams. CW keying speed is then controlled by the CW knob on the RR-1256. Controlling a Remote KPA500 from the Local Site A KPA500 can be controlled through the remote K3 with a simple cable modification, assigning a small macro to the K3 and setting the KPA500 menu so the amplifier turns on in operate mode. The remote KPA500 power then may be turned on and off from the control K3 or K3/0 by pressing the assigned function switch. Since the KPA500 is all solid state, there is no warm-up period required so turning it off is equivalent to putting the amplifier in standby. Power faults are indicated on the control K3 or K3/0 display and cleared by reducing the drive from the K3 prevent reoccurrence and then switching power to the KPA500 off , then on again. NOTE: If the K3 is equipped with a PR6 that is switched on only when the 6 meter band is selected using the DIGOUT1 signal from the K3 ACC connector, that function must be removed as described in your PR6 Owner’s manual. The PR6 can be left powered on at all times as long as the K3 RX ANT connectors are not needed on any other bands. K3 to KPA500 Cable Modification The K3 ACC to KPA500 AUX cable described in your KPA500 Owner’s Manual under K3 Enhanced Cabling is required so the KPA500 can report its status to the remote K3 and on to the control K3 or K3/0. However, one more wire than shown under Elecraft K3 Cable Connections in the manual is required to control power on and power off. Add a wire that connects pin 11 on the K3 ACC connector to pin 8 on the KPA500 AUX connector. KPA500 Menu Setting Use the KPA500 MENU to change the PWR--ON parameter to OPER so the KPA500 turns on in operating mode. K3 Macro Use the K3 Utility program to assign the following macro to a K3 function switch: MN019;MP001;MN255;MN019;MP000;MN255 15 Customer Service and Support Technical Assistance You can send e-mail to [email protected] and we will respond quickly – typically the same day Monday through Friday. If you need replacement parts, send an e-mail to [email protected]. Telephone assistance is available from 9 A.M. to 5 P.M. Pacific time (weekdays only) at 831-763-4211. Please use e-mail rather than calling when possible since this gives us a written record of the details of your problem and allows us to handle a larger number of requests each day. Repair / Alignment Service If necessary, you may return your Elecraft product to us for repair or alignment. (Note: We offer unlimited email and phone support, so please try that route first as we can usually help you find the problem quickly.) IMPORTANT: You must contact Elecraft before mailing your product to obtain authorization for the return, what address to ship it to and current information on repair fees and turnaround times. (Frequently we can determine the cause of your problem and save you the trouble of shipping it back to us.) Our repair location is different from our factory location in Aptos. We will give you the address to ship your kit to at the time of repair authorization. Packages shipped to Aptos without authorization will incur an additional shipping charge for reshipment from Aptos to our repair depot. Elecraft 1-Year Limited Warranty This warranty is effective as of the date of first consumer purchase (or if shipped from the factory, the date the product is shipped to the customer). It covers both our kits and fully assembled products. For kits, before requesting warranty service, you should fully complete the assembly, carefully following all instructions in the manual. Who is covered: This warranty covers the original owner of the Elecraft product as disclosed to Elecraft at the time of order. Elecraft products transferred by the purchaser to a third party, either by sale, gift, or other method, who is not disclosed to Elecraft at the time of original order, are not covered by this warranty. If the Elecraft product is being bought indirectly for a third party, the third party’s name and address must be provided at time of order to ensure warranty coverage. What is covered: During the first year after date of purchase, Elecraft will replace defective or missing parts free of charge (post-paid). We will also correct any malfunction to kits or assembled units caused by defective parts and materials. Purchaser pays inbound shipping to us for warranty repair; we pay shipping to return the repaired equipment to you by UPS ground service or equivalent to the continental USA and Canada. For Alaska, Hawaii, and other destinations outside the U.S. and Canada, actual return shipping cost is paid by the owner. What is not covered: This warranty does not cover correction of kit assembly errors. It also does not cover misalignment; repair of damage caused by misuse, negligence, battery leakage or corrosion, or builder modifications; or any performance malfunctions involving non-Elecraft accessory equipment. The use of acid-core solder, watersoluble flux solder, or any corrosive or conductive flux or solvent will void this warranty in its entirety. Also not covered is reimbursement for loss of use, inconvenience, customer assembly or alignment time, or cost of unauthorized service. Limitation of incidental or consequential damages: This warranty does not extend to non-Elecraft equipment or components used in conjunction with our products. Any such repair or replacement is the responsibility of the customer. Elecraft will not be liable for any special, indirect, incidental or consequential damages, including but not limited to any loss of business or profits. 16 Appendix A – Cable Sets Cables Supplied with RR-1256 Units Power Supply, Quantity 1: DC Power Cable, Quantity 1: USB A to Mini USB Cable, Quantity 1: RJ45 to RJ45 Cable, Quantity 2: RRMTCBL Cable Set E980169, Quantity 1: E850510, Quantity 1: E850511 , Quantity 1: E980207, Quantity 2: E980208, Quantity 1: 17 RRK0CBL Cable Set E980207, Quantity 1: E980210, Quantity 1: E980211, Quantity 1: E850511 , Quantity 1: RRK3CBL Cable Set E980210, Quantity 1: E980211, Quantity 1: E850512, Quantity 1: 18 Appendix B – Cable Schematics Cables whose schematics are not shown here are wired straight through, pin to pin. E850510: E850511: E850512: 19