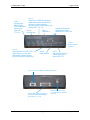
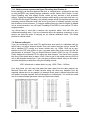
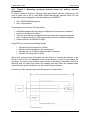
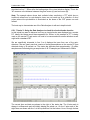
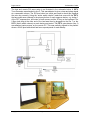
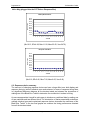
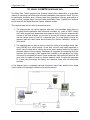
1
The Black Box Toolkit
Serious about science: Serious about timing
User Guide
Rev. 1.1
Copyright © 2004 The Black Box Toolkit Ltd. All rights reserved.
Page 2 of 98
The Black Box Toolkit
Credits:
Author: Dr. Richard R. Plant, C.Psychol, AFBPsS
Covers the following hardware:
The Black Box Toolkit
BBTK Response Pad
BBTK Digital Microphones
BBTK Digital Tone Generators
BBTK External Opto-Detector Modules
For the following platforms:
Microsoft Windows 2000 and XP
Contact details:
Global Distributors: Psychology Software Distribution
PO Box 17
Stittenham
YORK
YO60 7YJ
UK
Phone:
Fax:
00 44 (0)7950 115737
00 44 (0)1347 878416
Email:
[email protected]
Web Address:
www.psychologysoftwaredistribution.com
Black Box Toolkit contact details:
Email:
[email protected]
[email protected]
[email protected]
Web address:
www.blackboxtoolkit.com
Copyright © 2004 The Black Box Toolkit Ltd. All rights reserved.
The Black Box Toolkit
Page 3 of 98
CONTENTS
1. INTRODUCTION
1.1. Background
1.2. How can I ensure my timing accuracy is up to scratch?
1.3. How can you ensure millisecond accuracy and experiment generators typically
can’t?
2. HARDWARE & SOFTWARE REQUIREMENTS
2.1. Host PC hardware requirements
2.2. Remote PC requirements
5
6
7
8
9
3. INSTALLATION
3.1. Software installation
3.2. Hardware installation
3.3. Connecting the toolkit to the host PC
10
10
11
4. INTERFACES ON OFFER
4.1. Detection & generation
13
5. DETECTION INTERFACES & SENSORS
5.1. Opto-detectors
5.2. BBTK digital microphones
5.3. Passive switch closure detection on remote response devices
5.4. The BBTK response pad
16
17
17
18
6. GENERATION INTERFACES
6.1. BBTK digital tone generators
6.2. Active switch closure of remote response devices
21
21
7. CALIBRATION
7.1. Assessing the suitability of a host PC for realtime data collection
7.1.1. Multi-processor systems and Hyper-Threading (Intel Pentium 4)
7.2. External calibration
7.3. Adjusting sensor thresholds for optimum performance
7.3.1. Tutorial 1: Setting-up opto-detectors for monitoring visual stimuli
7.3.2. Tutorial 2: Setting-up microphones for monitoring auditory stimuli
7.3.3. Tutorial 3: Setting-up sensors for cross-modal stimulus materials
7.3.4. Tutorial 4: Setting-up for active switch closure/stimulus-response
23
26
26
27
27
30
31
32
8. THE TOOLKIT SOFTWARE SUITE
8.1. Using the menu system
8.2. Digital stimulus capture (DSC)
8.2.1. Tutorial 1: Measuring synchrony between visual and auditory stimulus
presentation
8.2.2. Tutorial 2: Rapid serial visual presentation (RSVP)
8.2.3. Tutorial 3: Using the BBTK response pad with DSC with a paradigm that
involves visual and auditory presentation
8.3. Event generator (EG)
8.3.1. Tutorial 1: Simulated auditory response and duration measurement
using a voice key
34
34
35
39
40
42
43
Copyright © 2004 The Black Box Toolkit Ltd. All rights reserved.
Page 4 of 98
The Black Box Toolkit
8.3.2. Tutorial 2: Simulating the TTL synch pulse from an fMRI scanner
8.3.3. Tutorial 3: Using two BBTKs to simulate an fMRI scanners operation
8.4. Digital stimulus capture and response (DSCAR)
8.4.1. Tutorial 1: Examining the response time error caused by using a mouse
for response registration
8.4.2. Tutorial 2: Exporting a predefined sequence from the design-time
DSCAR module
8.5. The data analyser (DA)
8.5.1. Tutorial 1: Using the Data Analyser to check for visual stimulus duration
8.5.1.1. Analysing visual stimulus event data obtained from monitoring a
TFT
8.5.1.2. Analysing visual stimulus event data obtained from monitoring a
CRT
8.6. Switching graph background colour
8.7. Labelling lines with your own terms
8.8. Making and viewing notes
8.9. Copying plots and data to the clipboard
8.10. Saving plots as standard Windows WMF or BMP files
8.11. Exporting the spreadsheet to Microsoft Excel or an HTML file
8.12. Shortcut keys used in the data analyser
9. STEP-BY-STEP CASE STUDY
9.1. Using the Black Box Toolkit to investigate the effect of using several different
mice as response devices in a simple visual reaction time paradigm
9.2. The effect of changing response device
9.3. The effect of using a TFT with various response devices
46
48
50
51
58
60
61
62
62
65
65
66
67
68
69
70
71
83
88
10. USING THE BBTK RESPONSE PAD
91
11. GLOSSARY
93
12. BIBLIOGRAPHY
94
13. SPECIFICATIONS
13.1. General specifications of the Black Box Toolkit
13.2. Sensor and generation modules timing specifications
13.3. Individual line specifications
13.3.1. Lines 1 & 2, powered digital-in & passive switch closure
13.3.2. Lines 3 & 4, opto-detector
13.3.3. Lines 5 & 6, powered digital-out
13.3.4. Lines 7 & 8, active switch closure
13.4. Power supply
13.5. Optional response box
95
95
96
96
96
97
97
97
97
14. APPENDIX A: REALTIME PRIORITY
98
Copyright © 2004 The Black Box Toolkit Ltd. All rights reserved.
The Black Box Toolkit
Page 5 of 98
1. INTRODUCTION
1.1. Background
Computers, whilst ramping-up in terms of clock speed, are actually no more accurate than
those of a decade ago. In fact quite the reverse can be true with today’s modern multitasking operating systems. Even if you make use of a recognised experiment generator,
there is little assurance that your stimulus and response timings are “millisecond accurate”.
Many packages promise to achieve “millisecond precision”. Unfortunately there is a subtle,
yet important, difference between “accuracy” and “precision”. Millisecond precision simply
means that timings are reported in units of a millisecond – there is no assurance that the
actual timings are accurate!
By using the Black Box Toolkit, or BBTK for short, you can check the presentation and
response timing accuracy of the majority of paradigms in use today. If you are measuring
presentation or response events in units of a millisecond, you should be using the toolkit
as a matter of course.
Achieving the best possible stimulus display timing is becoming more important as
researchers push the envelope with the types of studies they run and data they collect.
Synchrony between visual and auditory materials for example is often prone to larger
variation than many researchers acknowledge. Response timing can also be affected
adversely. The mere act of swapping one response device for another can statistically
alter your results. This is a proven fact – what’s more, without checking you would never
know!
Within any study that has not already been “calibrated” using the Black Box Toolkit there is
almost guaranteed to be one or more sources of uncontrolled timing error; be this within
presentation or response timing. Such error can adversely effect statistical power,
introduce conditional bias, make replication difficult, and lead to spurious effects. This is
before one verifies the paradigm to ensure that it is actually doing what it has been
designed to do. Honest mistakes in scripting can lead to presentation errors that are hard
to detect due to high presentation rates.
By using the BBTK you can help ensure that:
•
•
•
•
•
Your experiment is performing as intended in terms of presentation and
synchrony. For fast presentation schedules it can be difficult for the researcher
themselves spot errors unaided
You can tune presentation schedules to achieve the best possible presentation
accuracy and consistency (if you don’t know what’s broken you can’t fix it!)
You know what the absolute error and variance is within your chosen response
device – remember these can vary enormously! Armed with this knowledge you
may decide to change device or perform a post-hoc statistical correction
You improve your chances of replication and internal consistency
Above all you improve the quality and respectability of your research
Copyright © 2004 The Black Box Toolkit Ltd. All rights reserved.
Page 6 of 98
The Black Box Toolkit
1.2. How can I ensure my timing accuracy is up to scratch?
The ethos of the BBTK is to allow researchers to benchmark their paradigm in-situ and
without modification by means of an easily programmable “virtual human”. By making use
of a wide range of external sensors the toolkit can detect a variety of stimulus materials
when presented. Depending on programming it can generate a response at a known onset
and for a given duration. The toolkit can detect visual stimuli, auditory stimuli or any TTL
signal. Responses can be made using TTL signals, switch closures (button/key down) or
through a tone generator to trigger voice keys etc. Stimulus detection and resulting
responses are recorded with sub-millisecond accuracy.
Conceptually the BBTK offers much the same functionality as a four channel digital signal
generator and a four channel digital oscilloscope. It is easily capable of sub-millisecond
sampling rates on a typical host PC (around 48kHz, or 48 samples per millisecond). Unlike
a signal generator and oscilloscope which typically costs many thousands and are difficult
to use, the BBTK enables the researcher to check most paradigms in-situ in less than 30
minutes. Even with a modern signal generator and scope you cannot hope to virtualise
human senses and response characteristics – with the BBTK you can do just that! Timing
analysis of events is accomplished using a virtual 8-channel oscilloscope style display.
Moveable cursors allow event timing to be measured relative to any two points. Four lines
show detected stimuli and four lines show simulated responses made by the toolkit and
fed into the remote PC running the paradigm being benchmarked.
1.3. How can you ensure millisecond accuracy and experiment generators typically
can’t?
First the BBTK will only run on Microsoft Windows 2000 and XP based operating systems.
Multi-tasking operating systems typically use threads with each piece of software utilising
one or more of these threads. The operating system typically gives each application a
share of the CPU time in a round-robin fashion based on each applications threads and
the priority of those threads. Typically experiment generator software tries to increase the
priority of its own threads so that it has more time to process its own tasks and is less
likely to be interrupted by other applications that might disturb its progress. However under
Microsoft Windows for example the priority can only ever be boosted to “Above Normal” or
“High Priority” as boosting threads any higher will have undesirable side effects. All BBTK
software runs with its threads switched to “Realtime” priority. This means that our software
gets nearly all the processor time and is not interrupted by other software or the operating
system itself. Experiment generator software cannot run with “Realtime” priority due to
“undesirable” side effects. Realtime priority “locks out” non-critical operating system
threads meaning that the mouse, keyboard and background disk flushes are turned off.
Obviously there is little point in having an experiment generator that cannot accept
responses from participants!
Once a piece of toolkit software is running it cannot be stopped as it takes over the whole
system until it reaches a predetermined time limit and control is relinquished. The mouse
and keyboard become inactive and the only way to stop a module is to turn off the PC!
Whilst event data is being collected timestamps taken from the PC’s internal high
resolution timer are stored within a pre-allocated memory buffer. Once a run has finished
data is written to the hard disk ready for analysis. This helps ensure we are millisecond
accurate.
Copyright © 2004 The Black Box Toolkit Ltd. All rights reserved.
The Black Box Toolkit
Page 7 of 98
For more information see Appendix A and the section on calibration. You might also
like to visit various experiment generator vendors websites to see how they phrase
“millisecond timing accuracy”.
Copyright © 2004 The Black Box Toolkit Ltd. All rights reserved.
Page 8 of 98
The Black Box Toolkit
2. HARDWARE & SOFTWARE REQUIREMENTS
2.1. Host PC hardware requirements
The host PC is the computer which has the BBTK physically plugged into it and runs the
suite of data collection and analysis tools.
Minimum
Recommended
• 1Ghz+ Athlon/XP or P4 class CPU
• PIII 500Mhz
• IEEE 1284 port (standard printer
• IEEE 1284 port (standard printer
port) switched to EPP 1.7 or 1.9
port) switched to EPP 1.7 or 1.9
mode
mode
• 256Mb RAM
• 128Mb RAM
• 30Gb Hard Drive
• 30Gb Hard Drive
• CD/RW or DVD/RW
• CD-ROM
• MS Windows 2000 or XP
• Microsoft Windows 2000 or XP
BBTK base hardware
BBTK base
modules
hardware
and
optional
You will need to ensure that you have enough hard drive space free to store all event data
captured by the toolkit. Its real-time log (.rtl) files can grow at rate of 1-2Mb per second of
data capture.
Before using the toolkit for data capture you should ensure that it can sample at a high
enough rate in a consistent manner. Special “calibration” software is included which
determines the number of processor cycles needed to take one event sample. The lower
the number of processor cycles taken per sample the higher the toolkit sampling rate in
kHz. This feature is designed to help ensure you always collect valid timing data.
If you wish to make use of the full functionality of the BBTK you will need to purchase the
following optional modules:
•
BBTK Digital
Microphone(s)
The BBTK Microphones are not the same as ordinary
analogue microphones. They are custom built and include
specialised circuitry to convert analogue signals into digital
ones at very high sampling rates. Although you may be able
to physically plug a microphone into the 3.5mm jack on the
BBTK it will not function and may damage both your
microphone and the BBTK. Any damage caused as a result
will void your warranty.
•
BBTK Digital
Tone
Generator(s)
The BBTK Tone Generators are not the same as ordinary
analogue speakers. They are custom built and include
specialised circuitry and make use of digital signals together
with piezoelectric sounders which have known timing
characteristics. Although you may be able to physically plug
a speaker, e.g. Walkman headphones into the 3.5mm jack
on the BBTK it will not function and may damage both your
speakers and the BBTK. Any damage caused as a result will
void your warranty.
Copyright © 2004 The Black Box Toolkit Ltd. All rights reserved.
The Black Box Toolkit
•
Page 9 of 98
BBTK response The four button BBTK response pad enables you to record
both presentation and response timing independent of the
pad
paradigm and remote PC. Active switch closure leads allow
each button to be linked to those on your own response
devices so that they can be triggered in parallel. Each button
has a snap-on clear keytop.
2.2. Remote PC requirements
The remote PC is the computer which runs the paradigm you are interested in
benchmarking. This is accomplished by attaching various toolkit sensors to the PC to
detect stimuli and its response devices so that they can be remotely controlled.
Although the term “remote PC” is used throughout this guide, the term PC actually refers
to “Personal Computer” and does not imply an IBM compatible PC or indeed a PC at all! A
remote PC could be:
A Mac, an IBM PC compatible, a Linux machine, Unix machine, MRI scanner, MEG
etc.
We manufacture and supply a wide variety of interfacing options which enable you to
monitor and control the majority of equipment in use today. Please contact us for further
details.
Copyright © 2004 The Black Box Toolkit Ltd. All rights reserved.
Page 10 of 98
The Black Box Toolkit
3. INSTALLATION
3.1. Software installation
Installing the toolkit software is straightforward as it uses industry standard MSI
deployment. Before you install you will need to ensure you are logged into the local PC
with administrator privileges.
When installing you have the option of selecting one of three installation types.
A. Test & Analyse
This option is used if you will be
hosting the toolkit. The full suite of
software, utilities, documentation and
sample data files will be installed.
B. Analyse Only
This option will install the bare
minimum required to analyse data
collected on another PC.
Documentation and sample data files
will be installed.
C. Sensor Check Utility/Custom Setup
This option allows you to install a paradigm simulator which simulates the
presentation of stimulus materials in order for you to check the toolkit sensors are
operating correctly. Typically you will install this on the remote PC you are running
your own paradigms on.
For setup options A and B a Black Box Toolkit entry will be created under the “Start|All
Programs” menu. Under that program group will be three entries. One for the main menu,
one for viewing the electronic manual and one for visiting the Black Box Toolkit website.
To access the electronic version of the manual you should ensure that Adobe Acrobat
Reader is installed (www.adobe.com/reader). If you choose to install the “Sensor Check
Utility” a relevant entry will be created on the Start menu.
3.2. Hardware installation
Before installing the toolkit hardware on a host PC you should check that the BIOS
settings are suitable for hosting the toolkit. To do this you will need to reboot your PC and
enter the BIOS setup. Typically you do this by pressing the DEL key as the PC boots-up.
Some systems use a different key combination so you may need to consult the
documentation that came with your computer.
Once you have entered your BIOS setup you need to ensure that your parallel printer port
is setup to operate as an EPP parallel port. All modern BIOS’s should enable you to do
this simply by selecting from a list of options. Typically you will need to look under an
integrated peripherals menu. You should select the default address for LPT1 which is 378
with an IRQ of 7. In order to host the toolkit the port type must be switched to EPP. You
may also have the option to set the EPP version number. This should be set to either 1.9
or 1.7.
Copyright © 2004 The Black Box Toolkit Ltd. All rights reserved.
The Black Box Toolkit
Page 11 of 98
Remember once you have made any changes you will need to save changes and reboot
the PC.
3.3. Connecting the toolkit to the host PC
Before connecting the toolkit hardware you should ensure that the host PC is switched off.
You should then connect the toolkit to the printer port as shown. On standard ATX
motherboards the port is coloured purple. Finally connect the toolkit power supply and
power on the toolkit followed by your host PC.
Copyright © 2004 The Black Box Toolkit Ltd. All rights reserved.
Page 12 of 98
The Black Box Toolkit
IEEE 1284 LPT
(printer) port on
a standard ATX
motherboard.
Should be
set to EPP mode
in the BIOS
(1.7 or 1.9).
On most
motherboards
the port is
coloured
purple.
Once the toolkit is connected you are ready to begin benchmarking
paradigms running on a second PC.
Copyright © 2004 The Black Box Toolkit Ltd. All rights reserved.
The Black Box Toolkit
Page 13 of 98
4. INTERFACES ON OFFER
4.1. Detection & generation
The toolkit has a total of eight digital lines or channels. Four digital input lines are used for
detecting events that occur on a remote PC. Four further lines are used by the toolkit host
to feed simulated responses into the remote PC as if they had been made by a human.
When making use of the BBTK response pad the four output lines are switched to input
mode giving a total of eight digital input lines. Four continue to offer support for the
standard sensors or TTL inputs while the additional four monitor each button of the
response pad. An overview of the toolkit interfaces is shown overleaf.
Copyright © 2004 The Black Box Toolkit Ltd. All rights reserved.
Copyright © 2004 The Black Box Toolkit Ltd. All rights reserved.
External Opto-detector
module
BBTK Digital
Microphone
BBTK Digital
Tone Generator
Power
Supply
Standard Opto-detector
with fixing strap
Power Connector
IEE1284 lead
to host PC
Standard PS/2
Mouse with
Active Switch
Closure lead
tacked to left
button
BBTK 4 button
Response Pad
Active Switch
Closure lead
to be tacked
onto your own
response device
USB joypad with
Active Switch Closure
lead tacked to primary
response button
Lead to BBTK
Response Pad
Page 14 of 98
The Black Box Toolkit
The Black Box Toolkit
Page 15 of 98
Line 1:
Powered In - BBTK Microphones,
additional External Opto-detector
modules or Passive Switch
Closure monitor 3.5mm stereo jack.
Orange LED. TTL +5v
Line 5:
Powered Out BBTK Digital
Tone Generators
stereo jack.
Red LED.
Line 6:
Powered Out
TTL +5v
Line 2:
Powered In
Sensitivity Threshold
Adjustment for Optodetectors on Lines 3 & 4
Line 8:
Active Switch
Closure
Line 3:
Opto-detector for CRTs, TFTs,
Data Projector or any other
light emitting display device
2.5mm mono jack. Yellow LED
Line 4:
Opto-detector
Line 7:
Active Switch Closure
2.5mm mono jack.
Green LED. TTL
9 way connector to BBTK 4 Button Resonse Pad
25 way IEEE 1284 Connection to
Host PC. Standard EPP Parallel
Port version 1.7 or 1.9
Power Supply Connector
7.5~9v DC 250mA. Positive
inner pin.
Copyright © 2004 The Black Box Toolkit Ltd. All rights reserved.
Page 16 of 98
The Black Box Toolkit
5. DETECTION INTERFACES & SENSORS
5.1. Opto-detectors
Up to four opto-detectors can be used to monitor for screen events that occur on a remote
PC or data projector screen. As standard the toolkit offers two opto-detector inputs via
lines 3 and 4. 3.5mm jack plugs are used to connect photodiode opto-detectors to the
toolkit. Two tuning potentiometers above the sockets allow you to fine tune sensitivity
(crossing threshold) to suit the stimulus materials being displayed. A yellow LED indicates
that visual activity has been detected. Two opto-detectors are shipped as standard.
The photodiode opto-detector is attached to the remote PC by means of an adjustable
elastic strap. The clear polycarbonate mounting allows for accurate positioning over a
visual stimulus.
If required two additional opto-detector modules [optional extra] can be used allowing for
up to four visual regions to be monitored. If you purchased these external modules they
can be plugged into the 3.5mm powered-in lines of the toolkit (lines 3 and 4). A sensitivity
potentiometer is located on the plug-in module itself. The orange LED of the powered-in
lines indicates that visual activity has been detected.
Copyright © 2004 The Black Box Toolkit Ltd. All rights reserved.
The Black Box Toolkit
Page 17 of 98
Note: If you are using both external opto-detector modules you will not be able to
make use of the toolkit powered-in lines (BBTK Microphones, TTL-in etc.). If you
are using one additional opto-detector module you will be able to make use of one
additional powered-in line simultaneously.
The photodiode opto-detectors can be used for TFTs, CRTs and data projectors. In short,
any display device that emits enough luminescence to trigger the detector.
5.2. BBTK digital microphones
The toolkit offers support for up to two digital microphones [optional extra]. These allow for
two audio sources to be monitored on a remote PC.
If you purchased the microphone modules they can be plugged into the 3.5mm powered-in
lines of the toolkit (lines 1 and 2). A sensitivity potentiometer is located on the plug-in
module itself. The orange LED of the powered-in lines indicates that auditory activity has
been detected.
The microphone module should be positioned as close to the speaker/headphone of the
remote PC as possible. You should then use the “Sensor Threshold Check” tuning utilities
to adjust the microphone sensitivity to match your stimulus materials amplitude, as in
essence these modules function as a highly accurate voice-key.
Note: The BBTK Microphones are not the same as ordinary analogue
microphones. They are custom-built and include specialised circuitry to convert
analogue signals into digital ones at very high sampling rates. Although you may
be able to physically plug a microphone into the 3.5mm jack on the toolkit it will not
function correctly and may damage both your microphone and the toolkit. Any
damage caused as a result will void your warranty.
5.3. Passive switch closure detection on remote response devices
The toolkit can monitor for up to two switch closures on a remote PC. For example, you
can use a passive switch closure monitoring lead [optional extra] tacked onto a button of
your own response device. Then when you press a button/key the toolkit will also register
the properties of the response. Specifically the onset, duration and offset with submillisecond accuracy. In sort, any suitable switch closure (see 13.3.1) or TTL signal can be
monitored using this method.
Copyright © 2004 The Black Box Toolkit Ltd. All rights reserved.
Page 18 of 98
The Black Box Toolkit
If you purchased the additional switch closure monitoring leads you can plug them into
lines 1 and 2 (powered-in lines). Activity on lines 1 and 2 is indicated by orange LEDs.
Each line you utilise for remote switch closure monitoring means that you will not be able
to use that line for any other purpose.
Note: If you decide to make use of the passive switch closure monitoring, you do
so entirely at your own risk. It is assumed that your local technical staff will be onhand to advise as required. We cannot be held responsible for any damage caused
to your own equipment through incorrect wiring. In addition any damage caused to
the toolkit as a result will void your warranty.
If you intend to make use of passive switch closure/TTL monitoring you are strongly
advised to purchase additional leads from us.
5.4. The BBTK response pad
The BBTK response pad functions as a standard four button response pad [optional extra].
It offers high quality response buttons with customisable keytops and is housed in a
lightweight ergonomically designed enclosure. A cable links it to the rear of the toolkit.
When the toolkit software runs with the pad all four buttons can be monitored alongside
the four other input lines (opto-detectors and powered-in lines, e.g. microphones). This
means that you can monitor for a visual and auditory stimulus on the remote PC at the
same time as detecting responses. The onset, duration and offset for each button press in
relation to other monitored events are recorded with sub-millisecond accuracy.
Copyright © 2004 The Black Box Toolkit Ltd. All rights reserved.
The Black Box Toolkit
Page 19 of 98
In addition you can wire up to four buttons of your own response device(s) in parallel to the
response pad buttons (optically isolated). This means that when a response pad button is
pressed your own device is also triggered as if its button/key had been physically pressed.
This leaves your own experiment to concentrate on its job with the toolkit monitoring the
exact timing of all stimulus presentations and response characteristics. This may allow you
to make use of stimulus materials that are known to adversely affect timing on the remote
PC, e.g. video playback.
Up to 4 sets of
Active Switch Closure
flying leads can be
tacked onto the
buttons of your own
response device.
When a button is
pressed on the BBTK
pad your own device
will also register a
response.
Note: If you decide to make use of the active switch closure feature provided by
the response pad you do so entirely at your own risk. It is assumed that your local
technical staff will be on-hand to advise as needed. We cannot be held responsible
for any damage caused to your own equipment through incorrect wiring. In addition
any damage caused to the toolkit as a result will void your warranty.
Copyright © 2004 The Black Box Toolkit Ltd. All rights reserved.
Page 20 of 98
The Black Box Toolkit
BBTK Response Pad
button to line mapping
The diagram above illustrates how response pad buttons map to lines.
Copyright © 2004 The Black Box Toolkit Ltd. All rights reserved.
The Black Box Toolkit
Page 21 of 98
6. GENERATION INTERFACES
6.1. BBTK Digital tone generators
The toolkit allows for use of two tone generator modules [optional extra] with the two
powered-out lines. These can be used to trigger voice keys on a remote PC as if a human
had made a vocal response. Each tone generator is connected via 3.5mm jacks to lines 5
and 6. Each tone generator has two potentiometers, one for pitch and another for
amplitude.
BBTK Digital Tone
Generator Frequency
Adjustment
Amplitude Adjustment
Red LEDs on the toolkit indicate that a signal is being sent to the tone generator.
Note: The BBTK Tone Generators are not the same as ordinary analogue
speakers. They are custom built and include specialised circuitry and make use of
digital signals together with piezoelectric sounders which have known timing
characteristics. Although you may be able to physically plug a speaker, e.g.
Walkman headphones into the 3.5mm jack of the toolkit it will not function correctly
and may damage both your speakers and the toolkit. Any damage caused as a
result will void your warranty.
It is also possible for you to make use of these powered-out lines for other purposes
specific to your application, e.g. robotic servo control. However extended use is beyond
the scope of this manual.
Note: If you decide to make use of the powered-out feature, you do so entirely at
your own risk. It is assumed that your local technical staff will be on-hand to advise
as needed. We cannot be held responsible for any damage caused to your own
equipment through incorrect wiring. In addition any damage caused to the toolkit as
a result will void your warranty.
6.2. Active switch closure of remote response devices
The toolkit offers two active switch closure lines. These enable you simulate key or button
down events on your own response devices as if they had been made by a human
participant. Two switch closure leads are shipped as standard. For example, you could
tack one wire on to the left button of your mouse and the other to the right. You are then
Copyright © 2004 The Black Box Toolkit Ltd. All rights reserved.
Page 22 of 98
The Black Box Toolkit
free to activate either button of the mouse in response to events on the remote PC. These
leads plug into the toolkit using the 2.5mm sockets (lines 7 and 8). The green LEDs
indicate switch closure activity.
If you wish to make use of the two additional active switch closure lines (lines 5 and 6) you
will need to purchase additional leads for this purpose as they use different size jack plugs.
These are available at reasonable cost from our distributors. If you are using both the
powered-out lines for active switch closure you will not be able to use them to power the
toolkit tone generators. Please see section 13.3.1. for details on how to connect these
lines to suitable equipment buttons etc.
Typically you can use the active switch closure lines to activate any switched device, e.g.
mouse button, key on a keyboard, button on a response pad etc. You can also use the
powered digital optically isolated lines 5 and 6 to generate pulse trains if required.
Note: If you decide to make use of the active switch closure feature, you do so
entirely at your own risk. It is assumed that your local technical staff will be on-hand
to advise as needed. We cannot be held responsible for any damage caused to
your own equipment through incorrect wiring. In addition any damage caused to
the toolkit as a result will void your warranty.
Copyright © 2004 The Black Box Toolkit Ltd. All rights reserved.
The Black Box Toolkit
Page 23 of 98
7. CALIBRATION
7.1. Assessing the suitability of a host PC for realtime data collection
Before you use the toolkit with a new host PC you should run the calibration utility. You are
also advised to run it from time to time to check that the host is still capable of a high
enough sampling rate to support sub-millisecond accuracy.
The calibration utility takes 500,000 samples and reports on various aspects related to
sampling performance and consistency. You are free to alter the number of samples and
the priority with which the calibration utility runs. A typical PC will take around 10 seconds
to complete 500,000 samples with realtime thread priority. You should be careful not to
enter a too higher number of samples as you will not regain control of your PC until
sampling has finished. Remember as the BBTK runs with realtime thread scheduling the
mouse, keyboard and other peripherals may not function during calibration. You should
also note that approximately 1-2Mb of hard drive space will be used for each second of run
time.
To start calibrating your host PC click on the “Calibrate” button. Once calibration is
underway an hourglass icon will be displayed. When all 500,000 samples have been taken
a status bar will indicate the progress of the data analysis. Once all data has been
processed the upper spreadsheet will be filled-in and a plot showing tick variance per
sample will be plotted. The higher the number of ticks per sample and the larger the
variation the poorer the performance of the host PC for realtime work. Should the PC tick
variance be too high or the sampling rate too low you are advised not to use the toolkit
with the PC in question. The screen shot below shows a typical PC’s performance when
running with realtime thread scheduling. The PC in question is a 1.4Ghz AMD Duron with
1Gb of RAM. It is heavily loaded with software and is running many background
processes. Note the scale on the Y axis and the regular interruptions. These are typically
caused by low level operating system tasks or unruly software. Remember lower and more
consistent peaks are better.
Copyright © 2004 The Black Box Toolkit Ltd. All rights reserved.
Page 24 of 98
The Black Box Toolkit
Shown below is another calibration run from the same PC but with scheduling set to “High”
(the same mode experiment generators typically run in). Close attention should be paid to
the scale on the Y axis and the “Tick Variance” figure displayed in the spreadsheet. The
more processor cycles or ticks that are required per sample the worse any software will
perform. In short, other factors can begin to adversely affect timing precision even when
running a recognised experiment generator. For example, other unknown processes can
interrupt stimulus display or reaction time measurement leading to a spurious result.
Unknown processes can include virus checkers, network activity, unruly drivers etc.
Copyright © 2004 The Black Box Toolkit Ltd. All rights reserved.
The Black Box Toolkit
Page 25 of 98
Finally here are the results for the calibration utility run on the same PC but with “Normal”
priority. This illustration helps show that scheduling priority can have a large affect on
system performance and the accuracy of timing data you collect regardless of the software
you use. In the three screen shots the time to complete 500,000 samples ranges from
10.916 seconds to 12.530 seconds as a result of varying the scheduling priority.
Where a large number of ticks are taken during a sample this can be thought of as the
period the PC is “out to lunch”. In such periods timing accuracy will suffer. If during such
periods you responded to a stimulus it is likely that your response would not be registered
accurately. Hence your response timing would be adversely affected. This effect is clearly
illustrated when playing back video-based stimulus materials. During such presentations
response timing is so bad that experiment generator distributors recommend you don’t rely
on the timing measures taken.
The table below summarises the calibration findings for the example PC but under each of
the three scheduling modes.
Elapsed Time
Mean Sampling Rate
Mean Ticks Per
Sample
Tick SD
Min Ticks Per
Sample
Max Ticks Per
Sample
Tick Variance
Pass or Fail?
Realtime
10.92 secs
45.81 kHz
High
10.94 secs
45.688 kHz
Normal
12.53
39.91 kHz
78.15
78.35
89.70
8.96
70.03
2309.62
73
73
73
1667
35364
1320764
80.21
Pass
4903.72
Pass
5334342.04
Fail
Copyright © 2004 The Black Box Toolkit Ltd. All rights reserved.
Page 26 of 98
The Black Box Toolkit
7.1.1. Multi-processor systems and Hyper-Threading (Intel Pentium 4)
During testing it has become apparent that dual, or multiprocessor, systems that are used
to host the BBTK may display strange calibration results. Newer Intel Pentium 4’s with
Hyper-Threading may also display similar results as they emulate a dual processor
system. Testing has suggested that such systems whilst having a very high clock rate, e.g.
a 3.0GHz P4 with Hyper-Threading, may actually sample at half the expected rate as each
processor receives alternate clock ticks and a given piece of software typically runs tied
with its affinity to one processor. To improve sampling rates you have the option to disable
one or more processors, turn off Hyper-Threading in the BIOS or use another PC with a
single processor.
You should bear in mind that a sample rate anywhere above 1kHz will offer submillisecond sampling rates. If you are concerned about the sampling consistency of your
system you have the option of carrying out an external calibration check. This simple
process is outlined below.
7.2. External calibration
If you are concerned by your host PC’s performance as a result of a calibration test you
should carry out further external checks. One such method involves using a second PC
with a standard CRT running at a known refresh rate, e.g. 100Hz. Hook up an optodetector to the CRT and position it over a constant white area of the screen so that the
opto-detector is activated. Then run Digital Stimulus Capture (DSC) for say 10 seconds.
Finally analyze the collected RTL file using the data analyser. You should see a regular
blip every 10ms which lasts for about 2-3ms. 10ms is due to the refresh rate and 2-3ms is
due to the phosphor decay time. If you are using a different refresh rate you will need to
calculate the display re-draw time using the following formula.
1000 / refresh rate = redraw time in ms e.g. 1000 / 70Hz = 14.29ms,
As a final check you can copy and paste the lower sheet from the data analyzer into
Microsoft Excel and enter a simple formula which will show any deviation from the
expected redraw time for any sample. An example Excel sheet is shown below both with
and without formulas exposed. Note all timings are in milliseconds. You could also make
use of an external signal generator should you have one to hand.
Event No
1
2
3
4
5
6
7
8
9
10
11
12
13
14
15
16
17
18
19
20
21
22
23
24
25
L3 Onset
633.2375
643.2348
653.2313
663.2217
673.2403
683.2268
693.2468
703.2436
713.2409
723.2335
733.2524
743.2389
753.2477
763.2562
773.2455
783.2588
793.2584
803.244
813.2576
823.258
833.2565
843.2614
853.2788
863.2659
873.2694
L3 Offset
635.5425
645.5323
655.5789
665.5396
675.5842
685.5424
695.6041
705.5534
715.6021
725.5662
735.5957
745.5517
755.6005
765.5548
775.6226
785.5683
795.6201
805.5786
815.6067
825.5714
835.6093
845.5698
855.623
865.5759
875.6219
L3 Duration
2.305
2.2975
2.3476
2.3179
2.3439
2.3156
2.3573
2.3098
2.3612
2.3327
2.3433
2.3128
2.3528
2.2986
2.3771
2.3095
2.3617
2.3346
2.3491
2.3134
2.3528
2.3084
2.3442
2.31
2.3525
Redraw
=B3-B2
=B4-B3
=B5-B4
=B6-B5
=B7-B6
=B8-B7
=B9-B8
=B10-B9
=B11-B10
=B12-B11
=B13-B12
=B14-B13
=B15-B14
=B16-B15
=B17-B16
=B18-B17
=B19-B18
=B20-B19
=B21-B20
=B22-B21
=B23-B22
=B24-B23
=B25-B24
=B26-B25
Min
Max
Mean
SD
Var
Copyright © 2004 The Black Box Toolkit Ltd. All rights reserved.
=MIN(F3:F26)
=MAX(F3:F26)
=AVERAGE(F3:F26)
=STDEV(F3:F26)
=VAR(F3:F26)
The Black Box Toolkit
Page 27 of 98
7.3. Adjusting sensor thresholds for optimum performance
Before testing the timing accuracy of any paradigms running on a remote PC it is important
to ensure that any sensors being used have their thresholds set correctly. For example if
making use of the BBTKs digital microphones the trigger level, or “crossing threshold”, of
these will need to be set so that a stimulus sound triggers the appropriate line reliably.
To help ensure that the BBTK has been setup correctly a small utility program can be
installed on the remote PC. Please consult the “software installation” section for details of
how to do this. Also note that currently the “Sensor Check” software will only run on
Microsoft Windows based platforms. Another small utility, “Sensor Threshold Check”, is
automatically installed on BBTK host PCs. This is used alongside the main software to
help aid in final tuning of the opto-detectors and microphones.
Once installed the sensor check software on the remote PC contains features that are
commonly found in paradigms in the behavioural and brain sciences. For example it can
simulate a paradigm that involves simple visual reaction time, cross-modal priming or
complex video based presentations. In short it enables you to simulate running a paradigm
that contains many of the features of your own and enables you to alter sensor positioning
and trigger thresholds quickly and easily.
A screen shot of the sensor check utility running on a remote PC is shown below.
Remember the remote PC is the one which will ultimately be running your own paradigm
to be benchmarked.
7.3.1. Tutorial 1: Setting-up opto-detectors for monitoring visual stimuli
As can be seen from the screen shot there are numerous 32x32 white blocks strategically
positioned around the interface. To begin with you should check that the “Luminance
Sensitivity Threshold” for opto-detector you wish to use is set correctly. Using the fixing
strap position the opto-detector over the lower white block shown on the simulated TFT
display.
Copyright © 2004 The Black Box Toolkit Ltd. All rights reserved.
Page 28 of 98
The Black Box Toolkit
Next turn down the sensitivity as far as possible so that the activity LED on the toolkit is
unlit. Then gradually increase the sensitivity until the activity light just illuminates. If you are
using a CRT you may see the light flicker as the CRT beam redraws the screen or with a
TFT it will be constantly lit. You should bear in mind that you may need to increase or
decrease the brightness or contrast of your own monitor as well. Ideally all levels should
be as close to those used in a real experimental setting as possible.
As a final check you should run the “Sensor Threshold Check” on the BBTK host. This
small utility virtualises the activity LEDs on the front of the BBTK and helps you fine tune
sensitivity. Depending on which opto-detector you are using you should see the virtual
LED illuminate (lines 3 and 4) and the decimal “Port Val” change.
Note: Due to the high gain circuitry
used within the opto-detectors it is
possible to overload them if the
sensitivity is set too high or they are
positioned over a very bight area of the
screen. This will be evident as the
activity LED will remain constantly
illuminated regardless of the sensitivity
setting. To correct this disconnect
power to the BBTK for a few seconds.
Copyright © 2004 The Black Box Toolkit Ltd. All rights reserved.
The Black Box Toolkit
Page 29 of 98
In order to simulate a real paradigm you can select “Opto-detector|Flashing Block Test” on
the remote PC. This will cause the white block to flash as near as possible to the chosen
frequency.
Once the stimulus block is flashing you may opt to capture timing data using the toolkits
Digital Stimulus Capture software module. Once you are happy with sensitivity threshold
you can begin to benchmark your own paradigm.
As can be seen from the “opto-detector” menu many other tests are available:
•
Bitmap
Test
This is ideal if you want to test two or more opto-detectors. A bitmap
followed by a black screen will be displayed alternately on the simulated
TFT with a chosen frequency.
The left and centre white block will flash at the chosen frequency, whereas
the lower white block will remain constantly illuminated as it is
superimposed onto both the bitmap and black screen.
•
•
•
•
•
•
•
•
•
•
•
•
Copyright © 2004 The Black Box Toolkit Ltd. All rights reserved.
Page 30 of 98
•
RSVP
Test
The Black Box Toolkit
In the RSVP test two bitmaps are alternately displayed with the chosen
frequency. One bitmap has a 32x32 white block on the left, with a black
block on the right whereas the other bitmap has the reverse. One optodetector should be positioned over the left and right block. The central
white blocks are displayed on every frame.
Alternating activity between opto-detectors should be seen as alternate
bitmaps are displayed at the chosen frequency. In the screen shot above
we can see the simulated effect of two images being presented at very
high speed. Where the first daytime woodland scene is replaced by a
similar scene at sunset with a blurring effect.
•
Video
Test
In the video test a black and white block has been superimposed onto the
lower right hand corner of a video stimulus. An opto-detector can be
positioned over the block. In this case when a cyclist with a white jumper
rides past the block will change from black to white and a tone will sound.
In your own paradigms you could use the block to indicate the onset and
duration of a stimulus. This could be picked-up by an opto-detector and
responses could be detected using the optional toolkit response pad. This
would ensure that you knew with absolute certainty where the stimulus
occurred in the video relative to the response.
Before you test the timing of your own paradigm you are advised to make use of the toolkit
software to benchmark the sensor check utility to ensure you’ve correctly setup the
sensors and adjusted the thresholds accordingly. You should bear in mind that the
presentation timing of our utility may not be exact on your specific hardware.
7.3.2. Tutorial 2: Setting-up microphones for monitoring auditory stimuli
The sensor check utility can be used to produce tones of various durations. These will be
played through the default audio device on the remote PC. This is useful when adjusting
the sensitivity of the toolkits digital microphone(s). You should begin by positioning one or
more microphones next to the speakers or headphones of the remote PC. Next select one
of the tone schedules from the “Microphone” menu.
Copyright © 2004 The Black Box Toolkit Ltd. All rights reserved.
The Black Box Toolkit
Page 31 of 98
Depending on which schedule has been chosen a tone will be played and a white block
will appear over any active speakers. This gives you the opportunity to test both
microphones and opto-detectors simultaneously.
You may want to make use of the “Sensor Threshold Check” utility on the BBTK host PC
as previously outlined in relation to opto-detectors as its virtual LEDs will illuminate each
time a sound is detected. In addition to altering the physical positioning of the microphones
and tuning their trigger threshold you may also need to alter the volume of your own
speakers or headphones. Again the Digital Stimulus Capture software module can be used
to capture timing data related to the tones onset and duration.
7.3.3. Tutorial 3: Setting-up sensors for cross-modal stimulus materials
The sensor check utility can help you setup sensors ready to benchmark cross-modal
studies that make use of both visual and auditory stimulus materials.
Two images are displayed alternately with a black screen every 500ms. The onset of each
image is synchronised with a 500ms tone which should sound for the duration of the image
display. Again white blocks are displayed to help aid in opto-detector positioning. The
sequence will loop until stopped manually. To start the sequence, access the “Cross
Modal” menu. You are advised to use the “Sensor Threshold Check” on the BBTK host PC
as this will show activity on the four lines associated with visual and auditory activity. Again
the Digital Stimulus Capture software module can be used to capture timing data related to
the tones onset and duration characteristics.
Copyright © 2004 The Black Box Toolkit Ltd. All rights reserved.
Page 32 of 98
The Black Box Toolkit
7.3.4. Tutorial 4: Setting-up for active switch closure/stimulus-response
active switch closure is where the toolkit controls one or more keys or buttons on your own
standard response devices. Typically this may be a mouse button or key on a keyboard.
Again the sensor check utility can help you check that any wiring is functioning correctly
and that stimulus materials trigger a response from the toolkit. This is most easily
accomplished using the “Input & Output Line Test” module running on the BBTK host.
Once started this gives you the option to check that input lines/sensors are triggering the
toolkit and that output lines are outputting and correctly interacting with your own devices.
Once the line check module is running you should click on the “Output lines” – “Check”
button. You can then click on an LED to latch the particular line on or off.
For example line 8, one of the active switch closure lines, could be attached to the space
bar of your own keyboard. When the LED is clicked the space bar of the remote PC should
be held down for as long as the LED is latched. To test this you need to click on the large
button to the left of the sensor check screen and hover the mouse in a stationary position.
Each time line 8 is activated the key will light green, a white opto-detector block will be
displayed and the keyboard event count will be increased.
If you have attached an active switch closure lead to a mouse button make sure the
mouse is kept stationary over the large button. Depending on which mouse button is
activated a white opto-detector block will be displayed and the mouse event counter will be
increased.
Copyright © 2004 The Black Box Toolkit Ltd. All rights reserved.
The Black Box Toolkit
Page 33 of 98
In this example the left mouse button has been activated
by the active switch closure line attached to the left
button.
Alternatively, lines 5 and 6 can be activated to latch the tone generators on or off. This
gives the opportunity to alter the sensitivity of any voice keys that are being used as
response devices on the remote PC.
By using the Digital Stimulus Capture And Response (DSCAR) software module you can
check that stimulus materials produce the correct response. Once a sequence has been
constructed in DSCAR any of the stimulus materials presented by the sensor check
module can be used to trigger responses.
Copyright © 2004 The Black Box Toolkit Ltd. All rights reserved.
Page 34 of 98
The Black Box Toolkit
8. THE TOOLKIT SOFTWARE SUITE
8.1. Using the menu system
The toolkit menu system provides centralised control over the various modules of the
software suite. Each software module is logically grouped in the tree structure shown to
the left in the screen shot below. When a module name is clicked a short description of its
function is given in the panel shown on the right. The description accompanying each
module can be printed or copied to the clipboard. Along with detailed descriptions are
references to academic papers and links to relevant websites. This should be your first
port of call when making use of the toolkit.
To start the menu select the toolkit folder from the “Start” button in Windows. Then click on
toolkit menu icon. To start a module double click on the title in the left hand tree.
8.2. Digital stimulus capture (DSC)
Using DSC together with the BBTK provides much the same functionality as an eight
channel digital oscilloscope. Typically two lines are used for detecting screen events on
the remote PC, two for detecting audio events and four additional lines are used if you are
using the BBTK response pad [optional extra] as your response device.
Powered-in lines that are typically used with BBTK microphones can also be used for
passively detecting remote switch closures that occur on your own response devices. You
can also use the two powered-in lines with the external opto-detector modules [optional
extra] to provide up to four opto-detectors.
Typically DSC is used to check for the onset, duration and synchrony of one or more
stimulus types. The best way to illustrate the use of DSC is with three short tutorials.
Copyright © 2004 The Black Box Toolkit Ltd. All rights reserved.
The Black Box Toolkit
Page 35 of 98
8.2.1. Tutorial 1: Measuring synchrony between visual and auditory stimulus
presentation
In order to measure synchrony between visual and auditory stimulus materials you will
need to make use of one or more BBTK Digital Microphones [optional extra]. For this
tutorial detectors are plugged into the following lines on the BBTK:
•
•
line 1: BBTK Digital Microphone
line 3: Opto-detector
The paradigm on the remote PC is as follows:
•
•
•
•
•
800x600 bitmapped stimulus image is displayed until a response is detected
Audio tone is played for 1000ms
The tone should be synchronised with the first frame of the visual presentation
After a response there is a 1000 ms wait period in which feedback is displayed
Screen resolution is 800x600 at 100Hz
Using DSC we can check the following timings:
•
•
•
•
Whether the tone is played for 1000ms
Whether the bitmap and tone are synchronised
Whether there is a 1000ms wait period after a response
Whether the refresh rate is 100Hz
Armed with accurate timing information we can reduce or increase the duration of the
bitmap or tone so that it is displayed for the correct amount of time. We can improve the
synchrony by moving either stimulus onset forward or backward. Remember we will be
detecting both the timing error within the paradigm and also within the hardware being
used to present stimulus materials, e.g. the sound card and speakers.
An overview of the expected experimental sequence is shown below.
Copyright © 2004 The Black Box Toolkit Ltd. All rights reserved.
Page 36 of 98
The Black Box Toolkit
Setup:
•
•
An opto-detector is fixed to the centre of the screen on the remote PC. A 32x32
pixel white block has been superimposed in the centre of each bitmap to aid
detection (line 3)
A BBTK Digital Microphone is placed next to the relevant speaker (line 1) –
sensitivity should be adjusted so that a sound just triggers the microphone and
causes the LED activity light to illuminate
Once DSC has started by selecting “Tools|Options” we can set the sample time limit to
30,000ms (30 seconds). Then we choose a filename. Finally we click on the run button. At
this point we are presented with a “press space to start” dialog box. The paradigm is
started on the remote PC and is left at the instruction screen. Next space is pressed on the
BBTK host PC and then immediately after the start key, e.g. space is pressed on the
remote PC running the paradigm. To move on to the next trial we manually press the ‘b’
key on the remote keyboard to register a response. This is done after the tone has been
fully played. Note the keyboard needs to be far enough away from the BBTK microphone
so as not to activated by mistake with a key click sound. Once 30 seconds has elapsed the
DSC will display summary statistics showing details about the sample rate and data file
size etc.
Copyright © 2004 The Black Box Toolkit Ltd. All rights reserved.
The Black Box Toolkit
Page 37 of 98
We can now use the Data Analysis module to check synchrony and other timings obtained
from the remote PC.
Once we have loaded the RTL file into the data analyser we can see that the tone was
played consistently for 40 to 41ms longer that it should have been (line 1). This
presentation timing error may be attributed to the experiment generator used, the remote
PC, the soundcard, the amplifier and speakers or a combination of all these factors.
Next we can measure the synchrony between the onset of the image and the tone. The
onset of both events should be identical. We do this by bringing up two moveable cursors
Copyright © 2004 The Black Box Toolkit Ltd. All rights reserved.
Page 38 of 98
The Black Box Toolkit
and measuring the distance between lines 1 and line 3. Below we can see that the audio
was played later than intended (line 1). It was actually late by 3 refreshes (line 3) or some
27ms (M) if you take the timings to the opto-detector positioned mid screen.
Our final measure is to check that there was a 1000ms delay after each trial before the
next commenced. Here we can see that the actual delay was 56ms longer than expected
(6 refreshes at 100Hz).
Accurate timing measures this give us the opportunity to alter the paradigm so that it more
closely matches our conceptual understanding. We may decide to reduce the duration of
the tone by 40ms in a sound editor if using a sound file. Thus when presented the duration
will be exactly 1000ms as intended. We could insert three black screen bitmap displays
before the visual stimulus begins. This would in effect move the onset of the real visual
stimulus back by 30ms so as to more closely synchronise with the start of the audio. We
could also decrease the wait period by 60ms to account for the additional 6 refreshes. The
wait period would then be as close to the intended 1000ms as possible.
Copyright © 2004 The Black Box Toolkit Ltd. All rights reserved.
The Black Box Toolkit
Page 39 of 98
8.2.2. Tutorial 2: Rapid serial visual presentation (RSVP)
Typically RSVP involves making use of a PC as a pseudo tachistoscope where images are
presented in rapid succession with primes and masks contained in the sequence.
For a PC to successfully be able to present RSVP sequences ideally the software one is
using should be able to present a different image on each refresh or frame. For example,
at a refresh rate of 100Hz, that would mean one every 10ms. For a TFT running at a
nominal 60Hz that would theoretically be one every 16.66ms.
In this tutorial an experiment generator has been programmed to display 8 bitmapped
images in rapid succession. Each image was programmed to be displayed for 1ms. This
theoretically should mean that a new image should be displayed on each refresh.
Again all images have three 32x32 pixel blocks superimposed on to them. The left and
right blocks on the images alternated between black and white. White blocks should be
easily detectable by the opto-detectors whereas black would not.
Two opto-detectors attached to the screen of the remote PC (lines 3 and 4) were
positioned over where alternative white blocks would appear. Sensitivity should be
adjusted so that a white screen just triggers the opto-detector and illuminates the activity
LED. Alternatively if using the adjustable fixing straps the white and black blocks may be
offset slightly.
Copyright © 2004 The Black Box Toolkit Ltd. All rights reserved.
Page 40 of 98
The Black Box Toolkit
After DSC has captured a sequence of presentations it is immediately evident that
presentation rates are seriously flawed. On line 3 we can see a bitmap being displayed
and activating the left opto-detector. On line 4 we can see another bitmap activating the
right opto-detector. As can be seen the second bitmap appears 6 refreshes after the first
rather than on the very next refresh as instructed to. Simply there should only have been
10ms difference at 100Hz!
Theoretically a typical TFT would have faired worse due to its nominal 60Hz refresh.
Hence the delay would likely have been at least 99.96ms rather than 16.66ms. Without
use of the BBTK it would be very difficult for the researcher to ensure that a paradigm is
presenting RSVP sequences as intended.
8.2.3. Tutorial 3: Using the BBTK response pad with DSC with a paradigm that
involves visual and auditory presentation
Using the BBTK response pad [optional extra] opens up intriguing possibilities for using
stimulus materials notorious for producing poor timing, e.g. video clips where a small white
block could be unobtrusively superimposed onto the video to act as a marker for the optodetector. However in this example we are making use of the audio/visual synchrony check
outlined in tutorial 1. This time however we are using DSC with the BBTK response pad in
order to register exact reaction times relative to any stimulus material. The equipment
setup is identical to that described in tutorial 1 bar that the BBTK response pad is being
used. An active switch closure lead from the pad is tacked to the back of the ‘b’ key on the
keyboard. As a result when the pad button is pressed this will also close the ‘b’ key which
will simultaneously be registered by the experiment generator being used.
Before we begin we need to tell DSC that we will be using the BBTK response pad. Do this
from the “Tools|Options” menu and select “Yes” from “Capture from “BBTK response pad”
menu.
Copyright © 2004 The Black Box Toolkit Ltd. All rights reserved.
The Black Box Toolkit
Page 41 of 98
When we run the paradigm on the remote PC we not only obtain information about audio
and visual synchrony but also exact timing data on when the response pad button was
pressed and how long it was held down for. This gives us the option for measuring
response time from either stimulus type’s leading edge.
Copyright © 2004 The Black Box Toolkit Ltd. All rights reserved.
Page 42 of 98
The Black Box Toolkit
Here we have taken the response time from the start of the visual presentation on line 3 to
the leading edge of the response pad button on line 7. The resulting response time is
1,643ms (M).
We can also measure how long the button was held down for, in this case 302ms (M).
8.3. Event generator (EG)
The Event Generator module can be thought of as an advanced four channel digital signal
generator. Events on any line can be varied at will in terms of onset and duration. Lines
can be used independently or together as a group. Up to 32,000 events can be
programmed on each line. Typically the two powered-out lines are used for generating
tones using the BBTK Digital Tone Generators [optional extra] and the two further lines are
used for active switch closure.
The Event Generator can be used to trigger response devices on the remote PC as though
a human had pressed a button or activated a voice key. This allows you to check response
times and durations for both button down and auditory responses. Alternatively EG can be
used to simulate a regular pulse, e.g. the synch pulse from an fMRI scanner. This latter
application allows you to check your paradigm as if physically linked to the real hardware.
Copyright © 2004 The Black Box Toolkit Ltd. All rights reserved.
The Black Box Toolkit
Page 43 of 98
The best way to illustrate the use of EG is with three worked tutorials.
8.3.1. Tutorial 1: Simulated auditory response and duration measurement using a
voice key
In this example we want to generate simulated audio responses using the BBTK Digital
Tone Generators. Ideally before we start we would check that we had adjusted the pitch
and amplitude of each tone generator so that it was at an acceptable level. Do this by
pressing “F3” to bring up the “Output line Check” box – simply click the LED on/off for the
line you wish to check. Alternatively select “Tools|Output line Check” from the menu.
Finally we would place the unit near to the microphone on the remote PC and check that it
triggered as intended.
BBTK Digital Tone
Generator Frequency
Adjustment
Amplitude Adjustment
In this example we are going to use a Tone Generator plugged into powered-out line 5 of
the BBTK.
At first glance the layout may seem complex. However, we only need to make use of the
four “Port Value” LEDs in the upper grid together with a duration entry.
Copyright © 2004 The Black Box Toolkit Ltd. All rights reserved.
Page 44 of 98
The Black Box Toolkit
As the Tone Generator is connected to line 5 we click on the far left LED to indicate that
we want it in the “on” state. As we click on one or more LEDs the port value will change.
Once the LED for line 5 is illuminated we can enter the duration we want it to stay on for.
In the example shown we have chosen a 1000ms.
To enter the event into the schedule (or program) we click on “Append Row”. Note that the
status of each line is indicated by a 1 or 0, for on or off repectively. The decimal port value
along with the duration is also shown. The sequence begins at 1000ms after being started.
Here we can see that our first event begins at 1000ms and finishes at 2000ms. If we wish
to change the default 1000ms offset select Tools|Options from the menu bar.
Usually we define a sequence with a series of on and off events. So next we need to add
an off period to the sequence we are constructing. Ensure that all LEDs are off then add
an off duration of 5000ms.
Here we have added three “on” events, each of which will make the Tone Generator sound
for exactly 1000ms. Each event is separated by a 5000ms silent “off” period. We can see
that the total run time will be 19,000ms. We are also free to edit the sequence should the
need arise. Select the row you wish to edit from the lower sequence grid and click on the
appropriate “Event Controls” button.
Once we have saved the sequence and chosen a Real Time Log file we can click on the
“Run” button.
Copyright © 2004 The Black Box Toolkit Ltd. All rights reserved.
The Black Box Toolkit
Page 45 of 98
We will then be prompted to press space to start the sequence. Before you commence you
should ensure that the remote PC is ready to go by taking the appropriate action.
When the run is complete various summary statistics are displayed. We have the option of
saving these if we wish. Here we achieved a sample rate of 68.5kHz and collected some
1.3 million samples during 19 seconds of run time. Once the sequence has completed we
can analyse the resulting 29Mb file by loading it into the Data Analyser.
By examining the activity on line 5 we can see that the three “on” events were generated
as intended. We can check the onsets, offsets and durations using the cursors.
Copyright © 2004 The Black Box Toolkit Ltd. All rights reserved.
Page 46 of 98
The Black Box Toolkit
By measuring the first “on” event we can see that it lasted exactly 1000ms as intended. By
comparing the sequence generated with that recorded by the remote PC we can calculate
the amount of timing error.
8.3.2. Tutorial 2: Simulating the TTL synch pulse from an fMRI scanner
It can be useful to simulate TTL pulses that an fMRI scanner produces. These can be used
to check that they are being recorded and acted upon correctly by third party hardware
and software running on a remote PC. By default TTL pulses generated can be very short
in duration, e.g. 0.005ms (Philips Intera scanner). However, it is assumed that most
researchers will have increased the dynamic pulse width to around a millisecond or above
as this can easily be accomplished in the scanner software. Using the Event Generator we
can simulate TTL pluses that are a millisecond wide.
We start EG as normal but as we may want to generate a sequence of pulses that may
consist of hundreds of events we wouldn’t wish to define each one individually. This is
where we can make use of the “Auto Sequence Generator”. To use this utility press “F2” or
click on “Tools|Auto Sequence Generator” from the menu bar.
To use the generator we need to know several pieces of information.
Copyright © 2004 The Black Box Toolkit Ltd. All rights reserved.
The Black Box Toolkit
•
•
•
Page 47 of 98
How many events we wish to generate in a sequence – remember we need to
include the off periods as events too
The decimal port value for a given event. We can determine this by clicking on the
LEDs and making a note of the decimal port value
The duration of each “on” and “off” period in milliseconds
In this case assume that we are simulating a scanner that generates pulses every
1993ms. So pulses that are a millisecond wide might be generated at 1993, 3986, 5979,
7972, 9965ms and so on. So we would need to create an “on” event which lasts for 1ms
and occurs every 1993ms. To do this we would need to enter the following values into the
generator.
Here we are using line 5 (powered digital output) to simulate the scanner TTL pulse. This
line has a decimal port value of 128. Note: you must enter an even number of events you
wish to generate (250 in the example). Once you have filled out the table click on “Apply”
then “OK”. When you click on “Apply” the completed sequence will appear.
Here we can see that a 1ms pulse occurs every 1993ms. Finally we specify a Real Time
Log file and run the sequence. When we run the sequence we should ensure that our
remote PC is ready to accept our TTL pulses. Typically a remote PC would accept pulses
using it parallel port or dedicated interface board. You should also be aware that creating
long sequences will take up at least 60Mb of hard drive space per minute of runtime and
that the resulting RTL files will be slower to analyse.
Copyright © 2004 The Black Box Toolkit Ltd. All rights reserved.
Page 48 of 98
The Black Box Toolkit
When we analyse the RTL with the Data Analyser we can see the 1ms wide pulses were
generated every 1993ms as indicated by the measurement cursors. By comparing sync
times and pulse widths recorded by the remote PC we can evaluate its accuracy when
syncing it with an fMRI scanner.
8.3.3. Tutorial 3: Using two BBTKs to simulate an fMRI scanners operation
By making use of two BBTKs one could be used to simulate an fMRI scanners sync pulse
with the second being used to check the timing of the remote PC hardware and software
paradigm. Typically you would do this by utilising the DSC software module together with a
BBTK response pad.
Line 8 from the first BBTK would be split and connected to the parallel port or specialist
board of the remote PC to simulate the scanner sync pulse. The second split would be
connected into line 1 (Powered-In) of the second BBTK. A BBTK Digital Microphone could
be connected to line 2 on the second BBTK. A single opto-detector could be connected to
line 3 on the second BBTK. Remember a second opto-detector remains free on line 4
should we wish to check RSVP stimulus materials alongside audio. Finally the BBTK
response pad is connected to the custom 9-way port on the rear of the BBTK. An active
switch closure flying lead from the appropriate button of the response pad could then be
connected to the response device on the remote PC.
Copyright © 2004 The Black Box Toolkit Ltd. All rights reserved.
The Black Box Toolkit
Page 49 of 98
This type of setup is illustrated by the schematic below.
In order to test the presentation and response timing of the remote PC, BBTK No 1 would
generate a 1ms wide pulse every 1993ms exactly matching a real fMRI scanner. This
pulse would be simultaneously fed into the remote PC and also into BBTK No 2.
BBTK No 2 would run DSC in response pad mode and would detect stimulus images
together with any auditory materials presented by the remote PC (as would a subject in the
real scanner). The researcher would mimic a subject and respond to either an image or
audio presented by the remote PC paradigm. Reponses would be made using the BBTK
response pad. The active switch closure lead would simultaneously close the response
device on the remote PC.
By using a setup like this we can check all aspects of the remote PC’s performance in
terms of:
•
•
•
•
•
Scanner sync pulse registration
Visual stimulus display onset, duration and offset
Auditory stimulus onset, duration and offset
Synchrony between visual and auditory stimulus materials
Response time and response duration
By comparing the times with those recorded by the remote PC we can detect any timing
discrepancies. When we examine the RTL data captured by BBTK No 2 we would be able
to examine exact timing data for all events. A simulated trace is shown below.
Copyright © 2004 The Black Box Toolkit Ltd. All rights reserved.
Page 50 of 98
The Black Box Toolkit
In the example shown, line 1 is the simulated fMRI pulse produced by BBTK No 1. Line 2
shows audio detected coming from the headphones of the remote PC. Line 3 shows the
properties of the image displayed on the remote PC. Line 5 shows the response made on
the BBTK response pad. By using the measurement cursors you can obtain exact
millisecond timing between two events on any line.
Note: If you wish to use the toolkit in a scanner room you will need to contact us to discuss
options for sensors as the standard kit is not suitable for use in a live MRI environment.
8.4. Digital stimulus capture and response (DSCAR)
DSCAR combines the features of the EG and DSC modules to provide four input and four
output lines. A bank of simulated responses can be setup with between one and four lines
being defined as active during each response. A set of trigger event(s) can then be defined
which need to be detected before a response with known timing characteristics is
simulated and fed into a remote PC. You are free to alter the delay after detecting any
trigger event(s) and vary the duration of the response as you see fit. This is the essence of
the notion of a virtual human.
DSCAR can be used to check both stimulus and response timings with sub-millisecond
accuracy. By comparing what was recorded this gives you the opportunity to fine tune the
paradigm to improve presentation and response timing accuracy.
DSCAR is actually made up of two programs. The first is used to define the characteristics
of the “virtual human”. That is, which events will be reacted to and what responses will be
simulated. The second is used to run the sequences that have been designed. The best
way to illustrate the use of DSCAR is with a simple worked example. A more expansive
tutorial is given in the case study section where the effect of using various response
devices is examined in terms of presentation and response timing error.
Copyright © 2004 The Black Box Toolkit Ltd. All rights reserved.
The Black Box Toolkit
Page 51 of 98
8.4.1. Tutorial 1: Examining the response time error caused by using a mouse for
response registration
In this tutorial we want to discover the response time error that is attributable to using an
unknown mouse as a response device. To do this we utilise a simple reaction time
paradigm run on the remote PC in which a subject has to respond to the appearance of a
visual stimulus as quickly as possible by clicking the left mouse button. The stimulus then
terminates and a black screen is displayed for 1000ms before the next stimulus is
displayed. If we simulate a response 300ms after the BBTK detects the image then we
would expect the response time recorded by the paradigm to be 300ms. In other words
0ms difference in terms of observed - expected.
To check timing, a standard opto-detector is plugged into line 3 of the BBTK and attached
mid screen of the remote PC using the adjustable strap. An active switch closure flying
lead is tacked to the left mouse button micro-switch. The other end of the lead is plugged
into line 7. This means we have a way of both detecting a stimulus and responding to it.
For more details of the physical setup please refer to the detailed case study in the next
section.
To define the sequence of response and trigger events, DSCAR is started in design mode.
The interface is divided into two main spreadsheet grids. The upper allows you to define a
“Bank of Simulated Responses”. These are reusable response events where any response
event can be called upon when needed. Up to 32,000 possible response events can be
defined. An event can consist of simulated activity on one or more digital out lines. This
could be an active switch closure, Tone Generation etc. The lower sheet allows you to
define the patterns of events you wish to detect before generating a simulated response
taken from your response bank. Both sheets can be saved independently and reused later.
Copyright © 2004 The Black Box Toolkit Ltd. All rights reserved.
Page 52 of 98
The Black Box Toolkit
In the case of the simple visual reaction time paradigm we are about to test we only need
create one simulated response. That is, the active switch closure event that will simulate a
human pressing the left mouse button. To do this we select “on” for line 7 in the upper
sheet and enter a duration of 150ms. This means that we have created a response event
on line 7 that simulates pressing the left mouse button and holding it down for 150ms.
Once we are happy with the response event we click on the “Append Row” button to enter
it into the bank.
If we need to edit any of the response events in the bank select the row concerned and
make use of the “Insert”, “Replace” and “Delete” row buttons. Once we are happy with the
response bank we save it.
The next stage in the process is to define one or more “Stimulus Pattern Matches”. These
are patterns of event(s) that must occur on the remote PC in order to be responded to in a
predefined way. You should think carefully about sequencing as DSCAR responds to
events in sequence by looking at the current “Stimulus Pattern Match” event. So it will start
to look for a pattern that matches the first SPM, if it detects one DSCAR will respond and
then move on to start looking for the second SPM event and so on. If an event match is
not detected the list of SPM events will not be progressed through as intended. This
means you need to think about the sequence in which a real human would have to
respond and then define the events accordingly.
Here we are defining that we need to watch for an SPM on line 3 (the opto-detector). To
accept this as a SPM to watch for we click on the “Add SPM PV” button. Next we need to
enter the “Delay”. This is the elapsed time we want to wait after detecting the matching
stimulus before generating a simulated response from the response bank we defined
earlier. In this case we want a delay of 300ms which corresponds to the average response
time of a real human in this type of experiment.
Copyright © 2004 The Black Box Toolkit Ltd. All rights reserved.
The Black Box Toolkit
Page 53 of 98
We have now defined an event on the remote PC which we will “watch” for. If we see this
stimulus event occur, DSCAR will wait 300ms before simulating a response.
Finally we need to associate this stimulus event with a predefined response event from our
bank. To do this we simply choose a response event from the drop down box.
In this case we have chosen event one from our bank of possible responses. The first
number refers to the response ID, the next is the binary state of the four digital output
lines, the next is the port value in decimal and the final number is the response duration in
milliseconds. Once we are happy with the definition we click on “Append”. Again we are
free to edit rows as we see fit.
In the example shown we have pressed the “Append Row” button 10 times. In this case
we are going to look for a sequence of 10 bitmap presentations on the remote PC using
the opto-detector on line 3, wait 300ms after detecting the image onset and respond to
each one with a mouse down event that lasts for 150ms. As we detect each stimulus we
will move through the list of event IDs in the sequence.
It is important to remember that we are free to change both what we “look for” and what
response we make on an event by event basis. We are also free to add up to four SPMs
on any single presentation. For example we may decide to respond to detecting either a
bitmap presentation OR an auditory tone. We would do this by selecting “On” for line 1 as
well.
Copyright © 2004 The Black Box Toolkit Ltd. All rights reserved.
Page 54 of 98
The Black Box Toolkit
We do this by selecting either of the lines we wish to be active and then add them by
clicking on the “Add SPM PV” button. We must do this after defining the state of each of
the four lines – we would need to ensure line 3 was set to off! If we selected line 1 and line
3 to be “On” and then added them this would mean we wanted both lines to be active
rather than either OR. In short this would AND them together as shown below.
As can be seen this combination gives different port values and as a result DSCAR would
be looking for a different stimulus to respond to. In the first example this would be a bitmap
OR a tone. In the second a bitmap and tone at the same onset. In the latter case a
response would only be made when both stimulus types (or lines) were perfectly
synchronised and active. When DSCAR runs all stimulus and response activity is logged
into a Real Time Log file for later analysis.
Once we are happy with our definitions we can save the sequence to disk, close the
design-time version of DSCAR and switch to the runtime version using the toolkit menu.
The runtime version of DSCAR is shown below.
Copyright © 2004 The Black Box Toolkit Ltd. All rights reserved.
The Black Box Toolkit
Page 55 of 98
Before we can run the sequence we need to select a Realtime log file into which we store
captured stimulus presentation and response timing data. Do this by selecting “File|Save
Realtime Log As…”. Finally before starting the sequence you should enter a time limit for
the run. This needs to be done because we are running in realtime scheduling priority
under Windows and the only way to stop DSCAR is by defining a run time limit or ensuring
that all the stimuli being watched for are presented to that the end of the sequence is
reached. In this example we have entered 30 seconds. Select “Tools|Options” to do this.
Copyright © 2004 The Black Box Toolkit Ltd. All rights reserved.
Page 56 of 98
The Black Box Toolkit
Once we are happy with all the settings we can run the sequence by pressing “F5” or by
clicking on the run button. We should also start the paradigm on the remote PC at this
point. Once both are running stimulus presentations will be automatically detected and
responded to.
Once the sequence has been run through on an event by event basis we can analyse the
log using the Data Analysis module. In this case we are interested in the contribution made
to response timing by the particular mouse in question. Before we begin to check the
response time recorded we should first check that responses were simulated reliably with
an offset of 300ms after the opto-detector detected the stimulus image onset.
Looking at the whole sequence we can see each stimulus image being displayed on line 3
and each simulated response occurring on line 7. By using the measurement cursors and
zooming in we can check the simulated response time of each event. Here we can see
that the simulated response event occurred at exactly 300ms after the onset (leading
edge) of the first refresh of the stimulus image.
Now that we have double checked the responses were simulated as intended, we can
check response times recorded by our paradigm running on the remote PC. How you do
this will vary depending on which Experiment Generator you are using or if running your
Copyright © 2004 The Black Box Toolkit Ltd. All rights reserved.
The Black Box Toolkit
Page 57 of 98
own software how you have chosen to structure your data files. In this hypothetical
scenario in we could use E-DataAid that ships with E-Prime. To analyze response time
error we can copy the relevant column into Excel, in this case we would copy all
“StimDisplay.RT” data.
We can already see that response times are longer than the 300ms that was simulated
after each stimulus image. Once in Excel we easily manipulate the data in order to
calculate the actual response time error. In the case of the mouse used in this example the
contribution it made to response time is very large in absolute terms and high in variability.
This may make for a poor choice of response device as a result.
Copyright © 2004 The Black Box Toolkit Ltd. All rights reserved.
Page 58 of 98
The Black Box Toolkit
8.4.2. Tutorial 2: Exporting a predefined sequence from the design-time DSCAR
module
Once a sequence has been designed in the design time module of DSCAR we have the
option to export it as a standard HTML or Microsoft Excel format file. This may be useful
when documenting what aspect of timing accuracy was examined.
Do this by selecting “Export” from the file menu. Below we can see how the exported
HTML file looks in a browser. The example shown here is from the case study section of
the manual. Remember only the completed lower sheet will be exported. Also note there is
no way to import saved sequences.
Copyright © 2004 The Black Box Toolkit Ltd. All rights reserved.
The Black Box Toolkit
Page 59 of 98
Alternatively from the “Export” menu the same sequence can be exported as a standard
Microsoft Excel file. Below we can see the same data displayed in Microsoft Excel.
Copyright © 2004 The Black Box Toolkit Ltd. All rights reserved.
Page 60 of 98
The Black Box Toolkit
8.5. The data analyser (DA)
All software modules stream timing data into Real Time Log (RTL) files. The Data Analyser
allows post-hoc examination of the timing data and allows you to get an overview of events
that occurred on any of the eight lines against a constant time base. Two free moving
cursors let you accurately measure the timing difference between any two points. A
spreadsheet view is also available and aids in exact timing measurement.
Note: The Data Analyser should not be running when you collect data as it pre-allocates a
large amount of memory and is extremely processor intensive when analysing data files.
To load a RTL file click on “File|Open” from the menu bar or use the open file icon from the
toolbar. As the file is loaded and analysed a progress bar will display the loading status.
Note: It is important to note that many millions of samples may need to be analyzed before
the plot and summary statistics can be displayed. The speed at which the data can be
loaded is highly dependent on the number of samples and ultimately the speed of your PC.
However as the Data Analyser is multi-threaded it can be minimized and left to get on with
its job whilst you do something else.
Once all data has been loaded the plot will be drawn and spreadsheet completed.
In the example screen shot above we can see that a stimulus image has been detected on
line 3. We can see that it begins at 1,821ms into the run and ends at 2,196ms and stays
on screen for 375ms. We can also see that an active switch closure response was
Copyright © 2004 The Black Box Toolkit Ltd. All rights reserved.
The Black Box Toolkit
Page 61 of 98
simulated on line 7, 300ms after the leading edge of the visual stimulus display. This is the
“M” measure or the distance between the green cursor (A) and red cursor (B).
Note: The example above shows data collected when monitoring a TFT which has no
traditional refresh and so opto-detector traces are not made up as a collection of short
pulses where the opto-detector is illuminated as the beam of the CRT passes on each
refresh.
The best way to demonstrate use of the Data Analyser is with an in-depth tutorial.
8.5.1. Tutorial 1: Using the Data Analyser to check for visual stimulus duration
In this tutorial we want to discover how long a visual stimulus was displayed on a remote
PC. Ideally the bitmap would have appeared for 300ms. In this example a TFT is being
used on the remote PC and we do not need to be concerned with screen refreshes as we
might with a standard CRT.
We are specifically interested in line 3 as it displays the trace from one of the optodetectors. We can clearly see that a series of visual presentations on the remote PC was
detected during a 30 second run. The status bar indicates that approximately 1.5 million
samples were collected giving a sample rate of 49.70 samples per millisecond or 50kHz.
The current time and date are shown to the right of the status bar. The X-axis scale is
always in milliseconds and will initially display the whole run. On the Y-axis each of the
eight lines are shown with line 1 at the top and line 8 at the bottom. Lines 1 though 4 show
Copyright © 2004 The Black Box Toolkit Ltd. All rights reserved.
Page 62 of 98
The Black Box Toolkit
events that have been detected. Lines 5 through 8 show events that were generated by
the BBTK and fed into the remote PC to simulate a human making a response.
8.5.1.1. Analysing visual stimulus event data obtained from monitoring a TFT
At this point we have two options. One is to make use of the spreadsheet for analysis and
the other to make use of the two measurement cursors. Because we are using a TFT as a
display device this offers discrete on and off timing measures together with a constant on
period (with no refresh). As a result we can simply examine the timings for the relevant line
in the lower spreadsheet view. When we examine line 3 we can see that display times for
each image presentation varied between 363ms and 375ms. Obviously this is significantly
longer than the expected display time of 300ms.
8.5.1.2. Analysing visual stimulus event data obtained from monitoring a CRT
However, if we were using a standard CRT the duration column would show the duration
of each refresh rather than the total image duration. In the standard CRT example shown
below we can see each refresh occurring at 10ms intervals (1,255-1245=10ms) indicating
the monitor was being driven at 100Hz. The duration gives an indication on the phosphor
decay time which in this case is around 3ms. You should be aware that the duration time
can be effected by the brightness of the screen and the luminance sensitivity threshold
settings of the BBTK.
Typically we would use the measurement cursors in order to find out exactly how long the
image stimulus had been displayed. You also have the option to analyse the spreadsheet
data further should you wish.
By right clicking anywhere on the plot a pop-up menu will appear. If you click on “Measure”
two cursors will be activated. These can be used to directly compare timings between two
points anywhere on the plot. When you bring up the cursors initially you should do so
when the full extent of the plot can be seen.
Copyright © 2004 The Black Box Toolkit Ltd. All rights reserved.
The Black Box Toolkit
Page 63 of 98
The green cursor is A and the red cursor is B. The distance between them is “M”. All
measures (in milliseconds) are shown in the status bar as well as the upper status area.
Cursors can be dragged with the mouse and positioned roughly in place with the in-built
“snap to sample” feature. Generally the green cursor is used to define the leading edge on
one line and the red the trailing edge on another.
Note: The “snap to sample” feature is only an approximation and you should always zoom
in and make precise final adjustments to each cursors position on the plot as described
below. Failure to do so may affect the precision of the measurement between the two
cursors.
Once you have roughly snapped to a sample you should do a final exact position by right
clicking and selecting “Zoom In”.
In zoom mode you can click and drag over the region you want to zoom into. This will be
indicated by white dashed vertical lines. When the mouse is released the region will be
enlarged and will fill the whole graph area. You are free to zoom in as many times as
required to get exact positioning.
Copyright © 2004 The Black Box Toolkit Ltd. All rights reserved.
Page 64 of 98
The Black Box Toolkit
In the screen shot below the cursors have been positioned exactly on the leading and
trailing edge of the bitmap display (opto-detector centre screen on line 3).
On line 3 we can see each refresh of the bitmap display (35 refreshes). We can see the
exact position of the cursors by looking at the upper or lower status bar. The green cursor
A is positioned at 1245ms on line 3 and the red B cursor at 1598. This gives an elapsed
time between the cursors of 353ms. This is the M measure.
As the opto-detector was positioned mid screen we should remember that the actual time
is for mid-screen to mid-screen. If we used a frame-by-frame full-screen measurement the
duration would have been 360ms as we would need to account for the theoretical 5ms
before and after the leading edge of the opto-detector being triggered. This is because the
screen must be redrawn as a whole. These periods are indicated by the troughs between
“on” periods in the graph.
In the screen shot above we have dragged the green cursor -5ms from the leading edge of
the first image being detected. This represents the top of screen position on the first
refresh of the image being displayed. The red cursor has been dragged +5ms from the
leading edge of the last sample. This represents the bottom of screen position of the last
refresh trace of the stimulus image display. As can be seen the M measure matches the
theoretical 360ms which is based on 36 refreshes of 10ms each when a monitor is driven
at 100Hz. When using a CRT, corrections such as these need to be made as if an optodetector is positioned mid screen, there will always be a delay before the top of screen
redraw reaches the sensor and again from the sensor position to the bottom of the screen.
Copyright © 2004 The Black Box Toolkit Ltd. All rights reserved.
The Black Box Toolkit
Page 65 of 98
8.6. Switching graph background colour
On many occasions it is useful to switch the background colour of the graph, e.g. before
we save the plot as a Windows BMP file.
To change the colour select “View|Graph Background Colour|White” from the menu.
8.7. Labelling lines with your own terms
When checking the timing of a paradigm it is often useful to label lines to make them more
meaningful and relevant. This helps when re-analyzing data at a later date. To label your
lines select “Tools|Label lines” from the menu bar. The following dialog will then appear.
In the text boxes to the left enter short descriptions that are relevant to your own tests. In
the example below we have labelled line 7 (L7) as “L7: My standard mouse” and L3 as
“L3: NEC 17” CRT @ 100Hz”. To accept the line labels we click on OK. These are then
automatically saved with the RTL file and displayed on the Y-axis of the graph.
Copyright © 2004 The Black Box Toolkit Ltd. All rights reserved.
Page 66 of 98
The Black Box Toolkit
8.8. Making and viewing notes
It is often useful to make notes as well as labelling your own lines when carrying out data
analysis. To make a note hit CTRL+N or select “Tools|Notes” from the menu bar. A small
note size window will then appear. If any notes exist they will be displayed or you are free
to start creating your own. You can cut and paste from the clipboard if required either by
using the standard Windows shortcut keys or by using the menu which is available when
you right click.
When you click on OK the note will automatically be saved as an RTF file (Rich Text
Format) along side your RTL file. It will have the same filename but with an .RTF extension
Copyright © 2004 The Black Box Toolkit Ltd. All rights reserved.
The Black Box Toolkit
Page 67 of 98
and will be stored in the same folder. You can edit notes in document processing
packages such as Microsoft Word etc.
It is strongly advised you label lines and make copious notes as you carry out data
analysis to aid you should you revisit the raw data at a later date.
8.9. Copying plots and data to the clipboard
When writing-up studies it is often useful to copy and paste plots into documents. By
selecting “Edit|Copy Plot to Clipboard” you can copy the current plot view to the clipboard.
This can then be pasted this into any Windows application that accepts bitmaps.
You can also copy data from the spreadsheet and paste it into packages such as Microsoft
Word or Excel. To do this select “Edit|Copy Selected Cells to Clipboard” and then paste
into your chosen package.
Copyright © 2004 The Black Box Toolkit Ltd. All rights reserved.
Page 68 of 98
The Black Box Toolkit
8.10. Saving plots as standard Windows WMF or BMP files
The current plot view can be saved as a standard Microsoft Windows bitmap (BMP) or
Windows Meta File (WMF) for use in other packages. To save a plot as a bitmap select
“File|Save Plot As…|Bitmap” then choose the appropriate location and filename.
Alternatively choose “File|Save Plot As…|Metafile” to save as a Windows Metafile (WMF).
You should note that WMF files are much higher resolution than bitmaps and that not all
packages can handle them correctly. We recommend JASC Paint Shop Pro 8.0 or higher.
Copyright © 2004 The Black Box Toolkit Ltd. All rights reserved.
The Black Box Toolkit
Page 69 of 98
8.11. Exporting the spreadsheet to Microsoft Excel or an HTML file
You can export the lower spreadsheet to a Microsoft Excel file (.XLS) by selecting
“File|Export|To Excel File…” then choose the appropriate location and filename. Excel files
will be exported in the BIFF 8 format, which is the format used by Excel 97. All current
versions of Excel can read this format directly.
Alternatively you can highlight the range of cells you are interested in, copy them to the
clipboard (CTRL+C) and paste them into Excel (CTRL+V).
To export as standard HTML select “File|Export|To HTML File…” then choose the
appropriate location and filename.
You should bear in mind that both files will be quite large as you are exporting all 32,000
rows and 25 columns. This equates to 800,000 cells!
Copyright © 2004 The Black Box Toolkit Ltd. All rights reserved.
Page 70 of 98
The Black Box Toolkit
8.12. Shortcut keys used in the data analyser
Various shortcut keys help you work faster. These are summarised below.
F2
F3
F4
F5
CTRL+N
Zoom – click and drag between two points on the plot.
Pan – click and drag the plot to pan left or right.
Measure – brings up the green (A) and red (B) measurement cursors.
These will appear bottom left of a full sequence. If you are zoomed in
you may not see them and will need to hit F5 first.
Replot – redraws the plot so that the whole sequence is in view.
Useful just before you bring the measurement cursors up
Notes – you can make typewritten notes regarding any aspects of the
current data file. These are saved along with the data file and can be
edited using a standard RTF editor, e.g. Microsoft Word or Wordpad.
Copyright © 2004 The Black Box Toolkit Ltd. All rights reserved.
The Black Box Toolkit
Page 71 of 98
9. STEP-BY-STEP CASE STUDY
9.1. Using the Black Box Toolkit to investigate the effect of using several different
mice as response devices in a simple visual reaction time paradigm
The best overview of the Black Box Toolkit is one where it is actually used in the field. The
case study outlined is a replication of work published by “Plant, R.R., Hammond, N.V. &
Whitehouse T. (2003), How choice of mouse may effect response timing in psychological
studies, Behavior Research Methods, Instruments and Computers 35(2), 276-284”. Here
the researcher wants to know the contribution that a given response device has on their
paradigm in terms of presentation and response timing. In this example E-Prime is being
used, although any Experiment Generator would be likely to produce similar results.
The paradigm itself examines simple visual reaction time. A remote PC running E-Prime
displays a stimulus image and waits for a response via the mouse. Once a response is
detected the image terminates and the paradigm then displays a black screen for 500ms
before displaying the next image in the sequence.
remote PC running E-Prime
• E-Prime 1.1 SP3 (www.pstnet.com)
• 800x600 16bit colour on a CRT monitor run at 100Hz (10ms screen redraw)
• 8x 800x600 bitmaps, 2 runs of 8 trials (not randomised)
• NEC 19” monitor running at 100Hz (verified)
• Windows 2000 SP4 with Direct X 9.0a
• Athlon 900Mhz with 128Mb 133 SDRAM
• ATI Rage graphics card with 16Mb
• 30Gb Hard Drive
• AC 97 on-board sound (note E-Primes voice key connects to its own serial
response box)
• Various response devices:
o PS/2 AMI mouse
o PS/2 OEM “unbranded” mouse
o PS/2 cherry 102 key keyboard
o E-Prime deluxe four button response box
o E-Prime microphone/voice key
Host PC running the Black Box Toolkit
• 1800 Athlon XP with 512Mb DDR RAM
• Windows 2000 SP4
• Standard parallel port (IEEE 1284) running in EPP 1.9 (switchable in the BIOS
between 1.7/1.9 modes)
• The IEEE 1284 version of the Black Box Toolkit (parallel port)
• 1x BBTK Tone Generator (3.5mm jack)
• 5x switch closure leads soldered to the primary button/key of the response device
on the remote PC (2.5mm jack)
Copyright © 2004 The Black Box Toolkit Ltd. All rights reserved.
Page 72 of 98
The Black Box Toolkit
The host and remote PCs were setup in as illustrated in the schematic below. A BBTK
Tone Generator was attached to line 5. This was adjusted to give a clear and sharp signal
at a reasonable volume. The E-Prime button box script was used to check this triggered
the voice key correctly. Using the “active switch closure” leads that come with the BBTK
the bare ends were soldered to the primary button of each response device, e.g. button 1
of the PST response box, left button of each mouse, and the “B” key on the keyboard. The
2.5mm jack plug at the other end of the lead was then be plugged into the line 7 on the
BBTK (active switch closure) as each device was tested. The BBTK opto-detector (line 3)
was attached centre screen on the remote PC. This was perfectly aligned to the position
where a 32x32 pixel white block had been superimposed on each bitmap.
Copyright © 2004 The Black Box Toolkit Ltd. All rights reserved.
The Black Box Toolkit
Page 73 of 98
The BBTK DSCAR (Digital Stimulus Capture And Response) software was programmed to
act as a virtual human with the following characteristics:
1. Watch for a visual event on line 3 (the opto-detector)
2. After detecting the leading edge of a visual event wait 300ms (about average for a
human subject)
3. Generate a key down event (switch closure) on line 7 that lasts for 150ms (about
average for a human subject)
The actual DSCAR sequence can be seen below. Note that a total of 16 visual events are
being “watched” for. This sequence will work for any device that makes use of a switch
closure, i.e. mice, keyboard, button box. Details on the sequence for activating the voice
key are given later.
The DSCAR sequence is pretty straightforward. We only wish to make one kind of
response. That is, a switch closure on line 7 with a “key down” duration of 150ms. This is
shown in the upper “BSR” spreadsheet. In this case we are only making use of one
response on several occasions from a bank of 32,000 possible responses.
Next in the lower sheet we have added 16 event patterns to watch for in the “SPM”
spreadsheet. For each event we have told DSCAR to wait for 300 milliseconds after
detecting the leading edge of an event on line 3. Once detected, the predefined response
will be generated. In this case the response is a switch closure on line 7. This will have the
effect of pressing the left mouse button at exactly 300 milliseconds after the image
appears and holding it down for 150ms. One would therefore reasonably expect the
paradigm to record a response time of 300 milliseconds.
Copyright © 2004 The Black Box Toolkit Ltd. All rights reserved.
Page 74 of 98
The Black Box Toolkit
To run the DSCAR sequence it is loaded into the DSCAR runtime module as shown
below.
The appropriate device is selected for use with E-Prime and the BBTK active switch
closure lead plugged into line 7. The opto-detector was positioned on the remote screen
and plugged into line 3. Finally a time limit of 30,000 ms was entered into the options
dialog of DSCAR so that monitoring would stop after 30 seconds. An appropriate Real
Time Log filename (*.rtl) was chosen.
Copyright © 2004 The Black Box Toolkit Ltd. All rights reserved.
The Black Box Toolkit
Page 75 of 98
Once everything is ready on both the host and remote PC DSCAR is set running by
pressing “F5”. As each bitmap is displayed by the paradigm a response is automatically
triggered at 300ms with the actual sequence of bitmaps only lasting a few seconds.
When data for a given device has been collected the next response device was tested.
The identical E-Prime script was used each time, bar that the response device was
changed. For the voice key DSCAR was programmed to generate a response on line 5 to
trigger the BBTK Tone Generator. A duration of 150ms was used meaning that the trigger
tone was output for 150ms.
Once a device has been tested the following data is available for analysis:
BBTK .rtl file (host PC)
• Data on the onset of each image
• Offset of each image
• Duration of each image
• Refresh rate
• Onset of the simulated response
• Offset of the simulated response
• Duration of the simulated
response
E-Prime E-DataAid .edat file (remote PC)
• Data on the refresh rate
• Duration of the image display prior
to termination
• Reaction time
• Any other logging data that has
been chosen to be logged
Primarily we are interested in two key measures of timing error:
1. The display error – the image display was scripted in the paradigm to terminate to a
black screen immediately after a response. Ideally this should have been at the end
of the same refresh. The target display time should be as close to 300ms as
possible.
2. The response time error – this is calculated by looking at the response times
recorded by E-Prime. Any difference from 300ms is error.
Here we need to make use of data collected by the BBTK together with the response times
recorded by the paradigm. To analyse data collected by DSCAR we use the data analyser
module.
The example below shows the .rtl file for an OEM unbranded mouse.
Copyright © 2004 The Black Box Toolkit Ltd. All rights reserved.
Page 76 of 98
The Black Box Toolkit
The upper trace (L3: E-Prime bitmap display) shows the image being displayed by the
paradigm as detected by the opto-detector attached to the remote PC’s screen. The lower
trace (L7: Left mouse button) shows the simulated mouse response that was generated by
the DSCAR in response to detecting the stimulus image. Note the time base shown in
milliseconds across the full extent of the plot. Actual illumination durations detected by the
opto-detector are shown in the spreadsheet. Here the line 3 duration is around 3
milliseconds. As we were using a CRT this is the duration the phosphor stayed illuminated
as the CRTs beam scanned down the screen every 10ms at a refresh rate of 100Hz.
Should we have used a TFT or data projector these would show the actual display
duration as there is no refresh produced by these devices.
If we scroll the spreadsheet across to show the details for the mouse on line 7 we can see
that the durations were very close to the intended button down duration of 150ms.
Copyright © 2004 The Black Box Toolkit Ltd. All rights reserved.
The Black Box Toolkit
Page 77 of 98
If we look at the status bar we can see that the toolkit has taken 1,474,120 samples in
30,000ms. This gives a sampling rate of just over 49 samples per millisecond, or 49kHz.
The actual file size was 33.5Mb. This means that Real Time Log files will grow at a rate of
around 1.2Mb every second! Fortunately .rtl files compress greatly with standard archive
utilities such as WinZip.
By right clicking on the graph a pop-up box can be activated. If you then click on
“Measure” two cursors can be activated. These can be used to directly compare timings
between any two points on any of the eight lines.
Both cursors can be dragged and positioned roughly in place with the in-built snap to
sample feature. Generally the green cursor is used to define the leading edge on one line
and the red the trailing edge on another.
Once you have roughly snapped to a sample, exact positioning can be performed by right
clicking and selecting “Zoom In”.
Copyright © 2004 The Black Box Toolkit Ltd. All rights reserved.
Page 78 of 98
The Black Box Toolkit
Once zoom mode is activated you can click and drag over a region you want to zoom into.
This will be indicated by white dashed vertical lines. When the mouse is released the
region will be enlarged and will fill the whole graph area. You are free to zoom in as many
times as required to achieve exact positioning of the measurement cursors.
In the screen shot below the cursors have been positioned exactly on the leading edge of
the image display (opto-detector on line 3) and the leading edge of the simulated response
(switch closure/left mouse button down on line 7).
On line 3 we can see each refresh of the image display as the bitmap was drawn on the
CRTs screen. The measure between the display leading edge and the simulated
responses leading edge is exactly 300 milliseconds as intended. This tells us that a
response was fed into the paradigm on the remote PC at exactly the right time relative to
the appearance of the bitmap. If we look at the red cursor and trace up the vertical cross
hair and count the number of refreshes to the right of it we can see that the image was
displayed for longer than it should have been. Remember it should have terminated to a
black screen once a response was detected. Here we can see that it was displayed for an
additional 6 refreshes. At a refresh rate of 100Hz (10ms redraw) this means it was
displayed for 60ms longer that it should have been. This is a significant display error, with
the image being displayed 20% longer than it should have been under ideal conditions.
The actual image was displayed for 360 milliseconds (36x10ms). We can arrive at the
same conclusion by simply measuring the first and last leading and trailing edge. However
we must remember to add half the refresh interval (between peaks) to the front and end of
the run as we positioned the opto-detector mid screen, so there is a screen area above
and below the sensor where data is not collected. Here we can see what this would look
like on the graph once accounted for.
Copyright © 2004 The Black Box Toolkit Ltd. All rights reserved.
The Black Box Toolkit
Page 79 of 98
We can also determine the duration of the period the mouse button was held down for.
Remember this should have been 150 milliseconds. Again we can use the cursors to
determine this. You’d first need to zoom out using the “Replot” option of the fly out menu
available when you right click on the graph.
Using the cursors we can easily see that the simulated response was generated for 150
milliseconds as intended. Thus the mouse button wired to the active switch closure lead
was held down for 150 milliseconds .
So to sum up, the data we have obtained from the BBTK Data Analysis module provides
us with the following information:
•
•
•
•
The duration the image was actually displayed by paradigm (360ms)
The length of time the image was displayed after is should have terminated (60ms)
The elapsed time before the response was simulated after the bitmap was detected
(300ms as intended)
The duration of the simulated response (150ms as intended)
From the worked example one can envisage how synchrony between two or more
stimulus types can be checked.
Copyright © 2004 The Black Box Toolkit Ltd. All rights reserved.
Page 80 of 98
The Black Box Toolkit
Next we should examine the data collected by E-Prime using E-DataAid. We already know
that the bitmap was displayed for around 60ms more than predicted.
If we copy and paste the reaction times recorded by E-Prime into Microsoft Excel we can
quickly calculate the response time error as shown in the table below.
Copyright © 2004 The Black Box Toolkit Ltd. All rights reserved.
The Black Box Toolkit
Page 81 of 98
Response
Time
Recorded By
E-Prime
(milliseconds)
[Observed]
Response
Time
Simulated By
the BBTK
(milliseconds)
[Expected]
364.00
364.00
374.00
352.00
355.00
355.00
358.00
360.00
361.00
362.00
360.00
362.00
346.00
355.00
356.00
357.00
300.00
300.00
300.00
300.00
300.00
300.00
300.00
300.00
300.00
300.00
300.00
300.00
300.00
300.00
300.00
300.00
Response
Time Error
(milliseconds)
[O-E]
64.00
64.00
74.00
52.00
55.00
55.00
58.00
60.00
61.00
62.00
60.00
62.00
46.00
55.00
56.00
57.00
Mean
SD
Min
Max
Variance
58.81
06.21
46.00
74.00
38.56
By copying and pasting data from the Data Analyser we can plot both the display and
response time error recorded by the BBTK in Microsoft Excel. Here we can see the
stimulus image display time error.
Bitmap Duration Error (OEM Mouse)
90.00
Error in ms
80.00
70.00
60.00
50.00
40.00
30.00
20.00
10.00
0.00
1
2
3
4
5
6
7
8
9 10 11 12 13 14 15 16
Trial No
(M=65.50, SD= 7.06, Min=52.00, Max=82.00, Var=49.87)
Copyright © 2004 The Black Box Toolkit Ltd. All rights reserved.
Page 82 of 98
The Black Box Toolkit
By examining reaction times we can see that the E-Prime recorded times far longer than
they actually were in reality. The absolute error between the target reaction time, and that
recorded by E-Prime, was 58.81 milliseconds with a standard deviation of 6.21
milliseconds. So rather than being 300 milliseconds as intended they were 359
milliseconds on average with a Standard Deviation of 6.21 milliseconds. Again these RT
errors can be easily plotted in Excel.
Response Time Error (OEM Mouse)
90.00
80.00
Error in ms
70.00
60.00
50.00
40.00
30.00
20.00
10.00
0.00
1
2
3
4
5
6
7
8
9 10 11 12 13 14 15 16
Trial No
(M=58.81, SD=6.21, Min=46.00, Max=74.00, Var=38.56)
In this sample case study we have compared timing information obtained or generated
using the Black Box Toolkit with data recorded by the paradigm under test. From this we
can conclude that if we were to use the OEM mouse in question as a response device this
would have an unacceptable affect on our presentation and response timing. In terms of
stimulus presentation this may substantially alter what we intended when designing the
paradigm.
Copyright © 2004 The Black Box Toolkit Ltd. All rights reserved.
The Black Box Toolkit
Page 83 of 98
9.2. The effect of changing response device
By repeatedly following the procedure outlined previously the effect of substituting various
response devices on presentation and response timing can easily be evaluated. All
aspects of the paradigm remain unchanged bar that a new response device is physically
plugged into the remote PC and where required, E-Prime is instructed to accept responses
from the new device. In order to illustrate the effects of various response devices can have
on timing a representative range have been tested and are summarised in the following
series of graphs.
Trust AMI wheel mouse
Bitmap Duration Error (AMI Mouse)
90.00
Error in ms
80.00
70.00
60.00
50.00
40.00
30.00
20.00
10.00
0.00
1
2
3
4
5
6
7
8
9 10 11 12 13 14 15 16
Trial No
(M=22.06, SD=2.43, Min=21.00, Max=31.00, Var=5.93)
Response Time Error (AMI Mouse)
90.00
80.00
Error in ms
70.00
60.00
50.00
40.00
30.00
20.00
10.00
0.00
1
2
3
4
5
6
7
8
9 10 11 12 13 14 15 16
Trial No
(M=17.25, SD=2.77, Min=14.00, Max=26.00, Var=7.67)
Copyright © 2004 The Black Box Toolkit Ltd. All rights reserved.
Page 84 of 98
The Black Box Toolkit
Cherry Keyboard
Bitmap Duration Error (Cherry Keyboard)
90.00
Error in ms
80.00
70.00
60.00
50.00
40.00
30.00
20.00
10.00
0.00
1
2
3
4
5
6
7
8
9 10 11 12 13 14 15 16
Trial No
(M=45.38, SD= 4.79, Min=41.00, Max=52.00, Var=22.92)
Response Time Error (Cherry Keyboard)
90.00
80.00
Error in ms
70.00
60.00
50.00
40.00
30.00
20.00
10.00
0.00
1
2
3
4
5
6
7
8
9 10 11 12 13 14 15 16
Trial No
(M=39.31, SD=2.87, Min=35.00, Max=44.00, Var=8.23)
Copyright © 2004 The Black Box Toolkit Ltd. All rights reserved.
The Black Box Toolkit
Page 85 of 98
Psychology Software Tools Deluxe Response Box
Bitmap Duration Error (PST Response Box)
90.00
Error in ms
80.00
70.00
60.00
50.00
40.00
30.00
20.00
10.00
0.00
1
2
3
4
5
6
7
8
9 10 11 12 13 14 15 16
Trial No
(M=16.69, SD=5.25, Min=11.00, Max=22.00, Var=27.56)
Response Time Error (PST Response Box)
90.00
80.00
Error in ms
70.00
60.00
50.00
40.00
30.00
20.00
10.00
0.00
1
2
3
4
5
6
7
8
9 10 11 12 13 14 15 16
Trial No
(M=7.75, SD=0.93, Min=6.00, Max=10.00, Var=0.87)
Copyright © 2004 The Black Box Toolkit Ltd. All rights reserved.
Page 86 of 98
The Black Box Toolkit
Voice Key (plugged into the PST Deluxe Response Box)
Bitmap Duration Error
90.00
Error in ms
80.00
70.00
60.00
50.00
40.00
30.00
20.00
10.00
0.00
1
2
3
4
5
6
7
8
9 10 11 12 13 14 15 16
Trial No
(M=16.13, SD=4.98, Min=11.00, Max=22.00, Var=24.78)
Response Time Error
90.00
80.00
Error in ms
70.00
60.00
50.00
40.00
30.00
20.00
10.00
0.00
1
2
3
4
5
6
7
8
9 10 11 12 13 14 15 16
Trial No
(M=8.19, SD=0.66, Min=7.00, Max=9.00, Var=0.43)
9.3. Response device summary
The mere act of changing response device can have a huge effect over both display and
response timing in terms of absolute error and variance. In terms of response timing there
is a significant difference between all the devices tested and stresses the importance of
making use of the Black Box Toolkit to determine the contribution it makes to timing.
As one can appreciate it would be quite easy to introduce a conditional bias by making use
of two machines and two different mice! The introduction of faster presentation schedules,
multiple stimulus types and customised response devices increases the usefulness of the
Black Box Toolkit. In the two final graphs we combine the timing performance obtained
from all the devices tested.
Copyright © 2004 The Black Box Toolkit Ltd. All rights reserved.
The Black Box Toolkit
Page 87 of 98
Bitmap Duration Error
OEM Unbranded mouse
Trust AMI mouse
Cherry Keyboard
PST Response Box
90
80
70
Error in ms
60
50
40
30
20
10
0
1
2
3
4
5
6
7
8
9
10
11
12
13
14
15
16
Trial No
Response Time Error
OEM Unbranded mouse
Trust AMI mouse
Cherry Keyboard
PST Response Box
80
70
60
Error in ms
50
40
30
20
10
0
1
2
3
4
5
6
7
8
9
10
11
12
13
14
15
16
Trial No
Copyright © 2004 The Black Box Toolkit Ltd. All rights reserved.
Page 88 of 98
The Black Box Toolkit
9.3. The effect of using a TFT with various response devices
TFTs whilst not suffering from the inherent problems of being tied to refresh rate for
display duration do suffer from response time effects. It should be noted that data
projectors also suffer from response time artefacts but to a much greater degree on certain
models. Here in a short follow-on from the case study outlined in the previous section we
examine the effects of using a TFT for stimulus display. Once again the paradigm remains
unaltered and no settings were changed in E-Prime. These results are simply a result of
changing the physical display device. Again visual presentation should have terminated on
detection of a response and reaction time should have been 300 milliseconds.
Here we can see the timing performance of the same OEM Mouse as tested earlier.
However unlike the Data Analyser plot when testing with a standard CRT, display times
are made up of a discrete on period rather than a series of refresh blocks. The
spreadsheet duration for line 3 also shows a constant illumination period.
Again it is useful to summarise the performance for the poorest and best performing
response device when used with a TFT.
Copyright © 2004 The Black Box Toolkit Ltd. All rights reserved.
The Black Box Toolkit
Page 89 of 98
OEM Mouse
Bitmap Duration Error (OEM Mouse)
90.00
80.00
Error in ms
70.00
60.00
50.00
40.00
30.00
20.00
10.00
0.00
1
2
3
4
5
6
7
8
9 10 11 12 13 14 15 16
Trial No
(M=73.38, SD=8.17, Min=61.01, Max=88.98, Var=66.76)
Response Time Error (OEM Mouse)
90.00
80.00
Error in ms
70.00
60.00
50.00
40.00
30.00
20.00
10.00
0.00
1
2
3
4
5
6
7
8
9 10 11 12 13 14 15 16
Trial No
(M=77.19, SD=6.96, Min=65.00, Max=87.00, Var=48.43)
Copyright © 2004 The Black Box Toolkit Ltd. All rights reserved.
Page 90 of 98
The Black Box Toolkit
Psychology Software Tools Deluxe Response Box
Bitmap Duration Error (PST Response Box)
90.00
Error in ms
80.00
70.00
60.00
50.00
40.00
30.00
20.00
10.00
0.00
1
2
3
4
5
6
7
8
9 10 11 12 13 14 15 16
Trial No
(M=23.56, SD=4.69, Min=20.99, Max=36.00, Var=22.01)
Response Time Error (PST Response Box)
90.00
80.00
Error in ms
70.00
60.00
50.00
40.00
30.00
20.00
10.00
0.00
1
2
3
4
5
6
7
8
9 10 11 12 13 14 15 16
Trial No
(M=26.06, SD=0.85, Min=25.00, Max=27.00, Var=0.73)
As can clearly be seen the mere act of changing the display device not only affects
presentation timing but also response timing error across a range of devices.
Copyright © 2004 The Black Box Toolkit Ltd. All rights reserved.
The Black Box Toolkit
Page 91 of 98
10. USING THE BBTK RESPONSE PAD
The Black Box Toolkit response pad [optional extra] offers researchers a guaranteed
method for collecting sub-millisecond accurate presentation and response times. This can
be particularly important when collecting data from paradigms involving presentation of
video or other complex stimuli involving rapid presentation rates. Typically the response
pad is used with the Digital Stimulus Capture software module.
The response pad can be useful in several scenarios:
1. The response pad can collect response data from a live paradigm where timing is
so critical that the paradigm itself is deemed unreliable, e.g. video or RSVP. Simply
the Toolkit records both presentation and response timing. Using the measurement
cursors of the Data Analyser you are free to choose the stimulus onset point and
use the second cursor to read off a response time. For more details of using the
response pad with video based stimuli consult the “Sensor Calibration” section of
the manual.
2. The response pad can also be used to check the timing of a paradigm rather than
using DSCAR as a virtual human. In this way a human can make responses to
stimuli using the pad and by utilising the active switch closure leads from the pad a
standard response device can be simultaneously triggered. By comparing the exact
response time recorded by DSC against that recorded by the paradigm any timing
errors can be computed as normal. Some researchers may prefer this option as this
gives them the option of using live human response times, but with the advantage
of a third party monitoring all display and response times with sub-millisecond
accuracy.
In the diagram below a response pad and microphone have been added to the simple
visual reaction time paradigm outlined in the previous section.
Copyright © 2004 The Black Box Toolkit Ltd. All rights reserved.
Page 92 of 98
The Black Box Toolkit
By using the response pad the four digital output lines of the BBTK operate as four
additional input lines (one for each button). The four standard input lines continue to
monitor for visual and auditory stimulus materials. When using the Data Analyser each of
the pads four buttons are plotted as a separate line in addition to two for standard optodetectors and two powered-in lines, e.g. microphones.
Copyright © 2004 The Black Box Toolkit Ltd. All rights reserved.
The Black Box Toolkit
Page 93 of 98
11. GLOSSARY
Remote PC
A remote PC is the computer or other equipment which is running the paradigm you wish
to benchmark the timing of.
Host PC
The host PC is the Microsoft Windows 2000 or XP based desktop or laptop that is
physically connected to the Black Box Toolkit via its parallel port. This PC controls the
BBTK and carries out all timing analysis.
Active switch closure
Active switch closure is where the Black Box Toolkit closes a switch or key on a response
device on the remote PC. For example the toolkit may make a simulated response by
holding down a mouse button of the remote PC. This is accomplished via a switch closure
lead that is physically attached to a switch on the response device.
Passive Switch Closure
Passive switch closure is where the Black Box Toolkit detects a suitable switch closure on
a response device on the remote PC (see 13.3.1.). For example if a human presses a key
on a remote response device this can be detected simultaneously by the BBTK.
BBTK Digital Tone Generator
A digital tone generator is a specialised digital sound producing device that is used by the
Black Box Toolkit to trigger voice keys on remote PCs.
BBTK Digital Microphone
A digital microphone is a specialised microphone that is used for detecting sound stimuli
produced by the remote PC.
Copyright © 2004 The Black Box Toolkit Ltd. All rights reserved.
Page 94 of 98
The Black Box Toolkit
13. BIBLIOGRAPHY
Plant, R.R., Hammond, N.V. & Turner G. (2004), Self-validating presentation and
response timing in cognitive paradigms: How and why?, Behavior Research Methods,
Instruments and Computers, 36(2), 291-303.
Plant, R. R., Hammond, N. V. and Whitehouse T. (2003), How choice of mouse may
effect response timing in psychological studies, Behavior Research Methods, Instruments
and Computers, 35(2), 276-284.
Plant, R. R. and Hammond, N. V. (2002). Towards an Experimental Timing Standards
Lab: Benchmarking precision in the real world, Behavior Research Methods, Instruments,
and Computers, 34(2), 218-226.
Plant, R. R., Hammond, N. V. and Whitehouse T. (2002c), Towards an experimental
timing standard laboratory, Proceedings of Measuring Behaviour 2002: 4th International
Conference on Methods and Techniques in Behavioural Research, 27th – 30 August 2002,
Amstrerdam, The Netherlands, ISBN 90-74821-43-X.
Plant, R. R., Quinlan P., Hammond, N. V. and Whitehouse T. (2002), Benchmarking
precision in the real world, Proceedings of Measuring Behaviour 2002: 4th International
Conference on Methods and Techniques in Behavioural Research, 27th – 30 August 2002,
Amsterdam, The Netherlands, ISBN 90-74821-43-X.
Plant, R. R., Hammond, N. V. and Whitehouse T. (2002a), How choice of mouse may
effect response timing in psychological studies, Presentation at Society for Computers in
Psychology Annual Meeting, (November 21), Kansas City, Missouri.
Plant, R. R., Hammond, N. V. and Whitehouse T. (2002b), Benchmarking the accuracy
of commonly used experiment generators, Abstracts of the Psychonomic Society (43rd
Annual Meeting)
Plant, R. R. and Hammond, N. V. (2002), Absolute accuracy in studies of human
performance: a trade-off between timing and ease of use, Psychology Learning And
Teaching conference, 18th -20th March 2002, University of York
Plant, R. R. and Hammond, N. V. (2001a). Towards an Experimental Timing Standards
Laboratory. Presentation at Society for Computers in Psychology Annual Meeting,
(November 15), Orlando, Florida.
Plant, R. R. and Hammond, N. V. (2001b). Benchmarking the timing characteristics of
tools used by behavioural scientists. Abstracts of the Psychonomic Society (42nd Annual
Meeting), 6, 109.
Copyright © 2004 The Black Box Toolkit Ltd. All rights reserved.
The Black Box Toolkit
Page 95 of 98
13. BBTK SPECIFICATIONS
13.1. General Specifications of the Black Box Toolkit
•
•
•
•
•
•
•
8 channel - 4 digital input/4 digital output
o 2 opto-detector leads for detecting screen events on a second PC, Mac or
Linux system
o 2 switch closure channels for simulating button presses on equipment
running your paradigm
o 2 powered digital-in channels for BBTK microphones etc.
o 2 powered digital-out channels for BBTK tone generators etc.
Fully modular so that additional custom sensors can be added
Opto-isolated switch closure lines
Sampling rates of over 48 kHz using a standard PC
EPP 1.7 or 1.9 or Bi-directional parallel port interface to host PC
Powered by external 5v supply
12 month warranty
13.2. Sensor and Generation Modules Timing Specifications
The timing tests were carried out using a digital oscilloscope and our own specialized
microphones and tone generators together with the standard software suite. Testing was
carried out using a 1.3 GHz AMD Athlon based computer with EPP 1.9 port.
Nominal
timing
characteristics
Sensor or Module
Black Box Sampling Rate across all 8 lines (typical
sampling rate on a 1.3Ghz Athlon)
Powered input/output timed from parallel port to
input/output pin of peripheral or switch closure
Microphone timed from output of tone generator to
parallel port (Op-amp amplified Electret mic – uses
microcontroller to detect peak and cancel false
triggering)
Opto-detector input timed from diode to parallel port
2.5mm switch closure timed from parallel port to contact
Tone generator timed from parallel port to piezo sounder
pin (Piezo sounder with pitch and amplitude control via 2
potentiometers)
48+ kHz
<100nS
<50µS
<100nS
35µS
50µS ~ 625µS
Copyright © 2004 The Black Box Toolkit Ltd. All rights reserved.
Page 96 of 98
The Black Box Toolkit
13.3. Individual line Specifications
13.3.1. Lines 1 & 2, Powered digital-in & passive switch closure
TTL input. A TTL signal (0-5V) can be connected to these lines, with ground connected to
the 3.5mm jack plug sleeve (0V) and the signal to the jack plug ring (input signal). Device
switch connections (eg. Joystick, mice etc.), can also be connected across these points as
long as the polarity of any voltage across the switch is noted and this voltage doesn’t
exceed 5V. Power can be taken from the 5V on the tip of the jack plug as long as the
consumption is limited to 50mA.
3.5mm stereo jack socket. Connection as detailed below:
•
•
•
Tip: 5V (< 50mA)
Ring: TTL signal
Screen: 0V
The audio detection module (microphone) can be connected to these lines.
13.3.2. Lines 3 & 4, opto-detector
These 2 lines are intended only for the opto-detectors provided with this kit and provide a
connection from the amplifier within the Black Box Toolkit to their photo diodes.
•
2.5mm mono jack socket.
13.3.3. Lines 5 & 6, Powered digital-out
TTL output. The signal between the ring and sleeve of the 3.5mm stereo jack socket is
TTL (0-5V) and can be used to connect to any peripheral with an input expecting a TTL
signal. Power can be taken from the 5V on the tip of the jack plug as long as the
consumption is limited to 50mA.
Copyright © 2004 The Black Box Toolkit Ltd. All rights reserved.
The Black Box Toolkit
Page 97 of 98
3.5mm stereo jack socket. Connection as detailed below:
•
•
•
Tip: 5V (< 50mA)
Ring: TTL signal
Screen: 0V
The tone generator modules can be connected to these lines.
13.3.4. Lines 7 & 8, Active switch closure
The 2.5mm mono sockets connect to the switch contacts of a solid-state relay. The
maximum ratings for which are:
•
•
•
•
Load voltage (peak AC): 50V
Continuous load current: 0.13A
Peak load current: 0.4A (100mS, 1 shot, DC)
On resistance: 18 Ω
The connections from the active switch closure lines can be connected in parallel with
device buttons (eg. Joysticks, mice, etc.) to emulate the pressing of the button. The unit is
supplied with 2 flying leads with 2.5mm connectors for this purpose.
NOTE: Exercise caution when connecting the flying leads from the ‘active switch closure’
not to connect the two leads across the power supply of the device you’re measuring!
•
•
•
2.5mm mono jack socket.
Tip:Solid-state relay contacts
Screen:Solid-state relay contacts
13.4.. Power supply
The power adaptor for the unit needs to supply between 7.5 and 9V with a power rating of
at least 250mA. The connector for the supply is a 2.1mm low power connector where the
centre pin is 5V and the outer being ground (0V).
The UK version is supplied with a suitable power adaptor with a multi plug connector. The
larger (2.1mm) connector is the one to use.
13.3.5. Optional response box
The response box comes supplied with an 8 way cable with flying leads. These can be
connected to external peripherals as described in the ‘active switch closure’ section. The
flying leads are connected in pairs to solid-state relays within the response box, the wiring
is described in the table below:
Colour wires
Green – Yellow
Orange – Red
Brown – Blue
Purple – Grey
lines
5
6
7
8
Copyright © 2004 The Black Box Toolkit Ltd. All rights reserved.
Page 98 of 98
The Black Box Toolkit
14. APPENDIX A
Realtime priority
Excerpt taken from the Microsoft Developer Network (MSDN)
“Threads are scheduled to run based on their scheduling priority. Each thread is assigned a scheduling priority. The
priority levels range from zero (lowest priority) to 31 (highest priority). Only the zero-page thread can have a priority
of zero. (The zero-page thread is a system thread responsible for zeroing any free pages when there are no other
threads that need to run.)
The system treats all threads with the same priority as equal. The system assigns time slices in a round-robin
fashion to all threads with the highest priority. If none of these threads are ready to run, the system assigns
time slices in a round-robin fashion to all threads with the next highest priority. If a higher-priority thread
becomes available to run, the system ceases to execute the lower-priority thread (without allowing it to finish
using its time slice), and assigns a full time slice to the higher-priority thread. For more information, see
Context Switches.
The priority of each thread is determined by the following criteria:
•
•
•
The priority class of its process
The priority level of the thread within the priority class of its process
The priority class and priority level are combined to form the base priority of a thread. For
information on the dynamic priority of a thread, see Priority Boosts.
Each process belongs to one of the following priority classes:
•
•
•
•
•
•
IDLE_PRIORITY_CLASS
BELOW_NORMAL_PRIORITY_CLASS
NORMAL_PRIORITY_CLASS
ABOVE_NORMAL_PRIORITY_CLASS
HIGH_PRIORITY_CLASS
REALTIME_PRIORITY_CLASS
By default, the priority class of a process is NORMAL_PRIORITY_CLASS. Use the CreateProcess function to
specify the priority class of a child process when you create it. If the calling process is
IDLE_PRIORITY_CLASS or BELOW_NORMAL_PRIORITY_CLASS, the new process will inherit this class.
Use the GetPriorityClass function to determine the current priority class of a process and the
SetPriorityClass function to change the priority class of a process.
Processes that monitor the system, such as screen savers or applications that periodically update a display,
should use IDLE_PRIORITY_CLASS. This prevents the threads of this process, which do not have high
priority, from interfering with higher priority threads.
Use HIGH_PRIORITY_CLASS with care. If a thread runs at the highest priority level for extended periods,
other threads in the system will not get processor time. If several threads are set at high priority at the same
time, the threads lose their effectiveness. The high-priority class should be reserved for threads that must
respond to time-critical events. If your application performs one task that requires the high-priority class
while the rest of its tasks are normal priority, use SetPriorityClass to raise the priority class of the application
temporarily; then reduce it after the time-critical task has been completed. Another strategy is to create a
high-priority process that has all of its threads blocked most of the time, awakening threads only when critical
tasks are needed. The important point is that a high-priority thread should execute for a brief time, and only
when it has time-critical work to perform.
You should almost never use REALTIME_PRIORITY_CLASS, because this interrupts system threads that
manage mouse input, keyboard input, and background disk flushing. This class can be appropriate for
applications that "talk" directly to hardware or that perform brief tasks that should have limited
interruptions.”
http://msdn.microsoft.com/library/default.asp?url=/library/en-us/dllproc/base/scheduling_priorities.asp
Copyright © 2004 The Black Box Toolkit Ltd. All rights reserved.