1
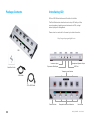
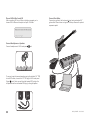
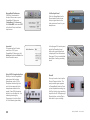
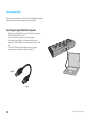
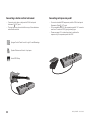
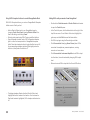
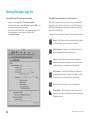
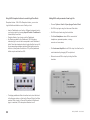
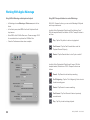
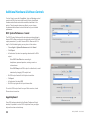
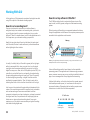
User’s Guide
support.apogeedigital.com
Table of Contents
Package Contents
Introducing GiO
Quick Start
System Requirements
Getting Started
Install Apogee Software
Connect the USB Cable
Choose GiO for Mac Sound I/O Connect Headphones or Speakers Connect Your Guitar
Set up GarageBand ‘09
GarageBand Preferences
Using GiO’s Stompbox Buttons
Set the Input Level
Record!
Connecting GiO
Connecting an Apple Macintosh computer
Connecting Headphones
Connecting Powered Speakers
Connecting a Home Stereo
Connecting an Instrument Amplifier
Connecting a Guitar or other Instrument
Connecting an Expression Pedal
Working With Apple GarageBand
Using GiO for GarageBand audio input and output
Using GiO’s Transport buttons to control GarageBand
Using GiO’s Stompbox buttons to control GarageBand
Setting GiO’s audio parameters from GarageBand
i
1
1
2
2
2
2
2
3
3
3
4
5
5
5
5
6
6
7
7
8
8
9
9
10
10
10
11
11
Working With Apple Logic Pro
Using GiO for Logic Pro audio input and output
Using GiO’s Transport buttons to control Logic Pro
Using GiO’s Stompbox buttons to control Logic Pro Setting GiO’s audio parameters from Logic Pro
Using GiO’s Expression Pedal with Apple Logic Pro
Working With Apple Mainstage
Using GiO for Mainstage Audio Input and Output
Using GiO’s Transport Buttons to control Mainstage
Using GiO’s Stompbox Buttons to control Mainstage
Setting GiO’s audio parameters from Mainstage
Additional Hardware & Software Controls
OS X System Preferences - Sound
Apple Keyboard
OS X Audio MIDI Setup
Selecting GiO for Mac Sound Input/Output
Controlling GiO’s Input/Output Parameters
Setting GiO’s Sample Rate
Working With GiO
How do I set a recording level?
How do I set my software’s I/O buffer? I/O buffer continued What sample rate should I record at?
Can I record my session on the startup hard drive?
How do I set the input control of my powered speakers?
Using GiO Config
FAQs
Troubleshooting
12
12
12
13
13
14
15
15
15
16
16
17
17
17
18
18
18
18
19
19
19
20
20
20
20
21
22
23
Specifications
24
GiO by APOGEE – User’s Guide
Package Contents
Introducing GiO
GiO is a USB Guitar Interface and Controller for the Mac.
This QuickStart section describes how to set up GiO with your Mac,
connect speakers, headphones and instruments to GiO, and get
started quickly with GarageBand.
Please check our web site for the most up-to-date information:
http://support.apogeedigital.com
GiO
Instrument Input
Expression Pedal Input
QuickStart Guide
Headphone/Speaker Output
USB Port
Transport control buttons
USB Cable
1/4” to RCA Cable
Previous button
1
Stompbox buttons and indicators
Next button
GiO by APOGEE – User’s Guide
Quick Start
System Requirements
Connect the USB Cable
Your Mac should meet the following requirements:
Connect GiO’s USB port to a USB port on your Mac using the
provided cable. GiO is powered through the USB connection.
• Intel or PPC G5 processor, OS X 10.5.8 or 10.6 or greater
• 1 GB minimum of installed RAM, 2 GB recommended
• GarageBand ‘09 v. 5.1 and/or Logic Studio 9
(Please consult our website for the most up-to-date compatibility information: http://support.apogeedigital.com.)
Getting Started
Install Apogee Software
Download the GiO Software Installer from:
http://www.apogeedigital.com/downloads.php
Double-click it and follow on-screen instructions. The installer may
require the connection of your GiO to verify the firmware version, so
please have it ready. When the installation is complete you will be
required to restart your Mac.
2
Once the USB connection is made, the Transport buttons light in
sequence and all Stompbox indicators light green, indicating that
GiO is ready for use.
GiO by APOGEE – User’s Guide
Choose GiO for Mac Sound I/O
After connecting GiO to your Mac, a dialog box prompts you to
choose GiO for Mac sound output and input. Click Yes.
Connect Headphones or Speakers
Connect headphones to GiO’s back panel
Connect Your Guitar
Connect your guitar to the Instrument input using a standard 1/4”
guitar cable. Shown below is a typical GiO setup shown with optional
expression pedal
jack.
To connect a pair of powered speakers using the included 1/4” TRS
to dual RCA cable, connect the 1/4” TRS plug to GiO’s back panel
Output
jack. Next, connect the white-banded RCA plug to the
left speaker and the red-banded RCA plug to the right speaker
3
GiO by APOGEE – User’s Guide
Set up GarageBand ‘09
Open GarageBand, found in your
Mac’s Applications folder. In the
Project Window that appears
during launch, click Electric
Guitar then click Choose to
create an audio track.
Set up GarageBand ‘09
(continued)
Click Edit (at the top of the Track
Info pane) and click on the guitar
amp to highlight it.
In GarageBand, double-click the
Track header to show the Track
Info pane. At the top of the pane,
click Guitar Track.
At the bottom of the pane,
select Mono 1 (GiO) in the Input
Source menu and select On in
the Monitor menu. If GiO can’t
be selected in the Input Source
menu, please see the next page.
Choose a guitar preset from the
pop-up menu at the top of the
Track Info pane. You can scroll
through the preset list by tapping
GiO’s Previous or Next button.
Click the faders button to the
right of the Input Source menu
to open the Apogee GiO control
panel
4
GiO by APOGEE – User’s Guide
GarageBand Preferences
If GiO can’t be selected in
the Input Source menu, open
GarageBand Preferences
(GarageBand > Preferences),
click Audio/MIDI, and select GiO
in the Audio Output and Audio
Input menus.
Important!
To experience the full audio
resolution of GiO, open
GarageBand Preferences, click
Advanced, and select Best in the
Audio Resolution menu.
Using GiO’s Stompbox buttons
When you load a GarageBand
guitar preset that includes
stompboxes, each of GiO’s
Stompbox indicators light to a
color that corresponds to the
stompboxes selected in the
preset. Press GiO’s stompbox
switch to turn the effect on - the
indicator glows brightly.
Press again to turn the effect
off - the indicator glows dimly.
5
Set the Input Level
Click the GarageBand track’s
Record enable button to see
the input signal level on the
track meters and hear it in your
headphones.
In the Apogee GiO control panel,
adjust the Recording Level
slider until a good signal level
is displayed in the track meters.
See page 19 for a more detailed
description of setting recording
levels.
Record!
Once you’ve set a level, tap the
Record Transport button. The
newly created region appears
in GarageBand’s timeline. Once
you’ve completed recording, tap
the Play button to stop recording,
tap either the Go To Beginning or
Rewind button, and tap Play to
listen back to your recording.
GiO by APOGEE – User’s Guide
Connecting GiO
In this section, the connection of GiO to your Mac, headphones, speakers,
instruments and other audio hardware devices is described.
Connecting an Apple Macintosh computer
• Using the provided USB cable, connect the Type B connector to
GiO’s back panel USB connector.
• Connect the Type A connector to your Mac computer.
• For the best system stability, it’s recommended to connect
directly to your Mac’s USB port, without passing through a USB
hub.
• To use GiO’s Transport and Stompbox switching, Apogee
software must be installed, as described on page 2
Type B
Type A
6
GiO by APOGEE – User’s Guide
Connecting Headphones
• Connect headphone to GiO’s back panel Output
jack.
• The output level may be controlled from any of these hardware
and software controls:
Apple keyboard volume controls (when System Preferences Sound is configured as described on page 17).
Connecting Powered Speakers
• Using the included 1/4” TRS to dual RCA cable, connect the 1/4”
TRS plug to GiO’s back panel Output
jack. Next, connect the
white-banded RCA plug to the left speaker and red-banded RCA
plug to the right speaker.
• The output level may be controlled from any of the hardware and
software controls listed on the facing page.
Menu bar volume slider (when System Preferences Sound is configured as described on page 17).
Apogee Control Panel found in Logic Pro and Mainstage
System Preferences Sound > Output pane
Audio MIDI Setup
• To set the speakers’ input level control (sometimes labelled input
sensitivity), please see the description on page 20.
• If hum or buzz is heard in the speakers, please see the
Troubleshooting tip on page 23.
7
GiO by APOGEE – User’s Guide
Connecting a Home Stereo
• Using the included 1/4” TRS to dual RCA cable, connect the 1/4”
TRS plug to GiO’s back panel Output
jack. Next, connect the
RCA plugs to your stereo system’s Aux or Tape inputs.
• Set GiO’s output level to maximum, and control the listening
level using the home stereo’s volume control.
Connecting an Instrument Amplifier
• To connect to most instrument amplifiers, it’s necessary to add
a 1/4 TS to RCA female adaptor to the included cable’s RCA
plugs. Connect the 1/4” TRS plug to GiO’s back panel Output
jack and the RCA plugs (with 1/4” TS adaptors) to the instrument
amp’s inputs. If the amp has one channel, connect the left side of
the cable.
• It’s possible to set GiO’s output level to a fixed value, so that it
can’t be inadvertently changed. Open Audio MIDI Setup (or any
of the other control panels listed on page 7), and select the Amp
(or Instrument Amp) setting.
8
GiO by APOGEE – User’s Guide
Connecting a Guitar or other Instrument
• Connect a guitar, bass or keyboard to GiO’s back panel
Instrument (1/4”) input.
• The input gain may be controlled from any of these hardware
and software controls:
Connecting an Expression pedal
• Connect a standard MIDI expression pedal to GiO’s back panel
Expression Pedal (1/4”) input.
• To be compatible with GiO, the expression pedal’s 1/4” connector
must be a 3-conductor TRS (tip-ring-sleeve) type.
• Please see page 21 for instructions how to optimize the
response of your expression pedal with GiO.
Apogee Control Panel found in Logic Pro and Mainstage
System Preferences Sound > Input pane
Audio MIDI Setup
9
GiO by APOGEE – User’s Guide
Working With Apple GarageBand
Please see the Quickstart Guide on pages 4-5 for basic information
on using GarageBand with GiO.
Using GiO for GarageBand audio input and output:
• Choose GarageBand > Preferences, then click Audio/MIDI.
• Select GiO or System Setting in the Audio Output and Audio
Input menus. When System Setting is selected, GarageBand
uses the audio device selected in the System Preferences >
Sound window.
Using GiO’s Transport buttons to control GarageBand
With GiO’s Transport buttons, you can record, play and move
the playhead in your Garageband song with your feet. GiO’s
Transport and Stompbox functions are automatically enabled once
GarageBand detects GiO as a MIDI input.
The behavior of each of GiO’s Transport buttons is described below:
Press Record to start recording on record-enabled tracks. If
you press Record again, recording will stop but playback will
continue.
Press the “Go to Beginning” button to move the playhead
to the start of the project. If you’ve set a cycle region, the
playhead will move to the start of the region.
Tap the Rewind button to move the playhead towards the
song start one measure (or a half-second, if absolute time is
selected as the song time). Press and hold down the Rewind
button to continually move the playhead.
• Click Advanced.
• Select Better or Best in the Audio Resolution menu.
• Close the Preferences window when complete.
Tap the Forward button to advance the playhead one
measure (or a half-second, if absolute time is selected as
the song time). Press and hold down the Rewind button to
continually advance the playhead.
Press the Play button to start or stop playback.
Tap the Previous or Next button to scroll through Electric
Guitar presets, Software instruments or Real instrument
effects.
10
GiO by APOGEE – User’s Guide
Using GiO’s Stompbox buttons to control GarageBand effects
With GiO’s Stompbox buttons, you can turn GarageBand’s Stompbox
effects on and off with you feet.
• Add an Electric Guitar track in your GarageBand song by
choosing Track > New Track, selecting Electric Guitar in the
New Track dialog, and clicking Create.
• Select a guitar preset using GiO’s Previous and Next buttons.
• Once the preset is loaded, each of GiO’s Stompbox indicators
light to a color that corresponds to a GarageBand stompbox
effect. Press the stompbox button to toggle the effect on and off;
the corresponding stompbox indicator lights brightly when the
effect is on, dimly when the effect is off.
Setting GiO’s audio parameters from GarageBand
• Double-click a Real Instrument or Electric Guitar track header
to open the Track Info pane.
• In the Track Info pane, click the faders button to the right of the
Input Source menu. On an Electric Guitar track, highlight the
guitar amp and click Edit to reveal the faders button.
• Set GiO’s input gain using the Recording Level slider
• Click Connected to: Line (e.g. Home Stereo) when GiO is connected to headphones, powered speakers, a mixing console or a home stereo.
• Click Connected to: Instrument Amplifier to set GiO’s output
to a fixed level, to avoid inadvertently changing GiO’s output
level.
• Mute and unmute GiO’s output with the On and Off buttons
• To display stompbox effects of another Electric Guitar track,
highlight that track’s header in the timeline. If an Instrument or
Real track header is highlighted, GiO’s stompbox indicators turn
off.
11
GiO by APOGEE – User’s Guide
Working With Apple Logic Pro
Using GiO for Logic Pro audio input and output:
• In Logic, choose Logic Pro > Preferences > Audio.
• In the CoreAudio pane, checked Enabled, and select GIO in the
Output Device and Input Device menus.
• Select 128 in the I/O Buffer Size menu. Please see page 19-20
for more details how to optimize the I/O Buffer Size.
• Click Apply Changes.
Using GiO’s Transport buttons to control Logic Pro
With GiO’s Transport buttons, you can record, play and move the
playhead in your Logic Pro project with your feet. GiO’s Transport
and Stombox functions are automatically enabled once Logic Pro
detects GiO as a MIDI input.
The behavior of each of GiO’s Transport buttons is described below:
Record - GiO’s Record button duplicates the functionality of
the Record button found on Logic Pro’s Transport.
Go To Beginning - Press the “Go to Beginning” button to
move the playhead to the start of the project.
Rewind - Tap the Rewind button to move the playhead
towards the song start one measure. Press and hold down
the Rewind button to continually move the playhead.
Fast Forward - Tap the Fast Forward button to advance
the playhead one measure. Press and hold down the Fast
Forward button to continually advance the playhead.
Play - Press the Play button to start or stop playback.
Previous/Next - Tap the Previous or Next button to scroll
through Channel Strip or PedalBoard presets, depending on
the object selected.
12
GiO by APOGEE – User’s Guide
Using GiO’s Stompbox buttons to control Logic Pro effects
Stompbox buttons - With GiO’s Stompbox buttons, you can turn
Logic’s Pedalboard effects on and off with your feet.
• Insert a Pedalboard on an Audio or Software Instrument track in
your Logic project by choosing Amps & Pedals > Pedalboard in
a channel strip Insert slot.
• Drag the effects of your choice onto the Pedalboard.
• As effects are added to the Pedalboard, GiO’s Stompbox
indicators light to a color that corresponds to each Pedalboard
effect. Press the stompbox button to toggle the effect on and off;
the corresponding stompbox indicator lights brightly when the
effect is on, dimly when the effect is off. Up to five pedalboard
effects may be switched from GiO.
Setting GiO’s audio parameters from Logic Pro
• Choose Options > Audio > Open Apogee Control Panel.
• Set GiO’s input gain using the Instrument Gain slider.
• Set GiO’s output level using the Level slider
• Click Line/Headphones when GiO is connected to `
headphones, powered speakers, a mixing console or a home stereo.
• Click Instrument Amplifier to set GiO’s output to a fixed level, to
avoid inadvertently changing GiO’s output level.
• Mute and unmute GiO’s output by clicking the Mute checkbox.
• To display pedalboard effects of another track, select that track
in the Arrange window, or that track’s Channel Strip in the Mixer
window. When a track or Channel Strip without a Pedalboard
plug-in is selected, GiO’s stompbox indicators turn off.
13
GiO by APOGEE – User’s Guide
Using GiO’s Expression Pedal with Apple Logic Pro
With a standard expression pedal connected to GiO’s Expression Pedal input, it’s possible to control continuosly variable software parameters
(such as volume) with the pedal. In the following example, the expression pedal is set up to control Logic Pro’s Pedalboard Wah.
• Open a Logic Pro project and insert a Pedalboard plug-in on a Channel Strip.
• Drag a Wah onto the Pedalboard.
• Choose Logic Pro > Preferences > Control Surfaces > Controller Assignments.
• In the Controller Assignments window, click Control Surface : GiO in the Zones column.
• Click Learn Mode.
• With the mouse, move the Pedalboard Wah pedal; the entry “Pedalboard:
Pedal Position” should appear in the Parameter column
• Now move the expression pedal connected to GiO; the entry “Learned” should appear in the Control column.
The expression pedal now controls the Wah pedal.
14
GiO by APOGEE – User’s Guide
Working With Apple Mainstage
Using GiO for Mainstage audio input and output:
• In Mainstage, choose Mainstage > Preferences, and click on
Audio.
• In the Audio pane, select GIO in the Audio Output and Audio
Input menus.
• Select 128 in the I/O Buffer Size menu. Please see page 19-20
for more details how to optimize the I/O Buffer Size.
• Close the Preferences window when complete.
Using GiO’s Transport buttons to control Mainstage
With GiO’s Transport buttons, you can control Mainstage’s Playback
and Looper instruments.
Load the Guitar Rig template “Single Amp & One Backing Track”.
With this template loaded, the behavior of GiO’s Transport buttons is
as follow:
Play - Tap the Play button to start or stop playback.
Fast Forward - Tap the Fast Forward button mute the
Playback Channel Strip only.
Rewind - Tap the Rewind button to turn Cycle on and off.
Load the Guitar Rig template “Single Amp & Looper. With this
template loaded, the behavior of GiO’s Transport buttons is as
follows:
Record - Tap Record to start and stop recording.
Go To Beginning - Tap the “Go to Beginning” button to undo
the last recording pass
Rewind - Tap Rewind to reverse something
Fast Forward - Tap Fast Forward to fade out previously
recorded audio
Play - Tap Play to start and stop playback.
15
GiO by APOGEE – User’s Guide
Using GiO’s Stompbox buttons to control Mainstage effects
Stompbox buttons - With GiO’s Stompbox buttons, you can turn
Mainstage’s Stombox effects on and off with you feet. GiO’s
Transport and Stompbox functions are automatically enabled once
Mainstage detects GiO as a MIDI input.
• To get started quickly, load a Guitar Rig template by choosing
File > New, clicking Guitar Rigs in the Choose Template
window, selecting a template, and clicking Choose.
• GiO’s first four Stompbox buttons are mapped to the 4 Stompbox
screen controls. Tap GiO’s stompbox buttons to turn on and off
Mainstage stompboxes.
• GiO’s rightmost stompbox button is mapped to the Mainstage
patch’s Mute, which mutes the audio Master. Tap this stompbox
button to mute all audio output (including any playback).
16
Setting GiO’s audio parameters from Mainstage
• Choose Mainstage > Open Apogee Control Panel.
• Set GiO’s input gain using the Instrument Gain slider.
• Set GiO’s output level using the Level slider
• Click Line/Headphones when GiO is connected to `
headphones, powered speakers, a mixing console or a home stereo.
• Click Instrument Amplifier to set GiO’s output to a fixed level, to
avoid inadvertently changing GiO’s output level.
• Mute and unmute GiO’s output by clicking the Mute checkbox.
GiO by APOGEE – User’s Guide
Additional Hardware & Software Controls
You don’t have to open the GarageBand, Logic or Mainstage control
panel to set GiO’s input and output levels. A variety of additional
hardware and software controls are available, described in this
section. Though several options are offered, you can choose
the hardware and software controls that best suit your individual
preferences.
OS X System Preferences - Sound
The OS X System Preferences Sound window provides settings to
choose GiO for Mac sound input and output and control GiO’s input/
output parameters. If you didn’t choose GiO for Mac sound I/O in
step 3 of the Quickstart guide, you may do so in this window.
• Choose Apple > System Preferences and click Sound.
• Click Output.
• In the devices list, select an operating characteristic for GiO’s
output:
Select GiO: Line Out when connecting to headphones, powered speakers, a mixing console or a home stereo.
Select GiO: Amp to set GiO’s output to a fixed level, to avoid •
•
•
•
inadvertently changing GiO’s output level.
Set GiO’s output level with the Output volume slider.
Click Input.
In the devices list, select GiO.
Set GiO’s input gain with the Input volume slider.
To control’s GiO’s output level from your Mac’s menu bar, check
Show volume in menu bar.
Apple Keyboard
Once GiO has been selected in the System Preferences Sound
window, it’s possible to control GiO’s output level from your Apple
keyboard’s volume and mute keys.
17
GiO by APOGEE – User’s Guide
OS X Audio MIDI Setup
The OS X utility Audio MIDI Setup provides settings to choose GiO
for Mac sound input/ output and control GiO’s parameters. To open
Audio MIDI Setup, choose Applications > Utilities > Audio MIDI
Setup.
Selecting GiO for Mac Sound Input/Output
• Select GiO in the Default Input menu.
• Select in the Default Output.
• Leave System Output set to Built-In Audio to hear OS X alert
sounds and user interface sound effects via the Mac’s built-in
speakers.
Controlling GiO’s Input/Output Parameters
• Select GiO in the Properties For menu.
• To set GiO’s input gain, use the Volume slider under Audio Input.
• Select an output operating characteristic in the Audio Output
Source menu:
Select Line Out when connecting GiO to headphones, powered speakers, a mixing console or a home stereo;
Select Amp to set GiO’s output to a fixed level, to avoid inadvertently changing GiO’s output level.
Setting GiO’s Sample Rate
GiO operates at a sample rate of 44.1kHz or 48kHz . In most cases
the sample rate is set by the audio application with which GiO is
streaming audio. For example, when working with GarageBand,
GiO’s sample rate is automatically set to 44.1kHz, to match the
GarageBand song’s sample rate. For those audio applications that
don’t include a sample rate selection, such as Apple’s iTunes, GiO’s
sample rate may be selected in either Format menu under Audio
Input or Audio Output. For more information on which sample rate to
work at, see page 20.
18
GiO by APOGEE – User’s Guide
Working With GiO
In this section you’ll find answers to questions that might arise while
using GiO as part of a Mac-based recording system.
How do I set a recording level?
Once your instrument is connected, your audio software is
configured and you’ve created a new recording track, just how do
you set the input gain for a proper recording level in your audio
software? There’s no simple answer, but with a few guidelines and a
bit of experience, you can master setting a proper level.
How do I set my software’s I/O buffer?
The I/O Buffer setting found in most audio software is one of the
most crucial, but often ignored, settings in a Mac-based recording
system.
When choosing a buffer setting, a compromise between the latency
through the application and the amount of computer processor power
accessible to the application must be made.
Latency
Ideally, the input gain should be set so that when the input signal
is at its loudest, the level in audio software is just below maximum
without lighting the Over indicator.
In reality, it’s unlikely that you’ll be able to guess just the right gain
setting to accomplish this - when your gain is too low, the signal
never gets close to maximum and when your gain is too high, a
digital Over may occur. Now, with a 24-bit system (such as GiO), the
noise floor is so low that there’s no real penalty for undershooting
the gain setting and recording at a lower level. There IS a penalty
for overshooting the gain setting - a digital Over that results in
significantly increased distortion. Thus, it’s better to work with a
recording level that’s a bit too low than a level that’s a bit too high.
Just how much to undershoot the gain setting is determined by the
nature of the sound being recorded. As a general rule, instruments
such as bass and organ have a more consistent level than
percussive instruments, such as a tambourine, and may be recorded
at a higher level. Also, the performer’s skill and playing style can
dictate more or less caution when setting levels. As you gain
experience, you’ll be able to more accurately set a good recording
level while avoiding digital overs.
Latency - the slight delay between the moment you play a note and hear it in your
headphones after conversion and processing.
A lower buffer setting results in lower latency but less available
processing power. If the application can’t access enough processor
power, processor overruns may occur, resulting in audible clicks and
pops or error messages that interrupt playback and recording.
A higher buffer setting, on the other hand, results in greater amount
of accessible processor power (i.e. less chance of overruns) but
increases the latency. Determining the best setting requires some
trial-and-error in order to find the best compromise.
I/O buffer size
32
64
128
Lower Latency
Fewer Plug-Ins
19
256
512
1024
Higher Latency
More Plug-Ins
GiO by APOGEE – User’s Guide
I/O buffer continued
Keep in mind that as tracks and plug-ins are added to a software
session, processor requirements increase. Thus, the buffer setting
that works during the early stages of a session might result in
processor overruns during later stages.
The best strategy is to set the buffer to a lower setting during
recording and accept certain limitations on plug-in usage, and then
raise the buffer during mixing to utilize the computer’s full processor
power when latency isn’t an issue.
With the processing power of today’s Macs, you may find that
adjustment of the buffer isn’t necessary, and you can leave it at
a setting for low latency and still access a sufficient amount of
processing power when adding tracks and plug-ins. If you do
encounter clicks, pops or software errors, don’t hesitate to
experiment with the buffer setting.
Please consult the section on Working with GarageBand, Logic and
Mainstage to determine how to se the I/O buffer setting is found in
your audio application.
Can I record my session on the startup hard
drive?
It’s an accepted “best practice” of most audio software providers
that audio files should be recorded on a hard drive other than the
Mac’s Startup drive (i.e. the drive on which the operating system is
installed). You can probably get away with recording a few tracks to
your computer’s Startup disk, but for the best performance of your
GiO recording system, record onto a separate ATA/IDE, SATA, or
FireWire drive whose spindle speed is at least 7200 RPM.
How do I set the input control of my powered
speakers?
Most powered speakers offer an input volume control, often labelled
as input sensitivity. Rather than describe an overly complicated
method for setting this control, the easiest way to determine the right
setting is to note where you generally set GiO’s output level. If you
find yourself rarely turning the output past a very low output level
(say, -35 dB), decrease the input sensitivity on the speaker. If, on
the other hand, you find yourself setting GiO for full output and the
What sample rate should I record at?
speakers aren’t loud enough, increase the input sensitivity. Ideally,
GiO offers a choice of two sample rates, 44.1kHz or 48kHz. So,
what’s the best sample rate to record your project at? It’s a good idea
to avoid unnecessary sample rate conversion stages, so the answer
is determined by the sample rate of media on which you plan to
distribute your recording. If the final distribution media is CD, record
at 44.1kHz. If the media is video or TV, most often 48 kHz is the best
choice. If you’re part of a larger production chain, and aren’t sure,
ask the person who’s responsible for assembling the final product they’ll undoubtedly appreciate the forethought.
GiO’s output should be at 0 dB when you’re listening at your absolute
20
maximum desired volume.
GiO by APOGEE – User’s Guide
Using GiO Config
During the installation of GiO software and drivers, GiOConfig is
installed in your Mac’s Applications folder. This utility app offers the
ability to optimize the response of your expression pedal with GiO
as well as quickly determine the versions of software, firmware and
drivers installed.
For the best pedal response, it’s necessary to match the
characteristic of GiO’s expression pedal input to that of your
expression pedal. This is done with the following steps:
• Open GiOConfig (installed in your Mac’s Applications folder).
• In GiOConfig, set the Expression pedal curve to Yamaha or Roland, based on the brand of your pedal.
• If you don’t know which setting to choose, rock your expression pedal between its lowest and highest positions and
choose the setting that offers the smoothest volume envelope as
displayed in the Value progress bar.
Please consult http://support.apogeedigital.com for specific
compatibility information with commonly available expression pedals
21
GiO by APOGEE – User’s Guide
FAQs
Question - What is GiO?
Answer - GiO is the best way for guitarists to work with Logic Studio
and GarageBand. With GiO, you can connect your instrument,
headphones and speakers to your Mac, and control Logic Pro,
Mainstage or GarageBand hands-free.
Question - Can I still use GiO’s footswitches (Transport, Stompbox
and Previous/Next) while using another Apogee interface (such as
Apogee’s ONE) for audio input and output?
Answer - Yes you can. Simply connect both devices, and choose
ONE as your audio input/output device. GiO’s footswitch functions
will automatically be recognized, regardless of the audio input/output
setting.
Question - Can I use GiO with other applications besides Logic
Studio or GarageBand?
Answer - Playback from any audio application such as iTunes or
DVD Player has greater clarity and dynamic range through GiO’s
output. GiO’s complete functionality, including footswitch control and
illuminated user feedback, is only available with Logic Studio and
GarageBand.
Question - What expression pedals are compatible with GiO?
Answer - First, the expression pedal’s 1/4” connector must be a
3-conductor TRS (tip-ring-sleeve) type. Pedals with a 2-conductor TS
(tip-sleeve) are usually meant for analog volume control, and won’t
work properly. Even amongst 3-conductor expression pedals, there
are two commonly used connection standards. Through the utility
app GiOConfig, GiO supports both standards. Please see page 21
for details.
Question - Yeah, thanks for the expression pedal dissertation, but
which pedals have you tested?
Answer - Apogee has tested the Yamaha FC-7 and the Roland
EV-5. We’ll post additional supported expression pedals on our
website:
http://support.apogeedigital.com
Question - None of GiO’s lights are illuminated - is my GiO powered
on?
Answer - Under certain circumstances of normal operation, none of
GiO’s lights are illuminated. In order for GiO’s Stompbox Indicators
to light, the track onto which stompboxes have been inserted must
be selected. If you’ve selected a track with no stompboxes, the
Stompbox Indicators go out.
22
GiO by APOGEE – User’s Guide
Troubleshooting
Symptom - There’s no signal at GiO’s output.
Solution • Verify that the System Preferences Sound windows are
configured as described on page 17.
• If there’s no output after checking the items above, open Audio
MIDI Setup, set Properties For to GiO, and toggle the sample
rate (labelled as Format) from one setting to the other and back.
Symptom - The input connected to GiO isn’t getting to my audio
application
Solution - Check that the audio software has been configured to use
GiO for audio inputs and outputs, as described on pages 10-18.
Symptom - When recording, the input is delayed in my headphones
Solution - Decrease the I/O buffer size in your audio application.
See page 21 for more information about setting the I/O buffer.
Symptom - I hear clicks and pops when recording or playing back
from my DAW.
Solution - Problems with clicks and pops usually indicates that the
I/O buffer in your DAW (audio application) is set too low. Please see
page 19-20 for more information about setting the I/O buffer.
Symptom - When recording in GarageBand, I can see an input
signal but I can’t hear it.
Solution - To hear the input signal of a record-enabled track,
Monitoring must be set to On. Double-click a Real Instrument or
Electric Guitar track header to open the Track Info pane, and verify
the Monitoring setting at the bottom of the pane. On an Electric
Guitar track, highlight the guitar amp and click Edit to reveal the
Monitoring menu.
23
Symptom - When connecting speakers to GiO, there is hum and/or
buzz at the output.
Solution - In most cases, a steady hum or buzz at the output is
caused by grounding issues between GiO and the connected
equipment. Because bus-powered USB interfaces are grounded
through the USB and audio connections, and not through a
3-prong grounded AC connection, the situation may arise where
the grounding configuration of the connected equipment must be
modified. Check that the computer is grounded with a 3-prong AC
connection.
Some experimentation may be required to find the grounding
configuration that results in the lowest noise. It may be useful
to disconnect all equipment except GiO, the Mac and a pair of
headphones, and then connect additional equipment one piece
at a time.
Symptom - GiO doesn’t appear in OS X System Preferences
Solution • Verify that OS X 10.5.8 or later is installed.
• If so, choose About This Mac, then click More Info... to open
System Profiler. In the Contents column, open the Hardware
disclosure triangle and click USB.
• Verify that GiO appears in the USB Device Tree pane.
• If GiO does not appear, try another USB cable or port.
Symptom - Neither the Transport nor Stompbox switches operate
with GarageBand or Logic Studio.
Solution • Ensure that GiO software and MIDI drivers have been installed
• Verify that the correct version of GarageBand (version 5.1) or
Logic Studio (9) is installed.
GiO by APOGEE – User’s Guide
Specifications
Audio Input:
• Unbalanced 1/4” instrument input with 0 to 45 dB of gain;
maximum input level of +12 dBu.
Audio Outputs:
• Stereo, unbalanced 1/4” jack; maximum output level of +12 dBu;
compatible with headphones or powered speakers.
AD/DA Conversion
• 2 Channel, 24-bit, 44.1kHz or 48kHz sample rates.
USB
• USB 1.1
• GiO is powered through the USB bus; connection directly to one
of the Mac’s USB ports is recommended.
OS X Compatibility
• Mac OS X Leopard 10.5.8.
• Mac OS X Snow Leopard 10.6 and above.
• Please consult our website for up-to-date compatibility
information - http://support.apogeedigital.com.
Software Control
• Apple GarageBand 5.1
• Logic Studio 9
• Logic Express 9
24
GiO by APOGEE – User’s Guide
Registration and Warranty Information
Please register this unit online at:
http://www.apogeedigital.com/register/
Warnings
FCC warning
This equipment has been tested and found to comply with the limits for a Class B digital device,
pursuant to Part 15 of the FCC rules. These limits are designed to provide reasonable protection
against harmful interference when operated in a commercial environment. This equipment
generates, uses, and can radiate radio frequency energy and, if not installed and used in
accordance with the instruction manual, may cause harmful interference to radio communications.
Operation of this equipment in a residential area is likely to cause harmful interference, in which
case the user will be required to take whatever measures necessary to correct the interference at
his own expense.
Copyright Notice
The Apogee GiO is a computer-based device, and as such contains and uses software in ROMs.
This software, and all related documentation, including this User’s Guide contain proprietary
information which is protected by copyright laws. All rights are reserved. No part of the software
and its related documentation may be copied, transferred, or modified. You may not modify, adapt,
translate, lease, distribute, resell for profit or create derivative works based on the software and its
related documentation or any part thereof without prior written consent from Apogee Electronics
Corporation, U.S.A.
Be sure to register your GiO, either by filling in the enclosed Registration Card or by completing
the on-line registration form at our Web site: http://support.apogeedigital.com. If you do so,
Apogee can contact you with any update information. As enhancements and upgrades are
developed, you will be contacted at the registration address. Firmware updates are free for the first
year of ownership unless otherwise stated. Please address any inquiries to your dealer or directly
to Apogee at:
APOGEE ELECTRONICS CORPORATION,
1715 Berkeley St., Santa Monica, CA 90404, USA
Tel: (310) 584-9394
Fax: (310) 584-9385
Email: [email protected]
Web: http://www.apogeedigital.com
APOGEE ELECTRONICS CORPORATION warrants this product to be free of defects in material
and manufacture under normal use for a period of 12 months. The term of this warranty begins on
the date of sale to the purchaser. Units returned for warranty repair to Apogee or an authorized
Apogee warranty repair facility will be repaired or replaced at the manufacturer’s option, free of
charge.
ALL UNITS RETURNED TO APOGEE OR AN AUTHORIZED APOGEE REPAIR FACILITY MUST
BE PREPAID, INSURED AND PROPERLY PACKAGED, PREFERABLY IN THEIR ORIGINAL
BOX. Apogee reserves the right to change or improve design at any time without prior notification.
Design changes are not implemented retroactively, and the incorporation of design changes into
future units does not imply the availability of an upgrade to existing units.
This warranty is void if Apogee determines, in its sole business judgment, the defect to be the
result of abuse, neglect, alteration or attempted repair by unauthorized personnel.
The warranties set forth above are in lieu of all other warranties, expressed or implied, and Apogee
specifically disclaims any and all implied warranty of merchantability or of fitness for a particular
purpose. The buyer acknowledges and agrees that in no event shall the company be held liable for
any special, indirect, incidental or consequential damages, or for injury, loss or damage sustained
by any person or property, that may result from this product failing to operate correctly at any time.
USA: Some states do not allow for the exclusion or limitation of implied warranties or liability for
incidental or consequential damage, so the above exclusion may not apply to you. This warranty
gives you specific legal rights, and you may have other rights which vary from state to state.
25
GiO by APOGEE – User’s Guide
Service Information
Industry Canada Notice
The GiO contains no user-serviceable components: refer to qualified service personnel for repair
or upgrade. Your warranty will be voided if you tamper with the internal components. If you have
any questions with regard to the above, please contact Apogee.
This Class B digital apparatus meets all requirements of the Canadian Interference-Causing
Equipment Regulations. Cet appareil numérique de la classe B respecte toutes les exigences du
Règlement sur le matérial brouilleur du Canada.
In the event your GiO needs to be upgraded or repaired, it is necessary to contact Apogee prior to
shipping, and a Return Materials Authorization (RMA) number will be assigned. This number will
serve as a reference for you and helps facilitate and expedite the return process. Apogee requires
that shipments be pre-paid and insured — unless otherwise authorized in advance.
Declaration of Conformity – CE
IMPORTANT: ANY SHIPMENT THAT IS NOT PRE-PAID OR IS SENT WITHOUT AN RMA
NUMBER WILL NOT BE ACCEPTED.
Declarations of Conformity
This device complies with Part 15 of the FCC Rules. Operation is subject to the following two
conditions:
1. This device may not cause harmful interference
2. This device must accept any interference received, including interference that may cause
undesired operation.
This equipment has been tested and found to comply with the limits of a Class B digital device,
pursuant to Part 15 of the FCC Rules. These limits are designed to provide reasonable protection
against harmful interference in a residential installation. This equipment generates, uses and can
radiate radio frequency energy and, if not installed and used in accordance with the instructions,
may cause harmful interference to radio communications. If this equipment does cause harmful
interference to radio or television reception, which can be determined by turning the equipment off
and on, the user is encouraged to try to correct the interference by one or more of the following
measures:
Apogee Electronics Corporation hereby declares that the product, the GiO, to which this
declaration relates, is in material conformity with the following standards or other normative
documents:
EN55022:1998, EN55024:1998
EN61000-3-2, EN61000-3-3, EN61000-4-2, EN61000-4-3, EN61000-4-4, EN61000-4-5,
EN61000-4-6, EN61000-4-8, EN61000-4-11
Declaration of Conformity – Japan
Apogee Electronics Corporation hereby declares that the GiO, to which this declaration relates,
is in material conformity with the VCCI Class B standard.
Declaration of Conformity – Australia/New Zealand
Apogee Electronics Corporation hereby declares that the GiO is in material conformity with AN/
NZS standard requirements.
1. Re-orient or relocate the receiving antenna.
2. Increase the separation between the equipment and receiver.
3. Connect the equipment into an outlet on a different circuit from that to which the receiver is
connected.
4. Consult the dealer or an experienced radio/TV technician for help.
NOTE: The use of non-shielded cable with this equipment is prohibited.
CAUTION: Changes or modifications not expressly approved by the manufacturer responsible for
compliance could void the user’s authority to operate the equipment.
Apogee Electronics Corporation, Betty Bennett, CEO.
26
GiO by APOGEE – User’s Guide
For FAQs and more GiO support information,
please visit the Apogee Support Website:
http://support.apogeedigital.com/
Apogee Electronics Corporation
1715 Berkeley Street Santa Monica, CA 90404 U.S.A.
00+1 310-584-9394
email: [email protected]
GiO User’s Guide - Version 1.1