1
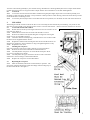
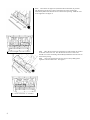
O
W
N
E
R
G
U
I
D
E
M ODEL 473
Room Sealed
Radi ant / Convector
Ga s Fi re
Bla c k Be a uty U nig a s II
This Owner Guide is intended to help you care for your Valor gas fire.
Please read carefully before using your gas fire and keep for future reference.
This Owner Guide gives sufficient details to enable your gas fire to be
operated and m aintained.
IMPORTANT.
Please keep your Owner Guide in a safe place together with the Installer
Guide.
600A743/01
the nation’s favourite for
PLUMBING & HEATING SUPPLIES
FREE SHIPPING
SECURE PAYMENTS
on all orders over £100 to mainland UK
shop online with confidence
FINANCE AVAILABLE
PRICE MATCH
spread the cost with low interest rates
always get the best deals available
we have
H U G E
R E D U C T I O N S
ON THOUSANDS OF ITEMS
Boilers
Bathroom suites
Radiators
Kitchen sinks & taps
Heating controls
Showers
Pipes & ittings
Wet rooms
Cylinders
Towel warmers
Fires
Bathroom furniture
Renewable energy
& much more
visit our website
plumbnation.co.uk
CALL US ON
0844
800
3460
This appliance is for use with natural gas (G20)
This appliance is for use in the United Kingdom (GB) and the Republic of Ireland
(IE) only.
C
U
S
T
O
M
E
R
C
A
R
E
Thank you for choosing Valor.
All Valor gas fires are designed to meet the most stringent quality, performance and safety requirements to provide our
customers with many years’ trouble-free service.
Your owner guide aims to improve your understanding and appreciation of your Valor gas fire by providing simple and
informative instructions to ensure that you benefit from the excellent performance and features it has to offer.
In the United Kingdom If you require further assistance or any advice about gas in general, the Valor AdviceLine will be
pleased to help.
Please telephone 0345-626341 (local call rates apply).
FOR OTHER USEFUL TELEPHONE NUMBERS SEE PAGE 8.
C O N T E N T S
Safety
General Specification
Operation
• Lighting The Pilot
• Selecting Burner Setting
• Turning Off
Cleaning
• Cleaning The Window
• Cleaning The Coal Pieces
Replacing The Coal Pieces
Servicing & Maintenance
2
Page
3
4
4
4
4
5
5
5
5
5
8
SAFETY
•
•
•
•
•
•
•
•
•
•
•
•
•
Soft wall coverings (e.g. embossed vinyls etc.) are easily affected by heat. They may, therefore, scorch or become
discoloured when close to a heating appliance. Please bear this is mind when having a heating appliance installed and
when redecorating.
As with any gas fire, this appliance must be installed by a competent person in accordance with the latest edition of the
Gas Safety (Installation & Use) Regulations and in accordance with the installation guide supplied with this appliance.
A shelf made of wood or other combustible material may be fitted above the fire provided that the following conditions
are satisfied:For a shelf not more than 150mm deep, there is at least 75mm clearance above the extreme top surface of the fire. For a
shelf of greater depth, there is an additional clearance of 12.5mm for each extra 25mm of added shelf depth.
Please bear this in mind if you alter the room.
A minimum clearance of 140mm should be maintained at the right side of the fire to allow easy access to the control
knob and 75mm at the left side to allow access to the knurled nut for removal of the outer case.
Never throw paper or other material on the fire.
The fire should not be used without the coal bed in its correct position or with a damaged coal bed.
The fire must never be used without the glass panel in position or with damaged glass. If the glass is damaged the fire
should be switched off and not used until the glass is replaced.
The glass panel acts as a fireguard conforming to BS 1945: 1971 and satisfies the H eating Appliance (Fireguard)
(Safety) Regulations 1991 but does not give full protection for young children, the elderly or the infirm. Extra security
can be provided by fitting a fireguard which complies with the requir ements of BS 6539 (Fireguards for use with Solid
Fuel Appliances) 1984. Such a fireguard is also recommended for the pr otection of pet animals.
The glass panel, and areas surrounding the firebox become very hot when the fire is in use. Always switch the fire off
and allow to cool before handling.
No attempt should be made to clean the bright metal interior of the firebox with metal polish or other abrasives. After a
little use the interior of the firebox will colour. This is quite no rmal.
Never obstruct any of the openings of the fire casing by hanging clothing, towels etc. over them.
This appliance is fitted with a device which will automatically shut off the supply of gas to the fire if, for any reason, the
burner goes out. If this device does operate or if the fire is turned o ff accidentally or intentionally, always wait three
minutes before attempting to relight.
The flue terminal on the outside wall must be kept free from all obstr uctions and blockages.
Please Note
When your fire is operated for the first tim e, som e vapours
m ay be given off which m ight cause a slight odour and
could possibly set off any sm oke alarm s in the im m ediate
vicinity. These vapours are quite norm al with new
appliances. They are totally harm less and will disappear
after a few hours use.
Glass Window
As with all windows, the glass m ay need to be cleaned
both outside and inside from tim e to tim e. The window
and fram e on this appliance has, therefore been designed
to be custom er rem ovable allowing you to clean it without
having to call in a service engineer. Details of how to
rem ove the window unit are given further on in this
booklet.
3
Thank you for choosing this Valor gas fire. It has been designed to give years of trouble-free service. To maintain its optimum
performance, advantage should be taken of the regular servicing and inspection facilities available for gas appliances. Annual
servicing is recommended. These instructions are provided to help you in operating and looking after your new fire and should be
kept in a safe place together with the installation and servicing instructions for future reference.
PLEASE OBSERVE THE CAUTION STATEMENTS ON PAGE 1
1.
GENERAL SPECIFICATION
The fire has a maximum gas input of 4.9kW.
The overall dimensions are shown in Figure 1.
Fig. 1 O verall dimensions
2.
OPERATION
2.1
The pilot may be left alight. It is advisable, however, that the pilot is turned
off if the premises are to be left unoccupied for a lengthy period.
2.2
For your safety the fire is fitted with a Flame Supervision D evice which will
shut off the gas supply if for any reason the pilot goes out. This device incorporates a
fixed probe which senses the heat from the pilot flame. If the probe is cool the device
will prevent any gas flow unless the control knob is held down. (see the following
lighting instructions).
2.3
To light the pilot
Warning: If the pilot flame is extinguished either intentionally or unintentionally, do not
attempt to relight the gas until at least 3 minutes have elapsed.
2.3.1
Depress the control knob. While keeping it depressed, turn to IGN position.
Turning the control should normally cause two consecutive sp arks to occur
which should ignite the pilot gas. A click should be heard while turning each
time a spark is generated. The pilot flame can be seen by looking through the
gap at the front of the right side front coal - see figure 3.
2.3.2
When the pilot is alight, keep the control knob depressed for a few
seconds to prevent the flame supervision device from shutting off the gas
supply while its probe warms up, as explained above, then release it. If the
pilot does not remain alight turn the knob back to OFF, wait a few seconds
and repeat the lighting sequence.
2.4
To select burner setting.
When the pilot is alight, partially depress the knob and turn to position 1.
Both main and decorative flame burners should light at their lowest setting.
The decorative flames should just be visible.
4
Fig. 3 Pilot Viewing O pening
Turn the control knob gradually to your desired setting. Both burne rs should gradually increase in output until at MAX
position the main burner is at its greatest heat output and the decorative flames are at their full magnitude.
2.5
To turn off
2.5.1
To turn the main and decorative flames off but leaving the pilot alight, depress the control knob partially, turn
clockwise to IGN and release the knob. If any resistance is felt at position 1 when turning, release the downwards pressure
on the knob before continuing to turn.
2.5.2
To turn the pilot off, depress the control knob at the IGN position, turn clockwise to OFF and release the knob.
3.
CLEANING
All cleaning should be carried out when the fire is cold. Normally, the fire should only need dusting. Any stains on the
glass can be removed with a non abrasive cleaner such as a ceramic hob cleaner. Abrasive cleaners should never be used.
3.1
To clean the inside of the window.
3.1.1
Detach the case front by removing the knurled screws and washers at the
case sides (see figure 1).
3.1.2
Pull the bottom of the case forwards and then lift to remove.
3.1.3
Remove the window unit by detaching the 12 wing nuts securing the
frame (see fig. 4) and pulling forward.
3.1.4
Clean the window carefully using a suitable cleaner in accordan ce with
the instructions supplied with the cleaner.
3.1.5
Replace the window unit ensuring that the seal around the frame is not
damaged or misplaced. Secure with the 12 wing nuts tightening them evenly.
3.1.6
Replace the case front.
3.2
Cleaning the coal pieces
If for any reason the coal pieces require cleaning, proceed as follo ws:3.2.1
Remove the case front and window as described above.
3.2.2
Carefully lift the coal pieces out of the firebox and place them
on a piece of cardboard or similar.
3.2.3
Carefully clean the upper and lower surfaces of the coals with a
soft brush or vacuum using a soft brush attachment.
3.2.4
Replace the coal pieces as described below.
3.3
Replacing the coal pieces
3.3.1
Place the fuel bed (embossed 'A' underneath) in position. The
front edge of the fuel bed locates under the flange of the locating strip at
the base of the firebox. See figure 5.
5
3.3.2
Place the front right coal (embossed 'B' underneath) in position.
The flat bottom front face of the coal should rest on the metal ledge
immediately behind the bottom front of the firebox opening. Slide the coal
to the right side. See figure 6.
Fig. 6 Front Right Coal “B” Location
Fig. 7 Front Left Coal “C” Location
6
3.3.3
Place the front left coal (embossed 'C' underneath) in position
at the side of the first coal. The flat bottom front face of the coal
should rest on the metal ledge immediately behind the bottom front of
the firebox opening.
3.3.4
Close any gap between the two front coals by sliding them
together to meet at the centre. See figure 7.
3.3.5
Place the rear right coal (embossed 'D' underneath) in position as
shown in figure 8.
3.3.6
Place the rear left coal (embossed 'E' underneath) shown in
figure 9.
3.3.7
Replace the window unit ensuring that the seal around the frame
is not damaged or misplaced.
Secure with the 12 wing nuts tightening them evenly.
3.3.8
Replace the case front.
Fig. 8 Rear Right Coal “ D” Location
7
SERVICING & MAINTENANCE
•
•
•
In order to achieve and maintain high levels of personal safety and performance efficiency it is essential that the flue
terminal outside the building is kept clear of any form of obstructio n.
We recommend that all gas appliances and their flues, are checked annually by a competent person (in the UK a
CORGI registered installer).
In the United Kingdom it is the law that a landlord must have any gas appliance, flue and pipework which is situated in
a tenant’s premises checked for safety at least every twelve months.
The following spare parts can be fitted by the user. It is essential that only correct parts approved for use with this
appliance are fitted. When fitting these spares please follow the instructions.
Part No.
525269
525259
525159
533249
514679
Description
Set of 4 coals
Coal Bed only
Window U nit
Wing nut for window unit
Knurled nut for case front
No. Per Fire
1
1
1
12
2
To help us quickly help you, please try to have the
following information available before you contact us:
a)
b)
c)
d)
e)
Your Post Code.
Type of fire.
Model/Name.
Serial Number This will be found on a label on the right hand side of the case near the bottom.
The fault, problem or request.
General advice about gas and your gas fire:
VALOR ADVICELINE
0345 626341.
To report faults or arrange for your fire to be serviced:
VALOR SERVICE
0121 386 6203.
To order spares or for sales information:
VALOR SALES
0121 386 6260.
CALLERS IN THE REPUBLIC OF IRELAND
Call 0044 121 373 8111
8
Safety First.
Valor fires are CE Approved and designed to meet the appropriat e British Standards and Safety Marks.
Quality and Excellence.
At the heart of every Valor fire.
All Valor fires are manufactured to the highest standards of quality and excellence and are manufactured
under a BS EN ISO 9001 quality system accepted by the British Standards Institute.
The Highest Standards
Valor is a member of the Society of British Gas Industries which works to ensure high standards of safety,
quality and performance.
Careful Installation
Valor is a Corgi registered company. All our gas fires must be
installed by a competent Corgi Registered Installer in accordance
with our Installer Guide and should not be fitted directly on to a
carpet or floor of combustible material.
Valor H eating, Erdington, Birmingham B24 9Q P
Because our policy is one of constant development and improvement, details may vary slightly from those given in this publication
9