1
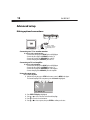
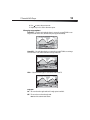
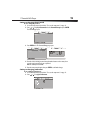
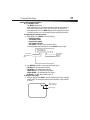
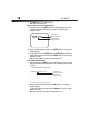
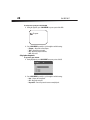
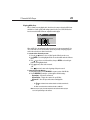
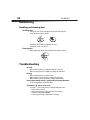
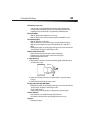
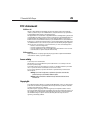
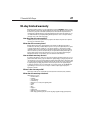
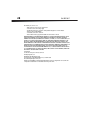
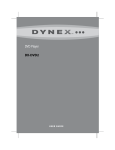
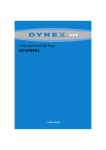
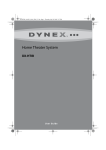
7" Portable DVD Player
DX-BPDVD7
DX-BPDVD7
2
Dynex DX-BPDVD7
7" Portable DVD Player
Contents
Important safety instructions....................................................................3
DVD player components............................................................................6
Setting up your DVD player .......................................................................8
Playing video and audio discs .................................................................11
Advanced setup.......................................................................................12
Maintaining ............................................................................................22
Troubleshooting......................................................................................22
Specifications..........................................................................................24
90-day limited warranty .........................................................................27
Introduction
Congratulations on your purchase of this high-quality Dynex product. Your DX-BPDVD7
represents the state of the art in portable DVD player design, features a 7” wide screen
(16:9 aspect ratio) LCD, and is designed for reliable and trouble-free performance.
7" Portable DVD Player
3
Important safety instructions
CAUTION
RISK OF ELECTRIC SHOCK
DO NOT OPEN
The lightning flash with arrowhead symbol within a triangle is intended to alert
you to the presence of uninsulated dangerous voltage within the player's
enclosure that may be of sufficient magnitude to constitute a risk of electric
shock to persons.
The exclamation point within a triangle is intended to alert you to the presence
of important operating and maintenance (servicing) instructions in the
literature accompanying the player.
Warning: To reduce the risk of fire or electric shock, do not expose this player to rain or
moisture. Dangerous high voltage is present inside the enclosure. Do not open the case.
Caution: To ensure the correct use of the player, read this manual carefully and keep it for
future reference. If the player requires servicing, contact the seller or our service center. For
more information, see” Maintaining” on page 22.
1
2
3
4
5
6
7
8
9
10
11
12
Read these instructions.
Keep these instructions.
Heed all warnings.
Follow all instructions.
Do not use this apparatus near water.
Clean only with dry cloth.
Do not block any ventilation openings. Install in accordance with the manufacturer's
instructions.
Do not install near any heat sources such as radiators, heat registers, stoves, or other
apparatus (including amplifiers) that produce heat.
Protect the power cord from being walked on or pinched particularly at plugs,
convenience receptacles, and the point where they exit from the apparatus.
Only use attachments/accessories specified by the manufacturer.
Use only with the cart, stand, tripod, bracket, or table specified by the
manufacturer, or sold with the apparatus. When a cart is used, use
caution when moving the cart/apparatus combination to avoid injury
from tip-over.
Unplug this apparatus during lightning storms or when unused for
long periods of time.
4
DX-BPDVD7
13 Refer all servicing to qualified service personnel. Servicing is required when the
apparatus has been damaged in any way, such as power-supply cord or plug is
damaged, liquid has been spilled or objects have fallen into the apparatus, the
apparatus has been exposed to rain or moisture, does not operate normally, or has
been dropped.
14 To reduce the risk of fire or electric shock, do not expose this device to rain, moisture,
dripping, or splashing, and no objects filled with liquids, such as vases, shall be placed
on it.
15 The wall plug is the disconnecting device. The plug must remain readily operable.
Cauttion: Batteries should not be exposed to excessive heat such as sunshine, fire, or the like.
Caution: Danger of explosion if battery is incorrectly replaced. Replace only with the same or
equivalent type.
• Using headphones
• To avoid hearing damage caused by a sudden increase in volume, keep the volume
at the lowest level before playback, then adjust it to a comfortable level.
• Keep the volume at a moderate level to protect your ears.
• To avoid traffic accidents, never wear headphones when driving a car or riding a
bicycle.
• Placement
Avoid placing the player in:
• Direct sunlight or near a source of heat, such as a heater or heater duct
• A closed automobile, on a dashboard, or a parcel shelf. Excess heat may deform the
cabinet or cause malfunction.
• Dusty or sandy environments
• Wet or humid places, such as a bathroom
• Areas of strong magnetism, such as a television or a magnet
• Places where there is a lot of movement or vibration, such as on a car dashboard or
on an unstable shelf
• Extremely hot or cold enviromments
• Wet or moist enviroments, such as exposure near rain or water
7" Portable DVD Player
5
• Power sources—This player operates on an AC power adapter, car adapter, or
rechargeable battery.
• Make sure that the input voltage of the AC power adapter is compatible with the
local voltage. Otherwise, the AC power adapter and the player may be damaged.
Warning: To avoid electric shock, do not touch the AC power adapter with wet hands.
• When connecting with an automobile (cigarette lighter) adapter, make sure that
the input voltage of the adapter is identical with the car voltage.
• Unplug the AC power adapter from the outlet when the player will not be used for
an extended period of time.
• Hold the plug while unplugging the AC power adapter. Do not pull on the power
cord.
Note: When player is in use for a long period of time, the surface of the player will be hot.
This will not affect its operation.
DX-BPDVD7
6
DVD player components
DVD player
Front view
Top view
(screen open)
CLOSE
Side view
Item
Name
Function or control
1
Power indicator LED
Lights green when the power is on.
2
Remote sensor
Receives signals from the remote control.
3
Open switch
Opens the disc tray.
4
DC Input jack
Connects to the AC power adapter.
5
Charge indicator LED
Lights red when the battery is charging.
6
A/V Out jack
Connects to an external A/V device, such as a monitor or amplifier.
7
Headphone jack
Provides the output signal for headphones. Disables internal speakers.
8
Volume control
Increases or decreases the output sound level.
9
Power On/Off switch
Turns the player on or off.
10
LCD screen shut off switch
Turns off the LCD screen.
11
(next) button
Causes the DVD or CD to skip forward one chapter (DVD) or track (CD).
7" Portable DVD Player
Item
Name
12
13
(previous) button
(stop) button
7
Function or control
Causes the DVD or CD to skip back one chapter (DVD) or track (CD).
Stops the playback of the DVD or CD.
14
Menu
Accesses the DVD menu.
15
Wide button
Switches the LCD screen between 16:9 and 4:3 screen display.
16
(Direction
buttons) and
(play/
pause) button
Navigates on-screen menus.
The
(play/pause) button plays or pauses the DVD or CD.
Remote control
10
11
12
13
14
15
16
17
18
1
2
3
4
5
6
7
8
9
19
Item
Name
Function or control
1
SETUP button
Press to access the Setup menu.
2
DISPLAY button
Press to display information (for example, title, chapter, track, or time).
3
(previous) button
Press to go back to the previous chapter or scene on a DVD or track on a CD.
4
(up) button
Press to navigate up on a menu.
5
(reverse/left) button
Press to scan backward at 2, 4, 8, 16, or 32 times normal speed, or navigate
left on a menu.
6
ENTER button
Press to execute or confirm a selection.
DX-BPDVD7
8
Item
7
8
Name
(play/pause) button
(down) button
9
Number buttons
Function or control
Press to start playback. When a disc is playing, press to pause playback.
Press again to resume playback.
Press to navigate down on a menu.
Press to select an item or setting.
10
SUBTITLE button
Press to select the subtitle language and turn subtitles on or off.
11
ZOOM button
Press to enlarge the image to 2, 3, or 4 times the original size.
12
A-B (repeat) button
Press to repeat a specific portion (from point A to point B) of the disc.
13
(Next) button
Press to skip forward to the next chapter or scene on a DVD or track on a CD.
14
1/ALL REPEAT button
Press to repeat playing a title, chapter, or track.
15
(fast forward/right)
button
Press to scan forward at 2, 4, 8, 16, or 32 times normal speed, or navigate
right on a menu.
16
MENU button
Press to access the root menu or title menu (DVD).
17
STOP button
Press to stop the playback of the DVD or CD.
18
AUDIO button
Press to select the audio language for the DVD.
19
ANGLE button
Press to select an alternate viewing angle (when available) for the DVD.
Regional coding and compatibility
Both the DVD player and DVDs are coded by region. These region codes must match for the
DVD to play. The player is coded for Region 1. Only DVDs that are coded for Region 1 play in
this player.
Setting up your DVD player
Box contents
Make sure that the box contains the following items:
• DVD player
• A/V cable
• Remote control with battery (CR2025)
• User Guide
• AC power adapter
• Automobile cigarette lighter adapter
7" Portable DVD Player
9
Making connections
Note: When making connections:
- Turn off the DVD player and other equipment.
- Fully insert the plug.
- Hold the plug while unplugging the cord. Do not pull the cord.
Connecting to the AC power adapter
To connect the AC power adapter:
1 Make sure that the supplied AC power adapter is correct for your local voltage.
2 Connect the supplied AC power adapter to the DC input jack on the left side of the
player, then to the AC power outlet.
Connecting to the cigarette lighter adapter in a car
To connect the cigarette lighter adapter in a car:
• Connect the supplied cigarette lighter adapter to the DC input jack on the left side of
the player, then to the automobile’s cigarette lighter socket.
Warning: To avoid traffic accidents, never wear headphones when driving a car or riding a
bicycle.
Charging the built-in battery
To charge the battery:
1 Turn off the player. The battery charges only when the power to the player is turned
off.
2 Connect the supplied AC power adapter to the DC input jack on the player, then plug
the adapter into an AC power outlet.
When the battery is charging, the charge indicator LED turns red. When the battery is
fully charged the indicator turns off.
3 Unplug the AC power adapter when the battery is fully charged.
Notes:
• While the charging is in progress, do not disconnect the AC power adapter until the
charge indicator LED turns off. The charging time of a battery is about 5 hours and
depends on environmental conditions.
• To maximize battery life, immediately recharge it when it is fully discharged.
• Li-Polymer batteries do not have a “memory effect” and can be recharged at any time,
regardless of whether the battery is fully or only partially discharged.
• The battery may get warm when you are charging it or operating the player. This is
not a defect.
DX-BPDVD7
10
Using the remote control
To use the remote control:
1 The first time you use the remote control, remove the plastic sheet from the bottom of
the battery to activate the remote.
2 To use the remote control, point it at the remote sensor on the player. (Operate in the
range of 10 feet (3.3 meters) and 60° ).
30 0
0
30
3 Remove the batteries if the remote control will not be used for an extended period of
time.
Tip: Generally, batteries last for about one year. Replace the batteries if the remote control
does not work.
7" Portable DVD Player
11
Playing video and audio discs
Turning on the player
To turn on the player:
1 Open the LCD screen.
2 Turn on the player. The power LED lights green and the LCD screen turns on.
Playing discs
To load and play a disc:
1 Press the OPEN button to open the disc tray.
2 Hold the edges of the disc and place the disc in the center of the tray with the label
side up.
3 Press the OPEN button to close the disc tray. The player starts playing the disc.
4 Turn the VOLUME knob to adjust volume (even when using headphones).
If the player is connected to a TV or an amplifier, adjust the volume on the connected
device.
5 Stop playback by pressing the STOP button on the player or remote control.
Pausing discs
To pause a disc:
1 When playing a disc, press
(play/pause) to pause playback.
2 Press
(play/pause) again to resume playback.
Removing discs from the player
To remove a disc from the player:
1 Press the OPEN button to open the disc tray, then remove the disc.
2 Press the area on the DVD disc tray marked CLOSE to close the disc tray, then turn off
the player.
Using with headphones
You can also use the player with headphones (optional) by plugging the headphones into the
headphone jack on the left side of the player. Plugging headphones into the headphone jack
disables the internal speakers.
Warning: To avoid damaging your hearing, set the volume to a low level before putting on
the headphones, then adjust the volume up to a comfortable level.
DX-BPDVD7
12
Advanced setup
Making optional connections
DC 9V CHG
AV OUT
VOL.
ON
OFF
Video - Yellow
Audio (L) - White
Audio (R) - Red
Connecting to a TV or another monitor
To connect to a TV or another monitor:
• Connect black mini-plug to the AV OUT jack on the DVD player.
• Connect the yellow plug to the VIDEO IN jack on the TV.
• Connect the red plug to the AUDIO IN R jack on the TV.
• Connect white plug to the AUDIO IN L jack on the TV.
Connecting to TV and amplifier
To connect to a TV and amplifier:
• Connect black mini-plug to the AV OUT jack on the DVD player.
• Connect the yellow plug to the VIDEO IN jack on the TV.
• Connect the red plug to the AUDIO IN R jack on the amplifier.
• Connect white plug to the AUDIO IN L jack on the amplifier.
Using the setup menu
To access the setup menu:
1 With no disc in the player, press SETUP on the remote control or MENU on the player.
The General Setup Page of the setup menu opens and General is highlighted.
General
2
3
4
5
Video
Password Preferences
Exit
Press ENTER. TV Display is highlighted.
Press or to select a sub-menu on the General Setup Page.
Press to open the selected sub-menu.
Press or to select an option, then press ENTER to confirm your selection.
7" Portable DVD Player
13
6 Press to return to the previous menu.
7 Repeat Steps 3 to 5 to set the other menu options.
Changing setup options
Normal/PS—Select this option when the player is connected to a normal TV. Wide-screen
images are shown on the screen, but with some parts cropped automatically.
Normal/LB —Select this when the player is connected to a normal TV. Wide-screen images
are shown on the screen, with a black band on the top and bottom.
Wide—Select this when the player is connected to a wide-screen TV.
Angle Mark
On—The screen shows the angle mark icon if an angle option is available.
Off—The screen does not show the angle mark.
Note: Not all discs contain the above features.
DX-BPDVD7
14
OSD Lang
You can choose one of several different languages for the OSD (On-Screen Display) setup
language.
Screen Saver
This setting enables or disables the screen saver. The screen saver image appears when the
player stops or the image is frozen for about five minutes.
On—Enables the screen saver.
Off—Disables the screen saver.
Last Memory
On—The player returns to the last position on the disc.
Off—The player does not return to the last position on the disc.
Note: The last position memory function is only activated when the disc tray has been opened.
Setting video quality
To change video quality settings:
1 Access the Setup menu as described in “To access the setup menu:” on page 12.
2 Press or to highlight Video.
3 Press ENTER. Brightness is highlighted.
4 Press or to select the option you want to change. Options include:
• Brightness
• Contrast
5 Press to open the selected sub-menu.
6 Press or to adjust the setting, then press ENTER to confirm your selection.
7 Press to return to the previous menu.
8 Repeat Steps 4 to 6 to set the other video quality setup options.
7" Portable DVD Player
15
Setting or changing the password
To set or change the password:
1 Access the Setup menu as described in “To access the setup menu:” on page 12.
2 Press or to highlight Password and select Password Setup, then press ENTER.
The Password page opens.
General
Video
Password Preferences
Exit
3 Press ENTER twice. The Password Change page opens.
General
Video
Password Preferences
Exit
General
Video
Password Preferences
Exit
4 Enter the old (or default) password using the number buttons on the remote, then
enter the new password in the spaces provided.
Note: The default password is 3308.
5 Enter the new password again, then press ENTER to confirm the change.
Setting or changing preferences
To set or change your preferences:
1 Access the Setup menu as described in “To access the setup menu:” on page 12.
2 Press or to highlight Preferences.
DX-BPDVD7
16
3 Press ENTER to highlight Audio, then press or to select the option you want on
the Preference Page. Options include:
• Audio (language)
• Subtitle (language)
• Disc Menu (language)
• Parental (control)
• Default
4 Press to enter the selected sub-menu.
5 Press or to select the setting you want, then press ENTER to confirm your
selection.
6 Press to return to the previous menu.
7 Repeat Steps 3 to 5 to set your other Preference options.
Setting preference options
Note: Available languages depend on the languages available on each DVD. If you select a
language that is not available, the player plays and displays on the screen in the original
recorded language contained on the disc.
Audio (language)
Subtitle (language)
Disc menu (language)
Parental (control) – Available control levels include:
• 1 - Kid Safe
• 2-G
• 3 - PG
• 4 - PG-13
• 5 - PG-R
• 6-R
• 7 - NC-17
• 8 - ADULT
After you select the parental control level you want, press ENTER, then enter the 4-digit
password (or the default password 3308). Press ENTER again to confirm your choice.
Default
You can use this option to reset all settings (except the Parental Control setting) on the player
to factory defaults. To reset the player, after you press to enter the selected sub-menu,
press ENTER.
Notes:
• The default password is 3308. This password is effective even after you have selected
your own password and changed it. To avoid the possibility of others using the default
password to set the parental level and change the password, we suggest you put this
manual in a location that is out of reach by children in your home.
• Parental control may not be available on all DVDs.
7" Portable DVD Player
17
Setting DVD playback options
To access the DVD root menu:
• Press MENU during playback.
A DVD is divided into sections called titles and chapters. When you play a DVD, a root
menu of the disc appears on the screen of your TV or monitor. The contents of the
menu vary from disc to disc. Press MENU during playback to display the menu again.
Some DVDs only allow you to select disc playback options using the DVD root menu.
To display playing time and time remaining:
1 During playback, press DISPLAY to show the following:
• Current title number
• Total number of titles
• Current chapter number
• Total number of chapters
• Title elapsed (or the other options described in Step 2)
The heading disappears automatically after three seconds if DISPLAY is not pressed again.
Total number
of chapters
Chapter
number
Title number
Total number of
titles
2 Press DISPLAY repeatedly to cycle through the following options:
• Title Elapsed—The elapsed time of the title
• Title Remain—The remaining time of the title
• Chapter Elapsed—The elapsed time of the chapter
• Chapter Remain—The remaining time of the chapter
• Display Off—The DVD’s time Information turns off
To change the viewing angle:
1 During disc playback, press ANGLE to show the available angles for discs containing
multiple angles. The current angle number and the total number of angles available
are shown.
2
Total number of
angles available
Current angle
DX-BPDVD7
18
2 Press ANGLE again to select a different angle.
Note: Not all discs contain this feature.
To turn on subtitles and select the subtitle language:
1 During disc playback, press SUBTITLE to select the subtitle language you want. The
current subtitle language number and the total number of subtitle languages
available are shown.
Total number of
languages available
Current subtitle
language number
2 If there are multiple languages available, press SUBTITLE again to cycle through the
available languages.
3 To turn subtitles off, press the SUBTITLE button until SUBTITLE OFF is displayed. The
subtitle display disappears automatically if the SUBTITLE button is not pressed again
within three seconds.
Note: Some DVDs only allow access to this feature through the DVD menu.
To select a different audio language:
1 During disc playback, press AUDIO to select the audio language you want. The current
audio language number and the total number of audio channels (languages) available
are shown.
Audio 1/2 : Ac3 5. 1ch
Total number of
languages available
Current audio
language number
2 If there are multiple languages available, press AUDIO again to cycle through the
available languages.
The audio display disappears automatically if the AUDIO button is not pressed again
within three seconds.
Note: Some DVDs only allow access to this feature through the DVD menu.
7" Portable DVD Player
19
To select a different zoom multiple:
1 During disc playback, press ZOOM to select the zoom multiple you want. Pressing
ZOOM once enlarges the picture by 2×.
2X
Current zoom
multiple
2 Press ZOOM repeatedly to cycle through the zoom level (2×, 3×, 4×, and Normal).
To use A-B Repeat to repeat a portion of the DVD:
1 During disc playback, press A-B to set the starting point (A).
A
2 Press A-B again when the program gets to the ending point (B). The player plays the
segment between point A and point B repeatedly.
AB
3 To cancel A-B Repeat and resume normal playback, press A-B again.
DX-BPDVD7
20
To use Repeat to repeat part or all of the DVD:
1 During disc playback, press 1/ALL REPEAT to repeat a portion of the DVD.
Chapter
2 Press 1/ALL REPEAT repeatedly to cycle through the available settings:
• Chapter—Repeats the current chapter.
• Title—Repeats the current title.
• All—Repeats all chapters and titles.
• Off—Repeat off.
CD playback options
To repeat all or part of the CD:
1 During CD playback, press 1/ALL REPEAT to repeat a portion of the CD.
2 Press 1/ALL REPEAT repeatedly to cycle through the available settings:
• One—Repeats the current track.
• All—Repeats the entire CD.
• Repeat off—Turns off repeat and resumes normal playback.
7" Portable DVD Player
21
Playing MP3 discs
MP3 is a format for storing digital audio. An audio track is compressed into the MP3 format
with little loss of audio quality, while taking up much less disc space. CD-R /RW discs that
have been encoded in MP3 format are compatible with this player.
When an MP3 disc is inserted into the player, the menu screen appears automatically. You
can use the menu screen to select the folders and tracks you want, or the player plays the
tracks in the order they were burned onto the disc.
To select the folders and tracks you want:
1 Press the or buttons to choose a folder from the folder list on the screen.
2 Press ENTER to select the highlighted folder. The tracks available under the folder are
listed.
3 Press or to choose a track from the list, then press ENTER to select and begin
playback of the highlighted track.
4 Press
(next) to move to the next track.
- OR Press
(previous) to move to the beginning of the previous track.
To repeat all or part of the MP3 disc:
1 During MP3 playback, press 1/All REPEAT to repeat a portion of the MP3 disc.
2 Press 1/All REPEAT repeatedly to cycle through the available settings:
• Repeat One—Repeats the current track.
• Repeat Folder—Repeats the contents of a specific folder.
• Repeat off—Turns off repeat and resumes normal playback.
Notes:
• The
icon in front of an item indicates that this is a folder, not an MP3 file.
• The “MP3” icon in front of an item indicates that this is an MP3 file.
Note: Due to Dynex’s policy of constant improvement and technical refinement, Dynex
reserves the right to change or alter software.
DX-BPDVD7
22
Maintaining
Handling and cleaning discs
Handling discs
• To keep a disc clean, do not touch the play side (non-label side) of the disc.
• Do not attach paper or tape to the disc.
• Keep the disc away from direct sunlight or heat sources.
• Store the disc in a disc case after use.
Cleaning discs
• Before playback, wipe the disc outwards from the center with clean cloth.
Troubleshooting
No sound
• Make sure that all cables are securely inserted into the correct jacks.
• Make sure you operate the TV or amplifier according to the instructions.
No image
• Make sure that the player is connected securely.
• Make sure that you operate the player according to the instructions.
• Make sure that you set the color system according to the instructions.
Cannot advance through a movie’s opening credits and warning information
• The disc is programmed to prohibit that action.
The hand icon (
) appears on the screen
• The selected feature or action cannot be completed at this time because:
• The disc software restricts it.
• The disc software does not support the feature (such as angles).
• The feature is temporarily unavailable.
• You have requested a title or chapter that is out of range.
7" Portable DVD Player
23
No forward or reverse scan
• Some discs have sections that prohibit rapid scanning or title and chapter skip.
• You cannot advance through the opening credits and warning information at the
beginning of movies because the disc is programmed to prohibit that action.
Bad sound quality
• Make sure that the audio output mode is set correctly.
• Make sure that the audio connection between the player and amplifier is correct.
Disc cannot be played
• Make sure that a disc is in the player.
• Make sure that the disc is placed on the disc tray correctly, with the label side up.
• Make sure you are using the correct type of disc (digital video discs, audio CDs, or
MP3s).
• Both the player and disc are coded by region. If the region codes do not match, the disc
cannot be played. This player is coded for Region 1 discs.
Remote control does not work
• Remove obstructions between the remote control and the player.
• Point the remote control at the remote control sensor of the player.
• Replace the battery with new ones.
To replace the battery:
1 While pushing in on the tab as shown in the following graphic, pull the battery tray
out of the remote control.
CR2025
Open
Push
2 Remove the old battery, then insert a new battery with the + sign on the battery
facing up.
3 Push the battery tray back into the remote control.
Disc play starts, then stops immediately
• Both the player and disc are coded by region. If the region codes do not match, the disc
cannot be played. This player is coded for Region 1 discs.
• The disc is dirty. Clean it.
• Condensation has formed in the player. Let the player dry out, then try again.
Picture is distorted
• Inspect the disc because it might be damaged. Try another disc.
• It is normal for some distortion to appear during forward or reverse scan.
No power
• If running on AC power:
DX-BPDVD7
24
• Make sure that the plug is correctly inserted in the power outlet.
• Make sure that the AC power adapter is inserted to the correct jack or connector on
the DVD player.
• Make sure that the power outlet has power (some power outlets are controlled by a
switch).
• If running on battery power:
• Make sure that the battery is fully charged.
Specifications
Laser
Video system
Semiconductor laser
Wavelength 650 nm~795 nm
NTSC
Frequency response
DVD/DVD+R/DVD+RW/DVD-R/DVD-RW/CD/
CD-R/CD-RW/MP3
20 Hz ~ 20 KHz
Signal/noise ratio
> 60dB
Dynamic range
> 85dB
Compatible discs
DC 9V
Rechargeable Li-Polymer battery
Operating temperature 41 ~ 95°F (5 ~ 35°C)
7 inches
Screen size
Power supply
Dimensions
W×D×H
7.96 × 6.29 × 1.47 inches
(195 × 154 × 36 mm)
Weight
1.79 lbs (0.81 kg)
Changes to the design and specifications may be made without notice.
7" Portable DVD Player
25
FCC statement
FCC Part 15
This device complies with Part 15 of the FCC Rules. Operation of this product is subject to the following two
conditions: (1) this device may not cause harmful interference, and (2) this device must accept any interference
received, including interference that may cause undesired operation.
This equipment has been tested and found to comply within the limits for a class B digital device, pursuant to Part
15 of the FCC Rules. These limits are designed to provide reasonable protection against harmful interference in a
residential installation. This equipment generates, uses, and can radiate radio frequency energy and, if not
installed and used in accordance with the instructions, may cause harmful interference to radio communications.
However, there is no guarantee that interference will not occur in a particular installation. If this equipment does
cause harmful interference to radio or television reception, which can be determined by turning the equipment
off and on, the user is encouraged to try to correct the interference by one or more of the following measures:
• Reorient or relocate the receiving antenna.
• Increase the separation between the equipment and receiver.
• Connect the equipment into an outlet on a circuit different from that to which the receiver is connected.
• Consult the dealer or an experienced radio/TV technician for help.
FCC warning
Changes or modifications not expressly approved by the party responsible for compliance with the FCC Rules
could void the user’s authority to operate this equipment.
Laser safety
Location: Inside, near the deck mechanism.
This unit employs a laser. Only a qualified service person should remove the cover or attempt to service this
device, due to possible eye injury.
To prevent direct exposure to the laser radiation, do not open the case. Invisible laser radiation is present when
the case is opened or the interlocks are defeated. Do not stare into the laser beams.
Use of any controls, adjustments, or procedures other than those specified herein may result in hazardous
radiation exposure.
Warning: Use of controls or adjustments or performance of procedures other than those
specified herein may result in hazardous radiation exposure.
Warning: Visible and invisible laser radiation when open and interlock defeated. Do not
stare into beam.
Copyright
© 2009 Dynex. Dynex and the Dynex logo are trademarks of Best Buy Enterprise Services, Inc. Other brands and
product names are trademarks or registered trademarks of their respective holders. Specifications and features
are subject to change without notice or obligation.
This product incorporates copyright protection technology that is protected by method claims of certain U.S.
patents and other intellectual property rights owned by Macrovision Corporation and other rights owners. Use of
this copyright protection technology must be authorized by Macrovision Corporation, and is intended for home
and other limited viewing uses only unless otherwise authorized by Macrovision Corporation. Reverse
engineering or disassembly is prohibited.
26
DX-BPDVD7
7" Portable DVD Player
27
90-day limited warranty
Dynex Products (“Dynex”) warrants to you, the original purchaser of this new DX-BPDVD7 (“Product”), that the
Product shall be free of defects in the original manufacture of the material or workmanship for a period of 90 days
from the date of your purchase of the Product (“Warranty Period”). This Product must be purchased from an
authorized dealer of Dynex brand products and packaged with this warranty statement. This warranty does not
cover refurbished Product. If you notify Dynex during the Warranty Period of a defect covered by this warranty
that requires service, terms of this warranty apply.
How long does the coverage last?
The Warranty Period lasts for 90 days from the date you purchased the Product. The purchase date is printed on
the receipt you received with the product.
What does this warranty cover?
During the Warranty Period, if the original manufacture of the material or workmanship of the Product is
determined to be defective by an authorized Dynex repair center or store personnel, Dynex will (at its sole option):
(1) repair the Product with new or rebuilt parts; or (2) replace the Product at no charge with new or rebuilt
comparable products or parts. Products and parts replaced under this warranty become the property of Dynex
and are not returned to you. If service of Products and parts are required after the Warranty Period expires, you
must pay all labor and parts charges. This warranty lasts as long as you own your Dynex Product during the
Warranty Period. Warranty coverage terminates if you sell or otherwise transfer the Product.
How to obtain warranty service?
If you purchased the Product at a retail store location, take your original receipt and the Product to the store you
purchased it from. Make sure that you place the Product in its original packaging or packaging that provides the
same amount of protection as the original packaging. If you purchased the Product from an online web site, mail
your original receipt and the Product to the address listed on the web site. Make sure that you put the Product in
its original packaging or packaging that provides the same amount of protection as the original packaging.
To obtain in-home warranty service for a television with a screen 25 inches or larger, call 1-888-BESTBUY. Call
agents will diagnose and correct the issue over the phone or will have an Dynex-approved repair person
dispatched to your home.
Where is the warranty valid?
This warranty is valid only to the original purchaser of the Product in the United States, Canada, and Mexico.
What does the warranty not cover?
This warranty does not cover:
• Customer instruction
• Installation
• Set up adjustments
• Cosmetic damage
• Damage due to acts of God, such as lightning strikes
• Accident
• Misuse
• Abuse
• Negligence
• Commercial use
• Modification of any part of the Product
• Plasma display panel damaged by static (non-moving) images applied for lengthy periods (burn-in).
28
DX-BPDVD7
This warranty also does not cover:
• Damage due to incorrect operation or maintenance
• Connection to an incorrect voltage supply
• Attempted repair by anyone other than a facility authorized by Dynex to service the Product
• Products sold as is or with all faults
• Consumables, such as fuses or batteries
• Products where the factory applied serial number has been altered or removed
REPAIR REPLACEMENT AS PROVIDED UNDER THIS WARRANTY IS YOUR EXCLUSIVE REMEDY. DYNEX SHALL NOT BE
LIABLE FOR ANY INCIDENTAL OR CONSEQUENTIAL DAMAGES FOR THE BREACH OF ANY EXPRESS OR IMPLIED
WARRANTY ON THIS PRODUCT, INCLUDING, BUT NOT LIMITED TO, LOST DATA, LOSS OF USE OF YOUR PRODUCT, LOST
BUSINESS OR LOST PROFITS. DYNEX PRODUCTS MAKES NO OTHER EXPRESS WARRANTIES WITH RESPECT TO THE
PRODUCT, ALL EXPRESS AND IMPLIED WARRANTIES FOR THE PRODUCT, INCLUDING, BUT NOT LIMITED TO, ANY
IMPLIED WARRANTIES OF AND CONDITIONS OF MERCHANTABILITY AND FITNESS FOR A PARTICULAR PURPOSE, ARE
LIMITED IN DURATION TO THE WARRANTY PERIOD SET FORTH ABOVE AND NO WARRANTIES, WHETHER EXPRESS OR
IMPLIED, WILL APPLY AFTER THE WARRANTY PERIOD. SOME STATES, PROVINCES AND JURISDICTIONS DO NOT
ALLOW LIMITATIONS ON HOW LONG AN IMPLIED WARRANTY LASTS, SO THE ABOVE LIMITATION MAY NOT APPLY TO
YOU. THIS WARRANTY GIVES YOU SPECIFIC LEGAL RIGHTS, AND YOU MAY ALSO HAVE OTHER RIGHTS, WHICH VARY
FROM STATE TO STATE OR PROVINCE TO PROVINCE.
Contact Dynex:
For customer service please call 1-800-305-2204
www.dynexproducts.com
Distributed by Best Buy Purchasing, LLC
7601 Penn Avenue South, Richfield, Minnesota, U.S.A. 55423-3645
© 2009 Best Buy Enterprise Services, Inc.
All rights reserved. DYNEX is a trademark of Best Buy Enterprise Services, Inc. Registered in some countries. All
other products and brand names are trademarks of their respective owners.
7" Portable DVD Player
29
30
DX-BPDVD7
7" Portable DVD Player
31
www.dynexproducts.com (800) 305-2204
© 2009 Best Buy Enterprise Services, Inc. All rights reserved.
DYNEX is a trademark of Best Buy Enterprise Services, Inc. Registered in some countries.
All other products and brand names are trademarks of their respective owners.
Distributed by Best Buy Purchasing, LLC
7601 Penn Ave. South, Richfield, MN 55423 U.S.A.
09-0428
ENGLISH