1
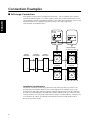
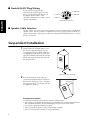
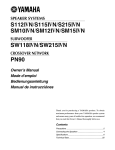
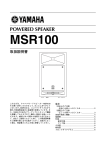
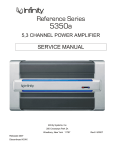
ENGLISH
SPEAKER SYSTEMS
漢語
R112/R112C
R115/R115C
R215/R215C
R12M/R12MC
R15M/R15MC
SUBWOOFER
R118W/R118WC
Owner’s Manual
使用手卌
Thank you for choosing a YAMAHA speaker system.
In order to take full advantage of the superior
performance and features provided by these
speakers while ensuring maximum reliability and
longevity we urge you to read this manual
thoroughly before setting up and using your
speakers. Also, please keep the manual in a safe
place for future reference.
感謝您購買 YAMAHA 揚聲器系統。為了充分發揮這些
揚聲器的全部優點和卓越的性能 , 並確保可靠性和
長壽命 , 建議您在設定和使用揚聲器之前 , 請仔細
閱讀本使用手卌並妥為保管 , 以備今后查閱。
Contents
Precautions . . . . . . . . . . . . . . . . . . . . . . . . . . . . 2-3
Connection Examples . . . . . . . . . . . . . . . . . . . . . . 4
Full-range Connection . . . . . . . . . . . . . . . . . . . . 4
Using a Channel Divider and Subwoofers. . . . . . 5
Phone Plug Wiring . . . . . . . . . . . . . . . . . . . . . . . 5
Neutrik NL4FC Plug Wiring . . . . . . . . . . . . . . . . 6
Speaker Cable Selection . . . . . . . . . . . . . . . . . . . 6
Suspended Installation . . . . . . . . . . . . . . . . . . . . . . 6
Specification . . . . . . . . . . . . . . . . . . . . . . . . . . . . . 7
Technical Data . . . . . . . . . . . . . . . . . . . . . . . . . . . 8
目錄
注意事項 . . . . . . . . . . . . . . . . . . . . . . . . . . . . . 9-10
連接例 . . . . . . . . . . . . . . . . . . . . . . . . . . . . . . . . . 11
全音域連接 . . . . . . . . . . . . . . . . . . . . . . . . . . . . 11
使用通道分頻器和副低音揚聲器 . . . . . . . . . . . . 12
耳機插頭接線 . . . . . . . . . . . . . . . . . . . . . . . . . . 12
Neutrik NL4FC 插頭接線. . . . . . . . . . . . . . . . . . 13
揚聲器電纜選擇 . . . . . . . . . . . . . . . . . . . . . . . . 13
懸挂安裝 . . . . . . . . . . . . . . . . . . . . . . . . . . . . . . . 13
規格 . . . . . . . . . . . . . . . . . . . . . . . . . . . . . . . . . . . 14
技術資料 . . . . . . . . . . . . . . . . . . . . . . . . . . . . . . . 15
Precautions
WARNING
ENGLISH
In case an abnormality occurs during operation
• If you notice any abnormality, such as smoke, odor, or noise,
turn the power amp off immediately. Remove the power cord
from the AC outlet. Consult your dealer for repair. Using the
unit in this condition is a fire and electrical shock hazard.
CAUTION
Installation
• When choosing a location for your speakers, avoid the following:
- Direct sunlight, high temperatures (such as near heaters),
or excessively low temperatures.
- High humidity.
- Areas subject to excessive dust accumulation and vibration.
- Non-level or unstable surfaces.
• To prevent short circuits or breakage of cables, always disconnect cables prior to moving system equipment.
• When using two or more speaker systems, be sure match the
polarity (+/–) of the speaker system connectors to those at the
amplifier. If the polarities do not match, the sounds produced
by the speakers will interfere with each other, making it impossible to achieve a well-balanced sound field.
• This unit is heavy. Use two or more people to carry it.
2
Operation
• To avoid damage to your speakers and other parts of your system, when you turn on your system, ALWAYS turn the power amp on last! This will avoid loud, damaging pops that will
annoy your audience, and blow your speakers. When you
power down, the amplifier should ALWAYS be turned off
first to avoid the same problems.
• Always turn the power switches of system components OFF
prior to connecting or disconnecting cables. Failure to do so
may result in damage to speakers as well as to connected
equipment.
• Do not output distorted sounds for long periods of time, as
this will cause the speaker to heat up, leading to a fire hazard.
Poly Switch
When choosing a power amplifier to use with your
speakers, make sure that its power output matches the
speakers’ power capacity (refer to the Specifications on
page 7). Even if the amplifier’s power output is lower
than the speakers’ PGM (program) power capacity, the
speakers may be damaged when clipping of a high input
signal occurs.
All full-range loudspeakers are fitted with a self-resetting poly switch that protects the high-frequency driver
from damage caused by excessive power.
The following may cause damage to speakers:
• Feedback caused when using a microphone.
• Continuous high sound pressure level produced by
electronic instruments.
• Continuous high-power output distorted signals.
ENGLISH
To protect your speakers
If a loudspeaker cabinet loses high-frequency output,
immediately remove power from the unit and wait for
two to three minutes. The should allow the poly switch
to reset. Re-apply power and check the performance of
the high-frequency driver before continuing with the
power reduced to a level that does not cause the poly
switch to interrupt the signal.
On the R118W/R118WC sub woofer, the Poly Switch
protects the woofer and a similar routine should be followed if its output is lost.
• Popping noises caused by turning on equipment, or
by connecting or disconnecting system components
while the amplifier is turned on.
This product, when used in combination
with amplification and/or additional
loudspeakers, may be capable of producing sound levels that could cause permanent hearing loss.
DO NOT operate at high volume levels
or at a level that is uncomfortable. If you
experience any discomfort or ringing in
the ears, or suspect an hearing loss, you
should consult an audiologist.
3
Connection Examples
■ Full-range Connection
ENGLISH
Each speaker features three input/parallel connectors – two 1/4" phone jacks and one
Neutrik NL4MP connector. Use either a phone jack or the Neutrik connector to receive
input from your sound system/power amplifier. One of the spare connectors can be used
to parallel-connect an additional speaker (keeping in mind the impedance
considerations mentioned below).
Neutrik
NL4MP
Phones
DAISY-CHAINED
MIXING
CONSOLE
L
GRAPHIC
EQUALIZER
POWER
AMPLIFIER
L
L
SPEAKER
SYSTEMS
R
R
SPEAKER
SYSTEMS
R
Impedance Considerations
We do not recommend connecting more than two 8-ohm speakers in parallel. Two
parallel-connected 8-ohm speakers have a total impedance of 4 ohms, which is the
minimum that should be connected to one amplifier output channel. The R112/R112C,
R115/R115C, R12M/R12MC, R15M/R15MC and R118W/R118WC are 8-ohm speakers,
and two of these can safely be paralleled on one output. The R215/R215C, however, has
an impedance of 4 ohms and should not be parallel-connected with another R215/
R215C or any other model.
4
■ Using a Channel Divider and Subwoofers
SPEAKER SYSTEMS
TWO-CHANNEL
POWER AMPLIFIER
CHANNEL
DIVIDER
L
L
LEFT
MIXING
CONSOLE
TWO-CHANNEL
GRAPHIC
EQUALIZER
HIGH INPUT
OUTPUT
RIGHT
L
L
R
R
LEFT
INPUTS
TO POWER
AMP INPUTS
R118W/R118WC
SPEAKER SYSTEMS
RIGHT
R
R
L
L
LEFT
LOW
INPUT
OUTPUT
RIGHT
R
R
TWO-CHANNEL
POWER AMPLIFIER
R118W/R118WC
■ Phone Plug Wiring
Phone plugs for connection to the phone
jack inputs should be wired as shown to
the right. Be sure to use proper speaker
cable – NOT shielded instrument or line
cable – for all speaker connections.
5
ENGLISH
Using a channel divider in a multi-way system like the one shown in the diagram can
provide superior dynamic range and overall sound quality. The channel divider divides
the line-level audio from the preamplifier or mixing console into separate frequency
bands that are then sent to separate power amplifiers. The power amplifiers drive
speaker systems selected for optimum performance in the corresponding frequency
ranges.
■ Neutrik NL4FC Plug Wiring
ENGLISH
If you will be using the Neutrik
connectors for speaker input, wire the
plugs as shown to the right. Be sure to
use proper speaker cable – NOT
shielded instrument or line cable – for all
speaker connections.
2– (NO USE)
2+ (NO USE)
1+ : HOT(+)
1– :COLD (–)
Neutrik NL4FC connector
■ Speaker Cable Selection
Speaker cables must carry a significant amount of current in order to drive a high-power
speaker system. For this reason it is important to use heavy-gauge speaker cable for all
speaker connections. Other types of cable can dramatically limit performance as well as
being a fire hazard.
Suspended Installation
1
The R112/R112C and R115/R115C can
be used in suspended “flying” rigs by
using optional long eye bolts (M10) and
an appropriate suspension wire. For this
type of installation replace the three bolts
on the top and back of the speaker with
the long eye bolts.
Bolts
M10 long eye bolts (Optional)
2
Refer to the diagram to the right for
suspended installation details. Make sure
that all wire and fittings used – including
the ceiling structure – are strong enough
to support the speakers.
Maximum
45 Degrees
Suspension Cautions
• Installation should be carried out by experienced personnel.
• Some fittings may deteriorate due to wear or corrosion over extended periods of time.
The installation should be checked thoroughly at regular intervals for safety.
• Use only the specified M10 long eye bolts.
• Always suspend the speakers using all three long eye bolts.
• Never use the speakers' handles as suspension points.
6
Specifications
R112/R112C
R12M/R12MC
Type
R115/R115C
R15M/R15MC
R215/R215C
2Way Bass reflex
Speaker Unit
LF
12" Cone
—
55 Hz - 20 kHz (–10 dB)
50 Hz - 20 kHz (–10 dB)
40 Hz - 20 kHz
(–10 dB)
35 Hz - 3 kHz
(–10 dB)
NOISE*
200 W
250 W
500 W
250 W
PGM
400 W
500 W
1000 W
500 W
MAX
800 W
1000 W
2000 W
1000 W
4 ohms
8 ohms
Nominal Impedance
8 ohms
Sensitivity
97 dB SPL (1W,1 m)
Nominal
Dispersion
18" Cone
1.75" v.c.Comp. Driver
Frequency Range
Power
Capacity
Bass reflex
15" Cone × 2
15" Cone
HF
R118W/
R118WC
Horizontal
90˚
40˚
Vertical
40˚
90˚
97 dB SPL
(1W,1 m)
98 dB SPL (1W,1 m)
Cross Over Frequency
90˚
40˚
40˚
90˚
1.7 kHz
90˚
—
40˚
—
1.5 kHz
—
SPEAKON NL4MP × 1, 1/4" Phone Jack × 2
Input Connectors
Dimensions (W × H × D)
480 × 695 ×
400 mm
675 × 450 ×
380 mm
520 × 765 ×
470 mm
745 × 490 ×
400 mm
520 × 1175 ×
600 mm
562 × 811 ×
639 mm
26.5 kg
24.0 kg
35.0 kg
30.5 kg
69.0 kg
49.5 kg
—
—
—
Weight
Color
Black
Mounting Screw
M10 3points
—
M10 3points
*: EIA RS-426
Specifications and descriptions in this owner’s manual are for information purposes only.
Yamaha Corp. reserve the right to change or modify products or specifications at any
time without prior notice. Since specifications, equipment or options may not be the
same in every locale, please check with your Yamaha dealer.
R112/R112C
R115/R115C
R12M/R12MC
105˚
75˚
105˚
75˚
120˚
450
30˚
695
765
380
675
400
470
R215/R215C
102.5˚
77.5˚
480
520
R118W/R118WC
R15M/R15MC
1175
120˚
490
811
30˚
600
400
745
639
520
562
7
ENGLISH
Model
Technical Data
R115/R115C/R15M/R15MC
100
100
90
32
80
16
70
60
8
RESPONSE (dB)
110
RESPONSE (dB)
110
4
20
100
1k
90
16
70
60
10k
32
80
8
4
20
100
FREQUENCY (Hz)
100
100
90
16
80
8
70
4
2
100
1k
FREQUENCY (Hz)
8
10k
RESPONSE (dB)
110
20
10k
R118W/R118WC
110
60
1k
FREQUENCY (Hz)
R215/R215C
RESPONSE (dB)
ENGLISH
R112/R112C/R12M/R12MC
90
32
80
16
70
60
8
4
20
100
1k
FREQUENCY (Hz)
10k
Yamaha Manual Library
http://www2.yamaha.co.jp/manual/english/
M.D.G., Pro Audio & Digital Musical Instrument Division, Yamaha Corporation
© 2002 Yamaha Corporation
209AP-01A0
Printed in China