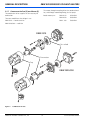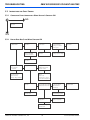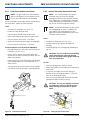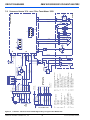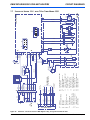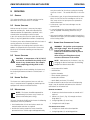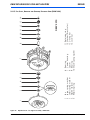
1
Service and Repair Manual Coolant Heaters DBW 2010 DBW 2020 DBW 300 Circulation Pumps U4810 U4814 U4846 U4851 – Improper installation or repair of Webasto heating and cooling systems can cause fire or the leakage of deadly carbon monoxide leading to serious injury or death. – Installation and repair of Webasto heating and cooling systems requires special Webasto training, technical information, special tools and special equipment. – NEVER attempt to install or repair a Webasto heating or cooling system unless you have successfully completed the factory training course and have the technical skills, technical information, tools and equipment required to properly complete the necessary procedures. – ALWAYS carefully follow Webasto installation and repair instructions and heed all WARNINGS. – Webasto rejects any liability for problems and damage caused by the system being installed by untrained personnel. DBW 2010/2020/300 COOLANT HEATERS Contents TABLE OF CONTENTS Page 1. Introduction 7 1.1 1.2 1.3 1.4 1.5 Scope and Purpose . . . . . . . . . . . . . . . . . . . . . . . . . . . . . . . . . . . . . . . . . . . . . . . . . . . . . . . . . . . . . . . . . . . . . . . . . . . 7 Applicability of Manual . . . . . . . . . . . . . . . . . . . . . . . . . . . . . . . . . . . . . . . . . . . . . . . . . . . . . . . . . . . . . . . . . . . . . . . . 7 Meaning of Warnings, Cautions and Notes . . . . . . . . . . . . . . . . . . . . . . . . . . . . . . . . . . . . . . . . . . . . . . . . . . . . . . . . . 7 Additional Documentation to be used. . . . . . . . . . . . . . . . . . . . . . . . . . . . . . . . . . . . . . . . . . . . . . . . . . . . . . . . . . . . . 7 Safety Information and Regulations . . . . . . . . . . . . . . . . . . . . . . . . . . . . . . . . . . . . . . . . . . . . . . . . . . . . . . . . . . . . . . 7 1.5.1 General Safety Notes. . . . . . . . . . . . . . . . . . . . . . . . . . . . . . . . . . . . . . . . . . . . . . . . . . . . . . . . . . . . . . . . . . . . 7 1.6 Legal Provisions for Installation . . . . . . . . . . . . . . . . . . . . . . . . . . . . . . . . . . . . . . . . . . . . . . . . . . . . . . . . . . . . . . . . . . 8 1.7 Corrections and Improvements . . . . . . . . . . . . . . . . . . . . . . . . . . . . . . . . . . . . . . . . . . . . . . . . . . . . . . . . . . . . . . . . . . 8 2. General Description 2.1 9 Parts of the Heater . . . . . . . . . . . . . . . . . . . . . . . . . . . . . . . . . . . . . . . . . . . . . . . . . . . . . . . . . . . . . . . . . . . . . . . . . . 12 2.1.1 Electronic Control Unit (1) . . . . . . . . . . . . . . . . . . . . . . . . . . . . . . . . . . . . . . . . . . . . . . . . . . . . . . . . . . . . . . . 12 2.1.2 Overheat Fuse (15) . . . . . . . . . . . . . . . . . . . . . . . . . . . . . . . . . . . . . . . . . . . . . . . . . . . . . . . . . . . . . . . . . . . . 12 2.1.3 Temperature Limiter (17) . . . . . . . . . . . . . . . . . . . . . . . . . . . . . . . . . . . . . . . . . . . . . . . . . . . . . . . . . . . . . . . . 12 2.1.4 Temperature Control Thermostat (16) . . . . . . . . . . . . . . . . . . . . . . . . . . . . . . . . . . . . . . . . . . . . . . . . . . . . . . 12 2.1.5 Flame Detector (23). . . . . . . . . . . . . . . . . . . . . . . . . . . . . . . . . . . . . . . . . . . . . . . . . . . . . . . . . . . . . . . . . . . . 13 2.1.6 Combustion Air Intake (26) . . . . . . . . . . . . . . . . . . . . . . . . . . . . . . . . . . . . . . . . . . . . . . . . . . . . . . . . . . . . . . 13 2.1.7 Combustion Air Fan (5) and Motor (2) . . . . . . . . . . . . . . . . . . . . . . . . . . . . . . . . . . . . . . . . . . . . . . . . . . . . . . 14 2.1.8 Coupling (4) . . . . . . . . . . . . . . . . . . . . . . . . . . . . . . . . . . . . . . . . . . . . . . . . . . . . . . . . . . . . . . . . . . . . . . . . . 15 2.1.9 Toothed Gearing (6) . . . . . . . . . . . . . . . . . . . . . . . . . . . . . . . . . . . . . . . . . . . . . . . . . . . . . . . . . . . . . . . . . . . 15 2.1.10 Fuel Pump (24) . . . . . . . . . . . . . . . . . . . . . . . . . . . . . . . . . . . . . . . . . . . . . . . . . . . . . . . . . . . . . . . . . . . . . . . 15 2.1.11 Fuel Control Valve and Solenoid (8) . . . . . . . . . . . . . . . . . . . . . . . . . . . . . . . . . . . . . . . . . . . . . . . . . . . . . . . . 15 2.1.12 Fuel Nozzle and Nozzle Holder (14) . . . . . . . . . . . . . . . . . . . . . . . . . . . . . . . . . . . . . . . . . . . . . . . . . . . . . . . . 16 2.1.13 Fuel Line Connections (25) . . . . . . . . . . . . . . . . . . . . . . . . . . . . . . . . . . . . . . . . . . . . . . . . . . . . . . . . . . . . . . 16 2.1.14 Electronic Ignition Unit (3) . . . . . . . . . . . . . . . . . . . . . . . . . . . . . . . . . . . . . . . . . . . . . . . . . . . . . . . . . . . . . . . 16 2.1.15 Ignition Electrodes (13) . . . . . . . . . . . . . . . . . . . . . . . . . . . . . . . . . . . . . . . . . . . . . . . . . . . . . . . . . . . . . . . . . 16 2.1.16 Combustion Chamber (20), Combustion Air Swirler (21) . . . . . . . . . . . . . . . . . . . . . . . . . . . . . . . . . . . . . . . . 17 2.1.17 Heat Exchanger (19) . . . . . . . . . . . . . . . . . . . . . . . . . . . . . . . . . . . . . . . . . . . . . . . . . . . . . . . . . . . . . . . . . . . 17 2.1.18 Preheat Thermostat (7) . . . . . . . . . . . . . . . . . . . . . . . . . . . . . . . . . . . . . . . . . . . . . . . . . . . . . . . . . . . . . . . . . 17 2.1.19 Pre-heater Cartridge (10). . . . . . . . . . . . . . . . . . . . . . . . . . . . . . . . . . . . . . . . . . . . . . . . . . . . . . . . . . . . . . . . 17 2.1.20 Coolant Circulating Pump . . . . . . . . . . . . . . . . . . . . . . . . . . . . . . . . . . . . . . . . . . . . . . . . . . . . . . . . . . . . . . . 18 3. Functional Description 3.1 3.2 3.3 19 Switch ON . . . . . . . . . . . . . . . . . . . . . . . . . . . . . . . . . . . . . . . . . . . . . . . . . . . . . . . . . . . . . . . . . . . . . . . . . . . . . . . . 19 Heating Operation . . . . . . . . . . . . . . . . . . . . . . . . . . . . . . . . . . . . . . . . . . . . . . . . . . . . . . . . . . . . . . . . . . . . . . . . . . 19 Switch Off . . . . . . . . . . . . . . . . . . . . . . . . . . . . . . . . . . . . . . . . . . . . . . . . . . . . . . . . . . . . . . . . . . . . . . . . . . . . . . . . 19 4. Technical Data 4.1 4.2 4.3 20 Technical Data of the Heaters . . . . . . . . . . . . . . . . . . . . . . . . . . . . . . . . . . . . . . . . . . . . . . . . . . . . . . . . . . . . . . . . . . 21 Technical Data of the Circulating Pumps . . . . . . . . . . . . . . . . . . . . . . . . . . . . . . . . . . . . . . . . . . . . . . . . . . . . . . . . . . 22 Permissible Extension of the Connections . . . . . . . . . . . . . . . . . . . . . . . . . . . . . . . . . . . . . . . . . . . . . . . . . . . . . . . . . 22 5. Troubleshooting 23 5.1 5.2 Quick Check Troubleshooting Matrix. . . . . . . . . . . . . . . . . . . . . . . . . . . . . . . . . . . . . . . . . . . . . . . . . . . . . . . . . . . . . 23 Tester Instructions (Tester P/N 1302691A) . . . . . . . . . . . . . . . . . . . . . . . . . . . . . . . . . . . . . . . . . . . . . . . . . . . . . . . . . 23 5.2.1 Test Procedures . . . . . . . . . . . . . . . . . . . . . . . . . . . . . . . . . . . . . . . . . . . . . . . . . . . . . . . . . . . . . . . . . . . . . . . 23 5.3 Instructions for Fault Finding. . . . . . . . . . . . . . . . . . . . . . . . . . . . . . . . . . . . . . . . . . . . . . . . . . . . . . . . . . . . . . . . . . . 26 5.3.1 Combustion Starts Immediately When Heater Is Switched ON . . . . . . . . . . . . . . . . . . . . . . . . . . . . . . . . . . . . 26 5.3.2 Heater Does Not Start When Switched ON . . . . . . . . . . . . . . . . . . . . . . . . . . . . . . . . . . . . . . . . . . . . . . . . . . 26 5.3.3 After Switching ON, The Heater Switches OFF after Approx. 30 Seconds On Fault . . . . . . . . . . . . . . . . . . . . . 27 5.3.4 Heater Starts Only After Several Starting Attempts . . . . . . . . . . . . . . . . . . . . . . . . . . . . . . . . . . . . . . . . . . . . 28 www.webasto.us 3 Webasto Thermo & Comfort N.A., Inc. TABLE OF CONTENTS 5.3.5 5.3.6 5.3.7 5.3.8 DBW 2010/2020/300 COOLANT HEATERS Heater Switches Off By Itself During Operation . . . . . . . . . . . . . . . . . . . . . . . . . . . . . . . . . . . . . . . . . . . . . . .28 Heater Smokes . . . . . . . . . . . . . . . . . . . . . . . . . . . . . . . . . . . . . . . . . . . . . . . . . . . . . . . . . . . . . . . . . . . . . . .29 Heater Smokes . . . . . . . . . . . . . . . . . . . . . . . . . . . . . . . . . . . . . . . . . . . . . . . . . . . . . . . . . . . . . . . . . . . . . . .30 Heater Cannot Be Switched Off . . . . . . . . . . . . . . . . . . . . . . . . . . . . . . . . . . . . . . . . . . . . . . . . . . . . . . . . . . .30 6. Functional Adjustments 6.1 6.2 31 General. . . . . . . . . . . . . . . . . . . . . . . . . . . . . . . . . . . . . . . . . . . . . . . . . . . . . . . . . . . . . . . . . . . . . . . . . . . . . . . . . . .31 Adjustments . . . . . . . . . . . . . . . . . . . . . . . . . . . . . . . . . . . . . . . . . . . . . . . . . . . . . . . . . . . . . . . . . . . . . . . . . . . . . . .31 6.2.1 Adjustment of CO2 Contents . . . . . . . . . . . . . . . . . . . . . . . . . . . . . . . . . . . . . . . . . . . . . . . . . . . . . . . . . . . .31 6.2.2 Flame Detector Resistance Check. . . . . . . . . . . . . . . . . . . . . . . . . . . . . . . . . . . . . . . . . . . . . . . . . . . . . . . . . .32 6.2.3 Ignition Electrode Check and Setting . . . . . . . . . . . . . . . . . . . . . . . . . . . . . . . . . . . . . . . . . . . . . . . . . . . . . . .32 6.2.4 Ignition Coil Check . . . . . . . . . . . . . . . . . . . . . . . . . . . . . . . . . . . . . . . . . . . . . . . . . . . . . . . . . . . . . . . . . . . .33 6.2.5 Fuel Pump Check. . . . . . . . . . . . . . . . . . . . . . . . . . . . . . . . . . . . . . . . . . . . . . . . . . . . . . . . . . . . . . . . . . . . . .33 6.2.6 Fuel Solenoid Valve Check . . . . . . . . . . . . . . . . . . . . . . . . . . . . . . . . . . . . . . . . . . . . . . . . . . . . . . . . . . . . . . .34 6.2.7 Nozzle Block Pre-heater Check. . . . . . . . . . . . . . . . . . . . . . . . . . . . . . . . . . . . . . . . . . . . . . . . . . . . . . . . . . . .34 7. Circuit Diagrams 7.1 7.2 7.3 7.4 7.5 7.6 7.7 7.8 35 DBW 2010 12 V and 24 V - Early Canadian Version. . . . . . . . . . . . . . . . . . . . . . . . . . . . . . . . . . . . . . . . . . . . . . . . . .35 DBW 2010 12 V and 24 V - Present North American Version . . . . . . . . . . . . . . . . . . . . . . . . . . . . . . . . . . . . . . . . . . .36 DBW 2020 / 300 12 V and 24 V - without Nozzle Preheat . . . . . . . . . . . . . . . . . . . . . . . . . . . . . . . . . . . . . . . . . . . . .37 DBW 2020 / 300 12 V and 24 V - with Nozzle Preheat . . . . . . . . . . . . . . . . . . . . . . . . . . . . . . . . . . . . . . . . . . . . . . .38 Scholastic Heater 12 V - with On/Off Switch . . . . . . . . . . . . . . . . . . . . . . . . . . . . . . . . . . . . . . . . . . . . . . . . . . . . . . .39 Scholastic Heater 12 V - with 7-Day Timer Model 1529 . . . . . . . . . . . . . . . . . . . . . . . . . . . . . . . . . . . . . . . . . . . . . . .40 Scholastic Heater 12 V - with 7-Day Timer Model 1531 . . . . . . . . . . . . . . . . . . . . . . . . . . . . . . . . . . . . . . . . . . . . . . .41 Control Unit - Identification of Terminals . . . . . . . . . . . . . . . . . . . . . . . . . . . . . . . . . . . . . . . . . . . . . . . . . . . . . . . . . .42 8. Servicing 43 8.1 8.2 8.3 8.4 8.5 General. . . . . . . . . . . . . . . . . . . . . . . . . . . . . . . . . . . . . . . . . . . . . . . . . . . . . . . . . . . . . . . . . . . . . . . . . . . . . . . . . . .43 Heater Servicing . . . . . . . . . . . . . . . . . . . . . . . . . . . . . . . . . . . . . . . . . . . . . . . . . . . . . . . . . . . . . . . . . . . . . . . . . . . .43 Vehicle Servicing . . . . . . . . . . . . . . . . . . . . . . . . . . . . . . . . . . . . . . . . . . . . . . . . . . . . . . . . . . . . . . . . . . . . . . . . . . . .43 Heater Test Run. . . . . . . . . . . . . . . . . . . . . . . . . . . . . . . . . . . . . . . . . . . . . . . . . . . . . . . . . . . . . . . . . . . . . . . . . . . . .43 Maintenance. . . . . . . . . . . . . . . . . . . . . . . . . . . . . . . . . . . . . . . . . . . . . . . . . . . . . . . . . . . . . . . . . . . . . . . . . . . . . . .43 8.5.1 Burner Head Opening and Closing. . . . . . . . . . . . . . . . . . . . . . . . . . . . . . . . . . . . . . . . . . . . . . . . . . . . . . . . .43 8.6 Visual Inspections and Regulations for Installation . . . . . . . . . . . . . . . . . . . . . . . . . . . . . . . . . . . . . . . . . . . . . . . . . . .45 8.6.1 Connection to Vehicle Cooling System. . . . . . . . . . . . . . . . . . . . . . . . . . . . . . . . . . . . . . . . . . . . . . . . . . . . . .45 8.6.2 Connection to Vehicle Fuel System. . . . . . . . . . . . . . . . . . . . . . . . . . . . . . . . . . . . . . . . . . . . . . . . . . . . . . . . .45 8.6.2.1 Fuel Lines . . . . . . . . . . . . . . . . . . . . . . . . . . . . . . . . . . . . . . . . . . . . . . . . . . . . . . . . . . . . . . . . . . . .45 8.6.2.2 Fuel Filter . . . . . . . . . . . . . . . . . . . . . . . . . . . . . . . . . . . . . . . . . . . . . . . . . . . . . . . . . . . . . . . . . . . .45 8.6.3 Combustion Air Supply . . . . . . . . . . . . . . . . . . . . . . . . . . . . . . . . . . . . . . . . . . . . . . . . . . . . . . . . . . . . . . . . .45 8.6.4 Exhaust Line . . . . . . . . . . . . . . . . . . . . . . . . . . . . . . . . . . . . . . . . . . . . . . . . . . . . . . . . . . . . . . . . . . . . . . . . .46 8.7 Removal and Installation . . . . . . . . . . . . . . . . . . . . . . . . . . . . . . . . . . . . . . . . . . . . . . . . . . . . . . . . . . . . . . . . . . . . . .46 8.7.1 Heater, Removal and Installation . . . . . . . . . . . . . . . . . . . . . . . . . . . . . . . . . . . . . . . . . . . . . . . . . . . . . . . . . .46 8.7.1.1 Removal . . . . . . . . . . . . . . . . . . . . . . . . . . . . . . . . . . . . . . . . . . . . . . . . . . . . . . . . . . . . . . . . . . . . .46 8.7.1.2 Installation . . . . . . . . . . . . . . . . . . . . . . . . . . . . . . . . . . . . . . . . . . . . . . . . . . . . . . . . . . . . . . . . . . .46 8.7.2 Temperature Limiter, Replacement . . . . . . . . . . . . . . . . . . . . . . . . . . . . . . . . . . . . . . . . . . . . . . . . . . . . . . . . .47 8.7.3 Temperature Thermostat, Replacement . . . . . . . . . . . . . . . . . . . . . . . . . . . . . . . . . . . . . . . . . . . . . . . . . . . . .47 8.7.4 Overheat Fuse, Replacement . . . . . . . . . . . . . . . . . . . . . . . . . . . . . . . . . . . . . . . . . . . . . . . . . . . . . . . . . . . . .47 8.7.5 Burner Head, Replacement . . . . . . . . . . . . . . . . . . . . . . . . . . . . . . . . . . . . . . . . . . . . . . . . . . . . . . . . . . . . . .47 8.7.6 Ignition Coil, Replacement . . . . . . . . . . . . . . . . . . . . . . . . . . . . . . . . . . . . . . . . . . . . . . . . . . . . . . . . . . . . . . .47 8.7.7 Flame Detector (Photo Eye), Replacement . . . . . . . . . . . . . . . . . . . . . . . . . . . . . . . . . . . . . . . . . . . . . . . . . . .47 8.7.8 Combustion Chamber, Replacement . . . . . . . . . . . . . . . . . . . . . . . . . . . . . . . . . . . . . . . . . . . . . . . . . . . . . . .47 8.8 First Operation . . . . . . . . . . . . . . . . . . . . . . . . . . . . . . . . . . . . . . . . . . . . . . . . . . . . . . . . . . . . . . . . . . . . . . . . . . . . .47 8.8.1 Water Circuit, Bleeding . . . . . . . . . . . . . . . . . . . . . . . . . . . . . . . . . . . . . . . . . . . . . . . . . . . . . . . . . . . . . . . . .47 8.8.2 Fuel Supply System, Bleeding . . . . . . . . . . . . . . . . . . . . . . . . . . . . . . . . . . . . . . . . . . . . . . . . . . . . . . . . . . . . .48 Webasto Thermo & Comfort N.A., Inc. 4 www.techwebasto.com DBW 2010/2020/300 COOLANT HEATERS 9. Repair TABLE OF CONTENTS 49 9.1 General Information . . . . . . . . . . . . . . . . . . . . . . . . . . . . . . . . . . . . . . . . . . . . . . . . . . . . . . . . . . . . . . . . . . . . . . . . . 49 9.1.1 Work on Components after Disassembly . . . . . . . . . . . . . . . . . . . . . . . . . . . . . . . . . . . . . . . . . . . . . . . . . . . . 49 9.1.1.1 Visual Inspection, General . . . . . . . . . . . . . . . . . . . . . . . . . . . . . . . . . . . . . . . . . . . . . . . . . . . . . . . . 49 9.1.1.2 Combustion Chamber, Visual Inspection . . . . . . . . . . . . . . . . . . . . . . . . . . . . . . . . . . . . . . . . . . . . . 49 9.1.1.3 Heat Exchanger, Visual Inspection . . . . . . . . . . . . . . . . . . . . . . . . . . . . . . . . . . . . . . . . . . . . . . . . . . 49 9.1.1.4 Combustion Air Fan Wheel, Visual Inspection . . . . . . . . . . . . . . . . . . . . . . . . . . . . . . . . . . . . . . . . . 50 9.2 Disassembly and Assembly . . . . . . . . . . . . . . . . . . . . . . . . . . . . . . . . . . . . . . . . . . . . . . . . . . . . . . . . . . . . . . . . . . . . 50 9.2.1 Overheat Fuse, Replacement . . . . . . . . . . . . . . . . . . . . . . . . . . . . . . . . . . . . . . . . . . . . . . . . . . . . . . . . . . . . . 50 9.2.1.1 Removal . . . . . . . . . . . . . . . . . . . . . . . . . . . . . . . . . . . . . . . . . . . . . . . . . . . . . . . . . . . . . . . . . . . . . 50 9.2.1.2 Installation . . . . . . . . . . . . . . . . . . . . . . . . . . . . . . . . . . . . . . . . . . . . . . . . . . . . . . . . . . . . . . . . . . . 50 9.2.2 Temperature Control Thermostat, Replacement . . . . . . . . . . . . . . . . . . . . . . . . . . . . . . . . . . . . . . . . . . . . . . . 50 9.2.2.1 Removal . . . . . . . . . . . . . . . . . . . . . . . . . . . . . . . . . . . . . . . . . . . . . . . . . . . . . . . . . . . . . . . . . . . . . 50 9.2.2.2 Installation . . . . . . . . . . . . . . . . . . . . . . . . . . . . . . . . . . . . . . . . . . . . . . . . . . . . . . . . . . . . . . . . . . . 50 9.2.3 Temperature Limiter, Replacement . . . . . . . . . . . . . . . . . . . . . . . . . . . . . . . . . . . . . . . . . . . . . . . . . . . . . . . . . 51 9.2.3.1 Removal . . . . . . . . . . . . . . . . . . . . . . . . . . . . . . . . . . . . . . . . . . . . . . . . . . . . . . . . . . . . . . . . . . . . . 51 9.2.3.2 Installation . . . . . . . . . . . . . . . . . . . . . . . . . . . . . . . . . . . . . . . . . . . . . . . . . . . . . . . . . . . . . . . . . . . 51 9.2.4 Control Unit, Replacement . . . . . . . . . . . . . . . . . . . . . . . . . . . . . . . . . . . . . . . . . . . . . . . . . . . . . . . . . . . . . . 51 9.2.4.1 Removal . . . . . . . . . . . . . . . . . . . . . . . . . . . . . . . . . . . . . . . . . . . . . . . . . . . . . . . . . . . . . . . . . . . . . 51 9.2.4.2 Installation . . . . . . . . . . . . . . . . . . . . . . . . . . . . . . . . . . . . . . . . . . . . . . . . . . . . . . . . . . . . . . . . . . . 51 9.2.5 Burner, Replacement . . . . . . . . . . . . . . . . . . . . . . . . . . . . . . . . . . . . . . . . . . . . . . . . . . . . . . . . . . . . . . . . . . . 51 9.2.5.1 Removal . . . . . . . . . . . . . . . . . . . . . . . . . . . . . . . . . . . . . . . . . . . . . . . . . . . . . . . . . . . . . . . . . . . . . 51 9.2.5.2 Installation . . . . . . . . . . . . . . . . . . . . . . . . . . . . . . . . . . . . . . . . . . . . . . . . . . . . . . . . . . . . . . . . . . . 51 9.2.6 Fuel Valve and Solenoid, Replacement . . . . . . . . . . . . . . . . . . . . . . . . . . . . . . . . . . . . . . . . . . . . . . . . . . . . . . 53 9.2.6.1 Removal . . . . . . . . . . . . . . . . . . . . . . . . . . . . . . . . . . . . . . . . . . . . . . . . . . . . . . . . . . . . . . . . . . . . . 53 9.2.6.2 Installation . . . . . . . . . . . . . . . . . . . . . . . . . . . . . . . . . . . . . . . . . . . . . . . . . . . . . . . . . . . . . . . . . . . 53 9.2.7 Fuel Pump, Replacement . . . . . . . . . . . . . . . . . . . . . . . . . . . . . . . . . . . . . . . . . . . . . . . . . . . . . . . . . . . . . . . . 53 9.2.7.1 Removal . . . . . . . . . . . . . . . . . . . . . . . . . . . . . . . . . . . . . . . . . . . . . . . . . . . . . . . . . . . . . . . . . . . . . 53 9.2.7.2 Installation . . . . . . . . . . . . . . . . . . . . . . . . . . . . . . . . . . . . . . . . . . . . . . . . . . . . . . . . . . . . . . . . . . . 53 9.2.8 Fuel Nozzle, Replacement . . . . . . . . . . . . . . . . . . . . . . . . . . . . . . . . . . . . . . . . . . . . . . . . . . . . . . . . . . . . . . . 54 9.2.8.1 Removal . . . . . . . . . . . . . . . . . . . . . . . . . . . . . . . . . . . . . . . . . . . . . . . . . . . . . . . . . . . . . . . . . . . . . 54 9.2.8.2 Installation . . . . . . . . . . . . . . . . . . . . . . . . . . . . . . . . . . . . . . . . . . . . . . . . . . . . . . . . . . . . . . . . . . . 54 9.2.9 Flame Detector, Replacement . . . . . . . . . . . . . . . . . . . . . . . . . . . . . . . . . . . . . . . . . . . . . . . . . . . . . . . . . . . . 54 9.2.9.1 Removal . . . . . . . . . . . . . . . . . . . . . . . . . . . . . . . . . . . . . . . . . . . . . . . . . . . . . . . . . . . . . . . . . . . . . 54 9.2.9.2 Installation . . . . . . . . . . . . . . . . . . . . . . . . . . . . . . . . . . . . . . . . . . . . . . . . . . . . . . . . . . . . . . . . . . . 54 9.2.10 Ignition Electrodes, Replacement . . . . . . . . . . . . . . . . . . . . . . . . . . . . . . . . . . . . . . . . . . . . . . . . . . . . . . . . . . 55 9.2.10.1 Removal . . . . . . . . . . . . . . . . . . . . . . . . . . . . . . . . . . . . . . . . . . . . . . . . . . . . . . . . . . . . . . . . . . . . . 55 9.2.10.2 Installation . . . . . . . . . . . . . . . . . . . . . . . . . . . . . . . . . . . . . . . . . . . . . . . . . . . . . . . . . . . . . . . . . . . 55 9.2.11 Ignition Coil, Replacement . . . . . . . . . . . . . . . . . . . . . . . . . . . . . . . . . . . . . . . . . . . . . . . . . . . . . . . . . . . . . . 55 9.2.11.1 Removal . . . . . . . . . . . . . . . . . . . . . . . . . . . . . . . . . . . . . . . . . . . . . . . . . . . . . . . . . . . . . . . . . . . . . 55 9.2.11.2 Installation . . . . . . . . . . . . . . . . . . . . . . . . . . . . . . . . . . . . . . . . . . . . . . . . . . . . . . . . . . . . . . . . . . . 55 9.2.12 Drive Motor, Replacement . . . . . . . . . . . . . . . . . . . . . . . . . . . . . . . . . . . . . . . . . . . . . . . . . . . . . . . . . . . . . . . 56 9.2.12.1 Removal . . . . . . . . . . . . . . . . . . . . . . . . . . . . . . . . . . . . . . . . . . . . . . . . . . . . . . . . . . . . . . . . . . . . . 56 9.2.12.2 Installation . . . . . . . . . . . . . . . . . . . . . . . . . . . . . . . . . . . . . . . . . . . . . . . . . . . . . . . . . . . . . . . . . . . 56 9.2.13 Combustion Air Fan, Replacement . . . . . . . . . . . . . . . . . . . . . . . . . . . . . . . . . . . . . . . . . . . . . . . . . . . . . . . . 57 9.2.13.1 Removal . . . . . . . . . . . . . . . . . . . . . . . . . . . . . . . . . . . . . . . . . . . . . . . . . . . . . . . . . . . . . . . . . . . . . 57 9.2.13.2 Installation . . . . . . . . . . . . . . . . . . . . . . . . . . . . . . . . . . . . . . . . . . . . . . . . . . . . . . . . . . . . . . . . . . . 57 9.2.14 Fan Replacement. . . . . . . . . . . . . . . . . . . . . . . . . . . . . . . . . . . . . . . . . . . . . . . . . . . . . . . . . . . . . . . . . . . . . . 58 9.2.15 Fan Shaft, Bearings and Gearing, Exploded View (DBW 2010) . . . . . . . . . . . . . . . . . . . . . . . . . . . . . . . . . . . . 59 9.2.16 Fan Shaft, Bearings and Gearing, Exploded View (DBW 2020 / DBW 300) . . . . . . . . . . . . . . . . . . . . . . . . . . . 60 www.webasto.us 5 Webasto Thermo & Comfort N.A., Inc. TABLE OF CONTENTS DBW 2010/2020/300 COOLANT HEATERS 9.2.17 Combustion Chamber, Replacement . . . . . . . . . . . . . . . . . . . . . . . . . . . . . . . . . . . . . . . . . . . . . . . . . . . . . . .61 9.2.17.1 Removal . . . . . . . . . . . . . . . . . . . . . . . . . . . . . . . . . . . . . . . . . . . . . . . . . . . . . . . . . . . . . . . . . . . . .61 9.2.17.2 Installation . . . . . . . . . . . . . . . . . . . . . . . . . . . . . . . . . . . . . . . . . . . . . . . . . . . . . . . . . . . . . . . . . . .61 9.2.18 Heat Exchanger, Replacement . . . . . . . . . . . . . . . . . . . . . . . . . . . . . . . . . . . . . . . . . . . . . . . . . . . . . . . . . . . .61 9.2.18.1 Removal . . . . . . . . . . . . . . . . . . . . . . . . . . . . . . . . . . . . . . . . . . . . . . . . . . . . . . . . . . . . . . . . . . . . .61 9.2.18.2 Installation . . . . . . . . . . . . . . . . . . . . . . . . . . . . . . . . . . . . . . . . . . . . . . . . . . . . . . . . . . . . . . . . . . .61 9.3 Coolant Circulating Pump Repair. . . . . . . . . . . . . . . . . . . . . . . . . . . . . . . . . . . . . . . . . . . . . . . . . . . . . . . . . . . . . . . .62 9.3.1 Removal . . . . . . . . . . . . . . . . . . . . . . . . . . . . . . . . . . . . . . . . . . . . . . . . . . . . . . . . . . . . . . . . . . . . . . . . . . . .62 9.3.2 Disassembling . . . . . . . . . . . . . . . . . . . . . . . . . . . . . . . . . . . . . . . . . . . . . . . . . . . . . . . . . . . . . . . . . . . . . . . .62 9.3.3 Assembling . . . . . . . . . . . . . . . . . . . . . . . . . . . . . . . . . . . . . . . . . . . . . . . . . . . . . . . . . . . . . . . . . . . . . . . . . .62 9.3.4 Installing . . . . . . . . . . . . . . . . . . . . . . . . . . . . . . . . . . . . . . . . . . . . . . . . . . . . . . . . . . . . . . . . . . . . . . . . . . . .62 9.4 MP School Bus Circulation Pump . . . . . . . . . . . . . . . . . . . . . . . . . . . . . . . . . . . . . . . . . . . . . . . . . . . . . . . . . . . . . . . .64 9.4.1 Removal . . . . . . . . . . . . . . . . . . . . . . . . . . . . . . . . . . . . . . . . . . . . . . . . . . . . . . . . . . . . . . . . . . . . . . . . . . . .64 9.4.2 Disassembling . . . . . . . . . . . . . . . . . . . . . . . . . . . . . . . . . . . . . . . . . . . . . . . . . . . . . . . . . . . . . . . . . . . . . . . .64 9.4.3 Assembling . . . . . . . . . . . . . . . . . . . . . . . . . . . . . . . . . . . . . . . . . . . . . . . . . . . . . . . . . . . . . . . . . . . . . . . . . .64 9.4.4 Installing . . . . . . . . . . . . . . . . . . . . . . . . . . . . . . . . . . . . . . . . . . . . . . . . . . . . . . . . . . . . . . . . . . . . . . . . . . . .64 10.Instruments and Tools 10.1 10.2 10.3 10.4 10.5 10.6 10.7 65 Setting Gauge. . . . . . . . . . . . . . . . . . . . . . . . . . . . . . . . . . . . . . . . . . . . . . . . . . . . . . . . . . . . . . . . . . . . . . . . . . . . . .65 Tester . . . . . . . . . . . . . . . . . . . . . . . . . . . . . . . . . . . . . . . . . . . . . . . . . . . . . . . . . . . . . . . . . . . . . . . . . . . . . . . . . . . .65 CO2 Test Apparatus . . . . . . . . . . . . . . . . . . . . . . . . . . . . . . . . . . . . . . . . . . . . . . . . . . . . . . . . . . . . . . . . . . . . . . . . .65 Smoke Number Test Apparatus . . . . . . . . . . . . . . . . . . . . . . . . . . . . . . . . . . . . . . . . . . . . . . . . . . . . . . . . . . . . . . . . .65 Nozzle Wrench . . . . . . . . . . . . . . . . . . . . . . . . . . . . . . . . . . . . . . . . . . . . . . . . . . . . . . . . . . . . . . . . . . . . . . . . . . . . .66 Fuel Pressure Gauge . . . . . . . . . . . . . . . . . . . . . . . . . . . . . . . . . . . . . . . . . . . . . . . . . . . . . . . . . . . . . . . . . . . . . . . . .66 Grease and Locking Varnish . . . . . . . . . . . . . . . . . . . . . . . . . . . . . . . . . . . . . . . . . . . . . . . . . . . . . . . . . . . . . . . . . . .66 11.Product Information 67 11.1 ISS “White” Timer for the Scholastic Heater™ . . . . . . . . . . . . . . . . . . . . . . . . . . . . . . . . . . . . . . . . . . . . . . . . . . . . .67 Webasto Thermo & Comfort N.A., Inc. 6 www.techwebasto.com DBW 2010/2020/300 COOLANT HEATERS INTRODUCTION 1. INTRODUCTION 1.5 1.1 The general safety regulations for the prevention of accidents and the relevant operating safety instructions have to be observed at all times. SCOPE AND PURPOSE This repair shop manual is intended to support familiarized personnel in the repair of water heaters DBW 2010, 2020 and 300. SAFETY INFORMATION AND REGULATIONS "General Safety Regulations" beyond the scope of these regulations are detailed in the following. The water heater may only be operated with the fuel specified on the model plate and the relevant designated type of electrical connection. The specific safety regulations applicable to this manual are highlighted in the individual chapters by Warnings, Cautions, and Notes. 1.2 1.5.1 APPLICABILITY OF MANUAL The year of first operation must be permanently marked on the identification label by removing the relevant number of the year. This manual is applicable only for heaters identified on the title page. 1.3 The heaters are cleared for heating the vehicle engine and the passenger cabin. The use of the heater in vehicles not subject to the EU Directive 70/156/EEC (e.g. ships) is partly governed by regional regulations. MEANING OF WARNINGS, CAUTIONS AND NOTES WARNINGS, CAUTIONS, and NOTES in this manual have the following meaning: The heater may only be fitted in vehicles or in independent heating systems with a minimum coolant capacity of 10 liters for DBW 2010 and 15 liters for DBW 2020 and 300. DANGER: This heading and text style is used to highlight that non-compliance with instructions or procedures will cause injuries or lethal accidents to personnel. The heater must not be installed in the passenger or driver compartments of vehicles. Should the heater nevertheless be installed in such a compartment, the installation box must be sealed tight against the vehicle interior. WARNING: This heading and text style is used to highlight that non-compliance with instructions or procedures may cause injuries or lethal accidents to personnel. There must be sufficient ventilation of the installation box from the exterior in order not to exceed a maximum temperature of 85° C (185 °F) in the installation box. Excessive temperatures may cause malfunctions. CAUTION: This heading and text style is used to highlight that non-compliance with instructions or procedures may cause damage to equipment. WARNING: Due to the danger of poisoning and suffocation the heater must not be operated, not even with timed operation, in enclosed areas such as garages or workshops not equipped with an exhaust venting facility. NOTE: This heading and text style is used to highlight and draw attention to information we feel you would like to have. It could have to do with procedures and tips that will help you work more efficiently. 1.4 WARNING: At filling stations and fuel depots the heater must be switched off to prevent explosions. ADDITIONAL DOCUMENTATION TO BE USED This workshop manual contains all information and procedures necessary for the repair of heaters DBW 2010, 2020 and 300. CAUTION: Where flammable fumes or dust may build up (e.g. in the vicinity of fuel, coal, wood, cereal depots, or similar installations) the heater must be switched off to prevent explosions. The heater must not be operated near flammable materials such as dry grass and leaves, cardboard boxes, paper, etc. The use of additional documentation is normally not necessary. Operating instructions and installation instructions may be used as complementary information as necessary. www.webasto.us GENERAL SAFETY NOTES 7 Webasto Thermo & Comfort N.A., Inc. INTRODUCTION DBW 2010/2020/300 COOLANT HEATERS Installation Instructions for Webasto fuel tanks for the fuel supply of water heaters in vehicles: In the vicinity of the water heater a temperature of 85° C (185 °F) must not be exceeded under any circumstances (e.g. during body paint work). • in vehicles the installation is not permitted in the passengers’ or driver’s compartment. A violation of this temperature limit may cause permanent damage to the electronics. • the fuel filler neck must not be located in the passengers’ or driver’s compartment of any vehicle. When checking the cooling water level proceed in accordance with the vehicle manufacturer’s instructions. • fuel containers must either be equipped with a vent cap or any other type of ventilation (vent line). The water in the heating circuit of the heater must contain a minimum of 20% of a quality brand antifreeze. Only vent caps in accordance with DIN 73400 may be used. Additives in the heating circuit must not affect metals, plastics and rubber and must leave no deposits. All fuel containers offered in the Webasto Accessories Catalogue are suitable for a maximum operating pressure of 0.15 bar overpressure. The opening pressure in the vehicle cooling system normally indicated on the radiator filler cap - must be between 0.4 and 2.0 bar above operating pressure (also applicable to separate heating circuits). 1.6 All fuel containers offered in the Webasto Accessories Catalogue are subjected during manufacture to individual pressure testing with at least 0.3 bar overpressure. LEGAL PROVISIONS FOR INSTALLATION • The operational state of the heater, i.e. at least an indication "on" or "off" must be easily and clearly visible. DBW series heaters have been type-tested and approved in accordance with EG Directives 72/245/EWG (EMV) and 2001/56/EG (heater) with the following EG permit numbers: For heaters in vehicles not ruled by the EU Directive but other regulations, the acceptance by the relevant authority is required as applicable. e1*2001/56*0006*xx Installation is governed above all by the provisions in Annex VII of Directive 2001/56/EC. 1.7 CORRECTIONS AND IMPROVEMENTS Deficiencies, improvements, or proposals for correction of this workshop manual are to be mailed to: NOTE: The provisions of these Directives are binding within the territory governed by EU Directive 70/156/EEC and should similarly be observed in countries without specific regulations. WEBASTO PRODUCT NORTH AMERICA, INC. TECHNICAL DOCUMENTATION GROUP 15083 NORTH ROAD FENTON MI 48430 (Extract from Directive 2001/56/EC Annex VII) “1.7.1. A clearly visible indicator within the user's field of vision must show when the heater is switched On or Off.” NOTE: For further notes and provisions relating to the installation of the heater in vehicles, refer to the installation instructions. IMPORTANT! Failure to follow the installation instructions and the notes contained therein will lead to all liability being refused by Webasto The same applies if repairs are carried out incorrectly or with the use of parts other than genuine spare parts. This will result in the invalidation of the type approval for the heater and therefore of its homologation / EC type licence. Webasto Thermo & Comfort N.A., Inc. 8 www.techwebasto.com DBW 2010/2020/300 COOLANT HEATERS 2. GENERAL DESCRIPTION GENERAL DESCRIPTION For control and monitoring, the heater includes: – a control unit The water heaters Webasto DBW 2010, DBW 2020, DBW 300 and Scholastic Heater™ are used in combination with the vehicle’s own heating installation to: – an overheat fuse (non-reset) – a temperature limiter – a temperature control thermostat – a flame detector (photo eye) – heat the passenger compartment – defrost the windshield – preheat water-cooled engines A coolant circulating pump is installed directly to the heater or inside an enclosure or on a tray mount. – in self-contained cargo heating applications The heaters may also be equipped with an optional cold starting aid consisting of: The water heater operates independent from the vehicle engine and is connected to the vehicle cooling system, the fuel system and the electrical system. – a preheat thermostat The heater is designed to the heat exchanging principle and operates intermittently, controlled by the temperature control thermostat. – a nozzle holder preheat cartridge – a relay and wiring harness The heaters DBW 2010, DBW 2020, DBW 300 and Scholastic Heater™ basically consist of: – the combustion air intake (adjustable) – the combustion air fan and motor – the fuel pump – the fuel control valve and solenoid – the nozzle holder and nozzle – the ignition coil and ignition electrodes – the combustion chamber – the heat exchanger www.webasto.us 9 Webasto Thermo & Comfort N.A., Inc. GENERAL DESCRIPTION 1 2 3 4 DBW 2010/2020/300 COOLANT HEATERS 5 26 6 25 7 8 9 10 11 12 13 14 24 23 22 21 15 16 20 17 18 19 DBW 2010 1. Electronic control unit 10. Pre-heater 18. Coolant inlet 2. Motor 11. Coolant outlet 19. Heat exchanger 3. Electronic ignition unit 12. Bleeding valve 20. Combustion chamber 4. Coupling (clutch) 13. Ignition electrodes 21. Combustion air swirler 5. Combustion air fan 14. Fuel nozzle 22. Exhaust outlet 6. Toothed gearing 15. Overheat fuse (white wires) 23. Flame detector 7. Preheat thermostat (blue and green wires) 16. Temperature control thermostat (green and red wires)* 24. Fuel pump 8. Fuel control valve and solenoid 17. Temperature limiter (green wires) 26. Combustion air intake with adjusting shutter 9. Electrode holder 25. Fuel pipes *Lower temperature version of the temperature control thermostat has white and orange wires. Webasto Thermo & Comfort N.A., Inc. 10 www.techwebasto.com DBW 2010/2020/300 COOLANT HEATERS 1 2 3 4 26 5 6 25 8 24 10 GENERAL DESCRIPTION 9 18 13 23 22 7 14 21 15 16 11 17 20 19 DBW 2020 DBW 300 1. Electronic control unit 10. Pre-heater 18. Coolant inlet 2. Motor 11. Coolant outlet 19. Heat exchanger 3. Electronic ignition unit 12. Bleeding valve 20. Combustion chamber 4. Coupling (clutch) 13. Ignition electrodes 21. Combustion air swirler 5. Combustion air fan 14. Fuel nozzle 22. Exhaust outlet 6. Toothed gearing 15. Overheat fuse (white wires) 23. Flame detector 7. Preheat thermostat (blue and green wires) 16. Temperature control thermostat (green and red wires) 24. Fuel pump 8. Fuel control valve and solenoid 17. Temperature limiter (green wires) 26. Combustion air intake with adjusting shutter 9. Electrode holder www.webasto.us 11 25. Fuel pipes Webasto Thermo & Comfort N.A., Inc. GENERAL DESCRIPTION 2.1 2.1.1 DBW 2010/2020/300 COOLANT HEATERS PARTS OF THE HEATER 2.1.3 TEMPERATURE LIMITER (17) The temperature limiter is a thermostat that responds (opens) at a temperature of 95° C (203° F). The temperature limiter will automatically reset (closes) once temperature falls well below 95° C (203° F). Once the limiter has reset, the heater will have to be switched off and back on to restore operation. ELECTRONIC CONTROL UNIT (1) The control unit SG 1553 in 12 volt and 24 volt versions is the central component to ensure controlled operation and monitoring of combustion. Temperature Limiter (green wires) Switching temperature – opens at 95° C (203° F) Figure 3: 2.1.4 2.1.2 TEMPERATURE CONTROL THERMOSTAT (16) After the operating temperature has been reached, the temperature control thermostat opens and shuts off the heating cycle and a purge cycle begins. Once the operating temperature drops to the lower temperature threshold of the control thermostat, the thermostat closes and another heating cycle begins, thus, maintaining a consistent coolant temperature. Control unit Figure 1: Temperature Limiter Control Unit OVERHEAT FUSE (15) Temperature Control Thermostat The overheat fuse protects the heater from too high and inadmissible temperatures. The overheat fuse contains a fusible link that reacts when the temperature exceeds 138° C (280° F), and switches the heater off with a purge cycle. Version 1 (red and green wires) – opens at 75 ± 3° C (167 ± 6° F) – closes at 68 ± 5° C (154 ± 9° F) Version 2 (orange and white wires) – opens at 70 ± 3° C (158 ± 6° F) – closes at 60 ± 5° C (140 ± 9° F) Overheat Fuse (white wires) Response temperature 138° C (280° F) Figure 4: Temperature Control Thermostat NOTE: DBW 2020/300 Only. An optional control thermostat could be mounted in the heating system in place of the control thermostat located on the heater. Figure 2: Overheat Fuse Webasto Thermo & Comfort N.A., Inc. 12 www.techwebasto.com DBW 2010/2020/300 COOLANT HEATERS 2.1.5 FLAME DETECTOR (23) 2.1.6 GENERAL DESCRIPTION COMBUSTION AIR INTAKE (26) The air intake socket provides regulation of the combustion air quantity to the fuel quantity atomized by the high-pressure atomizer nozzle. Screw Photo Disc Flame Detector Locking screw Figure 5: Flame Detector and Photo Disc Combustion air The flame detector is a photosensitive, varying resistance element that supplies a “flame” or “no flame” signal to the control unit. Figure 6: Combustion Air Intake Bellows IMPORTANT! The photo disc to which the flame detector is attached must be flat and free floating over the nozzle and electrodes. www.webasto.us 13 Webasto Thermo & Comfort N.A., Inc. GENERAL DESCRIPTION 2.1.7 DBW 2010/2020/300 COOLANT HEATERS COMBUSTION AIR FAN (5) AND MOTOR (2) The motor, through a coupling, drives the combustion air fan, and through a toothed gearing, the fuel pump. The combustion air fan supplies the air necessary for combustion. Rated motor r.p.m.: DBW 2010 4500 RPM There are two different fan designs in use: DBW 2020 5000 RPM DBW 2010 — lateral canal fan DBW 300 5800 RPM DBW 2020/300 — radial fan DBW 2010 Fan wheel Drive motor Cap DBW 2020/300 Figure 7: Combustion Air Fans Webasto Thermo & Comfort N.A., Inc. 14 www.techwebasto.com DBW 2010/2020/300 COOLANT HEATERS 2.1.8 COUPLING (4) GENERAL DESCRIPTION 2.1.10 FUEL PUMP (24) The coupling (clutch) provides the mechanical connection between the motor and the combustion air fan. The fuel pump (single-staged toothed gear pump) delivers the fuel from the tank to the heater and brings it to a pressure of 10 ± 0.5 bar (145 ± 7 psi) for DBW 2010*, DBW 2020 and DBW 300. *DBW 2010 equipped with a 0.35 Gal/hr. nozzle only. For DBW 2010 with 0.40 Gal/hr. nozzle, the fuel pressure should be set to 8 – 0.5 bar (116 – 7 psi). Strainer Figure 8: Pressure Regulation Valve Motor to Fan Coupling (Clutch) NOTE: Before reusing the coupling, it has to be checked for cracks, wear and the condition of the flat portion of the center shaft hole. Too much play on the shaft will result in a load continuous noise. Figure 10: 2.1.9 Fuel Pump Assembly TOOTHED GEARING (6) 2.1.11 FUEL CONTROL VALVE AND SOLENOID (8) The gears drive the fuel pump with a gear ratio of 1:3.5. The fuel solenoid valve interrupts the fuel supply to the atomizer nozzle when the heater is switched off and during a control pause period. When there is no current present, the solenoid valve is closed. Plunger Valve Figure 9: Fuel Pump Drive Gearing Figure 11: NOTE: If signs of wear are showing within the sector of the toothed gearing as well as at the flat portion of the shaft hole of the large gear, the gears will have to be replaced. www.webasto.us 15 Fuel Solenoid Assembly Webasto Thermo & Comfort N.A., Inc. GENERAL DESCRIPTION DBW 2010/2020/300 COOLANT HEATERS 2.1.12 FUEL NOZZLE AND NOZZLE HOLDER (14) 2.1.14 ELECTRONIC IGNITION UNIT (3) The fuel atomizing nozzle is screwed into the nozzle holder. Under pressure, the fuel nozzle atomizes the fuel entering the combustion chamber. The electronic ignition unit develops high voltage of approximately 8000 volts to produce a spark at the tips of the ignition electrodes. The electronic ignition unit is only in operation during the starting phase. IMPORTANT! Never switch on the electronic ignition unit without being connected to the ignition electrodes! Nozzle Holder Nozzle Figure 12: Nozzle Holder and Nozzle 2.1.13 FUEL LINE CONNECTIONS (25) + Black Wire Fuel lines from the fuel tank are connected to the suction and return pipes of the heater in the case of the DBW 2010/2020/300. – Brown Wire Figure 14: The Scholastic Series heater use a single fuel line that is connected to the suction pipe of the heater. There is no return fuel line on this model. Electronic Ignition Unit 2.1.15 IGNITION ELECTRODES (13) The ignition spark is formed between the points of the ignition electrodes, thus starting the combustion process. Dual Line System (DBW 2010/2020/300) Electrodes Figure 15: Setting Gauge Ignition Electrodes and Setting Gauge Single Line System (Scholastic Heater) Figure 13: Fuel Pumps Webasto Thermo & Comfort N.A., Inc. 16 www.techwebasto.com DBW 2010/2020/300 COOLANT HEATERS 2.1.16 COMBUSTION CHAMBER (20), COMBUSTION AIR SWIRLER (21) GENERAL DESCRIPTION 2.1.18 PREHEAT THERMOSTAT (7) The preheat thermostat is installed in the burner head on the back wall (DBW 2010) or on the photo disc (DBW 2020/300). It switches the nozzle holder pre-heating element (10) on which warms the fuel inside the nozzle holder to ensure fuel atomization in severe cold conditions. Within the burner tube of the combustion chamber, the air-fuel mixture is burned. DBW 2010 Preheat Thermostat (blue and green wires) Air Swirler Figure 16: Switching temperature – closes at 0° C (32° F) – opens at 8° C (48° F) DBW 2020/300 Figure 18: Combustion Chambers Preheat Thermostat 2.1.19 PRE-HEATER CARTRIDGE (10) 2.1.17 HEAT EXCHANGER (19) The pre-heater is a heating element located in the fuel nozzle holder. Operated by the preheat thermostat (7), it heats the fuel inside the nozzle holder when the temperature drops below 0° C (32° F). The heat, produced by the combustion process, is transferred to the coolant (water-antifreeze mixture) flowing through the heat exchanger. DBW 2010 Power consumption 130 Watts Red - 12 V Green - 24 V Figure 19: Heating Cartridge DBW 2020/300 Figure 17: Heat Exchangers www.webasto.us 17 Webasto Thermo & Comfort N.A., Inc. GENERAL DESCRIPTION DBW 2010/2020/300 COOLANT HEATERS 2.1.20 COOLANT CIRCULATING PUMP The externally mounted circulation pump ensures proper coolant circulation in the vehicle and heater circuit. The pump is activated by the control unit to operate as long as the heater is in operation. U 4810 The heaters may be operated with circulation pump U 4810 or U 4846 for the DBW 2010 heater, the U 4814, or U 4851 for the DBW 2020 and 300 heaters and a school bus specific, MP coolant pump for the Scholastic Heater™. U 4846 U 4814 U 4851 MP School Bus Pump (Scholastic Heater) Figure 20: Webasto Thermo & Comfort N.A., Inc. 18 Coolant Circulating Pumps www.techwebasto.com DBW 2010/2020/300 COOLANT HEATERS 3. FUNCTIONAL DESCRIPTION 3.1 FUNCTIONAL DESCRIPTION The heater now starts the control idle period. Heater operation is resumed when the temperature drops below the lower operating point of the temperature control thermostat. SWITCH ON Upon switching on the Webasto heater, the operation indicator lamp (A) comes on, the heater motor (C) and the coolant circulating pump (B) begin to run. After about 10 - 25 seconds, the solenoid valve (E) opens and fuel is sprayed into the combustion chamber. At the same time, the electronic ignition unit (D) produces high voltage (8000V) and the fuel - air mixture in the combustion chamber is ignited by the spark on the ignition electrodes. The flame is detected by the flame detector (F), then the electronic ignition unit stops producing high voltage and combustion continues on its own (spark on electrodes is required only to ignite the flame). At this time the heater is working and produces heat. CONTROL IDLE PERIOD 3.2 Switching off the heater stops combustion. The operating indicator light remains on and run-down commences. The combustion air fan and circulation pump are deactivated after approximately 150 seconds. The operating indicator light goes out to indicate the heater is now fully off. A rise in temperature above the upper operating point makes the solenoid valve in the fuel pump shut off the fuel supply initiating the run-down. The flame extinguishes, the combustion air fan and the circulation pump however continue their operation. After approximately 150 seconds run-down is completed with deactivation of the combustion air fan. The circulation pump remains in operation during the control idle period. The operating indicator light also remains on. 3.3 HEATING OPERATION After reaching operating temperature the control unit in conjunction with the temperature control thermostat takes over to provide controlled operation by activation and deactivation of the burner in order to maintain a nearly constant temperature of the heat exchanger (coolant). Reactivation of the heater during run-down is permitted. The burner immediately resumes operation after the runup time. The heating operation is terminated as soon as the upper operating point on the temperature control thermostat is exceeded. 1 A. Green light: operation indicator, control thermostat B. Coolant circulation pump, negative heater C. Heater motor D. Electronic ignition unit E. Fuel solenoid valve F. Flame detector G. Control thermostat 3 2 4 2 5 3 6 7 A B C D E F G 10 - 25s 5 - 25s 8 ~150s 9 10 - 25s 5 - 25s 10 8 1. Switch on 6. Switch off 2. Start 7. Heater stops 3. Combustion 8. Initial cycle 4. Control pause starts 9. Safety delay time 5. Control pause ends www.webasto.us SWITCH OFF 19 9 ~150s 10 10. Purge cycle Webasto Thermo & Comfort N.A., Inc. TECHNICAL DATA DBW 2010/2020/300 COOLANT HEATERS 4. TECHNICAL DATA FUEL FOR DBW SERIES (DIESEL/HEATING OIL/KEROSENE): Diesel fuel, heating oil and kerosene are suitable fuels for the heater. Unless tolerances are shown within the technical data table, a tolerance of ± 10% applies at an ambient temperature of +20 °C (+68 °F) and at the rated voltage and conditions. The Diesel fuel specified by the vehicle manufacturer is suitable as fuel for the heater. Any negative effect caused by additives is not known. When the fuel for the heater is drawn from the vehicle’s fuel tank, the vehicle manufacturer’s specifications concerning additives are to be observed. Any addition of waste oil is not permitted. ELECTRICAL COMPONENTS Control unit, fan and circulation pump motors, solenoid valve, ignition coil, heater cartridge for nozzle block preheater and timer are designed either for 12-volt or 24volt operation. Temperature limiter, overheat fuse, flame detector (photo eye), temperature control thermostat, preheat thermostat and switches are voltage independent components. When changing to cold-resistant fuels, the heater must be operated for approx. 10 minutes to ensure that the fuel pump, nozzle holder, nozzle and lines are filled with the new fuel. When using fuel from a separate fuel tank and at temperatures below 0° C, winter Diesel fuel must be used. NOTE: The allocation of circulation pumps to heater units must be in accordance with coolant resistances. Webasto Thermo & Comfort N.A., Inc. 20 www.techwebasto.com DBW 2010/2020/300 COOLANT HEATERS 4.1 TECHNICAL DATA TECHNICAL DATA OF THE HEATERS HEATER DBW 2010 DESIGN DBW 2020 DBW 300 Coolant heater with high-pressure nozzle HEAT OUTPUT kW (Btu/h) FUEL 13.0 (45,000) 23.3 (80,000) 30.0 (104,000) Diesel #1, #2, Arctic and Kerosene FUEL CONSUMPTION l/h (gal/h – US) (gal/h – Imp.) 1.5 (0.4) (0.3) 4.0 (1.2) (0.9) 3.0 (0.8) (0.7) RATED VOLTAGE V 12 or 24 OPERATING VOLTAGE V 10-14 or 20-28 POWER CONSUMPTION OF HEATER (WITHOUT COOLANT CIRCULATION PUMP) 60 Watts PERMISSIBLE AMBIENT TEMPERATURE DURING OPERATION OF HEATER, CONTROL UNIT AND COOLANT CIRCULATION PUMP: °C (°F) + 85 max. (+ 185 max.) – 40... + 85 (– 40... + 185) 15 3.96 3.3 10 2.65 2.2 PERMISSIBLE OPERATING PRESSURE OF THE COOLANT bar (psi) 0.4-2.0 (6-29) CO2 IN EXHAUST GASES% BY VOL. 10.5... 11.0 CO IN EXHAUST GASES% BY VOL. 0.2 max. SMOKE NUMBER (BOSCH) DIMENSIONS OF THE HEATER INCL. CONTROL UNIT mm (inch) 130 Watts – 40... + 60 (– 40... + 140) PERMISSIBLE STORAGE TEMPERATURE CONTROL UNIT: °C (°F) HEATER, COOLANT CIRCULATION PUMP: °C (°F) MIN. CAPACITY OF COOLING SYSTEM liter (gal. – US) (gal. – Imp.) 120 Watts 3.0 max. L W H WEIGHT OF HEATER INCL. CONTROL UNIT kg (lb) 584 (23) 205 (8.1) 228 (9.0) 680 (26.7) 240 (9.5) 279 (11.0) 15 (33) 22 (48.5) NOTE: Specifications for the Scholastic Heater are the same as the DBW 2010 heater unless otherwise specified. www.webasto.us 21 Webasto Thermo & Comfort N.A., Inc. TECHNICAL DATA 4.2 DBW 2010/2020/300 COOLANT HEATERS TECHNICAL DATA OF THE CIRCULATING PUMPS CIRCULATING PUMP FLOW RATE l/h (gal/min. – US) U 4810 U 4846 U 4814 U 4851 MP Pump 1600 (7.0) against 0.15 bar 700 (3.08) against 0.3 bar 5200 (22.9) against 0.2 bar 6000 (26.4) against 0.4 bar 3406 - 4542 (15 - 20) NOMINAL VOLTAGE 12 or 24 12 or 24 12 or 24 24 12 OPERATING VOLTAGE 10-14 or 20-28 10-14 or 20-28 10-14 or 20-28 20-28 10-14 POWER CONSUMPTION DIMENSIONS mm (inch) WEIGHT Watt L W H kg (lb) RECOMMENDED FOR HEATER* 25 30 104 209 72 166 (6.5) 94 (3.7) 77 (3.0) 180 (7.0) 74 (2.9) 112 (4.4) 248 (9.76) 100 (3.9) 106 (4.17) 285 (11.22) 115 (4.53) 118 (4.64) 214 (8.42) 106 (4.16) 106 (4.16) 0.8 (1.8) 22 (48.5) 2.1 (4.6) 2.8 (6.17) 2.5 (5.5) DBW 2010 DBW2010 DBW 2020 DBW 300 DBW 2020 DBW 300 Scholastic Heater™ *Choice of circulating pump depends on resistance of coolant circuit. 4.3 PERMISSIBLE EXTENSION OF THE CONNECTIONS DBW 2010 DBW 2020 DBW 300 Scholastic Series mm (inch) m (ft) m (ft) 6* (0.25) 10 (33) 2 (6.6) 6* (0.25) 10 (33) 2 (6.6) 6* (0.25) 10 (33) 2 (6.6) 6* (0.25) 10 (33) 2 (6.6) COMBUSTION AIR INTAKE PIPE: internal diameter mm (inch) maximum length m (ft) maximum degree of bends total m (ft) 80 (3.2) 5 (16.5) 270° 80 (3.2) 5 (16.5) 270° 80 (3.2) 5 (16.5) 270° 80 (3.2) 5 (16.5) 270° EXHAUST PIPE: internal diameter mm (inch) 38 (1.5) 5 (16.5) 270° 70 or 80** (2.75 or 3.2**) 5 (16.5) 270° 38 (1.5) m (ft) m (ft) 70 or 80** (2.75 or 3.2**) 5 (16.5) 270° HOSE CONNECTIONS - INLET/OUTLET outside diameter mm (inch) 18 (0.75) 38 (1.5) 38 (1.5) 25 (1.0) TEMPERATURE DIFFERENCE BETWEEN INLET and OUTLET °C (°F) 10 (18) 10 (18) 10 (18) 10 (18) HEATER FUEL LINE: internal diameter maximum length suction head maximum length maximum degree of bends total 5 (16.5) 270° *Other dimensions upon request. **Heaters built until model number DBW 2020.31 and DBW 300.10 inclusively. Webasto Thermo & Comfort N.A., Inc. 22 www.techwebasto.com DBW 2010/2020/300 COOLANT HEATERS TROUBLESHOOTING 5. TROUBLESHOOTING 5.1 QUICK CHECK TROUBLESHOOTING MATRIX PROBLEM Switch On Control Light Blower Motor in Unit Blower Motor in Unit Blower Motor in Unit Coolant Circulating Pump Ignition Spark Combustion Combustion Combustion During Combustion During Combustion Heating Unit 5.2 Vol tag eS upp Ele ctri ly cal F Ele use ctri cal Har Ine nes rtia s an Sw ON itch dC onn /O FF S (Scho ect l Ove a ion wit s t i s c ch rhe or W Heat a t Tem Fus er O irin e (W per nly g ) atu Co re L hite W ntr i i m res ol T i t e ) her r (G Flam mo ree eD sta ete t (G n Wir Co cto es) r ntr een r (P o and hot I g n l Unit o-c Red itio ell) nE Wi res lect Ign ) rod itio es nC Ele o il ctri –C cM oil Wi Fue oto res r l Su ppl y Fue l Pu Fue mp l So Hig lenoid hP Val res ve sur Co eN ola ozz nt C le Co ircu mb lati ust ng ion Exh Pum Air aus p Inta t Sy Hea ke ste m ting Sys tem CHECK, REPAIR OR REPLACE AS NECESSARY No Function OFF after 30 Seconds Inoperative No Prime Cycle No After-run Inoperative Absent Does Not Take Place Stops After 30 Seconds Cannot Be Stopped Light Color Smoke Dark Color Smoke Overheating TESTER INSTRUCTIONS (TESTER P/N 1302691A) 2 1 The tester unit has been designed to quickly check the proper operation of the various heater components. By using the tester in place of the heater control unit, you are able to manually control the heater to test components and actually operate the unit in heating mode. 3 TESTER 440280 for DBW 2010/2020/300 in 12 or 24 Volt Appareil de Contrôle 440280 pour DBW 2010/2020/300 in 12 or 24 Volt Control Thermostat (Aquastat) + – Flame Control (Cellule photoélectrique) 6 The actual testing is completed in two steps, first you perform an individual component test and then a manual start and run test, both designed to pinpoint actual problems in the heater system. 5 On (Ouvert) 4 On (Ouvert) 7 The tester should be used in conjunction with this Service and Repair Manual (P/N 699745) which details complete troubleshooting and repair procedures. Water Pump (Pompe de circulation) Motor (moteur) Ignition Coil (Centrale d'allumage) Solenoid Valve (Aimant d’électrovanne) 5.2.1 TEST PROCEDURES SETUP: 1 2 3 4 5 6 7 LED – input power to heater LED – control thermostat LED – flame detector On/Off switch – water pump On/Off switch – motor Push Button – ignition spark coil Push Button – fuel solenoid valve www.webasto.us A. Remove connector blocks from heater control unit, inspect for loose wires, corrosion and proper wire connections. B. Plug control unit connector blocks into tester. C. Set heater switch/timer to “ON” and turn vehicle heater valve to “FULL” mode (if equipped). D. Proceed to component test procedures. 23 Webasto Thermo & Comfort N.A., Inc. TROUBLESHOOTING DBW 2010/2020/300 COOLANT HEATERS COMPONENT TEST PROCEDURES: Test Step Result If not Tester connected BATTERY LED (1) unit lights up - test input voltage at control terminals B4(+) and B2(-) - check battery connections - check battery voltage CONTROL THERMOSTAT LED (2) lights up - test switch/ timer - test control thermostat on heater Normal operating range - approx. 75 °C (167 °F) or higher open (no heat required) - approx. 68 °C (155 °F) or lower closed (heat required) Push FUEL SOLENOID VALVE button (7) several clicking of solenoid should be times heard - test temperature fuse (if equipped) - test overheat limiter - test solenoid valve Push IGNITION SPARK COIL button (6) sparking should be heard - check electrode gap - test ignition spark coil Turn MOTOR switch (5) “ON“ motor should run - reset *inertia switch (Scholastic Heater Only) - test motor Turn WATER PUMP switch (4) “ON“ pump should run - test pump Table 1. Test procedures and result * INERTIA SWITCH: NOTE: Hold IGNITION SPARK COIL button (5) ON until FLAME DETECTOR LED (3) lights or combustion is heard, then release; in any case do not hold button on for more than 15 seconds or damage to the coil may result. All Scholastic heaters are equipped with a manual reset inertia switch located on the tray floor near the coolant pump. The switch has a round red diaphragm and about the size of a 25 cent piece on top. The purpose of this switch is to stop heater operation in the event the vehicle is involved in an accident or receives a strong impact shock, e.g. hitting a curb. When the switch responds, the fan motor circuit is interrupted thus stopping air and fuel delivery. TEST RESULTS: 1. LED (3) lights and combustion achieved – 2. Combustion achieved but no LED (3) light Always check to make certain the inertia switch has not been tripped. Resetting is accomplished by depressing the red diaphragm on top of the switch. You should hear an audible click whenever the switch is reset. – check flame detector 3. Combustion not achieved and no LED (3) light MANUAL TEST RUN OF HEATER: A. Turn the WATER PUMP switch (4) ON B. Turn the MOTOR switch (5) ON E. C. Push and hold the FUEL SOLENOID VALVE button (7) ON (starts fuel flow to combustion chamber) D. Push and hold the IGNITION SPARK COIL button (6) ON (starts electrodes sparking) until combustion has taken place. Webasto Thermo & Comfort N.A., Inc. operation normal 24 – check fuel nozzle – check fuel pressure – check for blocked fuel lines (dirt or ice) – check ignition electrodes for damage and set gap Heater should now be in heating mode and will continue to run until you release the fuel solenoid valve button (7) which stops fuel flow and extinguishes the flame immediately. Allow the heater to continue running for approximately 30 seconds (cool down) after which, turn the WATER PUMP switch (4) and the MOTOR switch (5) OFF. www.techwebasto.com DBW 2010/2020/300 COOLANT HEATERS TROUBLESHOOTING NOTE: If flame does not stop when the FUEL SOLENOID VALVE button (7) is released, turn MOTOR switch (5) OFF to stop heater. Check and repair fuel solenoid valve accordingly. F. Once the manual test run has been successfully completed, set the heater switch or timer to OFF, remove the tester and reconnect the control unit. Once done, set the switch or timer to ON. If the heater or a heater component does not respond, the control unit is defective. Replace the control unit and retest the heater. NOTE: Since the heater operates in the 68 °C (155 °F) to 75 °C (167 °F) On to Off / Off to On range, and the vehicle engine may be hot [e.g. coolant above 75 °C (167 °F)], the heater will not start until the coolant temperature is below 68 °C (155 °F). THIS IS NORMAL and does not indicate a problem. www.webasto.us 25 Webasto Thermo & Comfort N.A., Inc. TROUBLESHOOTING 5.3 5.3.1 DBW 2010/2020/300 COOLANT HEATERS INSTRUCTIONS FOR FAULT FINDING COMBUSTION STARTS IMMEDIATELY WHEN HEATER IS SWITCHED ON NO Electronic control unit defective YES 5.3.2 HEATER DOES NOT START WHEN SWITCHED ON Voltage on terminal B1, B2 and B4? Are electric fuses defective? Volume on control thermostat? Volume on control thermostat after cooling of coolant in the cycle? Replace fuses and switch heater ON; does fuse release? Feed connection defective Temperature in the cooling cycle too high Control thermostat defective? Are electric fuses defective? Voltage too low? < 18 ± 1V resp. < 9 ± 0.5V Voltage on motor? Under-voltage protection in the control unit has reacted; charge battery Voltage across terminal C2 and C5 of control unit? Control unit defective, replace. Check feed connections to motor for circuit interruptions Is the motor easy to spin up? Is the motor easy to spin up with the nozzle holder plate removed? Motor defective; internal fault Is the motor shaft easy to spin up when removed from mounting? Motor defective; internal fault Replace defective fan shaft bearings / parts Is the large spur gear easily spun? Fuel pump defective; replace fuel pump Motor defective; internal fault Webasto Thermo & Comfort N.A., Inc. 26 www.techwebasto.com DBW 2010/2020/300 COOLANT HEATERS 5.3.3 TROUBLESHOOTING AFTER SWITCHING ON, THE HEATER SWITCHES OFF AFTER APPROX. 30 SECONDS ON FAULT NO Overheat fuse opened? Has temperature limiter (green wires) opened? YES Can you detect the buzzing sound of the ignition coil after approx. 20 seconds? Remove cause for release, e.g. lack of coolant; replace overheat fuse or allow temp. limiter to reset. Voltage across terminal C8 and C5? Does flame detector show resistance >100 kΩ when dark? Check feed connections of control unit for open or interruption Is there the same effect with a new ignition spark coil? Remove intruption or open in circuit Ignition spark coil defective Insulator of electrode defective Flame detector defective Control unit defective Is combustion noise audible? Is fuel splashing out of the fuel nozzle? Does the fuel solenoid valve in the heater open? Does fuel nozzle produce good fuel atomization? Does flame detector show resistance >1.56 kΩ under bright 50 Lux light? Flame detctor defective, replace www.webasto.us Does the fuel solenoid valve in the heater open? Volume on solenoid valve? Fuel solenoid valve defective Voltage on solenoid valve? Check feed connections Are ignition electrodes correctly set with gauge? Adjust ignition electrodes to correct setting with gauge Does the pump deliver fuel? Fuel in the tank? Refill fuel tank Fuel nozzle is blocked, replace nozzle Are all fuel lines tightly connected? Tighten lines, repair leaks or replace leaking gaskets Is the gasket surface of the fuel valve piston or of the air relief drill hole dirty? Remove fuel pump; is the shaft seal okay? Clean or replace Fuel suction line blocked or fuel waxing or water in fuel freezing or fuel tank vent blocked Check air intake and exhaust outlet for blockage. Clean if necessary Viscosity below 20 centiStokes? Magnetic coil of fuel solenoid valve defective 27 Magnetic coil of fuel solenoid valve defective Fuel nozzle is blocked, replace? Replace fuel pump Fuel quality or grade not appropriate for cold weather operation. Switch to a winter grade. Webasto Thermo & Comfort N.A., Inc. TROUBLESHOOTING 5.3.4 DBW 2010/2020/300 COOLANT HEATERS HEATER STARTS ONLY AFTER SEVERAL STARTING ATTEMPTS NO YES 5.3.5 Does smoke emit from the exhaust pipe after failed attempts to start? Possible leakage in fuel suction or return fuel lines resulting in air pockets Continue fault finding according to section 5.3.7 Repair leakage points Does the ignition spark flash over on the high voltage wire? Does the ignition spark flash over on the electrode insulation? High voltage wire defective Ignition electrode(s) defective Possible leakage in fuel suction or return fuel lines Ignition spark coil defective HEATER SWITCHES OFF BY ITSELF DURING OPERATION Does the heater start after repeated starting attempts? Does heater reteact at all? Fuel supply from tank has been interrupted for an extended period of time Heater switches OFF after approx. 30 sec. on fault; continue fault finding according to section 5.3.3 Webasto Thermo & Comfort N.A., Inc. Continue fault finding according to section 5.3.2 28 www.techwebasto.com DBW 2010/2020/300 COOLANT HEATERS 5.3.6 TROUBLESHOOTING HEATER SMOKES NO YES Is combustion air intake or exhaust outlet dirty? Are the gas passages (fins) of the heat exchanger highly soiled? Clean if necessary, correct installation according to instructions Clean according to instructions. (see Sec. 9.1.1.3) Does heater smoke only during start-up? Let heater burn freely (warm up to temp.) Has the air intake bellows been incorrectly set? Are the permissible combustion values adjustable? (see section 10.3) Motor r.p.m. too low Are there restrictions or kinks in the fuel return line? Has the correct fuel been used according to the operating instructions? Observe the recommendations in the operating instructions Because of the return fuel pressure, the flow of the fuel nozzle is too high Check fuel pump pressure; is the pump pressure too high? Is battery voltage, when charged, below 10 V resp. 20 V Adjust according to instructions. (see Sec. 6.2.5) Charge battery Gap distance between the impeller and the housing too great (DBW 2010 and Scholastic only) Replace fuel nozzle Does the heater continue to smoke after adjustment? Motor r.p.m. too low www.webasto.us 29 Webasto Thermo & Comfort N.A., Inc. TROUBLESHOOTING 5.3.7 DBW 2010/2020/300 COOLANT HEATERS HEATER SMOKES NO Does heater smoke more than 20 seconds? Are ignition electrodes set correctly according to setting gauge? YES Does heater smoke after switching OFF? Does heater smoke during operation (also in waves)? Set ignition electrodes correctly with setting gauge Fuel solenoid valve piston is leaky Replace fuel nozzle Did other unsuccessful start attempts precede? Flow through fuel nozzle insufficient, - replace; does heater continue to smoke? Any accumulated fuel in the combustion chamber must be allowed to burn off; Does heater continue to smoke? Replace fuel nozzle Open burner, remove combustion chamber; are there coke deposits visible in the combustion chamber? Clean combustion chamber 5.3.8 HEATER CANNOT BE SWITCHED OFF Is there current through the switch or timer when switched OFF? Do exhaust gases still emit from the exhaust pipe after switching OFF? Electronic control unit defective Switch or timer defective Webasto Thermo & Comfort N.A., Inc. Does heater continue to run more than 180 sec. after switching OFF? Does control thermostat open when the upper set point is reached? Control thermostat defective? No positive voltage on the fuel solenoid valve? Electronic control unit defective Does fuel solenoid valve close (stuck open)? Solenoid valve defective 30 www.techwebasto.com DBW 2010/2020/300 COOLANT HEATERS 6. FUNCTIONAL ADJUSTMENTS FUNCTIONAL ADJUSTMENTS – Measure control unit power supply voltage – Operate heater for approximately 5 min. 6.1 GENERAL – Measure CO2 contents and compare with CO2 diagram This section describes the tests and adjustments on the heater in installed and removed condition to prove its serviceability. WARNING: The heater must not be operated in closed areas like garages or workshops with no exhaust ventilation facilities. To prevent fires do not switch heater on with burner swung open. 6.2 ADJUSTMENTS 6.2.1 ADJUSTMENT OF CO2 CONTENTS It is allowed to change the manufacturer’s setting for combustion air quantity by rotation of the setting ring. CO 2 – + CO 2 Measurement of the CO2 value of the exhaust gas must be performed followed by an adjustment of the combustion air quantity as required in case of: – repairs to the burner head Locking screw – irregularities in combustion – functional checks – nozzle replacement Figure 21: 6.2.1.1 SETTING PROCEDURE Combustion Air / Fuel Mixture Adjustment – Loosen locking screw (refer to Figure above) and reposition shutter with locking screw until rated value is obtained 13 – Tighten locking screw with 1.0 +0.5 Nm and apply screw seal varnish to mark new position 12 11 NOTE: CO2 setting depends on fuel (viscosity) and on geodetic altitude (0.1% per 100 m). 10 CO2 (Vol.-%) 9 8 If proper setting cannot be obtained, proceed as follows: 7 – Check burner head air side for damage and replace if required 6 18 9 20 10 22 11 24 12 26 13 28 14 – Check fuel pump pressure and replace pump if required 30 15 Voltage CO2 - setting at 500 m above sea-level – Check fuel filter and strainer in fuel pump for contamination and replace if required DBW 2010 (Nozzle: 0.35 gph) DBW 2020 (Rev. ≥.33) DBW 300 Fuel pump pressure set to 10 bar (145 psi) www.webasto.us – Adjust fuel pressure – Replace fuel nozzle – Measure burner motor speed 31 Webasto Thermo & Comfort N.A., Inc. FUNCTIONAL ADJUSTMENTS 6.2.2 DBW 2010/2020/300 COOLANT HEATERS FLAME DETECTOR RESISTANCE CHECK 6.2.3 NOTE: The glass bulb of the flame detector and the viewing glass of the window (refer to Fig. 22) are to be cleaned if contaminated. IGNITION ELECTRODE CHECK AND SETTING NOTE: The insulation body of the ignition electrodes must not show any damage. Damaged insulation of the electrodes requires their replacement. Setting ignition electrodes with a spacing beyond the tolerances shown in Fig. 23 may or will cause ignition failures. In case of damage, cracked glass bulb or not obtaining the rated values, replace the flame detector. CHECK NOTE: The ignition electrodes can be set with the setting gauge as shown. In addition the front edge of the setting gauge must rest against the atomizer nozzle and the tips of the electrodes in both notches. – Swing burner head open (see Sec. 8.5.1) – Disconnect flame detector leads – Connect flame detector leads to ohm meter – Cover flame detector glass bulb with your thumb CHECK – Check resistance (rated value: < 20 kOhm) – Uncover flame detector and expose to strong light – Swing burner head open (see Sec. 8.5.1) – Check resistance (rated value: < 200 Ohm) – Insulation body of the ignition electrodes for damages ALTERNATE METHOD USING TESTER (P/N 1302691A) – Electrode spacing with setting gauge according to Fig. 23. – Exchange control unit with tester and swing burner head open (see Sec. 8.5.1). CAUTION: Do not touch the nozzle drilling while measuring the electrode spacing. Keep the electrode setting gauge clean and free of contaminates. – Watch “Flame Control” LED while holding your thumb over the flame detector glass bulb. LED will darken considerably. – Remove your thumb, LED will brighten considerably. (Shine a bright light on the flame detector if in a dimly lit area.) SETTING – Place setting gauge over nozzle as shown. – The fluctuation of the LED between dim and bright will indicate the flame detector is working properly. – Loosen clamp bolt until electrode can be moved with slight effort – If necessary, electrodes can be bent slightly to conform to the setting gauge notches. Grip with pliers at the bending point only. – Once set, snug up clamp bolt and check electrode spacing once again to confirm setting. CAUTION: Do not over-tighten or bottom out clamp bolt. Doing so will distort the clamp causing the electrodes to spread apart. Screw Disc Window If necessary, grip here to bend Flame Detector Setting Gauge P/N 310646 Millimeters Figure 22: Figure 23: Flame Detector Check Webasto Thermo & Comfort N.A., Inc. 32 4.5 ± 0.5 0.5 8 ± 0.5 5± Setting of Ignition Electrodes www.techwebasto.com DBW 2010/2020/300 COOLANT HEATERS 6.2.4 FUNCTIONAL ADJUSTMENTS IGNITION COIL CHECK 6.2.5 WARNING: In some cases, high tension voltage of approx. 8,000 volts produced at the ignition electrodes can be fatal. A pressure gauge and the tester P/N 1302691A is required for performing this test. A suitable gauge with a range from 0 to 15 bar (0 to 220 PSI) can be procured from your authorized Webasto dealer. CAUTION: Do not operate the ignition coil without connection to the ignition electrodes. Doing so will cause damage to the ignition coil. FUEL PUMP CHECK NOTE: The fuel pump and the fuel hoses must be replaced every 5 years. CHECK CHECK – Exchange control unit with tester and swing burner head open (see Sec. 8.5.1). NOTE: Take care when connecting DC voltage to the ignition coil leads. Connect positive to the black lead and negative to the brown lead. – Remove nozzle. – Screw pressure test gauge into nozzle holder. – Swing burner head open (see Sec. 8.5.1) – Switch on heater motor via tester. – Supply DC voltage to coil leads. Positive to black lead and negative to brown lead. – Press fuel solenoid button on tester. – Read pressure gauge. If adjustment is required, release button and turn pump pressure screw 1/8 of a turn at a time in or out to increase or decrease pressure (see Fig. 10 for location of pressure screw). – With ignition coil energized, an ignition spark will jump the ignition electrodes. ALTERNATE METHOD USING TESTER (P/N 1302691A) – Exchange control unit with tester and swing burner head open (see Sec. 8.5.1). – Repeat testing and adjustment steps until pressure is within specified range. – Press and hold the ignition button to activate the ignition coil and observe spark condition. – Switch off heater switch on tester. – Unscrew pressure test gauge. CAUTION: Do not energize ignition coil for a period longer than 15 seconds. CAUTION: Do not damage nozzle bore. – Screw in nozzle and torque to 20 Nm. (15 lb-ft) DBW 2010 w/ 0.40 gph nozzle 8 –0.5 bar (116 –7 psi) DBW 2010 w/ 0.35 gph nozzle 10 ±0.5 bar (145 ±7 psi) DBW 2020 & DBW 300 10 ±0.5 bar (145 ±7 psi) Nozzle Holder Fuel Pump Pressure Test Gauge P/N 600190 + + Black Wire 120 – Brown Wire 80 160 0 220 40 Figure 24: Ignition Coil Check - 200 Gauge Face Pressure Regulator Figure 25: www.webasto.us 33 Fuel Pressure Check Webasto Thermo & Comfort N.A., Inc. FUNCTIONAL ADJUSTMENTS 6.2.6 DBW 2010/2020/300 COOLANT HEATERS FUEL SOLENOID VALVE CHECK 6.2.7 NOZZLE BLOCK PRE-HEATER CHECK At a temperature of <0° C (<32° F) the heater cartridge in the nozzle block is activated. The heating period depends on the heat reflected within the combustion chamber. NOTE: A leaking solenoid valve seat or valve results in a rather long smoke emission period during run-down. In this case fuel keeps dripping through the fuel nozzle. Short smoke emissions are normal caused by clearing the area between the solenoid valve and the nozzle bore. Preheating is deactivated when the thermostat ambient temperature is +8° C (46° F). Power consumption is 130 ±13 Watts. CHECK CHECK – Exchange control unit with tester P/N 1302691A and swing burner head open (see Sec. 8.5.1). – Swing burner head open (see Sec. 8.5.1) – Press fuel solenoid button on tester several times. You should hear an audible clicking sound indicating that the fuel solenoid valve is functioning. If no clicking can be heard, valve and or solenoid may require replacement (see Sec. 9.2.6). – Connect ohmmeter to connector Webasto Thermo & Comfort N.A., Inc. – Disconnect electrical connector – Using cooling spray to cool down thermostat – Resistance (max. 4.5 ). 34 www.techwebasto.com P2 P1 S4 S3 R S1 S2 P2 GRAY 1 6 4 BLACK YELLOW 6 7 8 3 GRAY 3 5 1 6 4 BROWN RED BLACK YELLOW 5 6 7 8 4 2 BLUE/YELLOW 2 VIOLET 5 BROWN RED 5 4 2 3 BLUE/YELLOW 3 9 2 VIOLET RED DASH LAMPS (OPTIONAL) YELLOW RED BROWN DASH LAMPS (OPTIONAL) YELLOW RED BROWN VEHICLE IGNITION + RED/YELLOW RED WIRING CABLE TO THE HEATER WIRING CABLE TO THE HEATER BT F3 F2 F1 t° TO TIMER OPTION S1 S2 BROWN BROWN BROWN YELLOW RED BLUE GREEN BLACK RED K 86 RED 87 85 RED/YELLOW BROWN DS BROWN BLUE K L1 L2 M1 M2 P1 RED RED 30 BROWN RED RED BROWN GREEN BLACK BLUE HR 2 5 6 3 1 B A 4 1 2 5 M2 BROWN BLACK BLACK M 2 2 1 A t° 1 4 1 2 5 B 6 S3 7 4 4 S4 BROWN t° 5 3 6 WHITE WHITE M1 M ORANGE ORANGE BATTERY INDICATOR LIGHT IGNITION ELECTRODES FUSE 20A FUSE 7.5A FUSE 25A HEATING ELEMENT (fuel pre-heater) RELAY (fuel pre-h eater) SOLENOID VALVE IGNITION COIL COOLANT CIRCULATION PUMP HEATER MOTOR 7-DAY TIMER (with adapter harness configured for bus and coach use) 7-DAY TIMER (with adapter harness configured for truck use) FLAME DETECTOR ON / OFF SWITCH (heater) PREHEAT (FUEL) THERMOSTAT (green and blue wires) CONTROL THERMOSTAT (white and orange wires) TEMPERATURE LIMITER (green and green wires) BLUE GREEN 35 GREEN BT DS E F1 F2 F3 HR 3 1 5 2 1 VIOLET 2 6 C C L1 3 7 4 8 VIOLET www.webasto.us BROWN BLUE BROWN R 6 YELLOW – + E HEATER L2 8 CONTROL UNIT GREEN Figure 26: BLACK 7.1 BROWN DBW 2010/2020/300 COOLANT HEATERS CIRCUIT DIAGRAMS 7. CIRCUIT DIAGRAMS DBW 2010 12 V AND 24 V - EARLY CANADIAN VERSION Schematic - DBW 2010 Early Canadian Version Webasto Thermo & Comfort N.A., Inc. K L1 L2 BT DS E F1 F2 F3 F4 HR BT S1 BROWN RED BATTERY INDICATOR LIGHT IGNITION ELECTRODES FUSE 15A FUSE 10A FUSE 15A FUSE 20A HEATING ELEMENT (fuel pre-heater) RELAY (fuel pre-heater) SOLENOID VALVE IGNITION COIL BLACK DS BROWN RED RED RED GREEN X1 X2 S4 S3 M1 M2 R S1 S2 X1 J H G F E A C D 1 2 3 4 7 6 5 COOLANT CIRCULATION PUMP HEATER MOTOR FLAME DETECTOR ON / OFF SWITCH (heater) PREHEAT (FUEL) THERMOSTAT (green and blue wires) CONTROL THERMOSTAT (white and orange wires) TEMPERATURE LIMITER (green and green wires) 9-PIN HARNESS CONNECTOR (round) 3-WAY INTERFA CE CONNECTOR BROWN BROWN 8 F1 F2 F3 F4 BROWN RED RED RED RED/YELLOW RED/BLACK GREEN VIOLET BROWN WHITE BLACK 30 87 K HR RED RED B M YELLOW BROWN BLUE WHITE M1 t° 85 86 S2 BLACK BROWN BROWN GREEN BROWN BLUE 6 2 5 4 3 1 2 1 M2 5 B A M 2 2 1 A t° 1 4 1 6 2 5 B WHITE S3 t° 5 7 3 6 4 4 S4 BROWN WHITE VIOLET 3 1 5 2 3 7 1 VIOLET 2 6 C L1 C 4 8 BROWN R 6 – + E HEATER L2 8 CONTROL UNIT BLUE BROWN ORANGE ORANGE BLOWER INTERFACE OPTION BLACK BROWN BLUE GREEN 36 GREEN X2 B A C VIOLET Webasto Thermo & Comfort N.A., Inc. BROWN GREEN Figure 27: YELLOW 7.2 BLACK CIRCUIT DIAGRAMS DBW 2010/2020/300 COOLANT HEATERS DBW 2010 12 V AND 24 V - PRESENT NORTH AMERICAN VERSION Schematic - DBW 2010 Present Version www.techwebasto.com BROWN BLUE BLACK X1 X2 X3 S4 CONTROL THERMOSTAT (green and red wires) TEMPERATURE LIMITER (green and green wires) 9-PIN HARNESS CONNECTOR (round) 2-WAY CONNECTOR 2-WAY CONNECTOR A B C GREEN S3 RED BLACK GREEN BROWN BROWN BROWN RED RED BATTERY INDICATOR LIGHT IGNITION ELECTRODES FUSE 15A FUSE 20A FUSE 15A OVERHEAT FUSE 138°C FUSE 30A FUSE 15A RELAY (on / off switch) SOLENOID VALVE IGNITION COIL COOLANT CIRCULATION PUMP HEATER MOTOR FLAME DETECTOR ON / OFF SWITCH (heater) S1 DS BROWN G BROWN H WHITE J D BROWN RED RED BT DS E F1 F2 F3 F4 F5 F6 K1 L1 L2 M1 M2 R S1 BT RED F5 X1 E F BROWN RED GREEN X2 ORANGE 2 M 1 K1 86 85 BROWN M1 30 87 BROWN GREEN BLACK GREEN BROWN BLACK 2 5 6 3 1 4 1 2 M2 5 B A BLACK M 2 2 1 A ORANGE WHITE RED ORANGE BLUE RED F6 t° 1 4 1 6 2 5 B WHITE S3 t° 5 7 3 6 4 4 S4 BROWN RED B A ORANGE GREEN X3 3 1 5 WHITE F1 2 1 3 7 C 4 8 L1 VIOLET F4 2 6 C BROWN R 6 – + E HEATER L2 8 CONTROL UNIT BLUE F3 F2 BLUE GREEN 37 GREEN YELLOW E F C D A B VIOLET www.webasto.us BROWN GREEN Figure 28: BLACK 7.3 BROWN DBW 2010/2020/300 COOLANT HEATERS CIRCUIT DIAGRAMS DBW 2020 / 300 12 V AND 24 V - WITHOUT NOZZLE PREHEAT Schematic - DBW 2020 / 300 Without Nozzle Preheat Webasto Thermo & Comfort N.A., Inc. BROWN X1 X2 X3 S4 S3 BT DS E F1 F2 F3 F4 F5 F6 HR K1 K2 L1 L2 M1 M2 R S1 S2 BT RED BLACK GREEN A B C G BROWN H WHITE J D BROWN RED RED BLUE BLACK GREEN BROWN BROWN BROWN RED RED BATTERY INDICATOR LIGHT IGNITION ELECTRODES FUSE 15A FUSE 20A FUSE 15A OVERHEAT FUSE 138°C FUSE 30A FUSE 15A HEATING ELEMENT (fuel pre-heater) RELAY (on / off switch) RELAY (fuel pre-heater) SOLENOID VALVE IGNITION COIL COOLANT CIRCULATION PUMP HEATER MOTOR FLAME DETECTOR ON / OFF SWITCH (heater) PREHEAT (FUEL) THERMOSTAT (blue and blue wires) CONTROL THERMOSTAT (green and red wires) TEMPERATURE LIMITER (green and green wires) 9-PIN HARNESS CONNECTOR (round) 3-WAY CONNECTOR 2-WAY CONNECTOR S1 DS BROWN RED F5 GREEN K2 86 85 BROWN ORANGE 30 87 K1 2 t° BROWN X2 86 85 3 S2 1 30 87 WHITE M1 HR BROWN GREEN BLACK GREEN BROWN BLACK BROWN WHITE M BLACK WHITE X1 E F 2 5 6 3 1 4 1 2 M2 5 B A M 2 2 1 A ORANGE WHITE RED RED ORANGE BLUE RED F6 t° 1 4 1 6 2 5 B WHITE S3 t° 5 7 3 6 4 4 S4 BROWN RED B A ORANGE GREEN X3 WHITE BLUE WHITE BLUE BLACK BROWN BLUE GREEN 38 GREEN F1 3 1 5 WHITE F3 F2 2 1 3 7 C 4 8 L1 VIOLET F4 2 6 C VIOLET Webasto Thermo & Comfort N.A., Inc. BROWN BROWN R 6 – + E HEATER L2 8 CONTROL UNIT GREEN E F C D A B BLUE Figure 29: YELLOW 7.4 BLACK CIRCUIT DIAGRAMS DBW 2010/2020/300 COOLANT HEATERS DBW 2020 / 300 12 V AND 24 V - WITH NOZZLE PREHEAT Schematic - DBW 2020 / 300 With Nozzle Preheat www.techwebasto.com BROWN BROWN X1 X2 S4 S3 I K1 K2 L1 L2 M1 M2 R S1 S2 BT DS E F1 F2 F3 F4 F5 HR BT WHITE GREEN BLACK RED BROWN J D C B A G H BROWN GRAY GREEN BLACK BLUE BROWN BROWN BATTERY INDICATOR LIGHT IGNITION ELECTRODES FUSE 15A FUSE 20A FUSE 15A OVERHEAT FUSE 138°C FUSE 30A HEATING ELEMENT (fuel pre-heater) INERTIA SAFETY SWITCH RELAY (on / off switch) RELAY (fuel pre-heater) SOLENOID VALVE IGNITION COIL COOLANT CIRCULATION PUMP HEATER MOTOR FLAME DETECTOR ON / OFF SWITCH (heater) PREHEAT (FUEL) THERMOSTAT (blue and blue wires) CONTROL THERMOSTAT (green and red wires) TEMPERATURE LIMITER (green and green wires) 9-PIN HARNESS CONNECTOR (round) 3-WAY CONNECTOR DS S1 BROWN BROWN RED X2 2 1 3 BROWN WHITE GREEN 3 1 K2 86 85 87 BROWN t° 30 BROWN S2 HR BROWN GRAY 2 5 30 BLACK 4 GRAY (Remote pump activation) 86 85 87 1 2 6 GREEN ORANGE BLACK K1 BROWN BLUE GREEN BLACK RED WHITE BLUE RED M WHITE BLUE RED BROWN WHITE RED BROWN RED BLACK WHITE I M2 5 B A BLACK 2 1 A 2 M BLACK M1 t° 1 4 1 6 2 5 B WHITE S3 t° 5 7 3 6 4 4 S4 BROWN RED X1 E F ORANGE GREEN F5 3 1 5 WHITE F1 BLUE GREEN 39 BROWN 2 1 3 7 C 4 8 L1 VIOLET F4 2 6 C BROWN R 6 – + E HEATER L2 8 CONTROL UNIT GREEN F3 F2 BLUE RED RED ORANGE BLUE RED E F C D A B VIOLET www.webasto.us GREEN YELLOW Figure 30: BLACK 7.5 BROWN DBW 2010/2020/300 COOLANT HEATERS CIRCUIT DIAGRAMS SCHOLASTIC HEATER 12 V - WITH ON/OFF SWITCH Schematic - Scholastic Heater™ With On/Off Switch Webasto Thermo & Comfort N.A., Inc. P1 I K1 K2 L1 L2 BT E F1 F2 F3 F4 F5 HR 1 6 4 RED BLACK YELLOW 6 7 8 BATTERY IGNITION ELECTRODES FUSE 15A FUSE 20A FUSE 15A OVERHEAT FUSE 138°C FUSE 30A HEATING ELEMENT (fuel pre-heater) INERTIA SAFETY SWITCH RELAY (heater activation) RELAY (fuel pre-heater) SOLENOID VALVE IGNITION COIL 5 3 2 9 WHITE GREEN BLACK RED BROWN BROWN GRAY BLUE/YELLOW VIOLET VIOLET BROWN BROWN RED 5 4 3 2 TO TIMER BT C D J B A G H X1 X2 X3 X4 S4 S3 M1 M2 P1 R S2 RED ORANGE BLUE WIRING CABLE TO THE HEATER RED X2 2 1 3 BROWN WHITE GREEN 3 1 K2 86 85 87 BROWN t° 30 BROWN S2 HR BROWN GRAY 2 5 30 BLACK 4 GRAY (Remote pump activation) 86 85 87 1 2 6 BLACK K1 BROWN BLUE GREEN BLACK RED ORANGE GREEN COOLANT CIRCULATION PUMP HEATER MOTOR 7-DAY TIMER MODEL 1529 FLAME DETECTOR PREHEAT (FUEL) THERMOSTAT (blue and blue wires) CONTROL THERMOSTAT (green and red wires) TEMPERATURE LIMITER (green and green wires) HARNESS CONNECTOR (round) 3-WAY CONNECTOR TIMER HARNESS CONNECTOR TIMER CONNECTOR DASH LAMPS (OPTIONAL) BLACK RED WHITE GREEN RED VEHICLE IGNITION + BROWN GRAY GREEN BLACK BLUE BROWN BROWN RED M WHITE BLUE 7-DAY TIMER 1529 M1 WHITE BLUE RED E F C D A B BROWN WHITE RED BLACK WHITE X1 E F BROWN RED I M2 5 B A M 2 2 1 A t° 1 4 1 6 2 5 B WHITE S3 t° 5 7 3 6 4 4 S4 BROWN RED F5 ORANGE GREEN BLACK BLACK BROWN BLUE GREEN 40 GREEN RED 3 1 5 WHITE F1 2 1 3 7 C 4 8 L1 VIOLET F4 2 6 C BROWN R 6 – + E HEATER L2 8 CONTROL UNIT BLUE F3 F2 VIOLET Webasto Thermo & Comfort N.A., Inc. BROWN YELLOW Figure 31: GREEN 7.6 BLACK CIRCUIT DIAGRAMS DBW 2010/2020/300 COOLANT HEATERS SCHOLASTIC HEATER 12 V - WITH 7-DAY TIMER MODEL 1529 Schematic - Scholastic Heater™ With Digital 7-Day, 3 Program Timer Model 1529 www.techwebasto.com P2 I K1 K2 L1 L2 BT E F1 F2 F3 F4 F5 HR 5 BROWN 4 6 4 RED BLACK YELLOW 11 2 1 BATTERY IGNITION ELECTRODES FUSE 15A FUSE 20A FUSE 15A OVERHEAT FUSE 138°C FUSE 30A HEATING ELEMENT (fuel pre-heater) INERTIA SAFETY SWITCH RELAY (heater activation) RELAY (fuel pre-heater) SOLENOID VALVE IGNITION COIL 1 BROWN 12 2 3 X3 WHITE GREEN BLACK C D J B A G H X1 X2 X3 X4 BROWN BLUE X2 2 1 3 3 1 K2 86 85 87 BROWN t° 30 BROWN S2 HR BROWN GRAY 2 5 BROWN WHITE GREEN 4 1 2 GRAY (Remote pump activation) 30 BLACK GREEN BLACK RED 6 86 85 87 M ORANGE COOLANT CIRCULATION PUMP HEATER MOTOR 7-DAY TIMER MODEL 1531 FLAME DETECTOR PREHEAT (FUEL) THERMOSTAT (blue and blue wires) CONTROL THERMOSTAT (green and red wires) TEMPERATURE LIMITER (green and green wires) HARNESS CONNECTOR (round) 3-WAY CONNECTOR TIMER HARNESS CONNECTOR TIMER CONNECTOR DASH LAMPS (OPTIONAL) VEHICLE IGNITION + BROWN GRAY GREEN M1 M2 P2 R S2 S4 RED BLACK BLACK S3 BLUE WIRING CABLE TO THE HEATER ORANGE BLACK WHITE RED RED K1 GREEN BLUE BROWN BROWN RED GREEN BROWN BROWN RED RED GRAY VIOLET BROWN 8 10 X4 TO TIMER BT WHITE BLUE 7-DAY TIMER 1531 M1 WHITE BLUE RED E F C D A B BROWN RED BROWN WHITE I M2 5 B A BLACK 2 1 A 2 M BLACK X1 E F BLACK WHITE t° 1 4 1 6 2 5 B WHITE S3 t° 5 7 3 6 4 4 S4 BROWN RED RED ORANGE GREEN F5 3 1 5 WHITE RED 2 1 3 7 C 4 8 L1 VIOLET F4 2 6 C BROWN R 6 – + E HEATER L2 8 CONTROL UNIT BLUE F1 BLUE GREEN 41 GREEN YELLOW F3 F2 VIOLET www.webasto.us BROWN GREEN Figure 32: BLACK 7.7 BROWN DBW 2010/2020/300 COOLANT HEATERS CIRCUIT DIAGRAMS SCHOLASTIC HEATER 12 V - WITH 7-DAY TIMER MODEL 1531 Schematic - Scholastic Heater™ With Digital 7-Day, 3 Program Timer Model 1531 Webasto Thermo & Comfort N.A., Inc. CIRCUIT DIAGRAMS 7.8 DBW 2010/2020/300 COOLANT HEATERS CONTROL UNIT - IDENTIFICATION OF TERMINALS 1 2 A 1 4 2 5 B Figure 33: 1 5 3 6 2 6 4 7 8 C Control Unit - Identification of Terminals CONNECTOR BLOCK A CONNECTOR BLOCK C A1 (–) coolant circulating pump A2 (+) coolant circulating pump C1 (+) To temperature control thermostat* C2 (+) To Blower motor C4 (+) To overheat fuse, temperature limiter and fuel solenoid valve C5 (–) For all heater components C6 (–) Flame detector C7 (+) From normally closed control thermostat C8 (+) To ignition coil CONNECTOR BLOCK B B1 B2 B3 B4 B5 B6 (+) On/Off switch with low voltage protection (–) Battery negative (+) Control light (Operation indicator) (+) Battery positive (+) Optional coolant pump control input (–) Control light (Operation indicator) * Control thermostat with white and orange wires. Closes at 60 ± 5° C (140 ± 9° F) Opens at 70 ± 3° C (158 ± 6° F) * Control thermostat with red and green wires. Closes at 68 ± 5° C (154 ± 9° F) Opens at 75 ± 3° C (167 ± 6° F) Webasto Thermo & Comfort N.A., Inc. 42 www.techwebasto.com DBW 2010/2020/300 COOLANT HEATERS 8. SERVICING 8.1 every four weeks for 20 minutes setting the heating system to "warm". This avoids difficulties in the startup. GENERAL • at least once a year, in case of contaminated fuel more often, the fuel filter or filter cartridge as well as the filter screen of the fuel pump must be replaced to avoid malfunctions. This section describes the servicing work that can be carried out on the heater when it is installed. 8.2 SERVICING HEATER SERVICING • at least once a year the heat exchanger must be cleaned inside. Maintenance of the heater is necessary for proper operation and long life. Read and understand the recommendations and procedures explained in this manual before attempting to service or repair. • in case of leakage the fuel pump and the fuel lines must be replaced immediately, otherwise every 5 years. If you wish to carry out extensive repair work on the heater, it may be a good idea to remove it completely. • the heater should be checked on regular intervals by a Webasto service agent, the latest before the beginning of the heating season. The battery must not be disconnected while the heater is running, otherwise the heater will overheat. 8.5.1 After working on the heating circuit replenish with a coolant mix prepared with water and anti-freeze and bleed circuit afterwards according to manufacturer’s instructions. 8.3 BURNER HEAD OPENING AND CLOSING WARNING: The ignition system operates with high voltage. Prior to opening the burner head the power source to the heater has to be disconnected to prevent lethal injuries. After closing and fixing burner head, reconnect connectors in the vehicle. VEHICLE SERVICING CAUTION: A temperature of 85 °C (185 °F) must not be exceeded in the vicinity of the heater in any circumstances (for example when completing painting work on the vehicle). NOTE: Maintenance on the heater is easy. By swinging the burner head open the following components become accessible: – fuel pump and fuel nozzle If the vehicle requires electric welding, the heater must be electrically disconnected from the vehicle (both “+” and “–”). – solenoid valve – ignition electrodes – flame detector (photo eye) 8.4 HEATER TEST RUN – combustion chamber – nozzle block pre-heater (if installed) The heater must not be operated, not even with the timer, in enclosed areas like garages or workshops not equipped with exhaust ventilation facilities. 8.5 In order to obtain a convenient burner head opening angle it may be required to disconnect the electrical connections at the control unit. MAINTENANCE OPENING OR REMOVAL 1. Disconnect electrical connections at control unit if required. NOTE: The heater should be operated for approximately 20 minutes every 4 weeks to prevent mechanical parts seizing. 2. Loosen nuts (item 3, Fig. 34) enough to release hinge bolts (2). To ensure functional reliability of the heater the following maintenance must be performed: 3. Swing hinge bolts (2) out of way. 4. Swing burner head (4) open. • check combustion air inlet and exhaust outlet for contamination and clean as required. CLOSING OR INSTALLATION • outside the heating season the heater should be operated with the vehicle engine cold approximately www.webasto.us 1. Swing burner head to the closed position. 2. Swing hinge bolts (2) to locking position. 43 Webasto Thermo & Comfort N.A., Inc. SERVICING DBW 2010/2020/300 COOLANT HEATERS 3. Torque nuts (3) to: DBW 2010: 4.0 - 4.5 Nm (35.5 - 40.0 lb-in.). DBW 2020/300: 7.5 - 8.5 Nm (66 - 75 lb-in.). 1 2 3 4 4. Reconnect electrical connections to the control unit. Cotter pin Hinge Bolts (2) Nut (2) Burner head 1 2 3 4 NOTE: Depending on the burner head direction of swing, the cotter pin may be located to the opposite side. CAUTION: Always use hinge bolts to lock burner head in place. Figure 34: Burner Head Attachment Webasto Thermo & Comfort N.A., Inc. 44 www.techwebasto.com DBW 2010/2020/300 COOLANT HEATERS 8.6 VISUAL INSPECTIONS AND REGULATIONS FOR INSTALLATION SERVICING to DIN 73378 observing the applicable jointing instructions. Basic rules for the routing of fuel lines are: 8.6.1 CONNECTION TO VEHICLE COOLING SYSTEM • Protect against undue temperatures. The installation of the heater should be in a location as low as possible to ensure self-venting of the heater and circulation pump. This applies in particular for the circulation pump because it is not self-priming. WARNING: In overheat condition the heater outer shell may reach the flash point temperature of Diesel fuel! The cooling system coolant capacity must be at least 10 liters. The vehicle cooling system or the separate heating circuit must use only pressure relief valves with an opening pressure of at least 0.4 bar and of max. 2.0 bar. • Protect lines from stone strikes and debris that could damage them and result in leakage. • Dripping or evaporating fuel must not be allowed to accumulate or ignite on hot components or electrical equipment. It is a basic requirement to use the coolant hoses supplied by Webasto, otherwise the hoses must at least meet the specifications of DIN 73411. The hoses have to be installed free of kinks and for proper venting in an inclination. Hose connections must be secured against slippage with hose clamps. The installation of an additional fuel pump is not allowed. Fuel lines permissible dimensions: • Inner diameter for suction and return line: 6 mm (except Scholastic Heater™). NOTE: The specified tightening torques of the hose clamps used must be complied with. • Scholastic Heater™ inner diameter for suction line: 3/16 inches. • Maximum permissible length for each suction and return line: 10 m Prior to the heater’s first operation or after replacement of the coolant, attention must be paid to carefully bleed the cooling system. Heater and lines must be installed so that static venting is guaranteed. • Maximum permissible suction height: 2 m • Maximum permissible priming pressure: 0.3 bar for suction and return line. Improper venting may cause malfunctions by overheating in equipment operation. 8.6.2.2 FUEL FILTER Proper venting may be identified by a circulation pump almost noiseless in operation. A fuel filter supplied as deliverable item or cleared for use 8.6.2 Installation position possibly vertical with horizontal direction of flow. To avoid operating malfunctions replace filter or filter cartridge once a year or more often if fuel is contaminated. by Webasto is to be fitted. CONNECTION TO VEHICLE FUEL SYSTEM Fuel is tapped from the fuel reservoir of the vehicle or from a separate fuel tank. 8.6.2.1 FUEL LINES 8.6.3 In order to avoid air from being captured in fuel lines, they should only be installed with an incline. The fuel line joints are to be secured against slipping with hose clamps should no screwed mechanical unions be in use. CAUTION: Observe official regulations concerning the installation (see 1.6). Combustion air must under no circumstances be extracted from rooms with persons. The combustion air inlet must not point towards the forward direction of motion. Should fuel hoses be installed always use the hoses supplied or offered by Webasto. If other hoses are used they must at least meet the specifications of DIN733791C; type 3. Fuel hoses must not be kinked or twisted and must be secured with clamps every 25 cm (10 in.). It must be located so that no clogging by contamination, impact of snow, or intake of splash water is to be expected. Also, fuel lines may be used consisting of materials standard in the manufacturing of vehicles, e.g. steel or plastic lines made of unhardened, light and temperature stabilized PA11 or PA12 (e.g. Mecanyl RWTL) according www.webasto.us COMBUSTION AIR SUPPLY The combustion air intake and exhaust outlet is to be located so that no air pressure difference builds up in any operating condition of the vehicle. 45 Webasto Thermo & Comfort N.A., Inc. SERVICING DBW 2010/2020/300 COOLANT HEATERS The combustion air inlet must be located so that no exhaust fumes can enter. – replacement of temperature limiter If the heater is located near the fuel tank in a common installation compartment, combustion air must be taken in from and the exhaust routed to the exterior. The feedthrough holes must be sealed against splash water. – replacement of overheat fuse If the heater is located in a closed installation box, a vent port is required: – replacement of nozzle preheat cartridge • DBW 2010: 20 cm2 (3.1 inch2) – replacement of ignition coil • DBW 2020/300: 30 cm2 (4.65 inch2) – replacement of flame detector – replacement of temperature control thermostat – replacement of burner – replacement of fuel atomizing nozzle – replacement of nozzle preheat thermostat – replacement of combustion chamber If the temperature in the installation box exceeds the permitted ambient temperature of the heater (see Technical Data), the vent port must be enlarged. – replacement of control unit 8.7.1 8.6.4 HEATER, REMOVAL AND INSTALLATION EXHAUST LINE 8.7.1.1 REMOVAL CAUTION: Observe official regulations concerning the installation (see 1.6). 1. Disconnect connectors of cable harness in vehicle and of circulation pump. The exhaust pipe outlet opening must not point in the direction of motion. 2. Disconnect combustion air intake on heater if equipped. The exhaust pipe outlet opening must be located so as not to expect clogging by snow or mud. 3. Loosen clamp on exhaust outlet. 4. Loosen fuel supply and return line connections and fit dummy plugs. Close water valves as applicable. The combustion air intake and exhaust outlet is to be located so that no air pressure difference builds up in any operating condition of the vehicle. 5. Loosen hose clamps on coolant hoses, disconnect hoses and fit dummy plugs. 6. Remove 3 screws and washers or 4 screws and washers of heater base. Rigid pipes made of unalloyed or alloyed steel with a minimum wall thickness of 1.0 mm have to be used as exhaust line or flexible pipes made of alloyed steel only. 7. Remove heater. The exhaust pipe is secured to the air heater e.g. with a clamp. 8.7.1.2 INSTALLATION – Permissible exhaust line dimensions: 1. Locate heater for installation and secure with 3 screws and washers or 4 screws and washers. DBW 2010 = 38 mm (1.5 in.) 2. Secure line on exhaust outlet using clamp. DBW 2020 up to .32 / DBW 300 up to .15 = 80 mm (3.15 in.) 3. Slide on coolant hoses and fasten with hose clamps. Torque clamps with 1.5 Nm. Open water valves. DBW 2020 from .33 / DBW 300 from .165 = 70 mm (2.75 in.) 4. Connect fuel supply and return lines and tighten connections or screw tight with banjo bolt and new gaskets. – max. length: 5 m (16 ft) – max. bend: 270° 5. Secure combustion air inlet line on heater if applicable. As an alternative an exhaust deflector can be installed when cleared by Webasto. 8.7 6. Connect electrical connectors of cable harness in vehicle and to circulation pump. REMOVAL AND INSTALLATION 7. Bleed fuel supply system. CAUTION: In installed condition only the following disassembly or removal procedures are permitted should enough space for removal allow such action: Webasto Thermo & Comfort N.A., Inc. 8. Bleed coolant circuit. 46 www.techwebasto.com DBW 2010/2020/300 COOLANT HEATERS 8.7.2 TEMPERATURE LIMITER, REPLACEMENT WARNING: The igniter box operates on high voltage. Prior to replacement of flame detector, disconnect electrical connectors of cable harness in vehicle to avoid lethal accidents. NOTE: The replacement procedure for the temperature limiter is identical with the heater installed or removed. Perform replacement in accordance with 9.2.3. 8.7.8 8.7.3 NOTE: The replacement procedure for the combustion chamber is identical with the heater installed or removed. Perform replacement in accordance with 9.2.17. WARNING: The heater operates on high voltage. Prior to replacement of combustion chamber, disconnect electrical connectors of cable harness in vehicle to avoid lethal accidents. OVERHEAT FUSE, REPLACEMENT NOTE: The replacement procedure for the overheat fuse is identical with the heater installed or removed. Perform replacement in accordance with 9.2.1. 8.8 8.7.5 After heater installation the coolant circuit and the fuel supply system must be thoroughly bled observing the vehicle manufacturer’s instructions. During test runs all coolant and fuel line connections have to be checked for security and no leakage. Should the heater in operation enter a fault condition, perform troubleshooting (refer to Section 5). WARNING: The ignition system operates on high voltage. Prior to replacement of burner, disconnect electrical connectors of cable harness in vehicle to avoid lethal accidents. 8.8.1 IGNITION COIL, REPLACEMENT Set vehicles own heating system to "warm" and replenish coolant which must consist of at least 20% anti-freeze (glycol base for protection against corrosion). When using pure water there will be no protection against corrosion and due to the lower boiling point of the water when overheating loss of cooling water may result requiring continuous replenishment. Additives in the coolant must not affect metals, plastics or rubber and leave no deposits. WARNING: The ignition system operates on high voltage. Prior to replacement of the ignition coil and related components, disconnect electrical connectors of cable harness in vehicle to avoid lethal accidents. Then operate engine at increased idle until radiator thermostat opens. Shut down engine, check coolant level and replenish as required. FLAME DETECTOR (PHOTO EYE), REPLACEMENT Switch on heater and vehicle heating fan with engine shut down. After a certain cool-down period the heater must automatically switch on and control to off. In case of no restart attempt the temperature limiter on the NOTE: The replacement procedure for the flame detector is identical with the heater installed or removed. Perform replacement in accordance with 9.2.9. www.webasto.us WATER CIRCUIT, BLEEDING NOTE: Bleeding must always be performed in accordance with manufacturer’s instructions. For bleeding the circulation pump must not be switched on. NOTE: The replacement procedure for the ignition coil is identical with the heater installed or removed. Perform replacement in accordance with 9.2.11. 8.7.7 FIRST OPERATION BURNER HEAD, REPLACEMENT NOTE: The replacement procedure for the burner head is identical with the heater installed or removed. Perform replacement in accordance with 9.2.5. 8.7.6 COMBUSTION CHAMBER, REPLACEMENT TEMPERATURE THERMOSTAT, REPLACEMENT NOTE: The replacement procedure for the temperature control thermostat is identical with the heater installed or removed. Perform replacement in accordance with 9.2.2. 8.7.4 SERVICING 47 Webasto Thermo & Comfort N.A., Inc. SERVICING DBW 2010/2020/300 COOLANT HEATERS 8.8.2 heater has responded because the heater has not been bled properly. When switching the heater on the fuel pump pulls fuel from the fuel tank to prime the complete fuel supply system. Reset temperature limiter (allow temperature limiter to cool, self resetting) and repeat complete bleeding procedure. Should no combustion be achieved with the first start attempt, switch the heater off and on again. NOTE: The heater may be equipped with an automatically resetting temperature limiter. The manual reset is not necessary. Webasto Thermo & Comfort N.A., Inc. FUEL SUPPLY SYSTEM, BLEEDING 48 www.techwebasto.com DBW 2010/2020/300 COOLANT HEATERS REPAIR 9. REPAIR 9.1.1.1 VISUAL INSPECTION, GENERAL 9.1 • Examine all components for damages (cracks, deformation, wear, etc.) and replace as necessary. GENERAL INFORMATION • Examine connectors and wiring for corrosion, loose contacts, wrong crimping, etc. and repair as necessary. This section describes the repairs that may be performed on the heaters DBW 2010, 2020 and 300 when removed. Any further disassembly will void the warranty. • Check terminals for corrosion and contacts for security. Repair as required. For re-assembly only components of the proper service part kits are to be used. 9.1.1.2 COMBUSTION CHAMBER, VISUAL INSPECTION WARNING: The ignition system operates on high voltage. Prior to replacement disconnect connectors of cable harness in vehicle to avoid lethal accidents. – Check swirl ring for security. – Check swirl ring for melting and deformation (DBW 2010). – Inspect combustion chamber for oxidizing and coke deposits and remove as required. The following components may also be replaced with the heater installed unless restricted space prevents access: – Check welding seem for cracks. – replacement of temperature limiter NOTE: Longitudinal cracks up to 38 mm (1.5 in.) are allowed. – replacement of temperature control thermostat – replacement of overheat fuse 9.1.1.3 HEAT EXCHANGER, VISUAL INSPECTION – replacement of burner – Inspect exhaust ducting in heat exchanger for sooting, deposits, damage and corrosion. – replacement of fuel atomizing nozzle – replacement of nozzle preheat cartridge – replacement of nozzle preheat thermostat NOTE: Deposits are to be removed with water jet and brush. – replacement of ignition coil – replacement of flame detector – replacement of combustion chamber – Inspect heat exchanger for exterior damage, deformation, etc. – replacement of control unit 9.1.1 WORK ON COMPONENTS AFTER DISASSEMBLY NOTE: Heavy deformation may cause restricted flow of coolant. CAUTION: All gaskets located between disassembled components must always be discarded and replaced with new gaskets. www.webasto.us CAUTION: When replacing the combustion chamber on heaters installed vertically, remove deposits in heat exchanger using a suitable tool. 49 Webasto Thermo & Comfort N.A., Inc. REPAIR DBW 2010/2020/300 COOLANT HEATERS 9.2 9.1.1.4 COMBUSTION AIR FAN WHEEL, VISUAL INSPECTION 9.2.1 – The fan wheel has to be checked for contamination, traces of grinding and cracks. DISASSEMBLY AND ASSEMBLY OVERHEAT FUSE, REPLACEMENT 9.2.1.1 REMOVAL DBW 2010 ONLY: 1. Disconnect electrical connection to overheat fuse at connector block. The clearance between the blower wheel and blower case must be measured (measurable with a feeler gauge) at the narrowest point. Clearance = 0.15/-0.05 mm. 2. Turn counterclockwise to remove overheat fuse (item1, Fig. 36) from dry-well. 9.2.1.2 INSTALLATION 1. Turn overheat fuse clockwise into dry-well until snug but not tight. DBW 2010 2. Turn out 1/2 turn. 3. Plug connector into connector block. NOTE: Observe electrical wiring color coding when making connections. Hexagon nut 9.2.2 TEMPERATURE CONTROL THERMOSTAT, REPLACEMENT 9.2.2.1 REMOVAL 0.15 ± 0.05 mm (.006 ± .002 inch) 1. Disconnect electrical connection to temperature control thermostat at connector block. 2. Turn counterclockwise to remove temperature control thermostat (item 2, Fig. 36). Figure 35: 9.2.2.2 INSTALLATION Clearance Adjustment - DBW 2010 Fan 1. Turn temperature control thermostat clockwise into bracket until snug. DBW 2020/300 ONLY: – The hub of the impeller has to be checked for cracks and the cover disc (back wall) as to its stability. Webasto Thermo & Comfort N.A., Inc. 2. Plug connector into connector block. Observe electrical wiring color coding when making connections. 50 www.techwebasto.com DBW 2010/2020/300 COOLANT HEATERS 9.2.3 TEMPERATURE LIMITER, REPLACEMENT REPAIR 9.2.4 9.2.3.1 REMOVAL CONTROL UNIT, REPLACEMENT 9.2.4.1 REMOVAL 1. Disconnect electrical connection to temperature limiter at connector block. 1. Disconnect all electrical connections from control unit. 2. Turn counterclockwise to remove temperature limiter (item 3, Fig. 36). 2. Carefully withdraw control unit from holding clip or slide out with holding clip (Fig. 37). 9.2.3.2 INSTALLATION 9.2.4.2 INSTALLATION 1. Turn temperature limiter clockwise into bracket until snug. 1. Carefully push control unit (into holding clip or slide into position with clip attached (Fig. 37). 2. Plug connector into connector block. 2. Restore electrical connections. NOTE: Observe electrical wiring color coding when making connections. 9.2.5 BURNER, REPLACEMENT 9.2.5.1 REMOVAL 1. Disconnect electrical connections on burner and loosen fuel lines. 2. Loosen two nuts (item 3, Fig. 38) until hinge bolts are free. 3. Swing hinge bolts (2) open and remove cotter pin (1). 4. Remove burner (4). 2 1 9.2.5.2 INSTALLATION 1. Position burner (4, Fig. 38) for installation, swing hinge bolts (2) closed and secure temporarily using hinge bolts (2). 3 2. Insert cotter pin (1) according to the intended opening swing direction. 3. Tighten nuts: DBW 2010 = 5 - 6 Nm (44 - 53 lb-in.). DBW 2020/300 = 7.5 - 8.5 Nm (66 - 75 lb-in.). 4. Connect fuel lines. 5. Restore electrical connections. 1 Overheat Fuse 2 Temperature Control Thermostat 3 Temperature Limiter Figure 36: Temperature Control Elements www.webasto.us 51 Webasto Thermo & Comfort N.A., Inc. REPAIR DBW 2010/2020/300 COOLANT HEATERS 3 2 1 1 Control Unit 1553 2 Holding Clip 3 Burner head Figure 37: Control Unit Removal / Installation 1 2 3 4 Cotter pin Hinge Bolts (2) Nut (2) Burner head 1 2 3 4 NOTE: Depending on the burner head direction of swing, the cotter pin may be located to the opposite side. CAUTION: Always use hinge bolts to lock burner head in place. Figure 38: Burner Head Removal / Installation Webasto Thermo & Comfort N.A., Inc. 52 www.techwebasto.com DBW 2010/2020/300 COOLANT HEATERS 9.2.6 FUEL VALVE AND SOLENOID, REPLACEMENT REPAIR 9.2.7 9.2.6.1 REMOVAL FUEL PUMP, REPLACEMENT 9.2.7.1 REMOVAL 1. Swing open or remove burner head (see Sec. 9.2.5). 1. Remove burner head (see Sec. 9.2.5). 2. Disconnect the ignition leads from the ignition electrodes. 2. Disconnect electrical leads from solenoid valve, flame detector, nozzle pre-heater and ignition electrodes. 3. Loosen the retaining clamp bolt and dismount the ignition electrodes. 3. Loosen the retaining clamp bolt and dismount the ignition electrodes. 4. Remove disc retaining ring and disc. Allow the disc to hang from the electrical leads. 4. Remove disc retaining ring and disc. 5. Disconnect the electrical leads from the fuel solenoid. NOTE: During the following steps, ensure that escaping fuel is captured or immediately neutralized and properly disposed of. 6. Unscrew the lock-nut (item 1, Fig. 39) securing the solenoid to the valve chamber (4) and slide magnetic head (3) back. 5. Disconnect the fuel return and supply pipes from the fuel pump. 7. Unscrew valve chamber (4) from nozzle holder (9). 6. Disconnect the fuel delivery pipe from the pump to the nozzle holder. 9.2.6.2 INSTALLATION 1. Unscrew lock-nut (item 1, Fig. 39) from new valve assembly. 7. Unscrew the four screws on the back wall and take the complete assembly out. 2. Make sure new O-ring seal (5) is in place on valve chamber (4) and items 6, 7 and 8 are present and correctly oriented inside the valve chamber. 8. Remove the retaining ring from the fuel pump shaft and dismount the gear-wheel. 9. Remove the two bolts securing the fuel pump to the back wall. 3. Screw assembled valve into nozzle holder and torque to 11.5 Nm (8.5 lb-ft). 9.2.7.2 INSTALLATION 4. Slide the magnetic head (3) into place making sure the boss registers in the end plate recess. NOTE: Do not disturb the pump pressure regulating screw. The pump has been pre-set to the correct pressure. 5. Secure with the lock-nut (1) and washer (2). 6. Install the round disc and retaining ring. 7. Connect electrical leads to fuel solenoid. 1. Attach new fuel pump to back wall with the two screws removed earlier. 8. Install and adjust ignition electrodes (see Sec. 6.2.3). 9. Install burner head (see Sec. 9.2.5). 1 2. Install gear-wheel on pump shaft and secure with retaining ring. 3. Dot gear-wheel in four places with ISOFLEX LDS 18 Special A lubricant P/N 143820 (45 gram tube). 2 3 4. Insert assembly into burner head being careful to mesh gears and secure with the four bolts removed earlier. 4 5 5. Connect fuel pipes. 6 7 6. Install disc with flame detector and retain with ring. 8 7. Install and adjust ignition electrodes (see Sec. 6.2.3). 9 1 2 3 4 5 Lock-nut Washer Magnetic Head Valve Chamber O-ring Figure 39: 8. Install burner head (see Sec. 9.2.5). 6 7 8 9 Stepped Roll Pin Spring Plunger Nozzle Holder Fuel Valve and Solenoid Assembly www.webasto.us 53 Webasto Thermo & Comfort N.A., Inc. REPAIR DBW 2010/2020/300 COOLANT HEATERS Nozzle Holder Nozzle Figure 41: 9.2.9 Nozzle Replacement FLAME DETECTOR, REPLACEMENT 9.2.9.1 REMOVAL 1. Swing burner head open (see Sec. 8.5.1). 2. Remove screw and lock washer and slide flame detector out of slot in disc. 3. Disconnect electrical leads to flame detector. Figure 40: Fuel Pump Replacement 9.2.9.2 INSTALLATION 1. Connect electrical leads to new flame detector. 9.2.8 2. Position flame detector in slot of disc and secure with screw and lock washer. FUEL NOZZLE, REPLACEMENT 3. Tighten screw to 5 Nm - 6 Nm (44 - 53 lb-in.). 9.2.8.1 REMOVAL 4. Swing burner head closed (see Sec. 8.5.1). 1. Swing burner head open (see Sec. 8.5.1). 2. Unscrew and remove nozzle using a nozzle wrench or two wrenches (16 mm & 19 mm). NOTE: Ensure cleanliness is maintained when installing the nozzle. Only touch the nozzle at its hexagon surface. The fuel nozzle should be replaced annually. Screw Disc NOTE: If ignition electrodes are disturbed during nozzle replacement, they will require adjustment (see Sec. 6.2.3). Window Flame Detector 9.2.8.2 INSTALLATION 1. Screw in new high pressure nozzle and tighten to 20 Nm (15 lb-ft.). 2. Swing burner head closed (see Sec. 8.5.1). Figure 42: Webasto Thermo & Comfort N.A., Inc. 54 Flame Detector Replacement www.techwebasto.com DBW 2010/2020/300 COOLANT HEATERS 9.2.10 IGNITION ELECTRODES, REPLACEMENT REPAIR 9.2.11 IGNITION COIL, REPLACEMENT NOTE: If the ignition is faulty, check also the flame detector (see Sec. 6.2.2). 9.2.10.1 REMOVAL 1. Swing burner head open (see Sec. 8.5.1). 2. Disconnect the ignition leads from the ignition electrodes. 9.2.11.1 REMOVAL 1. Swing open or remove burner head (see Sec. 9.2.5). 3. Loosen the retaining clamp bolt and dismount the ignition electrodes. 2. Disconnect the ignition leads from the ignition electrodes. 3. Remove the four screws securing the ignition coil to the protection cap (see Fig. 44). 9.2.10.2 INSTALLATION 1. Install the new ignition electrodes. 4. Lift coil off cap enough to access electrical connectors and disconnect. 2. Connect the ignition leads to the electrodes. 3. Adjust ignition electrodes (see Sec. 6.2.3). 9.2.11.2 INSTALLATION 4. Swing burner head closed (see Sec. 8.5.1). 1. Press electrical connectors together. Brown – Brown Black – Yellow 2. Place ignition coil into position making sure not to jam or trap electrical cables. 3. Secure ignition coil with four screws removed earlier. 4. Plug ignition leads onto ignition electrodes making sure to fully engage into their niches 5. Check electrode gap with gauge and adjust if necessary (see Sec. 6.2.3). 6. Swing burner head closed (see Sec. 9.2.5). Figure 43: Ignition Electrode Replacement + Black Wire – Brown Wire Figure 44: www.webasto.us 55 Ignition Coil Replacement Webasto Thermo & Comfort N.A., Inc. REPAIR DBW 2010/2020/300 COOLANT HEATERS 9.2.12 DRIVE MOTOR, REPLACEMENT 9.2.12.2 INSTALLATION NOTE: Recessed edge of mounting flange (item 3, Fig. 45) must be oriented towards top. All items must be aligned as before disassembly. 9.2.12.1 REMOVAL NOTE: Take note of alignment of all components before disassembly. 1. Attach mounting flange (3) to drive motor (2). 1. Move ignition coil out of the way. See Sec. 9.2.11 for guidance. 2. Tighten screws (8) to 5 - 6 Nm (44 - 53 lb-in.). 3. Align motor shaft, coupler (4) and flange (3) with housing (5) and attach with screws (7). 2. Remove four screws (item 6, Fig. 45) and withdraw protection cap (1) from burner. 4. Tighten screws (7) to 5 - 6 Nm (44 - 53 lb-in.). 3. Disconnect motor leads. 5. Connect motor electrical leads. 4. Remove three screws (7) with lock washers and withdraw drive motor (2). 6. Locate protection cap (1) and secure with the four screws (6) removed earlier. 5. Remove two screws (8) from motor (2) and flange (3). 7. Tighten screws (6) to 2 Nm (18 lb-in.). 8. Install ignition coil 6. Inspect all parts for wear and damage and replace as necessary. DBW 2010 9 8 7 6 5 4 3 2 9 8 1 7 6 5 4 3 2 1 Figure 45: DBW 2020/300 Drive Motor Assembly Webasto Thermo & Comfort N.A., Inc. 56 www.techwebasto.com DBW 2010/2020/300 COOLANT HEATERS 9.2.13 COMBUSTION AIR FAN, REPLACEMENT REPAIR 9.2.13.2 INSTALLATION DBW 2010 ONLY: NOTE: For replacement of the combustion air fan the burner may be left installed. In removed condition ensure that igniter electrodes are not bent and nozzle is not damaged. 1. Assemble bearings and components if required (see Sec. 9.2.15). 2. Push fan with shaft through bearings and spacer of housing (item 5, Fig. 46) 3. Install washer (6), drive gear (7) and lock-nut (8). 9.2.13.1 REMOVAL 4. Adjust fan clearance according to instructions in Sec. 9.1.1.4. 1. Swing open or remove burner head (see Sec. 9.2.5) 2. Move ignition coil out of the way. Refer to Sec. 9.2.11 for guidance. DBW 2020/300 ONLY 3. Remove four screws (item 6, Fig. 45) and withdraw protection cap (1) from burner. 5. Assemble fan, shaft, bearings and drive gear components if required (see Sec. 9.2.16). 4. Disconnect motor leads. 5. Remove drive motor (see Sec. 9.2.12). 6. Make sure O-ring (item 10, Fig. 48) in bearing recess of housing (item 5, Fig. 46) is present and in place. 6. Remove four Allen Socket screws (item 1, Fig. 46 ) and washers (2) from motor carrier (3). 7. Push fan assembly into housing (5) until motor carrier (3) is fully seated. 7. Remove four screws (10) from nozzle holder plate (9) and pull plate free. DBW 2010/2020/300 8. Install motor carrier (item 3, Fig. 46 ) over fan (4). DBW 2010 ONLY: 9. Install and tighten screws to – DBW 2010 - 5.5 - 6.5 Nm (48.5 - 57.5 lb-in). – DBW 2020/300 - 8.0 Nm ± 10% (71 lb-in ± 10%). 8. Remove lock-nut (8), drive gear (7) and washer (6). 9. With a hammer and small drift, tap fan shaft and fan (4) free from housing (5) 10. Install drive motor (see Sec. 9.2.12). 11. Connect electrical leads. 10. Perform further disassembly of shaft, bearings and gears if necessary (see Sec. 9.2.15). 12. Install protection cap and secure with four screws (item 6, Fig. 45) removed earlier. DBW 2020/300 ONLY 13. Install ignition coil. Refer to Sec. 9.2.11 for guidance. 11. Grasp motor carrier (item 3, Fig. 46 ) and with a slight rocking motion, work the motor carrier and fan (with bearing), free from housing (5). 12. Perform further disassembly of shaft, bearings and gears if necessary (see Sec. 9.2.16). www.webasto.us 57 Webasto Thermo & Comfort N.A., Inc. REPAIR DBW 2010/2020/300 COOLANT HEATERS 9.2.14 FAN REPLACEMENT 9 8 6 DBW 2010 5 4 3 10 2 1 7 9 6 8 5 4 3 10 2 1 7 DBW 2020/300 Figure 46: Fan Replacement Webasto Thermo & Comfort N.A., Inc. 58 www.techwebasto.com 1 1 2 3 4 5 Figure 47: www.webasto.us 3 4 5 Fan Large spring washer Small spring washer Washer (black) Retaining ring 2 6 6 7 8 9 10 Bearing Carrier housing Spacer Bearing Wave-spring washer 7 11 12 13 14 8 59 10 DBW 2010 11 12 13 14 Retaining ring Washer (Brass color) Drive gear Lock-nut 9 DBW 2010/2020/300 COOLANT HEATERS REPAIR 9.2.15 FAN SHAFT, BEARINGS AND GEARING, EXPLODED VIEW (DBW 2010) Exploded view - fan support assembly - DBW 2010 Webasto Thermo & Comfort N.A., Inc. REPAIR DBW 2010/2020/300 COOLANT HEATERS Back wall housing Washer (Brass color) Drive gear Lock-nut 6 7 8 9 10 1 1 2 3 4 5 2 3 Retaining ring Motor carrier Wave-spring washer Shaft Roll pins 4 5 6 7 8 Bearing Retaining ring Fan Bearing O-ring 9 10 11 12 13 14 11 DBW 2020 / 300 12 13 14 9.2.16 FAN SHAFT, BEARINGS AND GEARING, EXPLODED VIEW (DBW 2020 / DBW 300) Figure 48: Exploded view - fan support assembly - DBW 2020/300 Webasto Thermo & Comfort N.A., Inc. 60 www.techwebasto.com DBW 2010/2020/300 COOLANT HEATERS REPAIR 9.2.17 COMBUSTION CHAMBER, REPLACEMENT 9.2.18 HEAT EXCHANGER, REPLACEMENT 9.2.17.1 REMOVAL 9.2.18.1 REMOVAL 1. Swing burner head open (see Sec. 8.5.1). 1. Disconnect cables from temperature control thermostat, temperature limiter and overheat fuse. 2. Withdraw combustion chamber (Fig. 50) from heat exchanger and remove. 2. Detach cables from heat exchanger. 3. Remove burner head (see Sec. 9.2.5). NOTE: The DBW 2010 burner tube may require careful prying around the parameter of the tube to release it from the heat exchanger (see Fig. 49). 4. Withdraw combustion chamber from heat exchanger. 5. Remove heat exchanger. 6. Perform procedures on components after disassembly (see Sec. 9.1.1). NOTE: It is important that the heat exchanger and combustion chamber are cleaned and inspected periodically and at least annually. 9.2.18.2 INSTALLATION DBW 2010 burner tube removal. Carefully pry out with screw driver. Figure 49: 1. Slide combustion chamber fully into heat exchanger. 2. Install burner head (see Sec. 9.2.5). 3. Attach cables to heat exchanger DBW 2010 Burner tube removal 4. Install and connect temperature control thermostat, temperature limiter and overheat fuse. 3. Perform procedures on components after disassembly (see Sec. 9.1.1). NOTE: DBW 2010 Only: In case the combustion air swirler has been damaged, distorted or melted by high heat of a burn-back condition, the complete combustion chamber and the flame detector must be replaced. DBW 2010 9.2.17.2 INSTALLATION 1. Slide combustion chamber fully into the heat exchanger. 2. Swing burner head closed (see Sec. 8.5.1). DBW 2010 DBW 2020/300 Figure 51: DBW 2020/300 Figure 50: Heat exchanger replacement Burner tube replacement www.webasto.us 61 Webasto Thermo & Comfort N.A., Inc. REPAIR 9.3 DBW 2010/2020/300 COOLANT HEATERS COOLANT CIRCULATING PUMP REPAIR 9.3.4 INSTALLING 1. Mount the pump. A defective coolant pump may cause the heater to overheat. The heater’s overheat protection is likely to respond in this case. 2. Connect coolant hoses to pump and tighten hose clamps. 3. Remove hose clamping pliers if used. 9.3.1 REMOVAL 4. Connect the electrical leads and seal connector with dielectric grease such as Permatex® Dielectric Tuneup Grease or 3M™ Silicone Paste (Dielectric Grease). 1. Drain the coolant. Alternatively, the hoses leading to the pump can be pinched closed with hose clamping pliers. 3. Disconnect coolant hoses from pump. 5. Refill coolant system and bleed trapped air out of the coolant circuit according to instructions in Sec.8.8.1. 4. Dismount coolant pump. 6. Switch on and check function and for any leakage. 2. Disconnect the circulation pump electrical leads. 9.3.2 DISASSEMBLING 1. Clean the exterior of the pump and hold pump in a soft-jaw vice. U 4810 2. Unscrew the impeller housing screws and remove housing and O-ring. 3. Unscrew the impeller nut and carefully pry off impeller with two screwdrivers. 4. Remove the spring seal, ceramic and rubber seals. 18 5. On the U4810 pump, unscrew the pump base screws and remove the base and the O-ring. 9 18 10 6. Inspect all parts and replace if necessary. Seals are always replaced. 9.3.3 12 11 ASSEMBLING 8 1. Connect pump motor to a power source. With a strip of very fine emery cloth, polish the pump shaft to remove any contamination. 6 7 5 4 2. Remove power source from pump motor. 3 3. Assemble pump with all parts in order as shown in Fig. 53 through Fig. 55. The ceramic seal and the spring seal must be fitted as shown in Fig. 52 with the hard side of the spring seal (B) against the ceramic seal face (A). 2 1 1 2 3 4 5 6 A Screw - Impeller Housing Impeller Housing Nut - Impeller Impeller Spring Seal Stationary Ceramic Seal Figure 53: 7 8 9 10 11 12 Rubber Seal O-ring Screw - Pump Base Washer - Pump Base Pump Base Rubber Shaft Seal U4810 Circulation Pump - Exploded View B Figure 52: Seal Orientation Webasto Thermo & Comfort N.A., Inc. 62 www.techwebasto.com DBW 2010/2020/300 COOLANT HEATERS REPAIR U4851 U4814 9 38 38 10 9 10 38 38 12 12 11 11 8 8 5 6 7 5 7 4 4 3 3 2 2 1 1 1 2 3 4 6 Screw - Impeller Housing Impeller Housing Nut - Impeller Impeller Figure 54: 5 6 7 8 Spring Seal Stationary Ceramic Seal Rubber Seal O-ring 9 10 11 12 Screw - Pump Base Washer - Pump Base Pump Base Rubber Shaft Boot U4814 and U4851 Circulation Pump - Exploded View U 4846 U 4846 Pump Only: Pump is magnetically coupled to the motor (no shaft seals to leak or replace). The driven magnet of the pump must be free of metallic contaminates otherwise the heater may overheat due to loss of coolant circulation. The heater’s overheat protection is likely to respond. 4 20 20 3 2 1 1 2 3 4 O-ring - Impeller Housing O-ring - Magnetic Drive Impeller Housing Screw - Impeller Housing Figure 55: www.webasto.us 63 U4846 Circulation Pump - Exploded View Webasto Thermo & Comfort N.A., Inc. REPAIR 9.4 9.4.1 DBW 2010/2020/300 COOLANT HEATERS MP SCHOOL BUS CIRCULATION PUMP 9.4.3 ASSEMBLING 1. Connect pump motor to a power source. With a strip of very fine emery cloth, polish the pump shaft to remove any contamination. REMOVAL 1. Drain the coolant. Alternatively, the hoses leading to the pump can be pinched closed with hose clamping pliers. 2. Remove power source from pump motor. 3. Assemble pump with all parts in order as shown in Fig. 53. 2. Disconnect the circulation pump electrical leads. 3. Disconnect coolant hoses from pump. 9.4.4 4. Dismount coolant pump. INSTALLING 1. Mount the pump. 9.4.2 DISASSEMBLING 2. Connect coolant hoses to pump and tighten hose clamps. 1. Clean the exterior of the pump and hold pump in a soft-jaw vice. 3. Remove hose clamping pliers if used. 2. Unscrew the impeller housing screws and remove housing and O-ring. 4. Connect the electrical leads and seal connector with dielectric grease such as Permatex® Dielectric Tuneup Grease or 3M™ Silicone Paste (Dielectric Grease). 3. Unscrew the impeller lock screw and remove impeller. 5. Refill coolant system and bleed trapped air out of the coolant circuit according to instructions in Sec.8.8.1. 4. Remove the seal assembly. 5. Remove the pump adapter (base). 6. Inspect all parts and replace if necessary. Seals are always replaced. 6. Switch on and check function and for any leakage. 8 7 6 5 4 3 2 1 1 2 3 4 Figure 56: Impeller Housing O-ring Impeller Spring Seal Assembly 5 6 7 8 Pump Base Screw - Impeller Housing Nut - Pump Base Motor MP School Bus Circ. Pump - Exploded View Webasto Thermo & Comfort N.A., Inc. 64 www.techwebasto.com DBW 2010/2020/300 COOLANT HEATERS INSTRUMENTS AND TOOLS 10. INSTRUMENTS AND TOOLS 10.3 CO2 TEST APPARATUS 10.1 SETTING GAUGE Used for sampling and measuring the CO2 content of the exhaust gases. Used for setting the gap between the points of the electrodes and the distance from the fuel nozzle. In the case of irregularities of the combustion process or after major repairs, the CO2 content should be measured and adjusted as necessary. Part Number 310646 10.2 TESTER Used for testing components of the heater, test running the heater, making fuel pressure adjustments when used with a pressure gauge and general troubleshooting. Tester is connected in place of the control unit. Tester Part Number 1302691A An optional 5 ft. extension harness (P/N 905491A) is available for tester where additional reach is required. 10.4 SMOKE NUMBER TEST APPARATUS Used for checking smoke number TES T Ap ER 4 pare 40 il d 280 e C for on D trô BW le 4 20 40 10/2 28 0 p 020/3 ou r D 00 in BW 1 20 2 or 10 /20 24 Vo Co 20 /30 lt Thentrol 0 in (Aq rmo O 12 (Ou n uas stat or vert tat) 24 Fla ) Vo lt Come On (Ou (Centrol vert ll ph ule ) oto éle ctr iqu e) + Wa (Po ter P circmpe ump ula de tio n) – Mo (m tor ote ur) Ign (Ceition d'a ntraleCoil llum age ) Sole (Aimnoid d’é ant Valv e lec tro van ne) www.webasto.us 65 Webasto Thermo & Comfort N.A., Inc. INSTRUMENTS AND TOOLS DBW 2010/2020/300 COOLANT HEATERS 10.5 NOZZLE WRENCH 10.7 GREASE AND LOCKING VARNISH Used for replacing high-pressure fuel nozzle. • LDS 18 Special - used for lubricating the reduction gearing of the fuel pump drive. Part Number 66971A • Dielectric Silicone Grease - used to protect electrical terminals and connectors from corrosion. • Red Locking Varnish - used to indicate setting positions such as on the air intake locking screw once adjusted. 20 38 14 ams P/N 5 gr 4 10.6 FUEL PRESSURE GAUGE Used for checking and adjusting the fuel pressure delivered to the nozzle. al i c pe ease S 18 g Gr S LD arin Be ne Part Number 600190 c i ctr e l Die ease Gr 80 40 ico Sil e ub .T z 2o ish arn V g 5 kin oc 24 L 54 d 1 e R P/N 12 0 16 0 20 0 24 0 Webasto Thermo & Comfort N.A., Inc. 66 www.techwebasto.com DBW 2010/2020/300 COOLANT HEATERS PRODUCT INFORMATION 11. PRODUCT INFORMATION Product Information 11.1 ISS “WHITE” TIMER FOR THE SCHOLASTIC HEATER™ Category: Thermosystems Document Number: PI007RC Date Posted: 02/02/2007 Description: NOI (NO OPERATOR INTERFACE) “WHITE” TIMER INSTALLATION / OPERATION Overview The “White” timer is a 7-day NOI (no operator interface) timer. This means you can set this timer to specific needs and the timer will do the rest. This timer has battery backup and will hold its memory if the vehicle battery is disconnected and will recharge when 12 volt power is restored. Installation The timer should be installed in an area protected from the effects of weather and contamination. The timer can be surface mounted on the vehicle instrument panel or inside the circuit panel (Bus applications) or any place convenient and accessible. The timer can be mounted using customer/installer supplied Velcro tape by sticking one half of the Velcro to the timer and the other to a secure mounting location. The timer can be mounted with screws in place of Velcro. Connect the Webasto heater switching harness to the timer. Refer to the wiring diagram below for directions. After all connections are made, mount the new timer. Using customer/installer supplied Velcro tape or screws. Optionally, an On/Off toggle switch can be installed with the timer. The timer will work without using the toggle switch however, it’s a nice option to have. To mount the toggle switch, locate an appropriate mounting location and drill a ½” mounting hole. Refer to the wiring diagram on next page to, connect the appropriate wires to the toggle switch. X1 C Green A Red T1 Red Webasto Wiring Harness Black Black J White White E Red F Red G Brown B H 5 12 Volt Positive 4 Optional D Brown F5 Red Red 3 On Signal 2 Ground 1 12 Volt Positive BT Brown Legend T1 X1 Timer - 7-Day (NOI) 9-Pin Duetsch Connector Wiring diagram - NOI Timer www.webasto.us 67 Webasto Thermo & Comfort N.A., Inc. Product Information PRODUCT INFORMATION DBW 2010/2020/300 COOLANT HEATERS Category: Thermosystems Document Number: PI007RC Date Posted: 02/02/2007 Description: NOI (NO OPERATOR INTERFACE) “WHITE” TIMER INSTALLATION / OPERATION Wiring diagram - NOI Timer with optional Toggle Switch Setting the Timer The timer is a 7-day NOI (no operator interface) timer. This means you can set this timer to specific needs and the timer will do the rest. This timer has battery backup and will hold its memory if the vehicle battery is disconnected and will recharge when 12 volt power is restored. To set the timer clock: Press and hold the “Clock” button and by pressing the “Hour” and “Min.” buttons set the clock appropriately. In the upper left corner you will see the “AM” or “PM” sign. Setting the timer On/Off functions: Press the “Timer” button one time. You will see the screen now reads “1” “On” using the day button select the Appropriate day or days. Look in the upper left hand corner for the “AM” or “PM” sign. Using the day button you can select one or multiple days. After you have selected the proper day/days and set the appropriate on time, push the “Timer” button once again. You should now see “1” “Off” using the day button select the appropriate days again. BE SURE THE DAYS SELECTED MATCH THE SAME DAYS YOU SELECTED FOR TIMER “1” “ON”. Now set the timer to the appropriate “Off” time. After you have set the timer functions needed, push the “Clock” this will save your settings and return to the clock. These steps can be repeated 6 more times giving you multiple on and off settings. It is very important that you set this timer to the specific needs of each vehicle to optimize the heaters efficiency. Webasto Product N.A., Inc. s 15083 North Road s Fenton, Michigan 48430 For Technical Assistance in USA Call: (800) 555-4518 s In Canada Call: (800) 667-8900 Visit us on the Web at: www.techwebasto.com (North America) www.webasto.com (Global) Webasto Thermo & Comfort N.A., Inc. 68 Page 2 of 3 www.techwebasto.com Product Information DBW 2010/2020/300 COOLANT HEATERS PRODUCT INFORMATION Category: Thermosystems Document Number: PI007RC Date Posted: 02/02/2007 Description: NOI (NO OPERATOR INTERFACE) “WHITE” TIMER INSTALLATION / OPERATION Operation in manual mode: The largest button on the timer is the “Manual” button. At the bottom of the “LCD” screen you will see a small line that moves as you push this button. Underneath the small line you will see the corresponding function “On” “Auto” “Off”. The manual button can be used as a toggle switch to operate the heater or after you have programmed the timer for automatic service, push the manual button until the line is over “auto” on the timer. The timer will now turn the heater on and off at the times preset earlier. NOTE: The toggle switch will illuminate green when the heater has an “On” signal. If the toggle switch is in the “Off” position and the timer has turned the heater on, the toggle will illuminate green. This is an easy way to identify the heater is in operation. While the timer is “On” the toggle switch will NOT operate the heater. The toggle switch is a master switch whenever the timer is not in operation. Safety Precautions: s The heater must be switched off at filling stations and tank farms as a result of the risk of explosion. s The heater may not be operated in enclosed spaces (such as garages) as a result of the risk of poisoning and asphyxiation, even if a timer is used. s Wherever inflammable vapors or dust may form (for example in the vicinity of fuel, carbon, wood dust or cereal stores or the like), the heater must be switched off as a result of the risk of explosion. WARNING As with other devices whose activation is automated, if a particular application presents a risk should the heater be automatically activated, and such a vehicle or application is equipped with a “power cut off” type switch which prevents devices from activating automatically, then this timer/heater should be wired into this “power cut off circuit” to ensure automated activation of the heater does not occur. Webasto Product N.A., Inc. s 15083 North Road s Fenton, Michigan 48430 For Technical Assistance in USA Call: (800) 555-4518 s In Canada Call: (800) 667-8900 Visit us on the Web at: www.techwebasto.com (North America) www.webasto.com (Global) www.webasto.us 69 Page 3 of 3 Webasto Thermo & Comfort N.A., Inc. WARRANTY WARRANTY COVERAGE DBW 2010/2020/300 COOLANT HEATERS AND LIMITATIONS Webasto Product North America, Inc. (herein after referred to Webasto) warrants their heaters and heater kits against defects in material and workmanship for two (2) years effective at the time of installationor vehicle registration date for Original Equipment installations (OE). This warranty period may not exceed three (3) years from the original date of sale by Webasto. This warranty period may be superseded by a contractual agreement.* *Warranty coverage for Marine and Off-road applications containing DBW series heaters and the CSL Cargo Heaters are limited to a maximum of 3,000 hours of usage. All other models are limited to 2,000 maximum hours. Replacement parts are covered for six (6) months or the remainder of the original warranty period, which ever is longer. Replacement heaters are considered a “Replacement Part.” The intent of the Webasto warranty is to protect the end-user heater from such defects and provide free repair and replacement of defective parts in the manner provided herein. During the warranty period the exclusive remedy will be for Webasto, at their discretion, to repair or replace those parts which are demonstrated to be defective in material or workmanship. While warranty is provided to the "end-user", it is to be administered and serviced through an authorized Webasto dealer in accordance with the Webasto warranty policy or contractual agreement between Webasto and a second party. Limitations: Webasto specifically excludes and limits from warranty the following: · Normal wear of service parts: (fuel nozzles, filters and overheat fuses are not covered). · Removal and replacement of heater (with the exception of the Thermo Top C). · Damage to product in transit. All claims must be filed with carrier. · Improper installation, which is not in accordance with valid, supplied installation instructions or approved OEM applications. · Deterioration due to normal wear, corrosion, abuse, damage, accident, improper storage or operation. · Modification of product by alteration, use of non-genuine parts or repair by unauthorized personnel. · Economic loss for expenses related to travel, vehicle disability, personal injury or other incidental or consequential damages arising from any breach of this expressed warranty. Owner's Responsibilities: 1) Service heater at the start of each season by an authorized Webasto dealer (Service parts including; fuel nozzles, filters and overheat fuses are not covered under warranty). 2) A Warranty Registration Card is included with the sale of each heater. It is the owner's responsibility to complete this card and return it to Webasto for registration. A proof of purchase is required for all heaters that are not registered. This warranty gives you specific legal rights and you may also have other rights which vary by State or Province THE WARRANTY DESCRIBED IN THIS POLICY SHALL BE IN LIEU OF ANY OTHER WARRANTY, EXPRESSED OR IMPLIED, INCLUDING BUT NOT LIMITED TO, ANY IMPLIED WARRANTY OF MERCHANTABILITY OR FITNESS FOR A PARTICULAR PURPOSE. Webasto Thermo & Comfort N.A., Inc. 70 www.techwebasto.com WEBASTO THERMO & COMFORT N.A., INC. 15083 North Road Fenton, MI 48430 Technical Assistance Hot-line USA: (800) 860-7866 Canada: (800) 667-8900 Org. 01/2008 Rev. 04/2013 P/N LIT669745B www.techwebasto.com www.webasto.us