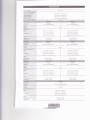
1
(^
SER|ES
L=D TV
user manual
s
*
I
Thank you for purchasing this Samsung product.
To receive more complete service, please register
your product at
www,samsung, com/reg ister
Model_SeridNo.
\
If you have any
questions, please call us at 1 -BOO-SAMSUNG
(1
-800-726-7864) for assistance.
l_9
page 33
A detailed Userb Manual is buift into your TV. For more information about how to view th s e lt4anuai see
differ from actua product appearances Product desrgn and
F gures and iL ustrations n this User l/anua are provided for reference only and rnay
spec frcatrons may be changed without notice
prrmar y designed to view wide screen format fullW de screen format LED Dlsplays (w th 1 6:9 aspect ratios, the ratio of the screen width to helght) are
to fill the screen, if your mode offers
rnotion video The images displiyed on them should primarlly be ln the wide screen, 1 6t9 ratio format, or expanded
s debars on non expanded
this feature, with the images constant y in motion. Drsplaying stationary graphics ancl rmages on the screen, such as the dark
viewing per week
standard jormat televis on video and programming, should be I mlted to no more than 5% of the total telev sion
logos, web sites or cornputer graphics
Additonaly, viewing other stationary images and text such as stock market reports, vlcleo game clisplays, station
the above gu delines can cause uneven
und putt.rnr, shoul"ld be lim ted as described above for all televis ons. D splaying stationary images that exceed
progranrnrng and mages, and
ug;g ;i Lro n .ptu}is that leave subfle, bui permanent burned-in ghost magea in the LED picture. To avoid thls, vary the
these controls to
Ospfayiul screen moving images, not stationary patterns or dark bars. On LFD models that offer picture szng features, use
view d tferent formats as a full screen picture
as a result of forrnat selection and use, as
Be carefu about the television formats you select and the length of t me you view them. Uneven LED aging
piri,.l'
we
.
as burned n irnages, are noi covered by your Samsung lirn ted warranty.
SAMSUNG ELECTRONICS NORTH AIVER CAN LLIV TED WARRANTY STATEN/ENT
E ectronics (SAN'4SUNG)
Subject to the requirements, condit ons, exclus ons ancl imitations oi the orig na Limited Warranty supplied wrth Samsung
provide Wananty Repair Servlce
products, and the requirements, condrtions, exclusions and limitations conta ned herein, SAIV]SUNG wil add tionally
products purchased in the United States, forthe
in tne UniteO States on SAMSUNG products purchased in Canada, and in Canacla on SAN/SUNG
warranty period orig nally spec fied, and to the Or ginal Purchaser only
Along with th s Statement, the Orig nal Limited
The above described wa(anty repairs must be pedormed by a SAMSUNG Authorized Service Center.
to and from the Service
Warraniy Statement and a dated Bi of Sale as Proof of Purchase must be presented to the Seruice Center. Transpodation
material or workmanship, and only those
Center ii the responsibil ty of the purchaser. Cond tions covered are limited only to manufaciuring defects in
encountered n norrl'ral use of the product,
repalr 1 rnes, exchanges or
Excluded, but not limited to, are any originally spec fied provlsions for, ln home or on site services, minimum or maxlmum
replacements, accessories, options, upgrades, or consurnables
For the locat on of a SAN/SUNG Authorized Serv ce Center, please call tol Jree:
the United States : 1 -8OO-SANISUNG
-
ln
-
ln Canada : 1 8OO-SAMSUNG
(1
-800 726-7864)
or news bars at the screen bottom etc.),
Avoid d splaying still mages (such as jpeg picture files), still image elements {such as TV channe logos, stock
oi p.g,il;in"punoramior4:3imageidrmatonthescreen.Constantlyclsplayingsti
picturescancauseimageburn-inontheLEDscreen,whlchwill
affect image qual ty. To reduce r sk of this effect, please fo low the recomrnendations below:
.
.
.
.
Avoid d splaying the same W channel for long periods
Alwaystrytodisplayanyimageinful
screen.Useiheryset'spctureformatmenuforthebestpossiblematch
Reduce brightness and contrast to avoid the appearance of after-lmages
Use all W fiatures destgned to reduce mage retent on and screen burn. Refer to the e-lvlanual for details
o
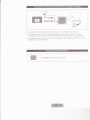
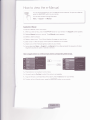
3D: This exciting new feature enables you to view 3D content.
a
SMART HUB: Your gateway to all your content, integrated in one place.
-
Provides diverse entertainment choices.
Lets you control your entedainment life with an easy-to-use, user friendly user intedace.
Gives you easy access to diverse apps, with more being added every day.
Lets you customize your
W
by grouping and sorting apps to your taste.
Allshare Play: Lets you access, view, or play photos, videos, or music located on USB devices,
digital cameras, cell phones, and PCs. PCs and cell phones can be accessed wirelessly, through your
wireless network.
Anynet+ (HDMI-CEC): Allows you to control all connected Samsung devices that support Anynet+
with your Samsung W's remote.
e-Manual: Provides a detailed, on-screen user's manual that's built into your TV. (page 33)
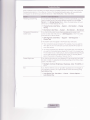
Please make sure the following items are included with your TV. lf any items are missing, contact your
dealer.
The items' colors and shapes may vary depending on the model.
Make sure that there are no accessories hidden behind or under packing materials after you open the
box.
Assembling the Stand Wire Holder
lnput Cables (Sold Separately)
You will need one or more of these cables to connect your
peripheral devices (Blu-ray players, DVD players, etc.)
W to your antenna or cable outlet and your
To purchase the RS232 cable, contact www.SamsungParts.com.
:=______4
--____+
iiffi lffi
\
ffi
_____2_-_
_>-
x*s-**$ffi ssilttsilvww
4
-t4ll
i!*s$iiffi
:g$ffi ffi ffi *#ffi #$ffi ff sffi *si$ *
Make sure you have the correct cable before plugging it in. lllustrations of common plugs and jacks
are brelow.
/i\
Do not plug cab es in upsrde cjown.
Be sure to check the oriental on of the plug before plugging it in.
Warning
Wireless Keyboard (Sold Separately)
#
":
When you install your TV maintain a distance of at least 4 inches between the W and other objects (walls,
cabinet sides, etc.) to ensure proper ventilation. Failing to maintain proper ventilation may result in a fire or a
problem with the product caused by an increase in its internal temperature.
S
Whether you install your TV using a stand or a wall-mount, we strongly recommend you use parts
provided by Samsung Electronics only.
.
lf you use parts provided by another manufacturer, it may cause difficulties with the product
or result
in injury caused by the product falling.
Other Warnings
\
\
The actual appearance of the TV may differ from the images in this manual, depending on the model.
Be careful when you touch the TV. Some parts can be somewhat hot.
Stand Parts: 32, 40,46 inches model only
(uN32ES65OO
/
UN40ES65OO, UN40ES658O
/ UN46ES6500,
UN46ES6580)
m
E@
(M4xL12)
Screvts x
Follow the steps below to connect the
stand installation guide.
W to the stand.
I
For more detailed instructions, see the separate
o
ffi@-+(M4xL12)
m
@@@
DO NOT
USE
.]gFIl'A S
@
USE DO NOI
GFFASE lSEOL
DO NOT
qJ
Place a soft c oth over a tab e to protect the TV, and then
place the TV on the cloth screen s de down
qr
lnsert the Stand Guide into the slot on the TV's bottom
soeview
ffi&Wx4(M4Xtr2)
Stand Parts: 50, 55, 60, 65 inches model only
(uN50ES65OO, UN5OES6580
/
UN55ES650O, UN55ES6580
/ UN60ES6500 /
UN65ES6500)
ffi
ffi
Follow the steps below to connect the
stand installation guide.
o
ffi
W
x4 (rM4x 110)
W to the stand.
|M
(N/4xLro)
For more detailed instructions, see the separate
Top View
@
5
Place a soft c oth over a tab e to protect the TV, and then
p ace the TV on the cloth screen side down.
5
lnsert the Stand Gu de lnto the siot on the TV's bottom
@ sioeve*
A
mmW
-w
x4(l'/4xL10l
S
NOTE
o Make sure to distinguish between the front and back of each component when assembling them.
. Make sure that at least two people lift and move the ry.
. Stand the product up before you tighten the screws. lf you tighten the screws with the W lying
down, it may lean to one side when you stand it up.
A
Do not insert your fingers into the stand base slot of the TV when installing the stand base.
Wall or Ceiling Mounting
lf you mount this product on a wall, it should be mounted only as recommended by the
manufacturer. Unless it is correctly mounted, the product may slide or fall, causing serious
injury to a child or adult, and serious damage to the product.
lnstalling the Wall Mount Kit
The wall mount kit (sold separately) lets you mount the W on the wall.
For detailed information about installing the wall mount, see the instructions provided with the wall mount.
We recommend you contact a technician for assistance when installing the wall mount bracket. We do not
advise you to do it yourself. Samsung Electronics is not responsible for any damage to the product or injury
to yourself or others if you elect to install the wall mount on your own.
To order the wall mount kit,
contact Samsung Customer Care at 1-800-SAMSUNG
(1
-800-726-7864).
VESA Wall Mount Kit Notes and Specifications
S lnstall your wall mount on a solid wall perpendicular to the floor. Before attaching the wall mount to
surfaces other than plaster board, please contact your nearest dealer for additional information. lf you
install the TV on a ceiling or slanted wall, it may fall and result in severe personal injury.
\
NOTE
a
Standard dimensions for wall mount kits are shown in the table below.
a
Samsung wall mount kts contain a detailed installation manual and all parts necessary for assembly
are provided.
a
Do not use screws that do not comply with the VESA standard screw speci{ications.
a
Do not use screws that are longer than the standard length or do not comply with the VESA
standard screw specifications. Screws that are too long may cause damage to the inside of the TV
set.
For wall mounts that do not comply with the VESA standard screw specifications, the length of the
screws may differ depending on the wall mount specifications,
Do not fasten the screws too firmly. This may damage the product or cause the product to fall,
leading to personal injury Samsung is not liable for these kinds of accidents.
Samsung is not liable for product damage or personal injury when a non-VESA or non-specified
wall mount is used or the consumer fails to follow the product installation instructions.
W at more than a 15 degree tilt.
a
Do not mount the
a
Always have two people mount the W on a wall.
S
Remove the screws in the mounting holes before you instail the wall mount.
Do not install your Wall Mount Kit while your
injury due to electric shock.
W
is turned
on. lt may result in personal
lnstalling a Wdl Mount from Another Manufacturer
To install a wall-mount from another manufacturer, use the HolderRing.
f,"*
\
s,
5,
Plug the power cord into a wall outlet only after you have made a I other connections.
lf you are connecting your TV to a cable or satellite box using HDMI, Component, or Video
connections, you do not need to connect the ANT lN jack to an antenna or a cable connection.
Use caution when you move or swivel the TV if the antenna cable is tightly connected, You could
break the antenna jack off the TV.
The EX-LINK connection is for service only.
Using an HDMI Cable for an HD connection (up to 1080p, HD digital signals)
For the best quality HD picture, we recommend using an HDMI connection.
Use with DVD players, Blu-ray players, HD cable boxes, and HD Set-Top-Box satellite receivers
tr
!
!
I
|
:-.
,,r,
:
]
-.;=-!1.-,-::=
l
HDhfir rN 1 {DVr}, HDMi lN 2 {ARC), HDMI lN 3
.
.
For the best picture and audio quality, connect digital devices to the TV using HDMI cables.
An HDMI cable supporls digital video and audio signals, and does not require an audio cable.
-
To connect the
W to a digital device that does not suppod
HDMI output, use an HDMI to DVI
cable and audio cables.
.
lf you connect an external device to the W that uses an older version of HDMI, the video and audio
may not work. lf this occurs, ask the manufacturer of the device about the HDMI version and, if it is
out of date, request an uPgrade.
.
Be sure to purchase a cerlified HDMI cable. Otherwise, the picture may not display or a connection
error may occur.
.
We recommend using a basic high-speed HDMI cable or an HDMI cable that is Ethernet
compatible. Note that this product does not suppotl the Ethernet function via HDMI.
.
This product supporls the 3D and ARC (Audio Return Channel) functions via an HDMI cable. Note
that the ARC function is supporled by the HEMI lN 2 {ARC) pod only.
.
The ARC function allows digital audio to output via the l-iDl\41 lnl 2 {ARe} port on the W. lt can be
enabled only when the TV is connected with an audio receiver that supporls the ARC function.
Using a Component Cable (up to 1080p HD signals) or an Audio/y'ideo Cable (480i analog signals only)
Use with DVD players, Blu-ray players, cable boxes, STB satellite receivers, VCRs.
i
t
I
i
t
;
Lr-
i
I
l
=---'.--
AUD]O OUT E&*g COMPONFNTOL]T
a
tuEGffiffi
1l
t
f
3Z incfres model only
I
.E
*.i-.:.,L:*.-
--,.'_:-;:tj-r'-_'6.:r,rl---.-,
ii.sgl
a fr
r'l
,.ry
!!rl!4
rlll
:lEd
lHi
Red
Wh
te
j
vtDFoottr $l AltDoolT
{
!
I
5'
6l_Tre & 6ae
i
I
For better picture quality, we recommend the Component connection over the A/V connection.
Rr When you connect
a Video cable to C0lVlpONEf,lT I AV lf.l, the color of the CO}/IPONENT / AV lf{
lvlPEO] jack (green) will not match the video cable
(yellow).
Using an Optical (Digital) Cable Connection and a Standard Stereo Cable Connection
Use with Digita Audio Systems, Amplifiers, and Home Theaters,
"t
'....i.
,i....
.t-r'I-'--'r";=1-
i
-
32 inches model only
-:l
:t;:::.it'3-=:'-__':l
':,''':""
l
i
t
!
An AL!mNO OLJT:
o
o
Connects to the audio input jacks on your amplifier/DVD home theater.
When connecting, use the appropriate connector.
When you connect an audio amplifier to the A{jE10 Oi.tT lacks, decrease the volume of the W and
adjust the volume level with the amplifter's volume control,
DlGlT,ait At-iElO OUT (oPTNCAL)
.
When you connect a Digital Audio System to the O|G|TAL Al".,nlO CIL,'T {OFTICAI-}jack, decrease
the volume of both the TV and the system.
.
.
5.1 CH(channel) audioisavailablewhenyouconnecttheWtoanexternal devicesupporting5.l CH.
When the receiver (or home theater) is set to on, you can hear sound output from the W's optical
jack. When the W is receiving a DW signal, the W will send 5,1 CH sound to the home theater
receiver. When the source is a digital component such as a DVD player / Blu-ray player / cable box
/ STB (Set-Top-Box) satellite receiver and you connected it to the W via HDMI, you will only hear
2 CH audio from the home theater receiver, lf you want to hear 5.1 CH audio, connect the digital
audio out jack from your DVD / 3lu-ray player / cable box / STB satellite receiver directly to an
amplifier or home theater.
Using an HDMI cable or an HDMI to DVI cable
\
5
Your PC may not support an HDMI connection
Use your PC speakers for audio.
r:?nt
l- Ef
I
a
t,
,i
.\
l'
32 inches model only
ffi.r':1"
ffi= ffi"F-k*
7
ffi
The optimal resolution is 1920 X 1O8O @ 60 Nz. See the Display Resolution page for all available
resolutions (page 43)
\
NOTE
.
.
.
For an HDMI to DVI cable connection, you must use the l-lDhill lN 1 {DVl} jack.
For PCs with DVI video out jacks, use an HDMI to DVI cable to connect the DVI out on the PC to
the !-*DMi NN 1 {PVl) jack on the W. Use the PC's speakers for audio.
PC (D-Sub) input is not supporled
You can set up your W so that it can access SMART
(LAN) using a wired or wireless connection.
5,
W applications through your local
area network
After you have "physically" connected your TV to your network, you must configure the network
connection to complete the process. You can configure the connection during the lnitial Setup
process (see page 23) or after the lnitial Setup process, through the TV's menu (see page 31).
Network Connection - Wireless
You can connect your TV to your local area network (LAN) through a standard wireless router or modem
Wireless lP Router or
l\/odem ihat has a DHCP
The LAN Porl on the
Wa
Server
,{t
i;T
l ta
I t\
\\
"
LAN Cable (Not Supplied)
This TV supports the IEEE 8O2.11alb/g and n communication protocols. Samsung recommends using
IEEE 802.1 1n. lf you play video using IEEE 802.11a, b, or g, the video may not play smoothly.
Most wireless network systems incorporate a security system thai requires devices that access the
network through an access point or AP (typically a wireless router or modem) to transmit an encrypted
security code called an access key.
Your
.
.
W is compatible
with the following security protocols:
Authentication Mode: OPEN, SHARED, WPAPSK, WPA2PSK
Encryption Type: WEP, TKIP, AES
lf you select Pure High-throughput (Greenfield) 802.1 1n mode and the Encryption type is set to WEP or
TKIP on your AP or wireless router, Samsung Ws will not supporl a connection in compliance with new
Wi-Fi certification specifications.
Network Connection - Wired
There are three main ways to connect your
setup. They are illustrated starting below:
W to your network
The l\,4odem Pod on the WaLl
using cable, depending on your network
TV Rear PaneL
External Modem
(ADSL / VDSL / Cable T\4
tAN Cab e (Nol Supplied)
l\,4odem Cable (Not Supplied)
The l\ilodem Port on ihe Wal
External l\,4odem
(ADSL / VDSL / Cable T\4
llodem Cable
(Not Supplied)
LAN Cab e
(Not Supplied)
Rear Panel
W
Rear Panel
LAN Cable
(Not Supplied)
The LAN Pofi on the Wal
LAN Cable (Not Suppl ed)
s The TV does not support network speeds less than or equal to 1OMbps.
\
lS
Use Cat 6 (STP Type.) cable for the connection. (-Shielded Twisted Pair)
lnstalling batteries (Battery size: AAA)
Match the polarity of the batteries to the symbols in the battery compadment.
.\*\\
{X"
\*h\.
o
\ \-\>
\
\
R\
\.,/
\.t
NOTE
.
.
e
.
lnstall the batteries so that the polarity of the batteries (+/-) matches the illustration in the battery
comparlment.
Use the remote control within 23 feet of the TV.
Bright light may affect the performance of the remote control. Avoid using it near fluorescent lights
or neon signs.
The color and shape of the remote may vary depending on the model.
eFi, MIENU,
\1CIL, CFi'
SCIURCE,:, MUTC, \ICIL,
on your remote. EsPeciallY note ${]UHU
Learn where the function buttons are
gX{T.
ioor-s i3, tNFo, cF{ Llsr, RETN'}RN and
and can be used
Power, Channel, and Volume buttons
Q:, This remote control has Braille points on the
by visuallY imPaired Persons'
D splays
and selects the avallable video
sources (Page 27)
Turns the
W on and off
Turns the remote control liqhi on or
off. When on, the butions becorne
for a moment when pressed
ilLuminateci
(STB)
Lets you control the Set Top-Box
connected to the TV using your renrote
After You connect the devlce to the
ry the rernote control can control ihe
nav gat on, number, and other keYS
needed to oPerate and control the
device (Page
19)
(Usinq the remote control wlth this
button set to On will reduce the battery
usage time.)
EEtil
Gives direct access to channels'
Returns to the Previous channel'
Press to select additional digltaL
channe s be ng broadcast bY the same
cco
cl'q.-al s.at on ro- 'arrpre to se
rrFl o e'S
. hJr-or a-3 , p.es) 5/ .
Cuts off the souncl temPorailY
'
Changes channels
' 'and'3''
Adiusts the vo unre'
Brings up the Smad Hub applications
See e Manua chapter Advanced
Smart Hub
Features
-
Dlsplays channe llsts on the screen'
OPens the
Starts search function see e-['4anual
Search
chapier Advancecl Features
+
OSD (['4enu)
D
Quickly select frequently used functl0ns
For
Use thls button ln a specflc feature'
cietails, refer to the e-Manual'
Moves the cursor, se ects the on-screen
menu ltems, ancl changes the vaues
seen on the W's menu
splays nformatlon on the
ry
screen
Exlts the rnenu.
Returns to the Previous menu'
FainilY S10ry: Connect to the FamilY
(nao"l
Story app toLior' See e-Ny'dnlra'
, Storv
Achdflr€o Eea.L'"s
lMTS: Pr"S rO Sel6C1 a \Ou"d 1a,
vou want to llsten fronr among the
Use these buttons according to the
clirections on the W's screen'
'Fa'
O"^. r:e.ro o OdOCdSIACj Seo e-\'4a
crapre'Ba.'u Fe.tJres
The color and shape of the remote
control maY vary dePending on
the model
al
AdJJS- g
Sound Settings
r-, r Turns the 3D ifllage on or off See
e-lvlanual chapter Advanced Features
Using the 3D funciion
Use these buttons ln a specific feature
For details, refer to the e N'4anual
8l
'
-
SUPPORT: Lets You use varlous
support functlons inc uding the
e Manua . (Page 33)
snnnsuNG
F.S|ZE: Lets You select the Picture
Size. See e.I,4d1.a , naoLer Ba. c
Changing the Picture S 7e
Feature
-
CC: Displays digital subtltles See
e N/lanual chapter Preference Features
Other Features.
-
Setting up Universal Remote with The Universal Remote Setup Application
\
lf your remote controller buttons
does not work, please set your remote to TV mode by using the
DEVICE button.
1. To set up Universal Remote, press the SETUP button on your remote.
2. To identify your remote, press and hold the SETUP button for 8 seconds. lf you use this function for
the first time, the END USER LICENSE AGREEMENT screen appears.
3. Press the
B
button to select AGREE. lt is required to agree with the terms prior to using Universal
Remote.
4. Select a remote control you have. The remote option menu screen appears.
5. Select Add a device to control. The Select a device screen appears.
6. Select an external device you want to connect. The lnput Source screen appears.
7. Select a port that the external device is connected to the W. lf your W cannot find an external device,
please check your external device connection, and then try again by selecting Refresh.
8. To search a brand name, select Search brands/TV service providers. The QWERTY keypdffscreen
appears. lnput a brand name using the QWERry keypad screen. When done, select Done. Wait until
the search is completed and then select a brand name in the search result.
9. Select Search Model. The QWERTY keypad screen appears. lnput a model number in the same
way as Step 8, and then select a model number you have in the search result list. lf you can't find the
model, select Recommended model. The W progresses a test using the code set of the brand you
selected. lf you select Recommended model, go to Step 11 . lf you select a model in the search result
.13.
list, go to Step
10. The Test screen appears. Press and hold the SETUP button for 3 seconds. Numbers appears on the
screen.
11. Enter the following numbers using your remote. The button test screen appears.
12. Press the v CH .,\ button to test your remote. lf your external device working, select Yes, go to
the next step. to register the device. lf you external device is not work, select No, try the test with a
different code set.. lf you select No, try the test with a different code set., the W changes the code
data, and then the Test screen reappears. Try again Steps 10 to 12.
5
lf all the code data do not work, please check the brand name or search a model name of your
external device again.
13. Your external device has been setup successfully.
S
When you use the BD home theater by using Universal Remote, some buttons may not be supported.
ln this case, we recommend to use Anynet+ (HDMI-CEC) function.
Setting up Universal Remote with Universal Remote Code Set
lf your remote controller buttons does not work, please set your remote to
W mode by using the DEVICE
button.
1.
To set up Universal Remote, press the SETUP button on your remote for 3 seconds. All the LEDs on
the top of your remote blink twice simulaneously.
2.
3.
Press the 1 button on your remote to select a Set-top box.
Press the number button corresponding to the port of device connected.
S
Port numbers are as follows:
4.
Enter Universal Remote Code corresponding to device you have.
s,
For more detailed information about Universal Remote Code, refer to "Universal Remote Code Set list"
on page 21.
Using your remote as a Universal Remote
ln Universal Remote mode, you can use your remote to control your W and STB together, your TV alone,
or your STB alone. When you have set your remote to control your W and STB, cerlain buttons control the
TV only and certain buttons control the STB only.
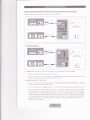
o
Controlling the TV and STB Together
To control your W and STB together, press the WATCH TV button at the top
center of your remote. The W and STB LEDs go on and off. lf the W is on, it
automatically changes to the source the STB is connected to.
You can control the W and Set-Top box using the universal remote. (For
example, press the Volume button to adjust the W volume, press the
channel button to change the STB channels, etc.)
s,
See the illustration to the right. When you are using the remote as a
universal remote, the buttons demarcated for TV control the TV only and
the buttons demarcated for STB control the set top box only.
S
To turn only the TV off, press the DFVICE button, change to TV mode,
and then press the (5 button. To turn only the STB off, press the
DEVNCE button, change to STB mode, and then press the (5 button.
To turn the TV and the STB off, press the (} button and hold it for two
seconds.
*i
i.
lr
Controlling the TV only.
Press the DEVICE button and change to TV mode. The
W using the universal remote.
W LED goes on and off. You can only control
the
Controlling the STB only
Press the DEVICE button and change to STB mode. The STB LED goes on and off. You can only
control the Set-Top box using the universal remote.
To initializing (reset) the Universal Remote Control
lnitializing erases the current code set from the remote control's memory
1.
Press the SETUF button for 3 seconds. All the
simultaneously.
2.
Press in sequence: 9, 8, 1.
3.
The
W and STB LEDs
on the top of your remote blink twice
W and STB LEDs on the top of your remote blink once simultaneously, and then the Universal
Remote Control initializes.
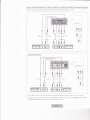
Setup Codes For Cable Set Top Box
1
481, 1 602, 1 822, 2482, 2655
1316, 1877
1376,1877
0040, 01 44, 0838, 2692
1376, 1877 ,2187
1
87
7, 1 982, 2345, 237 8, 3028
0476. 1376. 1877 , 1982, 2187 .2576
1376, 1877
0476, 0858, 1376, 1982, 1998, 2378
1376.1877
aaag,4877 , 1877
0008, 1376, 1877,1982
I
u44,
0040, 0144, 0B3B
A877
, 1877
0476.1376
0008, 0858, 0877 , 1877 , 1982,2345,3A2B
1376, 1877 ,2187
1376, 1877
Setup Codes For Satellite Set Top Box
1
442, 1 609
1276, 1377 , 1442,1609
0796, 1255,3321
When you turn the J\,l on for the first time, a sequence of screens and on-screen prompts will assist you in
button to
configuring the W's basic settings. Plug the power cord into a wall outlet, and then press the
turn on the W.
Ar Setup is available only when the input source is set to TV. See "Changing the lnput Source" (page 27)'
$
Rt To return to the previous step in the Setup sequence, seleci Previous.
q1 lf you are not using a cable box or satellite box, make sure you have connected the TV to an antenna
or cable connection before you turn on the TV. See page
qI
.
1O
for instructions.
lf you want to configure a wired network connection during Setup, make sure you've connected
a LnN caOte to your TV. See pages 16 for instructions. lf you want to configure a wireless network
connection during Setup, make sure your wireless modem or router is on and working.
*I .
Menu
Language:
Select a
.|. .
(,
,l::l::l;:ll.:ll
:.i::ii:l:.l::.li
Language.
Use Mode: Select On the Use Mode screen, select the Home Use using your remote, and
rhen serect Next. The Nerwork Settings screen appears.
the Home Use
MOde,
Mode.
eJ, Store Demo is for retail environments only. lf you select Store
Demo, some functions will not work, and the TV will reset all
functions to their factorv default every 30 minutes. For more
information about Store Demo, go to the end of this section.
Network
Settings:
Configure the
network settings
;.,.:,:l.
After you press the S button, the Start screen appears. Select Next
to continue. The Menu Language screen appears. Select lhe menu
language you want using your remote, and then select Next. The W will
display on-screen menus using the language you select beginning with
the next step in the SetuP Process.
S
fo
Next using your remote, and
then go to 3A - Wireless Network or 38 - Wired Network on the next
To configuring your network settings, select
Page
configure
lf you do not know your network configuratton information or want to
Skip.
selecl
later,
configure the settings later, or do not have a network, select Skip, and
You can set up
then go to 6 - Auto Program (1) on page 25.
::lY:l^,^'1"
connectlon larer
on-I
Lr re u!
ustng
rs tne
i'rr:r:rr uorr
screen Netwofk
]ri:.ii'
:t.:t:t.: menu.
To configure network settings later, refer to "setting up the wired or
wireless Neiwork" in the e-Manual or see the Network Connection
monr rat (pages
/naaao 15
1q and
onr1 31)
a1\
^^^+i^n^
in +hio
this manual
sections in
1,1'iadgss'l\letwork
1. The TV searches for and then displays all the wireless networks
within range. When done, it displays a list of the networks. ln the list
of networks, move the Highlight to select a network, and then select
Next. lf the selected network requires a Security Key, the Security
Key screen appears.
S'
lf you have a WPS(PBC) compatible router, select WPS(PBC)
instead, and then follow the directions on the screen. When
done, go to Step 4.
2. Enter your network security key or WPS PIN using your remote.
S
Enter numbers and letters using your remote.
o
.
You can enter numbers by pressing the number buttons on
the remote.
To enter a letter, move the Highlight to the letter, and then
select it. You can enter numbers in the same fashion if you
choose.
5
To display capital letters (or redisplay small letters if capital letters
are displayed), select Caps or Shift.
5
To display symbols and punctuation, select
letters, select
again.
*
*.
To redisplay
3. When done, select Next if you have entered a security key or WPS
PIN if you have entered a WPS PlN.
W checks the wireless connection. lf the connection is
successful, the You are connected to the lnternet. lf you have any
4. The
problems using online services, please contact your lnternet
Service Provider. message appears. Select Next, and then go to 4
Software Upgrade Step.
S
lffirfedr:'rN ork'l
lf the connection fails, select Previous, repeat Step 1 and 2,
carefully re-enter your security key or WPS PlN, then repeat
Steps 3 and 4. lf it fails again, select Next on the "Connection
Failed" screen, and then go to 6 - Auto Program (1) on the next
page. Configure your network later through Network Settings
in the TV's Menu. For more information, refer to "Setting up the
Wired or Wireless Network" in the e-Manual or see the Network
Connection sections in this manual (pages 15 and 31).
The TV checks the network connection, then displays the You are
connected to the lnternet. lf you have any problems using online
services, please contact your lnternet Service Provider. message
appears. Select Next. The Software Upgrade screen appears.
Software Upgrade:
Update the software
to'tlie latest version
5,,To"update later,
seleci Skip.
When Network Settings is complete, your W will check for a new
software version automatically. lf new software is available, the W
downloads and installs the new software. When the download is
complete, select Next.
Rr lf you want to upgrade later, select Skip. For more information, refer
to Software Update (Preference Features - Support Menu) in the
e-Manual.
a:, This may take some time, depending on your neiwork status.
al
You can only upgrade software if your TV has an active network
connection.
5,
lf no new update software is available, a no new updates message
appears on the screen. Select OK.
s
5:
Auto Piogl'am (1):
sebct wheie,,you!',
TV:signal con"res
,fft]frl...iriirt:i: ir, rii
Auto'Pr'6nr"* rr,,
Select ttre'search
oPlionS.:'.,,..,':..
: . ,'.
Select the appropriate option for your
W
using your remote, and ihen
select Next.
o
Yes, I need to.: Select if you have an antenna or a cable connection
without a set-top box. lf you select this option, go to 6 - Auto
Program (2)Step.
o
No, I don't need to.: Select if you have a satellite or cable set-top
box. You do not need to run Auto Program. lf you select this option,
go to 8 - Clock on the next page.
1. Select Air or Cable using your remote. A check appears on your
selection. When done, select Next. You can check both if you have
both connected.
2. lf you selected Air, go to 7 - Auto Program (3).
3. lf you selected Cable, you'll go to the cable system screen. Select
Digital Cable System. The option window appears. Select the
correct cable signal format; STD, HRC, or lRC. Most cable systems
use STD (Standard). Repeat the same process with Analog Cable
System,
4. When done, selecL Next.
Auto''Program
Channel
memorkation
{3):
Channel memorization stars. Channel memorization can take up to 45
minutes, depending on your cable system.
For more information, refer to Auto Program (Channel Menu
Memorizing Channels) in the e-Manual.
5, Select Stop
-
ai any time to halt the memorization process,
a u lt = la
=!= ==!=
then select Next'
Select Auto or Manual, and
(1)' you can
need to' in 5 - Auto Program
lf you selected No, I don't
oi6*::selthe
Cl0ci{!.l,,;'..,.:-
5
:,.,''::.l,].,r,.
out" manually' using your remote'
only set the current til-"" unJ
Auto
correct time
lf vou selected
download the
Auto, the TV will automatically
will appear' Select vour
screen
rne rime Zone
l;J#";i;i,;i:r.""""r
ihe DST (Davlight
Time Zone, and then
Savings Time)
hour to
""1;"i'N"^t
i'""ii"" sets the time aheadyouone
screen will appear' Th" ;;;
to turn
want
if
On
Select
su"inst Time
adjust the clock for oavrig-ni
adlustment You
DST
the
off
turn
il;;oFio
the DST adjustment
screen menu
l"it ,he DST""function on through lT TV t on
""" "r." S;ri"* -
I O4en^;-
Time
-
61ssk
-
DST)'
: Manual
Date or
go to the, Clo^ck screen Select
selected Manual, you'll
When
your
remoie'
using
out" and time
Time. You can set the
"']""nt
Next'
the Date and Time' select
n
,,
'
, ion" t"tong
Setup;:OomPleter
,:
"t
then select Close to finish'
Review the Setup data, and
Th" completed settings are displayed'
5,
lf You Want to Rerun Setup"'
Menu-SYstem-SetuP
setiP^1J""^il,To-;::lii
.
r-^ntrnllor rnrhen thg DOtl
mode
t:^!:^
t?HJ:
"' '"'u;i;i"rlo11"].t (toTir:i,t'iffi;,:::1.ti:
MENU (ffi)) and hold fot
ro
To set or unset store Demo
eusn
appears
usins
screen
menu
menu
:l:?"";";;:l';;;."',;;.i;;'rrn"tion
on rhe Function menu
111]|, itot"
Demo' brinq up the Function
i. ,"t roilnc"t
See
stoie-i",i;r"o"
tre
seconds
5
than 5 seconds.
(€jfano rrord ror"more than
,,ght ft"
contro,er, push the
outside of
ouISIue
the
;;"g;9;t
;;;i;;;ir-."
i;formation about the controller'
tf
ffi;;;
Source
$-
Source
When you are watching TV and you want to watch a movie on your DVD player or Blu-ray player or switch
to your cable box or STB satelliie receiver, you need to change the Source.
I
TV
1.
Press the
2.
Select Source. The Source screen appears.
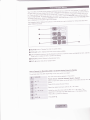
/ HDMI1/DV| / HDMI2 / HDMI3 / AV / Component
$
button on your remote. The Smart Hub screen appears.
3. Select a desired external input source.
q
Alternatively, you can access the Source screen by pressing the
SOURCE€ button on your remote
s You can only choose external devices that are connected to the TV. ln the displayed Source list,
connected inputs are highlighted.
How to Use Edit Name
Edit Name lets you associate a device name to an input source. To access Edit Name, press the
TOOLSF button on your remote when the Source list is displayed. The following selections appear under
Edit Name:
f
/DVD/ CableSTB/SatelliteSTB/PVRSTB/AVReceiver/Game/Camcorder /PC/DVl
/ DVI Devices / T\l / IPTV / Blu-ray / HD DVD / DMA: Select an input jack, and then select the
VCR
PC
name of the device connected to that jack from the list that appears. For example, if you have your Bluray player attached to HDMI lN 2 (ARC), select Blu-ray for that input.
S
\
S
you connect a PC to the HDMI lN 1 iDVl) port with an HDMI cable, assign PC to HDMIl/DVl
Edit Name.
lf you connect a PC to the HDMI lN 1 (DVl) port with an HDMI to DVI cable, assign DVI PC to
HDMI1/DV| in Edit Name.
tf
in
connect an AV device to the HDMI ll,l 1 (DVU port with an HDMI to DVI cable, assign DVI
Devices to HDMI1/DV| in Edit Name.
lf you
You can see detailed information about the selected external device.
Refresh
lf the external devices are not displayed in the Source list, open the Tools menu, select Refresh, and then
search for the connected devices.
\
Alternatively, you can refresh the Source list by pressing the
H button on your
remote.
4.
4
ll
=4r4
=
functions
YourrV's Main and rools menus contains
tl?l':t^Yi:^":lT,"J"tt:'#:.1?il,{31i5?:ilil1?Ji
L"$Yf*11?::::::ffi::1;:J;$;;;:lis{":r:*""t:::::::;"?i3[i3i]"[1,","i,11'l#u*"
YLl?":?::5f"T:l3ifl:JiJ:ilTffii1;ry:l:;":,"*,n"[?[','H*l;iTl',)"1?%il"1"1
;:.ili:1#:'::.",Hi"H:::":$;#J;g"-''"'"*r:lJi::::*Y:il:,ff#iH?JeU"#T?
;,"# ioor' '"n" are avairabre when the rooN*$$3 menu
?:'*'"8?::"'3H:x';J,"r?::::;J?"Ju1'J#
right of the screen
fcon ls Olsptayed on the bottom
and
navigate the menus and select
buttons on the remote you use to
The illustration below displays the
adjust different f unctions'
ffiee
ffifu#"€
':;
reffiil
t
j
'',..-,"-'*,".'."-'****"'
O
on-screen rnenu'
&4Ef{Um button: Displays the main
I
menus when available'
TOOLS$1 button: Displays the Tools
item. Use the
to move the cursor and highight an
buttons: Use the Direction buttons
O
- ts
ano Direction
;;d; button to select an item or confirm the setting'
()
previous menu'
RETURN: button: Returns to the
the on-screen menu'
@ EXIT*,$ button: Exits
on the menu option you select'
The access steps may differ depending
the screen:
The main menu options appear on
&A€S{{,}ffi -
System' Support'
Picture, Sound, Channel, Network'
;:7 g ::'.
''t:.,ai.:.r':r l.
':''
:rr''l ?
I
:rr:'
' "
x,/vl'{/}
'[3
,gxtT*l]f
'
',
or
left side of the screen with the '&
Select a main menu option on the
button.
Press f$ to access the sub-menus'
the
Select the desired submenu with
A
or
v
button'
} r or v button The
Adlust the value of an item with the {'
on the selected menu'
depending
differ
in the OSD may
"Jir.tt""t
Press [3 to confirm the selection'
Press FXNT"S.
v
The
W's
Controller, a small joy stick like button on the rear right side of the W, lets you control the TV
without the remote control.
el
The product color and shape may vary depending on the model.
TV Control
The maqe s drav;n
the irofi sde of rhe
bY fac
ry
er
fq
I
:
Remote control sensor
Follow these instructions facing the front of your TV.
6 When selecting the function by moving the W Controller to the up/down/leII/right directions, be sure
not to press the W Controller. lf you press it first, you cannot operate ii to move the up/down/left/right
directions.
Adjusting thevolume
Seleeting a channel
Using the Function
W on by pressing the W Controller when the W is in
standby mode.
Adjust the volume by moving the W Controller from side to side when
the power is on.
Select a channel by mov ng the W Controller upwards and
downwards when the power is on.
To view and use the Function menu, press and release the ry
Controller when the power is on. To close the Function menu, press
and release the W Controller again.
With the Function menu visible, select SMART HUB (8) by moving
the W Controller upwards. The SMART HUB main screen appears.
Select an application by moving the W Controller, and then pressing
the W Controller.
With the Function menu visible, select the MENU (fiil) bV moving the
TV Controller to the left. The OSD (On Screen Display) Menu appears.
Select an option by moving the W Controller to the right. Move the
W Controller to the right or left, or upwards and downwards to make
additional selections. To change a parameter, select it, and then press
Turn the
Power on
menu
:,
Selecting the SMAHT HUB{ffi)
$electing the MENU (m)
the
Selecting a Source
Power Off iS)
5,
(€)
W
Controller.
With the Function menu visible, open the Source (€) list by moving
the TV Controller to the right. The Source list screen appears. To
select a source, move the W Controller upwards and downwards.
When the source you want is highlighted, press the W Controller.
With the Function menu visible, select Power Off ({L) by moving the
W Controller downwards, and then press the TV Controller.
To close the Menu, Smart Hub, or Source, press the
W Controller for more than 1 second.
Standby mode
electric
it off and continues to consume a small amount of
Your w enters Standby mode when you turn
your
in standby mode for long
leave
not
do
power
consumption,
power. To be safe and to decrease
lt is best to unplug the power cord'
periods of time (wnen vou are away on vacation, for example)
w
to five functions that let you manage and access channels'
Smarl Hub provides easy, on-screen access
video
or music on USB devices' cameras' and PCs' select
set favorite channels, access photos, videos,
functions
five
The
is
on
watch
to
you
want
when a show
sources, and set the W to turn on automatically
below:
listed
are
.channel:Letsyoumanagechannels,selectfavoritechannels,addchannelstoanddeletechannels
fromtheAddedCh'list(thechannelsthatappearwhenyoupressthevcH/\button.)
.
Web Browser: Lets you browse the lnternet'
oScheduleManager:Letsyouscheduleshowsandchannelsforviewing.
.
.
video source to view'
Source: Lets you select a connected external
or play photos, videos, or music located on USB devices,
pcs ano cell phones can be accessed wirelessly, through your
digital cameras, cell phones, and PCs.
wireless network.
a host of on-line media and entertainment including
Smart Hub also provides an easy-to-use gateway to
Allshare Play: Lets you
aCCeSS, view,
appsfromtheSamsungAppsstore,streamingvideosandmovies'kidssites'andmore'
5 To access Smart Hub, press the S button on your remote'
5 For more information about Smart Hub' see the e-Manual'
After you have run the initial setup, you can configure or reconfigure the network connections through the
TV's menu.
Configuring a Wireless Network Connection
The instructions below are for networks that use the Dynamic Host Configuration Protocol (DHCP) to
configure network connections automatically. Most wireless networks use DHCP. lf you have a Static lP
network, see the e-Manual for configuration instructions,
To configure the network connection for a network
1.
Connect your
W to your network
2. furn on your W,
that uses DHCP, follow these steps:
as shown in the illustration on page 15.
and then go to ihe Network Settings screen. (Menu
Settings)
-
Network
+
Network
3.
Select Start. The Network function searches for available wireless networks. When done, it displays a
list of the available networks.
4.
ln the list of neiworks, move the highlight
\
5.
to select a network, and then select Next.
lf you have a WPS(PBC) compatible router, select WPS(PBC) instead, and then follow the
directions on the screen.
Enter your network security key or WPS PIN using your remote.
S
Enter numbers and letters using your remote.
r
.
Enter numbers by pressing the number buttons on your remote.
To enter a letter, move
the Highlight to the letter, and then select it. You can enter numbers
in
the same fashion if you choose.
5,
To display capital letters (or redisplay small letters if capital letters are displayed), select Caps or
s'
To display symbols and punctuation, select
shift.
*.
To redisplay letters, select
*
again.
6. When done, select Next if you have entered a security key or WPS PIN if you have entered a WPS PlN.
W checks the wireless connection. lf the connection is successful, the "You are connected to the
lnternet. lf you have any problems using online services, please contact your lnternet Service
Provider." message appears. Select Next using your remote.
7. The
S
For more detailed information, see "Setting up the Wireless Network" in the e-Manual.
5,
lf you want to configure the connection manually, select lP Settings on the Network Connection
screen. Set lP Setting to Enter manually, and then enter the lP Address, Subnet Mask,
Gateway, and DNS Server manually.
Connection
Configuring a Wired Network
MosthomenetworksusetheDynamicHos!!1{iourationProtoco't?!.C:]toconfigurenetwork
the lP address' subnet mask'
ti"i.rpp"rt DHCP lutomaticarrv provide
connections. uon]" nut*orr.,
yo' don't have to enter them manually'
your
oateway, and DNS values
lf you have a Static tp .#;k
w needs to u""".;jr,"" rt't"in"t to
;; il;r;";L-manual for configuration instructions'
Tocon{igurethenetworkconnection{orawirednetworkthatusesDHCP,followthesesteps:
page 16'
1
.
on
as shown in one of the illustrations
Connect your W to your network
2'rurnonyourTV,andthengototheNetworkSettingsScreen.(Menu-Network-Network
Settings)
3.
4.
Select Start
connection' when the c.olnection
appears, and verifies the network
The Network connection screen
have any problems using online
you
tf
connected tJt"# i"Li""t'
*"
tn"'::vo,
verified,
been
has
appears Network set up is
your lnternet service Provider"' message
services, please contact
comPleted.
s
or if you wantto set the
the connection values automatically
network
acquire
cannot
TV
lf vour
manually'
connectionmanually,selectlPSettingson."n"n".*orkconnection.",."un.SetlPsettingtoEnter
Mask, Gateway, and DNS Server
p
manually, anO
tnen'eiilrin"
f
nOO,i"", SuOn"t
SFormoredetailedinformation,referto..SettinguptheWiredNetwork,,inthee-Manual.
l-low to view the e-Manual
You can find instructions for your W's features in the e-Manual, To open the e-Manual
press the SUppORT button on your remote,
You can also access it through the menu:
Menu
-
Supporl
+
e-Manual
Access the e-Manual
To use the e-Manual, follow these steps:
1. When you
need to help, press the SLiPpCIffiT button on your remote. The Support screen appears.
2.
Select e-Manual using your remote. The e-Manual screen appears.
3.
4.
Select a desired category.
Select a des red top c. The e-Manual displays the page you want to see.
ei Blue words n e-Manua s gnify menu opt ons or selections on TV screen,
qi Green icons n the e-Manual signify a button on your remote.
\ Arrow steps (e.9, Menu ' Support - e-Manual) in the e-Manual signify the sequence
required to access an option or activate a function.
How to toggle between an e-Manual topic and the corresponding OSD menu(s).
er, This function is not enab ed in some menus.
\
You can't use the Try Now function if the menu is not available.
1.
To go to the topic's corresponding menu option, press the
2.
To return to the e-Manua screen, press the SiJppORT button on your remote.
il! button on your remote
of steps
Using the colored and function buttons with the e-Manual
. Scroll bar: Scroll the e-Manual screen up or down'
. 1/ l: Moves to the previous or next chapter.
o A TU Now: Move to the OSD menu that corresponds
to the topic. To return to the e-Manual screen,
press the SUPPORT button on your remote'
. E Home: Moves to the e-Manual home screen'
. El Position: Each time you select E, you change the position of the e-Manual screen'
. El lndex: Displays the lndex screen.
. ) Return: Return to the previous screen
How to search for a topic on the index page
E
using your remote' The lndex screen appears'
1.
Select
2.
that begin with the
To search for a topic, select a letter. The lndex displays a list of topics and keywords
letter you selected.
3.
Select a topic or keyword you want.
4.
The e-Manual page with the topic appears.
5, To close the lndex screen, press the RETURNS button'
To Chanqe the screen position of the e-Manual
you can change the e-Manual
lf the e-Manual screen is not invisible well because the OSD Menus screen,
screen's position.
1.
on your remote'
Move the Highlight to the e-Manual screen by pressing the SUPPORT button
2.
press the ts button on your remote. Each time you select Gl, the position of the e-Manual will change'
lf the W seems to have a problem, first review this list of possible problems and solution. Also review the
Troubleshooting Section in the e-Manual. lf none of the troubleshooting tips apply, visit www.samsung.
com/support or call Samsung Customer Service at 1-800-SAMSUNG (1 -800-726-7864).
lf your Samsung Television is flickering or dimming sporadically, you may
need to disable some of its energy efficient features such as the Eco
Sensor or the Energy Saving feature. Follow the steps below with your
remote to turn these features off or on.
Flickering and Dimming
o Energy
Saving: User Menu
+
System
Saving
.
Component Connections
Screen Color
/
Eco Sensor: User Menu
+
System
-
-
Eco Solution
Eco Solution
-
-
Energy
Eco Sensor
lf you find that the color on your Samsung television's screen is not
correct or black and white, first run a Self Diagnosis on the TV to make
sure there are no device issues
.
Self Diagnosis: User Menu
Picture Test
+
lf the problem does not appear in
.
.
Support
-
Self Diagnosis
r
the Picture test, make sure:
Your connections are all consistent. For example, if you've used the
AV ln jack on your T! make sure you have used the AV Out jack on
your video source.
You have connected your devices to the correct jacks. For example, if
you use the Component jacks, labeled Pb, Pr, and to connect your
W and video source, make sure you have connected the blue Pb jack
on the video source to the blue Pb jack on the W, and the yellow Y
jack on the source to the yellow Y jack on the W.
I
Screen Brightness
lf you find that the colors on your Samsung W are correct but just a little
too dark or bright, try adjusting the following settings in the Picture menu
option of the Main menu:
.
Backlight, Contrast, Brightness, Sharpness, Color, Tint (G/R) and
so on.
Blur
lf you find that there is a blur or "ghostlike" appearance to the images on
your television s screen, you might be able to correct the blurring using
Auto Motion Plus.
.
Auto Motion Plus: User Menu
Auto Motion Plus
-
Picture
+
Picture Options
-
Unwanted Powering Off
off by itself, there may be an issue
your
Eco friendly No Signal Power Off
eith"r your Timer settings or
lf your Samsung
*ith
W appears to turn
feature.
First make sure Sleep Timer is not accidentally set The Sleep Timer
turns off the w automatically after a certain period of time has passed.
. Sleep Timer: User Menu System + Time Sleep Timer
-
-
lf the Sleep Timer is not activated, you may have engaged the No Signal
Power Off or Auto Power Off feature.
.
No Signal Power Off : User Menu
No Signal Power Off
.
Auto Power Off: User Menu
Power Off
Trouble Powering On
-
-
System
System
+
-
Eco Solution
Eco Solution
-
-
Auto
Before you turn the TV on, find the red light on the right or left
bottom of your TV. Press the Power on button on the TV or remote'
The light should blink about 5 times before the TV turns on'
lf you find that you are having trouble powering on your Samsung
television, there are a number of things to check before making a call to
the service dePartment.
cord, remote control, and PC are functioning
properly, you may be having a cable issue. lf you have a cable or satellite
lf you're sure your power
box, yourW may appear to be off because the cable or satellite box is
not oitputting a signal. To test the signal output of your cable or satellite
box, press the guide or info button on the cable or satellite box remote
control. lf the screen displays the guide or info data, the problem is
caused by the box.
Stand AssemblY
Cannot Find a Channel
S
lf you have any trouble assembling the stand first, review
Stand" in the paPer manual.
Setup) or run Auto
System
Re-run Setup (Go to User Menu
+
Program)'
*
Auto
Channel
(Go
Menu
to
User
Program.
-
-
www'samsung'com/
For detailed troubleshooting information, watch the troubleshooting videos at
spsn.
The
W won't turn
Make sure the AC power cord is securely plugged in to the wall outlet
and the TV
on.
Make sure the wall outlet is working.
0 button on the W to make sure the problem is not
the remote. lf the W turns on, refer to "Remote control does not work"
Try pressing the
below.
There is no picture/video
Check the cable connections. Remove and reconnect all cables
connected to the W and external devices.
Set the video outputs of your external devices (Cable/Sat Box, DVD,
Blu-ray etc) to match the W's input connections. For example, if an
external device's output is HDMI, rt should be connected to an HDMI
input on the TV.
a
Make sure your connected devices are powered on.
o
Be sure to select the correct input source
a
Reboot the connected device by unplugging it, and then reconnecting
the device s power cable.
Replace the remote control batteries. Make sure the batteries are
installed with their poles (+/-) in the correct direction.
The remote control does not
work.
Clean the sensor's transmission window on the remote.
Try pointing the remote directly at the
The cable/set top box remote
control doesn't turn the TV on
or off, or adjust the volume.
.
W from 5-6 feet away.
Program the Cable/Set remote control to operate the W. Refer to the
Cable/Set-Top-Box user manual for the SAMSUNG W code.
\
This TFT LED panel uses a panel consisting of sub pixels which require sophisticated technology to
produce. There may be, however, a few bright or dark pixels on the screen. These pixels will have no
impact on the performance of the product.
S,
To keep your TV in optimum condition, upgrade to the latest firmware on the Samsung web site by
Downloads).
Support
USB (samsunQ.corn
+
'
EI ooLev
DCTTAL PLUs
----
l
edts
2.0+Digital 0ul
PUr-sFl
stso
Theatersound
HD
Dl,tX"
HD
HAml
you remove the stlcker.
lf a sticker was attached to the TV screen, some debris can remain after
Please clean the debris off before watching TV'
to wipe the exterior
and screen of the product can get scratched during cleaning. Be sure
The exterior
and screen carefully using a soft cloth to prevent scratches'
Caution: Pulling, pushing, or climbing
on the TV may cause the TV to fall. In
particula[ ensure your children do not
hang over or destabilize the TV. Doing
so may cause the TV to tip over, causing
serious injuries or death. Follow all safety
precautions provided in the Safety Flyer
included with your TV. For added stability
and safety, you can purchase and install
the anti-fall device as described below.
The TV-Holder Kit (Sold Separately):
The parls below are included in the W Holder kit. ln addition, you need to provide a wood screw, screw
and molly, or other screw appropriate for the wall or cabinet you intend to secure the W-Holder string to.
We recommend a size M4xL2O wood screw.
' (-
.
'r:.
r.g.
.:r:
:\/l)
Ivnl{tikiei:lr::aill,ll:i.rl:iill:rir,ir:iil
lnstalling the TV-Holder
1.
Remove the screw attached to the back of your W, and then connect the W-Holder to the W with the
screw inciuded in the W-Holder Kit that is designated for your TV.
5,
Make sure to use only the appropriate supplied screw. lf you use a ciifferent screw, you can
damage your TV.
2. Firmly fasten the screw you provided (size M4xL2O or simiiar) to the wall or cabinet where the
be installed.
5
lf you fasten the screw to the wall, we recommend you drive the screw into a
possible, use a moliy to anchor the screw.
W
is to
stud. lf that is not
3.TietheTV-HoldercordtothescrewfastenedtothewallorcabinetsothattheTVisfixed.Seethe
illustrations below'
that it does not fall'
s lnstall the TV close to the wall so
SWhenattachingtheTV-Holdercordtothewall,tiethecordlevelwiththegroundorslanted
downwards for safetY Purposes'
5
5
CheckthecordoccasionallytomakesureitisSecure.
cord first'
separate the connected
Before moving the TV'
check
tP::":"^"JlT:ti"il:J':t;'"1:11il; "'
are properrv ?99"?9^Pflilicallv
4. Verirv alr connections
your connections conra
oolol'aoout the security o{
failuie. lf you have any
.
r
1-8OO-SAMSUNG
ln the United States:
ln Canada: 1-800-SAMSUNG
(1
-800-726-7864)
(1-800-726-7864)
I
sa,aY
1920x 1080
=esciutcn
a^,:r'cc,..lenia{ Consideralrons
3cerating
Tempelgtue
Operating Humidiiy
.
Sioragelbmperature
.
50"F to 1 04"F
i'
1
(1
0'C to 40"C)
0% to 80%, non condens ng
4"F to 1 13"F { 20"C to 45'C)
to 9596
.
Storage Humidrly
59b
Stand SwMel {Lefi
I
-20"
-
2A"
40'Class
Screen Slze
(40.0- measured d agona y)
iDiagcnari
Sound
1OWX2
(Or.rtputj
Dimensions tvv x H xDi
29.2x11 7 x 1.8 inches
,1132x449 /x48.1 mml
Body
With stanri
36.6 x 21.8 x 1.8 nches
29.2x2A3x9.5inches
{930.4 x 555.1 x 48.1 mm)
36.6 x 24.4 x 9.5 nches
713.2 x 516.6 x 241 .3 mm)
(930.4 x 620.9 x 241.3 mm)
Wdght
Without Stand
14 7 lbs
kg)
23.3 bs (10.6 kg)
With Stand.
17 4 lbs (7.9 kg)
26.2 bs (11.9 kg)
i6./
5O'Class
Screen $ae
(49.5" measured
lDagonal)
Sound
(Oiltput)
lOWX2
Dimenslons(/VxHxDi
44.9 x 26.5 x 1.8 nches
41.9 x 24.8 x 1.8 inches
Body
(10658x631.5x48.1
With slan.l
41 .9 x
mm)
142.6 x 674.3 x 48.1 mm)
(1
44.9 x29.3 x 10.8 nches
28.3 x 1 0.8 nches
(1065.8 x 721 .2 x 276.7 mm)
(1
1
42.6 x
7
45.4 x 276./ mm)
Wsight
Wihout Stand
29.1 bs (13.2 kg)
33./
With Stand
33 0 bs
37.9 bs (17.2
(1
5.0 kg)
bs
5.3 kg)
(1
60 Class
Screen Size
(60
(Diagonal)
Sqund
(Onput)
0
measured
1OWX2
DmensLons {\J x
ii
x
fi
54.1 x31 .7 x 1.9 nches
49.4 x 29.0 x 1.8 inches
Body
(12564x738.3x48.1
Wiih stand
(1376.5 x 805.8 x 48.6 mm)
mm)
49 4 x 31.7 x l0.B ir-rches
(1256.4 x 806.4 x 276.7 mm)
54.1
(1
x34.5x
12.1 nches
376 5 x 877.1 x 309.8 rnm)
Wdght
Wltho'ri
2 bs {21.0 kg)
51 B bs {23.5
35.4 bs {16.1 kg)
Sia':i
46
39 4 bs (17 9
\ /iin Slani
Screen Slze
65" C ass
(64.5" measured
Sound
lOWX2
(Output)
Dimendons0
Eody
With stand
/xHxD)
58.5 x 34.3 x 1.9 inches
11487.3x872.4 x 49.0 mm)
58.5x37.4x13.8 nches
11487
3 x 950.7 x 351 .6 mm)
52.6 lbs (23.9 kg)
59.7 lbs (27
1
46 Class
Sdradli]gi26l
(45.9 measured
{.0iasqnali
igdniidu
]OWX2
Bi;rg;nsibnsr{Wr,{1rr80.}
42.1 x25.0 x
36.8 x 22.0 x 1.8 inches
42j
36.8 x 24.5 x 9.5 nches
witli'uditnd
23.5 bs
Wiihislanlt
26.6 lbs (12.1
i:llii:i rr,,l:i:
(1
.8 inches
x 27 .6 x 10.8 inches
107a.2 x7A2-0 x276.7 mm)
(936.0 x 623.5 x 241.3 mm)
witiiciilt"$tdhdr'
1
(1070.2 x 635,6 x 46,9 mm)
(936.0 x 559,8 x 46.9 rnm)
29.1 bs (13.2 ks)
0.7 kg)
33.2 lbs (15.
1
55" Class
r',3Ci6bh,rSlzd
(54.6'measured
1OWX2
Dims€i.qa€]r|i$:XrrH.XirEf
Pqi$jilr]]l.,.i
45.1 x26.7 x 1.8 nches
ltrr'iir
(1
w,ithstbiidi'
146.9 x 678.3 x 46.9 mm)
45,1
l1 1
.
oiglitlii
lAl?h?t
jt
x29.4x 10.8 nches
46.9 x
7
47 .0
x 276.7 mrn)
49,6x29.2x 1.8 inches
(1260.8 x 742.4 x 46.9 mm)
49.6 x 31.9 x 10.8 inches
(1260.8 x 81 1 ,1 x 276,7 mm)
l:Uiirl]:tii rl:l:lli.r.].a.t:t,l:Ui.']]t.,l'l
Slaiid.r.rariirl.,,:i
\/vitlir,gtiltldi
t.tl.rr.uti.ri:lt:iai
i::uiir:ri.tr,lirr..rii,li:ll'i,ltit:iitti.
34.1 lbs (15,5 kg)
36.5 lbs (16.6 kg)
38.3 bs (17.4
40.7 bs
(1
8.5 ks)
5
S
Design and specifications are subject to change without prior notice'
The actual appearance of the TV may differ from the images in this manual, depending on the model.
5,
This device is a Class B digital apparatus.
b
For information about the power supply, and more about power consumption, refer to the label
attached to the Product.
S
Typical power consumption is measured according to Energy Star Program requirements for
Televisions.
Dispose unwanted electronics through an approved recycler.
To find the nearest recycling location, go
to our website:
www.samsung.com/recyclingdirect or call, (877) 278 - 0799
lf you have attached the
Resolution column. The
IBM
MAC
VESA DMT
640 x 350
31 .469
70,086
724 x 404
31 .46S
74.087
640 x 480
35.000
66.667
s
a
25.175
-l+
34.240
51.284
4.551
832 x 624
49.726
7
68,681
75.062
640 x 480
31.469
5S.940
25.175
640 x 480
37.861
72.809
31
640 x 480
37,500
75.000
3r .500
800 x 600
37,879
60.317
40.000
+/+
800 x 600
48.477
72.188
50.000
+/+
800 x 600
46.875
/5,000
49.500
+/+
1024 x768
48.363
60.004
65.000
1024 x768
56.476
70,069
75.000
r
i
i
i
00.000
1
.500
ar-./
78.754
+l+
08.000
+l+
4.250
+l+
1024 x768
60,023
75.429
1152x864
67.500
75,000
1280 x720
45.000
60.000
7
280 x 800
49,742
59.810
83.500
-/+
1280 x 1424
63,981
60.020
108.000
+l+
1280 x 1424
79.976
75.425
135.000
+/+
1
366 x 768
47,712
59.790
85.500
1
440 x 900
55.935
59.887
1
06.500
+l+
-l+
08.000
+l+
1
600 x 900RB
60.000
60.000
r
1680x1050
65.290
59.954
146.250
1920x1080
67.500
60.000
1
NOTE
The interlaced mode is not suppoded.
The set might operate abnormally if you select a non-standard video format.
t
t
+/-
1152x870
1
1
W to your PC, you can select one of the standard resolutions listed in the
W will automatically adjust to the resolution you choose.
W
48.500
+/+
Dl\X 3,11/4.x/5.x/6.x
.avl
-.mkv
1920x1080
*.wmv
AC3
-.mp4
LPCIV
- 3gP
..vro
N/KV
rvs)
..mpg
ASF
AAC
..mpeg
NIP4
HE-,4AC
-.ts
3GP
WIVA
..tp
VRO
DD+
-.trp
MPEG(N/P3)
*.mov
VOB
oc
-,flv
TS
G.711(A-Law,
AV]
ADMPCIV(IN,4A,
DTS Core
-.vob
u-Law)
-.svi
-.m2ts
-.mts
..divx
-.webm
Other Restriction
play, or not play correctly, if there is an error in the content or the container'
the compatible
not work if the contents have a standard bit ratelframe rate above
qJ Video content will not
\
Sound or video may
Frame/sec listed in the table above'
slfthelndexTableisdamaged,theseek(Jump)functionisnotSupported.
5'WhenyouplayvideooveranetworkConnection,thevideomaynotbeplayedsmoothly.
RIThemenumaytakelongertoappearifthevideo,sbltrateexceedslOMbps'
5'SomeUSB/digitalCameradevicesmaynotbecompatiblewiththeplayer.
Video decoder
.
.
.
.
.
Supporls uP to H.264, Level 4 1'
N.264 FMO / ASO
/
RS,
VCl
SP
/
N/P
/ AP L4 are not supporled'
For all Video codecs except VP8, VP6:
-
Beiow 1280 x 720: 60 frame max
Above 1280 x 72O:30 frame max
GMC is not suPPorled.
Supports only SVAF Top/Bottom and Side by Side'
Audio decoder
MO)'
supports up to 5.1 channel and M2 profile (except LBR mode of
o
wMA 9,
.
.
WMA lossless audto is not suppoded.
1O Pro
lf Vorbis is only in Webm container,
suppotls up to 2 channel'
I
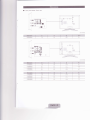
Jack panel detail
/
Rear view
ffiffi
,iH;t
ffitu
o
Hra
m@
-T
sH
HE
+ffiI:E
(Unit: inches)
(Unit: inches)
are subject to change without prior
NOTE: All drawings are not necessarily to scale. Some dimensions
of your TV. Not responsible for typographical
notice. Refer to the dimensions prior to performing installation
or printed errors.
@ 2O12 Samsung Electronics America, lnc
fi::Ti":ffiI"9.'y,l:::H"':'*
f,a66-sax7 gu
about
6
(7
26 -7 86 4\
gul\16
1 a635aM
(7
26 -7
t\l
your'u"'nn
*
o.u" "on'u""n'
864)
ffig
lnc , Customer service.ss
Mississauga, ontario L5R
Eb"ttt bt At"tb", lnc 85 Challenger Road
Eb"tr-ot Cu*du
i".olic*,tt
Sra*"S
Ri.locjield Park, NJ 07660
ill I il illililllllllllllllllilllil
@
Ltd' All rights reserved'
2012 Samsung Electronics Co''
BN68-04',192A-03
I
ll
ll
l[