1
Model 435L
Owner’s Guide
warranty
LIMITED PARTS AND LABOR WARRANTY
LoJack Corporation ("LoJack") warrants that if the alarm system (hereinafter the "Unit" and defined as the alarm module and, if installed
during initial alarm system installation, external sensors and siren),
exclusive of remote transmitters, installed in your vehicle proves to be
defective in material or workmanship within two (2) years from the
date of installation we will, at our option either replace the defective
Unit or component, or provide without charge the labor and the parts
necessary to remedy any such defect at a LoJack installation center.
LoJack's responsibility is only to replace or repair the LoJack products
and not for any additional payment, regardless of the nature. For a
period of ninety (90) days after installation, LoJack will provide parts
and labor or service to repair or replace any part of the remote transmitter which proves to be defective in material or workmanship.
Batteries are not manufactured or warranted by LoJack. It is your
responsibility to replace remote transmitter batteries as recommended
in your Owner's Manual.
To obtain service under the Limited Parts and Labor Warranty contact the LoJack Service Department by calling 1-800-4-LOJACK.
You must present your vehicle and dated proof of purchase to a
LoJack Installation Technician at the time of service.
CONDITIONS, LIMITATIONS AND EXCLUSIONS
The LoJack products covered by this warranty are permanently installed on
the original owner's vehicle and cannot be transferred to another vehicle.
This LoJack warranty is limited to the original retail purchaser and is not
transferable. Purchaser must comply with all the terms of this warranty.
If a warranty claim has been made, LoJack reserves the right to inspect
the unit before repairing or replacing the unit. If upon inspection of the
unit, no defect in material or workmanship is observed, then a labor
charge may be assessed. LoJack, in its sole discretion, will determine
what constitutes a unit that is defective in material, or workmanship.
i
This warranty does not cover any unit that may have been installed,
removed, serviced or modified by anyone other than an authorized
LoJack Technician. This warranty is void if: the unit's date code or serial number is defaced, missing or altered; the unit has been damaged
by accident, misuse, neglect, or improper service; the unit has been
modified or used in a manner contrary to its intended purpose. This
warranty does not cover damage that results from faulty or leaky batteries, abuse, or damage caused by conditions in the vehicle, or
improper voltage, or fire, flood, lightning or other acts of God.
LoJack reserves the right to make changes in design and improvements
upon its products without assuming any obligation to install such
changes upon any of its units previously manufactured or installed.
EXCEPT AS EXPRESSLY SET FORTH ABOVE, NO OTHER WARRANTIES ARE EXPRESSED OR IMPLIED, INCLUDING BUT NOT LIMITED TO, ANY IMPLIED WARRANTIES OF MERCHANTABILITY OR
FITNESS FOR A PARTICULAR PURPOSE, AND LOJACK CORPORATION EXPRESSLY DISCLAIMS ALL WARRANTIES NOT EXPRESSLY
STATED HEREIN.
THE DURATION OF ANY IMPLIED WARRANTY OF MERCHANTABILITY, FITNESS FOR A PARTICULAR PURPOSE, OR OTHERWISE ON LOJACK PRODUCTS SHALL BE LIMITED TO THE
DURATION OF THE APPLICABLE EXPRESS WARRANTY SET FORTH
ABOVE. IN THE EVENT THAT A UNIT PROVES TO BE DEFECTIVE IN
MATERIAL OR WORKMANSHIP WITHIN THE WARRANTY PERIOD,
THE PURCHASER'S SOLE REMEDY SHALL BE REPAIR OR REPLACEMENT AS PROVIDED ABOVE. IN NO EVENT SHALL LOJACK CORPORATION BE LIABLE FOR ANY LOSS, INCONVENIENCE OR DAMAGE WHETHER DIRECT, INCIDENTAL, CONSEQUENTIAL OR OTHERWISE RESULTING FROM BREACH OF ANY EXPRESS WARRANTY
OR ANY IMPLIED WARRANTY OF MERCHANTABILITY, FITNESS
FOR A PARTICULAR PURPOSE, OR OTHERWISE, WITH RESPECT TO
ANY LOJACK PRODUCT, EXCEPT AS SET FORTH HEREIN.
This warranty gives you specific legal rights, and you may also have
other rights that may vary from state to state. Some states do not allow
the exclusion or limitation of incidental or consequential damages, or
do not allow disclaimers of implied warranties or limitations on the
duration of implied warranties, so the above limitations or exclusions
may not apply to you.
ii
contents
warranty . . . . . . . . . . . . . . . . . . . .i
panic mode . . . . . . . . . . . . . .10
trademarks and copyrights . . . . .1
nuisance prevention circuitry® .11
what is included . . . . . . . . . . . . . .2
diagnostics . . . . . . . . . . . . . . . . .12
important information . . . . . . . . .2
arming diagnostics . . . . . . . .12
system maintenance . . . . . . . .2
disarming diagnostics . . . . . .12
fcc/id notice . . . . . . . . . . . . . . .3
table of zones . . . . . . . . . . . .13
standard configuration . . . . . . . .4
code hopping® . . . . . . . . . . . . . .14
transmitter functions . . . . . . . . . .5
rapid resume logic . . . . . . . . . . .14
standard configuration . . . . . .5
programming options . . . . . . . .15
using your system . . . . . . . . . . . . .6
programming settings . . . . . . . .16
manual (active) arming . . . . . .6
system feature menu . . . . . . .17
automatic (passive) arming . . .6
once a feature is programmed
armed protection . . . . . . . . . . .7
. . . . . . . . . . . . . . . . . . . . . . .18
disarming . . . . . . . . . . . . . . . .8
to access another feature . . .18
disarming without a transmitter
to exit the programming mode
. . . . . . . . . . . . . . . . . . . . . . . .8
. . . . . . . . . . . . . . . . . . . . . . .18
valet® mode . . . . . . . . . . . . . .9
feature descriptions . . . . . . . . . .19
remote valet® . . . . . . . . . . . .10
silent mode™ . . . . . . . . . . . .10
glossary of terms . . . . . . . . . . . .22
notes . . . . . . . . . . . . . . . . . . . . . .24
trademarks and copyrights
Code-Hopping™, Directed®, Doubleguard®, FailSafe®, Nuisance Prevention Circuitry®, NPC®,
Silent Mode™, Soft Chirp®, Stealth Coding™, Stinger®, Valet®, and Warn Away® are all
Trademarks or Registered Trademarks of Directed Electronics, Inc.
G435L 8-03
1
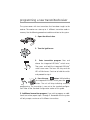
what is included
z
Control module
z
Two four-button remote transmitters
z
A Stinger® dual-stage shock sensor (on-board the control
module)
z
Pre-wired Valet® switch with integrated red status LED
z
Failsafe® Starter Kill relay (if equipped)
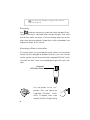
important information
This system has been designed to provide years of trouble-free operation. This system must be installed by an authorized LoJack technician.
Installation of this product by anyone other than an authorized LoJack
technician voids the warranty.
By carefully reading this owner's guide prior to using your security system, you will maximize the use of this system and its features.
system maintenance
This system requires no specific maintenance. Your remote is powered
by a miniature 3-volt battery, type 2032, that lasts approximately one
year under normal use. When the battery weakens, the LED on the
remote will dim and operating range will be reduced. Refer to Standard
Configuration section for battery access instructions.
2
fcc/id notice
This device complies with Part 15 of FCC rules. Operation is subject to
the following two conditions: (1) This device may not cause harmful
interference, and (2) This device must accept any interference received,
including interference that may cause undesirable operation.
Directed Electronics, Inc.
Tested to Comply
with FCC Standards
DRW 396
caution: Changes or modifications not expressly approved
by the party responsible for compliance could void the user’s
authority to operate this device.
3
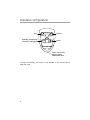
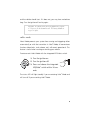
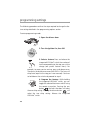
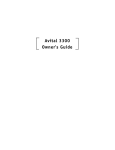
standard configuration
disarm
arm
auxiliary output/trunk
release (if equipped)
AUX
panic
insert coin at this
edge to open
transmitter case
To access the battery, use a coin at the bottom of the transmitter to
open the case.
4
transmitter functions
The functions of the buttons described below correspond to a transmitter programmed with the default Standard Configuration. Refer to illustration for layout of icon buttons.
standard configuration
Button
The arming and locking functions are controlled by pressing this button
for one second.
Button
The disarming and unlocking functions are controlled by pressing this
button for one second.
Button
Silent Mode™ and an optional auxiliary function are controlled by
pressing this button. Silent Mode™ works by pressing
for less
than one second before arming or disarming. An optional auxiliary
function, such as trunk release, is controlled by pressing and holding
for 1.5 seconds.
Button
Panic Mode is activated by pressing and holding
for one second.
5
using your system
The buttons described in all instructions in this manual correspond to
the standard configuration, unless otherwise specified.
manual (active) arming
The factory default is active arming. In this mode you can activate, or
arm the security system and lock your vehicle’s doors (if connected) by
pressing
for one second. When the system arms, you will hear
the horn chirp and the parking lights will flash once. Once armed, the
status LED will flash twice per second to indicate that the system is
actively protecting your vehicle. If you hear a second chirp after arming
and notice that the status LED is flashing in a grouped pattern, this signals Bypass Notification, which is described in the Diagnostics section
of this manual.
automatic (passive) arming
The system can also be programmed to arm itself automatically 30 seconds after the ignition is turned off and the last vehicle door has been
closed (called Passive Arming). Once the 30-second countdown period
initiates, the status LED will flash twice as fast as it does when the system is armed. After 20 seconds, the horn will chirp once to warn that
the system has only 10 seconds remaining prior to arming. The system
is not actually armed at this point. The system arms itself at the 30-second mark. At this point, the vehicle doors will also lock (if programmed
for Passive Locking) and the status LED will begin flashing twice per
second to indicate armed status. If Passive Locking is activated, care
must be taken to prevent the keys from being locked in the vehicle.
6
note: Passive arming may qualify for a higher insurance discount. Check with your insurance agent
note: If any protected entry point (such as a door or switchprotected trunk or hood) is open, Passive Arming will not
engage. Additionally, each time a sensor is triggered during
the 30-second arming countdown, the countdown starts over.
armed protection
Arming your security system protects your vehicle in the following ways:
z
Light impacts to your vehicle will trigger the Warn Away®
signal. The system will pulse the horn and flash the parking
lights for a few seconds.
z
Heavy impacts will trigger the system. The triggered
sequence is 30 or 60 seconds of constant horn honking and
flashing parking lights.
z
If a door is opened, the system will immediately start pulsing
the horn and flashing the parking lights. Three seconds later,
the horn output changes to a continuous blast. This progressive response gives you time to disarm the system with your
transmitter if you inadvertently open the door while the system is armed, while still providing instant response (even if
the door is immediately closed).
note: If programmed for 15 second entry delay, the system
will provide an instant trigger 15 seconds after the door has
been opened (see Programming Options)
z
Turning on the ignition key triggers the same progressive
response as opening a door.
z
If equipped, the starter interrupt prevents the vehicle’s
starter from cranking.
7
note: the vehicle may already be equipped with a starter kill
relay from the factory.
disarming
Press
to disarm the security system and unlock the doors (if con-
nected). Disarming is confirmed when the parking lights flash twice
and the horn emits two chirps. The horn chirping either four or five
times when disarming indicates Tamper Alert, which is described in the
Diagnostics section of this manual.
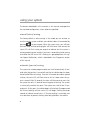
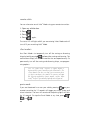
disarming without a transmitter
This feature allows you to override the system without the transmitter
should it be lost, damaged or disabled. To do this, you must have the
vehicle's ignition key and know where the integrated LED/Valet® switch
is located. The Valet® switch is activated by pressing the LED status indicator.
Integrated
LED/Valet® switch
Turn the ignition to the “run”
position. Press and release the
integrated LED/Valet® switch,
within 10 seconds. After a few
seconds the LED will stop flashing
8
DRW-35
and the vehicle should start. If it does not, you may have waited too
long. Turn the ignition off and try again.
Important: The Valet® switch can be programmed to respond
to 1-5 presses for the disarm function. The factory default setting is one pulse.
valet® mode
Valet® Mode prevents your system from arming and triggering either
automatically or with the transmitter. In Valet® Mode, all convenience
functions (door locks, trunk release, etc.) will remain operational. This
feature is useful when washing or servicing your vehicle.
To enter or exit Valet® Mode with the integrated LED/Valet® switch:
1. Turn the ignition on.
2. Turn the ignition off.
3. Press and release the integrated
LED/Valet® switch within 10 sec-
DRW-35
onds.
The status LED will light steadily if you are entering Valet® Mode and
will turn off if you are exiting Valet® Mode.
9
remote valet®
You can also enter or exit Valet® Mode using your remote transmitter:
1. Open any vehicle door.
2. Press
.
3. Press
.
4. Press
again.
The status LED will light solid if you are entering Valet® Mode and will
turn off if you are exiting Valet® Mode.
silent mode™
Use Silent Mode™ to temporarily turn off the arming or disarming
chirps by briefly pressing
before either arming or disarming. The
confirmation chirp(s) will be eliminated for that one operation only. To
permanently turn off the arming and disarming chirps, see programming options.
note: The Warn Away® Response to lighter impacts is
bypassed if the system is armed using the Silent Mode™. This
ensures that the horn does not chirp in an environment where
you don’t want chirps to be emitted. The system is still capable of being triggered by heavier impacts; only the Warn
Away® Response generated by light impacts is bypassed.
panic mode
If you are threatened in or near your vehicle, pressing
on your
remote transmitter for 1.5 seconds will trigger your alarm system and
attract attention. The horn will sound and the parking lights will flash
for 30 seconds. To stop the Panic Mode at any time, press
, or
10
.
,
nuisance prevention circuitry®
Your system has Nuisance Prevention Circuitry® (NPC®) to prevent
annoying repetitive trigger sequences caused by faulty door pin switches or environmental conditions such as thunder, jackhammers, airport
noise, etc.
Here’s how NPC® works: If the alarm is triggered by the same sensor or
switch three times within a 60-minute period, your system interprets
this pattern of triggers as false alarms. After the third trigger, your system ignores, or bypasses, that sensor or switch (along with any other
sensors or switches sharing the same zone) for 60 minutes. If the
bypassed sensor is triggered again while it is already being bypassed,
the 60-minute bypass period will start over. This ensures that a sensor
that is continually being triggered will remain bypassed.
note: Arming and disarming the system does not reset the
Nuisance Prevention Circuitry®. The only ways to reset a
bypassed zone are for that zone not to be triggered for 60
minutes or to turn the ignition key on. When testing your system, it is important to remember that this circuitry can cause
zones to be bypassed and appear to not work. If five chirps
are heard when disarming the system, the NPC® was
engaged. To clear the memory, turn the ignition key on.
11
diagnostics
The microprocessor at the heart of your system has the ability to constantly monitor all of the switches and sensors connected to it. It can
detect any faulty switches or sensors and prevent them from disabling
the entire system. It can also record and report any triggers that occur
when you are away from your vehicle.
arming diagnostics
If the security system is armed at the same time that an input is active
(door opening, sensor triggering, etc.), you will hear one chirp to indicate arming and a second chirp to indicate Bypass Notification. A
Bypass Notification chirp means that the system ignores the input that
was active when the system was armed, until that input ceases. Three
seconds after that input ceases, the system will resume normal monitoring. For example, if your vehicle has an interior light exit delay and
you arm the system before the light turns off, you may hear a second
Bypass Notification chirp. Once the light turns off, however, the system
resumes normal monitoring.
note: Bypass Notification does not occur when the system is
in Silent Mode or if the chirps have been programmed by
the installer not to sound.
disarming diagnostics
Your system has a Tamper Alert feature that notifies you of triggers that
occur while you are away from your vehicle. If you hear four chirps
when you disarm, this indicates that the system was triggered in your
absence. If you hear five chirps when you disarm, this indicates that a
specific zone was triggered so many times that the Nuisance Prevention
12
Circuitry® has bypassed that zone. In both cases, the pattern of the
flashing status LED will indicate which zone was triggered (see Table of
Zones). The system retains this information in its memory and will continue to chirp four or five times each time the system is disarmed, until
the next time the ignition is turned on.
table of zones
A zone is represented by the number of LED flashes used by the system
to identify a particular type of input. Standard input assignments are
listed below.
ZONE
(Number
LED Flashes)
DESCRIPTION
1
Instant trigger - often used
for hood/trunk pin switches
2
Instant trigger - a heavier impact
detected by the shock sensor
3
Door switch trigger
4
Instant trigger—for optional sensors
5
Ignition trigger
13
code hopping®
The receiver and transmitter use mathematical formulas called algorithms to change their codes each time the transmitter is used. This
Code Hopping® technology has been developed to increase the security of the unit. By following this set code sequence, the receiver and
transmitter stay synchronized, even if the remote transmitter is used
out of range of the vehicle. If, however, the transmitter is pressed many
times out of range of the vehicle, or the battery is removed, the transmitter may get temporarily out of sync and fail to operate the system.
To resynchronize the remote transmitter, simply press
several
times within range of the vehicle. The system will automatically resynchronize and the transmitter will respond normally.
rapid resume logic
Your security system stores its current operational state in non-volatile
memory, so that if power is lost and then reconnected, the system will
recall the stored state from memory. For example, if the system is in
Valet® Mode when the battery is disconnected, it will still be in Valet®
Mode when the battery is reconnected. This applies to all system features, including arming, disarming, and Valet® Mode.
14
programming options
Programming options control your system’s normal, operational set-up.
Most options do not require additional parts, but some may require
installation labor.
The following is a list of the program settings, with the factory settings
in bold:
z
Active Arming or Passive Arming (automatic arming 30 seconds after the last door is closed).
z
Arming and disarming confirmation horn chirps, On or Off.
z
Ignition controlled door lock feature, On or Off. With this
feature on, the doors will lock three seconds after the ignition key is turned on, and unlock when the ignition is turned
off. The system also prevents the doors from locking when
the ignition is turned on while any vehicle door is open.
z
Active Door Locking (only when arming with the transmitter) or Passive Door Locking (with Passive Arming).
z
Valet® Switch Pulse Count: The number of times the Valet®
switch needs to be pressed to disarm the system. One to five
pulses can be programmed, with the default setting being
one pulse.
15
programming settings
The following procedure outlines the steps required to change the feature settings detailed in the programming options section.
To enter programming mode:
1. Open the drivers door:
2. Turn the ignition On, then Off:
3. Select a feature: Press and release the
integrated LED/Valet® switch the number of
times corresponding to the step you wish to
change (see systems features menu). For
example, to access passive arming, press and release once.
Then press the button once more and HOLD it. The horn will
chirp once (equal to the step you have accessed). Continue
to hold down the switch and proceed to step 4.
4. Program the feature: While holding
the integrated LED/Valet® switch, you can
toggle the selected feature on and off using
the remote transmitter. Pressing the arm
button
that locks the doors will select
the one chirp setting. Pressing the disarm button
will
select the two chirp setting. Release the integrated
LED/Valet® switch.
16
note: The valet® pulse count feature (8) and the channel 3
time output (9) have five possible settings. Pressing unlock
will toggle through all the possible settings.
system feature menu
Step
One Chirp*
Two Chirps*
1
Active arming
Passive arming
2
Audible arm/
disarm confirmation ON
Audible Arm/disarm
confirmation OFF
3
Ignition-controlled
locking ON
Ignition-controlled
locking OFF
4
Ignition-controlled
unlocking ON
Ignition-controlled
unlocking OFF
5
Active locking
Passive locking
6
0.8 second door lock pulses
3.5 second door lock pulses
7
Single unlock pulse
Double unlock pulse
8
Door trigger error chirp ON
Door trigger error chirp OFF
9
Ignition-controlled
domelight ON
Ignition-controlled
domelight OFF
10
Valet® switch input: 1 Pulse
Valet® switch input: 2-5 Pulses
11
Channel 3: validity
Channel 3: latched/latched,
reset with ignition;30-second
timed/second unlock/delayed
accessory output.
* Default settings are indicated in bold type.
17
once a feature is programmed
z
Other features can be programmed.
z
The Programming Mode can be exited if programming is
complete.
to access another feature
Press and release the LED/Valet® switch the number of times necessary
to advance from the feature you just programmed to the next one you
want to program. Then press the integrated LED/Valet® switch once
more and hold it. For example, if you just programmed the third feature and you would like to program the seventh feature in the menu,
you would: Press and release the integrated LED/Valet® switch four
times. Then press it once more and hold it. The horn would chirp seven
times to confirm access to the seventh feature.
to exit the programming mode
Do one of the following:
1. Close the open door.
2. Turn the ignition on.
3. No activity for longer than 15 seconds.
18
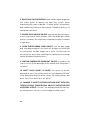
feature descriptions
1. ACTIVE/PASSIVE ARMING: When active arming is selected, the system will only arm when the transmitter is used. When set to passive,
the system will arm automatically 30 seconds after the last door is
closed. To alert the consumer of passive arming, the horn will chirp 20
seconds after the door is closed. This provides the consumer with an
audible warning prior to the system actually arming. At the 30 second
mark, the system will arm but the horn will not chirp.
2. AUDIBLE ARM/DISARM CONFIRMATION ON/OFF: This feature
controls the chirps that confirm the arming and disarming of the system. In the ON setting (default) the horn will provide audible confirmation when arming and disarming the system. If programmed to the
OFF position no horn chirps will be heard when arming and disarming.
3. IGNITION-CONTROLLED LOCKING ON/OFF: When turned on, the
vehicle doors will lock three seconds after the ignition is turned on.
4. IGNITION-CONTROLLED UNLOCKING ON/OFF: When turned on,
the vehicle doors will unlock when the ignition is turned off.
5. ACTIVE/PASSIVE LOCKING: If passive arming is selected in step 1,
then the system can be programmed to either lock the doors when
passive arming occurs, or only lock the doors when the system is armed
via the transmitter. Active locking means the system will not lock the
doors when it passively arms. Passive locking means that the system
will lock the doors when it passively arms.
note: Remember, when passive arming is selected, the unit
will chirp 20 seconds after the last door is closed. The system does not actually arm or lock the doors until 30 seconds
after the door has been closed.
19
6. DOOR LOCK PULSE DURATION: Some vehicles require longer lock
and unlock pulses to operate the door lock vacuum pump.
Programming the system to provide 3.5 second pulses, will accommodate the door lock interface in these vehicles. The default setting is 0.8
second door lock pulses.
7. DOUBLE PULSE UNLOCK ON/OFF: Some vehicles require two pulses on a single wire to unlock the doors. When the double pulse unlock
feature is turned on, the unlock relay will provide two pulses instead of
a single pulse.
8. DOOR TRIGGER ERROR CHIRP ON/OFF: With the door trigger
error chirp programmed off, the system will not report an invalid zone
on arming when the door trigger wire is active. This eliminates the
extra chirps that occur when interfacing with vehicles that have exceptionally long dome light delay circuits.
9. IGNITION-CONTROLLED DOMELIGHT ON/OFF: If turned on, the
system will turn on the domelight for 60 seconds when the ignition is
turned off.
10. VALET® PULSE COUNT 1-5 PULSES: The system can be programmed to count the number presses of the integrated LED/Valet®
switch before disarming the security system. The factory setting is one
pulse. The unit can be set for 2 to 5 pulses.
11. CHANNEL 3 VALIDITY/LATCHED/LATCHED RESET WITH IGNITION/30 SECOND TIMED/SECOND UNLOCK OUTPUT/DELAYED
ACCESSORY OUTPUT: Channel 3 can be programmed for these output configurations. The unit is set to the default validity output.
20
programming a new transmitter/receiver
The system comes with two transmitters that have been taught to the
receiver. The receiver can store up to 4 different transmitter codes in
memory. Use the following procedure to add transmitters to the system.
1. Open the driver’s door
2. Turn the ignition on.
3.
Enter transmitter program: Press and
release the integrated LED/Valet® switch once.
Then press and hold the integrated LED/Valet®
switch once more. The horn will chirp and the
LED will blink once. Continue to hold the switch
and proceed to step 4.
4. Press the arm
button: While holding
the integrated LED/Valet® switch, press the
button. The unit will chirp indicating successful
programming. The transmitter is now set to the standard configuration. Refer to the Standard Configuration section of this guide.
5. Additional transmitter program: If you wish to program an additional transmitter, repeat steps 1 through 4. Remember that the system
will only accept a maximum of 4 different transmitters.
21
glossary of terms
Control Module: The “brain” of your system. Usually hidden underneath the dash area of the vehicle. It houses the microprocessor that
monitors your vehicle and controls all of the alarm’s functions.
Failsafe® Starter Kill Relay (if equipped): An automatic switch controlled by the security system that prevents the vehicle’s starter from
cranking whenever the system is armed. The vehicle is never prevented
from cranking when the system is disarmed, in Valet® Mode, or if the
Starter Kill Relay fails.
Input: Any physical connection to the security system. An input can be
provided through a sensor, pinswitch or by existing systems in the vehicle, such as ignition or courtesy lights.
Integrated LED/Valet® Switch: A small push-button switch with an
integrated Red LED mounted somewhere in the vehicle. The switch is
used to override the alarm when a transmitter is lost or damaged, or to
put it into Valet® Mode. The LED indicates the status of your system. It
is also used to report triggers and faults in the system or sensors. This
switch is also used to program optional features.
Stinger® Double-Guard® Shock Sensor: A dual-stage shock sensor,
which is located on the control module, and is designed to detect
impacts to the vehicle or glass.
Transmitter: A hand-held, remote control that operates the various
functions of the security system.
Warn Away® Response: Light impacts to the vehicle generate the
Warn Away® Response, which consists of several seconds of horn
chirps and flashing parking lights.
22
Zone: A zone is a separate input that the alarm can recognize as
unique. Each input to the system is connected to a particular zone. Two
or more inputs may share the same zone.
23
notes
24
✂
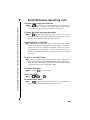
Quick Reference Operating Card
■ Press
for one second to arm the system and lock the doors (if
the door locks are connected to the system). When the system arms,
you will hear one chirp and the parking lights will flash once.
To disarm the system using your transmitter
■ Press
to disarm the system and unlock the doors (if the door
locks are connected to the system). When the system disarms, you will
hear two chirps and the parking lights will flash twice.
Disarming without a transmitter
■ To disarm without a transmitter, you must have the vehicle’s ignition
key and know where the integrated LED/Valet® switch is. Turn On the
ignition key. Press the integrated LED/Valet® switch the pre-programmed number of times within 15 seconds. If the system does not
disarm, you may have waited too long; turn the ignition off and repeat
the process.
To enter or exit Valet® Mode
■ To enter or exit Valet® Mode, turn the ignition key on and then off.
Then press and release the integrated LED/Valet® switch within 10 seconds. The status LED will light steadily if you are entering Valet® Mode
and will turn off if you are exiting Valet® Mode.
To activate Panic Mode
■ Press and hold
for 1.5 seconds.
To exit Panic Mode
■ Press
,
, or
.
To activate Silent® Mode
■ Press
briefly before arming or disarming. The confirmation
chirp(s) will be eliminated for that one operation only.
✂
Cut along dotted line and fold for a quick and easy reference to keep in your purse or wallet.
To arm the system using your transmitter
25