1
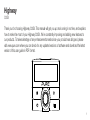
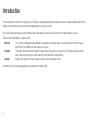
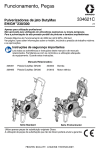
Highway
300Di
Owner’s Manual
Highway
300Di
Thank you for choosing Highway 300Di. This manual will get you up and running in no time, and explains
how to make the most of your Highway 300Di. We’re constantly improving and adding new features to
our products. To take advantage of any enhancements made since your product was shipped, please
visit www.pure.com where you can check for any updated versions of software and download the latest
version of this user guide in PDF format.
1
Safety instructions
Warning
Fit the unit and the antenna in a position that does not obscure the driver’s view.
Fit the unit securely.
Do not fit the unit or the antenna in such a way that may interfere with the safe operation of the vehicle, the deployment of air bags or other safety equipment.
Avoid objects or liquids getting into the unit.
Do not remove screws from, or open, the unit casing.
Do not operate the unit while driving.
Read this manual fully before operating the unit, including all safety notices.
Caution
To reduce the risk of theft, remove the controller from your vehicle, or position it out of sight, before leaving your vehicle unattended.
WARNING
This WARNING symbol is used throughout this manual to indicate a potentially serious risk to your personal safety. Obey all safety notices that accompany this symbol to avoid possible injury or death.
2
Contents
4Introduction
5
Controls and connectors
7
Getting started
9
Listening to digital radio
11 Connecting an iPod/iPhone/iPad/USB device
13 Using aux-in
14 Removing/fitting the controller
15Settings
17 Resetting Highway 300Di
18 Technical specifications
20 Pure Warranty Statement for Australia
3
Introduction
This manual provides instructions for using Highway 300Di. Highway is designed for professional installation and there are a number of different options for how
Highway can be connected to your existing car stereo depending on your car and your stereo.
Your installer will be able to advise you which method has been used and give you some basic instruction on how to operate Highway in your car.
There are three main components to Highway 300Di:
Main unit
Controller
Antenna
This is typically installed behind your dashboard or in a glovebox with extension cables run to convenient points for connecting your
iPod, iPhone, iPad, USB device or other auxiliary music sources.
The compact, removable controller should be installed within easy reach and has a high-contrast OLED display with back-lit buttons
and a simple rotary control for easy station selection or control over other connected devices.
Highway 300Di supports three types of antenna (external, internal and magnetic mount).
Installation instructions including wiring guidance are available in the Installation Guide.
4
Controls and connectors
Controller
Presets/More button
Digital Radio: Press to view and cycle through station
presets list.
iPod/USB: Press and repeat to change track shuffle
options. Press and hold, then press again to change
track repeat options.
Power/Home button
Press to switch Highway on.
Press again to cycle through
available sources and settings.
Press and hold to switch off.
Fast forward button
Digital radio: Press and repeat to jump forward in the
audio buffer in steps of 15 seconds if you have used
the pause/rewind feature.
iPod/USB: Press to skip forward. Hold to fast
forward.
Rewind button
Digital radio: Press and repeat
to Rewind live radio in steps of
15 seconds if you have used the
pause/rewind feature.
iPod/USB: Press to skip back.
Hold to rewind.
Back button
Press to move back up a level in
menus/lists.
Digital radio: Press to return to live
radio if using the pause/rewind
feature.
Select knob
Turn to browse stations, tracks and
menu items. Push to select.
Play/pause button
Digital radio: Press to pause digital radio (maximum
pause duration 5-15 minutes depending on the
station’s bitrate). Press again to play from where you
paused.
iPod/USB: Press to play/pause track playback.
5
Main unit
2Power In
Connected to your
car ignition 12V power
supply.
6
3Controller
Connected to the
Highway controller.
Digital Radio
Antenna In
FM Antenna In
Antenna Out
Aux In
Line Out
Controller
Power In
1USB
Usually connected to the supplied USB
extension cable. Connect your iPod
or USB media player to the extension
(or directly) for playback and charging.
Also used for USB memory stick
software updates.
USB
The Highway 300Di main unit is usually
installed out of sight, so you may only see
cable extensions enabling you to connect to
the Aux In and USB sockets.
8Digital Radio Antenna In
Connected to your Highway
digital radio antenna.
4Line out (3.5mm)
5Aux in (3.5mm)
Audio out (could be
connected to your
car stereo auxiliary
input).
Audio in from any
auxiliary audio
device.
6Antenna out
Connects to the FM
antenna input on your
car stereo if using FM
direct inject.
7FM Antenna In
Connects to your
existing FM car
antenna if using FM
direct inject.
Getting started
Highway
Highway 300Di Startup screen
Switching on and off
Press the
button on top of the controller to switch Highway 300Di on.
To switch off press and hold the
button down until the display switches off.
Forecourt pause
Ideal for quick stops at the petrol station or cashpoint, forecourt pause keeps Highway 300Di on standby
for 15 minutes after you remove the keys, making sure it’s ready for your return. Restart the ignition or
press the
button within this period and Highway immediately tunes to the station you were listening
to or plays the music you were listening to on your iPod or USB device exactly where it left off. If you’re
listening to digital radio, you can even pause it for around 5-15 minutes, and resume listening without
missing a second – see page 9 for more details.
Picnic mode
Continue to enjoy Highway 300Di after you’ve reached your destination with picnic mode, which enables
you to listen with the ignition off and your car keys removed. Simply switch Highway on again to activate
picnic mode. To save power, USB-connected devices are not charged in picnic mode and Highway will
automatically shut down after an hour.
Note:Both forecourt pause and picnic mode are subject to different vehicle specifications. For example,
some vehicles will only supply power to the car stereo for 15 minutes with the ignition off and the
keys out.
7
Listening to Highway 300Di
Depending on how your unit has been installed, there are three possible methods for hearing Highway
300Di through your car stereo:
Digital radio
iPod
Changing source
(current source on top line)
8
Auxiliary input
Select the aux in source on your car stereo if Highway has been wired in as an
auxiliary source.
FM direct inject
This method effectively takes over your FM source and replaces it with output
from Highway when you switch Highway on. Select the FM radio source on your
car stereo and tune to a particular frequency (default 87.6 MHz). Depending on
your installation this method may also retain access to your normal FM stations
to allow for traffic announcements and data services used by some navigation
systems. You can change this frequency in Settings, see page 15.
FM broadcast
This method broadcasts the output from Highway over FM to your car antenna.
Select the FM radio source on your car stereo and tune to a particular frequency
(default 87.6 MHz). You can change this frequency in Settings, see page 15.
Selecting your audio source
Highway 300Di gives you a choice of available audio sources depending on your installation.
Choose from Digital radio, USB (USB connection), iPod (USB connection) or Auxiliary input via
(3.5mm connection) as follows:
Press the
button and repeat to step through the source options until you see the one you want then wait
for a few seconds to select the source shown on the bottom line of the screen.
or
Press the
button and turn the Select knob to browse through the source options then press the
Select knob to select the source shown on the bottom line of the screen.
Listening to digital radio
To listen to digital radio, select the Digital radio source as described on page 8.
Selecting stations
Amazing Radio
Smooth Radio UK
Turn the Select knob to browse the list of available stations and press the Select knob to change station.
Changing station
(current station on top line)
Smooth Radi
Station name option - scrolling full
height text
Smooth Radio UK
01:05
Digital radio paused
(1 minute and 5 seconds behind live)
Changing the information on the display
Press the
button, select Settings > Info display and select one of the following options:
Station name
Full height station name (scrolls if necessary)
Name and text
Station name and any scrolling text broadcast by the station
Signal strength
Signal strength and signal quality
WARNING
Don’t get distracted – avoid reading scrolling text information while driving.
Pausing and rewinding digital radio
Highway enables you to pause and rewind digital radio by saving an audio ‘buffer’ of the current station.
You can rewind for around 5–15 minutes depending on the bitrate of the current station and/or how long
you’ve been tuned to the current station. Use the following controls to pause and control digital radio:
Pause and restart playback (display shows a pause icon and a timer counting time behind live)
Skip back through the saved audio in increments of 15 seconds
Skip forward through saved audio in 15 second increments until you get back to live radio
To return to live radio immediately, push the Select knob or change the station.
9
BFBS Radio
dedications to and from
Tune to your favourite station
Preset 01
Smooth Radio UK
Browsing your presets list
Preset saved
Your preset has been saved
10
Using presets
You can save up to 30 of your favourite digital stations in a presets list for easy access. By default some
of our favourite partner stations appear as the first few presets. You can replace these if you want.
Saving presets
1. Tune to one of your favourite stations.
2. Press the button on top of the controller.
3. Turn the Select knob to browse through your presets list and select where you want to save your
favourite.
4. Press and hold the Select knob or button down to save the current station to that position on
the list. Previous presets can be overwritten. You see ‘Preset saved’ on screen when the preset
has been saved.
Selecting presets
1. Press the button.
2. Press the button again to step through the presets list until you see the one you want then wait
for a few seconds to tune to that preset.
or
Turn the Select knob to browse through your presets list and push the Select knob to select
one.
Connecting an iPod/iPhone/iPad/USB device
Connect your iPod, iPhone, iPad* or USB device (MP3 player, mobile phone or USB memory stick) to Highway 300Di’s USB input using its cable. (If your main
unit is inaccessible your installer will have fitted a USB extension cable for easy access.) Once connected, you can use Highway’s controller to select tracks and
control playback.
Browsing and selecting tracks
Playlists
Browsing your tracks
Rock N Roll Train
AC/DC - Black
Track playing
Rock N Roll Train
AC/DC - Black Ice
1. Press the
button to access your device menu and turn the Select knob and press to choose
whether to list by Playlists, Artists, Albums, Genres or Tracks. You can also sort by Folders (USB
devices only) or by Composers, Audiobooks and Podcasts (Apple devices only), depending on
content.
2. Turn the Select knob to browse through your tracks and press to select one and start playing it. A
+ symbol on the display indicates that there are further choices within the selected category.
Controlling playback
Use the following controls to pause and control your device:
Pause and restart playback (display shows a pause icon)
Skip to start of current track or press again within three seconds to skip back to previous tracks.
Hold to fast rewind
Skip to start of next track. Hold to fast forward.
Track paused
* See http://www.pure.com/products/ipod-compatibility/ for compaitbility information on the latest iPod/iPad/iPhone models.
11
Shuffle and repeat options
Press the
Off
On
button, select Settings and choose one of the following options:
Shuffle
USB track shuffle options
Off
Track
Track repeat options
For Apple devices choose Tracks, Albums or Off, for USB devices choose On or Off.
Note: Alternatively you can press the
button to cycle through Shuffle states.
Repeat
Choose Track, All or Off.
Note: Alternatively you can press and hold the
states.
button, then press again to cycle through Repeat
Changing the information on the display
Green Onions
Full height track name option
Press the
button, select Settings and choose one of the following options:
Track name
Full height track name (scrolls if necessary).
Track and artist
Information on the selected track.
Track time
Track name with time into track and time remaining.
Note: Apple devices which draw more than 500mA when charging such as iPad will charge more quickly
if iPod source is selected on Highway 300Di.
12
Using aux-in
Connect the line out or headphone socket of any audio device to Highway 300Di using an appropriate 3.5mm to 3.5mm audio cable plugged into the AUX in
input on Highway. Depending on the position in which your main unit has been fitted this cable may have been pre-fitted by your installer.
This connection enables audio to be played through Highway into your car stereo. While connected you use the normal controls on your audio device and car
stereo, Highway cannot control playback as it does when connected using the iPod/USB connection.
To listen to music from your auxiliary device, select the Auxiliary input source as described on page 8.
AUX in
AUX in source selected
Changing the auxiliary input gain
You can adjust the gain on the Highway 300Di auxiliary input if you find the volume level from your device
seems too quiet or too loud. To adjust auxiliary input gain:
1. Select the Auxiliary input source.
2. Press the
button, select Settings > Aux gain and choose a value between 0 (quieter) and +3
(louder).
13
Removing/fitting the controller
The controller can be fitted and removed easily for security purposes. Your installation may also use a swivel bracket or some sort of universal or model-specific
mounting bracket onto which the controller bracket shown is mounted – if so, take extra care when removing or fitting the controller.
Removing the controller
Hold the bracket and pull the controller firmly up by the sides to remove it.
If Highway 300Di is switched on when you remove the controller it will continue radio or track playback
until you replace and stop playback, turn off Highway or turn off your ignition.
Note: We recommend that you remove the controller from your car (or store out of direct sunlight) on hot/
sunny days if your vehicle is to be left unattended, as temperatures inside a closed vehicle can get
very high.
Removing the controller
Fitting the controller
Slide the controller onto the mounting bracket as shown and click into place.
14
Fitting the controller
Settings
You can view and adjust the following settings from any source:
Timed dim
Bright
Setting backlight options
Backlight
1. Press the
button, select Settings > Backlight.
2. Choose from the following backlight options for the display and backlit buttons.
Timed dim: Dims the backlight after around 7 seconds and brightens when any button is
pressed.
Timed off: Switches the backlight off after around 7 seconds and switches on again when any
button is pressed.
Dim: Dim backlight option.
Bright: Bright backlight option.
V1.0
4.85.1.26.007
Insert USB stick then pres
Software update screen showing the
current software version number (left)
and build number (right)
Software update
Software updates for your Highway 300Di may be made available in the future which you can load on
to Highway using a USB stick connected to the USB input. If you register your product and include a
valid e-mail address you will receive notification of software updates (register at www.pure.com/register).
Available software updates are also made available for download from http://support.pure.com.
To update:
1. Press the
button, select Settings > Software update.
2. Insert the USB stick containing the update into Highway’s USB socket/lead and press the Select
knob.
Note:The update process may take around five minutes. Ensure that you don’t switch off Highway or
start your car during the update process or the update may fail.
15
English
Deutsch
Changing the display language
Press SELECT to confirm
Confirm restore defaults
Language
You can change the language Highway 300Di uses for displaying menus and options:
1. Press the
button, select Settings > Language.
2. Turn the Select knob and press to choose from English, French, German or Italian.
Restore defaults
Restore defaults removes all saved presets, clears the station list and resets all options to their defaults.
1. Press the
button, select Settings > Restore defaults.
2. Press the Select knob to confirm you want to restore Highway 300Di defaults.
Highway will reset, switch off and on again, you will then be asked to choose your preferred language, an
autotune will be performed to refresh the digital station list and Highway will tune to a digital station.
FM transmit frequency
If your unit has been installed to use FM transmit or FM direct inject, you can change the frequency on
which Highway 300Di transmits if you find it is interfering with a broadcast station.
1. Press the
button, select Settings > FM transmit frequency.
2. Turn the Select knob to choose a new transmit frequency and push the Select knob to confirm.
3. Retune your car stereo to the new FM frequency you have chosen.
16
Resetting Highway 300Di
1. Remove your Highway 300Di controller module from the mounting bracket.
2. Press and hold down the and
buttons on the controller - and at the same time insert the controller back into the mounting bracket.
3. Let go of the and
buttons when you see the Highway logo appear on the controller screen and wait for Highway 300Di to reset.
17
Technical specifications
DAB/DAB+/DMB-Radio depending on region. Dual digital radio tuners
Radio
Frequency ranges
Band III 174-240 MHz, L-Band 1452-1490 MHz and FM 87.5-108 MHz.
Input connectors
Output connectors
Digital radio antenna in: FAKRA SMBA connector
FM antenna in: ISO connector
Analogue AUX in: 3.5mm stereo auxiliary input
Power supply: 8 Way latched Molex connection - 12V from vehicle supply
USB: (type A) USB connection for iPod, iPad, iPhone, external hard drives and USB sticks for audio playback, also used for software updates
FM antenna out: ISO connector for pass-through of FM connection
Line out: 3.5mm audio out to car stereo
Apple compatibility Supports most iPod, iPhone and iPad models. For the latest information, check the compatibility table on our website:
www.pure.com/products/ipod-compatibility
Controls
Backlit control buttons for rewind and fast forward, play/pause and back. Home and presets buttons. Rotary knob with push to select
Display
High contrast yellow-on-black graphical OLED display
Antenna power supply4.5V @ 300mA DC.
Dimensions
Controller: 70mm wide x 53mm high x 27mm deep. Main unit: 150mm wide x 24mm high x 85mm deep
Temperature range
Maximum recommended operating temperature 75°C, maximum recommended storage temperature 85°C.
Approvals
CE marked. Compliant with the EMC and Low Voltage Directives (2004/108/EC and 2006/95/EC). ETSI EN 300 401 compliant.
Hereby, Pure declares that this Band II LPD device is in compliance with the essential requirements and other provisions of the Directive 1999/5/
EC. Please go to www.pure.com for the full Declaration of Conformity. Suitable for use in the following markets:- A, B, BG, CY, CZ, DK, EE, FIN,
F, D, EL, HU, IRL, I, LV, LT, L, MT, NL, PL, P, RO, SK, SL, E, S, GB, ISL, LIE, NOR, CHE
18
19
Pure Warranty Statement for Australia
This statement replaces any reference to warranty which may be contained elsewhere within this manual.
What do you need to do now?
Option 1: You can register your purchase on-line at https://www.pure.com/au/register/register.asp
Option 2: Or you can do nothing other than keep your proof of purchase as evidence of your purchase date. This proof of purchase would need to be presented if warranty service
was ever required.
If you have any questions about your warranty you can call us toll free .... 1800 988 268
What’s covered by this warranty?
•Pure agrees to refund, repair or replace, at your election, without charge to you, any part found to be defective during the warranty period.
•If equipment has been used according to its accompanying instruction manual and is used in a domestic situation, a two year warranty period applies.
How do you make your claim?
Call 1800 988 268 for instructions on how to return your Pure product for warranty service or go to http://support.pure.com/au/ and complete the contact us form.
What’s NOT covered by this warranty?
Under this express warranty Pure will not be liable for loss or damage of any kind whatsoever, whether direct, indirect, incidental, consequential or otherwise.
•Replacement of parts due to normal wear and tear
•Products with serial number defacement, modification or removal
•Water damage or corrosion caused by dampness
•Any damage or deterioration due to shipment
•Any product which has been subjected to misuse, abuse or accident
Australian consumers — The benefits to the consumer given by this express warranty are in addition to other rights and remedies of the consumer under a law in relation to the
goods or services to which this warranty relates. Our goods come with guarantees that cannot be excluded under the Australian Consumer Law, You are entitled to a replacement
or refund for a major failure and for compensation for any other reasonably foreseeable loss or damage. You are also entitled to have the goods repaired or replaced if the goods fail to
be of acceptable quality and the failure does not amount to a major failure.
Pure is distributed and supported in Australia by PIONEER ELECTRONICS AUSTRALIA PTY LTD, 5 ARCO LANE, HEATHERTON, VICTORIA, 3202
20
Warranty information
Disposal of Waste Electrical & Electronic Equipment
Imagination Technologies Ltd. warrants to the end user that this product will be free from
defects in materials and workmanship in the course of normal use for a period of two years
from the date of purchase. This guarantee covers breakdowns due to manufacturing or
design faults; it does not apply in cases such as accidental damage, however caused,
wear and tear, negligence, adjustment, modification or repair not authorised by us.
Please visit www.pure.com/register to register your product with us. Should you have a problem
with your unit please contact your supplier or contact Pure Support at the address shown on the
rear of this manual. If you need to return your product please use the original packaging and include
all parts and accessories. We reserve the right to refuse incomplete or badly packaged returns.
This symbol on the product or on its packaging indicates that this product should
not be treated as household waste. Instead it should be handed over to a suitable
collection point for the recycling of electrical and electronic equipment. By ensuring
this product is disposed of correctly, you will help prevent potential negative
consequences for the environment and human health, which could otherwise
be caused by inappropriate waste handling of this product. The recycling of
materials will help to conserve natural resources. For more detailed information
about recycling of this product, please contact your local council office, your
household waste disposal service or the shop where you purchased the product.
Disclaimer
Imagination Technologies Limited makes no representation or warranties with respect to the
content of this document and specifically disclaims any implied warranties of merchantability
or fitness for any particular purpose. Further, Imagination Technologies Limited reserves the
right to revise this publication and to make changes in it from time to time without obligation of
Imagination Technologies Limited to notify any person or organization of such revisions or changes.
Copyright
Copyright 2011 by Imagination Technologies Limited. All rights reserved. No part of this
publication may be copied or distributed, transmitted, transcribed, stored in a retrieval
system, or translated into any human or computer language, in any form or by any
means, electronic, mechanical, magnetic, manual or other wise, or disclosed to third
par ties without the express written permission of Imagination Technologies Limited.
Trademarks
Highway 300Di, Pure, the Pure logo, EcoPlus, the EcoPlus logo, Imagination Technologies, and the
Imagination Technologies logo are trademarks or registered trademarks of Imagination Technologies
Limited. iPad, iPod and iPhone are trademarks of Apple Inc., registered in the U.S. and other countries.
“Made for iPod,” “Made for iPhone,” and “Made for iPad” mean that an electronic accessory
has been designed to connect specifically to iPod, iPhone, or iPad, respectively, and has been
certified by the developer to meet Apple performace standards. Apple is not responsible for
the operation of this device or its compliance with safety and regulatory standards. Please note
that the use of this accessory with iPod, iPhone, or iPad may affect wireless performance. All
other product names are trademarks of their respective companies. Version 2 August 2012.
www.pure.com
connect.pure.com
www.facebook.com/pure
Pure UK Headquarters
Imagination Technologies Ltd.
Home Park Estate
Kings Langley
Herts, WD4 8LZ
United Kingdom
www.pure.com
http://support.pure.com
Pure Australasia Pty Ltd
PO Box 5049
Wonga Park
Victoria 3115
Australia
[email protected]
http://support.pure.com/au
103YK