1
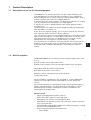
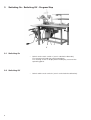
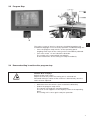
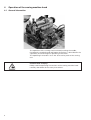
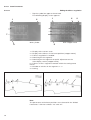
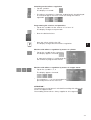
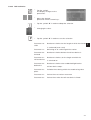
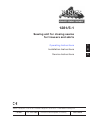
1281/5-1
Sewing unit for closing seams
for trousers and skirts
Operating Instructions
1
Installation Instructions
2
Service Instructions
3
Postfach 17 03 51, D-33703 Bielefeld • Potsdamer Straße 190, D-33719 Bielefeld
Telefon +49 (0) 521 / 9 25 23 40 • Telefax +49 (0) 521 / 9 25 25 83 • www.beisler-sewing.com
Ausgabe / Edition:
01/2011
Änderungsindex
Rev. index: 00.0
Printed in Federal Republic of Germany
Teile-Nr./Part.-No.:
0791 128102
All rights reserved.
Property of Beisler GmbH and copyrighted. Reproduction or publication of the content in any manner,
even in extracts, without prior written permission of Beisler GmbH, is prohibited.
Copyright © Beisler GmbH - 2011
Foreword
This instruction manual is intended to help the user to become familiar
with the machine and take advantage of its application possibilities in
accordance with the recommendations.
The instruction manual contains important information on how to
operate the machine securely, properly and economically. Observation
of the instructions eliminates danger, reduces costs for repair and
down-times, and increases the reliability and life of the machine.
The instruction manual is intended to complement existing national
accident prevention and environment protection regulations.
The instruction manual must always be available at the machine/sewing
unit.
The instruction manual must be read and applied by any person that is
authorized to work on the machine/sewing unit. This means:
–
–
–
Operation, including equipping, troubleshooting during the work
cycle, removing of fabric waste,
Service (maintenance, inspection, repair) and/or
Transport.
The user also has to assure that only authorized personnel work on the
machine.
The user is obliged to check the machine at least once per shift for
apparent damages and to immediatly report any changes (including the
performance in service), which impair the safety.
The user company must ensure that the machine is only operated in
perfect working order.
Never remove or disable any safety devices.
If safety devices need to be removed for equipping, repairing or
maintaining, the safety devices must be remounted directly after
completion of the maintenance and repair work.
Unauthorized modification of the machine rules out liability of the
manufacturer for damage resulting from this.
Observe all safety and danger recommendations on the machine/unit!
The yellow-and-black striped surfaces designate permanend danger
areas, eg danger of squashing, cutting, shearing or collision.
Besides the recommendations in this instruction manual also observe
the general safety and accident prevention regulations!
General safety instructions
The non-observance of the following safety instructions can cause
bodily injuries or damages to the machine.
1. The machine must only be commissioned in full knowledge of the
instruction book and operated by persons with appropriate training.
2. Before putting into service also read the safety rules and
instructions of the motor supplier.
3. The machine must be used only for the purpose intended. Use of
the machine without the safety devices is not permitted. Observe all
the relevant safety regulations.
4. When gauge parts are exchanged (e.g. needle, presser foot, needle
plate, feed dog and bobbin) when threading, when the workplace is
left, and during service work, the machine must be disconnected
from the mains by switching off the master switch or disconnecting
the mains plug.
5. Daily servicing work must be carried out only by appropriately
trained persons.
6. Repairs, conversion and special maintenance work must only be
carried out by technicians or persons with appropriate training.
7. For service or repair work on pneumatic systems, disconnect the
machine from the compressed air supply system (max. 7-10 bar).
Before disconnecting, reduce the pressure of the maintenance unit.
Exceptions to this are only adjustments and functions checks made
by appropriately trained technicians.
8. Work on the electrical equipment must be carried out only by
electricians or appropriately trained persons.
9. Work on parts and systems under electric current is not permitted,
except as specified in regulations DIN VDE 0105.
10. Conversion or changes to the machine must be authorized by us
and made only in adherence to all safety regulations.
11. For repairs, only replacement parts approved by us must be used.
12. Commissioning of the sewing head is prohibited until such time as
the entire sewing unit is found to comply with EC directives.
13. The line cord should be equipped with a country-specific mains
plug. This work must be carried out by appropriately trained
technicians (see paragraph 8).
It is absolutely necessary to respect the safety
instructions marked by these signs.
Danger of bodily injuries !
Please note also the general safety instructions.
Content
Page:
Preface and General Safety Notes
Part 1: Operating Instructions Cl. 1281/5-1 – Original Instructions
(Edition: 01/2011)
1.
1.1
1.2
1.3
Product Description
Description of use for the intended purpose . . . . . . . . . . . . . . . . . . . . . . . . . . . . .
Brief Description . . . . . . . . . . . . . . . . . . . . . . . . . . . . . . . . . . . . . . . . . . . . . .
Technical Data . . . . . . . . . . . . . . . . . . . . . . . . . . . . . . . . . . . . . . . . . . . . . . .
2
2
3
2
Optional Equipment . . . . . . . . . . . . . . . . . . . . . . . . . . . . . . . . . . . . . . . . . . .
4
3
3.1
3.2
3.3
3.4
Switching On - Switching Off - Program Stop
Switching On . . . . . . . . . . . . . . . . . . . . . .
Switching Off . . . . . . . . . . . . . . . . . . . . . .
Program Stop . . . . . . . . . . . . . . . . . . . . .
Renewed setting in motion after program stop .
.
.
.
.
5
5
6
6
4
4.1
4.2
4.3
Operation of the sewing machine head
General Information . . . . . . . . . . . . . . . . . . . . . . . . . . . . . . . . . . . . . . . . . . . .
Recommended yarn . . . . . . . . . . . . . . . . . . . . . . . . . . . . . . . . . . . . . . . . . . .
Detaching/ Attaching the fabric sliding plate. . . . . . . . . . . . . . . . . . . . . . . . . . . . .
7
8
9
5
5.1
5.2
5.3
5.4
5.5
5.6
5.7
Operating the sewing unit
Positioning table and work table . . . . . . . . . . . . . . . . . .
Mouse with guide rail and retraction mechanism . . . . . . . .
Inserting the sewing parts and starting the sewing operation.
Adjusting the blow air for the nozzles in the table top . . . . .
Adjusting the retraction speed of the mouse. . . . . . . . . . .
Adjusting the pressure of the puller . . . . . . . . . . . . . . . .
Stacker . . . . . . . . . . . . . . . . . . . . . . . . . . . . . . . . .
6
6.1
6.3
6.4
6.4.1
6.4.2
6.4.2.1
6.4.3
6.4.4
6.4.5
6.4.5.1
6.4.5.2
Operation of the control unit
Operation of the touch-screen monitor . . . . . . .
Main screen . . . . . . . . . . . . . . . . . . . . . . .
Sewing programs
Selecting the program and seam number . . . . . .
Creating a new seam program with seam number
Number of seam programs and seams . . . . . . .
Editing, deleting the seam program or seams . . .
Manual sewing, driven by the pedal . . . . . . . . .
Changing the seam programs . . . . . . . . . . . . .
Seam Parameters . . . . . . . . . . . . . . . . . . . .
Machine Parameters . . . . . . . . . . . . . . . . . .
.
.
.
.
.
.
.
.
.
.
.
.
.
.
.
.
.
.
.
.
.
.
.
.
.
.
.
.
.
.
.
.
.
.
.
.
.
.
.
.
.
.
.
.
.
.
.
.
.
.
.
.
.
.
.
.
.
.
.
.
.
.
.
.
.
.
.
.
.
.
.
.
.
.
.
.
.
.
.
.
.
.
.
.
.
.
.
.
.
.
.
.
.
.
.
.
.
.
.
.
.
.
.
.
.
.
.
.
.
.
.
.
.
.
.
.
.
.
.
.
.
.
.
.
.
.
.
.
.
.
.
.
.
.
.
.
.
.
.
.
.
.
.
.
.
.
.
.
.
.
.
.
.
.
.
.
.
.
.
.
.
.
.
.
.
.
.
.
.
.
.
.
.
.
.
.
.
.
.
.
.
.
.
.
.
.
.
.
.
.
.
.
.
.
.
.
.
.
.
.
.
.
.
.
.
.
.
.
.
.
.
.
.
.
.
.
.
.
.
.
.
.
.
.
.
.
.
.
.
.
.
.
.
.
.
.
.
.
.
.
.
.
.
.
.
.
.
.
.
.
.
.
.
.
.
.
.
.
.
.
.
.
.
.
.
.
24
25
26
27
32
33
35
39
.
.
.
.
.
.
.
.
.
.
.
.
.
.
.
.
.
.
.
.
.
.
.
.
.
.
.
.
.
.
.
.
.
.
.
.
.
.
.
.
.
.
.
.
.
.
20
21
.
.
.
.
.
.
.
.
.
.
.
.
.
.
.
.
.
.
.
. . . . . . . . . . . . . . . . . . . . . . . . .
. . . . . . . . . . . . . . . . . . . . . . . . .
.
.
.
.
.
.
.
.
.
.
.
.
.
.
.
.
.
.
.
10
11
13
16
17
18
19
.
.
.
.
.
.
.
.
.
.
.
.
.
.
.
.
.
.
.
.
.
.
.
.
.
.
.
.
.
.
.
.
.
.
.
.
.
.
.
.
.
.
.
.
.
.
.
.
.
.
.
.
.
.
.
.
.
.
.
.
.
.
.
.
.
.
.
.
.
.
.
.
.
.
.
.
1
Content
Page:
6.4.5.3
6.4.5.4
6.4.5.5
6.4.5.6
6.4.5.7
6.4.8
Roll-out Device . .
Puller. . . . . . . . .
Global Parameters
Input - Output Test
Stepper Motor Test
Version Data . . . .
.
.
.
.
.
.
.
.
.
.
.
.
.
.
.
.
.
.
.
.
.
.
.
.
.
.
.
.
.
.
.
.
.
.
.
.
.
.
.
.
.
.
.
.
.
.
.
.
.
.
.
.
.
.
.
.
.
.
.
.
.
.
.
.
.
.
.
.
.
.
.
.
.
.
.
.
.
.
.
.
.
.
.
.
.
.
.
.
.
.
.
.
.
.
.
.
.
.
.
.
.
.
.
.
.
.
.
.
.
.
.
.
.
.
.
.
.
.
.
.
.
.
.
.
.
.
.
.
.
.
.
.
.
.
.
.
.
.
.
.
.
.
.
.
.
.
.
.
.
.
.
.
.
.
.
.
.
.
.
.
.
.
.
.
.
.
.
.
.
.
.
.
.
.
.
.
.
.
.
.
.
.
.
.
.
.
.
.
.
.
.
.
.
.
.
.
.
.
.
.
.
.
.
.
.
.
.
.
.
.
.
.
.
.
.
.
.
.
.
.
.
.
.
.
.
.
.
.
.
.
.
.
.
.
.
.
.
.
.
.
.
.
.
.
.
.
.
.
.
.
.
.
.
.
.
.
.
.
.
.
.
.
.
.
40
41
42
44
46
48
7
7.1
7.2
7.3
7.4
7.5
7.6
7.8
Data protection by means of USB stick
General Information . . . . . . . . . . . . . . . . . . . . . . . . . . . . . . . .
Formatting the USB stick . . . . . . . . . . . . . . . . . . . . . . . . . . . .
Saving the seam programs and seam parameters on the USB stick . . .
Loading the seam programs and seam parameters from the USB stick.
Saving global parameters on USB stick . . . . . . . . . . . . . . . . . . . .
Loading global parameters from the USB stick . . . . . . . . . . . . . . .
Removing the USB stick . . . . . . . . . . . . . . . . . . . . . . . . . . . . .
.
.
.
.
.
.
.
.
.
.
.
.
.
.
.
.
.
.
.
.
.
.
.
.
.
.
.
.
.
.
.
.
.
.
.
.
.
.
.
.
.
.
.
.
.
.
.
.
.
.
.
.
.
.
.
.
.
.
.
.
.
.
.
.
.
.
.
.
.
.
.
.
.
.
.
.
.
.
.
.
.
.
.
.
49
49
50
52
53
53
53
8
8.1
8.2
8.3
Maintenance
Cleaning and Testing . . . . . . . . . . . . . . . . . . . . . . . . . . . . . . . . . . . . . . . . . . .
Lubrication . . . . . . . . . . . . . . . . . . . . . . . . . . . . . . . . . . . . . . . . . . . . . . . . .
Repair . . . . . . . . . . . . . . . . . . . . . . . . . . . . . . . . . . . . . . . . . . . . . . . . . . . .
54
56
57
1
Product Description
1.1 Description of use for the intended purpose
The 1281/5-1 is a sewing unit which can be used according to the
intended purpose of sewing of light to medium-heavy workpieces.
Such workpieces are as a rule materials made of textile fibers. These
sewing materials are used in the apparel industry.
In general, only dry sewing fabrics may be processed with this sewing
unit. The material must not contain any hard objects.
In general, the seam is prepared from core thread, polyester fibre
or cotton yarn.
The dimensions for needle thread and looper thread may be derived
from the tables in Chapter 4.2.
If you wish to use other threads, you must first estimate the inherent
risks and take safety measures, where required.
This sewing unit may be set up and operated only in dry and well-kept
rooms. If the sewing unit is used in other rooms that are not dry and
well-kept, further measures may become necessary that must be
agreed to by the manufacturer (see EN 60204-31: 1999).
As manufacturers of industrial sewing machines, we assume that our
products are operated by at least trained personnel, so that all the
usual operations, and possibly dangers, can be presumed to be
known.
1.2 Brief Description
The Beisler 1281/5-1 is a sewing unit for closing of long seams such
as e.g.
® trouser side seams and inside seams,
® Side seams without vent in outer fabric and lining in skirt parts
Depending upon the machine head used,
® Double chain stitch seams (401),
® Safety seams 4-thread (515) or 5-thread (516)
can be generated.
All the workplace components are arranged on a rack welded from
square-cut steel tubes and are controlled by a micro-processor
system.
The sewing workplace is operated by means of the operating panel.
Various control programs can be called up, new programs can be
defined and all the inputs and outputs can be checked here for
maintenance and repair jobs.
Machine head
– Pegasus Serging Machine EXT 3216-03
– Direct-Drive Efka Type DC 1500 /AB 425S
– Microprocessor control, freely programmable
– Light barrier for detecting seam start and seam end for automatic
seam start and stop.
– Programmable edge guide for different material strengths, moving
crosswise from feeding direction.
– External Operating Panel Efka V900 with:
- Menu Guide
3
1
-
–
–
–
–
–
–
–
–
–
–
–
Freely programmable parameters for
“Differential lower feed (optional)”, “Upper feed
(optional)”, “Roll-out Device”, “Puller”, “Machine
Parameters”,
“Global Parameters”, “Program Sequences”
- Input and Output Tests
- Test routine for stepper motors
- 20 Program Memory Capacity
- up to 7 seam programs per program storage space
Vertical cutter with suction device for overseaming and serging in
a work step.
Programmable chain cutting device with suctioning.
Adjustable blow nozzles in the table top for supporting the sewing
material feed, mechanical regulation of the blow strength by
means of adjusting knob, duration of table blowing is
programmable.
Positioning table with mouse and retraction device for the
workpiece;
for uniform workpiece guidance and higher productivity.
Special sewing equipment for trouser side seams with side seam
pockets and slant pockets.
Narrow gauge parts including narrow sewing foot for problem-free
feed/ sewing of the pocket openings.
Automatic contour control through programmable puller.
Height-adjustable rack, infinitely variable from 850 mm up to 1200
mm.
Automatic fullness distribution through stepper motor controlled
upper and lower feed (optional).
Within a seam program, the fullness of the upper and lower feed
can be programmed at the operating panel by means of 3 freely
selectable segments.
User-friendly adjustment option for fullness in a segment by
means of one control each.
Integrated destacking device.
Manual destacking by means of the shortcut key.
1.3 Technical Data
Machine Head:
Type of stitch:
Number of needles:
Needle system:
Needle thickness:
Type of hook:
Yarn:
Speed:
Speed at delivery:
Stitch length:
min.
max.
Seam width:
Optional
Workpiece:
Operating pressure:
Air consumption:
4
Pegasus EXT 3216-03/233-K 5x5-KH-021A
401, 515, 516
1 or 2
B27
Nm 80 to Nm 110
Looper crosswise to feeding direction
Serging looper
see table in Chapter 4.2
6,500 min -1
6,500 min -1
0.5 mm
3.5 mm
10 mm
8 - 12 mm
Light weight to medium weight
6 bar
20 NL per working cycle
Rated voltage:
Rated power:
Dimensions:
Work height:
Weight:
1 x 230 V 50/60 Hz
1.00 KVA
2300 x 1300 x 1500 mm (L x B x H)
850 … 1200 mm
(upper edge of table top)
125 kg
Rated noise level:
LC = 81 dB (A)
Workplace-related emission value according to DIN 45635-48-B-1
Stitch length:
2.6 mm
Seam length:
1,000 mm
Number of stitches:
6,500 min -1
Workpiece G1 DIN 23328: 2-ply
Measuring point according to DIN 4895
Part 1
X = 550 mm Y = 350 mm Z = 600 mm
X - axis = crosswise to direction of feed
Y - axis = main feed direction
Z - axis = height
1
2
Optional Equipment
See Appendix.
5
3
Switching On - Switching Off - Program Stop
1
3.1 Switching On
–
Switch on the main switch 1 (turn in clockwise direction).
The control unit loads the machine program.
The starting screen is displayed on the display screen of the
operating panel.
–
Switch off the main switch 1 (turn in anti-clockwise direction).
3.2 Switching Off
6
3.3 Program Stop
2
1
The safety system of 1281/5-1 foresees the following options for
immediate stoppage in case of faulty operation, needle breakage etc.:
– Press the program stop switch 2 at the operating panel.
Ongoing work steps at the sewing unit are immediately aborted.
– Turn main switch 1 in anti-clockwise direction.
The sewing unit is powered off immediately;
all the movements at the sewing unit stop immediately.
3.4 Renewed setting in motion after program stop
Caution: Risk of Injury!
Switch off the main switch.
Repair the fault only when the sewing unit is switched off.
Renewed setting in motion of the machine is allowed only after the
fault has been repaired.
–
–
Switch on the main switch 1 (turn in clockwise direction).
Unlock the program stop switch.
The control unit loads the machine program.
The start screen appears on the display screen of the operating
panel.
The sewing unit is once again ready for operation.
7
4
Operation of the sewing machine head
4.1 General Information
The operation of the sewing machine head (inserting the needle,
threading the needle thread and looper thread etc.) is described in the
separately enclosed Pegasus operating instructions.
The operating instructions are in the accessories pack of the sewing
unit.
Caution: Risk of Injury!
Kindly read the operating instructions of the sewing machine head
carefully and follow all the safety instructions.
8
4.2
Recommended yarn
Needle system:
Recommended
needle thickness:
B27
Nm 80 for very thin sewing material
Nm 90 for thin sewing material
Nm 100 for medium weight sewing material
High sewing safety and good sewability are achieved with the
following covering
threads:
– Double polyester continuous polyester core spun
(e.g. Epic Poly-Poly, Rasant x, Saba C, ...)
– Double polyester continuous cotton core spun
(e.g. Frikka, Koban, Rasant, ...)
In case these yarns cannot be procured, even polyester fibers or
cotton yarn specified in the table can be sewed up.
Double core threads are often offered by yarn producers under the
same designation as triple polyester fibre yarn (3-cyl. spun). This
results in doubts in respect of twist and yarn thickness.
In case of doubt, untwist the yarn and check as to whether it is double
or triple twisted.
The Label No. 120 on the yarn roll of a core thread e.g. corresponds to
the yarn thickness Nm 80/2 (see table values in brackets).
In case of monofil threads, needle threads and looper threads of the
same thickness can be used. In doing so, the best results are
achieved with soft and elastic threads (software) with thread thickness
of 130 Denier.
Recommended yarn thicknesses:
Needle Thickn.
Nm
Core thread
Core thread
Needle thread
Looper thread
Needle thread
Looper thread
Polyestercontinuous
Label No.
Polyestercore spun
Label No.
Polyestercontinuous
Label No.
Cotton
core spun
Label No.
90
120 (Nm 80/2)
120 (Nm 80/2)
120 (Nm 80/2)
120 (Nm 80/2)
100
100 (Nm 65/2)
100 (Nm 65/2)
100 (Nm 65/2)
100 (Nm 65/2)
80
Needle Thickn.
Nm
Polyester fibre yarn
(3cyl.-spun)
Cotton yarn
Needle thread
Looper thread
Needle thread
Looper thread
80
Nm 120/3
Nm 120/3
Ne 60/3-80/3
Ne 60/3-80/3
90
Nm 80/3-120/3
Nm 80/3-120/3
Ne 50/3-70/3
Ne 50/3-70/3
100
Nm 70/3-100/3
Nm 70/3-100/3
Ne 40/3-60/3
Ne 40/3-60/3
B
B
B
B
B
B
9
1
4.3 Detaching/ Attaching the fabric sliding plate
2
3
2
1
The fabric sliding plate 2 is held in the recess of the table top with the
help of the magnet 1.
The edge guide 3 is fastened to the fabric sliding plate.
Detaching the fabric sliding plate
– Detach the edge guide 3 carefully upwards from the magnet.
– Swivel the fabric sliding plate to the side.
The lower area of the sewing machine head is now accessible.
Attaching the fabric sliding plate
– Push the fabric sliding plate into the recess of the table top and
insert downwards.
10
5
Operating the sewing unit
5.1 Positioning table and work table
2
1
4
1
3
The sewing unit is equipped with two positioning tables 1 and 2. The
skirt parts or trouser parts are prepared on them respectively.
On work table 4, the trouser parts or skirt parts are positioned and
clamped with the mouse 3.
11
5.2 Mouse with guide rail and retraction mechanism
3
2
1
7
6
5
4
The mouse is used for clamping of the trouser parts or skirt parts, in
order to prevent them from sliding.
The guide rail 3 is flexible and must be adjusted to the contour of the
sewing part.
Caution: Risk of Injury !
Do not reach into the mouse when it is open.
Insert sewing part
– Place the sewing part between the mouse plate 2 and the
clamping arm 1.
– Press shut the mouse.
During the sewing operation, the mouse is drawn along the guide
rail 3 until the opening of the clamping arm 1 is actuated by a limit
switch.
Then, the mouse is drawn back by the retraction mechanism 4 until
the adjustable limit stop 5 is contacted.
12
9
9
3
8
Adjusting the guide rail 3
– Place the sewing part 8 on the work table in opposite direction to
the feed direction.
– Loosen the toggle screw 9.
– Advance the guide rail 3 towards the contour of the sewing part.
– Retighten the toggle screw 9.
Opening the mouse manually
10
–
Actuate lever 10.
The mouse opens.
13
1
5.3 Inserting the sewing parts and starting the sewing operation
The closing seam sewing unit 1281/5-1 works semi-automatically at
high production speed.
In the process, the operator of the sewing unit must perform the
following tasks:
® Call up the desired seam program;
® Insert the workpiece neatly;
® Actuate the sewing operation with the foot switch;
® Monitor the sewing operation of the sewing unit;
® Remove the finished parts from the stacker.
Side Seam M02 5_7
1
1)
2)
3)
4)
Select the seam program at the operating panel.
Lay out and adjust the trouser parts on the positioning table.
Insert the sewing parts in the mouse 1.
Close the mouse.
5) Insert the trouser parts under the sewing foot up to the point that
the feed dogs securely grasp the trouser parts.
6) Hold the trouser parts to be sewed up with the left hand.
7) Sew the hip curve manually with the “forward” pedal.
14
8) With the right hand, grasp the trouser parts to be sewed such that
the middle finger is below the lower trouser part, the index finger is
between the two and the thumb is on the upper trouser part.
9) With pedal “-1” “backwards”, the contour guide moves forward.
10) Should a correction be needed, the contour guide can be moved
back with the reset button.
Once the trouser parts have been corrected, the contour guide can
once again be moved forward with the “backwards” pedal.
11) Step on forward pedal.
The automatic sewing operation starts.
12) The transport puller is lowered and transports the workpiece.
- At the seam end, the roll-out device is lowered in order to
secure chain separation and prevent the trouser parts from sliding.
- The completely sewed trouser parts are destacked.
15
1
Inside seam M 01 4_6
1)
2)
3)
4)
Select the seam program at the operating panel (see Chapter 6.3).
Lay out and adjust the trouser parts on the positioning table.
Insert the trouser parts in the mouse.
Close the mouse.
5) Insert the trouser parts under the sewing foot up to the point that
the feed dogs securely grasp the trouser parts.
6) With the left hand, hold the trouser parts to be sewed.
7) With the right hand, grasp the trouser parts to be sewed such that
the middle finger is below the lower trouser part, the index finger is
between the two and the thumb is on the upper trouser part.
8) Step on the forward pedal.
The sewing operation is performed automatically.
9) The transport puller is lowered and transports the workpiece.
At the seam end, the roll-out device is lowered in order to
secure chain separation and
prevent the trouser parts from sliding.
The completely sewed trouser parts are destacked.
16
5.4 Adjusting the blow air for the nozzles in the table top
1
2
The blow nozzles 1 in the table top support the neat destacking of the
workpiece.
– Adjust the blow air strength with the hand wheel 2 under the table
top.
Turning the hand wheel to the right
= blow air is stronger
Turning the hand wheel to the left
= blow air is weaker
17
1
5.5 Adjusting the reverse motion speed of the mouse.
3
2
1
The cylinder 2 presses the mouse mechanism 3 downwards and thus
draws the mouse back into insertion position.
The return speed can be adjusted.
– Adjust the speed with the hand wheel 1.
Turning the hand wheel to the right
= speed is higher
Turning the hand wheel to the left
= speed is lower
18
5.6 Adjusting the pressure of the puller
2
1
The pressure of the puller rollers 1 can be influenced using the turning
knob 2.
– Turning the knob 2 to the right.
Pressure is increased.
– Turning the knob 2 to the left.
Pressure is reduced.
19
1
5.7 Stacker
2
1
3
The finished sewing parts are destacked on the flip stacker 2.
The destacked and clamped sewing parts can be removed by
actuating the foot switch 1.
The triggering of the stacker is done by means of a control impulse.
The pneumatic functions are shown in the pneumatic circuit diagram.
Caution: Risk of Injury !
Do not reach into the operating range of the flip stacker while the
stacking operation is on.
Manual destacking
– Press button 3 on the operating panel.
A destacking operation is performed.
Removal of destacked parts
– Actuate foot switch 1 and hold it in that position.
– Remove the destacked parts.
20
6
Operating the control unit
6.1 Operating the touch-screen monitor
To start a function, the display screen is touched with the finger-tip at
the point where the respective icon is shown.
Tap directly on the desired function symbol with the finger-tip.
The symbol will appear against a yellow background.
1
21
6.3 Main screen
–
Switch on the main switch 1 (turn in clockwise direction).
The control unit loads the machine program.
The start screen is displayed on the display screen of the
operating panel.
= Seam pattern is active seam in program
= Pedal Start
= Designation of the program (M01)
A program can comprise several seams ( 4, 6)
= Seam number of the active program
= Adjusting the upper feed (only stepper motor version)
Increasing or decreasing the value using the plus/minus symbols
= Adjusting the lower feed (only stepper motor version)
Increasing or decreasing the value using the plus/minus symbols
= Calling up the machine parameters
= Automatic seam change
= Adjusting the puller
= Adjusting the puller transport
= Daily pieces counter
= Display of the current seam
22
= Calling up the main menu
= Increasing (+) or
decreasing (-) values for the upper and differential feed
(only stepper motor version)
= Activating manual sewing
= Manual stacking
= Contour guide back to home position
Note:
When the symbols are tapped, the highlighting of the symbols in white
background signifies that the function is activated.
1
23
6.4 Sewing programs
The sewing unit is pre-programmed with four programs ex-works.
5
6
4
Program
No.
SeamNo.
Operation
Trouser position
Remarks
4
Closing the inside seam
Hind trouser top
6
Automatic sewing with
contour guide
Closing the inside seam
Hind trouser bottom
7
Closing the inside seam
Hind trouser top
5
Closing the inside seam
Hind trouser bottom
4
Closing the inside seam
Hind trouser top
6
Closing the inside seam
Hind trouser bottom
7
Closing the inside seam
with fullness
Closing the inside seam
with fullness
Hind trouser top
1
2
3
4
5
24
Hind trouser bottom
Manually guiding and
sewing over the hip curve,
then automatic sewing
Automatic sewing with
contour guide
Manually guiding and
sewing over the hip curve,
then automatic sewing
6.4.1
Selecting the program and seam number
–
Press the symbol when the main screen is displayed.
The display changes to the screen programs.
1
–
Tap the symbol for the desired program, e.g. “M04”.
The symbol appears in inverted image.
–
Tap the symbol “P” in order to adopt the selection and in order to
return to the main screen.
25
6.4.2
26
Creating a new seam program with seam number
–
Press the symbol on the displayed main screen.
The display changes to the screen programs.
–
Tap the symbol for the new seam program (e.g. “M05”).
The program number appears in inverted image.
–
Tap the symbol in order to adopt the selection.
The display changes to the seam program “M05”.
–
Tap the symbol.
The display is inverted.
–
Select a seam (e.g. “4”).
The display changes to confirmation prompt.
Selection: Yes/ No
–
Confirm with “Yes” in order to adopt the selection and in order to
return to the seam program “M05".
–
Tap the symbol.
The display is inverted.
–
Select a seam (e.g. “6”).
The display changes to confirmation prompt.
Selection: Yes/ No
1
–
Confirm with “Yes” in order to adopt the selection and in order to
return to the seam program “M05".
–
Tap the symbol “P” in order to adopt the selection and in order to
return to the display screen program.
–
Tap the symbol “P” in order to return to the main screen.
6.4.2.1 Number of seam programs and seams
Seam programs max: M01 – M20
Seams per seam program:
1-7
27
6.4.3
Editing, deleting the seam program or seams
Symbol
Meaning
Save
Delete
Enter
Insert
Scroll pages
Exchanging
Delete seam
Example: Seam “6”
28
–
Press the symbol when the main screen is displayed.
The display changes to the screen programs.
–
Tap the symbol for the new seam program (e.g. “M05”).
The program number appears in inverted image.
–
Tap the symbol “E” in order to adopt the selection.
The display changes to the seam program “M05”.
–
Tap the seam “6”.
The display
is inverted.
–
Tap the symbol “Delete”.
The display changes to the confirmation prompt Yes / No.
–
Confirm with “Yes” in order to delete the seam 6.
1
29
Inserting a seam
Example: No. “1”
The seam to be inserted is always inserted in front of an existent
seam.
–
Tap the seam “6”.
The display appears inverted.
30
–
Tap the symbol ”Insert”.
The seam or several seams are shifted one place to the right and
the free storage space flashes in negative image.
–
Select one seam, e.g. Number “1”.
The display changes to confirmation prompt Yes/ No.
–
Confirm with “Yes” in order to insert the seam “1”.
–
Tap the symbol “P” in order to adopt the selection and in order to
return to the display screen program.
Exchanging the seam
Example: No. “6” with No. “4”
–
Tap the seam “6”.
The seam “6” flashes.
–
Tap the symbol ”Exchange”.
The other seams are marked for selection.
–
Tap one seam “4”.
The seams “4” and “6” flash in inverted image.
–
Confirm with “Yes” in order to exchange the seams “4” and “6”.
–
Tap the symbol “P” in order to adopt the selection and in order to
return to the display screen program.
1
31
Deleting the seam program
Example: M05
32
–
Tap the symbol “Delete”.
The display changes to the confirmation prompt Yes/ No.
–
Confirm with Yes in order to delete the seam program M05.
The display changes to the program screen.
–
Select the desired seam program, e.g. 04.
The seam program is displayed in inverted image.
–
Tap the symbol “P” in order to adopt the selection and in order to
return to the display screen program.
6.4.2
Manual sewing, driven by the pedal
Switching on the function
– Tap the symbol “MAN”.
The display changes to the “manual mode”.
1
Switching off the function
– Tap the symbol “P” in order to return to the main screen.
Note
The maximal speed in “Manual Mode” can be changed in the global
parameters with the help of Parameter No. “103”.
33
6.4.5
Changing the seam programs
·
·
Seam parameters are parameters that can be changed for
individual seams (e.g. “4” or “6”).
Global parameters are parameters that are identical for all the
seam programs and seams.
Seam parameters
Global parameters
Automatic seam change
Note
The quick access keys
function only for the option “Fullness regulation by means of stepper
motors”.
34
1
35
6.4.5.1 Seam Parameters
6.4.5.1.1
Editing the fullness regulation
–
Tap the symbol for upper or lower feed.
The following display screen appears.
1
1
3
2
3
5
4
6
7
7
With cylinder
With stepper motor
8
8
1
2
3
4
5
=
=
=
=
=
Display of the current seam
Display of the fullness in the home position (stepper motor)
Fullness regulation is enabled
Switching on the segments
Switching on the segments for quick adjustment on the
main display screen (stepper motor)
6 = Fullness in the 5 segments towards which the sewing motor
moves
7 = Number of stitches in the segments 1 - 5
8 = Saving
With cylinder
Segment 1 Segment 2 Segment 3
Stitches
Stitches
Stitches
With stepper motor
Segment 1
Basic seam
Segment 2 Segment 3 Segment 4 Segment 5
Stitches Stitches
Stitches
Stitches
Stitches
Basic seam
Note
The parameters of the home positions 2 are located in the “Global
Parameters” with the numbers “40” and “42”.
36
Switching on the fullness regulation
– Tap the symbol 3.
The display is inverted.
–
The fullness regulation is therewith enabled and is also displayed
in inverted image on the main screen on exiting the fullness
regulation.
Programming the stitches and quantities
– Tap on the symbols for the stitches “6” or Item “5”.
The display changes to input mode.
–
Enter the desired values.
–
Save the values with the key “P”.
The display changes back to fullness regulation.
1
Machine with fullness regulation by means of cylinder
– Tap on the symbol for the segment 2.
The display appears inverted.
In segment 2, fullness is switched on by means of
the number of programmed stitches
.
Machine with fullness regulation by means of stepper motor
– Tap on the symbols 1, 3, 5
.
The display appears inverted.
–
The segments 1, 3, 5 are switched on for the
quick adjustment in the main view
.
ATTENTION !
The following must be borne in mind while working with fullness by
means of stepper motor:
The enabling of the fullness always applies to all 5 segments.
37
Quick adjustment of fullness regulation
–
Tap on the symbol for the desired
quick adjustment.
The display appears inverted.
–
Enable the fullness with the keys “+” and “-”.
Change segments 1, 3 and 5.
–
Tap on the symbol “+17”.
The value is saved.
Parameters of fullness regulation by means of cylinder
Upper feed
Parameter 01:
switched on
Parameter 02:
Parameter 03:
Segment 1
Number of stitches before the upper feed is
Quantity of fullness 1 OFF/ ON
Segment 2
Number of stitches, the length of time during
which the upper feed
Parameter 04:
Parameter 05:
is switched on
Quantity of fullness 2 OFF/ ON
Segment 3
Number of stitches, the length of time during
which the upper feed
Parameter 06:
is switched on
Quantity of fullness in segment 3 OFF/ ON
Differential lower feed
Parameter 07:
Parameter 08:
Parameter 09:
Segment 1
Number of stitches before
differential feed is switched on
Quantity of fullness 1 OFF/ ON
Segment 2
Number of stitches, the length of time during
which
Parameter 10:
Parameter 11:
differential transport is switched on
Quantity of fullness 2 OFF/ ON
Segment 3
Number of stitches, the length of time during
which
Parameter 12:
38
differential transport is switched on
Quantity of fullness in segment 3 OFF/ ON
Parameters of fullness regulation by means of stepper motor
Upper feed
Parameter 01:
Parameter 02:
Parameter 03:
Parameter 04:
Parameter 05:
Parameter 06:
Parameter 107:
Parameter 108:
Parameter 109:
Parameter 110:
Segment 1
Number of stitches
Quantity of fullness
Segment 2
Number of stitches
Quantity of fullness
Segment 3
Number of stitches
Quantity of fullness
Segment 4
Number of stitches
Quantity of fullness
Segment 5
Number of stitches
Quantity of fullness
in segment 1
in segment 2
in segment 3
in segment 4
in segment 5
1
Differential upper feed
Parameter 07:
Parameter 08:
Parameter 09:
Parameter 10:
Parameter 11:
Parameter 12:
Parameter 113:
Parameter 114:
Parameter 115:
Parameter 116:
Segment 1
Number of stitches
Quantity of fullness in segment
Segment 2
Number of stitches
Quantity of fullness in segment
Segment 3
Number of stitches
Quantity of fullness in segment
Segment 4
Number of stitches
Quantity of fullness in segment
Segment 5
Number of stitches
Quantity of fullness in segment 5
1
2
3
4
39
6.4.5.2 Machine parameters
–
Tap the symbol.
The display changes to the machine parameters.
–
Select the desired parameter with the arrow keys.
–
Tap the symbol “E” in order to adopt the selection.
–
Changing the value.
–
Tap the symbol “P” in order to save the selection.
Parameter 30:
Parameter 31:
Parameter 32:
Parameter 33:
by
automatic start
Parameter 34:
lowered
Parameter 35:
Number of stitches until the contour guide is
Parameter 37:
Number of stitches until the contour guide
moves in sideways
Number of stitches until the transport unit
is lowered
Start mode for contour control
0 = front right
1 = front left
2 = rear right
3 = rear left
Parameter
Parameter
Parameter
Parameter
Parameter
Parameter
Soft-start speed
Switching on or switching off the soft-start
Switching on or switching off the auto-start
Number of stitches before the auto-start begins
Sewing foot lift in the seam
Sewing foot lift at seam start
Parameter 36:
40
Adjusting the main speed
Manual sewing on/ off
Length of time during which table blowing
remains switched on
Number of stitches before start of sewing is followed
60:
61:
77:
78:
120:
121:
6.4.5.3 Roll-out Device
–
Tap the symbol.
The display changes to the
parameters.
–
Select the desired
parameter with the arrow keys.
–
Tap the symbol “E” in order to adopt the selection.
–
Changing the value.
–
Tap the symbol “P” in order to save the selection.
Parameter 16:
chain
Number of stitches for the length of which the thread
is suctioned (seam start)
Parameter 17:
Switching on or switching off the stacker
Parameter 20:
lowered
Number of stitches before the roll-out device is
Parameter 21:
roll-out device
Number of stitches, for the length of which the
is switched on.
Parameter 22:
before the
Number of stitches after unblocked light barrier
roll-out device stops.
Parameter 23:
place.
Period of time during which the smoothening takes
Parameter 47:
Point of time of stacker movement
Parameter 53:
Point of time when the roll-out device is lifted.
41
1
6.4.5.4 Puller
–
Tap the symbol.
The display changes to the
parameters.
For programming, see
Chapter 6.5.6.2 Roll-out Device
Parameter 26:
Parameter 27:
puller
Parameter 51:
Parameter 100:
puller is opened.
42
Number of stitches before the puller is lowered
Number of stitches, for the length of which the
is lowered.
Puller speed
Value lower = Puller is quicker
Value higher = Puller is slower
Number of stitches, for the length of which the
6.4.5.5 Global Parameters
–
Tap the symbol for “Main Menu”.
The display changes to main menu.
–
Tap the symbol for global parameters.
The display changes to the
global parameters.
–
Select the desired
parameter with the arrow keys.
–
Tap the symbol “E” in order to adopt the selection
.
–
Changing the value.
1
–
Tap the symbol “P” in order to save the selection.
Parameter 29:
Upper feed maximum track (option
of stepper motor)
Parameter 38:
Delayed start of light barrier
Parameter 39:
Differential feed (option of stepper motor)
Maximum track
Parameter 40:
Base value for upper feed (option of stepper motor)
Parameter 42:
Base value for differential lower feed
(option of stepper motor)
Parameter 45:
Number of stitches before table blowing
is switched on.
Parameter 46:
Duration of the stacker impulse
Parameter 48:
Max. speed
Parameter 49:
Speed during warp thread separation
Parameter 50:
Number of stitches before thread tensioning
is opened (seam end).
Parameter 52:
Speed of roll-out device
Parameter 54:
Impulse duration of retracted mouse
Parameter 55:
Time until after the roll-out device is lifted on the
transport unit.
Parameter 58:
Display of the software version
Parameter 59:
roll-out device
Number of stitches, for the length of which the
suctions the thread chain (seam start)
Parameter 65:
Thread tension lift
43
44
Parameter 79:
Soft-start after “Stop in the seam”
Parameter 80:
Resetting the daily pieces counter.
Parameter 102:
Language
Parameter 103:
Manual speed
Parameter 126:
Chaining-off speed
6.4.5.6 Input - Output Test
–
Tap the symbol for “Main Menu”.
The display changes to main menu.
–
Tap the symbol for Input-Output.
The display changes to Input.
Checking the inputs
e.g. Start light barrier In1
–
In
In
In
In
Switching the light barrier to dark.
The display In1 appears
inverted.
1
5
8
9
=
=
=
=
Start light barrier
Program Stop
Upper Feed Switch (Option)
Differential Lower Feed Switch (Option)
1
Checking the pedal
–
Actuate the pedal.
The display 2 to 12 appears in stepped mode.
0 to 2 = backwards
0 to 12 = forwards
45
Checking the outputs
–
Tap the symbol for the outputs.
The display changes to Outputs.
–
Tap the symbol “Y 1”.
The display appears inverted
and the output is switched on at the same time.
–
Tap the symbol “Y 1” once again.
The output is returned to its original position.
–
Tap the symbol.
The subsequently selected output is automatically switched
on/off.
Output element
Switch
Designation
Y01
Y02
Y03
Y04
Y05
Y06
Y07
Y08
Y09
Y10
Y11
Y12
Y13
Y14
Y15
Y16
46
Sewing foot up/ down
Thread tension lift
Contour guide up/ down
Stacker off / on
Roll-out device up/ down
Transport unit up/ down
Contour guide forward / backward
Contour guide blowing on
Move contour guide sideways
Differential lower feed on / off
Upper feed on / off
Warp thread separator off / on
Table blowing off / on
Dirt suctioning off / on
Puller up/ down
Mouse retracted
6.4.5.7 Stepper Motor Test
–
Tap the symbol “Stepper Motor Test”.
The display changes to the inputs.
–
Tap the symbol.
The display screen for the stepper motor test appears.
–
Tap the symbol “Differential Feed” .
The display screen for the differential transport test appears.
–
Tap on the symbol once again.
The stepper motor for differential transport moves to reference
position.
–
Tap the symbol once again.
The stepper motor moves through its steps.
1
47
48
–
Tap the symbol “Upper Feed” .
The display screen for the upper feed test appears.
–
Tap on the symbol once again.
The stepper motor for differential feed moves to reference
position.
–
Tap the symbol once again.
The stepper motor moves through its steps.
6.4.8
Version Data
–
Tap the symbol Global Parameters in the main menu.
The following display screen appears.
–
Tap the symbol Version .
The version data appears.
1
49
7.
Data protection using the USB stick
7.1 General Information
1
The USB stick 1 serves the purpose of preserving and transferring the
sewing unit software.
With its help, program and parameter data can be transferred even to
other sewing units and workplaces.
Even customary USB sticks can be used.
7.2 Formatting the USB stick
Before a new USB stick is used, it must be formatted accordingly.
The file format is the “FAT 16” system.
Format the USB stick using a PC with the FAT 16 system.
50
7.3 Saving the seam programs and seam parameters on the USB stick
–
–
–
–
Switch off the main switch.
Insert the USB stick in the slot of the operating panel.
Switch off the control element.
Tap the symbol.
The display changes to the main menu.
–
Tap the symbol.
The display changes to the display screen “Saving the seam
parameters”.
–
Tap the symbol “Control on USB stick”.
The display screen changes to selection.
–
Tap one file out of the five file options.
–
Tap the symbol “Control on USB stick”.
The display changes to the screen “Save”.
–
Tap the symbol.
The display changes to the main menu without saving.
1
Or
– Tap the symbol.
The seam program and all the parameters are saved.
51
This is followed by the message:
–
Confirm with “OK”.
The display changes to the main menu.
–
Tap the button “P” in order to return to the main screen.
Note
Five variously programmed files can be saved.
The files can be renamed using the PC.
ATTENTION: In the process, make sure that the file name does not
exceed 8 characters.
52
7.4 Loading the seam programs and seam parameters from the USB stick
–
–
–
–
Switch off the main switch.
Insert the USB stick in the slot of the control element.
Switch on the main switch.
Tap the symbol.
The display changes to the main menu.
–
Tap the symbol.
The display changes to the display screen “Saving the seam
parameters”.
–
Tap the symbol “USB stick in the control unit”.
The display screen changes to selection.
–
Select the desired file with the arrow keys.
–
Tap the symbol.
The display changes to the main menu without saving.
1
Or
– Tap the symbol.
The seam program and all the parameters are loaded.
53
This is followed by the message:
–
Confirm with “OK”.
The display changes to the main menu.
–
Tap the button “P” in order to return to the main screen.
7.5 Saving global parameters on USB stick
Procedure:
See Chapter 7.3
7.6 Loading global parameters from the USB stick
Procedure:
See Chapter 7.4
7.8 Removing the USB stick
–
Switch off the main switch.
Pull out the USB stick from the slot of the Efka control unit
54
8.
Maintenance
8.1 Cleaning and Testing
Caution: Risk of Injury !
Switch off the main switch.
The sewing unit may be serviced only when it is switched off.
The maintenance jobs must be performed latest after the maintenance
intervals specified in the tables (see column “Operating Hours”).
Shorter maintenance intervals can ensue for the processing of lint
collecting materials.
A clean sewing unit protects against faults.
1
1
2
6
5
4
3
55
Operating hours
Maintenance Job
Explanation
Operating Job
to be performed
Remove machine head
Clean
- Lint and thread waste
.
(e.g. with air blow gun)
the entire area 1 of the thread guides
under the thread sliding plate
Suctioning Device
Empty the container 2 of the suctioning
device
- Turn the lower part of the container
to the left and remove the lower part
- Empty the container
- Screw back the lower part
by turning it to the right.
8
Make sure that the water level does not
rise up to the filter insert 4.
- After pressing the drain screw 5,
blow out the water under pressure
from the water separator.
40
Dirt and condensate are discharged by
means of filter insert 4.
- Separate the sewing unit from the
compressed air supply.
- Press in the drain screw 5.
The pneumatic system of the sewing
unit
must be pressureless.
- Unscrew the water separator 6
- Extract the filter insert 4.
Wash and blow out the contaminated
filter cup and filter insert
with petroleum ether
(no solvent!).
- Reassemble the water separator
and connect the maintenance unit.
500
8
Pneumatic System
- Check the water level in the
pressure regulator
3
- Clean the filter insert 4
- Check the leak tightness of the
system
56
500
8.2 Lubrication
1
1
Caution: Risk of Injury !
Oil can induce skin rashes.
Avoid long-term skin contact.
Wash yourself thoroughly after contact.
ATTENTION !
The handling and disposal of mineral oils is subject to legal regulation.
Deliver used oil to an authorised collection point.
Protect your environment.
Take care not to spill oil.
For lubrication the sewing unit head, use exclusively the lubricant
DA 10 or an equivalent oil with the following specification:
– Viscosity at 40° C:
10 mm²/s
– Flash point
150° C
DA 10 can be ordered from the sales outlets of DÜRKOPP ADLER AG
while referring to the following part numbers:
250-ml container:
9047 000011
1-litre container:
9047 000012
2-litre container:
9047 000013
5-litre container:
9047 000014
Maintenance work
to be carried out
Lubrication
Explanation
Check the oil level in the sewing unit head
regularly (inspection glass 1 and 2).
Operating
hours
8
For more detailed information, kindly refer to
the enclosed operating instructions for the
sewing machine head.
57
8.3 Repair
When the machine is damaged or parts are worn please contact:
Dürkopp Adler AG
Potsdamer Str. 190
33719 Bielefeld
Tel.:
+49 (0) 180 5 383 756
Fax:
+49 (0) 521 925 2594
E-mail:
[email protected]
Internet:
www.duerkopp-adler.com
58