1
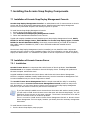
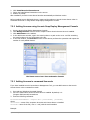
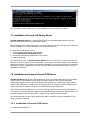
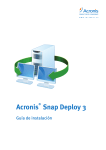
Table of Contents
1. What is Acronis® Snap Deploy® ............................................................................................... 3
2. Acronis Snap Deploy components............................................................................................. 3
3. Upgrade to v 3.0...................................................................................................................... 4
3.1 Upgrading licenses............................................................................................................. 4
3.2 Upgrading components ...................................................................................................... 4
4. System requirements .............................................................................................................. 5
5. Installation file........................................................................................................................ 5
6. Common installation configurations .......................................................................................... 6
7. Installing the Acronis Snap Deploy Components ......................................................................... 8
7.1 Installation of Acronis Snap Deploy Management Console ..................................................... 8
7.2 Installation of Acronis License Server................................................................................... 8
7.2.1 Installation.................................................................................................................. 8
7.2.2 Adding licenses using Acronis Snap Deploy Management Console .................................... 9
7.2.3 Adding licenses in command line mode.......................................................................... 9
7.3 Installation of Acronis OS Deploy Server ............................................................................ 10
7.4 Installation and setup of Acronis PXE Server ...................................................................... 10
7.4.1 Installation of Acronis PXE Server................................................................................ 10
7.4.2 Setting up a computer to boot from PXE ...................................................................... 11
7.4.3 Setting up PXE and DHCP on the same server .............................................................. 11
7.4.4 Setting up the PXE to work in other subnet .................................................................. 12
7.5 Installation of Acronis WOL Proxy...................................................................................... 12
7.6 Installation of Acronis Snap Deploy Management Agent ...................................................... 12
7.7 Installation of Acronis Universal Deploy ............................................................................. 13
8. Extracting the Acronis Snap Deploy components...................................................................... 13
2
© Acronis, Inc
1. What is Acronis® Snap Deploy®
Acronis Snap Deploy is a flexible, efficient software solution for deployment of a fully configured
operating system (with or without application software and any other data) to multiple computers.
Because the product uses disk imaging technology, it is ideal for rapid bare-metal installations and
flexible centralized provisioning.
2. Acronis Snap Deploy components
Acronis Snap Deploy includes the following components:
1. Acronis Snap Deploy Management Console is an administrative tool for remote access to
Acronis servers and Acronis Snap Deploy Management Agent.
When disconnected from the Acronis components, the console allows only installing Acronis
products on remote machines.
2. Acronis OS Deploy Server is a component that performs centralized deployment through the
network with the help of Acronis Snap Deploy Agents.
3. Acronis Snap Deploy Agent is a bootable component that performs deployment on each target
computer under control of the Acronis OS Deploy Server.
There are two ways to load Acronis Snap Deploy Agent on target computers: locally from bootable
media or remotely using Acronis PXE Server.
4. Acronis Master Image Creator is a bootable, locally controlled component that takes an image
of the master system.
There are two ways to load Acronis Master Image Creator on a master computer: directly from
bootable media or remotely using Acronis PXE Server.
5. Acronis Snap Deploy Management Agent is a component that takes an image of the master
system in Windows environment under the administrator’s control through the Acronis Snap
Deploy Management Console. The administrator can also manage files and execute applications on
a remote computer using Acronis Snap Deploy Management Agent.
6. Acronis PXE Server allows for network booting computers into Acronis Snap Deploy Agent,
Acronis Master Image Creator or Preinstallation Environment. The computers must support PXE.
Using Acronis PXE Server considerably reduces the time required for booting multiple computers
as compared to using bootable media. It also eliminates the need to have a technician onsite to
install the bootable media into the system that must be booted.
7. Acronis Wake on LAN Proxy is a component that enables the Acronis OS Deploy Server to
wake the target computers located in the other subnet.
8. Acronis Standalone Utility is a bootable component that enables full functional deployment
with GUI on a standalone computer (a computer isolated from the network or included in a
network without Acronis Snap Deploy infrastructure.)
9. Acronis License Server is a component that tracks licenses of Acronis products.
10. Acronis Universal Deploy (optional) is an add-on to Acronis Snap Deploy that enables
hardware-independent operating system deployment.
© Acronis, Inc
3
3. Upgrade to v 3.0
To upgrade from Acronis Snap Deploy version 2.0 or 1.0 to version 3.0, upgrade both the licenses and
the program components.
3.1 Upgrading licenses
Buy the necessary number of upgrade licenses and import the licenses to your license server.
The table below illustrates how the various combinations of licenses will be upgraded. Use the table to
calculate the number of 3.0 upgrade licenses you need.
What you can do with ASD 3.0 after the upgrade
1
Deploy to
any target
You
buy
You
have
2
Deploy to
Host1
3
Deploy to
any target
4
Deploy to
Host1
5
Deploy to
any target
6
Deploy to
Host1
7
Deploy to
any target
2.0
New
2.0
Used
(assigned
to Host1)
-
3.0 Upg
3.0 Upg
3.0 Upg
3.0 Upg
1.0
New
1.0
Used
(assigned
to Host1)
2.0 Upg
1.0
New
2.0 Upg
1.0
Used
(assigned
to Host1)
3.0 Upg
3.0 Upg
3.0
(1) You have a v 1.0 license that has not yet been used. Import a v 3.0 upgrade license. You will
be able to deploy to any computer with Acronis Snap Deploy 3.0.
(2) You have a v 1.0 license that is used and assigned to the computer Host1. Import a v 3.0
upgrade license. You will be able to deploy to Host1 with Acronis Snap Deploy 3.0.
(3) You have a combination of v 1.0 license and v 2.0 upgrade license. The licenses have not yet
been used. Import a v 3.0 upgrade license. You will be able to deploy to any computer with
Acronis Snap Deploy 3.0.
(4) You have a combination of v 1.0 license and v 2.0 upgrade license. Either license is assigned
to the computer Host1 by v 1.0 or v 2.0. Import a v 3.0 upgrade license. You will be able to
deploy to Host1 with Acronis Snap Deploy 3.0.
(5) You have a v 2.0 license that has not yet been used. Import a v 3.0 upgrade license. You will
be able to deploy to any computer with ASD 3.0.
(6) You have a v 2.0 license that is used and assigned to the computer Host1. Import a v 3.0
upgrade license. You will be able to deploy to Host1 with Acronis Snap Deploy 3.0.
(7) You don’t have any ASD licenses. Import a v 3.0 license. You will be able to deploy to any
computer with ASD 3.0.
3.2 Upgrading components
Install the components of v 3.0 over the v 2.0 or v 1.0 components.
Components of v 3.0 cannot communicate with v 2.0 and v 1.0 components since they use
cryptographic communication protocol that was not supported by the previous program
versions. Remove old Acronis Snap Deploy components, if the new components are installed
on other computers.
4
© Acronis, Inc
4. System requirements
The Acronis Snap Deploy components can be installed on computers running the following operating
systems:
MS Windows Server 2008 (TBD)
MS Windows Server 2003 Service Pack 2 (x86, x64)
MS Windows Server 2003 R2 (x86, x64)
MS Windows Small Business Server 2003
MS Windows Storage Server 2003 R2
MS Windows Server 2003 x64 Editions
MS Windows 2000 Server
MS Windows 2000 Advanced Server
MS Windows 2000 Professional SP4
MS Windows Vista Home Basic (x86, x64)
MS Windows Vista Home Premium (x86, x64)
MS Windows Vista Business (x86, x64)
MS Windows Vista Ultimate (x86, x64)
MS Windows XP Home
MS Windows XP Professional
MS Windows XP Professional x64 Edition
MS Windows XP Professional SP2
* - S – server license, WS – workstation license.
The type of license required for the
Acronis Snap Deploy Management
Agent installation
S
S
S
S
S
S
S
S
WS
WS
WS
WS
WS
WS
WS
WS
WS
5. Installation file
Acronis Snap Deploy installation file includes the following components and the components’ features:
Acronis Snap Deploy Management Console
Acronis Snap Deploy PE Builder
Media Builder for Acronis Image Creator
Media Builder for Acronis Snap Deploy Agent
Media Builder for Acronis Standalone Utility
Acronis License Server
Acronis License Server
Acronis License Server Management Console
Acronis License Server Management Tool
Acronis OS Deploy Server
Acronis PXE Server
Acronis Snap Deploy Management Agent
Acronis WOL Proxy
© Acronis, Inc
5
The installation window
The Acronis Universal Deploy option installs from its own installation file.
6. Common installation configurations
Acronis Snap Deploy components can be installed in various configurations, in terms of distributing the
components and features among the networked computers.
1. The minimal configuration that enables only offline imaging and standalone deployment:
Acronis Snap Deploy Management Console (custom installation, including:
Media Builder for Acronis Image Creator
Media Builder for Acronis Standalone Utility.)
all on the same computer.
2. The minimal configuration that enables offline imaging, standalone deployment and
deployment through the network with Acronis OS Deploy Server:
Acronis Snap Deploy Management Console (custom installation, including:
Media Builder for Acronis Image Creator
Media Builder for Acronis Standalone Utility
Media Builder for Acronis Snap Deploy Agent.)
Acronis License Server (custom installation, includes only:
Acronis License Server)
Acronis OS Deploy Server
all on the same computer. On the target computers, no Acronis components are required.
3. The configuration that adds the network boot of master and target computers to the above
functionality:
Acronis Snap Deploy Management Console (custom installation, including:
Media Builder for Acronis Image Creator
Media Builder for Acronis Standalone Utility
Media Builder for Acronis Snap Deploy Agent.)
Acronis License Server (custom installation, includes only:
Acronis License Server)
Acronis OS Deploy Server
6
© Acronis, Inc
Acronis PXE Server
all on the same computer. On the target computers, no Acronis components are required.
This is the recommended elementary configuration that enables most of the Acronis Snap Deploy
functionality.
In case physical access to the powerful server is limited, you can install the console on a separate
computer. Another common configuration is:
Workstation:
Acronis Snap Deploy Management Console (custom installation, including:
Media Builder for Acronis Image Creator
Media Builder for Acronis Standalone Utility
Media Builder for Acronis Snap Deploy Agent.)
Server:
Acronis License Server (custom installation, includes only:
Acronis License Server)
Acronis OS Deploy Server
Acronis PXE Server
Generally, you can install all Acronis servers on separate computers. In this case, you will have to
connect the management console to each server separately to manage the server. With all servers on
one computer, only one console connection is needed.
4. To add the ability to deploy Windows on dissimilar hardware to any configuration but (1),
install the Acronis Universal Deploy add-on on a computer where Acronis OS Deploy Server is
installed.
5. To add the online imaging ability and the ability to validate images integrity to any
configuration, install Acronis Snap Deploy Management Agent.
Online imaging means that the master system is imaged live (without reboot or suspending
operations.) Online imaging can be performed remotely whenever you need on connecting the console
to the management agent installed on the master computer. The management agent will be included
in the master image and deployed on all target computers. This will enable you to manage files and
execute applications on target computers at any time after deployment.
However, having excess software in the master image is not always rational. Besides, installation of
the agent takes a license.
We recommend that you create a master image using bootable Acronis Master Image Creator or the
command line utility in PE. Nevertheless, having at least one management agent on the network (not
necessarily on the master computer) makes sense. You will be able to validate (check) your images
integrity using the management agent.
6. To add the Acronis OS Deploy Server ability to deploy in other subnet (across a switch) to any
configuration but (1), install Acronis WOL Proxy on any server in the subnet where the target
computers are. No additional actions are required.
Acronis WOL Proxy has to be installed only if:
- you are going to perform scheduled deployment (manual or event-driven deployment do not
require WOL Proxy Server)
AND
- all or some of the target computers are in subnet(s) other than Acronis OS Deploy Server.
© Acronis, Inc
7
7. Installing the Acronis Snap Deploy Components
7.1 Installation of Acronis Snap Deploy Management Console
Acronis Snap Deploy Management Console is an administrative tool for remote access to Acronis
servers and Acronis Snap Deploy Management Agent. Install Acronis Snap Deploy Management
Console on any networked computer from which you prefer to operate.
To
1.
2.
3.
install Acronis Snap Deploy Management Console:
Run the Acronis Snap Deploy setup program
Click Install Acronis Snap Deploy Management Console
Follow the Install Wizard instructions on the screen.
Typical and complete installations install, besides Acronis Snap Deploy Management Console, Media
Builder for Acronis Image Creator, Media Builder for Acronis Snap Deploy Agent and Media
Builder for Acronis Standalone Utility. We strongly recommend that you install all the features
that enable creation of bootable CD, DVD or other removable media with bootable Acronis
components.
Once Acronis Snap Deploy Management Console is installed, you can install the other components
remotely using the console’s remote installation feature (for more information, see the Acronis Snap
Deploy User Guide section 4.2 Installation and update of Acronis components on remote computers.)
7.2 Installation of Acronis License Server
7.2.1 Installation
Acronis License Server is a component that tracks licenses of Acronis products. Install Acronis
License Server on a computer accessible to Acronis OS Deploy Server. Installing both products on
the same computer would make sense.
A typical installation installs Acronis License Server and the Acronis License Server Management
Console. A complete installation installs, besides these two, Acronis License Server Management Tool.
A custom installation lets you choose components to install.
The Acronis License Server Management Tool is a simple command-line utility for controlling
Acronis License Server. Acronis License Server Management Console provides an easy-to-use
GUI. Alternatively, you can control Acronis License Server using Acronis Snap Deploy Management
Console. So you can choose to install only the Acronis License Server.
If you have already installed Acronis License Server that came with another Acronis product,
you still need to install Acronis License Server that came with Acronis Snap Deploy. You can
install both license servers on the same computer. The Acronis License Server then will be
seen as a common server for all Acronis products.
There is no need to install Acronis License Server Management Console or Acronis License
Server Management Tool once again, because you already have the necessary management
instruments.
To install Acronis License Server:
1. Run the Acronis Snap Deploy setup program
8
© Acronis, Inc
2. Click Install Acronis License Server
3. Follow the Install Wizard instructions on the screen.
4. Reboot on prompt.
After installation, Acronis License Server launches automatically as Windows service.
Before installing Acronis OS Deploy Server, import serial numbers to Acronis License Server either in
command-line mode or using Acronis Snap Deploy Management Console.
7.2.2 Adding licenses using Acronis Snap Deploy Management Console
1.
2.
3.
4.
Run the Acronis Snap Deploy Management Console.
Click Manage licenses. Connect to the computer where Acronis License Server is installed.
Click Add License on the sidebar.
In the Add License window, type in the serial number or a path to the .txt or .eml file containing
the serial numbers. Or you can browse to the file.
5. In the final window, click Proceed. Acronis License Server performs the operation and reports the
number of newly-added licenses.
The license server has 5 free workstation licenses
7.2.3 Adding licenses in command line mode
If you have installed Acronis License Server Management Tool, you can add licenses to the Acronis
License Server in the command line mode.
1. Run cmd.exe (Windows Command Prompt)
2. Go to the folder where Acronis License Server is installed. By default, it is
\Program Files\Acronis\LicenseServer
3. Enter the following command:
LicenseServerCmdLine --import-file [servername] [filename]
where:
servername – name of the computer where Acronis License Server is installed
filename – name of the file (*.txt or *.eml) with the serial numbers
Example:
© Acronis, Inc
9
This will add the serial numbers from C:\AcronisEnglish.txt to the license server Ltest-2.
7.3 Installation of Acronis OS Deploy Server
Acronis OS Deploy Server is a component that performs centralized deployment through the
network with the help of Acronis Snap Deploy Agents.
Before installing Acronis OS Deploy Server, you need to install the Acronis License Server and import
license numbers to it (for more information see the previous section).
To
1.
2.
3.
4.
install Acronis OS Deploy Server:
Run the Acronis Snap Deploy setup program
Click Install Acronis OS Deploy Server
Follow the Install Wizard instructions on the screen.
Reboot on prompt.
The wizard will ask you for Acronis License Server. Browse to the server, or enter its name or IP
address, or let the server be found automatically on the network. This will not decrease the number of
deployment licenses. The program just checks the availability of the licenses and stores the specified
Acronis License Server parameters to be able to access the Acronis License Server later, when the
deployment is launched.
7.4 Installation and setup of Acronis PXE Server
Acronis PXE Server allows the network booting of the Acronis Snap Deploy Agent, Acronis Master
Image Creator or Preinstallation Environment on target computers. Using Acronis PXE Server
considerably reduces the time required for booting the computers as compared to using bootable
media. It also eliminates the need to have a technician onsite to install the bootable media into the
system that must be booted. This allows for unattended scheduled deployment.
Using Acronis PXE Server makes sense if there is a Dynamic Host Control Protocol (DHCP) server in
your network, so that the booting computers can automatically get IP addresses. Without DHCP, you
can boot computers from PXE, but have to configure their network settings manually.
We recommend that you have only one PXE server within a subnet to ensure predictability of the
booting computers behavior.
7.4.1 Installation of Acronis PXE Server
To install Acronis PXE Server:
10
© Acronis, Inc
1. Run the Acronis Snap Deploy setup program
2. Click Install Acronis PXE Server
3. Follow the on screen Install Wizard instructions.
Acronis PXE Server runs as a service immediately after installation. Later on it will automatically launch
at each system restart. You can stop and start this program in the same way as other services.
7.4.2 Setting up a computer to boot from PXE
For bare metal, it is enough that the machine’s BIOS supports network booting.
On a machine that has an operating system on the hard disk, the BIOS must be configured so that the
network interface card is either the first boot device, or at least prior the Hard Drive device. The
example below shows one of reasonable BIOS configurations. If you don’t insert bootable media, the
computer will boot from the network.
Setting up the BIOS (example) for network boot
In some BIOS versions, you have to save changes to BIOS after enabling the network interface card
so that the card appears in the list of boot devices.
If the hardware has multiple network interface cards, make sure that the card supported by the BIOS
has the network cable plugged in.
7.4.3 Setting up PXE and DHCP on the same server
If Acronis PXE Server and the DHCP server are on the same computer, add to the DHCP server
option 60: “Client Identifier” with string value “PXE Client”. This can be done as follows:
C:\WINDOWS\system32>netsh
netsh>dhcp
netsh>dhcp>server \\<server_machine_name> or <IP address>
netsh dhcp>add optiondef 60 PXEClient STRING 0 comment=”Option added for
PXE support”
netsh dhcp>set optionvalue 60 STRING PXEClient
© Acronis, Inc
11
7.4.4 Setting up the PXE to work in other subnet
To enable the Acronis PXE Server to work in other subnet (across the switch), configure the switch
to relay the PXE traffic. The PXE server IP addresses are configured on a per-interface basis using IP
helper functionality in the same way as DHCP server addresses. For more information please refer to:
http://support.microsoft.com/default.aspx/kb/257579
7.5 Installation of Acronis WOL Proxy
Acronis Wake on LAN Proxy enables the Acronis OS Deploy Server to wake the target computers
located in the other subnet.
Acronis WOL Proxy has to be installed only if:
- you are going to perform scheduled deployment (manual or event-driven deployment do not
require WOL Proxy)
AND
- all or some of the target computers are in subnet(s) other than Acronis OS Deploy Server.
Install Acronis WOL Proxy on any server in the same subnet as the target computers. No additional
actions are required.
To
1.
2.
3.
install Acronis WOL Proxy Server:
Run the Acronis Snap Deploy setup program
Click Acronis WakeOnLAN Proxy
Follow the Install Wizard instructions on the screen.
Acronis WOL Proxy runs as a service immediately after installation. Later on it will automatically launch
at each system restart. You can stop and start this program in the same way as other services.
7.6 Installation of Acronis Snap Deploy Management Agent
Installation of Acronis Snap Deploy Management Agent adds the online imaging ability and the
ability to validate integrity of your images.
Online imaging means that the master system is imaged live (without reboot or suspending
operations.) Online imaging can be performed remotely whenever you need on connecting the console
to the management agent installed on the master computer. The management agent will be included
in the master image and deployed on all target computers. This will enable you to manage files and
execute applications on target computers at any time after deployment.
However, having excess software in the master image is not always rational. Besides, installation of
the agent takes a license.
We recommend that you create a master image using bootable Acronis Master Image Creator or the
command line utility in PE. Nevertheless, having at least one management agent on the network (not
necessarily on the master computer) makes sense. You will be able to validate (check) your images
integrity using the management agent.
To install Acronis Snap Deploy Management Agent:
1. Run the Acronis Snap Deploy setup program
2. Click Install Acronis Snap Deploy Management Agent
3. Follow the Install Wizard instructions on the screen
12
© Acronis, Inc
4. The wizard will ask you for Acronis License Server. Browse to the server, or enter its name or
IP address, or let the server be found automatically on the network.
There must be at least one Acronis Snap Deploy license of appropriate type on the license server.
A license for the server product is needed to install the agent on a server operating system. A
license for the workstation product is needed to install the agent on a workstation operating
system. A server license can be used instead of a workstation license through a prompt. The
management agent installation will decrease the number of free licenses by one.
5. Reboot on prompt.
7.7 Installation of Acronis Universal Deploy
Acronis Universal Deploy is an add-on to Acronis Snap Deploy. It is purchased separately and
installed from a separate setup file.
Acronis Universal Deploy can be installed only on a computer where Acronis OS Deploy Server is
installed.
Acronis Universal Deploy can be installed on a networked computer either locally, by running the setup
program, or remotely. To install Acronis Universal Deploy remotely, extract the setup file (.msi) to a
network share (see below) and install Acronis Universal Deploy in the same way as other Acronis Snap
Deploy components. For more information, see the Acronis Snap Deploy User Guide section 4.2
Installation and update of Acronis components on remote computers.
After installation Acronis Universal Deploy automatically plugs in Acronis OS Deploy Server.
You do not need a license to install Acronis Universal Deploy. However, do not forget to add
the Acronis Universal Deploy licenses to the license server before starting deployment. If the
licenses are not found during deployment, the Acronis Universal Deploy step will be skipped.
8. Extracting the Acronis Snap Deploy components
During Acronis Snap Deploy Management Console installation, all Acronis Snap Deploy components’
setup (.msi) files will be placed in the \Program Files\Common Files\Acronis\RemoteInstall folder.
Thus, you will be able to remotely install, modify or repair the components using Acronis Snap Deploy
Management Console or msiexec.exe utility.
When installing Acronis Snap Deploy components on a local computer, you can save setup files for
each component separately on a local or network drive. This will help when modifying or recovering
the existing component installation on a local computer.
To
1.
2.
3.
save a component’s setup file:
Run the Acronis Snap Deploy setup file
In the Install Menu, right-click on the component name and select Extract
Select a location for the setup file and click Save.
© Acronis, Inc
13