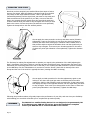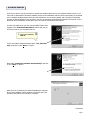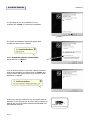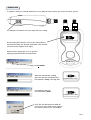
1
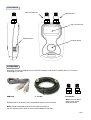
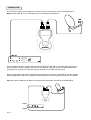
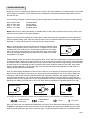
Instruction Manual
(English)
www.eurosat.com
Issue 1
Thank you for your purchase of the DSM-4S, should you require further assistance with its use it is suggested
that you initially contact your supplier with enquiries as many queries can be diagnosed via email or by phone.
CONTENTS
Overview / Please note / Speceifications
Your DSM-4S / Accessories
Making connections
Finding satellites
Improving your signal / Remember
Software updates
Downloads
Warranty / Conformity / Contacts
2
3
4
5
6
7
8
9
OVERVIEW
The latest development in satellite identification technology has been packed into the Eurosat Manhattan
DSM-4S satellite meter. The DSM-4S makes finding your satellite quick and easy with its unique satellite
direction indicator system and unique satellite identification with lock indication.
● All the accessories you need come complete with your meter so that it is ready to use out of the box.
● The clear and easy to read display ensures a excellent dish alignment every time.
● The DSM-4S does not require batteries as it runs from your satellite receiver.
● Full support and update download packs are available as free downloads.
PLEASE NOTE
The DSM-4S is a satellite finding device it is not designed to be permanently left in line between your
LNB and set top box. Once the installation is complete remove your DSM-4S and re-connect the LNB
to the receiver.
SPECIFICATIONS
●
●
●
●
●
●
●
●
●
●
●
●
●
Easy to use one button operation
Small and light weight
No batteries required
Positive satellite identification
Clear backlit 128 x 64 pixel LCD display
USB Interface
Downloadable updates
Automatic USB driver installation
1 metre F-F connecting lead supplied
USB cable included
Frequency range 950 to 2150 MHz
Unique satellite direction indicator
Carry case included
Eurosat ® and Manhattan® are registered trademarks of Eurosat Distribution Ltd.
Eurosat reserves the right to alter product specifications without prior notice.
Page 2
YOUR DSM-4S
Receiver Connector
LNB Connector
128 x 64 Pixel LCD
USB Connector
Function Button
Manhattan
ACCESSORIES
Everything you need is supplied with your DSM-4S including a USB cable for updates and a F to F lead for
connecting to your LNB.
USB Lead
F - F Lead
Replacements for both these items are available directly from Eurosat Ltd.
Port Savers
Note: The Port Savers
(fitted) must remain
fitted at all times.
Note: Should a Manhattan DSM-4S be returned to Eurosat Ltd
the Port Savers must be fitted as removal will invalidate the warranty.
Page 3
CONNECTIONS
Your DSM-4S is ready to use straight out of the box. How to connect your meter is illustrated below.
Note: Always make all of your connections prior to switching your DSM-4S on.
LNB
LNB IN
For the easiest method of connection disconnect the cable from the LNB on your dish and connect this to
the Set Top Box (receiver symbol) connector on your DSM-4S. Then use the short F cable supplied with
your DSM-4S to connect your LNB (dish symbol) connector to the LNB as shown above.
After your connections have been completed ensure that your set top box is switched on with any channel
selected. Tip: Ensure that the F connectors are hand tight and not loose (good connections are essential).
Tip: Other types of LNB such as Quad or Dual should be connected in the fashion illustrated below.
Input 1
Input 2
Page 4
FINDING SATELLITES
Now that you have connected your DSM-S4 you are ready to find some satellites. Your DSM-S4 will be pre-loaded
with a selection of satellites. These selections can be changed by downloading different region packs from the
Eurosat web site.
In the following examples we will be looking at the European pack of satellites which comprises of the following...
Astra 2A
Astra 2D
Astra 1
Hotbird
28.2' East
28.2' East
19.2' East
13.0' East
European Beam
UK Spot Beam
European Beam
European Beam
Note: Beam refers to where this satellite is available Astra 2D has a narrow beam focused over the UK for local
network services specific to the United Kingdom.
Switch on your DSM-S4 by holding the function button. After the start up has completed you will be presented
with the satellite finding mode. Press the function button until your desired satellite from the pre-loaded pack is
displayed. To switch the DSM-S4 off press and hold the function button.
Tip: For locations above the equator (Europe for example) satellites will be
located on the Southern horizon, with the use of a compass we can quickly
eliminate half of the visible sky, for the European satellites we can further
reduce our search area by focusing on the South East region of the visible
sky as the European satellite pack pre-loaded into your DSM-S4 is looking
for satellites in this region.
Astra 2D 28.2E
Searching...
Satellite finding is best done with the following technique. Ensure that your satellite dish is mounted on its fixings
so that the bolts are biting just enough to allow you to move the dish and it will hold its position in both Elevation
and Azimuth (side to side and up and down motion). Also the LNB clamp should be tight enough to hold the LNB
in place when you are adjusting the skew (clockwise and counter-clockwise rotation of the LNB). Some LNB’s
have a 5 position adjuster for this purpose and come with the LNB skew preset (typically on small dishes) as
supplied by the satellite service operator.
Point your dish slightly downwards so that the face is about 5 to 10 degrees off vertical and slowly move your
dish from east to west across the horizon in a slow smooth motion keeping an eye on your meter display. On
reaching the end of each sweep tilt the dish back a little (raising the elevation) and sweep back again in the
same slow smooth manner. You will notice that the signal level display will rise and fall as you pass different
satellites. When you are getting close to your selected satellite the unique satellite direction finding system will
display arrows telling you which way to move your dish (from the perspective of standing behind your dish).
Astra 2D 28.2E
Astra 2D 28.2E
Astra 2D 28.2E
Searching...
Searching...
Found
The Unique arrow system tells you that you are getting closer to your satellite in a countdown style.
Target satellite
is far away.
Target satellite
is closer.
Closer
Very close
Once you have found your satellite the satellite dish icon will be come solid and a melody will play, the word
“Found” will also appear in the lower left corner of the LCD display. On locating your satellite you can further
peak the signal by following the steps on the next page, to improve the performance of your satellite system.
Page 5
IMPROVING YOUR SIGNAL
Now that you have acquired your satellite follow these steps to further
improve your signal. While the display is showing found move the dish
very slowly off the target satellite in either a left or right direction
(Azimuth adjustment) until the signal level just starts to drop away and
make a mental note of the position of your dish, now move the dish
back in the opposite direction watch where the signal level peaks and
continue until the level just starts to drop off again. Now move you dish
back to the centre of these two points (the azimuth is now optimised).
Tighten the clamp bolts to lock the azimuth position.
We can apply the same procedure to the up and down motion (Elevation
adjustment), again we are looking to see where the signal just starts to
fall away and move while moving up in elevation make a mental note of
that position and then adjust the elevation down until the signal level just
starts to drop off again. Then return your elevation position to the centre
of these two points (the elevation is now optimised). Tighten the elevation
bolts.
The final step for making fine adjustments to optimise your signal is the polarisation of the LNB (adjusting the
skew). Depending of the style of dish you own this can take two different forms. One adjusting the skew of the
whole dish (via a mounting plate on the rear of the dish) or two rotating the LNB clockwise or counter-clockwise
in the LNB clamp. For the United States it is common to have the former (whole dish is rotated) where as in
Europe and the rest of the world it is typically the latter (rotating the LNB in its clamp).
+
+
We can apply a similar procedure for the skew adjustment, again we are
looking to see where the signal just starts to fall away and move while
rotating the LNB (or dish assembly) make a mental note of that position and
then adjust the skew in the opposite direction until the signal level just starts
to drop off again. Then return your skew position to the centre of these two
points (the polarisation is now optimised). Tighten the LNB clamp.
Following the procedures above will greatly improve the performance of your dish, and over time your familiarity
with installing your own dish will enable you to complete this procedure quickly.
REMEMBER
Page 6
The DSM-4S is a satellite finding device it is not designed to be permanently left
in line between your LNB and set top box. Once the installation is complete
remove your DSM-S4 and re-connect the LNB to the receiver.
SOFTWARE UPDATES
From time to time it may be necessary to update the satellite selections on your DSM-4S satellite meter or you
may wish to download an alternative satellite pack from the Manhattan web site. Before proceeding to download
new or updated settings please insure that the USB drivers are correctly installed, this is usually an automatic
process (as described below) but the drivers can also be manually downloaded and installed if required. For the
automatic driver installation to take place your PC must be connected to the internet.
Connect your DSM-4S to your PC with the USB interface lead
supplied. The “Found New Hardware” balloon will pop-up
in the lower left of your windows task bar.
Found New Hardware
DSM-S4
In the Found New Hardware Wizard select “Yes, this time
only” and click on the “Next >” button.
Next select “Install the software automatically” and click
on the “Next >” button.
While your PC is searching for and downloading the required
drivers the installation wizard window will look like this. This
operation may take a few seconds to complete.
Continued...
Page 7
Continued...
SOFTWARE UPDATES
The first stage of the driver installation is now
complete click “Finish” to continue the installation.
The Found New Hardware Wizard will appear again
to install the second driver required.
Select “Install the software automatically”
option and click on “Next >”.
Your PC will then search for the driver required. Once this
stage of the installation is complete click on “Finish” and
a notice balloon will appear to inform you that your driver
installation is complete.
Check to see that your DSM-4S is now in program mode as
illustrated on the right and you are then ready to update you
DSM-4S with your new satellite selections downloaded from
the Manhattan web site.
Page 8
Program mode
DOWNLOADS
To update or load your selected satellite file to your DSM-4S meter connect your meter via USB to your PC.
The USB port is located on the lower right side of the casing.
Program mode
On connecting the DSM-4S to your PC the LCD will flash a
few times and settle into program mode after a few seconds
(as shown in the diagram on the right).
Double click the target style icon to open the
loading program and follow the steps below.
Manhattan
Click Transfer
While the data transfer is taking
place the LCD text will indicate that
the NanoSat is “busy” receiving data.
Program mode: busy
On completion the LCD
text will indicate “done”
Program mode: done
Click “OK” and disconnect the DSM-4S
from your PC your meter is now ready for
use with the selection you downloaded.
Page 9
NOTES
Page 10
NOTES
Page 11
LIMITED WARRANTY
Eurosat will, at our option, repair or replace any Manhattan DSM-4S Digital Satellite Meter
found to be defective in manufacture within the warranty period (1 year).
The warranty period is determined by the date of DSM-4S purchase.
Keep your receipt as proof of purchase.
Otherwise the warranty is determined by date of manufacture.
This warranty does not apply to damage caused by accident, misuse, or tampering
with the unit or seals. This does not affect your statutory rights.
DECLARATION OF CONFORMITY
Manufacturer: Horizon Global Electronics Ltd.
Declares that the Eurosat Manhattan DSM-4S
complies with the following directives and standards.
Safety EN610 10-1:2001
EMC 61326:1997
All Horizon Global Electronics products are ROHS compliant.
Technical Department
Horizon Global Electronics Ltd.
November 2009
CONTACT DETAILS
Eurosat (Trade) act as the UK Distribution Agent for this range and similar
products, they can be contacted regarding further and other issues at the address below.
Eurosat
Argyle House
Longmore Avenue
Walsall
WS2 0BW
Tel: +44 (0)1922 639 299
Email: [email protected]