1
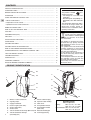
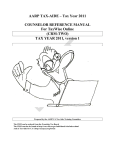
EG
OPERATING INSTRUCTIONS ● ISTRUZIONI D'USO
NOTICE D’UTILISATION ● BEDIENUNGSANLEITUNG
INSTRUCCIONES DE USO ● INSTRUCÇÕES DE FUNCIONAMENTO
I
F
D
E
P
MOVABLE AIR CONDITIONER ● CLIMATIZZATORE PORTATILE
CLIMATISEUR MOBILE ● MOBILES KLIMAGERÄT
ACONDICIONADOR PORTATIL ● AR CONDICIONADO PORTÁTIL
Save these instructions / Conservate queste istruzioni / Conserver cette notice d’utilisation
Bewahren Sie bitte diese Bedienungsanleitungen auf / Guardeis estas instrucciones / Guarde estas instruções
37.4252.008.2
06/2005
CONTENTS
EG
PRODUCT IDENTIFICATION......................................................................................
2
SIGNALING LAMPS ..................................................................................................
3
BEFORE USING THE APPLIANCE.............................................................................
3
OPERATION ...............................................................................................................
4
USING THE REMOTE CONTROL UNIT.....................................................................
4
• How to install batteries ..............................................................................................
4
• Temperature sensor selector.....................................................................................
4
• Operation with the remote control unit.......................................................................
4
REMOTE CONTROL UNIT .........................................................................................
5
HOW TO SET THE PRESENT TIME ..........................................................................
6
COOLING ..................................................................................................................
6
DEHUMIDIFYING (DRY).............................................................................................
6
FAN ONLY...................................................................................................................
6
ADJUSTING THE FAN SPEED...................................................................................
6
SLEEP MODE..............................................................................................................
6
SETTING THE TIMER.................................................................................................
7
SETTING THE AIR FLOW DIRECTION.....................................................................
8
HOW TO DISCHARGE THE WATER TANKS .............................................................
8
OPERATION WITHOUT THE REMOTE CONTROL UNIT..........................................
9
TIPS FOR ENERGY SAVING.....................................................................................
9
TROUBLESHOOTING............................................................................................... .
9
DECLARATION OF CONFORMITY
This product is marked
as it
satisfies Directives:
– Low voltage no. 73/23 EEC and
93/68 EEC.
– Electromagnetic compatibility no.
89/336 EEC, 92/31 EEC and 93/68
EEC.
This declaration will become void in
case of of misusage and/or non
observance though partial of
manufacturer's installation and/or
operating instructions.
NOTE: This symbol mark and
recycle system are applied only
to EU countries and not applied
to the countries in the other
area of the world.
Your product is designed and manufactured with high quality materials
and components which can be recycled and reused.
This symbol means that electrical and
electronic equipment, at their end-oflife, should be disposed separately
from your household waste.
Please dispose of this equipment at
your local community waste collection/recycling centre.
In the European Union there are separate collection systems for used electrical and electronic products.
Please help us to conserve the environment we live in!
PORTHOLE KIT ........................................................................................................... 10
CARE AND CLEANING .............................................................................................. 10
ELECTRIC WIRING DIAGRAMS’ SYMBOLS ............................................................
11
PRODUCT IDENTIFICATION
3
2
15
7
14
5
1
6
8
13
11
4
9
4
10
1.
2.
3.
4.
5.
6.
7.
8.
2
9.
Wireless remote control unit
10.
Signaling lamps
11.
Supply air deflector
12.
Return air grille (both sides)
13.
Air filter (both sides)
Air filter cover
Tube for condensate discharge (Main tank) 14.
15.
Tube for condensate discharge
(Secondary tank)
Electric cable with plug
Space for cable winding
Cable cover
Transportation wheels
Transportation handle
(both sides)
Retractile flexible pipe
Terminal pipe fitting
12
Operating limits:
Room Temperature:
Cooling:
MIN: 16°C D.B. / 14°C W.B.
MAX: 35°C D.B. / 24°C W.B.
Dehumidification: MIN: 16°C D.B / 80% R.H.
MAX: 35°C D.B. / 80% R.H.
SIGNALING LAMPS
1
6
2
3
4
5
EG
1. Receiver : receives signals transmitted from the remote control.
2. TIMER lamp: This lamp lights up when the system is being
controlled by the timer or sleep mode.
3. OPERATION lamp: This lamp lights up during operation.
It blinks once to announce that the remote control signal
has been received and stored. It blinks continuously during
the protection modes (defrosting, etc.).
4. STANDBY lamp: This lamp lights up when the air conditioner
is connected to the power and ready to receive the remote
control command.
CAUTION
5. Water-level alarm: When the main tank is full, the air conditioner stops automatically and this lamp begins blinking.
6. Operation button (without remote control): Push the button
to walk through the OFF and COOL operation modes.
WARNING
The OFF position does not disconnect the power. Use the
main power switch to turn off power completely.
BEFORE USING THE APPLIANCE
●
●
●
●
●
●
●
Check that the power supply at the location where the air conditioner is going to be
used is 220-240V ~ 50Hz .
Make sure that the electrical installation is suitable to supply continuously current
necessary for the air conditioner in addition to that already used by other electric
appliances (white goods, lighting). See the max electric input indicated on the
name plate positioned on the air conditioner.
The installation of a double-pole switch, protected by 10 A fuses of the delayed
type, upstream the electricity wall socket, is recommended.
The unit has to be connected according to the local electrical rules.
Make sure that circuit breakers, fuses, etc, are of sufficient capacity to handle a
start-up current of 20 A (generally less then 1 second).
Do not install the air conditioner where it could be wetted by drops of water (i.e. in
laundries).
Before connecting the air conditioner to a power socket, make sure that the socket
is provided with an earth connection in compliance with local codes.
●
Never use the power plug as a mean to start or stop the air conditioner: always
use the ON/OFF push-button switch on the air conditioner control panel.
●
Do not move the air conditioner during operation, turn it off and disconnect the
plug from the power supply. Verify and eventually discharge the condensate water,
through the discharge tube located on the rear of the unit.
WARNING! Do not stick anything into the air outlet of the air conditioner. This is
very dangerous because the fan is rotating at high speed.
●
●
●
●
●
WARNING!
The air conditioner is provided with a time-guard system, which does not allow
re-starting of compressor until after 3 minutes from a previous stop.
Make sure that there are no obstacles around the unit affecting the free circulation
of air. Do not block the air intakes and outlet of the unit with curtains or other.
Never put objects on the top of the unit.
The air conditioner reaches the maximum efficiency at the following conditions:
1-The flexible tube is retracted, without bends and without the outlet nozzle.
2-When you switch on the air conditioner for the first time, set the fan at the LOW
speed for at least one hour, then set the HIGH speed.
The manufacturer assumes no responsibilities if the safety regulations or local
codes are not observed.
WARNING
Always unplug the unit from the power socket before moving or cleaning it.
3
OPERATION
COOLING
● Place the air conditioner as near as possible to the window. Fit the flexible tube by
hooking it to the rear of the unit. Extend the flexible tube just enough to reach the
outdoor, passing under the window shutters set ajar.
● In case there is a window sill towards the inside of the room, it might be better to
use the supplied outlet nozzle. Insert the nozzle into the free end of the flexible
tube.
● Open the window and lock one of the shutters. Place the outlet nozzle between the
two shutters, held together with the supplied lace.
● Avoid sharp bends or plies of the flexible tube.
● In case of porthole utilise make a 140 mm diameter hole in the window pane.
EG
DEHUMIDIFICATION (DRY)
When the air conditioner is in the dehumidification mode, it doesn’t cool the room.
When you use the air conditioner in the dehumidification mode, you don’t have to
use the flexible tube. For maximum dehumidification efficiency leave the rear
discharge outlet free to discharge directly into the room.
●
NO!
Remove the flexible tube by grasping it at the attachment point on the air
conditioner and twisting it until you release it from the blocking hooks.
USING THE REMOTE CONTROL UNIT
HOW TO INSTALL BATTERIES
●
Remove the lid in the rear part of the remote control unit.
●
Insert two AAA alkaline batteries of 1,5 V-DC.
Make sure the batteries point in the direction marked in the
battery compartment.
●
The batteries last about six months. Depending on how
much you use the remote control unit.
Remove the batteries if you do not use the remote control
unit for more than one month.
Press the +, -, SET and CLEAR buttons together after
batteries replacement.
(This operation allows you to reset correctly all the
programs. The remote control unit is to be set up again).
Replace the batteries when the remote control unit lamp
fails to light, or when the air conditioner does not receive
the remote control unit signals.
●
The batteries of the remote control contain polluted
substances exhausted batteries must be disposed
according to the laws in force.
TEMPERATURE SENSOR SELECTOR
●
●
Under normal conditions the room temperature is detected
and checked by the temperature sensor placed in the
air conditioner.
Press the remote control I FEEL button to activate the temperature sensor placed in the remote control. This function is
designed to provide a personalised environment by transmitting the temperature control command from the location next
to you. Therefore, in using this function, the remote control
should always be aimed, without obstruction, at the
air conditioner.
NOTE
The remote control unit sends
the temperature signal to the air
conditioner regularly at two
minute intervals. If the signal
from the remote control unit
stops for more than five
minutes due to some troubles,
the air conditioner will switch
VISORE TELECOMANDO
to the temperature sensor
which is built into the unit and controls the room temperature. In these cases, the temperature around the remote
control unit may differ from the temperature
detected in the air conditioner position.
OPERATION WITH THE REMOTE CONTROL UNIT
When using the remote control unit, always point the unit transmitter head directly at the air conditioner receiver.
RECEIVER
TRANSMITTER HEAD
REMOTE CONTROL UNIT
4
REMOTE CONTROL UNIT
DISPLAY
Information are displayed when the remote control unit is
switched on.
Displayed when data trasmitted
Operation Mode
Or remote control unit lock
Cooling
Dehumidification (dry)
Fan only
Shows the
type of timer
TRANSMITTER
When you press the buttons
of the remote control unit,
the
mark appears on
the display to transmit the
setting changes to the receiver in the air conditioner.
Displayed
when the
timer off is
set and
activated
Set temperature or
room temperature
Displayed
when the timer
on is set and
activated
Clock (hours
and minutes)
Displayed when
the temperature
is the room
temperature
Displayed in Sleep
Mode Operation
SENSOR
A temperature sensor inside the
remote control unit detects the
room temperature.
— (cooler)
Press this button to decrease the set temperature.
+ (warmer)
Press this button to increase the set temperature.
FAN SPEED SELECTOR BUTTON
Fan speed is auto
matically selected by
the microcomputer.
Indicate that the air
conditioner is operating in I FEEL mode
High speed.
Medium speed.
Fan speed indication
Automatic fan
speed
High speed
Low speed.
Medium speed
SET BUTTON
Low speed
Push this button to select the functions:
• set the present time
• set the ON-OFF timer
For detail see “HOW TO SET THE
PRESENT TIME” and “SETTING THE
TIMER”.
ON/OFF OPERATION BUTTON
This button turns the air conditioner ON and OFF.
EG
TEMPERATURE SETTING BUTTONS
TIMER AND PRESENT TIME SETTING
BUTTONS
MODE SELECTOR BUTTON
Press this button to modify the air conditioner
mode.
Pushing + or - buttons the setting of the
time and timer can be activated. For
detail see “HOW TO SET THE PRESENT TIME” and “SETTING THE
TIMER”.
dehumidification (dry)
The air conditioner reduces the humidity in the
room.
TIMER BUTTON (timer setting)
Push the TIMER on the display starts
the timer ON and OFF setting procedure.
For detail see “SETTING THE TIMER”.
(cooling)
The air conditioner makes the room cooler.
(fan)
The air conditioner circulate the air.
LOCKING THE REMOTE CONTROL
Pushing this button freezes the last operation setting. When
is activated
the remote control will not be able to
control the air conditioner. To release
the lock status push
again.
SLEEP BUTTON
For details, see "Sleep mode".
When you press this button in the
COOL or DRY mode, the mark
appears on the display and the
microcomputer in the remote control
unit will adjust the set temperature to
save energy.
INACTIVATED BUTTONS
TEMPERATURE SENSOR
SELECTOR
Push IFEEL button to activate the
temperature control in the remote
control unit. This function provides
a more confortable temperature
control.
ROOM TEMPERATURE
Push the ROOM button to show the
actual room temperature around the
remote control.
TIMER RESET
Push the CLEAR button to cancel all timer setting.
5
ADJUSTING THE FAN SPEED
HOW TO SET THE PRESENT TIME
1.
Press the SET button for five seconds. The time indication
alone flashes.
2.
Press the + or - buttons until the present time is displayed.
3.
Press the SET button to stop the indication flashing.
EG
COOLING
AUTOMATIC
Simply set the FAN SPEED selector to the
position.
A microcomputer automatically controls the fan speed when the
AUTO mode is selected. When the air conditioner starts
operating, the difference between the room temperature and
the set temperature is detected by the microcomputer which
then automatically switches the fan speed to the most suitable
level.
NOTE
NOTE
Verify that the unit is connected to the main
power and the STANDBY lamp is light up.
1. Set the MODE selector to COOL
.
In FAN Only mode the fan speed is adjusted automatically
as in cooling mode.
2. Press the ON/OFF button and switch the
air conditioner ON.
WHEN DIFFERENCE BETWEEN
ROOM TEMPERATURE AND SET
TEMPERATURE IS
3. Press the TEMP. buttons to set the
desired temperature (the temperature
range is between 30 °C max. and 16 °C
min.).
3
4
2
Cooling and
dehumidifying
modes:
FAN SPEED
2 °C and over
Between 2 and 1 °C
Below 1 °C
High
Medium
Low
1
THE DISPLAY SHOWS THE
SELECTED TEMPERATURE.
NOTE
4. Press the FAN SPEED button to select the fan speed.
The above mentioned data make reference to air conditioner
operating when the sensor on the remote control unit is ON.
(Refer to temperature sensor selector). If the sensor on the unit
is being used then actual operation will slightly differ from that
described in the above tables.
NOTE
The air conditioner disposes of the condensate water automatically at the HIGH and MEDIUM fan speed, on the contrary at
the LOW fan speed the condensate water is collected in the
tank.
MANUAL
If you want to manually adjust speed just set the FAN SPEED
selector as desired.
High speed
DEHUMIDIFYING (DRY)
1. Set the MODE selector switch to “DRY”
.
2. Press the ON/OFF button and switch the air conditioner ON.
3. Press the TEMP. buttons to set the room temperature (the
temperature range is between 30 °C max. and 16 °C min.).
Med. speed
Low speed
SLEEP MODE
●
The SLEEP mode enables you to save energy.
1. Set the MODE selector to cool or dry.
THE DISPLAY SHOWS THE ROOM
TEMPERATURE.
NOTE
●
●
●
●
Use DRY operation when you want to reduce the humidity
in the room.
During DRY operation, the fan speed is automatically set to
low or stops to prevent overcooling.
Dry operation is not possible if the indoor temperature
is 15 °C or less.
The humidity of the room (condensate water) will be collected
in the internal tank of the air conditioner.
2. Press the SLEEP button.
3. The
mark appears on the display. Press the SLEEP
button again to release the SLEEP function.
What does the SLEEP mode mean?
In this mode, the air conditioner will cool or dry the room to the
set temperature, and then the thermostat will make the unit
pause. After about 1 hour, the air conditioner will automatically
reset the set temperature as follows (also refer to graph).
When the room temperature reaches the new set value, the
thermostat will cause the unit to pause. After about 1 hour the
temperature will be raised by 1°C. This enables you to save
energy without sacrificing your comfort.
COOLING AND DEHUMIDIFYING
FAN ONLY
If you want to make air circulate without any temperature
control, follow these steps:
1. Set the MODE selector switch to “FAN”
.
2. Press the ON/OFF button and switch the air conditioner
ON.
6
Room temperature
Setting temperature
1°C
1°C
1 hour
1 hour
TIME
SETTING THE TIMER
There are four timers that can be selected on the remote control.Two daily timers (designated as T1,T2) ,and two optional
weekend timers (designated as WKT1, WKT2) .Each timer can
be selected by pressing TIMER button.
The daily timers T1 and T2 can be set for ON and OFF separately for two different time periods.
Timer setting will not change until new setting is input.
The weekend timers WKT1 and WKT2 can be set for ON and
OFF separately for two different time periods and they are
effective two days only. These timers will be effective on the
day of setting and on the day after only.
At 24:00 on the second day, the WK timer will not be effective
anymore and the daily timer will be effective again.
WKT1 - effective on the setting day
WKT2 - effective one day after the setting day.
C) HOW TO SET A PROGRAM FOR DAILY ON/OFF OPERATION (OR VICEVERSA)
1. Press the TIMER button to select the desired timer.
2. Press the SET button till the ON sign blinks.
3. Press the + or - (HOUR) button until the desired value is
displayed.
4. Press the SET button again, the OFF sign blinks.
5. Press the + or - (HOUR) button until the desired value is
displayed.
6. Press the SET button to activate the timer.
EG
D) HOW TO CLEAR THE TIMER
1. Press the TIMER button to select the timer.
2. Press the CLEAR button if you want that every timer operation will be cleared.
NOTE:
1. During the weekend timer operation, the daily timers will
be disabled.
2. The WK timers must be reactivated before every weekend.
A)
1.
2.
3.
HOW TO SET THE OFF TIME
Press the TIMER button to select the desired timer.
Press the SET and CLEAR buttons till the OFF sign blinks.
Press the + or - (HOUR) button until the desired value is
displayed.
4. Press the SET button to activate the timer.
B)
1.
2.
3.
HOW TO SET THE ON TIME
Press the TIMER button to select the desired timer.
Press the SET button till the ON sign blinks.
Press the + or - (HOUR) button until the desired value is
displayed.
4. Press the SET and CLEAR buttons to activate the timer.
NOTE
If the procedure to set the timer is not completed, by pushing
the SET button, within 15 seconds the timer operation will be
cancelled and the last set-up is restored.
7
SETTING AIR FLOW DIRECTION
To set the air flow direction, seize the deflector blades and pull towards
you.
Vertical Flow
Horizontal Flow
EG
HOW TO DISCHARGE THE WATER TANKS
The air conditioner removes humidity of the air, collecting
the condensate into the internal tank. The condensate water can be
evacuated through the external discharge tube located on the rear of
the unit.
●
●
●
●
●
●
●
When the internal tank is full, the air conditioner will automatically
stop and the water tank alarm (5) begins flashing.
The tank capacity allows approx. 4 hours operation.
Verify the presence of water inside the air conditioner, looking
at the rear external discharge tube.
Stop the air conditioner using the remote control unit, then unplug
the cable.
Position a container under the discharge tube.
Grasp the tube removing it from its seat on the rear of the
air conditioner.
Close with the inch the open end of the tube and, tilting it towards
the container, let the condensate water flow.
At the end of the operations reinsert the discharge tube into
its place.
Every time you move the unit to another room or when you store it,
discharge also the condensate water of the secondary tank, through
the tube located inside the space for cable winding.
MAIN TANK
IMPORTANT
At the end of the operation close the tube with its stopper.
WARNING
●
●
Always switch off the air conditioner before unplugging it from the
power socket.
Always unplug the air conditioner before discharging the condensate water collected inside.
SECONDARY TANK
8
OPERATION WITHOUT THE REMOTE
CONTROL UNIT
If you have lost the remote control unit or it has troubles, follow
the steps below.
1. WHEN THE AIR CONDITIONER IS STOPPED
If you want to turn on the air conditioner push the operation button.
NOTE
The air conditioner will start in automatic fan speed
The temperature setting is 22°C for cooling mode
and 28°C for heating mode.
2. WHEN THE AIR CONDITIONER IS RUNNING
If you want to turn off the air conditioner push the operation button until the OPERATION lamp is turned off.
NOTE
Power failure during operation.
In the event of power failure, the unit will stop. When the power
is resumed, the unit will restart automatically after 3 minutes.
OPERATION BUTTON
• The blinking lamp (5) together with the stop of the air conditioner indicate that the main condensate water tank is full.
• If your air conditioner does not work properly, first check the
following points before requesting service.
If it still does not work properly, contact your dealer or service
centre.
Trouble: the air conditioner does not run at all.
Possible cause:
1. Power failure.
2. Leakage breaker tripped.
3. Line voltage is too low.
4. Operation button is OFF.
5. Batteries in remote control unit have run down.
Remedy:
1. Restore power.
2. Contact service centre.
3. Consult your electrician or dealer.
4. Press the button again.
5. Replace batteries.
EG
Trouble: The air conditioner does not operate and STANDBY
lamp flashes (4).
Possible cause:
1. Defective sensor.
Remedy:
1. Contact service centre.
Trouble: TIMER lamp (2) flashes and the air conditioner does
not operate.
Possible cause:
1. Trouble in wiring system.
Remedy:
1. Contact service centre.
Trouble: Compressor runs but soon stops.
Possible cause:
1. Obstruction of the air intake grilles.
Remedy:
1. Remove obstruction.
TIPS FOR ENERGY SAVING
DO NOT:
●
●
Block the air intake and outlet of the unit.
If they are obstructed, the unit will not work well, and may
be damaged.
Let direct sunlight into the room. Use sunshades,
blind or curtain.
DO:
●
Always try to keep the air filters clean. A clogged filter
will impair the performance of the unit.
●
To prevent conditioned air from escaping, keep windows,
doors and any other openings closed.
●
The flexible tube is correctly positioned without any sharp
bends nor plies.
●
The room temperature is above 16°C for cooling and dehumidification mode.
TROUBLESHOOTING
Trouble: Poor cooling performance.
Possible cause:
1. Dirty or clogged air filters.
2. Heat source or many people in room.
3. Doors and/or windows are open.
4. Obstacle near air intake or air discharge port.
5. The set temperature on the remote control unit is too high.
Remedy:
1. Clean air filters to improve airflow.
2. Eliminate heat source if possible.
3. Shut them to keep the heat or cold out.
4. Remove it to ensure good airflow.
5. Set the right temperature on the remote control unit.
Trouble: Clicking sound is heard from the air conditioner.
Possible cause:
1. During operation, any plastic parts may expand or shrink
due to a sudden temperature change. In this event, a clicking sound may occur.
Remedy:
1. This is normal, and the sound will disappear when an even
temperature is settled.
1
2
3
4
WARNING
• The use of portable telephones near the air conditioner may
cause disturbance to its normal operation and must
be avoided. In case abnormal operation is noticed,
(OPR operation lamp lights (3) but the air conditioner will not
run) to restore normal operation turn-off electric supply for 60
seconds at least, by disconnecting the main switch or the
wall plug, then start again the air conditioner.
5
9
PORTHOLE KIT
SINGLE GLASS
DOUBLE GLASS
ASSEMBLING
NOTE
HOLE
HOLE
EG
HOLE
●
Make a hole in the window
pane.
●
Insert the porthole without the
plug.
●
Remove the terminal pipe
fitting of the warm air outlet
from the retractile flexible
pipe.
●
Bring the air conditioner near
the window and insert
the air outlet in the porthole.
NOTE
If you want to utilise the air conditioner in several rooms, it is
possible to buy varies portholes for air discharge separately.
NOTE
Eliminate one or two membranes, cutting them with the scissors according
to the thickness of the glass.
CARE AND CLEANING
WARNING! For safety’s sake, be sure to turn the air conditioner OFF
and also disconnect it from the power supply before cleaning it.
1. Cleaning of the Air Filter
The air filter must be checked at least once every two weeks
operation. Operation with a dirty filter always causes a lower
efficiency of the air conditioner and severe product damage.
The filter is located at the back of the intake grille: open horizontally
the cover (1), grasp the air filter handle (2) and pull upwards.
Repeat the same operation also on the opposite side of the air conditioner. Use a vacuum cleaner to remove light dust. If there is
sticky dust on the filter, wash it with lukewarm soapy water, then
rinse in clean, cold water and dry it before reinstallation.
2. Cleaning of Casing and Grilles.
To clean the air conditioner, wipe it with a clean soft cloth, lightly
moisted. In case it is stained, moisten the cloth with soapy water.
Never use solvents or harsh chemicals, nor very hot water. Do not
pour water over the air conditioner to clean it: this will damage the
internal components and cause an electric shock hazard.
3. Storage.
If you are not going to make use of the air conditioner for a long
period, before storing it away clean the air filters and verify that both
the internal water tanks are empty. Always store the unit
in the vertical position. Do not put heavy objects on top of the unit
and protect it with a cloth or a plastic bag.
4. Transport.
Keep the air conditioner in the vertical position during
transportation.
5. For your safety care check periodically the conditions of the
electric supply cable; the electrical connection of the unit is X
type with cable prepared in a special way; in case you should
notice any damage due to usage, call the nearest After Sale
Service to get the cable replaced.
NO!
10
2
1