1
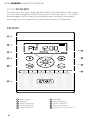
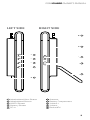
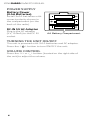
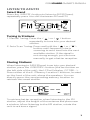
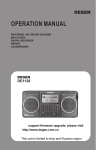
Weather Alert Clock Radio with Flashing Beacon
Owner’s manual
ZoneGuard OWNER’S MANUAL
NEED HELP? CONTACT US.
Etón Corporation, 1015 Corporation Way, Palo Alto, CA
94303, USA. 1-800-872-2228 (U.S.); 1-800-637-1648
(Canada); 650-903-3866 (worldwide); M-F, 8:00-4:30,
Pacific Standard Time; www.etoncorp.com.
WARNING
• Do not expose this appliance to rain or moisture.
• Do not submerge or expose for extended period to water.
• Protect from high humidity and rain.
• Only operate within specified temperature range
(0 °C to 40 °C).
• Unplug immediately if liquid has been spilled or any
object has fallen into the apparatus.
• Clean only with a dry cloth. Do not use detergents or
chemical solvents as this might damage the finish.
• Unplug and disconnect external antennas during
lightning storms.
• Do not remove cover [or back].
• Refer servicing to qualified service personnel.
ENVIRONMENT
Disposal
According to the European Directive 2002/96/EC all
electrical and electronic products must be collected
separately by a local collection system.
Please act according to your local rules and do not dispose
of your old products with your normal household waste.
Please dispose of all types of batteries per your
Government, State or Local rules and/or regulations.
If you are unsure, please call the appropriate local authority
to find out how to dispose of them safely and help protect
the environment.
3
ZoneGuard OWNER’S MANUAL
ZoneGuard
Thank you for purchasing the Etón ZoneGuard. We want
you to thoroughly enjoy the use of this product. To take
advantage of its many excellent and unique features,
we urge you to carefully read the Owner’s Manual.
FRONT
1
2
7
3
8
4
9
5
10
6
1
Alert Light
Display
3 Select Button
4 Power Button
5 Alert ON/OFF
2
4
6
Speaker
Menu Button
8 Alarm ON/OFF
9 Snooze Button
10 Memory Location 1-6
7
ZoneGuard OWNER’S MANUAL
left side
Right Side
16
17
11
WB
Alert
12
WB
13
AM/FM
+
18
VOL
-
19
14
Memory
20
15
11
16
12
17
Weatherband Alert Button
Weatherband Button
13 AM/FM Button
14 Memory Button
15 DC-in
Antenna
Battery Compartment
18 Volume +
19 Volume _
20 Backstand
5
ZoneGuard OWNER’S MANUAL
power supply
Battery Power
(3 AA Batteries)
Install 3xAA batteries with
correct polarity shown in
the compartment (on the
back of the radio).
DC-IN 5V AC Adapter
Plug in the AC adapter
(5V, 150mA) to the DC IN
socket.
AA Battery Compartment
Turning the unit on/off
The unit is powered with 3 AA batteries and AC adapter.
Press the < > button to turn ON/OFF the unit.
Volume Control
Press the <+> or <_> button (located on the right side of
the unit) to adjust the volume.
6
ZoneGuard OWNER’S MANUAL
Listen to AM/FM
Select Band
Press the <AM/FM> button to listen to AM/FM band,
repeatedly press it to shift between AM and FM.
Tuning in Stations
1. Manual Tuning: P ress the < > or < > button
repeatedly to tune into your desired
station.
2. Auto Scan Tuning: P ress and hold the < > or < >
button until frequency starts
scanning to auto tune into the next
available station. If the signal is
not strong enough, you can tune
manually to get a better reception.
Storing Stations
When listening to AM/FM band, tune into your desired
station, press the <MEMORY> button (the last button on
the left side of the unit), the LCD will display <STORE-->.
Press either of the 6 <Memory Location> buttons, located
on the front of the unit, above the speakers. You can
directly press the corresponding memory location to
retrieve the saved station.
To retrieve better reception when listening to the FM
station, adjust the length of the antenna and place near
a window. When listening to the AM station, rotate the
unit to retrieve a signal.
7
ZoneGuard OWNER’S MANUAL
alert light
Warning (Red Light)
A warning is issued when a hazardous weather or hydrologic
event is occurring, imminent or likely. A warning means
weather conditions pose a threat to life or property. People
in the path of the storm need to take protective action.
Watch (Orange Light)
A watch is used when the risk of a hazardous weather
or hydrologic event has increased significantly, but its
occurrence, location or timing is still uncertain. It is intended
to provide enough lead time so those who need to set their
plans in motion can do so. A watch means that hazardous
weather is possible. People should have a plan of action
in case a storm threatens and they should listen for later
information and possible warnings especially when planning
travel or outdoor activities.
Advisory (Green Light)
An advisory is issued when a hazardous weather or
hydrologic event is occurring, imminent or likely. Advisories
are for less serious conditions than warnings, that cause
significant inconvenience and if caution is not exercised,
could lead to situations that may threaten life or property.
8
ZoneGuard OWNER’S MANUAL
Setting the clock
1. In OFF mode, press the <MENU> button to enter
<SETUP TIME> mode.
2. P ress the < > or < > button. When the hour flashes,
press the < > or < > button to adjust the hour.
3. After adjusting the hour, press < > or < >.
When the minute flashes, press < > or < >
to adjust the minute.
4. Press the <MENU> button to confirm.
Note: T he clock mode is 12 hours; <AM> displays
in the morning and <PM> displays in the
afternoon and night.
9
ZoneGuard OWNER’S MANUAL
Setting the Alarm
Setting The Alarm Time
1. In radio OFF mode, press the <MENU> button, then press
the < > or < > button to enter <SETUP ALARM>
mode.
2. In the <SETUP ALARM> mode, press the < > or < >
button. When the hour flashes, press the < > or < >
button the adjust the hour.
3. A
fter adjusting the hour, press the < > or < > button,
when the minute flashes, press < > or < > to adjust
the minute.
4. Press the <MENU> button to confirm.
Activating and deactivating the alarm
Press the <
> button to activate or deactivate
the alarm. If the alarm function is activated, the symbol
< > will show on the display. When the alarm time is
reached, the unit will set off a beep. If the alarm function
is deactivated, the alarm symbol < > will disappear.
10
ZoneGuard OWNER’S MANUAL
Snooze Function
When the alarm activates, press the <SNOOZE> button to
snooze for 5 minutes (the symbol <
> will appear in the
display). After 5 minutes, the unit will start to beep again.
Press the <
> button to turn off the Snooze function.
Listen to Weather Band
1. Turn on the radio, press <WB> button shortly to receive
the weather band. You can also press the <WB ALERT>
button (the first button on the left side of the unit)
shortly to enter standby mode to receive weather band.
The symbol <ALERT.WB> appears in the display if the
unit is in standby mode.
2. P ress the button < > or < > to select the weather
station(CH1-CH7 is available).
WB ALERT: Receiving alert in silent, no sound when not
receiving any messages.
11
ZoneGuard OWNER’S MANUAL
3. O nce receiving the weather information, the
<Warning Light> will be on and you can receive the
weather message in the display. If you press <ALERT
ON/OFF> button shortly, the alarm beep will be off
but you can still receive the message in the display.
4. P ress < > or < > shortly, you can read the received
4 messages. If there are not any weather information,
the LCD will display <NO MESSAGE>.
Setting Alert
1. In radio off mode, press <MENU> button shortly and
then press < > or < > to enter <ALERT – SIREN/
VOICE/DISPL> mode.
2. P ress < > or < > button, when the <SIREN/VOICE/
DISPL> flashes, then press < > or < > to select
<SIREN>, <VOICE> or <DISPL>.
3. Press the <MENU> button to confirm.
[VOICE]: T he alarm beep will play about a few seconds
and the LCD will display the message.
[SIREN]: T he alarm beep will play about 5 minutes and
the LCD will display the message.
[DISPL]: No alarm beep, just display the message in
the LCD when received a weather information.
12
ZoneGuard OWNER’S MANUAL
SELECT THE COUNTY
1. In the radio off mode, press <MENU> button and then
press < > or < > to enter to <COUNTY – ALL/SINGL/
MULTI> mode.
2. P ress < > or < > button with <ALL>, <SINGL> or
<MULTI> flashes, then press < > or < > button
repeatedly to select from the three.
Select <SINGL> if you want to enter a code for a single area.
Select <MULTI> if you want to enter mutiple codes for
different areas.
Select <ALL> if you do not know the local code.
3. P ress the < > or < > button to start inputting
county code.
4. P ress the < > or < > button to set first code digit.
5. Repeat step 3 and 4 until all other digits are set.
6. Press the <MENU> button to confirm and exit the menu.
13
ZoneGuard OWNER’S MANUAL
Setting Defeat
1. In radio off mode, press the <MENU> button, then
press the < > or < > button shortly to enter
<DEFEAT-SIREN> mode.
2. P ress the < > or < > button to make the alert
mode scroll in the display.
3. P ress the < > or < > button to switch from one
alert mode to another, carefully reading each other.
4. P
ress the < > or < > button to select enable
or disable.
5. Press the <MENU> button to confirm and exit.
ENABLE: Alert when receiving a message.
DISABLE: Displays the message on the LCD
when receiving a message.
14
ZoneGuard OWNER’S MANUAL
WARRANTY REGISTRATION
To ensure full warranty coverage or product updates,
registration of your product should be completed as soon
as possible after purchase or receipt.
Please go to http://www.etoncorp.com/productregistration
to register your product.
LIMITED WARRANTY
Retain the warranty information from your warranty
card with your proof of purchase or the Limited Warranty
information can also be viewed at www.etoncorp.com.
SERVICE FOR YOUR PRODUCT
To obtain service for your product, we recommend
first contacting an Etón service representative at
800-872-2228 US, 800-637-1648 Canada or
(650) 903-3866 for problem determination and troubleshooting. If further service is required, the technical staff
will instruct how to proceed based on whether the radio is
still under warranty or needs non-warranty service.
PRODUCT WARRANTY
Visit http://www.etoncorp.com/productregistration to
register your product and get warranty information.
WARRANTY
If your product is still in warranty and the Etón service
representative determines that warranty service is needed,
a return authorization will be issued and instructions for
shipment to an authorized warranty repair facility.
Do not ship your radio back without obtaining the return
authorization number.
NON-WARRANTY
If your product is no longer under warranty and requires
service our technical staff will refer you to the nearest
repair facility that will be able to best handle the repair.
For service outside of North America, please refer
to the distributor information included at time of
purchase/receipt.
15
Etón Corporation
Corporate Headquarters
1015 Corporation Way
Palo Alto, California 94303 USA
tel +1 650-903-3866
tel +1 800-872-2228
fax +1 650-903-3867
Etón Canada
5580 Explorer Drive, Suite 503
Mississauga, Ontario L4W 4Y1 Canada
tel +1 416-214-6885
www.etoncorp.com
Designed by Etón Corporation and assembled in China.
© Copyright 2012 Etón Corporation. All rights reserved.
v122012