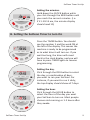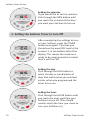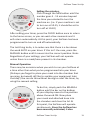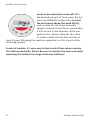
1
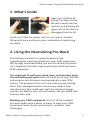
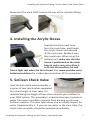
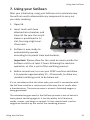
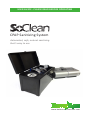
USER GUIDE - PLEASE READ BEFORE OPERATING
an
CPAP Sanitizing System
Automated, safe, natural sanitizing
that’s easy to use.
SOLUTIONS
www.betterrestsolutions.com
Thank you for your purchase of the SoClean CPAP sanitizing
system. We at Better Rest Solutions are committed to
providing innovative and safe methods that can improve
the health and well being of our customers. It is our hope
that the SoClean will do just that for you. Please familiarize
yourself with this manual, and the operation of the unit.
After a few easy steps, you’ll find that daily sanitizing of your
CPAP equipment has never been easier. This unique process
will completely eliminate bacteria, mold, viruses, and other
pathogens. It does all this by using gaseous activated oxygen
alone–no need for liquid sanitizers or messy preparations.
Please feel free to contact us with any questions or concerns
you might have.
Index & Technical Specifications
Technical Specifications.........................................................3
Safety....................................................................................4
1. What’s Inside ....................................................................5
2. Neutralizing Your Mask, Hose, and Reservoir.....................5
3. Installing the Injection Fitting.............................................6
4. Installing the Acrylic Sleeve...............................................7
5. SoClean Check Valve..........................................................7
6. Timer Set-Up.....................................................................8
7. Using Your SoClean.......................................................... 13
FAQ & Troubleshooting........................................................ 14
Warranty............................................................................. 15
Included with your SoClean:
1. Neutralizing pre-wash
2. SoClean filter (installed)
3. SoClean check valve (installed)
4. Acrylic sleeve
5. Injection fitting with hose
6. AC power adapter
Weight: 5 lbs
Dimension: 12.25”l x 6”w x 7”h
Cord Length: 4’ 8”
Electrical: 12 Vdc
Power consumption: 5 Watts
Warranty: 1 year warranty
Index & Technical Specifications
3
SoClean Safety
SAFETY
DANGER: Keep away from water sources including rain,
bathtubs, sinks and pools.
DANGER: Keep away from children. It is not a toy!
DANGER: Do not use in explosive air environments, near
gas vapors, or other flammables, etc.
DANGER: Do not place any items on top of SoClean
Unit, particularly flammables or ignitable items.
DANGER: Never place any living thing (including pets)
inside.
WARNING: Do not dismantle the SoClean unit.
WARNING: Do not run the SoClean for more than 30
minutes consecutively.
WARNING: Please be aware that there are sensitive
electronics inside the SoClean. If you need to clean your
SoClean, wipe with a damp cloth. Do not submerge your
SoClean or use any chemical cleaners to clean out the
inside of the SoClean chamber.
4
SoClean Safety
What’s Inside / Using the Neutralizing Pre-Wash
1. What’s Inside
Open your SoClean by
pulling the lower end of
the latch away from the
machine and allowing the
upper half of the latch to
disengage from the lid.
Inside you’ll find the power cord, acrylic sleeve, injection
fitting with hose and check valve, and bottle of neutralizing
pre-wash.
2. Using the Neutralizing Pre-Wash
The SoClean pre-wash is a special fragrance-free
hypoallergenic cleansing solution for your CPAP equipment.
We strongly recommend that you use the SoClean pre-wash
(or a fragrance-free dish soap) anytime you hand wash your
CPAP equipment.
It is important to wash your mask, hose, and reservoir using
the neutralizing pre-wash before the first use of your SoClean
and anytime you introduce new equipment to your CPAP
system. The purpose of this is to neutralize any pre-existing
odors from detergents and to remove any residue from
manufacturing that could react with the activated oxygen.
Use the pre-wash in your sink with water, like you would with
ordinary dish soap.
Washing your CPAP equipment: Use 1/4 of the included
pre-wash bottle with a gallon of water to wash your CPAP
equipment (mask, hose, and reservoir), and then rinse
thoroughly.
What’s Inside / Using the Neutralizing Pre-Wash
5
Installing the Injection Fitting
3. Installing the Injection Fitting
Disconnect the main hose from
the reservoir of your CPAP
machine. Position the injection
fitting onto the port of your
reservoir, allowing the smaller
hose to enter into and rest on
or near the bottom of the reservoir. It may be necessary to trim
off some of this smaller hose
to achieve the best fit. If you
experience difficulty inserting
the small hose into the reservoir,
please visit www.youtube.com/
betterrestsolutions to see how
this can be done with a number
of different style humidifiers.
If you are currently not using a
humidifier, remove this short
length of hose by pulling it
straight off, then attach the
fitting directly to the port on
your CPAP machine. (see next
page)
6
Installing the Injection Fitting
Installing the Injection Fitting, Acrylic Sleeve, and Check Valve
Reconnect the main CPAP hose to the top of the injection fitting.
4. Installing the Acrylic Sleeve
Separate the face mask hose
from the main hose, and thread
the acrylic sleeve onto the end
of the main hose. Reattach your
face mask hose. When using the
SoClean unit, make sure that the
sleeve is positioned on the main
hose in such a way as to allow it
to fit into the machine slot and
form a tight seal when the lid is closed. Visit www.youtube.com/
betterrestsolutions for a video demonstration of this procedure.
5. SoClean Check Valve
Your SoClean check valve assembly is
a series of two check valves separated
by a short length of clear tube. It is
installed along the length of hose that connects your SoClean to
your CPAP system. This assembly is important because it prevents
water from your humidifier reservoir from backing up into your
SoClean machine. The clear tube allows you to visually inspect for
water trapped within it. If you can see water in the clear tube, the
check valve assembly should be replaced immediately.
Installing the Injection Fitting, Acrylic Sleeve, and Check Valve
7
SoClean Timer Set-Up
6. Setting your SoClean timer
Visit www.youtube.com/BetterRestSolutions for video
demonstrations on how to set your SoClean timer.
Your SoClean timer will allow you to completely automate your
daily cleaning. Setting it to run for a duration of 5 - 10 minutes
should be enough to completely sanitize your equipment.
You can increase or decrease that duration depending upon
your needs. Please allow for your mask to remain inside the
SoClean unit for at least 2 hours following the machine’s
operation, as this is part of the sanitizing process.
12:00 AM–00:00 hrs
1:00 AM –01:00 hrs
2:00 AM –02:00 hrs
3:00 AM –03:00 hrs
4:00 AM –04:00 hrs
5:00 AM –05:00 hrs
6:00 AM –06:00 hrs
7:00 AM –07:00 hrs
8:00 AM –08:00 hrs
9:00 AM –09:00 hrs
10:00 AM–10:00 hrs
11:00 AM–11:00 hrs
12:00 PM –12:00 hrs
1:00 PM –13:00 hrs
2:00 PM –14:00 hrs
3:00 PM –15:00 hrs
4:00 PM –16:00 hrs
5:00 PM –17:00 hrs
6:00 PM –18:00 hrs
7:00 PM –19:00 hrs
8:00 PM –20:00 hrs
9:00 PM –21:00 hrs
10:00 PM–22:00 hrs
11:00 PM–23:00 hrs
A. Setting the Clock to your Local Day and Time
ON
ON
AUTO
OFF
CK
MI
N
O
CL
TIM
UR
ER
DAY
ON
ON
AUTO
HO
OFF
P
MI
OC
N
CL
MANUAL
K
TIM
ER
8
P
MANUAL
UR
DAY
HO
Setting the day.
Hold down the CLOCK button while
you click through the DAY button until
you reach the current day. (i.e. if it’s
Wednesday, the display should show
We at the top)
Setting the hour.
Hold down the CLOCK button while
you click through the HOUR button
until you reach the current hour. (i.e. if
it’s 10:15 am, the hour display should
read 10)
SoClean Timer Set-Up
SoClean Timer Set-Up
ON
ON
AUTO
OFF
P
MI
N
OC
CL
MANUAL
K
TIM
UR
ER
DAY
Setting the minutes.
Hold down the CLOCK button while
you click through the MIN button until
you reach the current minutes. (i.e.
if it’s 10:15 am, the minute display
should read 15)
HO
B. Setting the SoClean Timer to turn On
ON
ON
ON
AUTO
OFF
P
MI
OC
N
CL
MANUAL
K
TIM
UR
ER
DAY
HO
ON
ON
ON
AUTO
OFF
P
MI
K
OC
N
CL
MANUAL
TIM
UR
ER
DAY
HO
ON
ON
ON
AUTO
OFF
P
MI
OC
N
CL
MANUAL
Press the TIMER button. You should
see the number 1 and the word ON at
the left of the display. This means the
machine is ready to be programmed
as to what time it will turn on. If you
wait too long, the timer will revert
back to the clock display, and you will
have to press TIMER again to resume
programming.
Setting the day.
Click through the DAY button to select
the day, or combination of days,
you want to run your SoClean. For
instance, if you want to run it daily,
the top display should show all 7 days.
Setting the hour.
Click through the HOUR button to
select the hour of the day you want
your SoClean to turn on. Most people
choose mid-morning or 1-2 hours after
they awake.
K
TIM
ER
UR
DAY
HO
SoClean Timer Set-Up
9
SoClean Timer Set-Up
ON
ON
ON
AUTO
OFF
P
MI
N
OC
CL
MANUAL
K
TIM
Setting the minutes.
If you would like to set the minutes,
click through the MIN button until
you reach the minutes of the hour
you want your SoClean to turn on.
UR
ER
DAY
HO
C. Setting the SoClean Timer to turn Off
OFF
ON
ON
AUTO
OFF
P
MI
OC
N
CL
MANUAL
K
TIM
UR
ER
DAY
HO
OFF
ON
ON
AUTO
OFF
P
MI
K
OC
N
CL
MANUAL
TIM
UR
ER
DAY
HO
OFF
ON
ON
AUTO
OFF
MI
OC
N
CL
K
TIM
ER
10
P
MANUAL
UR
DAY
HO
After completing the settings to turn
on your SoClean, press the TIMER
button once again. This time you
should see the word OFF next to the
number 1, at the bottom left of the
display. This means the machine is
ready to be programmed as to what
time it will turn off.
Setting the day.
Click through the DAY button to
select the day or combination of
days that match what you selected
earlier, when you programmed the
timer to turn on.
Setting the hour.
Click through the HOUR button until
you reach the hour you’d like your
SoClean to turn off. (This should
usually match the hour you chose to
turn your SoClean on.)
SoClean Timer Set-Up
SoClean Timer Set-Up
OFF
ON
ON
AUTO
OFF
P
MI
N
OC
CL
MANUAL
K
TIM
UR
ER
DAY
HO
Setting the minutes.
Click through the MIN button until the
number goes 5 - 15 minutes beyond
the time you selected to turn the
machine on. (i.e. if your machine is set
to turn on at 10:15, it should be set to
turn off at 10:20)
After setting your timer, press the CLOCK button once to return
to the home screen, or you can wait a few moments and it
will return automatically. At this point, your SoClean has been
programmed to turn on and off automatically.
The last thing to do, is to make sure that there is a bar above
the word AUTO on your timer. If this isn’t the case, press the
MANUAL button until it moves into the correct position. Note:
Regardless of your settings, your SoClean will not operate
unless there is a mask/hose present in its chamber.
Manual Operation
There may be occasions when you wish to run your SoClean at
a time other than what you’ve programmed into your timer.
(Perhaps you forgot to place your mask into the chamber that
morning, but would still like to sanitize your equipment later
that day.) You can do this without having to reset the timer, by
using the manual setting.
ON
ON
AUTO
OFF
P
MI
OC
N
CL
MANUAL
K
TIM
ER
UR
DAY
HO
To do this, simply push the MANUAL
button until the bar on the bottom
of your display moves to the position
above the word ON. Now place
your mask and attached hose into
the chamber and close the lid. At
this point, the SoClean will operate
continuously. Since the SoClean has
been manually activated, it also
SoClean Timer Set-Up
11
SoClean Timer Set-Up
needs to be manually turned off. After
the desired amount of time, open the lid,
press the MANUAL button once (so that
the bar moves above the word AUTO),
ON AUTO OFF
and re-close the lid. Since activated
ON
P
oxygen is heavier than the air we breathe,
it will remain in the chamber while you
perform this. Please allow for the mask
to remain inside the SoClean unit for at
least 2 hours following the machine operation, as this is part of the
sanitizing process.
MI
N
OC
CL
MANUAL
K
TIM
ER
UR
DAY
HO
A note of caution: It’s very easy to lose track of time when running
the SoClean manually. Please be sure to monitor the time and avoid
operating the SoClean for longer than one-half hour.
12
SoClean Timer Set-Up
Using Your SoClean
7. Using your SoClean
After your initial setup, using your SoClean unit is extremely easy.
You will not need to disassemble any components to carry out
your daily sanitizing.
1. Open lid.
2. Insert mask with hose
attached into chamber, and
close lid. Be sure the acrylic
sleeve is positioned in its
slot, forming a tight seal.
Close latch.
3. SoClean is now ready to
automatically operate
according to its preset time and duration.
Important: Please allow for the mask to remain inside the
SoClean unit for at least 2 hours following the machine
operation, as this is part of the sanitizing process.
4. Before normal use, turn on your CPAP machine and allow
it to operate approximately 15 - 20 seconds, to allow any
residual sanitizing scent to be blown out.
It’s no coincidence that the clean odor you smell in connection with
the SoClean machine is reminiscent of the way the air smells after
a thunderstorm. The same process is at work: Activated oxygen is
being generated.
The activated oxygen used in the SoClean process is one of nature’s
most potent sanitizing agents. It has the ability to kill bacteria,
molds, viruses, and fungi on contact. It then reverts back into the
oxygen we breathe by the end of the sanitizing process.
Using Your SoClean
13
FAQ & Troubleshooting
FAQ & Troubleshooting
1. Will my CPAP equipment be wet from the SoClean?
No. The SoClean uses no fluids in its operation. It sanitizes with gaseous activated
oxygen. No harsh fluids or water are used in this process.
2. Is the SoClean harmful to me or the environment?
No. The powerful sanitizing agent used by the SoClean never reaches the outside
environment. It is generated and contained safely within the SoClean system, and is
converted back into the air we breathe when it is released.
3. How do I know that my SoClean is truly sanitizing?
After sanitizing, your equipment will carry a light, clean scent. Some have described
it as a mild bleach odor. This scent indicates that your equipment has been
sanitized.
4. What if the scent the SoClean leaves is too strong for me?
If you have already treated your equipment with the Neutralizing Pre-Wash, and still
feel that the scent is too strong, there are a number of things you can do: (1) Before
donning your mask at bedtime, run your CPAP for 20 seconds to allow any residual
scent to be expelled. (2) Set the timer so that treatments take place earlier in the
day, allowing any residual scent to dissipate by nighttime. (3) Reduce the treatment
duration time. Using your SoClean manual, you can cut back to as little as 5 minutes
and still receive effective sanitizing. (4) Sanitize your equipment every other day
instead of daily.
5. How long is too long to run my SoClean?
Five to ten minutes should be enough to completely sanitize your equipment.
Anything beyond that is likely unnecessary. The SoClean should never be set to run
for longer than 30 minutes, with at least a 30 minute cool-down.
6. Are there materials that I should avoid putting into the SoClean?
Nylon and natural rubber break down when exposed to activated oxygen.
Mainstream manufacturers typically do not use these materials in their reservoirs,
hoses, or headgear.
For further questions or concerns, please feel free to contact our technical support
group at 866-501-3705, between the hours of 9:00 a.m and 5:00 p.m (EST),
Monday through Friday.
14
FAQ & Troubleshooting
SoClean Warranty
Inceptus, Inc. (DBA Better Rest Solutions) warrants this product under a one (1) year
limited warranty for defects in manufacture or workmanship. DO NOT RETURN THIS
ITEM TO PLACE OF PURCHASE.
For all warranty issues, a Return Authorization number and Proof of Purchase is
required, please contact Better Rest Solutions at www.betterrestsolutions.com.
The return shipping cost is the responsibility of the customer; therefore, returned
products must be shipped prepaid and insured. CODs are not accepted. Original
shipping fees are non-refundable. Products repaired or replaced under warranty will
not incur reshipping charges. Under this warranty, the sole remedy shall be repair,
exchange, or replacement at Better Rest Solutions discretion.
This warranty does not cover any charges for labor, downtime, or any other
consequential or incidental damages resulting from the sale, use or improper
functioning of the product. The warranty does not cover product failures due to
misuse, abuse, improper maintenance, normal wear and tear, typical required
periodic replacement products, or circumstances beyond the control of Better Rest
Solutions.
LIMITATION DAMAGES: BETTER REST SOLUTIONS SHALL NOT BE LIABLE FOR ANY
INCIDENTAL OR CONSEQUENTIAL DAMAGES FOR BREACH OF ANY EXPRESS OR
IMPLIED WARRANTY ON THIS PRODUCT.
EVERY EFFORT HAS BEEN MADE TO INSURE THE COMPLETE ACCURACY OF THE
CONTENTS OF THIS MANUAL. NO LIABILITY ARISING FROM ITS USE, HOWEVER,
CAN BE ACCEPTED BY THE COMPANY, WHO RESERVES THE RIGHT, WITHOUT PRIOR
NOTICE, TO ALTER THE SPECIFICATIONS, CONSTRUCTION, OR CONTENT OF ITS
EQUIPMENT AT THE COMPANY’S OWN DISCRETION.
Required Disclaimer: This product or statements have not been evaluated or endorsed by the Federal
Food and Drug Administration. This product and publication is not intended to diagnose, treat, cure or
prevent any disease or medical condition. It is not intended to be a substitute for informed medical advice
or care. Always consult a physician before beginning therapy of any kind, especially if pregnant or nursing.
The information provided herein should not be construed as health-care diagnosis, treatment regimen or
any other prescribed health-care advice or instruction. You should consult your health care professional
for individual guidance for specific health problems. Persons with serious medical conditions should
seek professional care. Pregnant women should consult with their health-care professional before using
this product. No medical claims are intended or implied in conjunction with the sale of this product. The
purchaser accepts full responsibility for the safe and proper use of this product. The degree of benefits
derived from the use of this product may vary with each individual. No action should be taken based solely
on the content of this information provided herein.
SoClean Warranty
15
EDUCATIONAL USER GUIDE & INSTRUCTION BOOKLET
For more information about
SoClean - CPAP Sanitizing Equipment
or our other innovative products please visit
www.betterrestsolutions.com
Copyright © 2011-2013 www.betterrestsolutions.com
is a division of Inceptus, Inc.
SoCleanTM is a trademark of Inceptus, Inc.
Uxbridge, MA 01569-2001
Edition 05/09/13