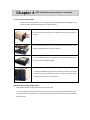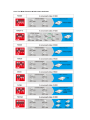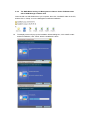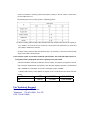
1
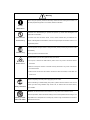
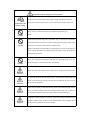
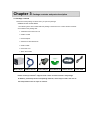
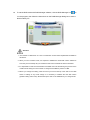
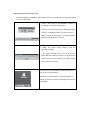
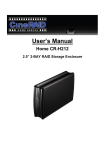
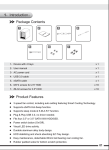
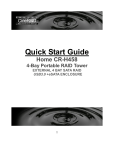
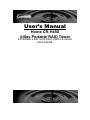
User’s Manual
Home CR-H458
4-Bay Portable RAID Tower
EXTERNAL 4 BAY SATA RAID USB3.0 & eSATA
ENCLOSURE
Table of contents
Chapter 1 Read Me First .................................................................................. 3
1-1 About this manual ............................................................................ 3
1-2 Notices ............................................................................................ 3
1-3 The policy of software and an attention matter of a manual ............. 6
Chapter 2 Introduction ..................................................................................... 7
2-1 Introduction ..................................................................................... 7
2-2 Specifications .................................................................................. 7
2-3 System requirements ....................................................................... 8
Chapter 3 Package contents and parts description .......................................... 9
3-1 Package contents ............................................................................ 9
3-2 Parts description .............................................................................. 9
Chapter 4 HDD installation and setup of a hard disk ..................................... 11
4-1 To install the Hard disks ................................................................. 11
4-2 The setting of DIP mode switch ..................................................... 11
4-2-1 The Mode function & DIP switch definition……………………13
4-2-2 HDD Power Setting………...................................………….….14
4-2-3 RAID Mode setting via RAID Manager Software………….….15
Chapter 5 Initialization and formatting the hard disk ..................................... 17
5-1 Initialization in Windows 2000 / XP / 7 ........................................... 17
5-2 Initialization in Windows ME / 98SE ............................................... 17
5-3 Initialization in Mac OS X ............................................................... 17
Chapter 6 How to use this product ................................................................. 18
6-1 Using the USB 4X HDD ................................................................. 18
6-2 Basics operation ............................................................................ 18
Chapter 7 Trouble Shooting ........................................................................... 20
Chapter 1
Read me first
1-1 About this Manual
Thank you very much for your purchasing of CineRAID Home CR-H458, the ”EXTERNAL 4
BAY SATA RAID to USB 3.0 & eSATA CASE”
• This manual describe the complete details and operating instruction of this
products. Please read the manual before using the product.
• We reserve the right of any change in the specifications without notice.
1-2 Notice
■ Please! use this product safely
○ Please read the below notes before starting.
○ Please keep this manual in a place you can reach at any time when using the unit.
■ Safety Notices
○ Before use of this device, be sure to check the following items.
A warning describes information you need to avoid possible personal injury or
damage to equipment or data.
An attention describes information you need to pay attention to avoid
possible personal injury or damage to equipment or data.
A warming or attention mark
A mark of an act of prohibition.
A mark describes information you must do to avoid possible personal injury or
damage to equipment or data.
Warning
When using this product, please be absolutely careful about the warning that a maker of a
PC and peripheral equipment of use orders, attention indication.
Strictly
observance
Prohibited from disassembling or repaired this product by oneself and disintegrate, and
please do not remodel it.
Prohibited from
If caused a fire and an electric shock, a burn, trouble. Please! Ask your distributor for
disassembling
repair. If disintegrate and remodeled it, there are charged repair and situation even if it is in
a guarantee period.
If smoke appears strange smells or strange sounds, please pull the plug out of the outlet
immediately.
Pull the plug
This may cause fire or electric shock.
Please! Follow up on this user guide to setup your device.
* Do not pull, or bend on the USB cable or power cord. It may cause a fire and/or fault of
Notice of fire
the device.
* Make sure the power cable is connected correctly otherwise it may cause a fire and/or
fault of the device.
* Please never connect the LAN cable to the device. When connected, a LAN cable can
cause a fire.
Please completely insert the power supply plug into an outlet.
When assembling or disassembling this product, please read the method in this manual
before you start. Doing otherwise may cause a fire, an electric shock or device fault by
Strictly observance
your mistake.
Please do not use the device in the bathroom. It may cause a fire or electric shock.
After transportation, wait till the device setting to the room temperature before using it. The
Strictly prohibit
Paint with water
large difference in temperature or humidity may cause a tough condensation and cause an
electrical short circuit.
An attention matter on having you use this product
Please connect a power supply outlet to a power supply outlet directly if possible.
Prohibit from foot
At AC power core foot wiring housing, if use of several outlet possibly causing a fire.
wiring housing
Do not cover your 4XSATA enclosure, this could lead to overheating your
Prohibit
device.
Please keep the device away from a place that is easy to cause shock and vibration.
Please keep the device away from a place with high temperature, high humidity and/or
Prohibit
high dust. Do not expose the drive to direct sunlight or heat.
Make sure the device is located at least one meter away from sources of high frequency
and/or magnetic disturbance (TV, Speaker, Mobile phone etc) in order to avoid data loss
and operational problems.
Do not turn off the device or unplug the USB cable when the access LEDs are on, also,
Prohibit
do not reset the PC. This will cause trouble, and data loss
Do not let children play with the device. Children cannot recognize the possible danger.
Attention
Do not cover the device with any other things, it will disable the cooling system and
cause a temp increase of the HDD. This will cause the HDD fail. Be sure to use the
Attention
device at room temperature.
Every time you update your data make back-up copies on the external storage medium.
We do not assume liability for data loss or damage to data storage unit, no claims can
Attention
be accepted for damages resulting from loss of data or consequential losses.
Please do not install software in this product. There is the situation that software (word
processor software, game software) cannot take advantage of why a program carried
Attention
out at the time of OS start is not found in normally.
1-3 The policy of software and the information of this manual
♦ The policy of software program
Please keep this manual as the proof of license agreement of this product (we say” a license
agreement” including a program manual or other attachment documents) and agree to be used as
copyright requirement.
1. Please read the software licensed agreement and use the software with copyright with the
computer which is owned by you.
2. Copy and reproduce a software with copyright is prohibited.
3. The software license can not be used by another person by any method.
4. It is not allowed to modify software without our permission.
5. It is not allowed to rent the software to any one.
6. We do not assume liability for data loss or damage to data storage unit, and no claims can be
accepted for damages resulting from loss of data or consequential losses that you use the
copied software.
7. The customer service will be acceptable with above items.
8. It is against the copyright laws if you against any items of 1 to 6.
♦ An attention for this manual
1. The information in this manual is subject to change without notice.
2. Please notify us if there have any errors in this manual.
3. While reasonable efforts have been made in the preparation of this document to assure
its accuracy, we assume no liability resulting from errors or omissions in this document, or
from the use of the information contained.
* Microsoft is a registered trademark of Microsoft Corporation.
MS DOS, Windows Me, Windows 2000 and the Windows XP logo are trademarks of Microsoft
Corporation.
* Macintosh and Mac OS are registered trademarks of Apple Computer, Inc.
* In addition, a company name / product name mentioned in this book is a trademark of the companies
or a registered trademark.
* As for this book, a right such as a copyright is protected by “Copyright Act”.
Chapter 2
Introduction
2-1 Introduction
CineRAID Home CR-H458 supports maximum 4 SATA HDD with RAID & JBOD functions, and the
latest USB 3.0 technology, the data transfer rate up to 5Gb/s; eSATA data transfer rate up to 3Gb/s.
It is desirable to be able to use all the disks as if they were one single volume (cf. # P.16). There
are 7 RAID modes for max 4 hard disks - the RAID 0, 1, 3, 5, 10 and JBOD which can combine 4
drives into one larger logical volume for the data safety. A RAID system is an ideal tool to secure
valuable data. Supports the SATA Port Multiplier function, it works without any express card to
read the multi bay SATA enclosure.
Notice # 1:
When connecting one volume or combined volume of more than 137GB, the version
of OS needs to be the Windows 2000 SP-3/Windows XP SP-1 or later. In Windows 98SE/ME, you
can not make one volume (a partition) more than 137GB or more than 137GB at “a combine
mode”.
2-2 Specifications
■ Dimension
L229 x W165 x H165 mm (9” x 6.5” x 6.5”)
■ Weight
3.0 KGs or 8.1 lbs (Doesn’t include the Hard Disk)
■ Interface
z
Host Interface: USB 3.0 , eSATA
z
HDD Device: SATA I/II
■ Power supply specifications
AC IN:
100V - 240V
DC OUT: +12V 5.0A (maximum)
It may not work normally, if power consumption over than the above standard.
■ Operating Environment
Temperature 41 °C - 95 °F
Humidity 20% - 80% (a thing without dew condensation)
2-3 System requirements
■ Support OS
IBM PC/AT compatible machine (including the NEC PC-98NX series) with USB2.0 or
USB1.1 / SATA I or SATAII interface.
The following series (only a model released in after March, 2001 of the PowerPC
deployment copes) of Apple Macintosh
* PowerMac G4/G5, PowerBookG4, i-Book, e-Mac, each model of Mac mini.
* Recommend what is used in an USB3.0 equipment model.
<Attention>
•
The below model may not work normal so that there is a possibility it does not support the
updated model(s) of machines.
o
The DynaBook PORTAGE, Satellite series (a thing of the K6 CPU deployment) made
by Toshiba
o
Aptiva E series (a thing of the AMD K6 CPU deployment) made by IBM, The e-note
M260 series made by SOTEC.
•
3566/3567/3576/3581/ 3590 which made by HP/COMPAQ.
•
It is not guaranteed of compatibility in all environments.
•
There is the case assume that specific machinery, affinity with software are out of support.
■ Interface
HDD Device: SATA I/II interface
* Host(include Apple Mac series): USB3.0 interface or eSATA interface
■ The Operating System
Windows7/ Windows Vista / XP Home Edition SP-1/Professional SP-1 /Windows 2000
Professional SP-3 , Windows Me and Windows 98SE or later version. (# 1, 2, 3)
After Apple Mac OS X 10.3 (recommended in 10.3.9 or 10.4 latest edition)
#1. Not applicable to use one volume more than 137GB or 137GB at “combine mode” in
Windows ME / 98SE.
#2. It is not guaranteed that works with Windows 98(a first edition).
The LBA(Logical Block Addressing) of IDE interface compatible with 3.5” and 2.5” Hard disks
(Need Optional 2.5” to 3.5” Adapter)
Notice: This product can not work with power source from USB bus power only. Please
connect the attached power supply cord by all means.
Chapter 3 Package contents and parts description
3-1 Package contents
Please check the package contents when you open the package.
■ Please check content below
The following items are included with this package. Please check to confirm whether all items
are included in the package first.
1. CineRAID Home 458 main unit
2. USB 3.0 Cable
3. Power Adapter
4. Software & User Manual CD
5. eSATA Cable
6. AC Power cord
7. Quick Start Guide
Main body X1
USB3.0 cable X1
Power Adapter
User Manual CD
eSATA cable X1
Power Cord
Please contact your dealer’s support center if there are items missed in the package.
In addition, please keep the box and packing materials, which may be used in the case of
the transportation such as repair or removal.
3-2 Parts description
1) USB/eSATA LED: to indicate the status of the connected interface ( USB 3.0 / eSATA).
2) Power switch: to turn ON/OFF the device.
3) HDD Tray: The Hard Drive Tray without screws
4) HDD status LED: to indicate the status of HDD access.
5) Reset: pls. press Reset button when change any kind of the mode.
6) Mode Setting DIP S/W: to set the RAID mode;
more details the Chapter 4-2.
7) eSATA connector: connect CR-H458 to an eSATA port of PC with attached eSATA cable.
8) USB 3.0 connector: Connect CR-H458 to an USB 3.0 port of PC with attached USB3.0 cable.
9) HDD Power S/W: to turn on/off the installed hard drives; more details in Chapter 4-2
10) Power connector: Connect CR-H458 to AC outlet for family outlet with attached power
adapter & cable.
(Note 1): Because there is a high heating possibility of Hard Disk. Please to confirm the
fan an the back side is in good condition.
Chapter 4 HDD installation and setting of a hard disk
4-1 To install the Hard disks
Please remove the plug from the power supply outlet before assembling the hard disk, it will
cause an electric shock and/or damage if not disconnected.
1. Press 2 blue door latches inward to release the tray lock, then pull out
the tray.
2. Put the HDD on the tray and make sure the HDD screw holes on the
bottom are aligned to the 4 posts on the tray.
3. Lock the HDD in the tray by pressing the side plate onto each side of
the tray, and connect with the HDD.
4. Slide the installed trays back to the enclosure, a click sound is heard
to confirm the tray is locked in the enclosure. Then connect the eSATA
or USB 3.0 cable and turn ON the device
4-2 The setting of DIP mode switch
First, please relocate the DIP switch at rear side of the case.
A, To reset all RAID modes, please set every DIP SW at OFF position then hold reset button and
turn ON the power of enclosure, then shut down the device and release reset button to complete
the mode reset.
B. To set the DIP switch to a new RAID mode, please follow the mode chart as below, press the
RESET button and hold it, turn on the box and keep hold reset button for 15sec.
DIP switch code(from left to right) “DIP switch 1”, “DIP switch 2” and “DIP switch 3” “DIP switch 4”.
Reset: please press and hold for 15 seconds RESET button when change any RAID mode.
ITEM
S/W 1
S/W2
S/W3
S/W4
MODE
1
OFF
ON
ON
ON
RAID0
2
OFF
ON
ON
OFF
RAID1/RAID10
3
OFF
ON
OFF
OFF
RAID3
4
OFF
OFF
ON
OFF
RAID5
5
OFF
OFF
ON
ON
CLONE
6
OFF
ON
OFF
ON
LARGE
7
OFF
OFF
OFF
OFF
NORMAL
4-2-1 The Mode Function & DIP switch definition
4-2-2 The HDD Power setting.
The HDD Power setting DIP S/W on the rear side can set the power connection of each individual HDD
installed in CR-H458, the HDD Power setting provides excellent protection the HDD which is not working.
Each DIP switch controls each of 4 HDD trays, the order of dip switch and HDD are as below.
Attention
1. “The number of HDD which show on a PC” is combination number when implemented 4X
HDDs to this device.
2. When you use a combine mode, it is required to initialize the virtual disk volume. Please be
careful because it is erased entirely.
3. It is impossible to read internal data of the HDD which is working in combine mode change to
normal mode or change the installation position of HDD.
4. Before you change the setting mode, make sure that you have backup the data of the HDD
which is working at any change of mode. It is necessary to initialization the new disk volume
(partition setting and Format). Please backup the data of HDD before you change mode.
4-2-2
The RAID Mode Setting via Management software. Home CR-H458 comes
with a RAID Manager software disk.
Insert the CD onto CD-ROM drive of you computer, then click “CineRAID” folder in the CD,
double click on “Setup” to run the Management software installation:
z
The display screen will pop up the Installation Wizard dialog box, click “Install” to start
software installation; click “Finish” after the installation is done
z
To set the RAID mode with RAID Manager software, click the RAID Manager icon
to
run the program, then follow the instructions on the RAID Manager dialog box to set the
RAID mode by PC
Attention
1. “The number of HDD shown on a PC” is combination number when implemented 4X HDDs to
this device.
2. When you use a combine mode, it is required to initialize the virtual disk volume. Please be
sure that you have backup all your old data as this action will erase the data in the HDDs.
3. It is impossible to read The internal data of the HDD cannot be read during the process of the
combine mode change to normal mode or change the installation position of HDD.
4. Before you change the setting, make sure that you have a backup of the data on the HDD
which is working at any mode change. It is necessary to initialize the new disk volume
(partition setting and Format). Please backup the data on the HDD before you change mode.
Chapter 5 Initialization and formatting the hard disk
5-1 Initialization in Windows 2000 / XP/ Vista /WIN7
CAUTION! Partitioning and formatting a disk drive will delete the data in the HDD. We assume NO
responsibility for your data lost if without a backup before your proceed Partitioning and formatting.
You must be logged on as an administrator or a member of the Administrators group in order to
initialize a hard disk on the system of WINDOWS 2000/XP/VISTA/WIN7 OS
With Windows 2000/XP/VISTA/WIN7 use the “Disk Management” program to install your disk.
This program is located in “Computer Management”.
Windows can support a disk volume at FAT32 over 32GB, but the format utility cannot format the
disk volume over 32GB. If you want to format a disk volume at FAT32 mode over 32GB then you
need the third party’s utility to format the disk volume. Like the “Partition Magic” from
“Power
Quest”.
5-2 Initialization in Windows ME / 98SE
Execute the “FDISK” program at the “MS-DOS” prompt to initialize and format the USB 4XHDD in
Windows ME/ 98 SE environment.
For addition, please refer to a help file of Windows.
# Under Windows 98SE/Me you cannot format a disk volume over 32GB under Windows 98SE/Me
user use FDISK (Under DOS). FDISK does not support over 137GB HDD. You need the third
party’s utility to format a disk volume over 32GB on windows Me and 98.
5-3 An initialization procedure in Mac OS X
Execute “Disk Utility” to initialize an individual disk. Please initialize the disk volume with “Mac
OS expansion”!
# Normal mode Initialization
The very first time you use the USB 4X HDD in normal mode, Mac only shows the master HDD,
you will need to execute the “Disk Utility” to partition the slave HDD.
Chapter 6 How to use this product
6-1 Using the USB 4X HDD
In WINDOWS, hot swapping is allowed with some limits. To avoid system failure, always follow the
steps below to hot UN-PLUG your USB3.0 device in Windows.
6-2 Basics operation
■ Connect to a PC
1. Start your computer and wait until the OS has been loaded.
2. Please connect the USB cable from the device to PC’s USB port.
3. Connect the power cord from the USB 4X HDD device t to the outlet of theAC power and turn
ON the enclosure. You can see the “Power LED” is ON, and the IDE0 and IDE1 LED will be
turn on to off after the HDDs is ready.
Note: Make sure the PC is turn on now otherwise the device will not turn on until the PC is
started.
■Disconnect the enclosure from a PC
Before disconnecting the USB 4X HDD enclosure from the PC please follow the following steps to
remove the USB cable.
1. Click on the “Unplug or eject hardware” indicator on
the task bar in computer screen display.
2. Click on the command bar “Stop USB Mass Storage
-Drive(F:)” to disable the device you wish to remove.
Please! Check the drive letter to be disconnected if
there are multiple devices connected
3.
When
the
screen
prompt
appears,
read
the
instructions carefully.
If the system indicates that you not to remove the
device, DO NOT remove the device. You should exit the
present program which accesses your USB 4X HDD
device and return to Step 1.
For Mac PC is you must drag the “USB 4X HDD” icon to
the “Trash” to eject the device.
Otherwise, a “Device Removal” warming message icon
will pop up to warm you that the data might have been lost
or damaged.
Chapter 7 Trouble Shooting
■ the RAID device is not recognized when connect to a computer. Or the RAID device
does not work well.
○ Check the status and connection of the power switch and the power supply outlet.
○ Check whether the connection of the USB 3.0 cable is firmly connected.
○ Check the jumper of each hard disk which is set correctly.
○ Check if each HDD is well installed in the enclosure.
○ Check device driver is installed for your OS.
○ Please check the OS limitation of filing system and partition capacity vs. what you are using.
■ “A disk management” screen cannot start in Windows 2000/XP.
○ You must be logged on as an administrator or a member of the Administrators group in order to
initialize hard disk at the system of WINDOWS 2000/XP.
■ Transfer speed is slow even if I have access to USB.
○ Check whether the USB port is working in USB3.0 mode.
○ Check whether it is connected to a port of USB1.1./ 2.0 / 3.0
○ If you are using a USB HUB to PC, please confirm that HUB is a USB3.0 HUB.
○ When other USB device are connected to the PC at same time, it might slow down the transfer
speed at the USB3.0 port; Please remove other USB device(s) from the computer.
○ Check whether you use an USB cable that comes with this product.
■ Cannot use this product by specific software (a disk tool and backup software).
○ Specific software (Note1), cannot use this product.
Please use other software whether that case uses a hard disk of the normal deployment for a
PC.
Note1: About specifications of software, please check with software vender for detail.
■ Windows does not start when start this product was connected, Or it hangs up on
PC starting process.
■ In Windows 98 SE and Mac OS cannot recognize HDD’s which were already
formatted on Windows 2000 / XP.
○ There is a limitation to the filing system and partition capacity of the OS. Please confirm which
OS is installed in the PC.
The following lists show you filing system of Operating System.
#1.When formatting USB 4X HDD in Microsoft Windows with FAT32 format, limit of the capacity is
up to 32GB. If you need to use one volume at FAT32 format over 32GB then you need third
part’s utility to initialize and format it.
#2.When sharing USB 4X HDD with Windows OS, it is necessary to format the USB 4X HDD
within FA32 format in Windows side
■ The volume space is less then hard disk specification, the hard disk space that it is
recognized, and is displayed less than capacity of the hard disk.
○ Because calculation methods are different, there is a little it, and capacity recognized on the OS
after a format is displayed than real capacity. This calculates capacity indication of a hard disk at
1GB =1000MB, but a calculation on the OS is calculated at 1GB =1024MB.
Following table shows you the different of capacity of the 1.2 TB volume size, before and after
format.
HardDisk
1.2TB
1,200GB
1,200,000MB
OS
1.09TB
1,117GB
1,144,409MB
For Technical Support
Email: [email protected]
Telephone: 714-961-0800 Ext.107
FAX: 714-961-0899