1
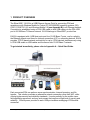
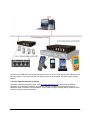
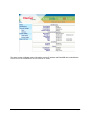
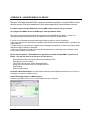
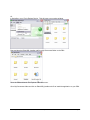
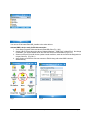
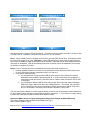
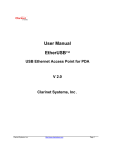
User Manual
EtherUSB™
USB Ethernet Access Point for PDA
V 1.6
Clarinet Systems, Inc.
Clarinet Systems, Inc.
//www.clarinetsys.com
Page 1
Publication Revision No. Control Table
Rev. No.
Date
Contents
1.6
8/22/07
Support connection of multiple WM5.0 devices
1.5
6/18/07
Support four Ethernet ports
1.0
1/16/07
Copyright
Copyright 2006 Clarinet Systems, Inc. All rights reserved. Information in this document is
subject to change without notice. No part of this publication may be transmitted,
transcribed, reproduced, stored in any retrieval system or translated into any language or
computer language in any form or by any means, mechanical, electronic, optical, chemical,
manual or otherwise, without the prior written permission of Clarinet Systems, Inc., 44040
Fremont Blvd., Fremont, CA 94538
Clarinet Systems and EtherUSB are trademarks of Clarinet Systems, Inc.
All other company and product names are trademarks or registered trademarks of their
respective owners.
Clarinet Systems, Inc.
//www.clarinetsys.com
Page 2
Table of Contents
1
PRODUCT OVERVIEW .......................................................................................................................................................................4
2
HARDWARE INSTALLATION ............................................................................................................................................................5
2.1 STATUS LED, PORT, AND BUTTON OF EA104 MAIN UNIT ............................................................................................................................5
2.1.1 External Status LED .......................................................................................................................................................................5
2.1.2 Ports ...............................................................................................................................................................................................5
2.2 HARDWARE INSTALLATION .......................................................................................................................................................................6
3
CONFIGURATION...............................................................................................................................................................................7
3.1 PDA SUPPORT ........................................................................................................................................................................................7
3.2 ETHERUSB WEB-BASED ADMINISTRATION TOOL (ADMINTOOL) .................................................................................................................7
3.3 ACCESS ADMINTOOL AND CHANGE EA104 INITIAL VALUES ........................................................................................................................7
4
SPECIFICATIONS AND PROVISIONS...............................................................................................................................................9
4.1 DIMENSIONS ............................................................................................................................................................................................9
4.2 ENVIRONMENT SPECIFICATIONS ...............................................................................................................................................................9
4.3 AC ADAPTER SPECIFICATIONS .................................................................................................................................................................9
4.4 SAFETY AND EMI CERTIFICATE.................................................................................................................................................................9
5
FUNCTIONS AND COMPATIBILITY ................................................................................................................................................10
5.1 PROTOCOLS ..........................................................................................................................................................................................10
5.1.1 Communications protocols ..........................................................................................................................................................10
5.1.2 Network protocols ........................................................................................................................................................................10
5.1.3 Network connection side..............................................................................................................................................................10
5.1.4
PDA connection side..................................................................................................................................................................10
5.1.5 PDA Compatibility........................................................................................................................................................................10
5.1.6 Communications Procedures........................................................................................................................................................10
5.2 EA104 FIRMWARE VERSION ..................................................................................................................................................................10
5.2.1 v02.00.00 .....................................................................................................................................................................................10
APPENDIX A – QUICK START GUIDE .......................................................................................................................................................11
APPENDIX B – WINDOW MOBILE 5.0 DEVICE.........................................................................................................................................15
APPENDIX C – CE5.0, CE.NET 4.1/4.2, AND PPC 2003/2003SE PDA .....................................................................................................19
C.1
INSTALLATION ON THE PDA ...........................................................................................................................................................19
C.2
COMMUNICATIONS WITH THE SERVER ............................................................................................................................................19
C.3
ACCESS INTERNET ........................................................................................................................................................................19
Clarinet Systems, Inc.
//www.clarinetsys.com
Page 3
1 PRODUCT OVERVIEW
The EtherUSB™ EA104 is a USB Ethernet Access Point for connecting PDA and
smartphone with Windows Mobile for Pocket PC 2003/2003SE operating systems (OS),
CE5.0, CE.NET4.1/4.2 and Windows Mobile 5.0 (see Appendix B) to an Ethernet network.
Connection is established using a PDA USB cradle or with USB cables via the PDA USB
port to10/100 Base-T Ethernet network. EA104 belongs to EtherUSB™ product line.
EA104 is equipped with 4 USB host ports and four 10/100 Base-T ports, one for uplink to
the Ethernet network and three for optional connection of PC or computing devices. EA104
provides TCP/IP-based network connectivity for up to 4 PDA devices simultaneously using
a PDA USB cradle or USB cables and the server side 10/100 Base-T network.
To get started immediately, please refer to Appendix A – Quick Start Guide.
Each connected PDA can perform server synchronization, Internet browsing, and file
transfer. This solution provides an alternative network connection other than WiFi, while
offering higher security and reliability standards. It works perfectly for the mobile users,
field application personnel, and any environment that requires a high level of security and
reliability. 500mA power provided to each USB port enables recharging of PDAs while
connected.
Clarinet Systems, Inc.
//www.clarinetsys.com
Page 4
2 HARDWARE INSTALLATION
Please confirm the following items have been included in the shipping box with the main
product.
1.
2.
3.
4.
EA104 main unit
180cm (6’) Ethernet cable
5VDC/3A power adapter, 2.1x5.5mm plug, center positive polarity
A paper notice that indicates the website from which to download the EA104 Users
Manual (this manual), Data Sheet and about WM5.0 device connection.
2.1 Status LED, port, and button of EA104 main unit
2.1.1 External Status LED
Signal Name
Power
Ethernet
USB
Status
Solid after power-on which indicates unit ready for operation
Slow blink during operation
Fast blink if power-on self test fails – bad unit
Glows green indicates a link has been established with another device
Flashing indicates Ethernet activities from itself or others
Glows green if a USB connection has been made
Fast flashing: WM5.0 device is making connection (Important: don’t
unplug USB connector during this period which lasts 4~40 seconds.)
2.1.2 Ports
1. Four Ethernet RJ45 and four USB female connectors.
2. One DC power connector.
3. One Reset button: press and hold the Reset Button for 8 seconds or longer, to reset
EA104 to factory default and then reboot.
Clarinet Systems, Inc.
//www.clarinetsys.com
Page 5
2.2 Hardware Installation
1. Connect the Ethernet cable to the EA104 Ethernet uplink (WAN) and the other end
to Ethernet switch/hub*.
2. Connect PDA to the EA104 USB port**.
3. Connect the power adapter to rear socket of the EA104, then into the wall outlet. If
power is present, the EA104 will proceed with normal power on sequence - self test
and boot up sequence within 25 seconds; once the Power LED is solid in color on
the front panel, the unit is ready.
• If the unit has a problem, the power LED will flash quickly.
• If the network connection has a Link, the Ethernet LED will blink green.
• If USB devices are connected & recognized by the EA104, the corresponding
LED will illuminate on the front panel.
To shut down the EA104, disconnect the AC power adapter. Do not shut down the EA104
when there is a PDA performing data communications since this may cause data to be lost.
Notes:
* In a non-DHCP environment, the system administrator must set up an enclosed DHCP
network by accessing the EA104 configuration using the browser-based AdminTool.
** Please refer “Appendix B – Mobile Windows 5.0 Device” for multiple WM5.0 devices
connection.
Clarinet Systems, Inc.
//www.clarinetsys.com
Page 6
3 CONFIGURATION
3.1 PDA support
The EA104 currently supports PDAs running PPC 2003, CE/Net 4.1 & 4.2, CE5.0 and
Windows Mobile 5.0 (see Appendix B.)
3.2 EtherUSB web-based Administration Tool (AdminTool)
The EtherUSB web-based AdminTool can be accessed via Internet Explorer browsers.
This tool provides the following functions:
•
•
•
•
•
•
•
Use static IP or DHCP for EtherUSB
Setup IP address, Subnet Mask, Gateway, WINS and DNS information when using
static IP.
Setup NAT configuration for the USB ports
Setup network identification such as device name and domain name for the
EtherUSB
Change password
Review reports of critical changes
Update firmware
3.3 Access AdminTool and change EA104 initial values
DHCP is the default setting in EA104 and the device will obtain one IP address from a
DHCP server once connected to a network. IP addresses of USB ports are assigned by an
internal NAT function. To change the settings, please access the EA104 through the
AdminTool. To access the AdminTool, open your Internet Explorer browser and enter the
URL using the IP address of the EA104 as shown below.
http://<EA104 IP address>:9876/
User name: admin
Password: password
(Note syntax: http://<IP address><colon>9876/ )
If the network contains a WINS server, you may use the device name of the EA104 in place
of the IP address. That is http://<device name>:9876/. For example:
http://EA4000100:9876.
All fields will be overwritten when restoring factory defaults by pushing the Reset Button for
8 seconds or longer.
Clarinet Systems, Inc.
//www.clarinetsys.com
Page 7
The Default Factory Setting is as follow:
Device Name:
Domain Name:
IP Mode:
IP Group:
User ID:
Password:
<Serial Number>
DHCP
193.168.10.0
Admin
Password
Please refer to EtherUSB AdminTool User Manual for details.
Clarinet Systems, Inc.
//www.clarinetsys.com
Page 8
4 SPECIFICATIONS AND PROVISIONS
4.1 Dimensions
•
•
Dimensions (L x W x H in mm): 152 x 88 x 25; (in inch) 6” x 3.5” x 1”
Weight: 0.5Kg (Hub and AC adapter); 18 oz
4.2 Environment Specifications
•
•
•
Operating temperature: 0℃~ 40℃
Humidity: 10% ~90% RH (Non-condensing)
Storage temperature: -20℃~ 90℃
4.3 AC Adapter Specifications
•
•
•
Input voltage & current: 5 VDC & 3 Amp, 2.1x5.5mm plug, center positive polarity
Plug: 2.1x5.5mm, center positive polarity
Regulation: UL and <PS>E for Japanese version only
4.4 Safety and EMI certificate
•
•
CE and FCC – B
VCCI (application in process)
Note: Please check the Data Sheet on //www.clarinetsys.com for updated product information.
Clarinet Systems, Inc.
//www.clarinetsys.com
Page 9
5 FUNCTIONS AND COMPATIBILITY
5.1 Protocols
5.1.1 Communications protocols
•
HTTP, UDP
5.1.2 Network protocols
•
TCP/IP, DHCP, WINS, DNS, NAT
5.1.3 Network connection side
•
•
IP Address: Acquired from DHCP server or manually set
Applicable Standards: IEEE802.3 (10BASE-T), IEEE802.3u (100BASE-TX), 10/100Mbps
(auto negotiation)
5.1.4 PDA connection side
•
•
IP Address: WM5.0 uses assigned IP, PPC2003 and earlier uses NAT
Data transmission speed: Max 12M (USB1.1 is currently enabled although USB2.0 capable)
5.1.5 PDA Compatibility
•
CE5.0; Windows Mobile for Pocket PC 2003/2003SE, Windows CE.NET4.1/4.2, and
Windows Mobile 5.0
5.1.6 Communications Procedures
•
•
•
EtherUSB will be recognized as an Access Point on the network
Once the PDA is connected, the PDA will be recognized as a network terminal
All configurations are done via HTTP using a browser on PC
5.2 EA104 Firmware version
5.2.1 v02.00.00
•
For the current Firmware Version, please check http://www.clarinetsys.com
Clarinet Systems, Inc.
//www.clarinetsys.com
Page 10
APPENDIX A – QUICK START GUIDE
This guide shows you how to quickly connect the EA-104 to your network and to PDA devices with CE5.0,
PPC2003, Windows CE.NET4.1/4.2, and Windows Mobile 5.0 OS.
Included in this box are:
• EA-104 USB server
• Power Adapter
• Ethernet cable
Before you start ensure that:
1. You have at least one computer and a network
2. You have TCP/IP networking properly configured on your computer. Please refer to Windows help for
more information.
3. You have an Ethernet network and a spare port available on your Ethernet switch
4. You have a PDA device with a USB interface connected to the available network
Once you have all of this in place move to Step 1 below.
1. Connections
Connect the Ethernet cable into the 10/100 uplink port (WAN) on the rear of the EA104. Connect the
Ethernet cable into your switch or hub. Connect the power cord to the back of the unit and plug the power
supply into the wall socket or AC power source. The power LED should blink slowly on the front of the unit there is no on/off switch. The Network LED should now light on the front of the unit if the link is established.
The EA104 default mode is DHCP. In a DHCP network environment EA104 will obtain one IP address from
the DHCP server after power-on. In a non-DHCP environment, the system administrator must set up an
enclosed DHCP network by accessing the EA104 configuration using the browser-based AdminTool as
described later in this guide. The power-on process takes about 25 seconds. The EA104 can be reset to
factory settings by pushing and holding the Reset Button for eight seconds or longer.
.
2. PDA connections
Now connect your USB PDA devices to the available USB ports on the back of the unit. Please refer
“Appendix B – Window Mobile 5.0 device” for connecting multiple WM5.0 devices.
Clarinet Systems, Inc.
//www.clarinetsys.com
Page 11
EA104 has four USB host ports that simultaneously connect up to four PDAs through their USB ports to an
Ethernet network. Each connected PDA can perform server synchronization, Internet browsing, and file
transfer.
3. Clarinet Systems DevFinder (optional)
Download “Clarinet Systems DevFinder” from http://www.clarinetsys.com and launch the DevFinder
application to locate the EA104 device and find its IP address. Choose the Default Search range as
Broadcast, which is suitable for small networks. If your network is large, choosing Range Search to define
and limit the search range is preferable.
Clarinet Systems, Inc.
//www.clarinetsys.com
Page 12
4. Configuration (optional)
Now that EA104 is connected to your network and you know its IP address, open an Internet Explorer
browser window and enter the following into the URL area and then press enter. If the network contains a
WINS server, you may use the serial number of the EA104 in place of the IP address. That is http://<serial
number>:9876/. For example: http://EA4000100:9876.
http://<IP address>:9876/
User name: admin
Password: password
For example: http://192.168.101.91:9876/
You will be presented with a Login Screen. The default User name and Password are admin/password. Click
“OK” to continue. Once the correct username and password have been entered, you should see a status
screen like this.
Clarinet Systems, Inc.
//www.clarinetsys.com
Page 13
The status screen will display system information such as IP address and EtherUSB device identification.
Please refer to EtherUSB AdminTool User Manual for details.
Clarinet Systems, Inc.
//www.clarinetsys.com
Page 14
APPENDIX B – WINDOW MOBILE 5.0 DEVICE
Firmware V02.00.00 dated 8/22/2007 supports simultaneous operation of multiple WM5.0 mobile
devices such as PDAs and smartphones, which was unsupported in earlier firmware versions.
In order to support multiple WM5.0 devices, the WM5.0 device must be set up as follows:
A) Configure the WM5.0 device for RNDIS Sync mode (the default mode)
This can be configured at Settings\Connections\ActiveSync Mode\RNDIS Sync Mode. If there is no
Settings\Connections\ActiveSync Mode, the WM5.0 device is likely set at default mode.
If you do not see Settings\Connections\ActiveSync Mode but want to confirm the settings:
1. Go to the mobile device manufacturer’s website and download the latest ROM/firmware to update to your
WM5.0 devices.
2. Check the device manufacturer’s software section webpages and determine if there is ActiveSync Mode
Switcher/Changer available for download.
3. Once you download and install the firmware and/or application, the ActiveSync Mode Switcher can be
found at Start->Setting->Connections.
B) Use Clarinet Systems’ “EtherUSB Client” application to enable multiple WM5.0 connections to
EA104. (You will only need to do this once for each device.)
EtherUSB Client offers the following functions for WM5.0 devices:
Display device’s current setting
Input USB IP Group value used by EtherUSB EA104
Assign one ID from 49 choices for each WM5.0 device
Apply Setting
Restore Default setting
Download “EtherUSB Installer” from http://www.clarinetsys.com/en/product-ea104.htm to a PC and use
ActiveSync to install it to a WM5.0 device.
Install “EtherUSB_Installer” to WM5.0 device:
Connect your WM5.0 device to a PC via ActiveSync and click on Explore,
Clarinet Systems, Inc.
//www.clarinetsys.com
Page 15
Or,
In ActiveSync, go to Tool->Explore Device. This will open a new explore window.
Drag and drop the EtherUSB_Installer.cab file to My Documents folder on the PDA.
Go to the PDA and launch File Explorer under Start menu.
Go to My Documents folder and click on EtherUSB_Installer.cab file to install the application on your PDA.
Clarinet Systems, Inc.
//www.clarinetsys.com
Page 16
You can use IR to beam EtherUSB_Installer to the other devices.
Activate WM5.0 device ready for EA104 connection:
1. Go to Start->Programs folder and launch EtherUSB Client (Fig 1 & 2).
2. Assign USB IP Group value (the value of “Network Settings – USB Ports” in AdminTool). No change
is needed if you use the default value 193.168.10.0 which is recommended. (Fig 3 & 4.)
3. Select one Client ID from 49 choices (under normal conditions, each device should be assigned one
unique Client ID). (Fig 3 & 4.)
4. Apply Setting so the device can now connect to EA104 along with other WM5.0 devices
simultaneously.
Fig 1
Clarinet Systems, Inc.
Fig 2
//www.clarinetsys.com
Page 17
Fig 3
Fig4
Now WM5.0 device is ready for EA104 connection. Connection time is around 4 seconds for the device with
a unique Client ID. Otherwise, connection time varies from 10 to 40 seconds.
Note 1: When a WM5.0 device is plugged into the EA104, port the USB LED will flash. LED flashing means
the connection process is on-going. Important: During LED flashing, the user should not unplug a mobile
device from the USB port unless it takes more than 40 seconds. USB LED solid on after flashing means the
connection is established. LED off after flashing means the connection cannot be established, for example,
as caused by a duplicate ID conflict.
Note 2: If two or more EA104 units are installed in proximity to each other and there are
1. less than 49 WM5.0 devices to be used, it is recommended to keep the same USB IP Group value
for every EA104 (for example, keep default values 193.168.10.0).
2. more than 49 WM5.0 devices,
a. it is recommended to keep the same USB IP Group value for every EA104 and assign a
duplicate ID to those WM5.0 devices beyond 49. If an ID conflict arises from plugging in a
second device with the same IP, that device will be unable to make connection until its “twin”
is unplugged.
b. you can assign a different USB IP Group value to each EA104 (through “Network Settings –
USB Ports” page in AdminTool) and a set of WM5.0 devices. In this case, the connection
time is 4 seconds for the devices connecting to EA104 with the same USB IP Group value
and 10~40 seconds if connecting to EA104 with a different IP Group value.
You must use “Restore Default” to restore original settings in order to use the ActiveSync function between a
PC and a WM5.0 device, assuming original settings allow PC ActiveSync. You must also use “Apply Setting”
to enable any subsequent EA104 connection after “Restore Default”.
Restore the WM5.0 device’s original setting (the setting before changed by EtherUSB Client).
Go to Start->Programs folder and launch EtherUSB Client (Fig 1)
Select “Restore Default” (Fig 2)
Note: Please refer to http://www.clarinetsys.com/en/product-ea104.htm for latest WM5.0 Devices Support.
Clarinet Systems, Inc.
//www.clarinetsys.com
Page 18
APPENDIX C – CE5.0, CE.NET 4.1/4.2, AND PPC 2003/2003SE PDA
C.1
Installation on the PDA
None
C.2
Communications with the Server
TCP/IP and UDP
C.3
Access Internet
Built-in browser on PDA
Clarinet Systems, Inc.
//www.clarinetsys.com
Page 19