1
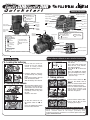
S5200/
S5600
Camera Controls
Viewfinder (EVF)
Power switch
Photography mode
W (Wide zoom) button
Diopter adjustment dial
Playback mode
T (Tele zoom) button
Indicator lamp
Strap mount
Power-OFF
EVF/LCD
(monitor selector) button
Shutter button
Focus mode
selector button
Low light view
button
Exposure
compensation
button
Continuous
shooting
button
Focus mode
selector lock
switch
MENU/OK button
Photo mode (
DISP/BACK button
LCD monitor
Battery cover
Flash
Tripod mount
4-direction (abd c) button
AF-assist
illuminator
Photography mode
d/
Macro button
Strap mount
Self-timer lamp
Mode dial
c/
Still photography
Auto
Programmed Auto
Anti-blur
Shutter-priority Auto
Natural light
Aperture-priority Auto
Portrait
Manual
) button
Playback mode
a/
Erase button
Flash button
Slot cover
Landscape
Night
Speaker
Movie recording
xD-Picture Card slot
A/V OUT (Audio /
Visual output) socket
Movie
Microphone
USB socket (mini-B)
DC IN 5V (power input)
socket
Lens
BL00485-200(1) E
Refer to Owner’s Manual for more detailed instructions
Picture Taking
A. Loading the batteries
3
1. Check that the camera is
turned off (set the Power
switch to “OFF”) before
opening the battery cover.
1
2. Load the batteries correctly
as indicated by the polarity
icons.
Press on the battery cover to
push the batteries down.
Slide the battery cover closed.
2
DATE/TIME
2007
2006
Y Y. M M . D D
2005
2004
2003
SET
1 1 1 2 00
AM
CANCEL
✽ Refer
to owner’s manual for
date/time setup.
C. Taking pictures
1
B. Setting up the camera
1
Gold
contact
area
Gold marking
1. Align the gold marking on the
xD-Picture Card slot with the
gold contact area on the xDPicture Card™ and push the
card firmly all the way into
the slot.
Close the slot cover.
3. You can select your preferred
date format.
Press “d” or “c” to select the
date format, Year, Month,
Day, Hour or Minute.
Press “a” or “b” to correct the
setting.
Press the “MENU/OK” button
after you complete the setting.
2
3
Click
Bebeep
1. Set the Power switch to “q”
and set the Mode dial to
“B”.
2. Press the shutter button down
halfway to adjust the focus.
3. Press the shutter button down
fully to take a picture. The
camera makes a “Click” sound
and takes the picture.
D. Viewing picture
2
2. To turn the camera on, set
the Power switch to “q ” or
“w”.
Press the “MENU/OK” button
to set the date and time.
1
2
1. Set the Power switch to “w”.
2. Press “d ” or “c ” to move
through your images.
Still images that can be viewed on the FinePix S5200/FinePix S5600
You can use this camera to view still images recorded on the FinePix
S5200 / FinePix S5600 or still images (excluding some
uncompressed images) recorded on a FUJIFILM digital camera that
supports xD-Picture Card.
FPT-507107-PW
Viewing images on your PC
A.Install Software
B.Connect a Camera to PC
C.Save Images
A. Install Software
Do not connect the camera to your PC until the software
installation is completed.
1. Turn on your PC and start up Windows.
! Users of Windows 2000 Professional or Windows XP should log in
●
by using a system administrator account (e.g. “Administrator”).
2. Quit all other active applications until no applications are
shown in the taskbar.
8. Windows 98/98 SE/Me/2000 Professional
FinePixViewer starts up automatically.
Windows XP
The “Found New Hardware” help message appears in the
bottom-right corner of your screen. This message will close
when the settings are completed. No action is required.
FinePixViewer starts up automatically.
3. Load the enclosed CD-ROM into the CD-ROM drive. The
installer starts up automatically.
4. The Setup screen appears.
Click
the
[Installing
FinePixViewer] button.
5. After installation completed, press [Close] button.
B. Connect the Camera to your PC
C. Save Images
1. Load an xD-Picture Card containing photographed images
into your camera.
1. The Save Image Wizard starts up. Click the [Start] button.
2. Set the Power switch to “w” to turn the camera on.
Select “¶” DSC in “ò” USB MODE in the “˜” SET-UP
menu (Refer to “USING THE SET-UP SCREEN” in the
owner’s manual).
DSC
1
2
3
4
2. Check that the files are downloaded from the camera to your
PC and that a folder with the date is created.
Ex. \My Documents \ My Pictures \ 2005_0824
D. View Images
1. Click the [Show List of Images]
button.
SET
SET
ENGLISH
SET
NTSC
3. Turn your camera off.
4. If you have one, plug the AC power adapter connector into
the “DC IN 5V” socket on the camera and then plug the
adapter itself into the main power outlet, otherwise be sure
your batteries are fresh and charged.
2. Select “Preview” in the View menu to display an enlarged image.
5. Turn your PC on.
6. Connect the camera to the PC using the USB cable (mini-B).
Camera
PC
USB socket
7. Set the Power switch to “w”.
For more information
Refer to “How to use FinePixViewer” in the HELP menu, or chapter 5
and 6 in the Owner’s Manual, or visit Fujifilm “Q&A Search” in the
following website.
( http://home.fujifilm.com/products/digital/ )
For Macintosh users, refer to chapter 5 and 6 in the Owner’s Manual.