1
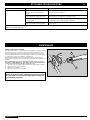
GAS GRILL
Built-In NG Gas Grill Owner’s Guide
S-440 - NG
#43146
#00000
YOU MUST READ THIS OWNER’S GUIDE
BEFORE OPERATING YOUR GAS GRILL
DANGER
If you smell gas:
1. Shut off gas to the appliance.
2. Extinguish any open flames.
3. Open lid.
4. If odor continues, keep away from the
appliance and immediately call your gas
supplier or your fire department.
Leaking gas may cause a fire or explosion
which can cause serious bodily injury or
death, or damage to property.
WARNING:
1. Do not store or use gasoline or other
flammable liquids or vapors in the
vicinity of this or any other appliance.
2. An LP cylinder not connected for use
shall not be stored in the vicinity of this
or any other appliance.
WARNING: Follow all leak-check
procedures carefully in this manual prior
to barbecue operation. Do this even if the
barbecue was dealer-assembled.
NOTICE TO INSTALLER: These instructions
must be left with the owner and the owner
should keep them for future use.
THIS GAS APPLIANCE IS DESIGNED FOR
OUTDOOR USE ONLY.
WARNING: Do not try to light this
appliance without reading the “Lighting
Instructions” section of this manual.
43146 US 04/14/07
NG
US ENGLISH
WARNINGS
2
DANGERS AND WARNINGS
DANGER
Failure to follow the Dangers, Warnings and Cautions contained in this Owner’s Manual may result in serious bodily injury or
death, or in a fire or an explosion causing damage to property.
WARNINGS
Do not store a spare or disconnected liquid propane cylinder under or near this barbecue.
Improper assembly may be dangerous. Please follow the assembly instructions carefully.
After a period of storage, and/or nonuse, the Weber® gas barbecue should be checked for gas leaks and burner obstructions
before use. See instructions in this manual for correct procedures.
Do not operate the Weber® gas barbecue if there is a gas leak present.
Do not use a flame to check for gas leaks.
Combustible materials should never be within 24 inches (61 cm) of the back or sides of your Weber® gas barbecue.
Do not put a barbecue cover or anything flammable on, or in the storage area under the barbecue.
Your Weber® gas barbecue should never be used by children. Accessible parts of the barbecue may be very hot. Keep young
children away while it is in use.
You should exercise reasonable care when operating your Weber® gas barbecue. It will be hot during cooking or cleaning and
should never be left unattended, or moved while in operation.
Should the burners go out while in operation, turn all gas valves off. Open the lid and wait five minutes before attempting to
relight, using the lighting instructions.
Do not use charcoal or lava rock in your Weber® gas barbecue.
Never lean over open grill or place hands or fingers on the front edge of the cooking box.
Should a grease fire occur, turn off all burners and leave lid closed until fire is out.
Do not enlarge valve orifices or burner ports when cleaning the valves or burners.
The Weber® gas barbecue should be thoroughly cleaned on a regular basis.
Liquid propane gas is not natural gas. The conversion or attempted use of natural gas in a liquid propane unit or liquid propane
gas in a natural gas unit is dangerous and will void your warranty.
Do not attempt to disconnect any gas fitting while your barbecue is in operation.
Use heat-resistant barbecue mitts or gloves when operating barbecue.
Keep any electrical supply cord and the fuel supply hose away from any heated surfaces.
Combustion byproducts produced when using this product contain chemicals known to the state of California to cause cancer,
birth defects, or other reproductive harm.
Do not use this barbecue unless all parts are in place. The unit must be properly assembled according to the assembly
instructions.
LIQUID PROPANE GAS UNITS ONLY:
Use the pressure regulator and hose assembly that is supplied with your Weber® gas barbecue.
Do not attempt to disconnect the gas regulator and hose assembly or any gas fitting while your barbecue is in operation.
A dented or rusty liquid propane cylinder may be hazardous and should be checked by your liquid propane supplier. Do not
use a liquid propane cylinder with a damaged valve.
Although your liquid propane cylinder may appear to be empty, gas may still be present, and the cylinder should be
transported and stored accordingly.
If you see, smell or hear the hiss of escaping gas from the liquid propane cylinder:
1.
2.
3.
Move away from liquid propane cylinder.
Do not attempt to correct the problem yourself.
Call your fire department.
WWW.WEBER.COM®
WARRANTY
Weber-Stephen Products Co. (Weber) hereby warrants to the ORIGINAL PURCHASER of this Weber®
gas grill that it will be free of defects in material and workmanship from the date of purchase as follows:
Aluminum castings -2 year
on paint excludes fading,
Stainless steel Shroud,
Porcelain-enameled shroud,
Cookbox Assembly -2 year
on paint excludes fading,
Stainless steel burners tubes,
Stainless steel cooking grates,
Stainless steel Flavorizer bars,
Porcelain-enameled cast-iron
cooking grates,
Porcelain-enameled
cooking grates,
Porcelain-enameled
Flavorizer bars,
Infrared Rotisserie Burner,
All remaining parts,
25-years
25-years
25-years
10-years
10-years
5-years no rust through or burn through
5-years no rust through or burn through
5-year no rust through or burn through
3-years no rust through or burn through
2-years no rust through or burn through
2-years
2-years
When assembled and operated in accordance with the printed instructions accompanying it.
Weber may require reasonable proof of your date of purchase. THEREFORE, YOU SHOULD RETAIN
YOUR SALES SLIP OR INVOICE.
This Limited Warranty shall be limited to the repair or replacement of parts that prove defective under
normal use and service and which on examination shall indicate, to Weber’s satisfaction, they are
defective. Before returning any parts, contact the Customer Service Representative in your area
using the contact information on our website. If Weber confirms the defect and approves the claim,
Weber will elect to replace such parts without charge. If you are required to return defective parts,
transportation charges must be prepaid. Weber will return parts to the purchaser, freight or postage
prepaid.
WWW.WEBER.COM®
3
3
This Limited Warranty does not cover any failures or operating difficulties due to accident, abuse,
misuse, alteration, misapplication, vandalism, improper installation or improper maintenance or
service, or failure to perform normal and routine maintenance, including but not limited to damage
caused by insects within the burner tubes, as set out in this owner’s manual.
Deterioration or damage due to severe weather conditions such as hail, hurricanes, earthquakes
or tornadoes, discoloration due to exposure to chemicals either directly or in the atmosphere, is not
covered by this Limited Warranty.
There are no other express warrants except as set forth herein and any applicable implied warranties
of merchantability and fitness are limited in duration to the period of coverage of this express written
Limited Warranty. Some regions do not allow limitation on how long an implied warranty lasts, so this
limitation may not apply to you.
Weber is not liable for any special, indirect or consequential damages. Some regions do not allow the
exclusion or limitation of incidental or consequential damages, so this limitation or exclusion may not
apply to you.
Weber does not authorize any person or company to assume for it any other obligation or liability in
connection with the sale, installation, use, removal, return, or replacement of its equipment; and no
such representations are binding on Weber.
This Warranty applies only to products sold at retail.
WEBER-STEPHEN PRODUCTS CO.
Customer Service Center
1890 Roselle Road, Suite 308
Schaumburg, IL 60195
USA
For replacement parts call:
1-800-446-1071
www.weber.com®
EXPLODED VIEW S-440
4
$
%
&
S440_NG_US
&$
'
&%
(
&&
)
&'
*
&(
+
&)
,
&*
$#
$$
$%
$&
&+
&,
'#
$'
$(
$)
$*
'$
$+
'%
'&
$,
%#
%$
%%
%&
%'
''
'(
')
'*
%(
%)
%*
'+
%+
',
%,
&#
(#
($
WWW.WEBER.COM®
EXPLODED VIEW LIST S-440
5
1.
Shroud Hardware
20.
Disposable Drip Pan
39.
Smoker Bar
2.
Shroud
21.
Drip Tray
40.
Smoker Burner
3.
Thermometer
22.
Catch Pan
41.
Cookbox
4.
Thermometer Bezel
23.
Catch Pan Holder
42.
Bulkhead
5.
Handle
24.
Left Rear Panel
43.
Manifold Hose
6.
Grill OutTM Handle Light
25.
Left Panel
44.
Rear Frame Support
7.
Rotisserie Motor
26.
Left Door
45.
Vent Cover
8.
Rotisserie Bracket
27.
Door Handles
46.
Front Frame Support
9.
Warming Rack
28.
Right Door
47.
Right Rear Panel
10.
Cooking Grates
29.
Left Vent Bracket
48.
Right Frame Panel
11.
Flavorizer® Bars
30.
Kick Vent
49.
Matchstick Holder
12.
Burner Tubes
31.
IR Burner Cover
50.
Bottom Panel
13.
Manifold
32.
Infrared Burner
51.
Right Vent Bracket
14.
Control Panel
33.
IR Burner Box
15.
Small Knob Bezel
34.
IR Burner Igniter Wire
16.
Small Knob
35.
Thermocouple
17.
Large Knob
36.
IR Burner Hose
18.
Large Knob Bezel
37.
Rotisserie Spit Assembly
19.
Water Baffle / Heat Shield
38.
Smoker Box
WWW.WEBER.COM®
5
6
GENERAL INSTRUCTIONS
OPERATING
The natural gas supply is easy to use and gives you more cooking control than charcoal
fuel.
•
These instructions will give you the minimum requirements for assembling your
Weber® gas barbecue. Please read the instructions carefully before using your
Weber® gas barbecue. Improper assembly can be dangerous.
•
Not for use by children.
•
If there are local codes that apply to portable gas grills, you will have to conform to
them. Installation must conform with local codes or, in the absence of local codes,
with either the National Fuel Gas Code, ANSI Z223.1/NFPA 54, Natural Gas and
Propane Installation Code, CSA B149.1, or Propane Storage and Handling Code,
B149.2 as applicable.
•
This Weber® gas barbecue is designed for natural (piped in city) gas only. Do not
use liquid propane (LP) bottled gas. The valves, orifices and hose are for natural
gas only.
•
Do not use with charcoal fuel.
•
Check that the area under the control panel and the bottom tray are free from
debris that might obstruct the flow of combustion or ventilation air.
STORAGE
•
•
•
•
•
The gas must be turned off at the natural gas supply when the Weber® gas
barbecue is not in use.
When the Weber® gas barbecue is stored indoors, the gas supply must be
disconnected.
The Weber® gas barbecue should be checked for gas leaks and any obstructions
in the burner tubes before using. (See Section: “Maintenance/Annual
Maintenance”).
Check that the areas under the control panel and the slide out bottom tray are free
from debris that might obstruct the flow of combustion or ventilation air.
The Spider /Insect Screens should also be checked for any obstructions. (See
Section: "Maintenance/Annual Maintenance").
WARNING: Do not use the barbecue within 24 inches
(610 mm) of combustible materials. This includes the top,
bottom, back or sides of the grill.
WARNING: The entire cooking box gets hot when in use. Do
not leave unattended.
WARNING: Keep any electrical supply cord and the fuel
supply hose away from any heated surface.
WARNING: Keep the cooking area clear of flammable vapors
and liquids, such as gasoline, alcohol, etc., and combustible
materials.
Gas Supply Testing
•
Disconnect your Weber® gas barbecue when the gas supply is being tested at high
pressures. This appliance and its individual shutoff valve must be disconnected
from the gas supply piping system during any pressure testing of that system at
test pressures in excess of 1/2 psig (3.5 kPa).
•
Turn off your Weber® gas barbecue when the gas supply is being tested at low
pressures. This appliance must be isolated from the gas supply piping system by
closing its individual manual shutoff valve during any pressure testing of the gas
supply piping system at the pressure equal to or less than 1/2 psig (3.5 kPa).
OPERATING
WARNING: Only use this barbecue outdoors in a wellventilated area. Do not use in a garage, building, breezeway
or any other enclosed area.
WARNING: Your Weber® gas barbecue shall not be used
under overhead combustible construction.
GRILLING METHODS
Note: If grill loses heat while cooking refer to the troubleshooting section of this manual.
WARNING: Do not move the Weber® gas barbecue when
operating or while barbecue is hot.
You can adjust the individual main burners as desired. The control settings are START/
HI, MEDIUM, LOW, or OFF.
Note: The temperature inside your cooking box for the first few uses, while surfaces
are still very reflective, may be hotter than those shown in your cookbook. Cooking
conditions, such as wind and weather, may require the adjustment of the burner controls
to obtain the correct cooking temperatures.
If burners go out during cooking, open lid, turn off all burners and wait five
minutes before relighting.
Preheating - Your Weber® gas barbecue is an energy-efficient appliance. It operates at
an economical low BTU rate. To preheat: after lighting, close lid and turn all burners to
“START/HI”. Preheating to between 500° and 550° F (260° and 290° C) will take 10 to
15 minutes depending on conditions such as air temperature and wind.
CLEANING
WARNING: Turn your Weber® gas barbecue off and wait for it
to cool before cleaning.
CAUTION: Do not clean your Flavorizer® bars or cooking
grates in a self-cleaning oven.
For availability of replacement cooking grates and Flavorizer® bars contact the
Customer Service Representative in your area using the contact information on
our website. Log onto www.weber.com®
Outside surfaces - Use a warm soapy water solution to clean, then rinse with water.
CAUTION: Do not use oven cleaner, abrasive cleansers
(kitchen cleansers), cleaners that contain citrus products, or
abrasive cleaning pads on barbecue or cart surfaces.
Drippings and grease - The Flavorizer® bars are designed to “smoke” the correct
amount of drippings for flavorful cooking. Excess drippings and grease will accumulate
in the catch pan under the slide out bottom tray. Disposable foil drip pans are available
that fit the catch pan.
WARNING: Check the bottom tray for grease build-up before
each use. Remove excess grease to avoid a grease fire in
the slide out bottom tray.
WWW.WEBER.COM®
GAS INSTRUCTIONS
7
7
Slide out Bottom tray - Remove excess grease, then wash with warm soapy water,
then rinse.
Do not use cleaners that contain acid, mineral spirits or xylene. Rinse well after
cleaning.
Flavorizer® bars and Cooking grates - Clean with a suitable brass bristle brush. As
needed, remove from grill and wash with warm soapy water, then rinse with water.
Preserve Your Stainless Steel
Your grill or its cabinet, lid, control panel and shelves may be made from stainless steel.
To keep the stainless steel looking its best is a simple matter. Clean it with soap and
water, rinse with clear water and wipe dry. For stubborn particles, the use of a nonmetallic brush can be used.
Catch pan - Disposable foil trays are available, or you can line the catch pan with
aluminum foil. To clean the catch pan, wash with warm soapy water, then rinse.
Thermometer - Wipe with warm soapy water; clean with plastic scrub ball.
Inside cooking module - Brush any debris off of burner tubes. DO NOT ENLARGE
BURNER PORTS (OPENINGS). Wash inside of cooking box with warm soapy water
and a water rinse.
Inside Lid - While lid is warm, wipe inside with paper towel to prevent grease build-up.
Flaking built-up grease resembles paint flakes.
Stainless steel surfaces - Wash with a soft cloth and a soap and water solution. Be
careful to scrub with the grain direction of the stainless steel.
IMPORTANT: Do not use a wire brush or abrasive cleaners
on the stainless steel surfaces of your grill as this will cause
scratches.
IMPORTANT: When cleaning surfaces be sure to rub/wipe in
the direction of the grain to preserve the look of your stainless
steel.
GAS INSTRUCTIONS
INSTALL GAS SUPPLY
General Specifications for Piping
Note: Contact your local municipality for building codes regulating outdoor gas
barbecue installations. In absence of Local Codes, you must conform to the
latest edition of the National Fuel Gas Code: ANSI Z 223.1/NFPA 54, or CAN/CGAB149.1, Natural Gas and Propane Installation Code. WE RECOMMEND THAT THIS
INSTALLATION BE DONE BY A PROFESSIONAL.
Some of the following are general requirements taken from the latest edition of the
National Fuel Gas Code: ANSI Z 223.1/NFPA 54, or CAN/CGA-B149.1, Natural Gas
and Propane Installation Code for complete specifications.
•
This barbecue is designed to operate at 4.5 inches of water column pressure (.163
psi).
•
A manual shut-off valve must be installed outdoors, immediately ahead of the quick
disconnect.
•
An additional manual shut-off valve indoors should be installed in the branch fuel
line in an accessible location near the supply line.
•
Pipe compound should be used which is resistant to the action of natural gas when
connections are made.
•
The outdoor connector must be firmly attached to rigid, permanent construction.
WARNING: Do not route the 10 foot hose under a deck. The
hose must be visible.
Gas Line Piping
•
If the length of the line required does not exceed 50 feet, use a 5/8" O.D. tube. One
size larger should be used for lengths greater than 50 feet.
•
Gas piping may be copper tubing, type K or L; polyethylene plastic tube, with a
minimum wall thickness of .062 inch; or standard weight (schedule 40) steel or
wrought iron pipe.
•
Copper tubing must be tin-lined if the gas contains more than 0.3 grams of
hydrogen sulfide per 100 cubic feet of gas.
•
Plastic tubing is suitable only for outdoor, underground use.
•
Gas piping in contact with earth, or any other material which may corrode the
piping, must be protected against corrosion in an approved manner.
•
Underground piping must have a minimum of 18" cover.
Test Connections
All connections and joints must be thoroughly tested for leaks in accordance with local
codes and all listed procedures in the latest edition of the National Fuel Gas Code: ANSI
Z 223.1/NFPA 54, or CAN/CGA-B149.1
WWW.WEBER.COM®
DANGER
Do not use an open flame to check for gas leaks. Be sure
there are no sparks or open flames in the area while you
check for gas leaks. This will result in a fire or explosion
which can cause serious bodily injury or death and damage
to property.
8
GAS INSTRUCTIONS
TYPE OF GAS
Your natural gas grill is factory built to operate using natural gas only. Never attempt to
operate your grill on gases other than the type specified on the grill rating plates.
Your grill operates at 4.5” of water column pressure. If replacement of the hose
becomes necessary, factory specified parts are required. See your local dealer.
For safety and design reasons, the conversion of a Weber® grill from operation using
Natural gas to operation using LP gas requires the change out of the entire gas supply
system of the grill. If this becomes necessary, see your dealer for additional information.
1
10.
2
WHAT IS NATURAL GAS?
1
Main Gas Line
2
Shut Off Valve
3
Corrugated Gas Line
4
Regulator Mounting Bracket
5
1/2”(1.27mm) Flared Gasket
6
Cap (Optional Side Burner)
7
Regulator (not included)
8
1/2”(1.27mm)SAE 45 Adapter
Fitting
9
Corrugated Gas Line to
Manifold
10
Gas Flow
Natural gas, often called methane, is a safe modern fuel. Natural gas is supplied by your
local utility and should be readily available if your house is already heated with gas.
LEAK CHECK PREPARATION
CHECK THAT ALL BURNER VALVES ARE OFF
Valves are shipped in the “OFF” position, but you should check to be sure that they are
turned off. Check by pushing in and turning clockwise. If they do not turn, they are off.
Proceed to the next step. If they do turn continue turning them clockwise until they stop,
then they are off. Proceed to the next step.
3
4
5
6
7
8
9
CHECK FOR GAS LEAKS
WARNING: The gas connections of your Summit® gas grill
have been factory tested. We do however recommend that
you leak check all gas connections before operating your
Summit® gas grill.
REMOVE CONTROL PANEL
Part required: Phillips Screwdriver.
1) Remove the burner control knobs.
WWW.WEBER.COM®
GAS INSTRUCTIONS
9
9
2) Remove the two screws that secure the control panel to the frame.
3) Remove the control panel. Tilt panel forward and lift up and away from grill.
Completely remove the control panel (3) from the cooking box assembly exposing the
valves, burners, igniter, and manifold.
2
3
1
CHECK FOR GAS LEAKS
DANGER
Do not use an open flame to check for gas leaks. Be sure
there are no sparks or open flames in the area while you
check for leaks. Sparks or open flames will result in a fire or
explosion which can cause serious bodily injury or death
and damage to property.
WARNING: You should check for gas leaks every time you
disconnect and reconnect a gas fitting.
Note: All factory-made connections have been thoroughly checked for gas leaks. The
burners have been flame-tested. As a safety precaution however, you should recheck
all fittings for leaks before using your Weber® gas barbecue. Shipping and handling may
loosen or damage a gas fitting.
WARNING: Perform these leak checks even if your barbecue
was dealer or store assembled.
You will need: a soap and water solution, and a rag or brush to apply it.
Turn on gas supply (A).
Check for leaks by wetting the connections with the soap and water solution and
watching for bubbles. If bubbles form or if a bubble grows, there is a leak.
Note: Since some leak test solutions, including soap and water, may be slightly
corrosive, all connections should be rinsed with water after checking for leaks.
WARNING: Do not ignite burners when leak checking.
WWW.WEBER.COM®
A
10
GAS INSTRUCTIONS
Check:
1)
2)
3)
4)
5)
Main gas line to manifold connection.
Rotisserie (I.R. Burner) gas line connection.
Bulkhead and gas supply hose connection.
Bulkhead to regulator connection.
Regulator to hose connection.
WARNING: If there is a leak at connection (1, 2, 3, 4, or 5),
retighten the fitting with a wrench and recheck for leaks
with soap and water solution.
If a leak persists after re-tightening the fitting, turn off the gas.
DO NOT OPERATE THE GRILL. Contact the Customer Service
Representative in your area using the contact information on
our web site. Log onto www.weber.com®.
6)
7)
2
1
Gas supply to shutoff connection.
Valves to manifold connections.
WARNING: If there is a leak at connections (6 or 7), turn
off the gas. DO NOT OPERATE THE GRILL. Contact the
Customer Service Representative in your area using the
contact information on our web site. Log onto
www.weber.com®.
When leak checks are complete, turn gas supply off at the source and
rinse connections with water.
REINSTALL CONTROL PANEL
Parts required: control panel, screws and burner control knobs.
Hook the top edge of the control panel onto the control panel brackets
on either side of the front of the cooking box.
Line up screws with screw holes on both the control panel bracket and
the frame. Tighten screws.
Place corresponding control knobs onto the valve stems.
3
4
5
7
6
*The grill illustrated may have
slight differences than the
model purchased.
WWW.WEBER.COM®
OPERATING INSTRUCTIONS
GRILLING METHODS
Note: If grill looses heat while cooking refer to the troubleshooting section of this manual.
You can adjust the individual burners as desired. The control settings are START/HI,
MEDIUM, LOW, or OFF.
If burners go out during cooking, turn off all burners and wait 5 minutes before relighting.
11
11
ARRÊTÉ
OFF
APAGADO
WARNING: Check the bottom tray and catch pan for grease
build-up before each use. Remove excess grease to avoid a
grease fire in the bottom tray.
Preheating
Preheating the grill before grilling is important. Light your Summit® gas grill according to
the instructions in this Owner’s Manual. Turn all of the main burners to Start/Hi, close
the lid, and preheat grill with the lid down until grill thermometer reaches 550ºF (260˚288˚C).This is the recommended broiling temperature. This will take approximately 10
to 15 minutes, depending on outside temperatures.
Covered cooking
All grilling is done with the lid down to provide uniform, evenly circulated heat. With the
lid closed, the Summit® gas grill cooks much like a convection oven. The thermometer
in the lid indicates the cooking temperature inside the grill. All preheating and grilling is
done with the lid down. No peeking — heat is lost every time you lift the lid.
C
D
B
D.
C.
B.
A.
OFF
START/
HI
MED.
LOW
Flavorizer® system
When meat juices drip from the food onto the specially angled Flavorizer® bars,
they create smoke that gives foods an irresistible barbecued flavor. Thanks to the
unique design of the burners, Flavorizer® bars and the flexible temperature controls,
uncontrolled flare-ups are virtually eliminated, because YOU control the flames.
Because of the special design of the Flavorizer® bars and burners, excess fats are
directed through the funnel-shaped bottom tray into the grease catch pan.
The most important thing to know about grilling is which cooking method to use for a
specific food, Direct or Indirect. The difference is simple: place the food directly over the
fire, or arrange the fire on either side of it. Using the right method is the shortest route to
great results—and the best way to ensure doneness safety.
DIRECT COOKING
The Direct Method, similar to broiling, means the food is cooked directly over the heat
source. For even cooking, food should be turned once halfway through the grilling time.
Use the Direct method for foods that take less than 25 minutes to cook: steaks, chops,
kabobs, sausages, vegetables, and more.
Direct cooking is also necessary to sear meats. Searing creates that wonderful crisp,
caramelized texture where the food hits the grate. It also adds great color and flavor to
the entire surface. Steaks, chops, chicken breasts, and larger cuts of meat all benefit
from searing.
To sear meats, place them over Direct High heat for 2 to 5 minutes per side. Smaller
pieces require less searing time. Usually after searing you finish cooking the food at a
lower temperature. You can finish cooking fast-cooking foods by the Direct method; use
the Indirect method for longer-cooking foods.
To set up your gas grill for Direct cooking, preheat the grill with all burners on “HI”. Place
food on the cooking grate, and then adjust all burners to the temperature noted in the
recipe. Close the lid of the grill and lift it only to turn food or to test for doneness at the
end of the recommended cooking time.
1
2
3
4
INDIRECT COOKING
The Indirect Method is similar to roasting, but with the added benefits of that grilled
texture, flavor, and appearance you can’t get from an oven. To set up for Indirect
cooking, gas burners are lit on either side of the food but not directly beneath it. Heat
rises, reflects off the lid and inside surfaces of the grill, and circulates to slowly cook the
food evenly on all sides, much like a convection oven, so there’s no need to turn the
food.
Use the Indirect method for foods that require 25 minutes or more of grilling time or that
are so delicate that direct exposure to the flame would dry them out or scorch them.
Examples include roasts, ribs, whole chickens, turkeys, and other large cuts of meat, as
well as delicate fish fillets.
To set up your gas grill for Indirect cooking, preheat the grill with all burners on “HI”.
Then adjust the burners on each side of the food to the temperature noted in the recipe
and turn off the burner(s) directly below the food. For best results, place roasts, poultry,
or large cuts of meat on a roasting rack set inside a disposable heavy-gauge foil pan.
For longer cooking times, add water to the foil pan to keep drippings from burning. The
drippings can be used to make gravies or sauces.
WWW.WEBER.COM®
A
1
4
12
OPERATING INSTRUCTIONS
GRILLING TIPS & HELPFUL HINTS
• Always preheat the grill before cooking. Set all burners on “HI” heat and close lid;
heat for 10 minutes, or until thermometer registers 500˚-550˚F (260˚-288˚C).
• Sear meats and cook with the lid down for perfectly grilled food every time.
• Grilling times in recipes are based on 70˚F (20˚C) weather and little or no wind. Allow
more cooking time on cold or windy days, or at higher altitudes. Allow less cooking
time in extremely hot weather.
• Grilling times can vary because of the weather, or the amount, size and shape of the
food being grilled.
• The temperature of your Summit® gas grill may run hotter than normal for the first few
uses.
• Grilling conditions may require the adjustment of the burner controls to attain the
correct cooking temperatures.
• In general, large pieces of meat will require more cooking time per pound than small
pieces of meat. Foods on a crowded cooking grate will require more cooking time
than just a few foods. Foods grilled in containers, such as baked beans, will require
more time if grilled in a deep casserole rather than a shallow baking pan.
• Trim excess fat from steaks, chops and roasts, leaving no more than a scant ¼ inch
(6.4mm) of fat. Less fat makes cleanup easier, and is a virtual guarantee against
unwanted flare-ups.
• Foods placed on the cooking grate directly above burners may require turning or
moving to a less hot area.
• Use tongs rather than a fork for turning and handling meats to avoid losing natural
juices. Use two spatulas for handling large whole fish.
• If an unwanted flare-up should occur, turn all burners off and move food to another
area of the cooking grate. Any flames will quickly subside. After flames subside,
relight the grill. NEVER USE WATER TO EXTINGUISH FLAMES ON A GAS GRILL.
• Some foods, such as a casserole or thin fish fillets, will require a container for grilling.
Disposable foil pans are very convenient, but any metal pan with ovenproof handles
can also be used.
• Always be sure the bottom tray and grease catch pan are clean and free from debris.
• Do not line the funnel-shaped bottom tray with foil. This could prevent the grease
from flowing into the grease catch pan.
• Using a timer will help to alert you when “well-done” is about to become “over-done.”
SNAP IGNITION OPERATION
Always open the lid before igniting the burners
Each control knob has its own igniter electrode built in. To create a spark you must push
the control knob in (A) and turn to “START/High” (B).
This action will generate gas flow and a spark to the burner lighting tube (C). You will
hear a “snap” from the igniter. You will also see a 3˝ - 5˝ orange flame coming from the
burner lighting tube at the left side of the burner (D).
Continue to hold the burner control knob in for two seconds after the “snap”. This
will allow gas to flow completely down the burner tube (E) and insure ignition.
B
Check that the burner is lit by looking through the cooking grates. You should see a
flame. If burner does not light on first try, push control knob in and turn to OFF.Repeat
lighting procedure a second time.
WARNING: If the burner still does not light, turn the burner
control knob to “OFF” and wait 5 minutes to let the gas clear
before you try again or try to light with a match.
A
E
D
C
WWW.WEBER.COM®
OPERATING INSTRUCTIONS
LIGHTING
Summary lighting instructions are inside the left hand cabinet door.
13
13
MAIN BURNER LIGHTING
DANGER
Failure to open the lid while igniting the barbecue’s burners,
or not waiting 5 minutes to allow the gas to clear if the
barbecue does not light, may result in an explosive flame-up
which can cause serious bodily injury or death.
1
5
MAIN BURNER SNAP IGNITION
Note: Each control knob snap igniter creates a spark from the igniter electrode to the
burner lighting tube. You generate the energy for the spark by pushing in the control
knob and turning to “START/HI”. This will ignite each individual burner.
WARNING: Check hose before each use of barbecue for
nicks, cracking, abrasions or cuts. If the hose is found to
be damaged in any way, do not use the barbecue. Replace
using only Weber® authorized replacement hose. Contact the
Customer Service Representative in your area using the contact
information on our web site. Log onto www.weber.com®.
1)
2)
3)
2 4
*The grill illustrated may have
slight differences than the
model purchased.
Open the lid.
Make sure all burner control knobs are turned to “OFF”. (Push control knob in and
turn clockwise to ensure that it is in the “OFF” position.)
Turn on the gas supply at source.
3
2
4
WARNING: Do not lean over the open barbecue.
4)
5)
Push the control knob in and turn to “START/HI” until you hear the igniter snap
- continue to hold control knob in for two seconds. This action will spark the igniter,
the burner lighting tube and then main burner.
Check that the burner is lit by looking through the cooking grates. You should see
a flame. If burner does not light on first try, push control knob in and turn to OFF.
Repeat lighting procedure a second time.
WARNING: If the burner still does not light, turn the burner
control knob to “OFF” and wait 5 minutes to let the gas clear
before you try again or try to light with a match.
MAIN BURNER MANUAL LIGHTING
DANGER
Failure to open the lid while igniting the barbecue’s burners,
or not waiting 5 minutes to allow the gas to clear if the
barbecue does not light, may result in an explosive flame-up
which can cause serious bodily injury or death.
1)
2)
3)
4)
TO EXTINGUISH
Push in and turn each burner control knob clockwise to “OFF” position. Turn gas supply
off at the source.
MAIN BURNER MANUAL LIGHTING
1
6
Open the lid.
Make sure all burner control knobs are turned to “OFF”. (Push each knob in and
turn clockwise to ensure they are in the “OFF” position.)
Turn on the gas supply at source.
Put match in the match holder and strike match.
WARNING: Do not lean over open barbecue.
5)
6)
Insert match holder and lit match down through cooking grates and Flavorizer®
bars to ignite the selected burner.
Push the control knob in and turn to “START/HI”.
WARNING: If the burner does not light, turn burner control
knob to “OFF” and wait 5 minutes to let the gas clear before
you try again.
2 5
*The grill illustrated may have
slight differences than the
model purchased.
3
TO EXTINGUISH
Push in and turn each burner control knob clockwise to “OFF” position. Turn gas
supply off at the source.
WWW.WEBER.COM®
2
5
14
OPERATING INSTRUCTIONS
USING THE SMOKER
The smoker uses presoaked wood chips. For best results with faster cooking foods like
steaks, burgers and chops, etc., we recommend using finer wood chips because they
ignite and create smoke faster. For longer cooking foods such as roasts, chicken and
turkeys, etc., we recommend using larger wood chunks because they ignite slowly and
provide smoke for a longer period of time. As you gain experience in using your smoker,
we encourage you to experiment with different combinations of wood chips and chunks
to find the smoke flavor that best suits your taste.
(1)
To Use the Smoker
As a starting point, soak wood chips in water for at least 30 minutes before using.
(Wet wood will produce more smoke flavor.) Place a handful of wood chips or a few
larger chunks in the bottom of the smoker body (1). As you gain experience in smoking,
increase or decrease the amount of wood to suit your taste.
Note: Always grill with the lid closed to allow the smoke to fully penetrate the food.
Light the smoker burner by following the instructions for Lighting The Smoker Burner
After wood starts to smolder turn control knob to “LOW”.
Smoke will start in approximately 10 minutes and last as long as 45 minutes. If you
require more smoke flavor, refill the smoker with wood chips and /or chunks. Keep the
lid of the grill closed while cooking.
Note: After refilling smoker, smoke will take about 10 to 15 minutes to start again.
The smoker may be used to enhance meat, poultry and fish recipes. Cook with the lid
down according to the times indicated in charts or recipes.
DANGER
Do not use any flammable fluid in the smoker to ignite the
wood. This will cause serious bodily injury.
Cleaning the smoker
Before each use, empty the smoker of ash to allow proper air flow.
Note: Smoking will leave a “smoke” residue on the surface of the smoker. This residue
cannot be removed and will not affect the function of the smoker. To a lesser degree a
“smoke” residue will accumulate on the inside of your gas grill. This residue need not be
removed and will not adversely affect the function of your gas grill.
LIGHTING THE SMOKER BURNER
1
DANGER
Failure to open the lid while igniting the grill, or not waiting
5 minutes to allow the gas to clear if the grill does not light,
may result in an explosive flare-up which can cause serious
bodily injury or death.
2
3
8
7
SMOKER BURNER SNAP IGNITION
Note: The control knob snap igniter creates a spark from the igniter electrode to the
burner lighting tube. You generate the energy for the spark by pushing in the control
knob and turning to “START/HI”. This will ignite the smoker burner.
WARNING: Check hose before each use of grill for nicks,
cracking, abrasions or cuts. If the hose is found to be damaged
in any way, do not use the grill. Replace using only Weber®
authorized replacement hose. Contact the Customer Service
Representative in your area using the contact information on
our web site. Log onto www.weber.com®.
4
6
*The grill illustrated may have slight differences
than the model purchased.
1)
2)
3)
4)
Open the grill lid.
Open smoker box lid.
Fill smoker with water soaked wood chunks or chips.
Make sure all burner control knobs are turned to “OFF”. (Push control knob in and
turn clockwise to ensure that it is in the “OFF” position.)
5) Turn on the gas at source.
4
5
6
WARNING: Do not lean over the open grill while lighting.
6) Push the control knob in and turn to “START/HI” until you hear the igniter snap
- continue to hold control knob in for two seconds. This action will spark the igniter,
the burner lighting tube and then main burner.
7) Check that the burner is lit by looking through the cooking grates. You should see
a flame. If burner does not light on first try, push control knob in and turn to OFF.
Repeat lighting procedure a second time
DANGER
If the smoker burner does not light, turn the burner control
knob to “OFF” and wait 5 minutes to let the gas clear before
attempting to light.
8) Close smoker cover after wood starts to smolder and turn control knob to “LOW”.
TO EXTINGUISH
Push in and turn each burner control knob clockwise to “OFF” position. Turn gas supply
off at the source.
WWW.WEBER.COM®
OPERATING INSTRUCTIONS
15
15
MANUALLY LIGHTING THE SMOKER BURNER
1)
Open the lid.
1
DANGER
Failure to open the lid while igniting the grill, or not waiting
5 minutes to allow the gas to clear if the grill does not light,
may result in an explosive flare-up which can cause serious
bodily injury or death.
7
2
3
9
10
2)
3)
4)
5)
6)
7)
Open smoker box lid
Fill smoker with water soaked wood chunks or chips.
Make sure all burner control knobs are turned to “OFF”. (Push control knob in and
turn clockwise to ensure that it is in the “OFF” position.)
Turn on the gas at source.
Put a match in the match holder and strike the match.
Insert match holder and lit match down through cooking grates and Flavorizer®
bars to ignite smoker burner.
4
8
WARNING: Do not lean over the open grill while lighting.
8)
9)
Push smoker burner control knob in and turn to “START/HI”.
Check that the burner is lit by looking down through the cooking grate.
*The grill illustrated may have
slight differences than the
model purchased.
DANGER
If the smoker burner does not light, turn the burner control
knob to “OFF” and wait 5 minutes to let the gas clear before
you try again.
10)
4
5
8
Close smoker cover after wood starts to smolder and turn control knob to “LOW”.
TO EXTINGUISH
Push in and turn each burner control knob clockwise to “OFF” position. Turn gas
supply off at the source.
USING THE ROTISSERIE
Note: Before using your rotisserie, measure your food at the widest point. If it exceeds
9½” (241.8mm), it is too large to fit the rotisserie. If it is too large, food can be prepared
using a roast holder and the Indirect Cooking Method.
IMPORTANT SAFEGUARDS
WARNINGS
•
Read all instructions before using your rotisserie.
•
This rotisserie is for outdoor use only.
•
Remove motor and store in a dry place when not in use.
•
Do not touch hot surfaces. Use barbecue mitts.
•
This rotisserie is not for use by children.
•
To protect against electrical hazards do not immerse cord,
plugs, or motor in water or other liquids.
•
Unplug the motor from outlet when not in use or before
cleaning.
•
Do not use rotisserie for other than intended use.
•
Make sure motor is off before placing it on the motor
bracket.
•
Do not operate the rotisserie motor with a damaged cord or
plug.
•
Do not operate the rotisserie motor if it should malfunction.
•
The rotisserie motor is equipped with a three prong
(grounding) power cord for your protection against shock
hazard.
•
The power cord should be plugged directly into a
properly grounded three prong receptacle. If use of an
extension cord is required, be sure that it is a minimum
16 AWG(1.3mm), 3-wire, well insulated cord marked for
WWW.WEBER.COM®
•
•
•
•
•
•
•
•
OUTDOOR USE ONLY and properly grounded.
When using an extension cord, make sure it is not in
contact with a hot or sharp surface.
Outdoor extension cords should be marked with the letters
“W-A” and a tag stating “Suitable for use with outdoor
appliances”.
Do not cut or remove the grounding prong from the
rotisserie motor power cord.
Do not let cord hang over any sharp edge or hot surface.
Do not expose to rain.
To reduce the risk of electric shock, keep extension cord
connection dry and off the ground.
A short power cord is supplied to reduce the risk of
tripping over the cord. Extension cords may be used, but
caution must be taken to prevent tripping over the cord.
In absence of local codes the rotisserie motor must be
grounded electrically in accordance with the National
Electric Code, ANSI / NFPA 70, or Canadian Electrical Code,
CSA C22.1.
16
OPERATING INSTRUCTIONS
WARNING: Setup up the rotisserie with food before lighting
rotisserie burner.
COOKING
•
OPERATING
1)
2)
3)
4)
5)
6)
7)
Remove rotisserie shaft from grill. Remove one spit fork.
Push the rotisserie shaft through the center of the food.
Slide the spit fork onto the shaft. Insert the tines of both spit forks into the food.
The food should be centered on the shaft. Tighten the spit fork screws
Place the motor in the bracket, slide to lock.
Insert the pointed end of the rotisserie shaft into the motor. Place the handle end
of the rotisserie onto the support rollers.
The rotisserie shaft should rotate so that the heavy side of the meat or poultry
rotates down to the bottom. Large cuts may require the removal of the cooking
grates and warming rack to allow full rotation of the shaft. Remount the food if
necessary for better balance.
Turn the motor on.
•
•
•
•
•
•
•
•
•
•
Meats (except poultry and ground meat) should be brought to room temperature
before cooking. (20 to 30 minutes should be adequate for most foods. If frozen
defrost completely before cooking.)
Tie meat or poultry with a string, if necessary, to make the shape as uniform as
possible before putting it on the spit.
Remove cooking grates and warming rack to allow food to turn freely.
Follow lighting instructions for rotisserie burner on next page.
Set rotisserie burner on medium-high based on outside air temperatures.
Place food within area of burner.
If you wish to save drippings for gravy, place a drip pan directly under the food on
top of the Flavorizer® bars.
Food preparation steps are the same for rotisserie cooking as for regular
cooking.
All cooking is done with the lid closed.
If foods are too heavy or are irregular shapes, they may not rotate well and
should be cooked by the Indirect Method without using the rotisserie.
Smoker can be used in conjunction with rotisserie for more smoke flavor.
Note: When using the rotisserie burner, grill thermometer will not reflect the
temperature inside the cooking box.
LIGHTING THE ROTISSERIE BURNER
ROTISSERIE BURNER SNAP IGNITION
Note: Each control knob snap igniter creates a spark from the igniter electrode to the
burner lighting tube. You generate the energy for the spark by pushing in the control
knob and turning to “START/HI”. This will ignite each individual burner.
ATTENTION: READ BEFORE
LIGHTING ROTISSERIE BURNER
After a period of non-use, before lighting the Rotisserie
Burner, a few seconds must pass for the gas supply line to
fill.
When using the snap igniter you will see a flash of flames
moving from left to right across the Rotisserie Burner
surface, the Rotisserie Burner is not lit until the entire
ceramic surface is aflame.
At this point, start a count of 20 seconds before releasing the
Rotisserie Burner control knob.
The Rotisserie Burner surface will glow red once the burner
is fully ignited.
1
2
6
5
3
*The grill illustrated may have
slight differences than the
model purchased.
DANGER
Failure to open the lid while igniting the grill, or not waiting
5 minutes to allow the gas to clear if the grill does not light,
may result in an explosive flare-up which can cause serious
bodily injury or death.
3
4
5
CAUTION: The Rotisserie Burner flame may be difficult to
see on a bright sunny day.
WARNING: Check hose before each use of grill for nicks,
cracking, abrasions or cuts. If the hose is found to be damaged
in any way, do not use the grill. Replace using only a Weber®
authorized replacement hose. Contact the Customer Service
Representative in your area using the contact information on
our web site. Log onto www.weber.com®.
1)
2)
3)
4)
Open the lid.
Remove the warming rack and the cooking grates from the cookbox.
Make sure all burner control knobs are turned to “OFF”. (Push control knob in and
turn clockwise to ensure that it is in the “OFF” position.)
Turn on the gas at source.
WARNING: Do not lean over the open grill.
5)
6)
Push the control knob in and turn to “START/HI”. This action will spark the
igniter and light the Rotisserie Burner. Continue to use the snap igniter until the
Rotisserie Burner has ignited. Release the control knob.
Check that the burner is lit by looking for the rotisserie burner to glow red.
WARNING: If the rotisserie burner does not light, turn the
burner control knob to “OFF” and wait 5 minutes to let the
gas clear before you try again or try to light with a match.
Note: When using the rotisserie with the lid closed, only light two of the main burners
on each side of the food (See Grilling Methods-Indirect Cooking). Check your food
periodically to prevent over cooking on the outside. Turn off the rotisserie burner once
the food has browned to the desired color. Finish cooking on Indirect heat.
TO EXTINGUISH
Push in and turn the rotisserie burner control knob clockwise to “OFF” position. Turn gas
supply off at the source.
WWW.WEBER.COM®
OPERATING INSTRUCTIONS
17
MANUALLY LIGHTING THE ROTISSERIE BURNER
ATTENTION: READ BEFORE
LIGHTING ROTISSERIE BURNER
After a period of non-use, before lighting the Rotisserie
Burner, a few seconds must pass for the gas supply line to
fill. When holding a match to the rotisserie burner you will
see a flash of flames moving from left to right across the
Rotisserie Burner surface, the Rotisserie Burner is not lit
until the entire ceramic surface is aflame. At this point, start
a count of 20 seconds before releasing the Rotisserie Burner
control knob. The Rotisserie Burner surface will glow red
once the burner is fully ignited.
6
17
1
2
8
7
DANGER
Failure to open the lid while igniting the grill, or not waiting
5 minutes to allow the gas to clear if the grill does not light,
may result in an explosive flare-up which can cause serious
bodily injury or death.
3
*The grill illustrated may have
slight differences than the
model purchased.
CAUTION: The Rotisserie Burner flame may be difficult to
see on a sunny day.
WARNING: Check hose before each use of grill for nicks,
cracking, abrasions or cuts. If the hose is found to be damaged
in any way, do not use the grill. Replace using only a Weber®
authorized replacement hose. Contact the Customer Service
Representative in your area using the contact information on
our web site. Log onto www.weber.com®.
1)
2)
3)
4)
5)
6)
Open the lid.
Remove the warming rack and the cooking grates from the cookbox.
Make sure all burner control knobs are turned to “OFF”. (Push control knob in and
turn clockwise to ensure that it is in the “OFF” position.)
Turn on the gas at source.
Put a match in the match holder and strike the match.
Hold match holder and lit match by right side of rotisserie burner.
WARNING: Do not lean over the open grill.
7)
8)
Push rotisserie burner control knob down and turn to “START/HI”. Continue to
hold the control knob down until twenty (20) seconds after the burner has ignited.
Check that the burner is lit by looking for the rotisserie burner to glow red.
WARNING: If the rotisserie burner does not light, turn the
burner control knob to “OFF” and wait 5 minutes to let the
gas clear before you try again.
WWW.WEBER.COM®
3
4
7
Note: When using the rotisserie with the lid closed, only light two of the main burners
under the food (See Grilling Methods-Indirect Cooking). Check your food periodically
to prevent over cooking on the outside. Turn off the rotisserie burner once the food has
browned to the desired color. Finish cooking on Indirect heat.
TO EXTINGUISH
Push in and turn the rotisserie burner control knob clockwise to “OFF” position. Turn gas
supply off at the source.
TROUBLESHOOTING
18
PROBLEM
CHECK
CURE
Burners burn with a yellow or orange flame, in
conjunction with the smell of gas (This is normal
for the burner lighting tube).
Inspect Spider/Insect Screens for possible obstructions.
(Blockage of holes.)
Clean Spider/Insect Screens. (See Section “Annual
Maintenance”)
Symptoms:
Burner does not light, or flame is low in “HI”
position.
Is fuel hose bent or kinked?
Straighten fuel hose.
Does Burner light with a match?
If you can light Burner with a match, then check the
Crossover® ignition system.
Did you use the snap igniter several times until the main
burner lit (See Lighting Instructions)?
Make sure to hold the control knob in for two seconds after
snapping the igniter and seeing the orange flame from the
burner lighting tube.
Does the igniter work (Do you see a spark when you
repeatedly use the snap igniter?
Try manually lighting the burner (refer to “Main Burner
Manual Lighting”). Call customer service.
Are you preheating barbecue in the prescribed manner?
All burners on HI for 10 to 15 minutes for preheating.
Are the cooking grates and Flavorizer® bars heavily
coated with burned-on grease?
Clean thoroughly. (See Section “Cleaning”)
CAUTION: Do not line the bottom tray
with aluminum foil.
Is the bottom tray “dirty” and not allowing grease to flow
into catch pan?
Clean bottom tray.
Burner flame pattern is erratic. Flame is low when
burner is on “HI”. Flames do not run the whole
length of the burner tube.
Are burners clean?
Clean burners. (See Section “Maintenance”.)
Inside of lid appears to be “peeling.” (Resembles
paint peeling.)
The lid is porcelain enamel or stainless steel, not paint. It
cannot “peel”. What you are seeing is baked on grease
that has turned to carbon and is flaking off.
THIS IS NOT A DEFECT.
Clean thoroughly. (See Section “Cleaning”.)
Experiencing flare-ups:
If problems cannot be corrected by using these methods, please contact the Customer Service Representative in your area using the contact information on our web
site. Log onto www.weber.com®.
a
OPERATING THE HANDLE LIGHT
The Weber Grill Out™ Handle Light has a built-in “Tilt Sensor.” With the power button (a) activated, the light will come on when the grill lid is open. The light will turn off when the lid
is closed. For daytime use, deactivate the sensor by pressing power button (a).
HANDLE LIGHT TROUBLESHOOTING
PROBLEM
Weber Grill Out™ Handle
Light does not light.
CHECK
Are the batteries old?
CURE
Replace batteries.
Are the batteries installed correctly?
See assembly illustration.
Is the lid in the up position with the power button ON?
Light will activate when lid is open.
Is the Weber Grill Out™ Handle Light activated?
Press the power button.
™
Is the Weber Grill Out Handle Light positioned correctly on the handle?
Adjust position (See assembly illustration).
If problems cannot be corrected by using these methods, please contact the Customer Service Representative in your area using the contact information on our web
site. Log onto www.weber.com®.
WWW.WEBER.COM®
ROTISSERIE TROUBLESHOOTING
PROBLEM
Rotisserie burner does not light.
CHECK
19
19
CURE
Did you hold the burner control knob in and
hold in for 20 seconds until after burner
ignited?
Try to relight burner by holding burner control knob in and continue holding in until
20 seconds after burner has ignited.
Did you wait to see the entire ceramic surface
become alight before counting 20 seconds?
When relighting burner by holding burner control knob in, wait to see the entire
ceramic surface become alight before counting 20 seconds?
Did you repeatedly use the snap ignition until
the burner ignited?
After waiting five minutes for gas to clear, try repeatedly using the snap igniter until
the burner ignites (refer to “Lighting the Rotisserie Burner”).
Does the igniter work (Do you see a spark
when you repeatedly use the snap igniter?
Try manually lighting the burner (refer to “Lighting the Rotisserie Burner”). Call
customer service.
If problems cannot be corrected by using these methods, please contact the Customer Service Representative in your area using the contact information on our
web site. Log onto www.weber.com®.
MAINTENANCE
WEBER® SPIDER /INSECT SCREENS
Your Weber® gas barbecue, as well as any outdoor gas appliance, is a target for spiders
and other insects. They can nest in the venturi section (1) of the burner tubes. This
blocks the normal gas flow, and can cause the gas to flow back out of the combustion
air opening. This could result in a fire in and around the combustion air openings, under
the control panel, causing serious damage to your barbecue.
The burner tube combustion air opening is fitted with a stainless steel screen (2) to
prevent spiders and other insects access to the burner tubes through the combustion air
openings.
We recommend that you inspect the Spider/Insect screens at least once a year.
(See Section “Annual Maintenance”.) Also inspect and clean the the Spider/Insect
screens if any of the following symptoms should ever occur:
1)
The smell of gas in conjunction with the burner flames appearing yellow and lazy.
2)
Barbecue does not reach temperature.
3)
Barbecue heats unevenly.
4)
One or more of the burners do not ignite.
DANGER
Failure to correct the above mentioned symptoms may result
in a fire, which can cause serious bodily injury or death, and
cause damage to property.
WWW.WEBER.COM®
1
2
20
MAINTENANCE
MAIN BURNER CLEANING PROCEDURE
Turn off the gas supply.
Remove the manifold (See “Replace Main Burners”).
Look inside each burner with a flashlight.
Clean the inside of the burners with a wire (a straightened-out coat hanger will work).
Check and clean the air shutter opening at the ends of the burners. Check and clean
the valve orifices at the base of the valves. Use a Steel bristle brush to clean outside of
burners. This is to make sure all the burner ports are fully open.
CAUTION: Do not enlarge the burner ports when cleaning.
REPLACE MAIN BURNERS
1)
2)
3)
4)
5)
6)
Your Summit® gas grill must be off and cool.
Turn gas off at source.
Disconnect gas supply.
Remove cooking grates.
Remove smoker box.
Remove Flavorizer® bars.
REMOVE CONTROL PANEL
7)
Part required: Phillips Screwdriver.
a) Remove the burner control knobs.
b) Remove the two screws that secure the control panel to the frame.
c) Remove the control panel. Tilt panel forward and lift up and away from grill.
Completely remove the control panel from the cooking box assembly exposing the
valves, burners, igniter, and manifold.
a
b
c
WWW.WEBER.COM®
MAINTENANCE
21
21
8)
Remove the two screws that secure the manifold to the cookbox. Pull manifold
assembly out from the manifold frame.
9) Pull the selected burner(s) tube(s) from manifold frame and replace with a new
burner tube.
10) To reinstall the manifold assembly, reverse steps 7 through 9.
CAUTION: The burner openings (A) must be positioned
properly over the valve orifices (B).
Make sure the opposite end of the burner tubes (C) properly
align into the slots on the backside of the cookbox. Check
proper assembly before fastening manifold in place.
WARNING: After reinstalling the gas lines, they should be
leak checked with a soap and water solution before using
the grill. (See, “Check for gas leaks.”)
9
8
C
B
A
AnnNNUAL MAINTENANCE
Inspection and cleaning of the Spider/Insect screens
To inspect the Spider/Insect screens, remove the control panel. If there is dust or dirt on
the screens, remove the burners for cleaning the screens.
Brush the Spider/Insect screens lightly with a soft bristle brush (i.e. an old toothbrush).
CAUTION: Do not clean the Spider/Insect screens with hard
or sharp tools. Do not dislodge the Spider/Insect screens or
enlarge the screen openings.
Lightly tap the burner to get debris and dirt out of the burner tube. Once the Spider/
Insect screens and burners are clean replace the burners.
If the Spider/Insect screen becomes damaged or cannot be cleaned, please contact the
Customer Service Representative in your area using the contact information on our web
site. Log onto www.weber.com®.
MAIN BURNER FLAME PATTERN
The Weber® gas barbecue burners have been factory set for the correct air and gas
mixture. The correct flame pattern is shown.
1)
Burner tube
2)
Tips occasionally flicker yellow
3)
Light blue
4)
Dark blue
If the flames do not appear to be uniform throughout the burner tube, follow the burner
cleaning procedures.
WWW.WEBER.COM®
1
2
3
4
ATTENTION: This product has been safety tested and is only certified for use in a specific country. Refer to country designation
located on outer carton.
These parts may be gas carrying or gas burning components. Please contact Weber-Stephen Products Co., Customer Service Department for genuine Weber-Stephen
Products Co. replacement part(s) information.
WARNING: Do not attempt to make any repair to gas carrying or gas burning components without contacting Weber-Stephen
Products Co., Customer Service Department. Your actions, if you fail to follow this product Warning, may cause a fire or an
explosion resulting in serious personal injury or death and damage to property.
WEBER-STEPHEN PRODUCTS CO.
www.weber.com®
©2007 The following trademarks are registered in the name of Weber-Stephen Products Co., an Illinois corporation, located at 200 East Daniels Road, Palatine, Illinois 60067 U.S.A.
Australia; Smokey Joe, Weber, Kettle Silhouette , Genesis, Austria; Kettle Silhouette , Smokey Joe, Weber, Benelux; Kettle Silhouette , Smokey Joe, Weber, Compact Grill Configuration, Botswana; Weber, Canada; Smokey Joe, Genesis, China; Kettle Silhouette , Denmark; Kettle Silhouette , Smokey Joe, Weber, Finland; Smokey Joe, France; Kettle Silhouette ,
Smokey Joe, Weber, One-Touch, Germany; Smokey Joe, Weber, One-Touch, Greece; Smokey Joe, Ireland; Kettle Silhouette , Smokey Joe, Italy; Smokey Joe, Weber, Japan; Smokey
Joe, Weber, Korea; Smokey Joe, Weber, New Zealand; Weber, Smokey Joe, Nigeria; Weber, Norway; Smokey Joe, Weber, Portugal; Weber, South Africa: Smokey Joe, Weber, Kettle
Configuration, Spain; Smokey Joe, Weber, Sweden; Kettle Silhouette , Smokey Joe, Switzerland; Kettle Silhouette , Smokey Joe, Weber, United Kingdom; Smokey Joe, Weber, Weber
One-Touch, U.S.A..; Kettle Configuration, Kettle Silhouette , Smokey Joe, Weber, One-Touch, Firespice, Go-Anywhere, U.S.A.;Kettle Configuration, Kettle Silhouette, Genesis, Flavorizer, Crossover, Flamgo, Performer, Rapidfire, Tuck ‘N Carry, Jumbo Joe, Bar-B-Kettle, Master-Touch, Spirit, Grill Out, Summit, Platinum, 1-800-Grill-Out, Ranch, Matchless Flame,
Zimbabwe; Weber, Kettle Configuration, Kettle Silhouette .
®
®
®
®
®
®
®
®
®
®
®
▲
FOUR GOOD REASONS TO REGISTER YOUR WEBER® GRILL RIGHT NOW
CUATRO BUENAS RAZONES PARA REGISTRAR SU ASADOR WEBER® AHORA MISMO
QUATRE BONNES RAISONS D’ENREGISTRER VOTRE GRILL WEBER® DES MAINTENANT
Register your grill online at www.weber.com® (If you register online, you do not need to send in this registration card.)
Registre su asador en línea en www.weber.com® (Si usted se registra en línea, no necesita enviar esta tarjeta de registro.)
Enregistrez votre grill en ligne sur www.weber.com® (Si vous vous inscrivez en ligne, vous n’avez pas besoin de retourner la
présente carte d’enregistrement.)
Spring. Summer. Fall. Winter. Four FREE issues of Weber Nation™, our hot e-mail newsletter all about grilling, will be coming your way. Each issue is packed with grilling tips and advice, triple-tested recipes, and
everything you need to know to become a bona fide Weber Grilling Guru. All you have to do to activate your subscription is log on to www.weber.com and register your grill. We’ll ask you a few short questions about
the kind of food you like to grill and the topics that interest you so we can serve up your newsletter just the way you like it. Whether you are just starting out or a practiced hand at the grill, you’ll get just what you need
to perfect your skills. So don’t put it off. Register now. Your hunger (and your pride) will thank you for it.
®
Primavera. Verano. Otoño. Invierno. Le estarán llegando cuatro ediciones GRATUITAS de Weber Nation™, nuestro candente boletín por correo electrónico acerca de todo lo concerniente a cocinar con asadores.
Cada edición viene repleta con sugerencias y consejos prácticos respecto al cocinar con asadores, recetas probadas por triplicado, además de todo lo que usted necesita saber para convertirse en un genuino Guru
Weber en Asar. Lo único que necesita hacer para activar su suscripción es conectarse a www.weber.com y registrar su asador. Le preguntaremos algunas breves preguntas sobre el tipo de comidas que le gusta
asar y sobre los tópicos de su interés de manera que podamos servirle un boletín justo a su gusto. Bien sea que usted esté empezando a cocinar con asador o sea un veterano en el tema, usted recibirá justo lo que
necesita para perfeccionar sus destrezas. Así que no lo deje para más tarde. Inscríbase ya Su apetito (y su orgullo) se lo agradecerán.
®
Printemps. Été. Automne. Hiver. Vous recevrez quatre exemplaires GRATUITS de Weber Nation™, notre lettre d’information électronique contenant toutes les actualités sur les grillades. Chaque numéro regorge
d’astuces et de conseils pour les grillades, de recettes éprouvées, plus tout ce que vous devez savoir pour devenir un véritable Gourou des grillades Weber. Pour activer votre inscription, il vous suffit de vous connecter
sur www.weber.com et d’enregistrer votre grill. Nous vous poserons quelques questions brèves sur le type d’aliments que vous aimez griller et sur les thèmes qui vous intéressent afin que nous puissions vous envoyer
une lettre d’information adaptée à vos goûts. Que vous débutiez ou que vous soyez expérimenté dans le domaine des grillades, vous recevrez juste ce dont vous avez besoin pour perfectionner vos compétences. Alors
n’attendez pas. Inscrivez-vous dès maintenant. Votre appétit (et votre fierté) vous en remercieront.
®
1. How Can We Reach You? / ¿Cómo Podemos Ponernos En Contacto Con Usted? / Comment Pouvons-nous Vous Joindre?
First Name / Nombre / Prénom
M.I. / Inicial / Seconde Initiale
Address / Dirección / Adresse
State / Estado / État
Last Name / Apellido / Nom
Apt. # / Apt. # / Appt. #
Zip Code / Código Postal / Code Postal
City / Ciudad / Ville
Telephone / Teléfono / Téléphone
(
)
E-mail Address / Dirección De Correo Electrónico / Adresse E-mail
2. How would you prefer for us to contact you? / ¿Cómo preferiría que nos
pongamos en contacto con usted? / Comment préfèreriez-vous que nous
vous contactions?
1.
By US mail / Por correo / Par courrier postal américain
2.
By e-mail / Por correo electrónico / Par e-mail
3.
By phone / Por teléfono / Par téléphone
4.
No preference / Ninguna preferencia / Aucune préférence
5.
Please don’t contact me unless it is in regards to a technical matter related to my grill /
Por favor no se pongan en contacto conmigo a menos que sea sobre un tema técnico
relacionado con el asador / Merci de ne me contacter que si votre appel concerne un
problème technique concernant mon grill
6.
5. Where did you buy your grill? / ¿Dónde compró el asador? / Où avez-vous
acheté votre grill?
6. Which model did you purchase? / ¿Qué modelo compró? / Quel modèle
avez-vous acheté?
I prefer to receive information in Spanish / Prefiero recibir información en español / Je
préfère recevoir des informations en espagnol
1.
Summit S-420
2.
Summit S-450
3.
Built-In Summit S-440
Empotrado Summit S-440
Integre Summit S-440
®
®
®
4.
Summit S-620
5.
Summit S-650
6.
Built-In Summit S-640
Empotrado Summit S-640
Integre Summit S-640
®
®
®
®
®
®
®
7. Have you ever owned a Weber grill before? / ¿Ha tenido alguna vez antes
un asador Weber ? / Avez-vous déjà possédé un grill Weber auparavant ?
®
3. When did you buy your grill? / ¿Cuándo compró usted el asador? / Quand
avez-vous acheté votre grill?
®
1.
Yes
Sí
Oui
®
Number of Weber gas grills owned:
Número de asadores de gas Weber que ha tenido:
Nombre de grills à gaz Weber possédés:
®
®
®
Number of Weber charcoal grills owned:
Número de asadores de carbón Weber que ha tenido:
Nombre de grills à charbon Weber possédés :
®
MONTH / MES / MOIS
DAY / DÍA / JOUR
YEAR / AÑO / ANNÉE
®
®
4. Without tax, how much did you pay for your grill? / ¿Sin impuesto, cuánto
pagó por el asador? / Hors taxes, combien avez-vous payé votre grill?
2.
No, this is my first Weber grill / No, éste es mi primer asador Weber / Non, il s’agit de
mon premier grill Weber
®
®
®
$
▲
.00
PLEASE CONTINUE ON BACK / POR FAVOR CONTINÚE EN EL REVERSO / VEUILLEZ CONTINUER AU VERSO. ➤ ➤ ➤
Thanks for sharing your contact information with us. Again, it all stays strictly
between us — Weber does not share customers’ names with anyone else. If
you need replacement parts or have questions about the assembly, use or
maintenance of your grill, please call Weber Customer Service.
Gracias por compartir su información de contacto con nosotros. De nuevo,
todo quedará estrictamente entre nosotros — Weber no comparte los nombres
de sus clientes con nadie. Si necesita partes de repuesto o tiene preguntas
acerca del ensamblaje, uso o mantenimiento del su asador, por favor llame al
Departamento de Soporte y Servicio al Cliente de Weber.
For purchases made in the U.S.:
Product Registration
Para compras hechas en los Estados Unidos: P.O. Box 1999
Pour les achats effectués aux États-Unis: Palatine, IL 60078-1999
1-800-446-1071
For purchases made in Mexico:
Para compras hechas en México:
Weber-Stephen Products S.A. de C.V.
Av. López Mateos Sur No. 2077, Local 29
Pour les achats effectués au Mexique:
COL. CHAPALITA 44510 •
GUADALAJARA, JALISCO
TELÉFONO – (33) 31 22 12 23
R.F.C. WPR 030919 ND4
Merci de nous avoir communiqué vos coordonnées. Nous vous rappelons que ces
informaitons resteront strictement entre nous : Weber ne communique les noms
de ses clients à personne. Si vous avez besoin de pièces de rechange ou si vous
avez des questions sur le montage, l’utilisation ou l’entretien de votre grill,
veuillez consulter le Service Client de Weber.
For purchases made in Canada:
Para compras hechas en Canadá:
Pour les achats effectués au Canada:
Knowing more about who buys our grills helps the crew back in R&D come
up with new cutting edge Weber products. Please fill in the answers you feel
comfortable sharing with us, and pass by any question you prefer to leave blank.
Thank you for being so generous.
14. Which activities or interests do you have that keep you (or your partner)
busy? / ¿Qué actividades o intereses tiene que lo mantienen a usted (o a
su compañero/a) ocupado? / Quelles sont les activités ou centres d’intérêt
(pour vous ou votre conjoint) qui vous occupent ?
Saber más sobre quién compra nuestros asadores ayuda al equipo de
Investigación y Desarrollo a concebir nuevos productos Weber de avanzada. Por
favor rellene las respuestas con las que se sienta más cómodo en compartir
con nosotros, y pase por alto cualquier pregunta que prefiera dejar en blanco.
Gracias por su generosidad.
Le fait de mieux connaître les personnes qui achètent nos grills aide le
personnel du service R&D à développer de nouveaux produits Weber innovants.
Veuillez répondre aux questions en fournissant les réponses pour lesquelles
vous vous sentez à l’aise, et passez toute question que vous préférez laisser
sans réponse. Nous vous remercions pour votre générosité.
8.
Are you: / Es usted: / Vous êtes:
1.
9.
Male / Hombre / Un homme
2.
Yes / Sí / Oui
Arts or antiques / Artes o
antigüedades / Arts ou antiquités
19.
My cat / Mi gato / Mon chat
20.
My dog / Mi perro / Mon chien
2.
Bicycling / Ciclismo / Bicyclette
21.
3.
Boating or sailing / Náutica o
velerismo / Bateau ou navigation
4.
Buying videos / Comprar videos /
Achat de vidéos
Listening to music on my CD
player / Escuchar música en mi
tocadiscos CD / Écouter de la
musique sur mon lecteur CD
22.
5.
Subscribing to cable TV /
Suscripción a televisión por cable /
Inscriptions à la TV câblée
Listening to music on any
device / Escuchar música en algún
dispositivo / Écouter de la musique
quel que soit l’appareil utilisé
6.
Camping or hiking / Acampar o
excursionismo a pie / Camping ou
marche
23.
Personal computers / Computadores
personales / Ordinateurs personnels
24.
7.
Attending cultural arts or events /
Asistir a artes culturales o eventos /
Assister à des représentations
artistiques ou à des événements
culturels
Photography / Fotografía /
Photographie
25.
Physical fitness or exercise /
Mantenerme en buena forma física o
ejercicio / Fitness ou exercices
physiques
Dieting / Hacer dieta / Régime
alimentaire
26.
Politics / Política / Politique
27.
Running / Correr / Course
Donating to charity / Donar a obras
caritativas / Dons à des organismes
caritatifs
28.
Shopping by mail order or catalog /
Comprar por ventas por correo o
catálogos / Achats par
correspondance ou sur catalogue
Female / Mujer / Une femme
Are you married? / ¿Está casado? / Êtes-vous marié?
1.
1.
2.
No / No / Non
10. What’s your date of birth? / ¿Cuál es su fecha de nacimiento? / Quelle est
votre date de naissance ?
8.
Month / Mes / Mois
Day / Día / Jour
Year / Año / Année
11. Including yourself, how many people live in your household? / Incluyéndolo
a usted, ¿cuántos viven en su casa? / Vous compris, combien de personnes
composent votre foyer ?
1.
2.
Children under 18 (example 01, 02, etc.)
Niños menores de 18 (ejemplo 01, 02, etc.)
Enfants de moins de 18 ans (par exemple, 1 an, 2 ans, etc.)
Adults / Adultos / Adultes
12. Do you own or rent the place you call home? / ¿Posee o alquila el lugar que
usted llama casa? / Possédez-vous ou louez-vous le lieu que vous appelez
votre domicile ?
1.
Own / Propio / Propriétaire
2.
Rent / Alquiler / Locataire
13. What’s your annual household income? / ¿Cuánto es su ingreso familiar
anual? / Quel est le revenu annuel de votre foyer ?
1.
<$15,000
9.
$60,000-$74,999
2.
$15,000-$24,999
10.
$75,000-$99,999
3.
$25,000-$29,999
11.
$100,000-$149,999
4.
$30,000-$34,999
12.
$150,000-$174,999
5.
$35,000-$39,999
13.
$175,000-$199,999
6.
$40,000-$44,999
14.
$200,000-$249,999
7.
$45,000-$49,999
15.
$250,000-$299,999
8.
$50,000-$59,999
16.
>$300,000
9.
10.
Fishing / Pesca / Pêche
11.
Foreign travel / Viajes al extranjero /
Voyages à l’étranger
29.
Snow skiing / Esquiar sobre nieve /
Ski
12.
Gardening or plants / Jardinería o
plantas / Jardinage ou plantes
30.
Stocks & bonds / Acciones y bonos
/ Actions & obligations
13.
Golf / Golf / Golf
31.
Tennis / Tenis / Tennis
14.
Grandchildren / Nietos /
Petits-enfants
32.
15.
Houseplants / Plantas de interior /
Plantes d’intérieur
Veterans’ affairs / Asuntos de los
veteranos de guerra / Affaires liées
aux anciens combattants
33.
Walking / Caminar / Marche
16.
Hunting / Caza / Chasse
34.
17.
Motorcycles / Motocicletas /
Motocyclettes
Watching sports on TV /
Ver deportes por TV /
Regarder le sport à la TV
18.
Needlework / Costura /
Couture
PLACE STICKER HERE / COLOQUE LA ETIQUETA
ADHESIVA AQUÍ / PLACEZ L’AUTOCOLLANT ICI
▲ ©2007 Weber-Stephen Products Co. All rights reserved. Printed in U.S.A.
Product Registration
P.O. Box 40530
Burlington, ON L7P 4W1
1-800-265-2150
35.
Other / Otros / Autre
(_________________________)
15. Serial number / número de serie / numéro de série
▲