1
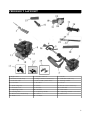
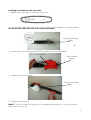
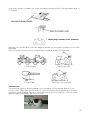
Table of Contents
SAFETY WARNINGS.................................................................................................................................................3
Warning labels on the units.............................................................................................................................3
Symbols on the machinery..............................................................................................................................4
SAFETY INFORMATION.........................................................................................................................................4
General Safety Instructions.............................................................................................................................4
Personal Safety Equipment.............................................................................................................................4
Work Place...............................................................................................................................................................5
Before Starting the Engine..............................................................................................................................5
Using the Product.................................................................................................................................................5
Maintenance............................................................................................................................................................6
Handling Fuel..........................................................................................................................................................6
Transport and Storage.......................................................................................................................................6
Kickback Safety Precautions – Chainsaw.................................................................................................7
PRODUCT LAYOUT...................................................................................................................................................8
ACCESSORIES.............................................................................................................................................................9
SETTING UP..................................................................................................................................................................9
Joint Attachment .................................................................................................................................................9
Installing the Handle..........................................................................................................................................10
Chain Tension Set Up........................................................................................................................................10
Bar and Chain Replacement...........................................................................................................................11
Installing the Guide Bar and Saw Chain...................................................................................................12
CHANGE CHAINSAW TO HEDGE TRIMMER..............................................................................................13
CHANGE HEDGE TRIMMER TO CHAINSAW..............................................................................................13
CHANGE TO METAL BLADE BRUSH CUTTER..........................................................................................13
OPERATIONS..............................................................................................................................................................14
Before Use Checks.............................................................................................................................................14
Fuel and Chain Oil...............................................................................................................................................14
Safe Operating Precautions...........................................................................................................................15
Starting the Engine.............................................................................................................................................15
Stopping the Engine..........................................................................................................................................17
OPERATING THE POLE SAW.............................................................................................................................17
Checking the Oil Supply..................................................................................................................................17
Adjusting Oil Flow Rate....................................................................................................................................17
OPERATING THE POLE HEDGE TRIMMER.................................................................................................18
Adjusting the Angle of the Cutting Blades............................................................................................19
OPERATING THE BRUSH CUTTER..................................................................................................................19
Extending the Cutting Fibre..........................................................................................................................19
MAINTENANCE........................................................................................................................................................20
Maintenance Schedule....................................................................................................................................20
ENGINE CARE.............................................................................................................................................................21
Air Cleaner..............................................................................................................................................................21
Spark Plug...............................................................................................................................................................21
Muffler.......................................................................................................................................................................21
HEDGE TRIMMER CARE......................................................................................................................................22
Blade.........................................................................................................................................................................22
Transmission..........................................................................................................................................................22
POLE CHAINSAW CARE......................................................................................................................................23
Oiling Port..............................................................................................................................................................23
Guide Bar................................................................................................................................................................23
Sprocket..................................................................................................................................................................24
Saw Chain...............................................................................................................................................................24
Cutter Setting Standards...............................................................................................................................24
Transmission..........................................................................................................................................................25
STORAGE.....................................................................................................................................................................26
DISPOSAL....................................................................................................................................................................26
TROUBLESHOOTING GUIDE.............................................................................................................................26
Starting failure.....................................................................................................................................................26
Engine will not reach maximum output.................................................................................................26
1
Engine will not stop..........................................................................................................................................26
Pruner runs but is not cutting.....................................................................................................................26
Insufficient chain lubrication.........................................................................................................................27
SPECIFICATIONS.....................................................................................................................................................27
Engine.......................................................................................................................................................................27
Pole Hedge Trimmer.........................................................................................................................................27
Pole Chain Saw....................................................................................................................................................27
Brush cutter (Metal blade)............................................................................................................................28
Nylon Cutter..........................................................................................................................................................28
2
SAFETY WARNINGS
Your safety and the safety of others is very important. There are important safety
messages included in this manual and printed on the units themselves. Please read and
follow these messages carefully.
A safety message alerts you to potential hazards that could hurt you or others. Each
safety message is preceded by a safety alert symbol and one of three words, DANGER,
WARNING or CAUTION.
These words mean:
• DANGER: You will be KILLED or SERIOUSLY INJURED if you don't follow
instructions.
• WARNING: You can be KILLED or SERIOUSLY INJURED if you don't follow
instructions.
• CAUTION: You can be HURT if you don't follow instructions.
Each message will tell you what the hazard is, what can happen, and how to avoid or
reduce injury.
Warning labels on the units
There are various symbols on the power chain saw plate.
They will facilitate essential information on the product or instructions for use.
Notice: When handling the power chain saw, special safety precautions are required.
Read and understand the entire manual before you use the saw. Non-observance of the
instructions may be dangerous to life.
Warning/Caution
No flames /
No Smoking
Keep bystanders away
Wear protective
glasses, hearing
protection and a
safety helmet
Wear protective
boots
Wear protective
gloves
Danger from
overhead power lines
Keep bystanders 15m away
Read manual before
operation
3
Symbols on the machinery
For safe operation and maintenance, symbols are embossed on the machinery.
According to these indicators, please follow instructions and do not make mistakes.
The port to refuel the unit.
POSITION: Fuel tank cap
Direction to close the choke.
POSITION: Air cleaner cover
Direction to open the choke.
POSITION: Air cleaner cover
Directions to control chain oil flow.
POSITION: Bottom of transmission
SAFETY INFORMATION
General Safety Instructions
•
•
•
This machine can cause serious injuries. Read these instructions carefully for the
correct instructions for handling, preparation, maintenance, starting and stopping
of the machine. Be familiar with all controls and proper use of the machine.
Keep this manual handy so that you may refer to it later whenever any questions
or issues arise. If you have any questions that are not covered by the information
in this manual, please contact the Kogan customer support team for more
information.
Never allow children or anyone unable to fully understand the directions given in
this manual to use the machine.
Personal Safety Equipment
When cutting make sure to wear the following safety equipment:
• Helmet
• Ear protectors
• Protection goggles or a face protector.
• Thick work gloves
• Non-slip-sole work boots
Do not wear loose clothing, jewellery, short trousers, short skirt, sandals or work
barefoot. Do not wear anything which might be caught by a moving part of the unit.
Secure hair so that it is above shoulder length.
4
Work Place
•
•
•
•
•
•
•
•
Never start the engine inside a closed room or building. Exhaust gases contain
dangerous carbon monoxide.
Never use the product:
(a) when the ground is slippery or when you cannot maintain a steady posture.
(b) at night, times of heavy fog, or at any other times when your vision might be
limited and it would be difficult to maintain a clear view of the working area.
(c) during rainstorms, thunderstorms, during strong or gale-force winds, or at any
other times when weather conditions may make it unsafe to use the product.
The machine may not be used unless it is undamaged and functions properly. If
the equipment or parts of it have become defective, contact the Kogan customer
support team for information.
Always obey the current national and international health and safety working
regulations.
Do not operate the machine unless you have inspected the unit thoroughly and
have found no faults. If a part has become defective, ensure it has been replaced
before the machine is used again.
The environment must be free of easily flammable or explosive materials.
Do not overload the machine. Use the machine only for its intended purpose.
Always work with care and stay alert: Do not operate the machine when you are
tired, feel ill, or are under the influence of alcohol, drugs or medications, as you
will no longer be able to operate the machine safely.
Before Starting the Engine
•
•
•
•
•
Make sure that no persons or animals are within your work area when you start
working.
Make sure there are no obstacles in your work area.
Ensure that the machine has been fully and properly assembled.
Check that the machine works properly and make sure, in particular, that the chain
rail or hedge trimmer head sits tightly and properly. Confirm that the ON/OFF
switch works properly. Do not operate the machine with a damaged or
extensively worn cutting device.
The machine will vibrate during operation. This may cause its screws and parts to
loosen. Therefore, check all screws and parts for tightness.
Using the Product
WARNING!
Use product only for the tasks for which it was designed.
• Keep bystanders and animals at least 15m away from the operating point. If you
are approached, immediately stop the engine.
• Grip the handles firmly with both hands, using your entire hands.
• Assume a firm standing position during operation:
- Make sure you cannot slip or fall over
- Do not stretch your arms too far in front of you
- Do not work above your shoulder level
• After starting the engine, check to make sure that the cutting attachment stops
rotating when the throttle is moved fully back into its original position. If it
continues to rotate even after the throttle has been moved fully back, turn off the
engine and contact the Kogan customer support team.
• If the unit starts to shake or vibrate, turn the engine off and check the whole unit.
Do not use it until the trouble has been properly corrected.
• Keep all parts of your body away from rotating cutting attachments and hot
surfaces.
5
•
•
•
•
•
•
•
Never touch the muffler, spark plug or other metallic parts of the engine while the
engine is in operation or immediately after shutting down the engine. Doing so
could result in serious burns or electric shock.
While the motor is still hot, keep the machine away from anything flammable, such
as dry grass, debris, leaves or excessive lubricant.
Before laying the machine down, make sure the motor is turned off!
Never work alone! Make sure you are always within shouting distance or have
visual or some other form of contact with another person who will be able to
provide first aid in an emergency situation.
Always be aware of your surroundings and stay alert for possible hazards that you
may not hear due to the noise of the machinery.
Never operate the pruner at an angle greater than 60° in order to reduce the
risk of being struck by falling objects during operation.
Avoid operating while people, especially children, are nearby.
Maintenance
•
•
•
•
•
•
In order to maintain your product in proper working order, perform the
maintenance and checking operations described in the manual at regular intervals.
Always be sure to turn off the engine before performing any maintenance or
checking procedures.
The metallic parts reach high temperatures immediately after stopping engine.
Use only original replacement parts sourced from Kogan.com. These are the only
spare parts guaranteed to be designed and suitable for use with this machine.
Using other spare parts will void your warranty and may cause danger to yourself
and your surroundings.
In the event that any parts need to be replaced, or any repair work not described
in this manual must be performed, please contact the Kogan support team for
assistance.
Under no circumstances should you take the machinery apart or alter it in any
way. Doing so might result in the product becoming damaged during operation or
the product becoming unable to operate properly.
Handling Fuel
The engine is designed to run on a mixed fuel. Never store cans of fuel or refill the tank
of the unit in any place where there is a boiler, stove, wood fire, electrical sparks, welding
sparks or any other source of heat or fire that might ignite the fire.
Never smoke while operating the unit or refilling its fuel tank.
When refilling the tank, always turn the engine off and allow it to cool down. Take a
careful look around to make sure that there are no sparks or open flames anywhere
nearby before refuelling.
After refuelling, screw the fuel cap back tightly onto the fuel tank and then carry the unit
to a location 3m or more away from where it was refuelled before turning the engine
back on.
Transport and Storage
•
•
•
•
•
When you finish cutting in one location and wish to continue in another location,
turn the engine off, lift the unit up and carry it paying attention to the blade.
When transporting or storing the machine, always fit the cutting device guard or
guide bar cover.
When hand-carrying the product, cover the cutting part if necessary, lift the
product up and then carry, paying attention to the blade.
Never transport the product over rough roads over long distances by vehicle
without removing all fuel from the fuel tank, as otherwise fuel may leak from the
tank during transport.
Protect the machinery from damage while transporting it.
6
Kickback Safety Precautions – Chainsaw
DANGER
• Kickback may occur when the nose or tip of the guide bar touches an object, or
when the wood closes in and pinches the chainsaw in the cut. Tip contact in
some cases may cause a lightning fast reverse reaction, kicking the guide bar
up and back towards the operator. Pinching the saw chain along the top of the
guide bar may push the guide bar rapidly back towards the operator. Either of
these reactions may cause you to lose control of the saw, which can result in
serious personal injury.
• Do not rely exclusively on the safety devices built into the saw. As a chainsaw
user, you should take several steps towards keeping cutting jobs free from
injury or accidents.
• With basic understanding of kickback, you can reduce or eliminate the element of
surprise. Sudden surprises contribute to accidents.
• Keep a good grip on the saw with both hands, with your right hand on the rear
handle and your left hand on the front handle when the engine is running. Use a
firm grip with thumbs and fingers encircling the chainsaw handles. A firm grip will
help you reduce kickback and maintain control of the saw.
• Make certain that the area in which you are cutting is free from obstructions. Do
not let the nose of the guide bar contact a log, branch or any other obstruction
which could be hit while you are operating the saw.
• Cut while the engine is at high speed.
• Make sure the chain and guide bar are correctly adjusted before operating the
equipment. Never attempt chain adjustments with the engine running!
• Always make sure the cutting attachment is properly installed and firmly
tightened before operation.
• Never use a cracked or warped guide bar; replace it with a new one and make
sure it fits correctly.
• If a saw blade should bind fast in a cut, shut off the engine immediately. Push the
branch or tree to ease the bind and free the blade.
• Do not operate the pole pruner with the muffler removed.
• When cutting a limb that is under tension, be alert for spring-back so that you will
not be struck by the moving limb.
• Always stop the engine immediately and check for damage if you strike a foreign
object or if the machine becomes tangled. Do not operate with broken or
damaged equipment.
• Do not make unauthorised modifications or substitutions to the guide bar or
chain.
• Never allow the engine to run at high speeds with a load. Doing so could damage
the engine.
• Keep the pruner as clean as possible. Keep it free from loose vegetation, mud, etc..
7
PRODUCT LAYOUT
1 – Engine unit
2 – Shoulder Harness
3 – Handle
4 – Extension Tube Assy.
5 – Hedge Trimmer Head Assy.
6 – Chainsaw Head Assy.
7 – Fuel Tank Cap
8 – Primer Bulb (under filter)
9 – Starting Handle
10 – Fuel Tank
11 – Air Filter
12 – Chock
13 – Spark Plug Cap
14 – Switch
15 – Brush Cutter Head Assy.
16 – Throttle Lock
17 – Throttle
18 – Guide Bar
19 – Adjusting Screw
20 – Oil Tank
21 – Saw Chain
22 – Cutting Unit
23 – Adjusting Handle
24 – Adjusting Handle Lock Lever
25 – Brush Cutter Head Assy.
26 – Joiner
27 – Bar Cover
28 – Blade Cover
29 – 2T Blade
8
ACCESSORIES
•
•
•
•
•
•
•
•
•
•
•
•
•
Pole Chain Saw Head assembly (with attachment tube)
Extension Tube assembly
Pole Hedge Trimmer Head assembly
Allen Key
Spanner
Nylon Cutter
2T Blade
3T Blade
Combination Tool
Ratio 25:1 Oil Pot
Safety Goggles
Funnel
Strip
SETTING UP
Joint Attachment
1 – Press the lock lever down
Lock Lever
2 – Insert the attachment to the main shaft. Fix the lock lever into the hole.
9
Knob Bolt
3 – Tighten the knob bolt securely.
Installing the Handle
1 – Insert the barrier handle into the top handle.
Top Handle
Barrier Handle
Hexagonal
Screws
2 – Fasten the 4 internal hexagonal screws with the allen key.
Chain Tension Set Up
WARNING
• The saw chain has very sharp edges. Use protective gloves for safety.
• Always pay attention to the chain tension. A slackened chain will increase the risk
of backlash. If slackened, the chain could spring out of the guide, possibly causing
injury to the operator and getting damaged. A slackened chain also wears out
quickly, as well as wearing the sprocket wheel and guide bars out.
1 – Unscrew the fixing nut
Fixing Nut
10
2 – Turn the adjusting screw until the chain fits but may be moved with ease.
Adjusting Screw
Bar and Chain Replacement
1 – Unscrew the fixing nut and remove the chain wheel guard
Fixing Nut
Chain Wheel
Guard
2 – Remove the saw chain and guide bar.
Saw Chain
Guide Bar
Sawing Rail
3 – You can now exchange the bar or the saw chain.
11
Installing the Guide Bar and Saw Chain
1 – Replace the sawing chain onto the sawing rail.
2 – Position the guide bar so that the chain tensioning studs project into the guide bar.
Ensure that the saw chains run in the correct direction!
Chain Tensioning
Studs
3 – Attach the chain wheel guard and then tighten the fixing bolt tightly.
Fixing Bolt
Chain Wheel
Guard
4 – Tighten the tension screw.
Adjusting Screw
5 – Tighten the fixing nut.
NOTE: The chain should not sag, but it should be possible to pull it a few millimetres
away from the saw rail.
12
CHANGE CHAINSAW TO HEDGE TRIMMER
1 – Unscrew 2 internal hexagonal screws with allen key and push the saw attachment out:
Internal Hexagonal
Screws
2 – Insert the hedge trimmer attachment into the tube, aligning the fixing hole to the
screw:
3 – Tighten the two internal hexagonal screws.
CHANGE HEDGE TRIMMER TO CHAINSAW
Simply follow the steps as shown above.
CHANGE TO METAL BLADE BRUSH CUTTER
1 – Press the lock lever down.
Lock Lever
13
2 – Insert attachment into main shaft. Fix the lock lever into the hole.
3 – Tighten the knob bolt securely.
Knob Bolt
OPERATIONS
Before Use Checks
WARNING!
For your safety and to maximise the service life of the equipment, it is very important
to take a few moments before you operate the engine to check its condition. Be sure to
take care of any problems you find, or contact the Kogan customer support team to
have them assess it for you.
Before beginning the pre-operation checks, be sure that the switch is in the OFF
position.
Always check the following items before you start the engine:
• Cutting head is mounted correctly
• Switches move easily and work correctly
• The ignition plug is safely mounted (If the plug is loose, sparking and subsequent
ignition of the fuel vapours may occur.)
• Hand-grips are clean, dry and steady
• Cutting head must move freely
DANGER!
If in doubt as to the safe working methods when using any of the attachments, take
advice from a professional gardener or contact the service center.
Non-professional advice may be dangerous to life.
Fuel and Chain Oil
DANGER!
Fuel is extremely flammable. Avoid smoking or bringing any flames or sparks near fuel.
Make sure to stop the engine and allow it to cool before refuelling the unit. Select bare,
flat ground outdoors for fuelling, and then move at least 3 metres away from the fuelling
point before starting the engine.
14
FUEL
•
•
•
•
•
•
Mix unleaded petrol with air-cooled 2-stroke engine oil at a ratio of 25:1
These engines are certified to run on unleaded fuel.
Make sure to use petrol with a minimum octane level of 93RON.
If you use petrol with a lower octane value than prescribed, there is a danger that
the temperature may rise and piston seizing may occur.
Unleaded petrol is recommended to reduce contamination in the air for the sake
of health and the environment.
Poor quality fuel or oil may damage sealing rings, fuel lines or the fuel tank.
CHAIN OIL
• Use motor oil SAE #10W-30 all year round, or SAE#30~#40 in summer, and SAE
#20 in winter.
Safe Operating Precautions
Before operating the engine for the first time, please review the SAFETY INFORMATION
and the BEFORE OPERATION CHECKS!
• Hold equipment firmly and safely with both hands at all times!
• Work thoughtfully and do not expose anybody to risk while in operation. Be calm
and considerate when working.
• Do not work unless the visual and lighting conditions are good.
• Keep your eye on the cutting head at all times!
• Never work while standing on a ladder.
• Work on firm and stable ground or flooring at all times!
• In the course of work procedure, make sure that no people or animals are
standing with a 10 metre diameter. Switch the unit off immediately if anybody
enters within the reach of the unit.
• Use unit during daytime only.
Starting the Engine
1 – Feed fuel into the fuel tank and tighten the cap securely. (For the Pole chainsaw, also
feed chain oil into the oil tank and tighten the cap securely.)
Fuel
Chain Oil
2 – Rest the unit on a flat, firm surface. Keep the cutting head off the ground, and clear
of surrounding objects, as it will start rotating upon starting the engine.
15
3 – Press the primer several times until the fuel overflow flows into the clear tube.
4 – Move the choke lever to the closed position.
Open
Choke Lever
Closed
5 – Set the stop switch to the “START” position. Press down the throttle lock.
6 – While holding the unit firmly, pull the starter rope quickly until the engine fires up. Be
sure to keep the head clear of all nearby objects still.
7 – Move the choke lever down towards the open position.
WARNING!
The product is equipped with a centrifugal clutch mechanism, so the cutting attachment
will begin to rotate as soon as the engine is started by putting the throttle into the start
position. When starting the engine, place the product onto the ground in a flat clear area
and hold it firmly in place to ensure that the cutting parts nor the throttle come into
contact with any obstacles when the engine starts.
Do not pull the cord too far. Watch the cutting head while pulling the starter cable.
16
8 – Allow the engine to warm up for several minutes before starting operations.
NOTES
• When restarting the engine immediately after stopping it, leave the choke open.
• Over-choking can make the engine hard to start due to excess fuel. When the
engine fails to start after several attempts, open the choke and repeat pulling the
rope, or remove the spark plug and dry it.
Stopping the Engine
1 - Release the throttle lever and run the engine for half a minute.
2 - Shift the stop switch to the STOP position.
WARNING!
• Except in an emergency, avoid stopping the engine while pulling the throttle lever.
• When engine doesn't stop with use of the stop switch, move the choke level to
the closed position.
OPERATING THE POLE SAW
DANGER!
• Always wear work gloves made of leather or some other sturdy material when
using the pole saw.
• Falling branches may fall onto your face or into your eyes, resulting in injuries,
scratches and cuts. For this reason, you should always be sure to wear a helmet
and face protection when using the pole saw.
Checking the Oil Supply
After starting the engine, run the chain at medium speed to see if chain oil is scattered
off, as shown in the image.
The oil reservoir has capacity to provide about 40 minutes of cutting time (when set to
deliver the minimum flow rate, or about as long as it will take to use a tank of fuel). Be
sure to refill the oil tank every time you refuel the saw.
Adjusting Oil Flow Rate
CAUTION!
Never fill the oil reservoir, nor adjust the oiler with the engine running.
An increase in bar oil flow rate will speed oil consumption, requiring more frequent
checks on the oil reservoir. To ensure sufficient lubrication, it may be necessary to check
the oil level more frequently than fuel tank refills.
The guide bar and chain are lubricated automatically by a pump that operates whenever
the chain rotates. The pump is set at the factory to deliver a minimum flow rate, but it
can be adjusted. A temporary increase in oil flow is often desirable when cutting things
like hardwood, or wood with a lot of pitch.
17
Adjust the pump as follows:
1 – Stop the engine and make sure the stop switch is in the OFF position.
2 – Place the unit on its side with the oil reservoir up.
3 – With a screwdriver, push in on the oil flow rate adjusting screw and turn in the
desired direction.
CAUTION!
The oil flow adjusting screw must be pressed in slightly in order to turn. Failure to do so
could damage the pump and the screw.
OPERATING THE POLE HEDGE TRIMMER
DANGER!
This product is equipped with extremely sharp blades, and when used improperly these
blades can be extremely dangerous. Improper handling can cause accidents which may
in turn lead to serious injury or death. For this reason, you should always be careful to
follow the following instructions when using the pole hedge trimmer.
•
•
•
•
•
•
Never hold the trimmer in a way in which the blades are pointed towards
somebody else.
Never allow the blades to come into close proximity with your body while the
engine of the trimmer is in operation.
Always be sure to turn the engine off before changing the angle of the blades,
removing branches which have become stuck in the blades, or at any other time
when coming into close contact with the blades.
Always wear work gloves made of leather or some other sturdy material when
using the trimmer.
Always place the blade cover provided with the trimmer over the blades when not
in use.
Falling branches may fall onto your face or into your eyes, resulting in injuries,
scratches and cuts. For this reason, you should always be sure to wear a helmet
and face protection when using the trimmer.
CAUTION!
The thickness of branches which may be cut with this trimmer is limited to up to
approximately 5mm (3/16”). Never try to cut branches thicker than this, as doing so may
result in damage to the trimmer.
18
Adjusting the Angle of the Cutting Blades
1 – Stop the engine.
2 – Lift the lock lever and press down on the adjusting lever.
3 – Adjust the angle of the blades to the desired angle then release the lever.
OPERATING THE BRUSH CUTTER
•
•
•
To turn the machine off, the switch must be in the “STOP” position.
Prior to using the brush cutter, remove all hard objects (stones, metal parts etc..)
from the working area. The cutter may strike them, causing them to cause
personal or material damage.
When working in high shrubs or bushes, the working height must be at least 15cm
from the ground as a minimum to protect small animals from danger.
When working in grass areas, hold the cutter at an angle of approximately 30 and make
semicircular turns to your right and left.
The best results are achieved from grass 15cm high. If higher, you may need to repeat
the cutting several times.
Be sure to NEVER putting the cutting head on the ground while the engine is running.
Extending the Cutting Fibre
•
•
Hold the running machine over the grass, then knock the ground several times
with the mowing head to release the fibre, which will lengthen.
The cutter enclosed in the protection shield will cut the fibre to the required
length.
If unit is vibrating heavily, turn the unit off and allow it to cool. Remove all loose grass
stuck in the mowing head and around the protection shield.
Never replace the plastic cutting fibre with steel wire. There is extreme risk of injury and
damage as this unit is not designed to be used with a metal cutting fibre.
19
MAINTENANCE
Good maintenance is essential for safe, economical and trouble-free operation.
It will also help to reduce pollution.
DANGER!
Improper maintenance, or failure to correct a problem before operation can cause a
malfunction in which you may be seriously hurt or killed.
Always follow the inspection and maintenance recommendations and schedules in this
owner's manual.
To help you properly care for your equipment, the following pages include a
maintenance schedule, routine inspection procedures and simple maintenance
procedures using basic hand tools. Other service tasks that are more difficult, or require
special tools, are best handled by professionals.
WARNING!
• Make sure that the engine has stopped and is cool before performing any
servicing to the machine. Contact with moving cutting head or hot muffler may
result in a personal injury.
• Read the instructions before you begin, and make sure you have the tools and
skills required.
• To reduce the possibility of fire or explosion, be careful when working around fuel.
Use only non-flammable solvents, not petrol, to clean parts. Keep cigarettes,
sparks and flames away from all fuel related parts.
Maintenance Schedule
System/Components
Procedure
Before Use
Fuel leaks/spillage
Wipe and clean
✔
Air Cleaner
Inspect
✔
Clean
Fuel tank / filter
Inspect
Every 25 Hours
Every 50 Hours
Every 100 Hours
Note
Replace if required
(2)
✔ (1)
Replace if required
(2)
✔
Clean
✔
Idle adjustment
screw
Adjust idling speed
✔
Spark Plug
Clean and readjust
Cylinder fins, air
intake
Clean
Muffler, exhaust port
Clean
Combustion
chamber
Clean
Throttle lever / stop
switch
Check operation
✔
Cutting parts
Replace if
damaged/worn
✔
Transmission
Grease
Screws / nuts / bolts
Tighten / Replace
✔
Guide Bar
Clean
✔
Sprocket
Inspect / replace
Saw Chain
Inspect / sharpen
Replace carburettor
if required
GAP: 0.025”
(0.6 ~ 0.7mm)
✔ (2)
✔
✔
✔(2)
Pole hedge trimmer
only
✔(2)
✔
Pole chain saw only
✔
✔
Pole chain saw only
Pole chain saw only
1 - Service more frequently when used in dusty areas.
2 - These items should be serviced by your local gardening appliance center, unless you have the
proper tools are are mechanically proficient. (No warranty coverage for third-party or self repairs.)
20
ENGINE CARE
Air Cleaner
If the air cleaner is clogged, the engine performance will be drastically reduced. Check
and clean the air filter element in warm, soapy water as required. Allow to dry
completely before installing. If the filter is damaged or shrinks, replace with a new filter.
Air Filter
Spark Plug
Starting failure and misfiring are often caused by a fouled spark plug. Clean the spark
plug and check that the plug gap is in the correct range.
0.6 ~
0.7mm
Recommended replacement spark plugs: NHSP LD L8RTF
CAUTION!
• Note that using any spark plug other than those designated may result in the
engine failing to operate properly, or with the engine becoming overheated and
damaged.
• To install the spark plug, first turn the plug until it is finger tight, then tighten it a
quarter of a turn more with a socket wrench.
Tightening torque: 9.8 ~ 11.8 N.m (1 ~ 1.2kg.m)
Muffler
WARNING!
• Inspect the muffler periodically for loose fasteners, damage or corrosion. If any
sign of exhaust leakage is found, stop using the machine and have it repaired
immediately.
• Note that failing to maintain the muffler may result in the engine catching fire.
Remove the muffler, insert a screwdriver into the vent, then wipe away any carbon buildup. Wipe away any carbon build-up on the muffler exhaust vent and cylinder exhaust
port at the same time.
21
HEDGE TRIMMER CARE
Blade
•
•
1.
When refilling the tank or resting, it is often a good idea to use the time to oil the
cutting blades.
If a gap exists between the upper and lower blades, follow the procedure below to
adjust them so that they fit closer together.
Loosen lock nut (A) as shown in the diagram.
2. Tighten screw (B) fully, then turn one-third of one half of a rotation backward.
3. While holding onto the screw to keep it in position, tighten the lock nut.
4. Check to make sure that the flat washer (C) is loose enough so that it may be
turned by pressing on it.
NOTE: Screwing the screw in too tight may make it impossible for the blades to move.
Conversely, not screwing it tightly enough may make the blades of the trimmer feel dull
and cause leaves and branches to become caught in the blades of the trimmer.
TIP: If the blades become so worn down that it is no longer possible to eliminate the gap
between them, you should contact a professional to resharpen them.
Transmission
The reduction gears are lubricated by multi-purpose grease in the transmission.
Apply new grease every 25 hours of use, or more often depending on the job condition.
When adding lubricant, use a grease gun to insert lubricant into the three grease nipples
located on the transmission.
22
POLE CHAINSAW CARE
Oiling Port
Dismount the guide bar and check the oiling port for clogging.
Oiling Port
Guide Bar
Remove sawdust in the bar groove and the oiling port.
Groove
Oiling port
The bar rail should always be a square. Check for wearing of the bar rail. Apply a ruler to
the bar and the outside of the cutter. If a gap is observed between them, then the rail is
normal. Otherwise, the bar rail is worn and needs to be corrected or replaced.
Ruler
Gap
Ruler
No Gap
Note in the bottom situation, the chain is tilting.
This is a sign that the bar is worn.
23
Sprocket
Check for extensive wear, and replace it when the teeth are worn over 0.3mm.
Sprocket
Saw Chain
CAUTION!
It is very important for smooth and safe operation to keep the cutters always sharp.
Your cutters need to be sharpened when:
• Sawdust becomes powder-like
• You need extra force to saw in
• The cut does not go straight
• Vibration increases
• Fuel consumption increases
Cutter Setting Standards
WARNING!
Be sure to always wear safety gloves when handling the cutting chain.
Before filing:
• Make sure the chain is held securely.
• Make sure the engine is stopped.
• Use a round file of proper size for your chain.
• Chain type: 91PJ
• File size: 5/32” (4.0mm)
Place your file on the cutter and push straight forward.
Keep the file in position, as illustrated below.
24
After every cutter has been set, check the depth gauge and file it to the proper level as
illustrated.
Note: Be sure to round off the front edge to reduce the chance of kickback or tie-strap
breakage.
Make sure every cutter has the same length and edge angles as illustrated.
Cutter Length
Filing Angle
Side Plate Angle
Top Plate Cutting Angle
Transmission
The reduction gears are lubricated by multi-purpose, lithium-based grease in the
transmission. Apply new grease every 25 hours or more often depending on the job
condition. When adding lubricant, use a grease gun to insert lubricant into the three
grease nipples located on the transmission.
Grease fitting
25
STORAGE
Aged fuel is one of the major causes of engines failing to start. Before storing the unit, empty the
fuel tank and run the engine until is uses all the fuel left in the fuel line and the carburettor.
Clean and carry out maintenance checks on the unit before storing.
Store the unit indoors, taking necessary steps to prevent rust prevention.
DISPOSAL
When disposing of the machinery, fuel or oil for the machine, please contact your local council for
advice on the best methods to ensure that there is no negative impact on the environment.
TROUBLESHOOTING GUIDE
Starting failure
Check
Possible Cause
Action
Fuel tank
→
Incorrect fuel
→
Drain and use correct fuel
Fuel filter
→
Fuel filter is clogged
→
Clean
Carburettor adjustment screw
→
Out of normal range
→
Adjust to normal range
Sparking (No spark)
→
Spark plug is fouled/wet
→
Clean/dry
→
Plug gap is incorrect
→
Correct (GAP = 0.6 ~ 0.7mm)
→
Disconnected
→
Retighten
Spark Plug
Engine will not reach maximum output
Check
Possible Cause
Action
Spark Plug
→
Fouled plug (the carbon residue
on electrodes) / too big a
distance between the electrodes
→
Clean the plug. Check the thermal
value and replace if necessary.
Set 0.6 ~ 0.7mm
Carburettor
→
Fouled carburettor or
carburettor jets
→
Clean the carburettor
Air filter
→
Fouled air filter
→
Clean
Exhaust
→
Exhaust, exhaust pipe
→
Remove exhaust pipe. Clean and
remove carbon residues.
Cylinder/piston/piston ring
→
Packing ring in the crank-house
leaking. Worn cylinders, pistons
or piston rings.
→
Replace cylinder, piston or piston
rings. Grind cylinder and piston then
install.
Fuel
→
Poor fuel mix (too much oil)
→
Remix and refill according to
instructions
Engine will not stop
Check
Possible Cause
Spark plug
→
Plug is pale grey with white-hot
marks
Action
→
Fit in plug of higher thermal value
Cylinder
→
Carbon residue in ignition area
→
Clean cylinder head, piston bottom
and cylinder.
Pruner runs but is not cutting
Check
Guide bar and saw
Possible Cause
→
Chain is fitted in reverse on the
guide bar
Action
→
Refer to bar and chain assembly
guide
26
Insufficient chain lubrication
Check
Possible Cause
Oil tank
→
Oil tank empty
Action
→
Replenish oil tank
Guide bar
→
Check that oil groove of saw rail
isn't clogged
→
Clean oil guide groove
SPECIFICATIONS
Engine
Parameter Items
Comments
Engine models
1E44F-5
Engine displacement
55CC
Max. engine speed
8200 r/min-1
Engine idle speed
2800~3200 r/min-1
Clutch engagement speed
4300 r/min-1
Volume of fuel tank
1.2L
Fuel ratio (unleaded fuel:motor oil)
25:1
Spark plug
NHSP LD L8RTF
Carburettor
Diaphragm
Maximum shaft brake power
0.75 kW / 7500rpm
Fuel consumption at maximum engine performance
0.52 kg/h
Guaranteed sound power level
LwA: 112dB(A)
Guaranteed vibration emission levels
8.5m/s2
Weight without cutting attachment with empty tanks
7.5kg
Starter
Recoil
Ignition system
CDI
Gasoline engine type
Air-cooled, single cylinder two stroke
Maximum shaft brake power
1.82W / 8200rpm
Pole Hedge Trimmer
Parameter items
Comments
Cutting speed
Max 7500 min-1
Cutting length
400
Gear ratio (engine : cutter)
18 : 22
Unit mass
9kg
Pole Chain Saw
Parameter items
Comments
Oil tank volume
120cm3
Cutting attachment type and size
Bar: JF05010AR
Chain: CARLTON N1 JLA-13-40
Saw Chain
Specified pitch
9,52
Specified gauge
1,27
Maximum cutting speed
9000min-1
Usable cutting length
200mm
27
Gear ratio (engine : cutter)
1 : 0.94
Unit mass (without guide bar and chain, empty tanks)
7.5
External dimensions (L x W x H)
2610 x 335 x 240
Brush cutter (Metal blade)
Weight with brush cutter and empty fuel tank
5.9kg
Blade
255 x 1.6mm
Blade centre hole diameter
25.4
Blade rotation speed at maximum speed
8000/min
Gear ratio
20:15
Cutting rotational direction
Counter-clockwise
Nylon Cutter
Max. cutting width
380mm
String diameter
2.5mm
28