1
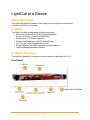
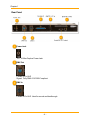
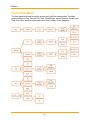
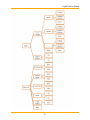
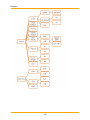
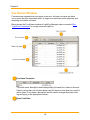
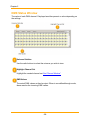
LightCue
With Ethernet
DMX Recorder
User Guide
LightCue
With Ethernet
DMX Recorder
User Guide
12/12/2013
Preface
Every effort has been made to assure the accuracy of the information contained in this
manual. If you find an error or typo, please bring it to our attention so that we can correct it for others. You may even get a coffee mug for your trouble. Alcorn McBride welcomes comments and suggestions on the content and layout of its documentation.
Applications described herein are for illustrative purposes only. Alcorn McBride Inc.
assumes no responsibility or liability for the use of these products, and makes no representation or warranty that the use of these products for specific applications will be
suitable without further testing or modification. Alcorn McBride products are not
intended for use in applications where a malfunction can reasonably be expected to
result in personal injury. Customers using or selling Alcorn McBride products for use in
such applications do so at their own risk, and agree to fully indemnify Alcorn McBride
for any damages resulting from such improper use or sale.
Hardware Design: Firmware Design:
Mechanical Design: Documentation:
Jim Carstensen, Scott Harkless, Steve Alcorn
Joy Burke, Adam Rosenberg
Martin Chaney
Joy Burke, Jim Carstensen
Alcorn McBride Inc.
3300 S. Hiawassee, Suite 105
Orlando, Florida 32835
(407) 296-5800
Fax: (407) 296-5801
Internet: http://www.alcorn.com
E-mail: [email protected]
LightCue™ is a trademark of Alcorn McBride Inc., all rights reserved.
Copyright © 2013 Alcorn McBride, Inc. All rights reserved.
Table of Contents
Preface
Table of Contents
LightCue at a Glance
About this Guide
Features
LightCue Overview
Front Panel
Rear Panel
Front Panel LCD
Front Panel Menu
Getting Started
LightCue Manager Software
Connecting the Unit
Recording a Cue
Playing a Cue
LightCue Manager
Edit Window
LightCue Connection
Cue Names Window
DMX Files Window
Play Window
Record Window
DMX Status Window
Control Protocols
ASCII Protocol
Control Commands
Command Details
Arm Recording
Play
Chase Play
Record Now
Record with SMPTE
Arm Recording with SMPTE
Pile-On Cue
Pile-On Cue and Loop at end
Still Cue
Clear Cue
Feedthrough
Force Value
Force DMX
Clear Forces
SMPTE Status
ii
iii
1
1
1
1
1
4
5
8
11
11
11
11
11
13
14
15
18
19
23
26
28
29
29
29
29
29
30
30
31
32
32
33
33
34
34
34
35
35
36
36
DMX File Query
Reset
Pile-On Priority
Longitude
Latitude
Reboot
IP address
Subnet Mask number
Gateway IP Address
Date
Time
User Name
Get/Set Password
DST Enable
DST Type
Time Zone
NTP IP Address
NTP Enable
Ethernet Port for NTP
DHCP Enable
HTTP Ethernet Port
HTTP WEB Page
MIDI Control
Start a Cue with SYSEX “GO CUE”
Pile on a Cue with "NOTE ON"
Clear Cue with "NOTE OFF"
Specifications
Overview
Serial Pins
Parallel (DB37) Pins
Inputs
Outputs
DMX Input Pins
DMX Output Pins
SMPTE Input
Accessories
Troubleshooting Tips
Glossary
Index
36
36
36
37
37
37
38
38
38
38
38
39
39
39
39
40
40
40
40
40
41
41
41
41
41
42
42
42
42
43
43
44
45
45
45
46
46
46
46
47
49
51
LightCue at a Glance
About this Guide
This guide describes the features of the single universe LightCue recorder and
4 universe LightCue Pro recorder.
Features
The Light Cue offers a wide range of features including:
l Records the Output of Any DMX-512 Lighting Board.
l Stores 100 hours of Continuous DMX Data
l Stand-Alone or PC-Driven Operation
l Parallel Input, Ethernet or RS-232 Serial Control.
l Can “Pile-On” up to 40 simultaneous cues
l Switch between “live” DMX input and recorded material
l LightCue Manager software included
LightCue Overview
The LightCue standard is a single universe recorder and playback unit in 1U.
Front Panel
-1-
Chapter 1
USB Port
USB Port used for control of LightCue
Control Knob
Used to control on screen menu system. Push in to bring up menu and make
selections.
LCD Screen
The menu system for the LightCue as well as System information. See "LightCue
at a Glance"
Compact Flash Compartment
Secured with a screw, the metal cover can be removed to reveal the compact
flash card. LightCue ships with a 4GB flash card. All data with the exception of the
IP address is stored on this card.
Power LED
Secured with a screw, the metal cover can be removed to reveal the compact
flash card.
-2-
LightCue at a Glance
Programmable Push Buttons
The 8 buttons on the front are fully configurable to play, record, stop, or pause a
cue. They can also be configured to feed-through incoming DMX.
The configuration for all 8 buttons is done using LightCue Manager software. The
resulting data is stored in an xml file on the flash card.
Status LEDs
Two status LEDs are provided. The LTC LED will illuminate Green whenever
valid SMPTE timecode is present. The DMX-LED will indicate status with the following color code:
DMX LED Color
Indication
Solid Red
Amber
Green
Blinking Red
Recording
Recording Armed
Playing
Error
-3-
Chapter 1
Rear Panel
Power Jack
12V, 1A Max Captive Power Jack
DMX Out
Female 5-Pin XLR
Signal: Fully DMX-512/1990 Compliant
DMX In
Female 5-Pin XLR. Used for record and feedthrough.
-4-
LightCue at a Glance
Parallel I/O
37-pin female connector for inputs and outputs.
Inputs: 8 opto isolated inputs can be configured to be either Voltage or Contact
Closure inputs. Just like the buttons, the inputs are fully configurable using the
LightCue Manager software.
Ouputs: 2 contact closure "Fault" and "Running" outputs automatically toggle during cue playback or on error.
For complete Pinout, See "Parallel (DB37) Pins".
SMPTE / LTC In
Female 3-Pin XLR. Ttransformer coupled 600 ohm Balanced -10 dbu to +4 dbu
Supported Frame Rates:
24,25,29.97,29.97drop,30
Serial RS-232 Control
RS-232C at 9600 Baud, N, 8, 1
Ethernet Control
UDP control on port 2639 is used by LightCue Manager. FTP file transfer and
HTTP webpage view is also available. See "Control Protocol" for more detail on
UDP strings.
Front Panel LCD
-5-
Chapter 1
View SMPTE status, playback status, and access the menu from the front panel LCD.
A typical front panel when not reading SMPTE reads:
Awaiting SMPTE
Playing: Cue1
The cue(s) playing are listed and will scroll if needed.
When SMPTE is being fed into the LightCue, the front panel will display the current
time in the form:
01:00:00.21
Playing: Cue1
If the LightCue is feeding through the incoming DMX to the DMX output, the display
will show a * in the upper right corner.
If the LightCue is looping a Cue, a '+' sign will appear after the Cue name.
01:00:00.21
Playing: Cue1+,Cue2
In the above box, Cue1 is looping and Cue2 is playing without looping.
-6-
Chapter 1
Front Panel Menu
The front panel knob can be used to access the LightCue menu system. The Main
menu consists of: Play, Record, Still, Stop, Feedthrough, Inputs, Network, System and
Date Time. More detail on each main menu item is shown in the diagrams.
-8-
LightCue at a Glance
-9-
Chapter 1
- 10 -
Getting Started
Getting Started
This section will teach you how to begin using your LightCue. More detailed information is contained in the rest of this manual.
LightCue Manager Software
Free software to control/monitor/edit lighting cues can be downloaded from our website (www.alcorn.com) under the "software" page. This software is the preferred
method for recording and playback of lighting cues.
See the section "LightCue Manager" for more detail on it's use.
Connecting the Unit
1. Connect the DMX Out from your Lighting Console to the DMX In on the rear of
the LightCue.
2. Connect the DMX Out from the LightCue to the DMX Input of your Dimmer Rack.
3. Optionally, connect the SMPTE Out from your SMPTE generator (e.g. Alcorn
McBride SMPTE Machine) to the SMPTE In on the rear of the LightCue.
Note: SMPTE is only required if it is necessary to synchronize lighting cues to other SMPTE equipment
Recording a Cue
After connecting the unit, use the front panel or LightCue Manager to record a cue.
Playing a Cue
After recording a cue, use the front panel or LightCue Manager. To configure front
panel buttons or inputs to start a particular cue, use LigthCue Manager
"Inputs" screen.
- 11 -
LightCue Manager
This software is designed for setup, record, playback, and monitor of a LightCue. It currently runs on Windows XP, Vista or Windows 7.
LightCue Manager can be downloaded for free from the Alcorn McBride website
(www.alcorn.com)
The "Edit" screen is the primary screen for Record/Playback. More information regarding each section is described in more detail in the chapters below.
- 13 -
Chapter 2
Edit Window
The main screen that appears in LightCue Manager is the edit window. This screen
allows you to record, edit cue file information, and play back cues.
- 14 -
LightCue Manager
DMX Channel Status
The status of the DMX channel values for 1 Universe. Incoming values are displayed when recording, outgoing dmx values are displayed when playing cues.
File Information
Information about the recorded cue name and DMX File can viewed by selecting
the tabs "Cue Names" or "DMX Files". See "Cue Names Window" or See "DMX
Files Window" for more information.
Record and Playback
These two views control record and playback of individual cues on the
LightCue.See "Play Window"
Navagator Bar
The navagator Bar switches been the Edit view and other views such as Monitoring, Controlling individual DMX, and configuring inputs.
LightCue Connection
When the software is first launched, you will be prompted to connect to a LightCue.
- 15 -
Chapter 2
Find LightCue
Click "Search" to find a LightCue on your network.
You MUST be on the same subnet for the find to work. (ie: your PC's IP address
must begin with 192.168.0. if the LightCuePro is the default 192.168.0.254)
If you have a router between you and the LightCuePro, try selecting "DHCP" from
the "Network" option on the front panel to change the LightCuePro's IP address to
something on the same subnet.
Available LightCues
Hightlight the LightCue for connection and click "Connect."
- 16 -
LightCue Manager
Establish Live Connection
Once the connect button is clicked, a live connection is established and windows
within the LightCue Manager will be populated with input, file and cue information.
Tip: If you're unable to see LightCue on your large network, it may be because you are on a different subnet.Try pushing in on the front panel knob to select "Network" from the main menu. Then, set your ethernet jack to enable "DHCP".
- 17 -
Chapter 2
Cue Names Window
Cue names are created when you record a new cue. A single cue name can have
one or more dmx files associated with it. A single cue name can control playback and
recording on multiple universes.
Below shows the Cue Names window in LightCue Manager when connected (See
"LightCue Connection") to a single universe LightCue.
Cue Name Properties
The cue's name, description and corresponding Universe file is listed on this row.
If there is more than one universe being used for that cue, more than one .dmx file
will be listed. Cue's name, description, and file can be changed by double clicking and typing in the appropriate column.
Open Cue Editor
- 18 -
LightCue Manager
Open the Cue in an editor to view DMX file contents.
Delete Cue Name
Delete the Cue Name. You will be prompted to delete actual Cue File data as
well. Deleting the name alone does not delete DMX lighting data. It only deletes
the name reference to the data.
Play the Cue Name
This will start playback of the Cue Name on the corresponding universes. Each
DMX File will play on the universe specified by the column. For example,
"U1" indicates universe 1.
Corresponding DMX File
This file contains the DMX data that will be played back and resides on the flash
card.
DMX Files Window
The DMX Files window is usually located on the bottom right of the screen behind the
"Cue Names" window (See "Cue Names Window").
- 19 -
Chapter 2
Delete DMX File
Remove the dmx file permanently from the flash card. You will be prompted to confirm. This cannot be undone.
Play DMX File
Play the file immediately using the filename. If the filename has a corresponding
Cue Name (See "Cue Names Window"
Refresh File List
Request an up-to-date list of files from the LightCue. List will be populated with
current list of files on the flash card.
Edit or View DMX File
Retrieve the file from the compact flash card using FTP. Then, open the file in the
- 20 -
LightCue Manager
dmx file editor to view the individual channel and DMX value information.
Put DMX File on Flash Card
Transfer a file using FTP to the LightCue. The transfer will take place after the file
is selected from your hard drive using the dialog that appears.
File on Flash Card
The name of the file that contains the DMX data information. This is usually
attached to a Cue Name (See "Cue Names Window"
Channels effected by Playback
When the DMX file was recorded, certain channels were selected. When the file
is played back, only those DMX channels will be effected.
Universe Recorded
This only applies to LightCue products with more than 1 universe (such as the
LightCuePro 4 universe player). This shows the universe on which the file was
originally recorded, but it can be played back on any desired universe.
Total File Run Time
The length of the DMX data. For SMPTE recorded files, this is only the length and
does reflect the actual SMPTE stop time.
SMPTE Recorded Start Time
The first recorded timestamp in the file. Saved using the SMPTE during record.
- 21 -
Chapter 2
Used for the "Play DMX File" button (see #2 above). It is NOT required to use this
time for SMPTE jam-sync playback. This is only the default. You can select any
SMPTE time from the Play Window (See "Play Window"
Date/Time Recorded
Time and date (in month, day, year) that the file was recorded.
- 22 -
LightCue Manager
Play Window
Playing cues can be done using the front panel knob or using the Play Window in
LightCue Manager. The Play window is found on the bottom right corner of the Edit
View (See "Edit Window").
Cue Name
Either Cue Name or Individual File can be selected. Cue Names can control multiple individual files when more than one universe is available.
Individual File
Individual files can be played back on a certain universe independent of the universe they were originally recorded on.
- 23 -
Chapter 2
PileOn check
When checked, the played cue does not stop cues that are currently playing.
Note: "Pile-On" cues are automatically "cleared" when the duration of the cue is
complete.
For example, a "clear Cue" would not be needed for a short cue of 1 second long.
Lights are always held at the last level if no other cues are actively running (in
other words, not completed their time duration)
Loop check
Loop the cue at the end. Does not apply to follow SMPTE files.
Follow SMPTE
Have the cue jam-sync to SMPTE time. In other words, as the SMPTE runs, the
cue dmx data will "scrub" to the appropriate time. The starting time of the cue data
can be set in the SMPTE Start Time box. If no SMPTE start time is checked, the
SMPTE time that was saved when the cue was recorded will be used.
Fade-In Time
When checked, the current DMX channel value will fade into the first cue dmx
value in the specified time.
Play button
Start playback
Stop All button
- 24 -
LightCue Manager
Stop the playback of all cues on all universes.
Clear Cue
Stop the cue name (or dmx file) from playing. Does not effect other playing cues.
- 25 -
Chapter 2
Record Window
Record new cues using the record window on the bottom right corner of the edit view
(See "Edit Window").
Cue Name
The cue name to record to. DMX files will be automatically created and linked to
this cue name.
SMPTE Start Time
Save the SMPTE Start Time as soon as the cue starts recording. The time saved
will be the time currently coming in on the SMPTE in port. This time can later be
changed or overridden with the play command.
Arm Recording
- 26 -
LightCue Manager
Have the LightCue begin recording as soon as any change of DMX value on any
channel is detected.
Record Now
Start the LightCue recording the incoming DMX values immediately. Do not wait
for change in DMX value.
Stop
Stop recording all channels on all universes.
Channel Selection
Select which dmx channels will be saved and played back for this cue. Channels
can be filled in automatically from channel sets (see below).
Channel Sets
Channel sets are saved values of DMX channel ranges for each universe. They
can be saved by setting the Channel Selection (above) and then clicking save.
They are useful to quickly recall large sets of channels accross multiple universes.
- 27 -
Chapter 2
DMX Status Window
The value of each DMX channel. Displayed as either percent or value depending on
the settings.
Universe Selction
Use the radio buttons to select the universe you wish to view
Highlight Channel Set
Highlight the created channel set. See "Record Window"
DMX Values
The actual DMX values as they're output. When in record/feedthrough mode,
these are also the incoming DMX values.
- 28 -
Control Protocols
Control Protocols
Ethernet (UDP) , USB, and serial (RS232) protocol commands are identical. This is
referred to as the "ASCII" protocol. A different MIDI protocol is available for control on
the MIDI port. A "Live" protocol is used for communication between LightCue Manager and the LightCue.
ASCII Protocol
For Ethernet, Serial and USB.
Control Commands
The following commands are used to control the playback of Lighting cues. All commands respond with an "R"<CR> where <CR> is a carriage return (hex 0D).
All times ("tm") are in the form:
hhmmssff where hh = hours, mm=minutes, ss=seconds, ff=frames
(ie: 01:02:03.04 is 01020304)
<cue> refers to either: A cue name in quotes, ie, "myCueName" OR a cue number
without quotes.
Command Details
Detail on each command is listed below.
Arm Recording
This command is useful for when you want to command the Light Cue Pro into record
mode using a serial controller. Recording begins as soon as a DMX change is
detected.
|vvv-vvv|vvv-vvv|vvv-vvv|vvv-vvv|nnnUuRA<CR>
|vvv…vvv|– the channels to record separated by commas. ie: 1-512. (optional)
nnn – the Cue number to record
u – the Universe number.
Examples:
Record to cue file dmx00001.dmx from Universe 1:
001U1RR <CR>
Record to cue file dmx00001.dmx from channels 5-8 onUniverse 2:
|5-8|U2RR <CR>
- 29 -
Chapter 2
Record channels 1-512 on universe1, no other universes:
|1-512|0|0|0|"myCueName"RR<CR>
Record channels 1-12,81 and 89 on universe2, channel 41 on universe 3 to cue
name "myCueName":
|0|1-12,81,89|41|0|"myCueName"RR<CR>
Play
Description: This command causes the Light Cue Pro to play a cue. When in HTP
mode, each of the 512 channel values of each cue that is playing is compared against
the corresponding channel in the other playing cues, and the highest value is output.
WHen in LTP mode, the last played cue is played.
Command bytes:nnnUuPL<CR>
nnn – the Cue number to play
u – the Universe number. Use * for all.
Message Response:R<CR>
Comments: When the end of a piled-on cue is reached, the last look of the cue is held
and used in the comparison of other piled-on cues, playing or not.
Example:"001U2PO" <CR> Pile-on cue number 1 on Universe 2
“3U4PO”<CR>Pile-on cue number 3 on Universe 4
Chase Play
Description: This command causes the Light Cue Pro to play the cue specified starting at the SMPTE time specified and “jam-syncing" (following incoming timecode forward or backwards) from that point in time. Command bytes:ohomosofhhmmssffnnnUuCP<CR>
ohomosof - the starting SMPTE time of hours, minutes, seconds, and frames. (optional)
hhmmssff - the crossfade time in hours, minutes, seconds, and frames. (optional)
nnn – the Cue number to play (optional – can use previously searched instead)
u – the Universe number. Use * for all.
Message Response:R<CR>
- 30 -
Control Protocols
Comments: The starting time is the SMPTE frame at which the first frame of DMX data
will be played from after the crossfade has completed.
Examples:
1. Chase play a previously searched cue on Universe 2
"U2CP"<CR>
2. Chase play cue 3 on Universe 1
"3U1CP"<CR>
3. Chase play a previously searched cue with first frame of cue at Start Time
01:00:03.15 and crossfade time of 00:00:20.00 on all Universes.
"0100031500002000U*CP" <CR>
2. Chase play a previously searched cue with first frame of cue at Start Time
02:01:04.10 and crossfade time of 00:01:05.02 on Universe 1.
"0201041000010502U1CP" <CR>
Record Now
Description: This command is useful for when you want to command the Light Cue
Pro into record mode using a serial controller. Recording begins as soon as DMX is
detected. (ie. No arming or “change-detection” takes place.)
Command bytes:|vvv-vvv|vvv-vvv|vvv-vvv|vvv-vvv|nnnUuRR<CR>
|vvv…vvv|– the channels to record separated by commas. ie: 1-512. (optional)
nnn – the Cue number, filename or Cue name to record
u – the Universe number (optional)
Message Response:R<CR>
Examples:Record to cue file dmx00001.dmx from Universe 1:
001U1RR <CR> Record to cue file dmx00001.dmx from channels 5-8 onUniverse 2:
|5-8|U2RR <CR>
Record channels 1-512 on universe1, no other universes:
|1-512|0|0|0|"myCueName"RR<CR>
Record channels 1-12,81 and 89 on universe2, channel 41 on universe 3 to cue
name "myCueName":
- 31 -
Chapter 2
|0|1-12,81,89|41|0|"myCueName"RR<CR>
Record with SMPTE
Description: This command is useful for when you want to command the Light Cue
Pro into record mode using a serial controller. Recording begins as soon as DMX is
detected. (ie. No arming or “change-detection” takes place.) The file is timestamped
with the values of the incoming SMPTE timecode.
Command bytes:|vvv-vvv|vvv-vvv|vvv-vvv|vvv-vvv|nnnUuRS<CR>
|vvv…vvv|– the channels to record separated by commas. ie: 1-512. (optional)
nnn – the filename, cuename or cue number to record
u – the Universe number.
Message Response:R<CR>
Examples:Record to cue file dmx00001.dmx from Universe 1:
001U1RR <CR> Record to cue file dmx00001.dmx from channels 5-8 onUniverse 2:
|5-8|U2RR <CR>
Record channels 1-512 on universe1, no other universes:
|1-512|0|0|0|"myCueName"RR<CR>
Record channels 1-12,81 and 89 on universe2, channel 41 on universe 3 to cue
name "myCueName":
|0|1-12,81,89|41|0|"myCueName"RR<CR>
Arm Recording with SMPTE
Description: This command is useful for when you want to command the Light Cue
Pro into record mode using a serial controller. Recording begins as soon as a DMX
change is detected. The file is timestamped with the values of the incoming SMPTE
timecode.
Command bytes:|vvv-vvv|vvv-vvv|vvv-vvv|vvv-vvv|nnnUuRE<CR>
|vvv…vvv|– the channels to record separated by commas. ie: 1-512. (optional)
u – the Universe number.
Message Response:R<CR>
- 32 -
Control Protocols
Examples:Record to cue file dmx00001.dmx from Universe 1:
001U1RR <CR> Record to cue file dmx00001.dmx from channels 5-8 onUniverse 2:
|5-8|U2RR <CR>
Record channels 1-512 on universe1, no other universes:
|1-512|0|0|0|"myCueName"RR<CR>
Record channels 1-12,81 and 89 on universe2, channel 41 on universe 3 to cue
name "myCueName":
|0|1-12,81,89|41|0|"myCueName"RR<CR>
Pile-On Cue
Description: This command causes the Light Cue Pro to play a cue simultaneously
with other cues currently playing/ Up to 40 cues may be piled-on at one time. Each of
the 512 channel values of each cue that is playing is compared against the corresponding channel in the other playing cues, and the highest value is output if in
HTP mode, or the last value if in LTP mode (set by front panel).
Note: "Pile-On" cues are automatically "cleared" when the duration of the cue is complete.
For example, a "clear Cue" would not be needed for a short cue of 1 second long.
Lights are always held at the last level if no other cues are actively running (in other
words, not completed their time duration)
Command bytes:nnnUuPO<CR>
nnn – the Cue number or name to play
u – the Universe number. Use * for all.
Message Response:R<CR>
Comments: When the end of a piled-on cue is reached, the last look of the cue is held
and used in the comparison of other piled-on cues, playing or not.
Example:"001U2PO" <CR> Pile-on cue number 1 on Universe 2
“3U4PO”<CR>Pile-on cue number 3 on Universe 4
Pile-On Cue and Loop at end
Description: This command is the same as the Pile-On Cue command above, except
that when the end of the cue is reached, it loops back to the first look and continues.
Command bytes:nnnUuLO<CR>
- 33 -
Chapter 2
nnn – the Cue number to play
u – the Universe number. Use * for all.
Message Response:R<CR>
Example:"001U2LO" <CR> Pile-on cue number 1 and
loop at end on Universe 2
“3U1LO”<CR>Pile-on cue number 3 and
loop at end on Universe 1
Still Cue
Description: This command causes the Light Cue Pro to clear a cue which is currently
being piled-on. The cue will be taken out of the comparison.
Command bytes:nnnUuSC<CR>
nnn – the Cue number or name to still
u – the Universe number. Use * for all.
Message Response:R<CR>
Example:"myCueU*SC" <CR>Still cue name "myCue"
Clear Cue
Description: This command causes the Light Cue Pro to clear a cue which is currently
being piled-on. The cue will be taken out of the comparison.
Command bytes:nnnUuCL<CR>
nnn – the Cue number to remove
u – the Universe number. Use * for all.
Message Response:R<CR>
Example:"001U*CL" <CR> Clear Cue Number 1 from all Universes
“3U1CL”<CR> Clear Cue Number 3 from Universe 1
Feedthrough
- 34 -
Control Protocols
Description: This command causes the Light Cue Pro to pass the data from the input
DMX connector to the output, bypassing the data recorded in the unit. Playback of
recorded data will continue if it was in progress when this command was received,
however the data will not be output.
Command bytes:nUuFT<CR> If n=1 feedthrough is actvated
If n=0 feedthrough is deactivated
u – the Universe number. Use * for all.
Message Response:R<CR>
Comments: "Feedthrough" will display on the main front LCD screen for the corresponding universe when activated.
Example:"1U*FT" <CR> feedthrough is activated on all Universes
“0U1FT”<CR>feedthrough is deactivated on Universe 1
Force Value
Description: Force a DMX channel to specified value.
Command bytes:cccvvvUuFV<CR> ccc - ASCII representation of the channel number 1 to 512. vvv - ASCII representation of the channel value 000 to 255. u – the Universe number. Use * for all.
Message Response:R<CR>
Example:"255128U*FV" <CR>
forces channel 255 to value 128 on all Universes
Force DMX
Description: Force an entire set of DMX channels to specified value.
Command bytes:nvvv....vvvUuFD<h0D>
n - 0 for first 128 channels, 1 for second 128 channels, 2 for the third 128 channels, 3
for forth
vvv.....vvvvvv - the ASCII representation of the channel value 000
to 255 listed 128 times. u – the Universe number. Use * for all.
Message Response:R<CR>
- 35 -
Chapter 2
Clear Forces
Description: Clear any forces that are in place
Command bytes:UuFC<h0D>
u – the Universe number. Use * for all.
Message Response:R<CR>
SMPTE Status
Description: This command causes the Light Cue Pro to respond with the current
status time and state of the SMPTE interface.
Command bytes:SS<CR> Message Response:status hh:mm:ss.ff<CR> status is either: "Awaiting SMPTE", "Running", "Paused", "Idle" or "Error"
Example:Running 01:00:20.30 <CR>
DMX File Query
Description: This command causes the Light Cue Pro to respond with the dmx files
currently playing. The word "none" is returned if no cues are playing.
Command bytes:UuCC<CR> u – the Universe number.
Message Response:"ccccccc.ccc" , "ccccccc.ccc" <CR>
where "ccccccc.ccc" is the ASCII representation of the file currently playing on that
Universe separated by commas
Example:"dmx00001.dmc","dmx00002.dmc" <CR> Cue numbers 1, & 2 are playing
None<CR>no cues are playing (unit is idle)
Reset
Description: This command causes the LightCue Pro to stop the playback of all active
cues and hold the current look.
Command bytes:UuRJ<CR
u – the Universe number. Use * for all.
Message Response:R<CR>
Pile-On Priority
- 36 -
Control Protocols
Description: When set to 1, the LightCue Pro is in "Last Takes Priority" mode. Regardless of whether the DMX Value is higher or not, the last piled on value for that channel
will be applied.
Command bytes:nPP<CR
n = 1 – Last Takes Priority
n = 0 – Highest Takes Priority
Message Response:R<CR>
Longitude
Description:This command will get or set the longitude coordinates.
Get command:LN<0D>
Message Response:current value<0D>
Example:
Send Command:LN<0D>
Response:81.0<0D>
Set command:81.0LN<0D>
Message Response:R<0D>
Latitude
Description:This command will get or set the latitude coordinates.
Get command:LA<0D>
Message Response:current value<0D>
Example:
Send Command:LA<0D>
Response:28.0<0D>
Set command:28.0LA<0D>
Message Response:R<0D>
Reboot
Description:This command will perform a hard reboot of the system.
Comments: The V16Pro will reload and run the selected script. The normal power on
response will apply
Command:XX<0D>
Message Response:K<0D> (after reboot complete)
- 37 -
Chapter 2
IP address
Description:This command will get or set the selected port IP address. Port A or B
may be selected
Comments: Where xxx is a decimal number in the range of 0 – 255.
Get command:(A or B)IP<0D>
Message Response:xxx.xxx.xxx.xxx<0D>
Set command:xxx.xxx.xxx.xxx(A or B)IP<0D>
Message Response:R<0D>
Subnet Mask number
Description:This command will get or set the number used to isolate the subnet.
Comments: xxx is a decimal number in the range of 0 – 255.
Get command:SM<0D>
Message Response:xxx.xxx.xxx.xxx<0D>
Set command:xxx.xxx.xxx.xxxSM<0D>
Message Response:R<0D>
Gateway IP Address
Description:This command will get or set the IP address of the gateway the unit will
connect through.
Comments: xxx is a decimal number in the range of 0 – 255.
Get command:GW<0D>
Message Response:xxx.xxx.xxx.xxx<0D>
Set command:xxx.xxx.xxx.xxxGW<0D>
Message Response:R<0D>
Date
Description:This command will get or set the calendar date.
Comments: mm/dd/yyyy Month/Day/Year.
Get command:DA<0D>
Message Response:mm/dd/yyyy<0D>
Set command:mm/rr/yyyyDA<0D>
Message Response:R<0D>
Time
- 38 -
Control Protocols
Description:This command will get or set the time of day.
Comments: hh:mm:ss Hours/Minutes/Seconds.
Get command:TI<0D>
Message Response:hh:mm:ss<0D>
Set command:hh:mm:ssTI<0D>
MessageResponse:R<0D>
User Name
Description:This command will get or set the user login name.
Comments: The default name is admin.
Get command:US<0D>
Message Response:(current login)<0D>
Set command:(new login)US<0D>
Message Response:R<0D>
Get/Set Password
Description:This command will get or set the password.
Comments: The default password is password.
Get command:PW<0D>
Message Response:password<0D>
Set command:passwordPW<0D>
Message Response:R<0D>
DST Enable
Description:This command will get or set the status of the daylight saving time parameter.
Comments: 0 = Standard Time, 1 = using DST.
Get command:SD<0D>
Message Response:current setting<0D>
Set command:1SD<0D>
Message Response:R<0D>
DST Type
Description:This command will get or set the status of the daylight saving time Type.
Comments: Example are: 1 = US, 2 = Universal, 3 = Australia, 4 = Europe.
Get command:DT<0D>
Message Response:current setting<0D>
- 39 -
Chapter 2
Set command:1DT<0D>
Message Response:R<0D>
Time Zone
Description:This command will get or set the Time Zone.
Comments: The time zone 0 is the Greenwich Mean Time GMT. Time zones going
west are given –1 numbers and +1 going east from GMT 0 until the International Date
Line is reached. Eastern TZ in the USA is -5
Get command:TZ<0D>
Message Response:current timezone<0D>
Set command:-5TZ<0D>
Message Response:R<0D>
NTP IP Address
Description:This command will get or set the NTP IP address needed to contact the
timeserver.
Get command:NI<0D>
Message Response:(current NTP address)<0D>
Example:Send Command:NI<0D>
Response:ntp.org<0D>
Set command:"NTP IP address"NI<0D>
Message Response:R<0D>
NTP Enable
Description:This command will enable or disable the NTP function and will get the
current status.
Comments: 0 = disable, 1 = enable
Get command:NE<0D>
Message Response:(current status)<0D>
Set command:(0 or 1)NE<0D>
Message Response:R<0D>
Ethernet Port for NTP
Description:This command will get or set the V16Pro Ethernet port used to contact the
NTP server.
Comments: A = port A, B = port B. The default port is A
Get command:NJ<0D>
- 40 -
Control Protocols
Message Response:(current port)<0D>
Set command:(port A or B)NJ<0D>
Message Response:R<0D>
DHCP Enable
Description:This command will enable or disable the DHCP function and will get the
current status.
Comments: x is 0 = disable, 1 = enable
p is A = port A, B = port B
Get command:pDH<0D>
Message Response:x<0D>
Set command:xpDH<0D>
Message Response:R<0D>
HTTP Ethernet Port
Description:This command will get or set the Ethernet port that will be used in connecting to the Internet
Comments: p = A/B Ethernet jack locations on the V16Pro
Get command:HJ<0D>
Message Response:x<0D>
Set command:(A or B)HJ<0D>
Message Response:R<0D>
HTTP WEB Page
Description:This command will get or set the default HTTP WEB address.
Comments: The default WEB page is index.html
Get command:HP<0D>
Message Response:(currentwebpage)<0D>
Set command:(myWebPage.html)HP<0D>
Message Response:R<0D>
sage sent from an PC (address 0xFF) to a LightCuePro on Universe 1.
- 41 -
Chapter 2
MIDI Control
The LightCuePro can be controlled with standard "Go Cue", "NoteOn" and "NoteOff"
MIDI commands.
Start a Cue with SYSEX “GO CUE”
The SYSEX “GO CUE” message can be used to start a cue. Here is the general form:
0xF0 0x7F <Universe Number> 0x02 0x7F 0x01 <data #1> <data #2> <data #3>
0xF7
The <Universe Number> is starting at 1. So 0x01 will start cues on Universe 1. Use
0x00 to start on ALL universes.
The <data #1> byte is the ASCII hundreds digit of the sequence number (sequence
index + 1). For example, if you were starting sequence #104, the <data #1> byte is
0x31 (or “1”).
The <data #2> byte is the ASCII tens digit of the sequence number (sequence index +
1). For example, if you were starting sequence #104, the <data #2> byte is 0x30 (or
“0”).
The <data #3> byte is the ASCII ones digit of the sequence number (sequence index
+ 1). For example, if you were starting sequence #104, the <data #3> byte is 0x34 (or
“4”).
Here is an example to start Cue #4 message sent from an PC (address 0xFF) to a
LightCuePro on All Universes:
0xF0 0x7F 0x00 0x02 0x7F 0x01 0x30 0x30 0x34 0xF7
Pile on a Cue with "NOTE ON"
The NOTE ON message can be used to "Pile On" and play a Cue:
<universe number + 0x90> <output index + 0x3C> 0x40
The universe number starts at 1. Use 0x00 for ALL universes. Here is an example
“Pile On Cue #1” message sent from an PC (address 0xFF) to a LightCuePro on Universe 1.
0x91 0x3C 0x40
Clear Cue with "NOTE OFF"
The NOTE OFF message can be used clear (stop) a specific cue that has been piled
on. If this cue number is the only cue, all playback stops.
<universe number+ 0x80> <output index + 0x3C> 0x40
The universe number starts at 1. Use 0x00 for ALL universes. Here is an example
“Pile On Cue #1” mes
- 42 -
Specifications
Specifications
Overview
Control
Parallel Inputs
Serial
MIDI
Ethernet
8 Programmable, Contact Closure or Voltage
DB-9M RS-232, 9600 baud, N, 8, 1
5 Pin DIN with basic "Note On" commands to start cues
10/100 Base-T, UDP Control, FTP File Transfer, NTP
Front Panel
Pushbuttons
Knob
Indicators
Display
CF Socket
8 Programmable: Play,Still,Stop,Feedthrough
Rotary Encoder with Push to Select
Power, DMX status, LTC In(SMPTE)
16x2 character LCD Display
Front Access, Security Cover Plate
Physical
Power
Size
Weight
Environment
Power SupplyCompliance
Captive Barrel, 100 to 250 VAC, 50/60 Hz, 20 Watts Maximum
Class 2 Supply Provided
19” W x 1.75” H x 7” D (48.3 cm W x 4.5 cm H x 17.8 cm D)
4 lbs
0°C (32°F) to 38°C (100°F) 0-90% Relative Humidity
CE, UL, CSA, WEEE, RoHS
- 43 -
Chapter 2
Serial Pins
DB-9 male RS-232C connector, intended to be connected using a straight-through
(not null-modem) 9-pin cable. Pin No. Function
1
2
3
4
5
6
7
8
9
not used
TXD (data from Light Cue Pro)
RXD (data to Light Cue Pro)
not used
GND
not used
not used
not used
not used
- 44 -
Specifications
Parallel (DB37) Pins
Inputs
Inputs may either be contact closure or voltage inputs. To configure, use the front
panel menu option "Inputs" or LightCue Manager software's "Inputs" page. To program their function, use the LightCue Manager software.
Input No Pin No’s.
1
2
3
4
5
6
7
8
1 (-), 20 (+)
2 (-), 21 (+)
3 (-), 22 (+)
4 (-), 23 (+)
5 (-), 24 (+)
6 (-), 25 (+)
7 (-), 26 (+)
8 (-), 27 (+)
Note: The "Legacy" pin-out of the original LightCue may still be used. Select "Legacy Mode" from the front
panel to use this pin out.
Note: The Pinout polarity for LightCuePro (4 Universe LightCue) is reversed from this pinout.
Outputs
"Playing" and "Fault" Status outputs are provided. They are dry contact closures rated
at 24 VDC and 1 amp max.
Function
Pin
No
Playing
Fault
9,28 Closed when the unit is playing a DMX Cue
10,29 Closed when the unit detects a CF search error or CPU failure.
Description
- 45 -
Chapter 2
DMX Input Pins
The DMX input is a standard 5-pin XLR male connector. Pin No Function
1
2
3
4
5
Shield
- (low)
+ (high)
not used
not used
DMX Output Pins
The DMX output is a standard 5-pin XLR female connector. Pin No Function
1
2
3
4
5
Shield
- (low)
+ (high)
not used
not used
SMPTE Input
The SMPTE input is a standard 3-pin XLR female connector. Input signal level range
is -10 dbu to +4 dbu. Impedance is 600 ohms.
Pin No Function
1
2
3
Shield
+ (high)
- (low)
Accessories
IOBB (Input Output Breakout Board) breaks out the 37pin DB Connector into terminal
blocks for easy wiring. Contact sales for pricing and information.
- 46 -
Troubleshooting Tips
Troubleshooting Tips
Symptom
Possible Cause
Possible Solution
Compact Flash
card failure or
incorrect allocation size.
Cannot Connect Firewall blocking
with LightCue port 2638 or 2639
Manager
if using Ethernet
Remove compact flash card from rear of unit.
Place in CF reader connected to a PC. Save the
.dmx files and .cfg files to the PC. Format as
FAT32 with DEFAULT ALLOCATION SIZE.
Connect directly from PC to Show Controller
(without router or switch), or change router/switch
settings.
Make sure your PC is on the same subnet as the
Not on same sub- LightCue. For example, PC is on 192.168.0.2
net
and LightCue is on 192.168.0.254. (both must be
on 192.168.0.xxx)
Check to make sure you are not in "Legacy"
Rear Inputs do
mode by going to the front panel and selecting
In legacy mode
not work
"inputs." Legacy mode is only for compatibility
with older LightCue rear input configuration.
Contact CloMake sure to set the Contact Closure or Voltage
sure/Voltage
mode by using LightCue Manager or by using the
Mode not set
front panel
Make sure that port 123 is allowed to pass
NTP doesn't
Firewall block
through any routers or switches to reach your desupdate
tination ip or dns address for NTP.
Files do not
play
- 47 -
Glossary
LightCuePro
4 Universe LightCue
C
P
Channel Set
Pile-On
Play a cue without stopping
other cues that are currently
being played back. Overlapping dmx channels will
be determined based on
HTP or LTP setting.
A grouping of channels on
multiple universes used for
easy record or playback
tracking.
Cue Name
A group of one or more dmx
files that were recorded from
multiple universes and may
be played back on multiple
universes.
D
DMH File
Legacy LightCue dmx file.
Ends in extension .dmh.
DMX Channel
A single channel in the
range 1-512 with a value 0255 (0%-100%).
DMX File
A file containing DMX and
timing information for a single universe. Ends in extension .dmx.
L
LightCue
Single Universe record and
playback device
- 49 -
Index
Power Jack
Power LED
4
2
R
A
Arm Recording
Record
32
S
B
buttons
Still
Stop
3
C
Channel Sets
Chase Play
Clear Cue
Compact Flash
Control Knob
Cue Editor
Cue Name
27
30
34
2
2
18
26
D
DMX-512
Dmx Files
DMX Files
4
21
19
F
Fade-In Time
Feedthrough
Follow SMPTE
24
8
24
M
menu
8
N
Navagator Bar
15
P
Pile-On Cue
Pile-On Cue and Loop at end
PileOn
Play
Play Window
Playback
8, 31-32
33
33
24
8
23
13
- 51 -
8, 34
8