1
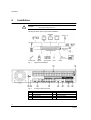
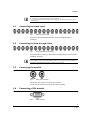
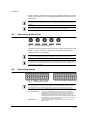
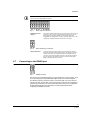
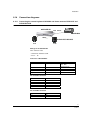
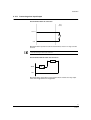
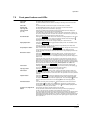
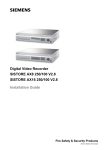
Digital Video Recorder
SISTORE AX8 1000/200 V4.0
SISTORE AX16 1000/400 V4.0
Installation Manual
6LHPHQV$*
Liefermöglichkeiten und technische Änderungen vorbehalten.
Data and design subject to change without notice. / Supply subject to availability.
© 2010 Copyright by Siemens AG
We reserve all rights in this document and in the subject thereof. By acceptance of the document the recipient acknowledges these rights
and undertakes not to publish the document nor the subject thereof in full or in part, nor to make them available to any third party without our
prior express written authorization, nor to use it for any purpose other than for which it was delivered to him.
About this document
This document contains instructions for the installation of SISTORE AX8 and
SISTORE AX16.
For information on configuration and operation please refer to the Configuration &
Operation Manual.
NOTE
This document cannot deal with every possible application. Further useful product information as well
as application examples and supplementary information to the manuals can be found on our intranet
website: https://psp.sbt.siemens.com/ (Product Support Platform).
Trademarks
SISTORE is a trademark of Siemens.
Microsoft is a registered trademark and Windows a trademark of Microsoft
Corporation.
All other product or company names mentioned in this document are trademarks or
registered trademarks of their respective owners and are used only for purposes of
identification or description.
Contacting us
If you have questions or suggestions regarding the product or this documentation,
please contact our Customer Support Center:
Intranet:
Customer Support Center
Internet:
About us > Worldwide Contacts
Email:
[email protected]
Tel.:
+49 89 9221 8000
Fax:
+49 89 6367 2000
Training courses
Siemens provides training courses for all products.
Contents
1
1.1
1.2
1.2.1
1.2.2
1.2.3
1.3
1.4
Safety .......................................................................................................5
Target readers...........................................................................................5
Work safety information ............................................................................5
Transport...................................................................................................5
Installation .................................................................................................6
Service and maintenance .........................................................................6
Meaning of the written warning notices ....................................................7
Meaning of the hazard symbols ................................................................7
2
Directives and standards .......................................................................7
3
Technical data .........................................................................................8
4
Details for ordering .................................................................................9
5
Scope of delivery ....................................................................................9
6
6.1
6.2
6.3
6.4
6.5
6.6
6.7
6.8
6.9
6.10
6.11
6.12
6.13
6.14
6.14.1
6.14.2
6.14.3
Installation .............................................................................................10
Connecting the video input .....................................................................11
Connecting the loop-through video .........................................................11
Connecting the monitor ...........................................................................11
Connecting a VGA monitor .....................................................................11
Connecting Audio In/Out.........................................................................12
Connecting alarms ..................................................................................12
Connecting to the RS485 port.................................................................13
Connecting to the USB ports ..................................................................14
Connecting to the RS232 port.................................................................14
Connecting to the network port ...............................................................14
Factory reset ...........................................................................................15
Connecting the power cord .....................................................................15
Connector pin outs ..................................................................................16
Connection diagrams ..............................................................................17
Connecting the remote keyboard CKA4820 and dome cameras
CCDA1415 and CCDA1425/1435...........................................................17
Local control of CCDA and CCDS dome cameras .................................18
Connecting alarm input/output ................................................................19
7
7.1
7.2
7.3
Operation ...............................................................................................20
Turning on the power ..............................................................................20
Front panel buttons and LEDs ................................................................21
System setup ..........................................................................................22
8
Disposal .................................................................................................22
3
Siemens AG
EN
05.2010
Safety
1
Safety
1.1
Target readers
The instructions in this document are designed for the following target readers:
1.2
Target readers
Qualification
Activity
Condition of the
product
Installer
Technical training for
electrical installations.
Installs the product,
individual components
of the product or
replacement parts.
Components of the
product are not yet
installed or need to be
replaced or modified.
Work safety information
z Read the general safety precautions before operating the device.
z Keep this document for reference.
z Follow all warnings and instructions marked on the device.
z Always pass this document on together with the device.
z Any national or local safety standards or laws that apply to the development,
design, installation, operation or disposal of a product must be adhered to in
addition to the instructions in the product documentation.
Radio interference with other devices in the environment
z This is a Class A device. This equipment may cause radio interference in a
residential installation. In this case the user is encouraged to perform
appropriate measures to correct the interference.
z The device may be connected only to LAN physically limited solely to interior
rooms of residential, business and commercial areas.
Liability claim
z Do not connect the device if it is damaged or any parts are missing.
z Do not make any changes or modifications to the device unless they are have
been approved by the manufacturer.
z Use only spare parts and accessories that have been approved by the
manufacturer.
1.2.1
Transport
Damage during transport
z Do not expose the device to mechanical vibrations or shocks.
z Keep the packaging material for future transportation.
5
Siemens AG
EN
05.2010
Safety
1.2.2
Installation
Damage due to unsuitable mounting location
z The environmental conditions recommended by the manufacturer must be
observed (see Section 3: Technical data).
z Do not operate the device close to sources of powerful electromagnetic
radiation.
z Do not operate the device in dusty places.
z The device should only be used for indoor applications.
z Do not expose the device to mechanical vibrations or shocks.
z Protect the device against moisture.
Cable damage due to mechanical load
z Make sure that cables are not under stress, kinked or damaged.
Damage to the device due to lack of ventilation
z Do not block or cover the ventilation openings of the device.
z Do not stack several devices on top of each other and do not place any objects
on the device.
Danger of electrical shock due to incorrect connection
z Use the device only in conjunction with a power supply cable that has been
approved in your country and complies with the national standards.
z This product is designed for TN power systems and for IT power systems in
Norway with 230 V phase-to-phase voltage. Do not connect the device to any
other IT power systems.
Damage to the device due to overvoltage
z Connect the device only to power sources with the specified voltage. Voltage
supply requirements can be found on the type label (see Section 3: Technical
data).
1.2.3
Service and maintenance
Danger of electrical shock during maintenance
z Always disconnect the power cable and other cables from the main power
supply before performing maintenance.
Danger of electrical shock while cleaning the device
z Disconnect the device from the mains supply before cleaning.
z Do not use liquid cleaners or sprays that contain alcohol, spirit or ammonia.
6
Siemens AG
EN
05.2010
Directives and standards
1.3
Meaning of the written warning notices
The severity of a hazard is indicated by the following written warning notices.
1.4
Signal word
Type of risk
CAUTION
There is a risk of minor injuries or damage to property.
Meaning of the hazard symbols
The nature of the hazard is indicated by icons.
Warning of a hazard
2
Directives and standards
This product complies with the requirements of the following European directives.
The EU declaration of conformity is available to the responsible agencies at:
Siemens AG
Siemensallee 84
76181 Karlsruhe
Germany
European Directive 2004/108/EC ”Electromagnetic Compatibility”
Compliance with the European Directive 2004/108/EC has been proven by testing
according to the following standards:
Emitted interference:
EN 61000-6-4
EN 55022 Class A
Interference resistance:
EN 50130-4
European Directive 2006/95/EEC ”Low-Voltage Directive”
Compliance with the European Directive 2006/95/EEC has been proven by testing
according to the following standard:
Safety:
EN 60950-1
7
Siemens AG
EN
05.2010
Technical data
3
Technical data
Monitoring
Video inputs
Composite: 8/16 looped through, BNC, PAL/NTSC (auto detection)
Video outputs
1 Composite: 1 Video, 1 SPOT
1 VGA: 800 x 600, 1024 x 768, 1280 x 1024 (60 Hz)
Inputs/Outputs
Audio inputs
4 line level RCA
Audio output
1 line level RCA
Alarm inputs
8/16 TTL (NC or NO), 2.4V (NC) or 0.3V (NO) threshold, 5VDC
Alarm outputs
2 relay outputs, terminal blocks, programmable as NC or NO,
2 A (25 V AC), 1 A (30 V DC)
Alarm reset input
1 TTL, terminal block
Network
Ethernet (10/100 BaseT)
Auxiliary inputs/outputs
RS232C, RS485, 2 x USB 2.0
Interfaces
Front buttons, mouse, remote keyboard
User administration
64 groups, 256 users/groups (access right programmable per group)
Recording/Playback
Compression
H.264 technology (video), ADPCM (audio)
Recording speed
SISTORE AX8: up to 200 ips (PAL), up to 240 ips (NTSC)
SISTORE AX16: up to 400 ips (PAL), up to 480 ips (NTSC)
Recording resolution
CIF, 2CIF, 4CIF
Recording mode
Time-Lapse, Event, Pre-Event (up to 30 min), Text-In, Panic
Search mode
Date/Time, Calendar, Event, Motion, Museum, Text-In, Record Table
System
Operating system
Embedded Linux (built-in flash memory)
Hard disk capacity
1000 GB SATA, extensible with two 250 GB, 500 GB, or 1000 GB SATA
extension kits
Backup recording media*
Built-in DVD burner, USB (hard disk drive, flash memory)
Disk management
Temperature check, SMART diagnosis, auto database recovery, operation
without hard disk drive, auto deletion
8
Siemens AG
EN
05.2010
Details for ordering
Specifications
Power requirements
100 – 240 V AC, 1.2 – 0.6 A, 50/60 Hz ± 10 %
Power consumption
45 W (60 W when 3 hard disk drives are installed)
Ambient temperature, operating
5 – 40 °C
Relative humidity
0 – 90 %, no condensation
Version
19-inch rack, 2 rack units
Dimensions (W x H x D)
430 x 88 x 405 mm
Approvals
CE, FCC, C-Tick, RoHS
* When installing an internal DVD RW drive, connect the SATA I/O cable to the SATA3 socket.
4
Details for ordering
Type
SISTORE AX8 1000/200
SISTORE AX16 1000/400
5
Order No.
S54569-C72-B3
S54569-C92-B3
Designation
SISTORE AX8, 1000 GB, 200 ips
SISTORE AX16, 1000 GB, 400 ips
Weight
10.2 kg
10.2 kg
Scope of delivery
z Digital video recorder
z Power cord
z CD-ROM including:
Configuration & Operation Manual
Multilingual RAS Software and User Manual
z Multilingual Installation Manual
z Rack-mount kit
z Assembly screws for adding hard disk drives
z Infrared remote control
9
Siemens AG
EN
05.2010
Installation
6
Installation
Always disconnect the power cable and other cables from the main power
supply before installing the device.
CAUTION
The diagram below shows a typical DVR installation.
Fig. 1
Typical DVR installation
Fig. 2
16-channel DVR rear panel
1
Video Input
6
RS232C Port
2
Video Loop Through
7
Audio In/Out
3
RS485 Port
8
Video Out
4
Alarm Input/Output
9
Factory Reset Switch
5
Network Port
10
Power Cord Connector
10
Siemens AG
EN
05.2010
Installation
NOTE
z Your DVR can be used with either PAL or NTSC equipment.
z You cannot mix PAL and NTSC equipment. For example you cannot use a PAL camera and an
NTSC monitor.
6.1
Connecting the video input
Fig. 3
Video input connectors
Connect the coaxial cables from the video sources to the BNC Video In
connectors.
6.2
Connecting the loop-through video
Fig. 4
Video loop-through connectors
If you would like to connect your video source to another device, you can use the
Loop BNC connectors.
NOTE
The Loop BNC connectors are auto terminated. Do not connect a cable to the Loop BNC unless it is
connected to a terminated device because it will cause poor quality video.
6.3
Connecting the monitor
Fig. 5
Video Out connectors
Connect the main monitor to the Video Out connector.
Connect the spot monitor to the SPOT connector as needed.
6.4
Connecting a VGA monitor
Fig. 6
VGA connector
11
Siemens AG
EN
05.2010
Installation
A VGA connector is provided so that you can use a standard, multi-sync computer
monitor as your main monitor. Use the cable supplied with your monitor to connect
it to the DVR.
NOTE
The VGA and Video Out (BNC) connectors may be connected to individual monitors for simultaneous
operation.
NOTE
Please note the technical specification for the VGA output in Section 3: Technical data.
6.5
Connecting Audio In/Out
Fig. 7
Audio input/output connectors
Your DVR can record audio from up to four sources. Connect the audio sources to
Audio In 1, Audio In 2, Audio In 3 and Audio In 4 as needed using RCA jacks.
Connect Audio Out to your amplifier.
NOTE
It is the user’s responsibility to determine if local laws and regulations permit recording audio.
NOTE
The DVR does not have amplified audio output, so you will need a speaker with an amplifier. The DVR
does not have a pre-amplifier for audio input, so the audio input should be from an amplified source,
not directly from a microphone.
6.6
Connecting alarms
Fig. 8
Alarm Input connectors
NOTE
To make connections on the Alarm Connector Strip, press and hold the button and insert the wire in
the hole below the button. After releasing the button, tug gently on the wire to make certain it is
connected. To disconnect a wire, press and hold the button above the wire and pull out the wire.
AI 1 to 16 (Alarm-In)
You can use external devices to signal the DVR to react to events.
Mechanical or electrical switches can be wired to the AI (Alarm-In) and
GND (Ground) connectors. When the electrical switch is wired, the
threshold voltage for NC (Normally Closed) is above 2.4V and for NO
(Normally Open) is below 0.3 V and should be stable at least 0.5 seconds
to be detected. For further information please refer to the Configuration &
Operation Manual: Section Alarm-In screen.
GND (Ground)
Connect the ground side of the alarm input and/or alarm output to the
GND connector.
12
Siemens AG
EN
05.2010
Installation
NOTE
All the connectors marked GND are common.
Fig. 9
Alarm Output connectors
NC/NO (Relay AlarmOutputs)
Fig. 10
Alarm Reset Input connectors
ARI (Alarm Reset In)
6.7
The DVR can activate external devices such as buzzers or lights. Connect
the device to the C (Common) and NC (Normally Closed) or C and NO
(Normally Open) connectors. NC/NO is a relay output which sinks
2A@125VAC and 1A@30VDC. For further information please refer to the
Configuration & Operation Manual: Section Alarm-Out screen.
An external signal to the Alarm Reset In can be used to reset both the
Alarm Out signal and the DVR’s internal buzzer. Mechanical or electrical
switches can be wired to the ARI (Alarm Reset In) and GND (Ground)
connectors. The threshold voltage is below 0.3V and should be stable at
least 0.5 seconds to be detected. Connect the wires to the ARI (Alarm
Reset In) and GND (Ground) connectors.
Connecting to the RS485 port
Fig. 11
RS485 connector
The DVR can be controlled remotely by an external device or control system, such
as a control keyboard, using RS485 half-duplex serial communications signals.
The RS485 connector can also be used to control PTZ (pan, tilt, zoom) cameras.
Connect TX+/RX+ and TX-/RX- of the control system to the RX+/TX+ and RX-/TX(respectively) of the DVR. For further information please refer to the Configuration
& Operation Manual and the PTZ camera or remote keyboard manual for
configuring the RS485 connection.
13
Siemens AG
EN
05.2010
Installation
6.8
Connecting to the USB ports
Fig. 12
USB connectors
Two USB ports on the front panel are provided to connect external hard disk, CDRW or flash drives for video clip copying or system upgrades. Position external
drives close enough to the DVR so that you can make the cable connections,
usually less than 6 feet. Use the USB cable provided with the hard disk drive to
connect it to the DVR.
A USB mouse (not supplied) can be connected to one of the ports. You can use
the mouse to navigate through the screens and menus much like you would on a
computer.
A USB to Serial converter can be connected to the USB port. Multiple text-in
devices can be used with a USB to Serial converter.
6.9
Connecting to the RS232 port
Fig. 13
RS232 connector
An RS232 port is provided to connect a remote control keyboard.
6.10
Connecting to the network port
Fig. 14
Network connector
The DVR can be networked using the 10/100Mb Ethernet connector. Connect a
Cat5 cable with an RJ-45 jack to the DVR connector. The DVR can be networked
with a computer for remote monitoring, searching, configuration and software
upgrades. For further information on configuring the Ethernet connections please
refer to the Configuration & Operation Manual.
NOTE
The Network connecter is not designed to be connected directly with cable or wire intended for
outdoor use.
14
Siemens AG
EN
05.2010
Installation
6.11
Factory reset
Fig. 15
Factory reset switch
The DVR has a factory reset switch to the left of the VGA connector on the rear
panel. This switch will only be used on the rare occasions that you want to return
all the settings to the original factory settings.
NOTE
When using the Factory Reset, you will lose any settings you have saved.
To reset the unit, you will need a straightened paperclip:
1.
Turn the DVR off.
2.
Turn it on again.
Î
While the DVR is initializing, the front panel LEDs will blink.
3.
When the front panel LEDs blink, poke the straightened paperclip in the
unlabeled hole to the left of the Alarm Output connectors.
4.
Hold the switch until all the LEDs on the front panel are lit.
NOTE
When the DVR successfully resets to factory defaults all the LEDs on the front panel flash five times.
5.
Release the reset switch.
Î
6.12
All of the DVR’s settings are now at the original settings it had when it left the
factory.
Connecting the power cord
Fig. 16
Power cord connector
Connect the AC power cord to the DVR and then to a wall outlet.
CAUTION
CAUTION
Route power cords so that they are not a tripping hazard. Make certain the
power cord will not be pinched or abraded by furniture. Do not install power
cords under rugs or carpet.
The power cord has a grounding pin. If your power outlet does not have a
grounding pin receptacle, do not modify the plug.
Do not overload the circuit by plugging too many devices in to one circuit.
Your DVR is now ready to operate. For information on configuration and operation
please refer to the Configuration & Operation Manual.
15
Siemens AG
EN
05.2010
Installation
6.13
Connector pin outs
I/O connector pin outs
AI (1 to 16)
Alarm Inputs 1 to 16
GND
Chassis Ground (5 connectors)
NC
Relay Alarm Outputs (Normally Closed)
NO
Relay Alarm Outputs (Normally Open)
C
Relay Common
ARI
Alarm Reset In
RS485 connector pin outs
Master unit
Slave unit
RX+/TX+ J To J TX+/RX+
RX-/TX-
J
To J TX-/RX-
RS232 connector pin outs
Pin 1
DCD (Data Carrier Detect)
Pin 2
RXD (Receive Data)
Pin 3
TXD (Transmit Data)
Pin 4
DTR (Data Terminal Ready)
Pin 5
GND (System Ground)
Pin 6
DSR (Data Set Ready)
Pin 7
RTS (Request To Send)
Pin 8
Pin 9
CTS (Clear To Send)
RI (Ring Indicator)
16
Siemens AG
EN
05.2010
Installation
6.14
Connection diagrams
6.14.1
Connecting the remote keyboard CKA4820 and dome cameras CCDA1415 and
CCDA1425/1435
SISTORE AX
ID #1 RS232
CKA4820
RS485
CCDA1415/1425/1435
ID #1
ID #n
Settings on the SISTORE AX
In the “Camera” menu:
– PTZ Device: Siemens CCDA
– ID: #1 … #n
In the menu “RS232/RS485”
RS232
RS485
Baud Rate
19,200
19,200 (CCDA1415)
1200…9600
(CCDA1425/1435)
Parity
None
None
Data Bit
8
8
Stop Bit
1
1
Usage
Remote control
PTZ control
Pin out RS232 connection
SISTORE AX: RS 232
CKA4820: RS232 Com 1A
Pin 1
Pin 1
Pin 2
Pin 3
Pin 3
Pin 2
Pin 5
Pin 5
Pin 9
Pin 9
Pin out RS485 connection
SISTORE AX: RS 485
CCDA14xx
Tx +
Data +
Tx -
Data -
17
Siemens AG
EN
05.2010
Installation
6.14.2
Local control of CCDA and CCDS dome cameras
The following commands are supported when controlling CCDA and CCDS dome
cameras locally on the DVR. Select the desired command in the PTZ menu using
either the front panel buttons or a connected USB mouse.
OSD
Description
Speed
Speed control for Pan/Tilt movements
Set Preset / Preset View
Stored, fixed camera position that you can return to by entering
the preset number
Auto panning
The dome camera will perform an auto scan operation
Tour
Repeat pre-configured sequence of presets that the dome will
move between continuously.
Device menu
Open the menu of the dome for configuration
OSD navigation
Once the OSD is displayed on the video output, navigation and parameter setup
can be performed using the following commands:
OSD function
PTZ command
OSD up
PTZ up
OSD down
PTZ down
Select parameter / next page
Focus near
Deselect parameter / page back
Focus far
18
Siemens AG
EN
05.2010
Installation
6.14.3 Connecting alarm input/output
Recommended Alarm-In connection
Alarm
Device
Alarm In
GND
Mechanical alarm input device can be used as above, and 5 V TTL logic can also
be used.
NOTE
The threshold voltage of alarm input is below 5 V.
Recommended RELAY Alarm Out connection
Mechanical alarm output device can be used as above. NC/NO is a relay output
which sinks 2A@125VAC and 1A@30VDC.
19
Siemens AG
EN
05.2010
Operation
7
Operation
7.1
Turning on the power
The SISTORE AX8/AX16 is operational in approximately 60 seconds after the
power cable is connected to the system. The SISTORE AX8/AX16 may be
powered down by selecting Shutdown in the System menu and pressing the
button. When shutting down the DVR, you need to confirm that you want to shut
down the unit. No on/off switch is provided.
Fig. 17
16-channel DVR front panel
1
Power LED
10
Clip Copy Button
2
HDD LED
11
Alarm Button
3
Alarm Out LED
12
Group/Sequence Button
4
Network LED
13
Playback Mode Button
5
Clip Copy LED
14
Menu/Cameo Button
6
Camera Buttons
15
Enter/Pause Button
7
Zoom/PTZ Button
16
Arrow Buttons
8
Panic Button
17
USB Connector
9
Display/SPOT Button
Display Modes
Press the desired camera number button to view the desired camera image, and
press the Display button repeatedly to toggle between different display formats:
4x4, 3x3, 2x2 and PIP.
Recording
Once you have installed the system following the instructions in chapter 6
Installation, it is ready to record. There is no recording button on the front panel to
initiate recording video. The SISTORE AX8/16 will start recording video according
to the schedule configured by the user and from external and internal events such
as alarm input, motion detection or text-in events.
20
Siemens AG
EN
05.2010
Operation
7.2
Front panel buttons and LEDs
Power LED
The Power LED is lit when the unit is On.
HDD LED
The HDD LED flickers when the DVR is recording or searching video on the hard disk
drive.
Alarm LED
The Alarm Out LED is lit when alarm output or internal buzzer is activated.
Network LED
The NETWORK LED is lit when the unit is connected to a network via Ethernet.
Clip Copy LED
The Clip Copy LED is lit when the DVR is clip-copying.
Camera buttons
(1 to 16)
Pressing the individual camera buttons will cause the selected camera to display full
screen. Buttons 1 to 9 are also used to enter passwords.
In the PTZ mode, pressing the button 1 zooms in the screen and the button 2 zooms out
the screen, pressing the button 3 focuses near and button 4 focuses far, and pressing the
button 5 moves to the preset and button 6 saves the preset.
Zoom/PTZ button
Pressing the Zoom/PTZ button enters zoom mode and a rectangle appears on the screen.
You can use the arrow buttons to move the rectangle to another area. Pressing the
(Enter/Pause) button zooms in the image in rectangle.
Pressing the button for two seconds or longer allows you to enter PTZ mode.
Display/Spot button
Pressing the Display/Spot button toggles different display formats. The available formats
are: PIP, 2x2, 3x3 and 4x4.
Pressing and holding the button for two seconds or longer allows you to select which
cameras will display on the Spot monitor.
Group/Sequence button
When in the live mode, pressing the Group/Sequence button changes the screen from the
current camera group to the next camera group, and the screen displays the page
number. Pressing and holding the button for two seconds or longer displays live channels
sequentially.
Menu/Cameo button
Pressing the Menu/Cameo button enters the Setup screen. You will need to enter the
authorized user and password to access Setup. Pressing the button also closes the
current menu or setup dialog box. In the Playback mode, pressing the button displays the
Search menu.
Pressing and holding the button for two seconds or longer enters the cameo mode. The
yellow outline surrounding the video indicates the active cameo, and pressing the arrow
buttons moves the active cameo. Pressing the desired camera button in the active cameo
(Enter/Pause)
edits the cameo and displays the video of selected camera. Pressing the
button exits the Active Cameo mode. Selecting Exit Group Edit in the cameo menu
displayed when pressing the Menu/Cameo button also exits the Active Cameo mode.
Panic button
Pressing the Panic button starts panic recoding of all camera channels, and displays
on the screen. Pressing the button again will stop panic recording.
Clip Copy button
Pressing the Clip Copy button allows you to copy video clips.
Alarm button
The Alarm button has two functions. First, it will reset the DVR’s outputs including the
internal buzzer during an alarm. Second, it will display the event log when you are in the
live monitoring mode unless there is an active alarm. This operation can be user password
protected.
Playback button
Pressing the Playback button enters the playback mode, and pressing the button again
exits the playback mode. When entering the playback mode, video is paused. Pressing
the Right arrow button plays back video at regular speed. The screen displays when the
DVR is in the Pause mode and the screen displays when the DVR is playing back
video.
Enter/Pause button
In the live monitoring mode, pressing the
button freezes the current screen and the
icon. When in the playback mode, pressing the
button pauses
screen displays
button selects a highlighted item
playing video. When in the setup mode, pressing the
or completes an entry that you have made
Up, Down, Left, Right Arrow
buttons
These buttons are used to navigate through menus and GUI.
The Up and Down arrow buttons are also used to change numbers by highlighting a
number in the menu and by increasing or decreasing the number’s value.
The Left and Right arrow buttons are also used to play back images in the playback mode.
Pressing the Right arrow button plays video at regular speed, and pressing the button
again toggles the playback speed from x2, x3 and x4. Pressing the Left arrow button plays
video backward at high speed, and pressing the button again toggles the playback speed
from x2, x3 and x4.
21
Siemens AG
EN
05.2010
Disposal
7.3
System setup
The front panel buttons are used to enter system commands and for programming.
Press Menu/Cameo button on the front panel and enter the password by pressing
the appropriate combination of Camera number buttons and then the Enter/Pause
button. Refer to the User’s Manual for the setup instructions in detail. The
documentation is located on the CD or in the application folder on the PC hard disk
(C:\SISTORE AX\…).
Setup menu
8
Disposal
All electrical and electronic products should be disposed of separately from the
municipal waste stream via designated collection facilities appointed by the
government or the local authorities.
This crossed-out wheeled bin symbol on the product means the product is covered by
the European Directive 2002/96/EC.
The correct disposal and separate collection of your old appliance will help prevent
potential negative consequences for the environment and human health. It is a
precondition for reuse and recycling of used electrical and electronic equipment. For
more detailed information about disposal of your old appliance, please contact your
city office, waste disposal service or the shop where you purchased the product.
22
Siemens AG
EN
05.2010
Issued by
Siemens AG
Siemensallee 84
D-76187 Karlsruhe
Tel. +49 721 595 1
www.buildingtechnologies.siemens.com
Document no.
A6V10315395
Edition
06.05.2010
© 2010 Copyright by Siemens AG
Data and design subject to change without notice.
Supply subject to availability.