1
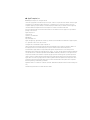
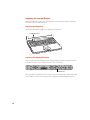
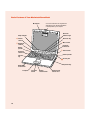
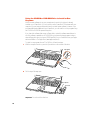
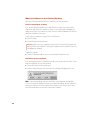
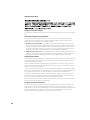
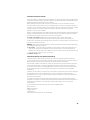
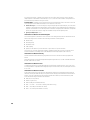
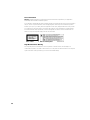
Getting Started With Your PowerBook Includes setup information for Macintosh PowerBook G3 Series computers K Apple Computer, Inc. © 1999 Apple Computer, Inc. All rights reserved. Under the copyright laws, this manual may not be copied, in whole or in part, without the written consent of Apple. The Apple logo is a trademark of Apple Computer, Inc., registered in the U.S. and other countries. Use of the “keyboard” Apple logo (Option-Shift-K) for commercial purposes without the prior written consent of Apple may constitute trademark infringement and unfair competition in violation of federal and state laws. Every effort has been made to ensure that the information in this manual is accurate. Apple is not responsible for printing or clerical errors. Apple Computer, Inc. 1 Infinite Loop Cupertino, CA 95014-2084 408-996-1010 http://www.apple.com Apple, the Apple logo, AppleTalk, Mac, the Mac logo, Macintosh, and PowerBook are trademarks of Apple Computer, Inc., registered in the U.S. and other countries. The Apple Store is a trademark of Apple Computer, Inc. Other company and product names mentioned herein are trademarks of their respective companies. Mention of third-party products is for informational purposes only and constitutes neither an endorsement nor a recommendation. Apple assumes no responsibility with regard to the performance or use of these products. Manufactured under license from Dolby Laboratories. “Dolby”, “Pro Logic” and the double-D symbol are trademarks of Dolby Laboratories. Confidential Unpublished Works, © 1992–1997 Dolby Laboratories, Inc. All rights reserved. The product described in this manual incorporates copyright protection technology that is protected by method claims of certain U.S. patents and other intellectual property rights owned by Macrovision Corporation and other rights owners. Use of this copyright protection technology must be authorized by Macrovision Corporation and is intended for home and other limited viewing uses only unless otherwise authorized by Macrovision Corporation. Reverse engineering or disassembly is prohibited. Apparatus Claims of U.S. Patent Nos. 4,631,603, 4,577,216, 4,819,098 and 4,907,093 licensed for limited viewing uses only. Simultaneously published in the United States and Canada. Contents Plugging in the Computer 6 Opening the Display 7 Turning the Computer On 8 Moving Items on the Screen 9 Adjusting the Internal Display 10 What’s Next? 11 Accessing the Internet 11 Basic Features of Your Macintosh PowerBook 12 Additional Features of Your Macintosh PowerBook 14 Learning How to Do More With Your PowerBook 16 Using the CD-ROM or DVD-ROM Drive to Install or Run Programs 18 What to Do When You Are Finished Working 20 Safety Instructions for Setting Up and Using Your Computer 21 General Safety Instructions 22 3 1 Getting Started With Your PowerBook Your Macintosh PowerBook has been designed so that you can set it up quickly and start using it right away. If you have never used a PowerBook or are new to Macintosh computers, read this section for instructions on getting started, an overview of PowerBook features, and where to get more information. If you are an experienced user, you may already know enough to get started. Be sure to look over the information in this book to find out about the new features of this Macintosh PowerBook, along with how to access the wealth of additional PowerBook and Mac OS information available on your computer and the Internet. Macintosh monitor adapter Phone cord Power adapter (your power adapter may look different) Composite-to-S-video cable PowerBook software CD-ROM disc 5 Plugging in the Computer Plugging in the power adapter recharges the computer’s battery. You should plug in the power adapter in case the battery has been drained during shipping or storage. 1 Plug one end of the power cord into the power adapter and the other end into an outlet. 2 Plug the power adapter plug into the power adapter port (marked with the icon ¯) on the back of the computer. ¯ Power adapter port Power adapter plug ¯ √ - G g ™ Æ W W Internal modem Power cord Telephone cord Power adapter (your power adapter may look different) 3 If you want to get connected to the Internet right away, connect one end of the phone cord to the internal modem port (marked with the icon W) and the other end to an analog telephone line (the type of telephone line found in most residences). Make sure to connect the phone cord to the internal modem port. Don’t connect it to the Ethernet port, which looks similar but is slightly larger and marked with the icon G. If you do, your modem will not function correctly. Important Warning Do not connect a digital telephone line to the modem, because the wrong type of line could damage the modem. 6 Opening the Display 1 Push the display release button. 2 Open the display and position it at a comfortable viewing angle. ® 7 Turning the Computer On To turn on the computer, press the Power button (®) above the keyboard. ® Power button ® You should hear a tone when you turn on the computer. It takes the computer a few moments to start up. As the computer starts up, several messages appear on the screen. Problems Turning the Computer On? Nothing happens when you press the Power button. m The battery may be drained. Make sure that you plugged in the power adapter, and that the power adapter is firmly connected to both the computer and a power source. m If the computer still doesn’t start up when you press the Power button, use the tip of a pen to press the reset button on the back of the computer. Wait a few seconds and then press the Power button again. m If the computer still doesn’t start up, see the troubleshooting information that came with your computer. After you press the Power button, there is a slight delay before the computer starts up. m This is normal. When you press the Power button, the PowerBook checks its memory before it starts up. The more memory installed in the PowerBook, the longer the delay. You see a picture of a disk or a folder with a blinking question mark. m This icon usually means that the computer can’t find system software on the hard disk or any disks attached to the computer. You may need to reinstall system software. See the troubleshooting information that came with your computer. 8 Moving Items on the Screen You use your PowerBook trackpad to move items and select items on the screen, much as you use a mouse with a desktop computer. To move the arrow pointer on the screen, slide your finger across the trackpad. To select, click, or double-click an item on the screen, use the trackpad button. ® Trackpad Trackpad button The trackpad is sensitive to how quickly you move your finger. To move the pointer a short distance across the screen, move your finger slowly across the trackpad. The faster you move your finger, the farther the pointer moves on the screen. Tips for Using the Trackpad For best results when using the trackpad, keep in mind these tips: m Use only one finger. m Use only your finger on the trackpad. Do not use a pen or any other object. m Keep your finger and the trackpad dry. If the trackpad becomes moist from humidity or condensation, gently wipe it with a clean cloth before you use it. m Never use any kind of cleaning solution on the trackpad. Note: You can set the trackpad to double-click and select items directly instead of using the button. For more information on configuring the trackpad, look in the Help Center, available from the Help menu. 9 Adjusting the Internal Display Before you begin working with your new PowerBook, you may need to adjust your display so that items on the screen are easy to see. Adjusting the Brightness Use the keys labeled with the ¤ icon to adjust screen brightness. ¤ Brightness controls ® Adjusting the Display Resolution You can increase the size of images on your display by switching from the standard resolution to a scaled resolution. Click the Resolution icon in the Control Strip. Resolution icon When you switch to a scaled resolution, items on the screen appear larger, making them easier to see. However, scaled resolutions may not be as sharp as the standard display resolution. 10 What’s Next? Your PowerBook is now ready for use. In the next few pages you will find m How to access information on the Internet m An overview showing all the features, components, and controls of your Macintosh PowerBook m Where to go to when you want to learn more about your PowerBook m How to install or run programs from your CD-ROM or DVD-ROM drive m What to do when you are finished working m Important care and safety information Accessing the Internet Your PowerBook has been designed so that you can quickly connect to the Internet using the internal modem. Even if you don’t have an Internet access account already, your PowerBook will help you get on the Internet in just a few minutes. Internet helpers provided with your PowerBook Internet Setup Assistant If you did not connect to the Internet the first time you started up your computer, you can connect at any time using the Internet Setup Assistant. Open the Apple (K) menu, choose Internet Access, and then choose Internet Setup Assistant from the submenu. Browse the Internet If you know the World Wide Web address of the Internet site that you want to use, double-click the Browse the Internet icon on your computer desktop. Sherlock If you want to look for something on the Internet, open the Apple (K) menu and choose Sherlock. Then click the Search Internet tab. Register With Apple In most countries, you can register your computer and other Apple products on the World Wide Web. Double-click the Register With Apple icon on your computer’s desktop. 11 Basic Features of Your Macintosh PowerBook You can find information on using these and other features of your Macintosh PowerBook in the Help Center on your computer. Microphone File Edit View Special Help 12:15 PM Help Center Show Balloon s Mac OS Hel p Sleep indicator Num Lock indicator light - Volume Num Lock key controls — Mute control ¤ Brightness controls Keyboard release tab Built-in speaker ® Power button Keyboard release tab ® Built-in speaker Function key Security slot Expansion bay Battery bay release lever Trackpad 12 Trackpad button Display release button Expansion bay release lever Sleep indicator Blinking green light indicates when the PowerBook is in sleep. ® Power button Turns your PowerBook on and off. Microphone Record sounds directly to your PowerBook hard disk with this built-in microphone. ¤ Brightness controls Increase or decrease the brightness of your PowerBook display. - Volume controls Increase or decrease the volume of the sound coming from the built-in speakers and sound output port. — Mute control Turns the sound off and on from the PowerBook built-in speakers and sound output port. Num Lock key Activates the numeric keypad embedded in the PowerBook keyboard. Function (Fn) key Hold down this key to activate the function keys (F1–F12). Trackpad Move the pointer on the PowerBook display. Using the Trackpad control panel you can set the trackpad to double-click and select items directly instead of using the button. Keyboard release tabs When you need to install memory or remove the hard disk, pull these tabs down to release the PowerBook keyboard. (Detailed instructions for memory installation and hard disk removal can be found in the Help Center.) Expansion bay with a CD-ROM or DVD-ROM drive module inserted Dual-function expansion bay that accepts removable modules or a PowerBook battery. Use the CD-ROM or DVD-ROM drive to install and run programs, play music CDs, and reinstall system software. PowerBook computers equipped with DVD-Video capabilities can use a DVD-ROM drive to play DVD-Video discs. Ç Security slot Protect your PowerBook by connecting a security cable. 13 Additional Features of Your Macintosh PowerBook Battery with LED status lights ¯ √ G 1 ¯ Power PC Card slot g 2 √ ™ - G Æ adapter port G Ethernet port 14 G - g ™ W Internal modem port W 1 Infrared window 2 input port output port PC Card eject button Keyboard locking screw (10/100Base-T ) √ Sound - Sound ™ W USB ports (2) W Æ g g SCSI port Æ External TV (HDI-30) out port (S-video) ™ External video port Reset button ™ External video port Connect to any external monitor or projection device with a VGA-style connector or to any older Macintosh monitor using the included adapter. Æ External TV out port (S-video) Connect your PowerBook to a television, VCR, or other video device. G Ethernet port (10/100 Base-T) Connect to a high-speed 10/100Base-T Ethernet network. Infrared window Allows you to use infrared (IR) communication to send files to another IR-equipped computer, print on an IR-equipped printer, or connect to a wireless IR network that uses that IrDA standard. Keyboard locking screw Protect the internal components of your PowerBook (such as memory and the hard disk drive) by preventing the keyboard from being removed. PC Card slot Expand the capabilities of your PowerBook using this Type II PC Card slot that supports both PCMCIA and CardBus formats. W Internal modem port Connect a standard phone line directly to the internal modem. PowerBook reset button Reset the computer with this button when you cannot shut it down using the Power button. g SCSI port (HDI-30) Connect up to seven external SCSI devices (such as external hard disk drives or scanners) or use your PowerBook as an external hard disk for another computer. √ Sound input port Connect an external line-level microphone or other sound input device. - Sound output port Connect external speakers, headphones, or other sound output device. Two USB (Universal Serial Bus) ports Connect external devices such as printers, external storage devices, modems, keyboards, and joysticks. Up to 127 devices can be connected using USB hubs. 15 Learning How to Do More With Your PowerBook About Your PowerBook Look here for details about your computer. Find out how to use features, connect equipment, install memory, and more. 16 Mac OS Help Search Look here to learn how to use your computer. Find out how to connect to the Internet, set up printing, and find out what’s new in the Mac OS. If you’re not sure where to look, type a question and click Search. Apple Web Site www.apple.com Links to everything Apple. The Apple Store www.apple.com/store The latest Apple hardware, software, and accessories. Apple Support Web Site www.apple.com/support Need extra help? Visit here for product support, software updates, and technical information. Apple PowerBook Web Site www.apple.com/powerbook News and information specifically for PowerBook users. 17 Using the CD-ROM or DVD-ROM Drive to Install or Run Programs All the necessary software to use your computer and connect to the Internet is already installed on your PowerBook. ( You only need to use the PowerBook CD that came with your computer if you are having problems and need to reinstall system software.) However, if you purchased additional software with your PowerBook, you can install or run the programs using the CD-ROM or DVD-ROM expansion bay drive. If you have older software that comes on floppy disks, contact the software manufacturer to see if the software is available on a CD-ROM disc or purchase a third-party expansion bay or external floppy disk drive (such as an LS120/SuperDisk) for your PowerBook from your Appleauthorized dealer or The Apple Store (www.apple.com/store). To install or use programs from a CD or DVD disc, follow these steps: 1 With the computer turned on, press the Open button on the outside of the drive. Open button ® 2 Pull the tray all the way open. ® Drive spindle Drive lens Important 18 Do not touch the drive lens. 3 Place a disc in the tray, with the label facing up. Make sure the disc is lying flat in the tray and is seated firmly on the spindle. ® Insert the disc, label side up. Note: CD-ROM and DVD-ROM drives have small locks on the drive spindle that securely hold the disc in place. When inserting a disc over these locks, you may need to apply additional pressure. Place the hole in the center of the disc directly over the drive spindle and press down until you feel the disc lock into place. 4 Push the tray in to close it. 5 When the icon for the CD or DVD disc appears on the screen, the disc is ready for use. Certain discs such as audio CDs automatically start when you insert them into your PowerBook. Others require that you install the software from the CD onto the hard disk first. See the instructions that came with the disc for more information. 19 What to Do When You Are Finished Working When you have finished working with your PowerBook, you have two options. Put Your PowerBook to Sleep If you are only going to be away from your PowerBook for a short period of time, put the computer to sleep. When the computer is in sleep, you can quickly wake it and bypass the startup process. When the computer is in sleep, its screen is dark and appears to be off and a small green light flashes on the case. To quickly put the computer to sleep, do one of the following: m Close the display. m Choose Sleep from the Special menu. After you put your computer to sleep, listen for the hard disk to stop spinning before you move your PowerBook. Moving your computer while the hard disk is spinning can damage your computer. Warning To wake the computer: m Press the Power button (®) or any key on the keyboard (except the Fn key). Shut Down Your PowerBook If you are not going to use your PowerBook for a day or two, you should shut it down. To shut down the PowerBook, do one of the following: m Choose Shut Down from the Special menu. m Press the Power button and click Shut Down in the dialog box that appears on screen: Note: Certain system settings (such as sound volume, screen brightness, and AppleTalk connection) may not be saved the first time you set them if the battery has been completely discharged or has been out of the computer for three days or more. You will need to reset these system settings the second time you start up the computer. 20 Safety Instructions for Setting Up and Using Your Computer Plugging In the Power Adapter Warning Use only the power adapter that came with your Macintosh PowerBook computer. Adapters for other electronic devices (including other Macintosh PowerBook models and other portable computers) may look similar, but they may damage your computer. If your power adapter came equipped with a three-wire grounding plug (a plug that has a third grounding pin), then this plug will fit only a grounded AC outlet. If you are unable to insert the plug into the outlet because the outlet is not grounded, contact a licensed electrician to replace the outlet with a properly grounded outlet. Do not defeat the purpose of the grounding plug! m Always leave space around your power adapter. Do not use this equipment in a location where airflow around the power adapter is confined, such as a bookcase. m Always disconnect the power adapter and remove the battery before opening the computer to perform procedures such as installing memory or removing the hard disk. Connecting a Phone Line to the Internal Modem Warning Do not connect a digital telephone line to the modem, because the wrong type of line could damage the modem. m Always disconnect the phone cable before opening the computer to perform procedures such as installing memory or removing the hard disk. Using Your PowerBook When using your PowerBook or when charging the battery, it is normal for the bottom of the case to get warm. The bottom of the PowerBook case functions as a cooling surface that transfers heat from inside the computer to the cooler air outside. The bottom of the case is raised slightly to allow airflow that keeps the unit within normal operating temperatures. Warning Never turn on your computer unless all of its internal and external parts are in place. Operating the computer when it is open or missing parts can be dangerous and damage your computer. 21 General Safety Instructions For your own safety and that of your equipment, always take the following precautions. Disconnect the power plug (by pulling the plug, not the cord) and remove the main battery if any of the following conditions exists: m you want to remove any parts (leave the cord disconnected as long as the keyboard is open) m the power cord or plug becomes frayed or otherwise damaged m you spill something into the case m your computer is exposed to rain or any other excess moisture m your computer has been dropped or the case has been otherwise damaged m you suspect that your computer needs service or repair m you want to clean the case (use only the recommended procedure describe later) The only way to disconnect power completely is to unplug the power cord and remove batteries from the expansion and battery bays. Make sure at least one end of the power cord is within easy reach so that you can unplug the computer when you need to. Important Be sure that you always do the following: m Keep your computer away from sources of liquids, such as drinks, washbasins, bathtubs, shower stalls, and so on. m Protect your computer from dampness or wet weather, such as rain, snow, and so on. m Read all the installation instructions carefully before you plug your computer into a wall socket. m Keep these instructions handy for reference by you and others. m Follow all instructions and warnings dealing with your system. Warning Electrical equipment may be hazardous if misused. Operation of this product, or similar products, must always be supervised by an adult. Do not allow children access to the interior of any electrical product and do not permit them to handle any cables. Warning Never push objects of any kind into this product through the openings in the case. Doing so may be dangerous and result in fire or a dangerous electric shock. 22 Cleaning the Computer Case To clean the case, do the following: 1 Disconnect the power plug and remove the main battery. (Pull the plug, not the cord.) 2 Wipe the surfaces lightly with a clean, soft cloth dampened with water. Warning Do not use any substance containing isopropyl alcohol. It can damage the case. 23 Communications Regulation Information FCC Declaration of Conformity This device complies with part 15 of the FCC rules. Operation is subject to the following two conditions: (1) This device may not cause harmful interference, and (2) this device must accept any interference received, including interference that may cause undesired operation. See instructions if interference to radio or television reception is suspected. Radio and Television Interference The equipment described in this manual generates, uses, and can radiate radio-frequency energy. If it is not installed and used properly—that is, in strict accordance with Apple’s instructions—it may cause interference with radio and television reception. This equipment has been tested and found to comply with the limits for a Class B digital device in accordance with the specifications in Part 15 of FCC rules. These specifications are designed to provide reasonable protection against such interference in a residential installation. However, there is no guarantee that interference will not occur in a particular installation. You can determine whether your computer system is causing interference by turning it off. If the interference stops, it was probably caused by the computer or one of the peripheral devices. If your computer system does cause interference to radio or television reception, try to correct the interference by using one or more of the following measures: m Turn the television or radio antenna until the interference stops. m Move the computer to one side or the other of the television or radio. m Move the computer farther away from the television or radio. m Plug the computer into an outlet that is on a different circuit from the television or radio. (That is, make certain the computer and the television or radio are on circuits controlled by different circuit breakers or fuses.) If necessary, consult an Apple-authorized service provider or Apple. See the service and support information that came with your Apple product. Or, consult an experienced radio/television technician for additional suggestions. Important Changes or modifications to this product not authorized by Apple Computer, Inc., could void the FCC Certification and negate your authority to operate the product. This product was tested for FCC compliance under conditions that included the use of Apple peripheral devices and Apple shielded cables and connectors between system components. It is important that you use Apple peripheral devices and shielded cables and connectors between system components to reduce the possibility of causing interference to radios, television sets, and other electronic devices. You can obtain Apple peripheral devices and the proper shielded cables and connectors through an Apple-authorized dealer. For non-Apple peripheral devices, contact the manufacturer or dealer for assistance. Responsible party (contact for FCC matters only): Robert Steinfeld, Apple Computer, Inc., 1 Infinite Loop, Cupertino, CA 95014-2084, 408-974-2618. Industry Canada Statement This Class B device meets all requirements of the Canadian interference-causing equipment regulations. Cet appareil numérique de la Class B respecte toutes les exigences du Règlement sur le matériel brouilleur du Canada. 25 VCCI Class B Statement Notify Your Telephone Company Some telephone companies require that you notify the local business office when you hook up a modem to their lines. Information You Need in the United States The internal modem complies with Part 68 of the FCC rules. On the back of this equipment is a label that contains, among other information, the FCC registration number and ringer equivalence number (REN). If requested, provide this information to your telephone company. m Ringer equivalence number (REN): 0.8 The REN is useful to determine the quantity of devices you may connect to your telephone lines and still have all those devices ring when your telephone number is called. In most, but not all areas, the sum of the RENs of all devices connected to one line should not exceed five (5.0). To be certain of the number of devices you may connect to your line, as determined by the REN, you should contact your local telephone company to determine the maximum REN for your calling area. m Telephone jack type: USOC, RJ-11 An FCC-compliant telephone cord and modular plug are provided with this equipment. This equipment is designed to be connected to the telephone network or premises wiring using a compatible modular jack that complies with Part 68 rules. See the installation instructions for details. Telephone Line Problems If your telephone doesn’t work, there may be a problem with your telephone line. Disconnect the modem to see if the problem goes away. If it doesn’t, report the problem either to your local telephone company or to your company’s telecommunications people. If disconnecting the modem eliminates the problem, the modem itself may need service. See the service and support information that came with your Apple product for instructions on how to contact Apple or an Appleauthorized service provider for assistance. If you do not disconnect your modem when it is adversely affecting the telephone line, the telephone company has the right to disconnect your service temporarily until you correct the problem. The telephone company will notify you as soon as possible. Also, you will be informed of your right to file a complaint with the FCC. The telephone company may make changes in its facilities, equipment, operations, or procedures that could affect the operation of your equipment. If this happens, the telephone company will provide advance notice in order for you to make the necessary modifications to maintain uninterrupted service. The optional internal modem will not work with party lines, cannot be connected to a coin-operated telephone, and may not work with a private branch exchange (PBX). Telephone Consumer Protection Act The Telephone Consumer Protection Act of 1991 makes it unlawful for any person to use a computer or other electronic device to send any message via a telephone fax machine unless such message clearly contains in a margin at the top or bottom of each transmitted page or on the first page of the transmission, the date and time it was sent and an identification of the business or other entity, or individual sending the message and the telephone number of the sending machine of such business, entity, or individual. 26 Information You Need in Canada The Industry Canada (IC) label identifies certified equipment. This certification means that the equipment meets certain telecommunications network protective, operational, and safety requirements. The Department does not guarantee the equipment will operate to a user’s satisfaction. Before installing this equipment, make sure that you are permitted to connect to the facilities of the local telecommunications company. Be sure you use an acceptable method of connection to install the equipment. In some cases, you may extend the company’s internal wiring for single-line individual service by means of a certified telephone extension cord. Be aware, however, that compliance with these conditions may not prevent degradation of service in some situations. Repairs to certified equipment should be made by an authorized Canadian maintenance facility designated by the supplier. Any equipment malfunctions or repairs or alterations that you make to this equipment may cause the telecommunications company to request that you disconnect the equipment. In Canada, contact Apple at: 7495 Birchmount Road, Markham, Ontario, L3R 5G2, 800-263-3394 Users should ensure for their own protection that the electrical ground connections of the power utility, telephone lines, and internal metallic water pipe system, if present, are connected together. This precaution may be particularly important in rural areas. Warning Users should not attempt to make such connections themselves, but should contact the appropriate electric inspection authority or electrician. m Load number: 0.3 The load number (LN) assigned to each terminal device denotes the percentage of the total load to be connected to the telephone loop that is used by the device, to prevent overloading. The termination of a loop may consist of any combination of devices, subject only to the requirement that the sum of the load numbers of all devices does not exceed 100. m Telephone jack type: CA-11 Informations Destinés aux Utilisateurs Canadiens L’étiquette d’Industrie Canada identifie un matériel homologué. Cette étiquette certifie que le matériel est conforme à certaines normes de protection, d’exploitation et de sécurité des réseaux de télécommunications. Le Ministère n’assure toutefois pas que le matériel fonctionnera à la satisfaction de l’utilisateur. Avant d’installer ce matériel, l’utilisateur doit s’assurer qu’il est permis de le raccorder au réseau de l’entreprise locale de télécommunication. Le matériel doit également être installé en suivant une méthode acceptée de raccordement. Dans certains cas, le cablage appartenant à l’entreprise utilisé pour un service individuel à ligne unique peut être prolongé au moyen d’un dispositif homologué de raccordement (cordon prolongateur téléphonique). L’abonné ne doit pas oublier qu’il est possible que la conformité aux conditions énoncées ci-dessus n’empechent pas la dégradation du service dans certaines situations. De fait, les entreprises de télécommunication ne permettent pas que l’on raccorde un matériel aux prises d’abonné, sauf dans les cas précis prévus par les tarifs particuliers de ces entreprises. Les réparations de matériel homologué doivent être effectuées par un centre d’entretien canadien autorisé désigné par le fournisseur. La compagnie de télécommuncations peut demander à l’utilisateur de débrancher un appareil suite à des réparations ou des modifications effectuées par l’utilisateur ou à cause de mauvais fonctionnement. Veuillez contacter le fournisseur suivant pour des informations supplémentaires : Apple Canada, Inc. 7495 Birchmount Road Markham, Ontario Canada L3R 5G2 Apple Canada Customer Assistance Line: 800-263-3394 27 Pour sa propre protection, I’utilisateur doit s’assurer que tous les fils de mise à la terre du secteur, des lignes téléphoniques et les canalisations d’eau métalliques, s’il y en a, soient raccordés ensemble. Cette précaution est particulièrement importante dans les régions rurales. Avertissement L’utilisateur ne doit pas tenter de faire ces raccordements lui-même; il doit avoir recours à un service d’inspection des installations électriques ou à un électricien, selon le cas. m Numéro de charge : 0.3 L’indice de charge (IC) assigné à chaque dispositif terminal indique, pour éviter toute surcharge, le pourcentage de la charge totale qui sera raccordée à un circuit téléphonique bouclé utilisé par ce dispositif. La terminaison du circuit bouclé peut être constituée de n’importe quelle combinaison de dispositifs pourvu que la somme des indices de charge de l’ensemble des dispositifs ne dépasse pas 100. m Type de prise téléphonique : CA-11 Information You Need in the United Kingdom This terminal equipment is intended for direct connection to the analogue Public Switched Telecommunications Network and is approved for use within the United Kingdom with the following features: m Modem facility m Autocalling facility m Autoanswer facility m DTMF signaling m Operation in the absence of proceed indication or upon detection of proceed indication This product is in conformity with relevant regulatory standards following the provisions of European Council Directives 73/23/EEC (Low Voltage Directive) and 89/336/EEC amended by 92/31/EEC (EMC Directive). Information You Need in Germany Diese Modem-Karte ist als Endeinrichtung vorgesehen und muss an ein TAE mit F-Kodierung angeschlossen werden. Diese Endeinrichtung ist in Konformität gemäss Niederspannungsrichtlinie 73 / 23 / EWG sowie EMC-Richtlinien 89 / 336 / EWG und 92 / 31 / EWG. Information You Need in France Ce matériel est conforme aux normes applicables de sécurité éléctrique d’après la directive 73 / 23 / CEE et aux normes applicables de comptabilité éléctromagnétique d’après la directive 89 / 336 / CEE, modifié par la directive 92 / 31 / CEE. Information You Need in Australia All telecommunications devices are required to be labelled as complying to the Australian telecommunications standards, ensuring the health and safety of the operator and the integrity of the Australian telecommunications network. To provide compliance with the Australian Communications Authority’s technical standards, please ensure that the following AT commands are maintained: m ATB0 (ITU/CCITT operation) m AT&G0 (no guard tone) m AT&P1 (33/66 pulse dial make/break ratio) m ATS0 = 0 or ATS0 = 1 (no answer or answer greater than one ring) m ATS6 = 95 (DTMF period between 70–255 ms) m ATS11 = 95 (DTMF period between 70–255 ms) 28 For calls that are automatically generated, a total of three call attempts are allowed to a telephone number, with a minimum period between calls of 2 seconds. If the call does not connect after three attempts, 30 minutes must expire before automatic redialing may be initiated. Failure to set the modem (and any associated communications software) to the above settings may result in the modem being non-compliant with Australian telecommunications standards. Under these circumstances a user could be subject to significant penalties under the Telecommunications Act 1997. Warning This card must be properly secured in order for you to use it. Telecommunications network voltages exist inside the computer and the telecommunications line connection must be removed before opening the computer. Information You Need in New Zealand This modem is fully approved to operate on the New Zealand telecommunications network under Telepermit number PTC 211/98/119. All telecommunications devices are required to hold a Telepermit and be labelled accordingly with the approved Telepermit number to comply with the New Zealand telecommunications standards, ensuring the health and safety of the operator and the integrity of the New Zealand telecommunications network. Note: Customers in New Zealand who are prompted to choose a country for their modem should choose the “Australia” country code setting. To ensure compliance, all calls that are automatically generated should not make more than 10 call attempts to the same number within any 30 minute period with a minimum period between calls of 30 seconds. Failure to adhere to these standards may result in the modem being non-compliant with New Zealand Telecom standards. Under these circumstances a user could be subject to significant penalties. Important If pulse dialing is required for any reason, the communications software must be set up to record numbers according to the following translation list. m Number to be dialed: 0; number to be entered into computer: 0 m Number to be dialed: 1; number to be entered into computer: 9 m Number to be dialed: 2; number to be entered into computer: 8 m Number to be dialed: 3; number to be entered into computer: 7 m Number to be dialed: 4; number to be entered into computer: 6 m Number to be dialed: 5; number to be entered into computer: 5 m Number to be dialed: 6; number to be entered into computer: 4 m Number to be dialed: 7; number to be entered into computer: 3 m Number to be dialed: 8; number to be entered into computer: 2 m Number to be dialed: 9; number to be entered into computer: 1 The preferred method of dialing is to use DTMF tones as this is faster than pulse (decadic) dialing and is readily available on almost all New Zealand telephone exchanges. 29 Laser Information Making adjustments or performing procedures other than those specified in your equipment’s manual may result in hazardous radiation exposure. Warning Do not attempt to disassemble the cabinet containing the laser. The laser beam used in this product is harmful to the eyes. The use of optical instruments, such as magnifying lenses, with this product increases the potential hazard to your eyes. For your safety, have this equipment serviced only by an Apple-authorized service provider. Your computer is a Class 1 laser product. The Class 1 label, located in a user-accessible area, indicates that the drive meets minimum safety requirements. A service warning label is located in a service-accessible area. The labels on your product may differ slightly from the ones shown here. Class 1 label Service warning label High-Risk Activities Warning This computer system is not intended for use in the operation of nuclear facilities, aircraft navigation or communications systems, or air traffic control machines, or for any other uses where the failure of the computer system could lead to death, personal injury or severe environmental damage. 30