1
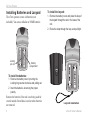
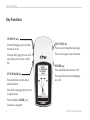
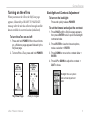
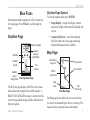
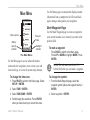
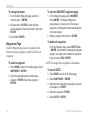
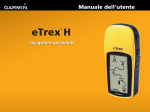
Owner’s Manual
eTrex H
®
personal navigator
© 2007 Garmin Ltd. or its subsidiaries
Garmin International, Inc.
1200 East 151st Street,
Olathe, Kansas 66062, USA
Tel. (913) 397.8200 or (800) 800.1020
Fax (913) 397.8282
Garmin (Europe) Ltd.
Liberty House
Hounsdown Business Park,
Southampton, Hampshire, SO40 9RB UK
Tel.+44 (0) 870.8501241 (outside the UK)
0808 2380000 (within the UK)
Fax+44 (0) 870.8501251
No. 68, Jangshu 2nd Road,
Shijr, Taipei County, Taiwan
Tel. 886/2.2642.9199
Fax 886/2.2642.9099
Garmin Corporation
All rights reserved. Except as expressly provided herein, no part of this manual may be reproduced, copied, transmitted,
disseminated, downloaded or stored in any storage medium, for any purpose without the express prior written consent of Garmin.
Garmin hereby grants permission to download a single copy of this manual onto a hard drive or other electronic storage medium
to be viewed and to print one copy of this manual or of any revision hereto, provided that such electronic or printed copy of this
manual must contain the complete text of this copyright notice and provided further that any unauthorized commercial distribution
of this manual or any revision hereto is strictly prohibited.
Information in this document is subject to change without notice. Garmin reserves the right to change or improve its products and
to make changes in the content without obligation to notify any person or organization of such changes or improvements. Visit the
Garmin Web site (www.garmin.com) for current updates and supplemental information concerning the use and operation of this
and other Garmin products.
Garmin® is a trademark of Garmin Ltd. or its subsidiaries, registered in the USA and other countries. myGarmin™, eTrex®,
AutoLocate®, TracBack®, BlueChart®, and MapSource® are trademarks of Garmin Ltd. or its subsidiaries. These trademarks may
not be used without the express permission of Garmin.
August 2007
Part Number 190-00818-00 Rev. B
Printed inTaiwan
Introduction
Introduction
Thank you for choosing the Garmin® eTrex® H. Take
a moment to compare the contents of this package
with the packing list on the box. If any pieces are
missing, contact your Garmin dealer immediately.
Contact Garmin
Contact Garmin if you have any questions while using
your unit. Contact Garmin Product Support by phone:
(913) 397-8200 or (800) 800-1020, Monday–Friday,
8 AM–5 PM Central Time; or go to
www.garmin.com/support/.
In Europe, contact Garmin (Europe) Ltd. at
+44 (0) 870.8501242 (outside the UK) or
0808 2380000 (within the UK).
eTrex H Owner’s Manual
Product Registration
Help us better support you by completing our online
registration today! Connect to our Web site at
http://my.garmin.com. Keep the original sales receipt,
or a photocopy, in a safe place.
Optional Accessories
For a complete list of available accessories for use
with the eTrex, refer to http://buy.garmin.com.
WARNING: See the Important Safety and Product
Information sheet in the product box for product
warnings and other important information.
Introduction
Table of Contents
Introduction.........................................................i
Contact Garmin.....................................................i
Product Registration.............................................i
Optional Accessories............................................i
Getting Started...................................................1
Unit Overview.......................................................1
Installing Batteries and Lanyard.........................2
Operating the eTrex..............................................3
Key Functions.......................................................4
Turning on the eTrex............................................5
Appendix..........................................................23
Specifications.................................................... 23
Interface Formats.............................................. 24
Connecting Your eTrex to a Computer............ 24
Software License Agreement........................... 25
Declaration of Conformity................................ 25
Index.................................................................26
Main Pages.........................................................7
SkyView Page.......................................................7
Map Page...............................................................7
Pointer Page.........................................................9
Trip Computer Page ......................................... 10
Main Menu . .....................................................11
Routes Page....................................................... 14
Tracks Page....................................................... 16
ii
eTrex H Owner’s Manual
Getting Started
Getting Started
Unit Overview
External power and data
connector
(under weather cap)
GPS antenna
UP/DOWN
keys
QUIT/PAGE
key
ENTER/
MARK key
POWER key
LCD display eTrex H Owner’s Manual
Battery compartment
locking ring
Battery compartment
cover
Carry lanyard
attachment slots
Getting Started
Installing Batteries and Lanyard
The eTrex operates on two AA batteries (not
included). You can use Alkaline or NiMH batteries.
Locking
pin slot
To install the lanyard:
1. Remove the battery cover and place the loop of
the lanyard through the slot in the base of the
unit.
2. Route the strap through the loop, and pull tight.
Battery
compartment
To install the batteries:
1. Remove the battery cover by turning the
Locking ring counter-clockwise and pulling out.
2. Insert the batteries, observing the proper
polarity.
Remove the batteries if the unit is not being used for
several months. Stored data is not lost when batteries
are removed.
Lanyard installation
eTrex H Owner’s Manual
Getting Started
Operating the eTrex
Understanding Terms
Select—move the highlighted area on the screen up
or down, using the Up and Down keys to select
individual fields.
Key—when you are directed to press a key, press and
quickly release the key.
Field—the location on a page where data or an option
can be shown or entered.
Manual Conventions
In this manual, when you are instructed to select
an item, small arrows (>) appear in the text. They
indicate that you should select a series of items on
the screen using the UP or DOWN keys, and press
ENTER after each item. For example, if you see
“select TRACKS > SETUP >,” you should highlight
TRACKS, and press ENTER. Then highlight
SETUP, and press ENTER.
Scroll bar—when viewing a list of items too long to
appear on the screen, a scroll bar appears next to the
list. To scroll through a list, press the Up or Down
keys.
Default—the factory setting saved in the unit’s
memory. You can change the settings, but you can
revert to the factory settings when you select Restore
Defaults.
eTrex H Owner’s Manual
Getting Started
Key Functions
UP/DOWN keys
From the Map page, press to zoom
the map in or out.
QUIT/PAGE key
Press to cycle through the main pages. From any other page, press to scroll
up or down a list or move a slider
bar.
Press to exit a page or quit a function.
ENTER/MARK key
Press and release to enter data or
menu selections.
HIGH SENSITIVITY
POWER key
Press and hold to turn unit on or off.
Press and release to turn backlighting
on or off.
Press with a main page open to view
its option menu.
Press and hold to MARK your
location as a waypoint.
eTrex H Owner’s Manual
Getting Started
Turning on the eTrex
When you turn on the eTrex, the SkyView page
appears, followed by a Ready to navigate
message after the unit has collected enough satellite
data to establish its current location (initialized).
To turn the eTrex on and off:
1. Press and hold POWER. When the unit turns
on, a Welcome page appears followed by the
SkyView page.
2. To turn off the eTrex, press and hold POWER.
Backlight and Contrast Adjustment
To turn on the backlight:
Press and quickly release POWER.
To set the timeout and adjust the contrast:
1. Press PAGE until the SkyView page appears,
then press ENTER twice to open the backlight/
contrast window.
2. Press ENTER to view the timeout options,
make a selection > ENTER.
3. Press DOWN to move to the contrast slider >
ENTER.
4. Press UP or DOWN to adjust the contrast >
QUIT to close.
Backlight time out options
and contrast adjustment
slider
SkyView Page
eTrex H Owner’s Manual
Ready to navigate
Getting Started
Selecting Options and Entering Data
Press UP/DOWN to highlight, select, or choose an
item in a list or a field on the screen.
To select and activate an option:
1. From any page except the Menu page, press
ENTER to view the options menu.
2. Press UP or DOWN to move the highlight up
and down on the menu. To select an option,
press ENTER.
On-Screen Messages
When a significant event in the operation of the
unit occurs, an on-screen message appears to advise
you of the occurrence. In each case, the condition
is described and often a remedy is provided. Press
ENTER to acknowledge the message and close.
To exit a menu or return to the previous
setting:
Press QUIT/PAGE. The QUIT/PAGE key
moves backward through your steps. Press
QUIT/PAGE repeatedly to return to the starting
page. Once at the starting page, pressing the
key cycles you through the five main pages.
eTrex H Owner’s Manual
Main Pages
Main Pages
SkyView Page Options
Information needed to operate the eTrex is found on
five main pages. Press PAGE to cycle through the
pages.
SkyView Page
Status message
Satellites
Location
accuracy
(estimated)
Satellite
signals
Satellite
signal
strength bar The SkyView Page
Your
location
The SkyView page displays the GPS receiver status.
It also shows the strength of the satellite signals. A
Ready to Navigate message is shown when the
receiver has gathered enough satellite information to
begin navigation.
eTrex H Owner’s Manual
To view the options menu, press ENTER.
• Setup Display—change the display contrast
and set the length of time that the backlight will
stay on.
• Advanced SkyView—select the Advanced
SkyView feature to view a page containing
detailed information on the satellites.
Map Page
Destination
waypoint
North pointer
Your location
Path to
destination
Map
scale
The Map Page
Trail
(Track Log)
The Map page shows where you are located, and as
you travel, the animated figure leaves a track log. The
map also shows waypoint names and symbols.
Main Pages
The eTrex is set to automatically rotate the map as
you move, so waypoints that are ahead of you are
always displayed in front of the animated figure. The
map orientation is shown in the upper left corner.
To increase the map scale, press UP. This shows more
area in less detail. To decrease the map scale, press
DOWN. This shows less area with more detail.
Map Page Options
• Orient Map Ahead/Northwards—when
AHEAD is selected, the top of the map is
oriented in the direction you are currently
moving, and a figure icon indicates your current
position. When NORTHWARDS is selected,
the map is always oriented to the north, and
your current position is indicated by a direction
arrow.
• Auto Zoom On/Off—when on, the map
automatically adjusts its scale to display your
entire route. When it is off, press UP or DOWN
to select a map scale.
• Hide Waypoints—keeps waypoint symbols
and names from being shown on the map.
• Show Course/Bearing Line—when using
the GOTO function, use this option to show a
course line or bearing line to your destination.
A course line is fixed from your starting
location, while a bearing line changes based on
your current location.
• Stop Navigation—stops active navigation.
To select a Map Page option:
1. Press ENTER on the Map page.
2. Press UP or DOWN to highlight an option,
press ENTER.
NOTE: A blinking question mark means
you have lost satellite reception. Move to a
location that has a clear view of the sky.
eTrex H Owner’s Manual
Main Pages
Pointer Page
Waypoint
(Destination)
Straight line
distance to the
destination
Time to
destination
Moving direction
line
Destination
symbol
Direction arrow
(follow this)
Selectable trip
data
Compass ring
The Pointer Page
The Pointer page helps guide you to a destination.
When navigating towards a destination, the Pointer
page shows the name, the distance, time to go, and a
direction arrow in the compass ring.
The compass ring reflects your heading (direction
of movement). To navigate, walk in the direction the
arrow is pointing. When the arrow is pointing at the
moving direction line, your destination is ahead.
Press UP or DOWN to cycle through the trip
information at the bottom of the page.
Pointer Page Options
• Reset Max Speed—resets the Maximum Speed
achieved during a trip.
• Reset Trip—resets the trip time, trip distance
(odometer), and average speed back to zero.
• Stop Navigation—stops any active navigation.
If you do not have a GOTO or route activated,
this option is not available.
To select a Pointer Page option:
1. From the Pointer page, press ENTER.
2. Select an option > ENTER. The change is
made and the options menu disappears.
To change a data field:
From the Pointer page, scroll through the
options, stopping on the data you want to view.
NOTE: The eTrex is not a magnetic
compass. You must be moving for the unit to
determine your heading.
eTrex H Owner’s Manual
Main Pages
Trip Computer Page
The Trip Computer page contains five data fields to
show travel information.
To change the fields:
1. From the Trip Computer page, press ENTER.
2. Select CHANGE FIELDS > ENTER.
3. Select the field to change > ENTER.
4. Select an option > ENTER.
5. Repeat Steps 3 and 4, as necessary.
• Reset Max Speed—resets your maximum
speed to zero.
• Reset Trip—resets all the data in the Trip
Computer to zero.
• Restore Defaults—restores the Trip Computer
to display the five default data fields.
Selectable
data fields
The Trip Computer Page
Customize these five fields to show information from
a list of data fields.
Trip Computer Page Options
• Change Fields—use the CHANGE FIELDS
option to select the data to be displayed from a
list of data fields.
10
eTrex H Owner’s Manual
Main Menu
Main Menu
Use the Menu page to customize the display, transfer
information from a computer to the eTrex and back
again, manage, and organize your waypoints.
Mark Waypoint Page
Menu options
Time and
date
Battery
capacity
indicator
Backlight
indicator
The Main Menu
Use the Menu page to access advanced features;
create and view waypoints, create a route, save and
view track logs, or access the system setup features.
To change the time zone:
1. Press PAGE to switch to the Menu page. Select
SETUP > ENTER.
2. Select TIME > ENTER.
3. Select TIME ZONE > ENTER.
Use the Mark Waypoint page to create a waypoint at
your current location or at a location you enter in the
position field.
To mark a waypoint:
Press PAGE to switch to the Menu page.
Press UP or DOWN to highlight MARK. Press
ENTER.
NOTE: The unit must state READY TO
NAVIGATE before you can mark a waypoint.
To change the symbol:
1. From the Mark Waypoint page, select the
waypoint symbol (above the waypoint name) >
ENTER.
2. Select a symbol > ENTER.
4. Scroll through the selections. Press ENTER,
when you have found your correct time zone.
eTrex H Owner’s Manual11
Main Menu
To change the name:
1. From the Mark Waypoint page, select the
numeric name > ENTER.
2. Select a letter > ENTER. A letter selection
window appears. Select a new letter, and press
ENTER.
3. Select OK > ENTER.
Waypoints Page
From the Waypoints page select a waypoint to edit,
locate the nearest waypoints, or delete all of the user
waypoints.
To select a waypoint:
1. Press PAGE to switch to the Menu page. Select
WAYPOINTS > ENTER.
2. Select the alphabetical tab containing the
waypoint > ENTER. Select the waypoint >
ENTER.
12
To view the NEAREST waypoints page:
1. On the Waypoints page, select NEAREST.
Press ENTER. The Nearest Waypoints
page appears, showing a list of the closest
waypoints, including their names and distances
from your location.
2. Select a waypoint from this list > ENTER.
To delete all waypoints:
From the Waypoint page, select DELETE ALL
> ENTER. A confirmation message box appears
asking if you really want to delete all waypoints.
If you do, select YES > ENTER.
A GOTO is straight line navigation to a destination.
To start a GOTO:
1. Press PAGE to switch to the Menu page.
2. Select WAYPOINTS > ENTER.
3. Select the tab containing the waypoint you want
to navigate to > ENTER.
4. Select the waypoint > ENTER.
5. Select GOTO > ENTER.
eTrex H Owner’s Manual
Main Menu
The Pointer page appears and you’re ready to begin
navigating.
To stop navigating
1. Press PAGE to switch to the Pointer or Map
page > ENTER.
2. Select STOP NAVIGATION > ENTER.
Hunt & Fish Page
The Hunt and Fish page lists best times for hunting
and fishing for a chosen location (waypoint) and date.
To view the Hunt /Fish Page:
On the Review Waypoint page, select HUNT/
FISH > ENTER.
The data provided reflects best times for the current
date and at the location of the waypoint unless you
enter a new date in the Date field.
Sun/Moon Page
The Sun/Moon page shows both sun and moon set
and rise times for a chosen location and date. This
option is located at the bottom of the Hunt/Fish page.
To view the Sun/Moon Page:
1. On the Hunt/Fish page, select SUN/MOON >
ENTER to view the Sun/Moon page.
2. View the Sunrise and Sunset Times, Moonrise,
and Moonset Times, as well as the Moon
Phase, for the waypoint location and date.
3. You can set the date at which you want to
view the sun and moon position (if other than
current) by entering the date in the Date field.
4. Return to the Hunt/Fish page by selecting the
Hunt/Fish option at the bottom of the page >
ENTER.
Project
Use the Project feature to create a new waypoint at
a specified distance and bearing, using an existing
waypoint as a reference. Change the name, symbol,
and elevation of the new waypoint on this page.
eTrex H Owner’s Manual13
Main Menu
To project a waypoint:
1. Select a waypoint on the Waypoint page >
ENTER.
2. Select PROJECT > ENTER. A numeric name is
assigned to the new waypoint.
3. Distance is selected by default. Press ENTER.
4. With the Edit Number page open, press DOWN
to move the highlight to the next number in the
field. With the preferred digit selected > ENTER
to activate the drop down number list.
5. Select the correct number > ENTER. When all
numbers are entered, highlight OK > ENTER.
6. With the Project Waypoint page open, press
DOWN to highlight the bearing field > ENTER
to view the Edit Angle page.
7. Press DOWN to move the highlight to the next
number in the field. With the preferred digit
selected, press ENTER to activate the drop
down number list.
8. Select the correct number > ENTER. When all
numbers are entered correctly, highlight OK >
ENTER.
14
9. The name, symbol, and elevation can be
changed on this page as well. When all
changes have been made, select OK >
ENTER to save the waypoint. Select GOTO to
save the waypoint and begin direct navigation
to the point.
Routes Page
Navigate using one of three methods: GOTO
TracBack, and Routes.
The Routes feature guides you from the first waypoint
in the route to each successive waypoint to your final
destination.
The Routes feature and the GOTO feature both guide
you to destination waypoints. However, the Routes
feature is more useful for navigating to multiple
points along a path. When you reach one waypoint,
you are directed to the next waypoint on the route.
To create a route, select waypoints from the waypoint
list and place them into a route in the sequence that
you want to navigate to them. You need at least two
waypoints (up to a maximum of 125) linked together
eTrex H Owner’s Manual
Main Menu
to form a route. Create and store up to 20 individual
routes. Saved routes are automatically named based
on the first and last waypoints in the route. Saved
routes are listed on the Routes page, with an arrow
indicating which route is currently active.
Activate the Routes feature and the receiver begins
navigation toward the first waypoint in the route. Use
the Pointer page to provide steering guidance.
To create a route:
1. Choose ROUTE on the Menu page, then
select NEW ROUTE > ENTER. An empty route
page appears with the first field of the route
highlighted.
2. Press ENTER.
3. Select the waypoint of your choice > ENTER.
The waypoint you selected is placed in the first
field of the route, and the second field of the
route is highlighted.
4. Repeat Steps 2–3 until all of the waypoints are
entered into the route.
5. After you have entered all the waypoints into
your route, press PAGE. Your new route is
saved and displayed on the Routes page.
Note: You can also plan a route using
Garmin MapSource on a computer and
upload the route to the eTrex. See your
Garmin dealer for more information on
using MapSource (MapSource is an optional
accessory and is not included with the
eTrex H).
To activate a route:
1. From the Routes page, select the route that you
want to follow > ENTER.
2. Select FOLLOW > ENTER. You are prompted
to select the destination waypoint. 3. Select a destination waypoint > ENTER. The
eTrex assumes you are at the first point in the
route, and the Pointer page appears giving you
guidance to the next waypoint in the route list.
eTrex H Owner’s Manual15
Main Menu
Editing a Route
To insert a waypoint into a route:
1. Press PAGE and switch to the Menu page.
Select ROUTES > ENTER.
2 Select a route > ENTER.
3 Select the waypoint you want to insert a new
waypoint in front of > ENTER. The Insert/
Remove window appears. Select INSERT >
ENTER.
4. Select a waypoint > ENTER.
The eTrex draws an electronic Track Log on the
Map page as you travel. The Track Log contains
information about each point it plots, including time
and position. Review the saved Track Log on the map,
turn recording on or off, and change the way tracks
are recorded.
To remove a waypoint from a route:
The Track Log starts recording as soon as the unit
gets a location fix. Save the current Track Log and
clear it before you start traveling. The percentage of
memory used by the current Track Log is displayed
at the top of the Tracks page. When the display shows
99%, it starts overwriting the beginning track points,
you should save the Track Log before it reaches 99%
of memory usage.
To delete a route:
After a Track Log is saved, the saved track will have a
BEGIN and END point. You can save 10 Track Logs.
1. Press PAGE and switch to the Menu page.
Select ROUTES > ENTER. Select a route >
ENTER. 2 Select the waypoint you want to remove. Select
REMOVE > ENTER.
1. From the Menu page. Select ROUTES >
ENTER. Select the route > ENTER.
2. Select DELETE > ENTER. The confirmation
window appears asking you if you really want to
delete the route. Select YES > ENTER.
16
Tracks Page
To save the current Track Log:
1. From the Menu page, select TRACKS >
ENTER.
eTrex H Owner’s Manual
Main Menu
2. Select SAVE > ENTER. The Save Back
Through window appears giving you a time
frame for saving a track or ENTIRE LOG.
3. Select the preferred option > ENTER. The
saved track appears graphically on a sub-page.
4. Select OK > ENTER. The track is now saved
and appears in the SAVED TRACKS list on the
Track Log page.
To clear the current Track Log:
1. With the Menu page displayed, highlight
TRACKS > ENTER.
2. Select CLEAR > ENTER.
3. A message asks DO YOU REALLY WANT TO
CLEAR THE TRACK LOG?, select YES.
2. Place the highlight on the preferred saved track
> ENTER. The saved track is shown on a map
with a default track name.
3. Select the name > ENTER.
4. With the Edit Track Name page shown, press
DOWN to move the highlight to the next place
in the name field. When the location is selected,
press ENTER.
5. Select the correct character > ENTER. When
the name is entered select OK > ENTER.
Two other options are: TRACBACK and DELETE.
To start TracBack Navigation:
1. With the Track Log page shown select a
SAVED TRACK > ENTER.
2. When finished viewing the saved track, select
OK.
1. With the Track Log page shown select a
SAVED TRACK > ENTER.
2. Select TRACBACK > ENTER. Decide if you
want the destination to be at the beginning of
the track or the end of the track.
3. Select a destination point. The Pointer page
guides you to the destination you selected.
To rename a saved Track Log:
To delete a saved track:
To show a map of a saved track:
1. With the Menu page displayed, select TRACKS
> ENTER.
1. With the TRACK LOG page shown select a
SAVED TRACK > ENTER.
eTrex H Owner’s Manual17
Main Menu
2. Select DELETE > ENTER. Select YES >
ENTER.
• Defaults—restores the factory default settings.
To delete all tracks:
1. From the Track Log page, select SETUP >
ENTER.
2. Select the preferred fields > ENTER. Make
the preferred changes to the fields, then press
ENTER to save the changes.
3. To restore the default Track settings, select
DEFAULTS > ENTER.
1. From the Track Log page, select DELETE ALL
> ENTER.
2. Select YES > ENTER.
Track Setup
Use the Track Setup page to customize the way tracks
are recorded.
• Recording—select ON to record tracks or OFF
to stop recording.
• Record Interval—set the type of interval for
recording tracks: Distance, Time, or Auto.
• Resolution/Value—this field works with the
Record Interval to set how often to record
points. If you select Auto, select a resolution
for recording track points. If you select
Distance or Time, enter the distance or time.
• Wrap When Full—select YES to overwrite
the beginning track points when the Track Log
is full. Select NO to stop recording when full.
18
To use the Track Setup page:
Setup Page
Use the Setup page to change coordinate systems,
map datums, and distance units, and to change the
time format, north reference, mode, contrast, and back
light timeout.
Time Page
Use the Time page to select a 12-hour or 24-hour
format, enter the time zone, and Daylight Saving
Time.
Time Format
In the 12-hour time format, the clock functions like a
standard clock. The 24-hour option is a 24-hour cycle.
eTrex H Owner’s Manual
Main Menu
To change the time format:
1. Press PAGE and switch to the Menu page.
Select SETUP > ENTER.
2. Select TIME > ENTER.
3. Select TIME FORMAT > ENTER.
4. Select 12 or 24 hours > ENTER.
Time Zone
Set the Time Zone field to an appropriate zone.
UTC Offset
Use the UTC Offset field to match any time zone
in the world. To access the UTC Offset field, select
OTHER for the time zone, and then enter a time offset
from UTC time.
Daylight Saving Time
Choose Automatic to automatically change the
clock settings for Daylight Saving Time. Choose Yes
to add daylight saving or No for standard time.
To change the daylight saving field:
1. Press PAGE and switch to the Menu page.
Select SETUP > ENTER.
2. Select TIME > ENTER.
3. Select DAYLIGHT SAVING > ENTER.
4. Select AUTO, YES, or NO > ENTER.
NOTE: The Daylight Saving Time setting does
not affect the UTC offset number.
Display Page
Use the Display page to set the display backlight
timeout and the display contrast.
To change the light timeout:
1. Press PAGE and switch to the Menu page.
Select SETUP > ENTER.
2. Select DISPLAY. Press ENTER on the Light
Timeout field.
3. Make your choice > ENTER.
To adjust the display contrast:
1. Press PAGE to switch to the Menu page. Select
SETUP.
2. Select DISPLAY > ENTER. Select the
CONTRAST icon.
3. Press UP or DOWN to adjust the contrast.
eTrex H Owner’s Manual19
Main Menu
Units Page
If using a map in conjunction with the eTrex, select
the position format (grid), map datum, map units, and
north reference to match the map’s units. The eTrex
supports the UTM/UPS and latitude/longitude grids.
Position Format
The default position format is latitude and longitude
in degrees and minutes (hdddº mm.mmm). User
position format is for custom-designed grids.
To change the Position Format:
1. Press PAGE and switch to the Menu page.
Select SETUP > ENTER. Select UNITS >
ENTER.
2. Select POSITION FRMT > ENTER.
3. Select a format > ENTER.
Map Datums
If you are comparing GPS coordinates to a paper
map, the map datum in the eTrex should match the
horizontal map datum used. The default datum in the
eTrex is WGS 84. Change only the datum if you are
using a different datum than WGS 84.
20
To change the Map Datum:
1. From the Menu page, select SETUP > ENTER.
2. Select UNITS > ENTER.
3. Select MAP DATUMS > ENTER.
4. Select a datum > ENTER.
Distance/Speed Units
Select statute, nautical, or metric units of measure for
all speed and distance readouts.
To change the Distance/Speed units:
1. From the Menu page, and select SETUP >
ENTER.
2. Select UNITS > ENTER.
3. Select the UNITS > ENTER.
4. Select a unit > ENTER.
North Reference
Reference refers to the orientation of a map’s grid.
True North is the direction from any location on
the earth’s surface to the North Pole. The eTrex
bearings correspond to a compass if the eTrex is set to
magnetic north.
eTrex H Owner’s Manual
Main Menu
To change the North Reference:
1. Press PAGE to switch to the Menu page. Select
SETUP > ENTER.
2. Select UNITS > ENTER.
3. Select NORTH REF > ENTER.
4. Select the reference (TRUE, MAG, GRID, or
USER) > ENTER.
Variance
The eTrex lists the variance between Grid North and
True North for the selected North Reference grid.
To enter Variance manually:
1. From the Menu page, select SETUP > ENTER.
2. Select UNITS >NORTH REF > USER.
3. Select VARIANCE > ENTER.
4. Enter a value > ENTER.
Angle
Show directional information in DEGREES or MILS.
To select an Angle setting:
1. From the Menu page, select SETUP > ENTER.
2. Select UNITS > ENTER.
3. Select ANGLE > ENTER.
4. Select DEGREES or MILS > ENTER.
Defaults
Restore the Units page to the default settings by
highlighting DEFAULTS > ENTER.
Interface Page
Use the Interface page to connect and use devices
such as computers.
Input/Output Formats
• GARMIN—the format for exchanging
waypoint, route, and track data.
• GARMIN DGPS—DGPS input using a
Garmin beacon receiver and a standard RTCM
SC-104 format and DGPS tuning.
• NMEA OUT—supports the output of standard
NMEA 0183 version 3.0 data.
• TEXT OUT—simple ASCII text output of
location and velocity information.
• RTCM IN—DGPS input using a standard
RTCM SC-104 format.
eTrex H Owner’s Manual21
Main Menu
• RTCM/NMEA—DGPS input; standard RTCM
SC-104 format , NMEA 0183 version 3.0 data.
• RTCM/TEXT—DGPS input using a standard
RTCM SC-104 format and simple ASCII text
output of location and velocity information.
• NONE—provides no interfacing capabilities.
If GARMIN DGPS or RTCM/NMEA format is used,
additional fields control a differential beacon receiver.
To select an I/O format:
1. Press PAGE to switch to the Menu page. Select
SETUP > ENTER.
2. Select INTERFACE > ENTER.
3. Press ENTER on the I/O format field > select
the preferred format > ENTER.
System Page
Mode
• Normal Mode—means the GPS is active and
running whenever the unit is powered on.
• WAAS Mode—improves the overall accuracy
and integrity of the GPS signal.
22
• Demo Mode—demonstrates features and
functions inside a closed building where
satellite reception is not possible.
To select an operating mode:
1. From the Menu page, select SETUP > ENTER.
2. Select SYSTEM > ENTER.
3. Select GPS > ENTER.
4. Select the mode > ENTER.
Language
To select a language:
1. From the Menu page, highlight SETUP > ENTER.
2. Select SYSTEM > ENTER.
3. Select LANGUAGE > ENTER.
4. Select a language > ENTER.
Software Version
The Software page shows the eTrex’s current software
version. To update, go to www.garmin.com.
eTrex H Owner’s Manual
Appendix
Appendix
DGPS (WAAS) Accuracy: 3 meters (10ft) 95% typical with DGPS corrections3
Specifications
Physical
Case: Fully-gasketed, high-impact plastic alloy, waterproof to IPX7 standards (waterproof to 1 meter for 30 minutes)
Size:
4.4”H x 2”W x 1.2”D (11.2 x 5.1 x 3.0 cm)
Weight: Approx. 5.3 ounces (150g) w/batteries
Temperature Range: 5° to 158°F (-15° to 70°C)
1
Performance
Receiver:
WAAS enabled, high-sensitivity
Acquisition time: Approx. 3 seconds (hot start)
Approx. 32 seconds (warm start)
Approx. 39 seconds (cold start)
Update Rate:
1/second, continuous
GPS Accuracy: <10 meters (33 ft) RMS2
Velocity Accuracy:
.1 knot RMS steady state
Dynamics:
Performs to specifications to 6 g’s
Interfaces:
NMEA 0183 (versions 2.00-3.0), RTCM 104 (for DGPS corrections)
and RS-232 for computer interface
Antenna:
Built-In
Power
Input:
Two 1.5-volt AA batteries, External power adapter
Battery Life:
Up to 17 hours of typical use
Specifications subject to change without notice.
1 The temperature rating for the eTrex may exceed the usable range of some batteries. External power can only be applied using the Garmin Auto Power Adapter or computer Interface Cable with Auto Power Adapter; this cable contains a voltage regulator).
2 Subject to accuracy degradation to 100m 2DRMS under the U.S.DOD Selective Availability program.
3 Optional Differential Beacon Receiver Input (by others).
eTrex H Owner’s Manual23
Appendix
Interface Formats
Interface formats are selected from the Setup page.
The input/output lines on your eTrex are RS-232
compatible, allowing easy interface to a wide range
of external devices, including computers, differential
beacon receivers, marine autopilots and/or a second
GPS receiver.
The NMEA 0183 version 3.0 interface format is
supported and the unit can drive up to three devices.
NMEA 0183 Version 3.0 Approved
Sentences:
GPGGA, GPGLL, GPGSA, GPGSV, GPRMB,
GPRMC, GPBOD, GPRTE.
Connecting Your eTrex to a
Computer
You can connect your eTrex to your computer using
the computer connector cable.
To connect your eTrex to your computer:
1. Lift the communication port protective cover
from the back of the eTrex, and insert the
smaller connector on cable into the matching
port.
2. Connect the remaining cable end to your
computer’s serial port.
Garmin Proprietary Sentences:
PGRME (estimated error) and PGRMZ (altitude).
DGPS (Differential GPS) corrections are accepted in
RTCM SC-104 version 2.0 format through the Data In
line. Beacon receivers with the correct RTCM format
may be used, but may not correctly display status or
allow tuning control from the GPS unit.
24
eTrex H Owner’s Manual
Appendix
Software License Agreement
BY USING THE eTrex H, YOU AGREE TO BE BOUND BY
THE TERMS AND CONDITIONS OF THE FOLLOWING
SOFTWARE LICENSE AGREEMENT. PLEASE READ
THIS AGREEMENT CAREFULLY.
Garmin grants you a limited license to use the software
embedded in this device (the “Software”) in binary executable
form in the normal operation of the product. Title, ownership
rights, and intellectual property rights in and to the Software
remain in Garmin.
Declaration of Conformity
Hereby, Garmin declares that this eTrex H product
is in compliance with the essential requirements and
other relevant provisions of Directive 1999/5/EC.
To view the full Declaration of Conformity, see the
Garmin Web site for your Garmin product: http://www.garmin.com/products/etrexH/ or Click
Manuals and then select the Declaration of
Conformity.
You acknowledge that the Software is the property of
Garmin and is protected under the United States of America
copyright laws and international copyright treaties. You further
acknowledge that the structure, organization, and code of the
Software are valuable trade secrets of Garmin and that the
Software in source code form remains a valuable trade secret
of Garmin. You agree not to decompile, disassemble, modify,
reverse assemble, reverse engineer, or reduce to human
readable form the Software or any part thereof or create any
derivative works based on the Software. You agree not to
export or re-export the Software to any country in violation of
the export control laws of the United States of America.
eTrex H Owner’s Manual25
Index
Index
A
accessories i
activating a route: 15
B
backlight 5
battery installation 2
battery strength indicator 11
bearing 8
C
compass ring 9
contrast 5
course 8
creating a route 15
creating a waypoint 11
D
daylight saving time 19
delete a track 17
delete a waypoint 12
E
Enter/Mark key 1
26
G
GOTO 12
H
heading 9
Hunt/Fish 13
I
initializing 5
input/output formats 21
installing batteries 2
Interface page 21
K
key functions 4
M
Main Menu 11
manual conventions 3
map datums 20
map orientation 8
Map page 7
mark 11
marking a waypoint 11
moving direction line 9
N
nearest waypoints 12
NMEA format 22
north pointer 7
north reference 20
O
on-screen message 6
P
Pointer page 9
Power/Baclkight key 4
projecting a waypoint 14
Q
Quit/Page key 4
R
routes 14
activating 15
creating 15
editing 16
S
selecting Options and entering
data 6
Setup page 18
SkyView page 7
software version 22
stop navigation 9
Sun/Moon 13
T
Time page 18
time zone 19
track log 16
trip computer page 10
turning on the unit 5
U
unit overview 1
Units page 20
Up/Down keys 3
UTC offset 19
V
variance 21
W
waypoints 11
waypoint symbol 11
eTrex H Owner’s Manual
For the latest free software updates (excluding map data) throughout the life of your
Garmin products, visit the Garmin Web site at www.garmin.com.
© 2007 Garmin Ltd. or its subsidiaries
Garmin International, Inc.
1200 East 151st Street, Olathe, Kansas 66062, USA
Garmin (Europe) Ltd.
Liberty House, Hounsdown Business Park, Southampton, Hampshire, SO40 9RB UK
Garmin Corporation
No. 68, Jangshu 2nd Road, Shijr, Taipei County, Taiwan
www.garmin.com
Part Number 190-00818-00 Rev. B