1
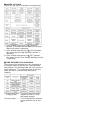
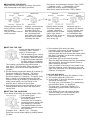
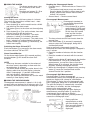
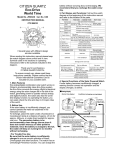
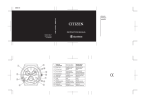
CITIZEN QUARTZ
ECO-DRIVE
Model No. AP2XXX
Cal. No. 087❈
• INSTRUCTION MANUAL
CTZ B6818
IMPORTANT
Before using
When the watch does not operate according to
the instruction manual, it is insufficiently
charged.
Charge the secondary battery of the watch for
more than 6 hours, approximately 20cm (8in.)
away from the fluorescent or incandescent lamp
(30W) as light sources.When charging the
secondary battery, do not put it too close to the
light source.
* When charging the watch under direct rays
of the sun, charge for more than an hour.
Please refer to the diagram on the left when
reading this instruction manual.
FEATURES
This watch is a multi-hands analog solar watch with
alarm and chronograph functions, and a solar power
function as its base which provides the power
source for the watch’s hands movement and alarm
sound by converting solar energy into electrical
power with the solar cell fitted on its face.
BEFORE USING
A secondary battery is used in this watch to store
electrical energy. This secondary battery is a
clean energy battery which does not use any
toxic substances such as mercury. Once fully
charged, the watch will continue to run for about
80 days (using the alarm sound for 15 seconds/day
and the chronograph timer for 60 minutes/day)
without further charging.
How to use this watch properly
For the comfortable use of this watch and its
additional alarm and chronograph functions, take
care to keep it sufficiently recharged.
There is concern of overcharging this watch.
(Overcharging Prevention Feature is included)
We recommend that you recharge the watch
every day.
FUNCTIONS OF SOLAR POWERED WATCH
These functions are only found in the solar power
watch. If the watch becomes insufficiently charged,
a warning comes into operation and the display
changes, as below.
Insufficient Charge Warning Function
If the watch is put in the undercharged state during
any display mode, it switches to the time display
when in the other display modes, then the second
hand moves to the CHARGE position, indicating
the shortage of electricity. (Electric power shortage
warning display) Even then, the time (hour, minute
and 24-hour hands) runs accurately.
* The alarm does not ring even if it is set.
* If the chronograph is being used, measurement
stops and it is reset.
* The push button does not function.
Refer to, “ In These Cases”.
Stop Warning Function
If the watch is left intact in the undercharged state,
about 5 days later the second hand will move to the
STOP position, indicating that the watch has
stopped due to electric power shortage. (Stop
warning display) The other hands (hour, minute and
24-hands) also stop.
* In this condition, all functions stop.
Refer to, “ In These Cases”.
Time Setting Warning Function
When the watch is recharged by exposing it to light
after once stopped, the second hand moves to the
SET position, indicating that the watch does not
keep correct time. (Time setting warning display)
* The hour, minute and 24-hour hands run at the
incorrect time.
Refer to, “ In These Cases”.
Overcharge Prevention Function
You can recharge without worry.
When the secondary battery is fully recharged, the
overcharging prevention function works so that the
secondary battery is not overcharged.
NOTES ON USE
Please take care to charge your watch during use.
Please note that if you wear long sleeves, the watch
can easily become insufficiently charged because it
is hidden and not exposed to light.
• When you take off the watch, try to place it in as
bright a place as possible, and it will always
continue to run properly.
CAUTION
Never use another battery apart from the secondary
battery (Titanium Lithium Ion Battery) used in this
watch.
The watch structure is so designed that a different
kind of battery other than that specified cannot be
used to operate it. However, in case a different
battery such as a silver battery is used by some
chance, there is a danger that it will be overcharged
to burst, causing damage to the watch and even the
human body.
When you replace the secondary battery, be sure to
use a designated secondary battery.
NOTES ON CHARGING
• The watch will be damaged during recharging if it
gets too hot (over about 60C/140F). Avoid
recharging at high temperatures.
(eg) Charging the watch near a light source that
easily becomes hot, such as an incandescent
lamp or a halogen lamp.
Charging in a place that easily becomes hot
such as a dashboard.
• Note that full charging is difficult in a place
irradiated by only weak light.
• When you charge the watch by an incandescent
lamp, take a distance about 50cm (20in.) from the
light source to prevent extremely high temperature.
NAMES OF PARTS
Please see the watch illustration at the beginning.
➇: If the second hand moves to CHARGE
position, this shows that the Insufficient Charge
Warning function is operating.
➈: If the second hand moves to STOP position,
this shows that the Stop Warning Function is
operating.
➉: If the second hand moves to SET position,
this shows that the Time Setting Warning function
is operating.
TIME REQUIRED FOR CHARGING
Time required for recharge may vary according to
the design (colour of the dial, etc.) and operating
environment. The following table will serve you as a
rough reference. *The recharging time is the time
when the watch is continuously exposed to
radiation.
Full recharging time... The time from when watch
(Empty to full)
stopped to when it is fully
recharged stopped.
One day usage.......... The recharging time required
for the watch to run for one
day.
CHANGING THE MODES
Other than the time display, this watch has alarm
and chronograph main display functions.
Each press of the M button changes Time <TME>
➝ Calendar <CAL> ➝ Chronograph <CHR>.
Confirm the change with the mode hand.
After that it returns to the time <TME> display.
Displays present time in
hours, minutes, seconds
and 24-hours.
Use the 24-hour hand to
confirm am/pm.
Display alarm set time.
The alarm setting is in
1 minute. Confirm of
am/pm with the 24-hour
hand. If the alarm is
ON, it will ring at the set
time for 15 seconds
once every day.
Displays current date by
second hand (month)
and date. Since the
date and function hand
are syncronized with
each other, the function
hand will turn at when
correcting the date.
SETTING THE TIME
Check that the mode hand is
indicating <TME> and the
watch is in time mode.
1. Pull the button M out, so that
the second hand stops at the
“0” position. When the watch
is adjusted by button operation,
the time setting is completed
by electromagnetic correction.
1. Time setting synchronizes the minute hand ➝
hour hand ➝ 24-hour hand. When adjusting the
hour hand, check the 24-hour hand position
(am/pm).
2. Set the time by pressing the button B or button C.
Each time button B is pressed…The watch
advances 1 minute in a clockwise direction.
Each time button C is pressed…The watch turns
back 1 minute in a counterclockwise direction.
Depress button B or button C continuously, the
hands move rapidly. turn the hands in the
direction that is closest to the set time.
3. After setting the time, push the button M to the
normal position and the watch will start at the
correct time.
SETTING THE CALENDAR
Press button M to switch to calendar mode <CAL>.
1. Pull button M out.
2. Press button A to correct
the month number.
Correction can be made by
advancing by one month each
time button A is pressed.
The month number can be
read directly from the normal
hour positions.
2. (Example: 3:00 ➝ March, 1:00 ➝ January)
Correction can be made rapidly by holding button
A down.
Measures up to a
maximum 60 minutes
in 1/20 seconds, and
displays split times.
A confirmation rings
when you start/stop or
measure a split time.
3. Press button B to correct the date.
Correction can be made by advancing one day
each time button B is pressed. The date
advances one day when the function hand makes
four turns. Correction can be made rapidly by
holding button B down.
M in to the normal position.
4. Push button * Since the date and function hand are synchronized
with each other, the function hand will turn at
when correcting the date.
* Date correction at the end of each month is not
required. However, since February is set at 28
days, date correction must be performed only for
February in leap years.
Leap Year Adjustment
1. Press button M to change the mode to <CAL>.
2. Pull out the button M by one click.
3. Press button C for more than two seconds to
set/cancel the leap year.
• The leap year is set if button C is continuously
pressed when March 1 is displayed.
• The leap year is cancelled if button C is
continuously pressed when February 29 is
displayed.
4. Push button M back into normal position.
* Once the leap year is set, February 29 is
displayed once in every four years.
USING THE ALARM
The alarm sounds once a day
for 15 seconds at the alarm
time set.
Pressing any buttons A ,
B or
C stops the alarm ringing.
Setting the Alarm
Alarm setting is on a 24-hour system in 1 minute.
The hands are moved thus: minute hand ➝ hour
hand ➝ 24-hour hand.
1. Press button M to set the mode hand to <ALM>
and switch to the alarm mode.
2. Pull button M out, to the alarm set time adjusting
state.
3. Press button B or C to set the minute, hour and
24-hour hands to the desired time.
• Each time button B is pressed…The watch
advances 1 minute in a clockwise direction.
• Each time button C is pressed…The watch turns
back 1 minute in a counterclockwise direction.
* Depress button B or button C continuously, the
hands move rapidly.
Switching the Alarm ON and OFF
Each time button A is pressed in the alarm mode,
the alarm switches ON and OFF.
Alarm Sound Monitor
On the alarm mode (button M in normal position),
pressing button A will sound the alarm for 5
seconds.
NOTE
• There may be some variation in the volume of
the alarm sound, depending on how much the
second battery is charged.
• The alarm sound volume gets rather lower in the
displays other than the time display (calendar,
alarm, chronograph, “0” position confirmation,
and each display’s adjustment state).
Once the alarm time has been set, use the watch
normally in time display mode.
USING THE CHRONOGRAPH
Chronograph measurement is taken in 1/20 (0.05)
seconds and can continue for 60 minutes max. Over
60 minutes, the watch enters the chronograph reset
state.
Reading the Chronograph Hands
• Function hand ➝ Chrono minutes or Chrono 1/20
seconds.
* The function hand moves every one minute.
Pressing button B while in chrono stop or split
display, switches the function hand to show
chrono 1/20 seconds.
• Second hand ➝ Chrono second hand.
Chronograph Measurement
Chronograph standard or
accumulated elapsed time
measurement
1. Press button M to set the
mode hand to <CHR> and
get the chronograph display.
At this time, the second
hand and the function
hand will return to the “0”
position.
* The hour, minute and 24-hour hands show the
present time.
2. Each time button A is pressed, it repeatedly
starts or stops the chronograph, along with a
confirmation sound.
How to read each chronograph hand if the
measured time when the chronograph is stopped is
over 1 minute.
➀ Read the number of minutes with the function
hand
➁ Read the number of seconds with the second
hand.
➂ While pressing button B continuously, the function
hand switches to 1/20 (0.05) second hand
measurement, so read the value at that time.
When button B is released, the function hand
resumes showing chronograph minutes.
3. While the chronograph is stopped state, pressing
button C resets the function hand and the
second hand to the 0 position.
Chronograph Split Measurement
C during chronograph
Pressing button measurement causes the chronograph split time to
appear on display with a beep for confirmation.
Press button C again, the next chronograph split
time is displayed, along with a confirmation sound.
The split time display is automatically cancelled
after about 10 seconds, and the chronograph
returns to the measurement state.
During either chronograph split time display or
measurement, pressing button A causes the
chronograph stop to appear on display.
In the chronograph stop state, pressing button C
causes the chronograph reset.
* During split time
measurement or while
split time display, each
time you press button C
the next split time is
displayed.
IN THESE CASES
When shown the Insufficient Charge Warning
Display
If the watch is put in the undercharged
state during any display mode, it
switches to the time display when in
other display modes, then the second
hand moves to the CHARGE
position, indicating insufficiently
charged.
In such a case, expose the watch to sufficient light
for the warning state to be cancelled. (The second
hand returns to 1 second movement)
It takes about 30 minutes to complete charging;
from starting to expose the watch to light until this
warning state is cancelled. The charging time varies
depending on the light (light source) that radiates
over the watch.
When Shown the Stop Warning Display
If the watch is left intact in the
undercharged state, about 5 days
later the second hand will move to
the STOP position, indicating that
the watch has stopped due to
insufficient recharge.
* All functions are stopped in this state.
In such a case, expose the watch to sufficient light
for the warning state to be cancelled.
After carrying out sufficient charging, it is necessary
to reset the alarm time.
When Shown the Time Setting Warning Display
If you expose a watch which has
stopped once to light and recharge it,
the second hand will move to the SET position to let you know that the
time is incorrect.
In such a case, readjust the hour,
minute and 24-hour hands to keep
the correct time.
Without adjusting the time hands after the watch is
fully recharged, you cannot use such functions as
alarm, chronograph, etc. properly.
* Be careful because if the watch is not sufficiently
charged during the Time Setting Warning Display
state, and if light is blocked from it, the second
hand will change to the STOP position and the
watch will stop running.
CHECKING AND ADJUSTING EACH HAND’S
“0” POSITION
The watch’s display may go wrong due to the effect
of static electricity, strong shock, etc.
In such a case, check and adjust the “0” postion of
each of the following hands.
“0” Position Checking
1. Press button M to set the
mode hand at <CHR> position
for chronograph function.
2. Pull out button M by one click
and check to see if each hour,
minute, second, 24-hour and
function hands quickly moves
to “0” position (12 o’clock position) while date
hand quickly moves to “1” position.
If any hand returns wrong out of the correct
position “0” or “1”, the watch needs [“0” position
adjustment].
“0” Position Adjustment
1. For adjusting the second hand
to “0” postion:
• Press button A .
2. For adjusting hour, minute and
24-hour hands to “0” position:
• Press button C.
3. For adjusting date and function
hand to position “1” and “0” respectively:
• Press button B.
• “0” position for function hand is equivalent to
12 o’clock position just after the date has been
set at “1” position.
• With four turns of a function hand, date indication
is adjusted by a day.
• If button A ,
C or B is continuously pressed, the
hand corresponding to the button moves quickly.
4. When “0” position adjustment is complete, push
button M into the original position.
* Make sure to reset time, calendar, alarm time
correctly following “0” position adjustment.
PRECAUTIONS
1. Resistance to water
Check the chart to determine the water resistant
properties of this watch.
2. Avoid temperature extremes
Avoid leaving your watch in extremely warm or cold
locations for long periods of time.
• This may cause your watch to gain or lose time and
affect its other function.
• The watch restores its original accuracy if it is placed
in normal temperature.
3. Avoid strong shock
This watch will withstand the bumps and jars
normally incurred while playing and during sports
activities.
Avoid dropping your watch on the ground or
subjecting the watch to severe shock which may
cause malfunction or damage.
4. Avoid strong magnetic fields
Keep your watch out of the immediate vicinity of
strong magnets. Generally, your watch is not
affected by magnetic fields from such household
appliances as television sets and stereo equipment.
5. Static electricity
The integrated circuits used in the watch are
sensitive to static electricity. If exposed to intense
static electricity, the watch’s display may lose its
accuracy.
6. Avoid harmful chemicals, solvents and gases
Avoid wearing your watch in the presence of strong
chemicals, solvents and gases. If your watch comes
in contact with materials such as gasoline, benzine,
paint thinner, alcohol, spray cosmetics, nail polish,
nail polish remover, adhesives or paint,
discolouration, deterioration or damage to the case,
band, and other components may occur.
7. Keep your watch clean
It may become difficult to pull out the crown due to
dirt and dust getting caught between the crown and
the watch case when the watch is worn for long
periods of time. To help prevent this from happening,
turn the crown freely back and forth occasionally
while it is in the normal set position.
Wipe off any water and moisture that adheres to the
case, glass and band with a soft, clean cloth. Any dirt
left on the case or band may cause skin rash.
A watchband will easily become soiled with dust and
perspiration because it is in direct contact with the
skin. Even a stainless or gold-plated band may begin
to corrode if it has not been cleaned for a long period
of time.
Mesh bands, because the meshes are very fine, will
lose their particular “flexibility” if they are left soiled
for a long time.
Metal watch bands should be washed periodically to
keep them looking beautiful at all times.
Metal watchbands are usually washed with a brush
in mild, soapy water and well wiped with a soft,
absorbent cloth to make sure all water is removed.
Pay attention to prevent any water from getting
inside your watch when the band is washed.
8. Periodic inspection
Getting your watch checked once in two or three
years is recommended to ensure long use and
trouble-free operation.
SPECIFICATIONS
1. Type...................... Multi-Hand Analog Solar
Power Watch
2. Caliber No............. 0870/0875
3. Time Accuracy....... ± 20sec per month (temp.
5°C/41°F to +35°C/95°F)
4. Operational temperature
range..................... -10°C ~ +60°C/14°F ~ 140°F
5. Display Functions:
Time.............. Hour, minute, second and
24 hour hands
Calendar.........Month, date
Alarm..............Hour, minute and 24-hour
hands, alarm ON/OFF
Chronograph.. Minute, second and 1/20
(0.05) second hands
6. Additional functions:
Alarm..............Daily alarm (sounds for about
15 seconds)
Alarm monitor (Sounds for
about 5 seconds)
Chronograph.. Measurement is taken in 1/20
seconds and for 60 minutes
max. (A beep for start/stop/split
confirmation will sound when
the associated button is
pressed.)
Insufficient Charge Warning Function
Stop Warning Function
Time Setting Warning Function
Overcharge Prevention Function
7. Secondary Battery
Used......................Titanium lithium ion
secondary battery