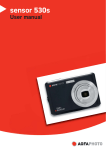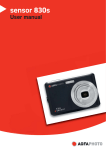
1
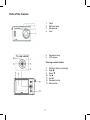
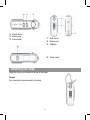
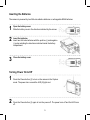
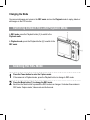
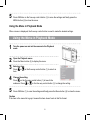
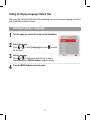
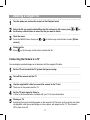
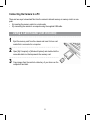
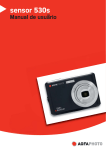
Thank you for purchasing this AgfaPhoto digital camera. Please read these operating instructions
carefully in order to use the digital camera correctly. Keep the instructions in a safe place after reading so that you can refer to them later.
Notice: this User’s Manual has been written for the following camera models: AgfaPhoto
sensor 500-D, AgfaPhoto sensor 505-D and AgfaPhoto sensor 510-D.
Precautions
Before using the camera, please ensure that you read and understand the safety precautions described below. Always ensure that the camera is operated correctly.
•
•
•
•
•
•
•
Do not point the camera directly into the sun or other intense light sources which could damage
your eyesight.
Do not try to open the case of the camera or attempt to modify this camera in any way. High-voltage
internal components create the risk of electric shock when exposed. Maintenance and repairs should
be carried out only by authorized service providers.
Do not fire the flash too close to the eyes of animals or people, especially young children. Eye damage
may result. In particular, keep at least one meter away from infants when using the flash.
Keep the camera away from water and other liquids. Do not use the camera with wet hands. Never
use the camera in the rain or snow. Moisture creates the danger of electric shock.
Keep the camera and its accessories out of the reach of children and animals to prevent accidents
or damage to the camera.
If you notice smoke or a strange odor coming from the camera, turn the power off immediately. Take
the camera to the nearest authorized service center for repair. Never attempt to repair the camera
on your own.
Use only the recommended power accessories. Use of power sources not expressly recommended
for this equipment may lead to overheating, distortion of the equipment, fire, electrical shock or
other hazards.
Disclaimer
We assume no responsibility over and above the provisions of the Product Liability Law for damages
suffered by the user or third parties as a result of inappropriate handling of the product or its accessories, or by their operational failure and by their use. We reserve the right to make changes to this
product and its accessories without prior notice.
Warning! Never open the camera or remove any parts of it. This will void all guarantee claims.
Using your batteries
For best performance and prolonged battery life, we recommend the use of AAA-sized rechargeable
NiMH batteries.
Extending battery life
The following functions use up a great deal of battery power and should therefore only be used
occasionally:
•
•
Excessive use of flash
Editing images on the camera display
The battery life can be affected by soiling. Please clean the contacts with a clean, dry cloth before
putting the batteries in the camera. Battery performance drops at temperatures below 5° C (41° F). If
you use the camera at low temperatures you should have replacement batteries to hand and ensure
they do not get too cold. Please note: you should not dispose of cold and seemingly flat batteries
because these batteries may work again at room temperature.
Parts of the Camera
1.
2.
3.
4.
Flash
Selftimer lamp
Microphone
Lens
5. Operation lamp
6. LCD display
Five-way control button
7.
8.
9.
10.
11.
12.
13.
OK/Enter button (vertically)
Right u
Down q
Up p
Left t
Playback button
Menu button
14. Shutter button
15. Mode button
16. Power button 17. Strap mount
18. Battery cover
19. USB jack
20. Tripod socket
Attaching the Strap
Attach the strap to your camera as shown in the image.
Caution
Do not swing the camera around by the strap
Inserting the Batteries
The camera is powered by two AAA-size alkaline batteries or rechargeable NiMH batteries.
Open the battery cover.
Slide the battery cover in the direction indicated by the arrows. 1
2
Insert the batteries.
Insert two AAA-size batteries with the positive (+) and negative
(-) poles matching the directions indicated inside the battery
compartment.
3
Close the battery cover. Turning Power On & Off
1
2
Press the Power button (1) to turn on the camera in the Capture
mode. The power turns on and the LED (2) lights red.
Press the Power button (1) again to turn the power off. The power turns off and the LED turns
off.
Changing the Mode
You can record images and voices in the REC mode and use the Playback mode to replay, delete or
edit images on the LCD monitor.
Switching between REC and Playback Mode
In REC mode, press the Playback button (2) to switch to the
Playback mode.
In Playback mode, press the Playback button (2) to switch to the
REC mode.
Selecting the REC Mode
1
2
Press the Power button to enter the Capture mode.
If the camera is in Playback mode, press the Playback button to change to REC mode.
Press the Mode button (1) to change the REC mode.
Each time the Mode button is pressed the REC mode icon changes. It includes three modes in
REC mode: Capture mode, Video mode and Audio mode.
Display
Title
Description
Capture mode
For taking still photos.
Video mode
For recording movie clips.
Audio mode
For recording audio files.
Caution
The Mode button will not work when the camera is in Playback mode.
Using the Menu in REC Mode
When a menu is displayed, the five-way control button is used to make the desired settings. The
Audio mode does not have a menu so the MENU button will not work in Audio mode.
1
Capture menu.
Turn the power on, and set the camera to the Capture
mode
2
Open the Capture menu.
3
Select an item.
Press
or
on the five-way control button (1) to select
an item.
Change the setting.
4
Press the MENU button (2) to display the menu. Press
on the five-way control button (1) to launch the
submenu. Press
or
on the five-way control button (1)
to change the setting.
5
Press OK/Enter on the five-way control button (1) to save the settings and finally press the
MENU button (2) to close the menu
Using the Menu in Playback Mode
When a menu is displayed, the five-way control button is used to make the desired settings.
Using the Menu in Playback Mode
Turn the power on and set the camera to the Playback
mode 1
2
3
4
5
Open the Playback menu.
Press the Menu button (2) to display the menu.
Select an item.
Press
or
on the five-way control button (1) to select an
item.
Change the setting.
Press
on the five-way control button (1) to launch the
submenu. Press
or
on the five-way control button (1) to change the setting.
Press OK/Enter (1) to save the settings and finally press the Menu button (2) to close the menu.
Caution
If the item in the menu list is gray it means this item doesn’t work in this file format.
Setting the Display Language / Date & Time
When using the camera for the first time after purchasing it, be sure to choose a language and set the
date & time before using the camera.
Setting Display Language
1
Turn the power on, and set the camera to the Setup Menu.
2
Select [Language].
3
4
Press
or
to select [Language] then press
to launch
the submenu.
Select a language.
Press
or
on the five-way control button to select a
language and press OK/Enter button to apply the setting.
Press the MENU button to close the menu.
Setup Menu
1
2
Turn the power on and set the camera to the REC or
Playback mode.
Press the MENU button (2) to open the REC or Playback
menu. The menu displayed depends on whether you are in the
REC mode or the Playback mode. 3
Open the Setup menu.
Press
on the five-way control button (1) to select [Setup] to
display the Setup menu.
Select an item.
4
5
6
Press
or
on the five-way control button (1) to select a menu item then press
five-way control button (1) to launch the submenu.
on the
Change the setting.
Press
or
on the five-way control button (1) to select an option and press OK/Enter (1) to
apply the setting.
Press the MENU button (2) to close the menu.
10
Deleting a Single File
1
2
3
4
Turn the power on, and set the camera to the Playback mode
Select the file you want to delete.When the file is shown in full screen, press
the five-way control button to select the file you want to delete.
Open the menu.
Press the MENU button, then press
current].
or
or
on
on the five-way control button to select [Delete
Delete the file.
Press
on the five-way control button to delete the file.
Connecting the Camera to a TV
You can display recorded images on a television with the supplied AV cable.
Set the TV-out to match the TV system that you are using.
1
2
3
4
5
Turn off the camera and the TV.
Use the supplied AV cable to connect the camera to the TV set.
Then turn on the camera and the TV.
Set the TV input signal to Video In.
• Refer to the documentation included with your TV for more information.
Display on TV.
Everything that would normally appear on the camera’s LCD screen, such as photos and video
clip playback, slide shows and image or video capture, will appear on the TV. The camera’s
LCD screen turns off.
11
Connecting the Camera to a PC
There are two ways to download files from the camera’s internal memory or memory card to a computer:
• By inserting the memory card into a card reader
• By connecting the camera to a computer using the supplied USB cable.
Using a Card Reader (not included)
1
2
3
Eject the memory card from the camera and insert it into a card
reader that is connected to a computer.
Open [My Computer] or [Windows Explorer] and double-click the
removable disk icon that represents the memory card.
Copy images from the card into a directory of your choice on the
computer’s hard disk.
12
Connecting the Camera to a PC with the USB Cable
1
2
3
To download photos from the camera
Connect the supplied USB cable to the computer’s USB port and turn on the camera. A
message “Mass Storage” or “PC Camera” appears on the screen when connection to the
computer has been successfully completed. Press the playback button to switch the camera
mode between mass storage and PC camera. To download photos please select “Mass
Storage” mode.
Open [My Computer] or [Windows Explorer]. A «Removable Disk» appears in the drive list.
Double-click the «Removable Disk» icon to view its contents. Files stored on the camera are
located in the folder named «DCIM».
Copy the photos or files to your computer.
13
Customer care
More information on the complete AgfaPhoto digital camera product range can be found under www.
plawa.com / www.plawausa.com
Service & Repair (USA / Canada):
1-866 475 2605
www.plawausa.com – live chat available
Support Service (USA / Canada):
[email protected]
Online Service USA / Canada:
[email protected]
Service & Repair Hotline (Europe):
00800 752 921 00 (from a landline only)
Service & Support Hotline (Germany):
0900 1000 042 (1.49 Euro/ min. from a German landline only)
Online Service / International contact (Not USA / Canada):
[email protected]
Designed and manufactured by
plawa-feinwerktechnik GmbH & Co. KG
Bleichereistraße 18
73066 Uhingen
Germany
AgfaPhoto is used under license of Agfa-Gevaert NV & Co. KG. Agfa-Gevaert NV & Co. KG. does not
manufacture this product or provide any product warranty or support. For service, support and warranty information, contact the distributor or manufacturer.
Contact: AgfaPhoto Holding GmbH, www.agfaphoto.com
14
Disposal of Waste Equipment by Users in Private Households in the
European Union
This symbol on the product or on its packaging indicates that this product must not be disposed of
with your other household waste. Instead, it is your responsibility to dispose of your waste equipment
by handing it over to a designated collection point for the recycling of waste electrical and electronic
equipment. The separate collection and recycling of your waste equipment at the time of disposal will
help to conserve natural resources and ensure that it is recycled in a manner that protects human
health and the environment. For more information about where you can drop off your waste equipment for recycling, please contact your local city office, your household waste disposal service or the
shop where you purchased the product.
FCC Compliance and Advisory
This device complies with Part 15 of the FCC Rules. Operation is subject to the following two conditions: 1.) this device may not cause harmful interference, and 2.) this device must accept any interference received, including interference that may cause unsatisfactory operation. This equipment has
been tested and found to comply with the limits for a Class B peripheral, pursuant to Part 15 of the
FCC Rules. These limits are designed to provide reasonable protection against harmful interference
in a residential installation. This equipment generates, uses, and can radiate radio frequency energy
and, if not installed and used in accordance with the instructions, may cause harmful interference to
radio communication. However, there is no guarantee that interference will not occur in a particular
installation. If this equipment does cause harmful interference to radio or television reception, which
can be determined by turning the equipment off and on, the user is encouraged to try to correct the
interference by one or more of the following measures.
•
•
•
•
Reorient or relocate the receiving antenna.
Increase the separation between the equipment and receiver.
Connect the equipment to an outlet on a circuit different from that to which the receiver is connected.
Consult the dealer or an experienced radio/TV technician for help.
Any changes or modifications not expressly approved by the party responsible for compliance could
void the user’s authority to operate the equipment. When shielded interface cables have been
provided with the product or when specified additional components or accessories have elsewhere
been designated to be used with the installation of the product, they must be used in order to ensure
compliance with FCC regulations.
15