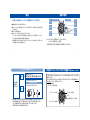
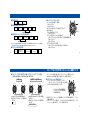
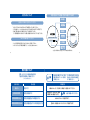
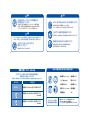
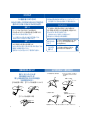
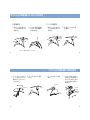
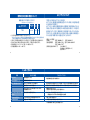
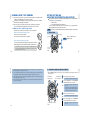
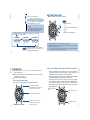
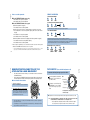
1
7T85
BSB7T85-1210
I N S T R U C T I O N S
DOUBLE RETROGRADE
ダブルレトログラード クロノグラフ
G-6
1
この度は弊社製品をお買い上げいただき、
誠にありがとうございました。
ご使用の前にこの説明書をよくお読みの上
正しくご愛用くださいますよう、
お願い申し上げます。
なお、
この説明書はお手元に保管し必要に応じてご覧ください。
※ お買い求めの際の金属バンドの調整は
お買い上げ店・弊社お客様相談窓口
(裏表紙に記載)
にて承っておりますが、
その他のお店では有料もしくはお取扱
いいただけない場合があります。
※ 保証期間内でも電池交換は
有料となります。
お買い上げの時計には検査用のモニター
電池が入っています。所定の年数よりも
早めに電池が切れることがあります。
取扱いを誤った場合に、重傷を負うなどの重大な
結果になる危険性が想定されることを示します。
警告
警 告
以下の場所での携帯・保管は避けてください
時計から電池を取り出さないでください
注 意
乳幼児の手の届くところに時計本体や部品を置かないでください
警 告
○ 揮発性の薬品が発散しているところ(除光液などの化粧品・防虫剤・シンナーなど)
○ 5℃∼35℃から外れる温度に長期間なるところ ○ 高湿度なところ
○ 磁気や静電気の影響があるところ ○ ホコリの多いところ ○ 強い振動のあるところ
電池や部品を乳幼児が飲み込んでしまうおそれがあります。
万一飲み込んだ場合は、
身体に害があるため、
ただちに医師とご相談ください。
※ 電池が切れた状態で長時間放置しないでください。電池が漏液するおそれがあります。
アレルギーやかぶれを起こした場合
注 意
次のような場合、ご使用を中止してください
警 告
取扱いを誤った場合に、軽傷を負う危険性や物質的
損害をこうむることが想定されることを示します。
注意
ただちに時計の使用をやめ、皮膚科など専門医に相談してください。
その他のご注意
○ 時計本体やバンドが腐食等により鋭利になった場合
○ バンドのピンが飛び出してきた場合
注 意
※ すぐに、お買い上げ店・弊社お客様相談窓口(裏表紙に記載)にご相談ください
2
○ 提げ時計やペンダント時計のひもや
チェーンが衣類や手・首などを傷つける
おそれがありますのでご注意ください。
○ 乳幼児に時計が触れないように
ご注意ください。
ケガやアレルギー
をひき起こすおそれがあります。
○ 商品の分解・改造はしないでください。
目 次
操作について
特長
各部の名称
時刻合わせ・ストップウオッチ針の0位置合わせ
6
7
9
日付の合わせかた
ストップウオッチの使いかた
ストップウオッチ針のデモンストレーション運針について
電池交換後のお願い(システムリセット)
製品仕様
14
15
21
22
23
(基本時計・ストップウオッチ針)
ご注意いただきたいこと
アフターサービスについて
保証について
お手入れについて
防水性能について
耐磁性能について
(磁気の影響)
バンドについて
特殊な中留の使い方について
使用電池・電池寿命・精度について
ルミブライトについて
こんなときには
4
26
28
30
32
36
38
40
46
47
48
操 作 に つ い て
3
特長
各部の名称
この時計は、基本時計とストップウオッチ機能を備えたアナログ時計です。
●基本時計は、
時・分・小秒針で表示します。
●ストップウオッチは、専用の針(秒、1分、
10分)
で表示する、1/5秒単位での計測が可能な
100分計です。
●スプリット計測が可能です。
●ストップウオッチ1分針と10分針はレトログラード式です。
ストップウオッチ1分針が10分の目盛に達すると、瞬時に「0分」の位置に戻り、
ストップウオッ
チ10分針が次の目盛に進み、
継続して計測できます。
計測時間が110分
(または210分)
に達するとストップウオッチ10分針は
「00分」
に戻り、300
分
(5時間)
に達すると、
自動停止します。
時針
ストップウオッチ1分針
ストップウオッチ秒針
ボタン
Ⓐ
分針
小秒針
ストップ
ウオッチ
10分針
りゅうず
2段目
(時刻合わせ、
針位置合わせ)
1段目
(日付合わせ)
ボタン
通常位置
Ⓑ
※りゅうずにはネジロック構造を持っているものがあります。
(→「りゅうずをご確認ください」
を参照)
※以降の説明では、
説明に不要な部分の針を省略することがあります。
6
7
りゅうずをご確認ください
回る
りゅうずを
右に回して
みてください。
通常のりゅうずです。
そのまま引き出して操作する事ができます。
「ねじロック式 りゅうず」※です
時計を操作する場合
りゅうずを左に回してゆるめてください。
回らない
時刻合わせ・ストップウオッチ針の0位置合わせ(基本時計・ストップウオッチ針)
この時計の時刻合わせ
(基本時計)
とストップウオッチ針の0位置合わせは、共にりゅうず2段目
位置で行ないます。
そのため、時刻合わせ等でりゅうずを2段目に引き出した際は、下記の2つの項目を確認または
合わせ直してから、
りゅうずを押し込んでください。
・基本時計の時刻
・ストップウオッチ針の0位置
ゆるめる
ストップウオッチ1分針
締める
8
※ りゅうずが誤って引き出される事を防止するため、時計本体にねじ止めできるりゅうずです。
○ 時計の操作後は必ずりゅうずを押し付けながら右に回して元通りに締めてください。
○ りゅうずを締める時、
回しにくい場合は元に戻してからやり直してください。
○ 無理に締めますとねじを壊す恐れがあります。
ストップウオッチ秒針
りゅうず
基本時計
(時、分、小秒針)
ストップウオッチ10分針
9
●時刻の合わせかた(基本時計)
②りゅうずを回して、
「基本時計」の時刻を合わせます。
①りゅうずを2段目まで引き出してください。小秒針が止まります。
小秒針は12時の位置に止めてください。
2段目
りゅうず
小秒計
このとき合わせる時刻は、今から数分後の時刻に合わせることをお勧めします。
その理由は、
この後「ストップウオッチ針の0位置の合わせ」
を行なうためです。
すべての合わせが終わってから、
りゅうずを押し込むことになるので、数分先の時刻に合わせて
おく必要があります。
2段目
※ストップウオッチ計測中の場合は、
ストップウオッチが強制的にリセットされます。
※日付が変わるところが、午前0時です。午前または午後を間違えないように合わせてください。
※この時、正確に合わせるために分針を正しい時刻より4∼5分進めてから針を戻して合わせてください。
10
③2本の「ストップウオッチ針」の0位置合わせを行
います。
ボタンⒶを2秒以上押し続けてください。
「ストップウオッチ
1分針」
が1周回ります。ボタンⒷを押して、
ストップウオッチ
1分針を0分位置に合わせてください。ボタンBを押し続け
ると、
早送りします。
修正中は10分の目盛を越え目盛のないところまで針が進
みますが、故障ではありません。ボタンⒷを押して0分位置
に合わせてください。
④ボタンⒶを約2秒押し続けると、
ストップウオッチ秒針が1周回ります。
ボタンⒷを押して、
ストップウオッチ秒針を
「0秒位置」に合
わせてください。
ボタンⒷを押し続けると、早送りします。
12
11
ストップウオッチ
1分針
ボタンⒶ
2段目
ボタンⒷ
ストップ
ウオッチ
秒針 ボタンⒶ
⑤ボタンⒶを約2秒押し続けてください。ストップウオッチ10分針が1周回ります。
ボタンⒷを押して、
ストップウオッチ10分針を00の位置に合わせてください。ボタンⒷを押し
続けると、早送りします。
※ストップウオッチ10分針は、
0位置合わせの時のみ100分
の目盛を超えて、
目盛りのないところにも針が進みます。
ボタンⒷを押して00分位置に合わせてください。
※次に、
ボタンⒶを2秒以上押すと、
「ストップウオッチ1分
針」の「0位置合わせ」に戻ります。
「ボタンⒶを2秒以
上押す」
ことで、以下のような修正順番で
「0位置合わ
せ」
が可能です。
ストップウオッチ1分針
ストップウオッチ秒針
ボタンⒶ
ボタンⒷ
ストップウオッチ10分針
ストップウオッチ分針
ボタンⒷ
⑥すべての合わせができたら、時報と同時にりゅうずを押し込みます。
※時刻合わせは、電話の時報サービスTEL.117が便利です。
13
日付の合わせかた
ストップウオッチの使いかた
・時刻合わせができてから、
日付を合わせてください。
・1ヶ月が31日でない=小の月
(2,
4,
6,
9,
11月)
の翌月のはじめに、
日付を合わせ直すときに行な
います。
○1/5秒単位で最大109分59秒8まで計測および読み取りができます。
○専用の3本の針で表示します。
ストップウオッチの分を2本の針で表示します。
12時位置の「ストップウオッチ1分針」と「6時位置のストップウオッチ10分針」が
扇状の範囲を動き、ストップウオッチの分単位を表示します。センターの「ストップ
ウオッチ秒針」が1/5秒ステップで運針します。
○300分(5時間)作動後、自動的にストップします。
○スプリット機能があります。
①りゅうずを1段目まで、引き出してください。
1段目
②りゅうずを右に回して、日付を合わせてください。
※午後9時から午前1時までは日付を合わせないでください。この時間帯に合わせると、翌日になって
も日付が変わらないことがあるので、
この時間帯外で日付を合わせてください。
③合わせ終わったら、
りゅうずを押し込んでください。
14
15
〈計測時間の読みかた〉
〈ストップウオッチ1分針とストップウオッチ10分針の動きについて〉
3本のストップウオッチ針で計測時間を読み取ります。
ストップウオッチ1分針
(10分以下を読み取ります)
ストップウオッチ秒針
・ストップウオッチ1分針が、10分の目盛に達すると、瞬時に
「0分」位置に戻ります。
同時に、
ストップウオッチ10分針が次の目盛に進みます。
・計測時間が110分
(または210分)
に達すると、
ストップウオッチ10分針は瞬時に
「00分」
に戻ります。
・計測時間300分(5時間)に達すると、ストップウオッチが自動停止します。
最終的に下図の位置で止まります。
(再び使用する際には、
ボタンⒷ
Ⓑでリセッ
トしてください。)
ストップウオッチ1分針
ストップウオッチ秒針
ストップウオッチ10分針
ストップウオッチ10分針
(分を10分単位で読みます)
28分11秒4《28'11"4》
16
〈ストップウオッチ針の0位置について〉
・ストップウオッチをリセットしても、
ストップウオッチ針が0位置に戻らない場合、
0位置合わせが必要です。
・ストップウオッチ針の0位置合わせは、基本時計の時刻合わせと同時に行ないます。
(→「時刻合わせ・ストップウオッチ針の0位置合わせ」
を参照)
17
●通常の使用方法
●ストップウオッチのリセット方法
ボタン Ⓐ
ボタン Ⓐ
ボタン Ⓑ
スタート → ストップ → リセット
●時間計測を積算で行なう場合
ボタン Ⓐ
ボタン Ⓐ
スタート → ストップ →
ボタン Ⓐ
ボタン Ⓐ
ボタン Ⓑ
再スタート → ストップ → リセット
何回でも繰返すことができます。
●途中経過(スプリットタイム)
を計測する場合
ボタン Ⓐ
ボタン Ⓑ
ボタン Ⓑ
スタート → スプリット → スプリット解 除
ボタン Ⓐ
ボタン Ⓑ
→ ストップ → リセット
何回でも繰返すことができます。
※「スプリット」状態で、計測時間が300分(5時間)になると、
自動停止がはたらきます。スプリットは解除され、
「100分0秒」を示しますので、次の計測をする前にボタンBでリセットしてください。
●2人のタイムを計測する場合
18
ボタン Ⓑ
ボタン Ⓐ
1人目がゴール
スタート → 1人目のタイム
ボタン Ⓐ
ボタン Ⓑ
・ストップウオッチ針が動いている場合、
Ⓐでストップ
①ボタンⒶ
②ボタンⒷでリセット
・ストップウオッチ針が止まっている場合、以下の3つの
場合があります。
【ストップ状態で止まっている】
①ボタンⒷでリセット
【スプリット表示でストップウオッチが計測中】
①ボタンⒷでストップウオッチ針が早送りし、
その後計測状態になる。
②ボタンⒶ
Ⓐでストップ
③ボタンⒷでリセット
【スプリット表示でストップ状態】
①ボタンⒷでストップウオッチ針が早送りし、
その後止まる。
②ボタンⒷでリセット
Ⓐ
ボタンⒷ
ボタン Ⓑ
→ 2人目がゴール → 2人目のタイム → リセット
19
ストップウオッチ針のデモンストレーション運針について
●タキメーター(TACHYMETER)の使い方(タキメーターがついている場合)
○時速や単位時間あたりの出来高などが簡単に測定できます。
時速の測定
スタート
Ⓐ
スタート
Ⓐ
1km
①1km走るのに要した時間を計測します。
②秒針が指しているタキメーターの数字を読
みとります。
80km/時
20
●デモンストレーション運針のしかた
1時間あたりの出来高の測定
ストップ
ストップ
Ⓐ
・ストップウオッチ専用の3本の針が、デモンストレーション運針を行います。
・3本の針がそれぞれ高速に運針し、最後にリセット位置に戻ります。
Ⓐ
1個
③製品1個が出来あがるのに要した時間を
計測します。
④秒針が指しているタキメーターの数字を読
みとります。
200個/1時間あたり
①ストップウオッチをリセット状態にしてください。
詳しくは、→「ストップウオッチの使いかた」を参照
②ボタンⒷを3秒以上押し続けてください。
ストップウオッチ秒針は高速運針。
2つのストップウォッチ分針はそれぞ
れ往復運針をします。
ボタンⒷ
※約7秒でデモンストレーション運針が終わります。終了後は通常のストップウオッ
チ操作が可能です。
※デモンストレーション運針中に、ボタンAまたはボタンBの操作があると、デモン
ストレーション運針を中止し、リセット状態に戻ります。
21
電池交換後のお願い(システムリセット)
電池交換後または、万一異常な動きになった場合、以下の操作を行ってください。時計内部が
システムリセットされ、正常に機能するようになります。
●システムリセットのしかた
①りゅうずを2段目に引き出します。
ボタンⒶ
ボタンⒷ
2段目
②ボタンⒶとボタンⒷを2秒以上同時に押します。
③りゅうずを通常位置に戻し、小秒針が、通常運針になっているかを確認してください。
システムリセット後は、初期状態になりますので、時刻合わせおよびストップウオッチ針の「0位
置合わせ」
を行なってください。→「時刻合わせ・ストップウオッチ針の0位置合わせ」
を参照
製品仕様
1. 水晶振動数・・・・・・・・・・・・・32,768Hz
2. 精度・・・・・・・・・・・・・・・・・・・平均月差±15秒
(気温5℃∼35℃において腕につけた場合)
3. 作動温度範囲・・・・・・・・・・・・−10℃∼+60℃
4. 駆動方式・・・・・・・・・・・・・・・ステップモーター式:4個
5. 表示内容・・・・・・・・・・・・・・・
【時刻機能】時、分、小秒針
(1秒ステップ運針)
【ストップウオッチ機能】
ストップウオッチ秒針
(1/5秒ステップ、60秒/1周)
ストップウオッチ1分針
(1分ステップ、10分/ 2/3周)
ストップウオッチ10分針
(10分ステップ運針、
100分/ 2/3周)
6. 使用電池・・・・・・・・・・・・・・・小型酸化銀電池 SR927SW:1個
7. 電池寿命・・・・・・・・・・・・・・・約3年
ただし、1日にストップウオッチ5時間以内の使用。
8. 電池寿命切れ予告機能つき
9. 電子回路・・・・・・・・・・・・・・・発振、分周、駆動回路
(C−MOS−IC)
:
1個
※上記の製品仕様は改良のため、予告なく変更することがあります。
22
23
ご注意いただきたいこと
アフターサービスについて
修理用部品について
○ この時計の修理用部品の保有期間は通常7年間を基準としています。
○
修理の際、
一部代替部品を使用させていただくことがありますのでご了承ください。
電池交 換について
電池交換はお買い上げ店・弊社お客様相談窓口にご依頼ください。
(交換の際に電池の回収をおこなっております。)
その際防水性能を維持するためパッキン交換をご依頼ください。
オーバーホール(分解掃除)について
時計は精密機械です。部品の油切れや磨耗により止まり遅れが生じることがあります。
その際にはオーバーホールをご依頼ください。
オーバーホールの際にはパッキンやバネ棒の
交換もご依頼ください。
保証と修理について
○
電池交換は保証期間内でも有料となります。
○ 10気圧防水以上の時計は、
防水検査をご依頼ください。
防水検査は日数を要しますので期間をご確認ください。
○
○
○
修理やオーバーホールの際は、
お買い上げ店・弊社お客様相談窓口にご相談ください。
○
保証期間内の場合は必ず保証書を添えてください。
○
保証内容は保証書に記載したとおりです。よくお読みいただき大切に保管してください。
電池交換してもすぐ止る場合はオーバーホールが必要です。
26
27
保証について
取扱説明書にそった正常な使用により、お買い上げ後1年以内に
不具合が生じた場合には、下記の保証規定によって無料で修理・調整いたします。
保証は、
保証書に明示した期間・条件のもとにおいて、
無料修理をお約束するものです。
これによりお客様の法律上の権利を制限するものではありません。
保証書は日本国内のみ有効です。
保証を受ける手続き
保証の対象部分
○
時計本体(ムーブメント・ケース)及び金属バンドです。
保証の適用除外(保証期間内あるいは保証対象部分であっても、次のような場合には有料になります)
28
○
保証対象の不具合が生じた場合は、時計と別紙保証書をご持参の上、
お買い上げ店にご依頼ください。
○
お買い上げ店の保証が受けられない場合には、
「セイコーウオッチ株式会社
お客様相談窓口」に保証書を添えてご依頼ください。
修理のとき、
ムーブメントを交換させていただいたり、
ケース・文字板・針・ガラス・
バンドなどに、一部代替部品を使用させていただくこともありますので、
ご了承ください。
ご使用部品の保有期間は本取扱説明書(P.26)
をご参照ください。
金属バンド等の調整は、
お買い上げ店または弊社お客様相談窓口に
ご依頼ください。上記以外の販売店での調整は有料になります。
○
電池交換及び皮革・ウレタン・布等のバンドの交換
○
事故または不適切な取扱いによって生じた故障および損傷
○
ご使用中に生じるキズ・汚れ等
○
火災・水害・地震等の天災地変による故障及び損傷
○
○
保証書記載項目の全てが記入された保証書のみが有効です。
故意に字句を書き換えた場合は規定の無償修理は受けられません。
○
その他
29
時計の裏ぶたでも性能と型式の確認ができます
お手入れについて
防水性能
日頃からこまめにお手入れしてください
水分や汗、汚れはこまめに柔らかい布で拭き取るように心掛けてください。
(金属バンド、
りゅうず周り、裏ぶた周りなど)
すきま
の汚れは柔らかい歯ブラシが有効です。
○ 海水に浸けた後は、
必ず真水でよく洗ってから拭き取ってください。
その際、
直接蛇口から水をかけることは避け、容器に水をためるなどしてから洗ってください。
○
○
○
ねじロック式りゅうずの場合も同様です。
(りゅうずを引く必要はありません)
型式番号
お客様の時計の
種類を示す番号
A
W
7N01-0B40 R2 AG
○ りゅうずの錆び付きを防止するために、
時々りゅうずを回してください。
「 耐磁性能に
ついて」を参照
R
WATER RESISTANT 10 BAR
TE
R
0B
7 N R E S I S TA N T 1
01
G
-0B4
A
0 R2
A
りゅうずは時々回してください
耐磁性能
※上記の図は例であり、
お買上げいただいた時計とは異なります。
30
31
防水性能について
お買い上げいただいた時計の防水性能を
下記の表でご確認の上ご使用ください。
(「P.31」をご覧ください)
裏ぶた表示
表示なし
WATER RESISTANT
WATER RESISTANT 5 BAR
WATER RESISTANT 10 (20) BAR
32
注意
○
防水性能を維持するため、電池 ○ また電池交換の際、10気圧
交換の際は必ずパッキン交換を 防水以上の時計は防水検査
ご依頼ください。
をご依頼ください。
防水性能
非防水です。
日常生活用防水です。
日常生活用強化防水で5気圧防水です。
日常生活用強化防水で10(20)気圧防水です。
お取扱方法
水滴がかかったり、汗を多くかく場合には、使用しないでください。
日常生活での「水がかかる」程度
の環境であれば使用できます。
警告 水泳には使用しないでください。
水泳などのスポーツに使用できます。
空気ボンベを使用しないスキンダイビングに使用できます。
33
注意
警告
この時計はスキューバダイビングや飽和潜水には
絶対に使用しないでください
BAR(気圧)表示防水時計はスキューバダイビングや飽和潜水用
の時計に必要とされる苛酷な環境を想定した様々な厳しい検査を
行っていません。専用のダイバーズウオッチをご使用ください。
水や汗、汚れが付着したままにしておくのは避けてください
防水時計でもガラスの接着面・パッキンの劣化や、
ステンレスが錆びることにより、防水不良になる恐れがあります。
入浴やサウナの際はご使用を避けてください
注意
※ 万一、
ガラス内面にくもりや水滴が発生し、長時間消えない場合は防水不良です。
お早めに、お買い上げ店・弊社お客様相談窓口(裏表紙に記載)
にご相談ください。
水分のついたまま、
りゅうずやボタンを
操作しないでください
蒸気や石けん、温泉の成分などが防水性能の劣化を早めてしまうからです。
直接蛇口から水をかけることは避けてください
水道水は非常に水圧が高く、
日常生活用強化防水の
時計でも防水不良になる恐れがあります。
時計内部に水分が入ることがあります。
34
35
耐磁性能について(磁気の影響)
時計に影響を及ぼす身の周りの磁気製 品例
アナログクオーツ時計は、身近にある磁気の影響を受け、
時刻が狂ったり止まったりします。
※磁気により時刻が狂っても、遠ざければ正常に動きます。 時刻を合わせ直してお使いください。
裏ぶた表示
表示なし
お取扱方法
磁気製品より10cm以上遠ざける必要があります。
磁気製品より5cm以上遠ざける必要があります。
携帯電話(スピーカー部)
磁気健康バンド
バッグ(磁石の止め金)
磁気ネックレス
交流電気かみそり
磁気健康 マット
携帯ラジオ(スピーカー部)
磁気健康枕
電磁調理器
など
(JIS水準1種)
磁気製品より1cm以上遠ざける必要があります。
(JIS水準2種)
36
アナログクオーツ時計が
磁気の影響を受ける理由
内蔵されているモーターは磁石を使用しており、
外からの強い磁力で互いに影響し合い、
モーターを止めたり、無理に回転させてしまうためです。
37
バンドについて
バンドは直接肌に触れ、汗やほこりで汚れます。
そのため、手入れが悪いとバンドが早く傷んだり、肌のかぶれ・そで口の汚れなどの
原因になります。長くお使いになるためには、こまめなお手入が必要です。
金属バンド
○ ステンレスバンドも水・汗・汚れをそのままにしておくとさび易くなります。
○ 手入れが悪いとかぶれやワイシャツの袖口が黄色や金色に汚れる原因になります。
○ 水や汗・汚れは、
早めに柔らかな布で取り除いてください。
○ バンドのすき間の汚れは、
水で洗い、柔らかな歯ブラシ等で取り除いてください。
○ 時計本体が日常生活強化防水
(10気圧防水)
になっているものでも、
アクアフリーバン
ド以外の皮革バンドは、
入浴中や水泳、水仕事などでのご使用はお控えください。
ポリウレタンバンド
○ 光で色が褪せたり、
溶剤や空気中の湿気などにより劣化する性質があります。
○ 特に半透明や、
白色、淡色のバンドは、他の色を吸着し易く、
また変色をおこします。
○ 汚れたら水で洗い、
乾いた布で良く拭き取ってください。
(時計本体は水にぬれないように台所用ラップなどで保護しておきましょう)
○ 弾力性がなくなり、
ひび割れを生じたら取り替え時期です。
(時計本体は水にぬれないように台所用ラップなどで保護しておきましょう)
皮革バンド
○
○
○
○
水や汗、直射日光には弱く、色落ちや劣化の原因になります。
水がかかった時や汗をかいた後は、
すぐに乾いた布などで吸い取るように軽く拭いてください。
直接日光にあたる場所に放置しないでください。
色味の薄いバンドは、汚れが目立ちやすいので、
ご使用の際はご注意ください。
かぶれやアレルギー
について
バンドサイズの
目安について
バンドによるかぶれは、金属や皮革が原因となるアレルギー反応や、
汚れもしくはバンドとのすれなど不快感が原因となる場合など、
いろいろな発生原因があります。
バンドは多少余裕をもたせ通気性をよくしてご使用ください。
時計をつけた状態で、指一本入る程度が適当です。
38
39
特殊な中留の使い方について
皮革バンド、および、メタルバンドの一部に
特殊な中留を用いたものがございます。
お買い上げの時計の中留が下記のいずれかに当てはまる場合は、
各々の操作方法をご覧ください。
三ツ折中留
(皮革バンド専用)
ワンプッシュ三ツ折中留
(皮革バンド、
メタルバンド)
三ツ折中留(皮革バンド専用)の使い方
1)
バンドを定革、遊革から抜いて、中留を開きます。
上箱
遊革
定革
2)
上箱の底板を下に開きます。
底板
3)
ピンをバンドのアジャスト穴から外し、
バンドを左右にスラ
イドさせて適切な長さのところでピンをアジャスト穴にもう
一度入れます。
ピン
アジャスト穴
4)
底板を閉めます。
(底板を押し込みすぎないようにしてください。)
ワンプッシュ三ツ折中留
(皮革バンド専用)
※中留を装着するときは、バンドの剣先(先端)を定・遊革に入れてから、中留をしっかり留めてください。
40
41
ワンプッシュ三ツ折中留(皮革バンド、メタルバンド)の使い方
時計の着脱方法
バンドの長さ調整方法
1)両方のプッシュボタンを押しながら
バンドを定革・遊革から抜いて、中
留を開きます。
遊革
2)バンドの剣先(先端)を定革・遊革
に入れてから、上箱の上面位置をし
っかり押さえ留めます。
プッシュボタン
定革
上箱
1)両方のプッシュボタンを押しながら
バンドを定革・遊革から抜いて、中
留を開きます。
遊革
2)もう一度プッシュボタンを押し上箱
を下に開きます。
プッシュボタン
定革
上箱
※メタルバンドの場合は、定革がないものがございます。
42
43
ワンプッシュ三ツ折中留(皮革バンド専用)の使い方
3)ピンをバンドのアジャスト穴から外
し、バンドを左右にスライドさせて
適切な長さのところでピンをアジャ
スト穴に入れます。
4)プッシュボタンを押しながら上箱を
閉めます。
1)プッシュボタンを押しながら中留を
開きます。
2)バンドのアジャスト穴をピンから外し、
バン
ドを左右にスライドさせて適切な長さのと
ころでピンをアジャスト穴にもう一度入れ
プッシュボタンを押しながら中留をしっか
り抑え留めます。
プッシュボタン
ピン
アジャスト穴
アジャスト穴
ピン
44
45
使用電池・電池寿命・精度について
機種は裏ぶたでご確認 いただけます。
(「お手入れについて」をご覧ください)
型式番号の前4桁
機種(例:7T85-0AC0)
7 T85
使用電池
SR
927SW
電池 精度
平均
寿命( )
月差
約3年 ±15秒
○ 上記の電池寿命は新しく電池を入れたときのものです。
※ただし、ストップウオッチの使用を1日5時間以内を基準としていますので、それ以上使用した場
合は上記の期間に満たないうちに電池寿命が切れる場合があります。
○ お買い上げ時の電池は検査用のモニター電池ですので、
上記期間より早く切れる事があります。
○ 秒針が2秒おきに動くのは、
電池が切れる合図です。
この場合でも時刻は正常です。
○ 精度は常温
(5℃∼35℃)
において腕につけた場合のものです。
○ 作動温度範囲は−10℃∼+60℃です。
ルミブライトについて
〔お買い上げの時計がルミブライトつきの場合〕
ルミブライトは、放射能等の有害物質を全く含んでいない、環境・人に安全な畜光(蓄
えた光を放出する)物質です。
ルミブライトは、太陽光や照明器具の明かりを短時間(10分間:500ルクス以上)
で吸収して蓄え、暗い中で長時間(約3∼5時間)光を放つ夜光です。なお、蓄えた
光を発光させていますので、輝度(明るさ)は時間が経つに従ってだんだん弱まっ
てきます。また、光を蓄える際のまわりの明るさや時計との距離、光の吸収度合い
により、光を放つ時間には多少の誤差が生ずることがあります。
〈照度データ〉
(目安値)
①太陽光
[晴天]
100,000ルクス [曇天]
10,000ルクス
②屋内
(昼間窓際) [晴天]
3,000ルクス以上 [曇天]
1,000∼3,000ルクス
[雨天]
1,000ルクス以下
③照明
(白色蛍光灯40Wの下で) [1m]
1,000ルクス
[3m]
500ルクス
(通常室内レベル)
[4m]
250ルクス
46
47
こんなときには
現象
考えられる原因
時計が止まった
電池の容量がなくなった。
小秒針が2秒運針している。
電池寿命切れが近づいた。
このようにしてください
電池交換をお買上げ店にご依頼ください。
暑いところ、または、寒いところへ放置した。
常温に戻れば元の精度に戻ります。時刻を合わせ直してください。この時計は気温5℃∼35℃で腕につけたときに安定した時間精度が得られるように調整してあります。
磁気を発生するもののそばに置いた。
磁気を遠ざけると、元の精度に戻ります。時刻を合わせ直してください。元に戻らない場合には、お買い上げ店にご相談ください。
落としたり強くぶつけたりまたは激しいスポーツをした。
強い振動が加えられた。
時刻を合わせ直してください。
元に戻らない場合には、お買い上げ店にご相談ください。
ストップウオッチをリセットしても0
に戻らない。
磁気や外部からの衝撃が加えられた。
ストップウオッチ針の0位置合わせをしてください。
→「時刻合わせ・ストップウオッチ針の0位置合わせ」を参照
ガラスのくもりが消えない
パッキンの劣化などにより時計内部に水分が入った
お買い上げ店にご相談ください。
時刻合わせが12時間ずれている
12時間、針を進めて時刻を合わせ直してください。
時計が一時的に進む/遅れる
日中、日付が切り替る
※その他の現象は、お買い上げ店にご相談ください。
48
49
Page
FEATURES ....................................................................................................
DISPLAY & BUTTONS .................................................................................
SCREW LOCK TYPE CROWN .....................................................................
SETTING THE TIME AND
ADJUSTING THE STOPWATCH HAND POSITION ....................................
SETTING THE DATE.....................................................................................
STOPWATCH................................................................................................
DEMONSTRATION FUNCTON OF THE STOPWATCH HAND MOVEMENT ....
TACHYMETER (for models with tachymeter scale) ....................................
TELEMETER (for models with telemeter scale) ..........................................
BATTERY CHANGE ......................................................................................
NECESSARY PROCEDURE AFTER BATTERY CHANGE ...........................
TROUBLESHOOTING ..................................................................................
SPECIFICATIONS .........................................................................................
52
53
54
ENGLISH
CONTENTS
55
59
60
64
65
67
69
71
72
74
, For the care of your watch, see “TO PRESERVE THE QUALITY OF YOUR
WATCH” in the attached Worldwide Guarantee and Instruction Booklet.
$"-5
STOPWATCH 1-minute hand
FEATURES
Q TIME/CALENDAR
• Hour, minute and small second hands
• Date displayed in numerals
Q STOPWATCH
• 100-minute stopwatch in 1/5-second increments, consecutively measurable
up to 300 minutes (5 hours)
The second and minute STOPWATCH hands continue counting after the
10-minute hand reaches 100 minutes. So you can even measure accurate
time up to 109 minutes 59.8 seconds. After that, the minute and 10-minute
STOPWATCH hands instantaneously return to the 0 or 10 minute position
respectively and continue counting again up to 300 minutes.
• 3 STOPWATCH hands
- 1/5-second, 1-minute, and 10-minute hands
- Minute counting is displayed by two types of STOPWATCH minute hands,
which move in reciprocating motion respectively.
• Split time measurement on demand
• Demonstration Functon
Demonstration of the stopwatch hand movement is available.
52
DISPLAY & BUTTONS
STOPWATCH 1/5-second hand
Minute hand
English
English
51
"
Hour hand
$308/
a b
#
Small second hand
STOPWATCH 10-minute hand
*
*
c
a: Normal position
b: First click
date setting
c: Second click
time setting,
hand position adjustment
Some models may have a screw lock type crown. If your watch has a screw lock
type crown, refer to “SCREW LOCK TYPE CROWN.”
The “0” position of each stopwatch hand may differ depending on the model. In
particular, in some models, the retrograde display in the 12 o’clock / 6 o’clock position
may be oppositely oriented from the illustration above. In such cases, however, the
method of operating the stopwatch according to this manual can be applied.
53
English
X Some models may have a screw-lock mechanism that can securely lock the
crown by screw when they are not being operated.
X Locking the crown will help to prevent any operational errors and enhance
the water resistant quality of the watch.
X It is necessary to unlock the screw lock type crown before operating it.
Once you have finished operating the crown, make sure to relock it.
O How to use the screw lock type crown
Keep the crown securely locked unless you need to operate it.
[How to unlock the screw lock type crown]
Turn the crown counterclockwise.
The crown is unlocked and can be operated.
SETTING THE TIME AND
ADJUSTING THE STOPWATCH HAND POSITION
O This watch is designed so that the following adjustments are made with the
crown at the second click position:
1) time setting
2) stopwatch hand position adjustment
Once the crown is pulled out to the second click, be sure to make both the
above adjustments 1) and 2) at the same time.
$308/
English
SCREW LOCK TYPE CROWN
Pull out to second click when the small second hand is at the 12 o’clock position.
1. TIME SETTING
Minute hand
Hour hand
$308/
Turn to set the hour and
minute hands.
[How to lock the screw lock type crown]
Once you have finished operating the crown, turn it clockwise
while gently pressing it in toward the watch body until it stops.
*
When locking the crown, turn it slowly with care, ensuring that the screw
is properly engaged. Be careful not to forcibly push it in, as doing so may
damage the screw hole in the case.
1. When the stopwatch is or has been measuring, if the crown is pulled out to the second click, it will
automatically reset the STOPWATCH hands to “0”.
2. It is recommended that the hands be set to the time a few minutes ahead of the current time, taking
into consideration the time required to adjust the STOPWATCH hand position if necessary.
3. When setting the hour hand, be sure to check that AM/PM is correctly set. The watch is so designed
that the date changes once in 24 hours.
4. When setting the minute hand, first advance it 4 to 5 minutes ahead of the desired time and then turn
it back to the exact minute.
55
2. STOPWATCH HAND POSITION ADJUSTMENT
, If the STOPWATCH hands are not in the 0 position, follow the procedure below to set them
to the 0 position.
STOPWATCH
1-minute hand
STOPWATCH
1/5-second hand
"
W
#
"
#
STOPWATCH 10-minute
hand
56
Press for 2 seconds or longer.
*
W
#
STOPWATCH 1-minute hand turns a full circle.
Press repeatedly to set STOPWATCH
1-minute hand to the 0 position.
*
The hand moves quickly if button B is kept
pressed.
*
STOPWATCH 1-minute hand turns a full circle
passing the 10-minute marker only during the
STOPWATCH hand position adjustment.
W
"
English
English
54
Small
second
hand
Press for 2 seconds or longer.
*
STOPWATCH 1/5-second hand turns a full circle.
Press repeatedly to set STOPWATCH
1/5-second hand to the 0 position.
*
The hand moves quickly if button B is kept
pressed.
57
English
W
#
Press for 2 seconds or longer.
*
SETTING THE DATE
O Before setting the date, be sure to set the time.
STOPWATCH 10-minute hand turns a full circle.
$308/
P r e s s r e p e a t e d l y to s e t S TO P WATC H
10-minute hand to the “0” position.
*
The hand moves quickly if button B is kept
pressed.
*
STOPWATCH 10-minute hand turns a full circle
passing the 100-minute marker only during the
STOPWATCH hand position adjustment.
W
Pull out to first click.
W
Turn clockwise until the desired date
appears.
W
Push back in to normal position.
O STOPWATCH hands can be readjusted in the following order by pressing
button " for 2 seconds or longer.
V
STOPWATCH
1/5-second hand
* STOPWATCH 1/5-second hand turns a full
circle.
W
$308/
* STOPWATCH 10-minute
hand turns a full circle.
After all the adjustments are completed,
push back in to normal position in
accordance with a time signal.
STOPWATCH
<How to read the stopwatch hands>
The measured time is indicated by the three stopwatch hands below.
STOPWATCH 1-minute hand
(Measured minute until 10 minutes can
be read in 1-minute increments.)
STOPWATCH 1/5-second hand
60
1. Date setting should always be carried out after the time is correctly set.
2. Manual date adjustment is required on the first day after a month that has less than 31 days: February,
April, June, September and November.
3. Do not set the date during any time between 9:00 P.M. and 1:00 A.M. Date setting during this time
period may cause failure of date change on the following day.
59
<Remarks on the STOPWATCH 1-minute hand and STOPWATCH 10-minute hand>
O The measured time c an b e read up to 10 9 minute s 5 9. 8 seconds in
1/5-second increments.
O When the measurement reaches 300 minutes (5 hours), the stopwatch
automatically stops counting.
O Split time measurement is possible.
[28 minutes 11.4 seconds]
Date
STOPWATCH
10-minute hand
STOPWATCH 10-minute hand
(Measured minute can be read in
10-minute increments.)
•
When the STOPWATCH 1-minute hand reaches the 10-minute graduation,
it instantaneously returns to the 0-minute position. At the same time, the
STOPWATCH 10-minute hand advances to the next graduation.
• When the measurement reaches 110 minutes (or 210 minutes), the STOPWATCH
10-minute hand instantaneously returns to the 10-minute position.
• When the measurement reaches 300 minutes (5 hours), the stopwatch
automatically stops counting. The final position of the STOPWATCH hands,
after completing 300 minutes (5 hours) of counting, is illustrated below.
Before starting to use the stopwatch again, make sure to reset the stopwatch
by pressing Button B.
STOPWATCH 1-minute
hand
STOPWATCH 1/5-second
hand
English
English
58
V
* STOPWATCH 1-minute
hand turns a full circle.
V
STOPWATCH
1-minute hand
English
W
"
STOPWATCH 10-minute
hand
61
START
DEMONSTRATION FUNCTON OF THE
STOP-WATCH HAND MOVEMENT
The demonstration function allows you to view the movement of the three
STOPWATCH hands.
Each of the three STOPWATCH hands demonstrates high-speed movements
and when the demonstration is finished, they return to the original position.
2. Press Button B for 3 seconds or longer.
* The stopwatch second hand moves at high
speed, and the STOPWATCH 1-minute hand
and STOPWATCH 10-minute hand move in
reciprocating motion respectively.
*
*
#
After approximately 7 seconds, the demonstration finishes, and the stopwatch is
reset for the next use.
If either Button A or B is pressed during a demonstration, the demonstration will be
stopped and the stopwatch will be reset.
* Restart and stop of the stopwatch can be repeated by pressing button A.
SPLIT
RELEASE
SPLIT
A
B
B
B
A
START
RESET
STOP
* Measurement and release of split time can be repeated by pressing button B.
* If the time measured reaches 300 minutes (5 hours) while the split time is being displayed, the stopwatch
automatically stops counting and releases the split time display, showing “100' 00" 00.” Before starting
the next measurement, make sure to reset the stopwatch by pressing Button B.
A
START
B
FINISH TIME
OF 1ST
COMPETITOR
A
2ND
COMPETITOR
FINISHES
TACHYMETER
B
<MEASUREMENT OF TWO COMPETITORS>
FINISH TIME
OF 2ND
COMPETITOR
B
RESET
63
(for models with tachymeter scale)
To measure the hourly average speed of a vehicle
1
2
* Refer to "STOPWATCH" section of this manual.
B
RESET
<SPLIT TIME MEASUREMENT>
O How to view the demonstration
1. Reset the stopwatch.
A
STOP
Use the stopwatch to determine
how many seconds it takes to
go 1 km or 1 mile.
Tachymeter scale indicated by
STOPWATCH 1/5-second hand
gives the average speed per
hour.
English
English
If the STOPWATCH hands do not return to the “0” position when the stopwatch is reset to “0” , follow
the procedure in "SETTING THE TIME AND ADJUSTING THE STOPWATCH HAND POSITION."
A
RESTART
, Before using the stopwatch, be sure to check that the crown is set at the normal position
and that the STOPWATCH hands are reset to the “0” position.
A
1. Press Button B to release the split time display and return to the normal
display
2. Press Button A to stop the stopwatch
3. Press Button B to reset the stopwatch
[When the split time measurement is displayed and the stopwatch is stopped]
1. Press Button B to release the split time display.
2. Press Button B to reset the stopwatch.
•
B
RESET
STOP
[When the split time measurement is displayed while the stopwatch is measuing.]
•
A
[When the stopwatch is stopped]
1. Press Button B to reset the stopwatch.
62
A
STOP
<ACCUMULATED ELAPSED TIME MEASUREMENT>
While the STOPWATCH hands are stopped
*
A
START
English
<STANDARD MEASUREMENT>
While the STOPWATCH hands are moving
1. Press Button A to stop the stopwatch.
2. Press Button B to reset the stopwatch.
64
English
STOPWATCH OPERATION
<How to reset the stopwatch>
Ex. 1
STOPWATCH
1/5-second
hand: 40
seconds
Tachymeter scale:
“90”
“90” (tachymeter scale figure) x 1 (km or mile)
= 90 km/h or mph
O Tachymeter scale can be used only when the time required is less than 60 seconds.
Ex. 2: If the measuring distance is extended to 2 km or miles or shortened to 0.5 km or miles
and STOPWATCH second hand indicates “90” on tachymeter scale:
“90” (tachymeter scale figure) x 2 (km or mile) = 180 km/h or mph
“90” (tachymeter scale figure) x 0.5 (km or mile) = 45 km/h or mph
65
English
1
2
Use the stopwatch to measure
the time required to complete 1
job.
Ex. 1
STOPWATCH
1/5-second
hand:
20 seconds
Tachymeter scale indicated by
STOPWATCH 1/5-second hand
gives the average number of
jobs accomplished per hour.
Tachymeter
scale: “180”
(for models with telemeter scale)
OThe telemeter can provide a rough indication of the distance to the source of
light and sound.
OThe telemeter indicates the distance from your location to an object that emits
both light and sound. For example, it can indicate the distance to the place
where lightning struck by measuring the time elapsed after you see a flash of
lightning until you hear the sound.
OA flash of lightning reaches you almost immediately while the sound travels to
you at a speed of 0.33 km/second. The distance to the source of the light and
sound can be calculated on the basis of this difference.
OThe telemeter scale is so graduated that the sound travels at a speed of 1 km in
3 seconds.*
*Under the condition of temperature of 20°C(68°F).
“180” (tachymeter scale figure) x 1 job
= 180 jobs/hour
CAUTION
The telemeter provides only a rough indication of the distance to the
place where lightning struck, and therefore, the indication cannot be used
as the guideline to avoid the danger of lightning. It should also be noted
that the speed of the sound differs depending on the temperature of the
atmosphere where it travels.
Ex. 2: If 15 jobs are completed in 20 seconds:
“180” (tachymeter scale figure) x 15 jobs = 2700 jobs/hour
67
BATTERY CHANGE
HOW TO USE THE TELEMETER
Before beginning, check that the stopwatch has been reset.
1 Press button A to start
START
the stopwatch as soon
as you see the light.
(Flash of light)
3
Years
The miniature battery which powers your watch should last approximately
3 years. However, because the battery is inserted at the factory to check the
function and performance of the watch, its actual life once in your possession
may be less than the specified period. When the battery expires, be sure
to replace it as soon as possible to prevent any malfunction. For battery
replacement, we recommend that you contact an AUTHORIZED SEIKO
DEALER and request SEIKO SR927SW battery.
*
STOP
2 When you hear the
If the stopwatch is used more than 5 hours per day, the battery life may be less than
the specified period.
sound, press button A
to stop the stopwatch.
(Crash of thunder)
3 Read the telemeter
Approx. 3 km
*
English
English
66
68
English
TELEMETER
To measure the hourly rate of operation
scale that the stopwatch
1/5-secondhand points
to.
Please note that the stopwatch second hand moves in 1/5-second increments and does not always
point exactly to the graduations of the telemeter scale. The telemeter scale can be used only when
the measured time is less than 60 seconds.
O Battery life indicator
When the battery nears its end, the small second hand moves at two-second
intervals instead of normal one-second intervals. In that case, have the
battery replaced with a new one as soon as possible.
*
The watch remains accurate while the small second hand is moving at
two-second intervals.
69
English
O Do not remove the battery from the watch.
O If it is necessary to take out the battery, keep it out of the reach of children. If a
child swallows it, consult a doctor immediately.
After the battery is replaced with a new one, or when an abnormal display appears,
follow the procedures below to reset the built-in IC. The watch will resume its
normal operation.
English
NECESSARY PROCEDURE AFTER BATTERY CHANGE
WARNING
O HOW TO RESET THE IC
CAUTION
1. Pull out the crown to the second click.
2. Press button A and B at the same time for 2 seconds or longer.
3. Push the crown back in to normal position and check if the small second
hand moves as normal.
O Never short-circuit, tamper with or heat the battery, and never expose it to fire. The
battery may burst, become very hot or catch fire.
O The battery is not rechargeable. Never attempt to recharge it, as this may cause
battery leakage or damage to the battery.
"
$308/
#
*
Resetting the IC will initialize the watch. Before starting to use the watch, it will be necessary to set
the time and adjust the STOPWATCH hands to the 0 position. Refer to “SETTING THE TIME AND
ADJUSTING THE STOPWATCH HAND POSITION” section of this manual.
71
TROUBLESHOOTING
Trouble
Possible causes
Solutions
The watch stops operating.
The battery has run down.
The small second hand moves in 2-second
increments.
Have the battery replaced with a new one immediately by the retailer from whom the watch was
purchased.
The battery nears its end.
The watch temporarily gains or loses
time.
The watch has been left or worn in extremely
high or low temperatures.
Return the watch to a normal temperature so that it works accurately as usual, and then reset the
time. The watch has been adjusted so that it works accurately when it is worn on your wrist
under a normal temperature range between 5 ºC and 35 ºC.
The watch has been left close to an object with a
strong magnetic field.
Correct this condition by moving and keeping the watch away from the magnetic source. If this
action does not correct the condition, contact the retailer from whom the watch was purchased.
You drop the watch, hit it against a hard surface,
or wear it while playing active sports. The watch
is exposed to strong vibrations.
Reset the time. If the watch does not return to its normal accuracy after resetting the time,
contact the retailer from whom the watch was purchased.
The STOPWATCH hands do not return to
the “0” position when the stopwatch is reset.
The watch has been affected by magnetism or
exposed to strong shocks or vibrations.
Adjust the STOPWATCH hands to the “0” position by following the instructions in “SETTING THE TIME AND
ADJUSTING THE STOPWATCH HAND POSITION”.
The inner surface of the glass is clouded.
Moisture has entered the watch because the
gasket has deteriorated.
Contact the retailer from whom the watch was purchased.
The date changes at 12 o’clock noon.
AM/PM is not properly set.
Advance the hour hands for 12 hours to correctly set the time and date.
*
72
In the event of any other problem, please contact the retailer from whom the watch
was purchased.
English
English
70
73
English
SPECIFIC
AT I ONS
1 Frequency of crystal oscillator ...... .........
2 Loss /gain (Monthly rate) ........................
3 Operational temperature range.... ..........
4 Driving syst em ................................
.......
5 Display syst em
Time ....................................................
Stopwatch...........................................
6 Battery ....................................................
7 Battery life ..............................................
8 IC (Integrated Circuit) ....... ......................
32,768 Hz (Hz = Hertz... Cycles per second)
Less than 15 seconds when used on the wrist within
normal temperature range (5 ºC 35 ºC)
Be tween ‒10 ºC and +60 ºC
Step motor 4 pieces
Hour, minute and small second hands in 1-second
increments
Stopwatch 1/5-second hand in 1/5-second
increments (60 seconds/ 360 degrees )
Stopwatch 1-minute hand in 1-minute increments
(40 minutes/ 240 degrees )
Stopwatch 10-minute hand in 10-minute increments
(100 minutes/ 240 degrees )
SE IKO SR 927S W, 1 piece
Approximately 3 ye ars
If the stopwatch is used less than 5 hours per day
C-MO S-IC: 1 piece
* The specifications are su bject to change without prior notice for product improvements.
74