1
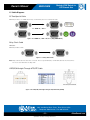
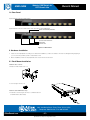
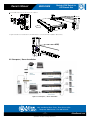
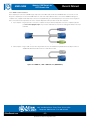
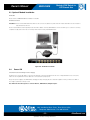
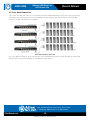
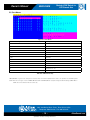
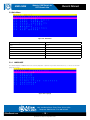
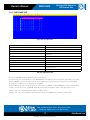
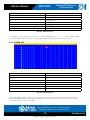
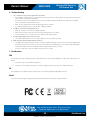
Owner’s Manual MMK-KVM8 Modular KVM Switch for LCD Console Use MMK-KVM8 Modular KVM Switch for LCD Console Use 1601 Jack McKay Blvd. • Ennis, Texas 75119 U.S.A. Telephone: 800.876.3333 • Fax: 800.765.3435 – 1 – Specifications are subject to change without notice. AtlasSound.com MMK-KVM8 Modular KVM Switch for LCD Console Use Owner’s Manual Table of Contents Table of Contents................................................................................................................................... 2 1. Introduction....................................................................................................................................... 3 1.1 Features.................................................................................................................................. 3 1.2 Package Contents.................................................................................................................. 3 1.3 Technical Specifications........................................................................................................ 4 1.4 System Requirements........................................................................................................... 4 1.5 Cable Diagrams...................................................................................................................... 5 1.6 Rear Panel............................................................................................................................... 6 2. Hardware Installation....................................................................................................................... 6 2.1 Rack Mount Installation........................................................................................................ 6 2.2 Computer / Server Installation............................................................................................. 7 2.3 Optional Module Installation................................................................................................ 9 2.4 Power ON................................................................................................................................ 9 2.5 Daisy Chain Connection...................................................................................................... 10 3. Usage............................................................................................................................................... 11 3.1 Front panel PC port LED Indication:................................................................................... 11 3.2 Hot plug................................................................................................................................ 11 4. Hotkey.............................................................................................................................................. 12 5. OSD (On Screen Display).............................................................................................................. 13 5.1 Login Window.................................................................................................................... 14 5.2 Port Name........................................................................................................................... 15 5.3 Main Menu.......................................................................................................................... 16 5.3.1 LANGUAGE........................................................................................................................ 16 5.3.2 PORT NAME EDIT.............................................................................................................. 17 5.3.3 PORT SEARCH................................................................................................................... 18 5.3.4 USER SECURITY................................................................................................................ 18 5.3.5 ACCESS LIST ................................................................................................................... 19 5.3.6 HOTKEY ........................................................................................................................... 20 5.3.7 TIME SETTINGS................................................................................................................ 21 5.3.8 OSD MOUSE...................................................................................................................... 22 6. Troubleshooting.............................................................................................................................. 23 7. Certifications................................................................................................................................... 23 8. Warranty Info.................................................................................................................................. 24 1601 Jack McKay Blvd. • Ennis, Texas 75119 U.S.A. Telephone: 800.876.3333 • Fax: 800.765.3435 AtlasSound.com – 2 – Specifications are subject to change without notice. MMK-KVM8 Owner’s Manual Modular KVM Switch for LCD Console Use 1. Introduction The 8-port modular combo-free KVM switch can control attached servers and computers from local or remote consoles. This KVM switch is loaded with features including one optional IP-based remote console port (MMK-IPM), On Screen Display (OSD) Menu, Password security, Hot key Control, and Auto Scan Control. It has complete keyboard and mouse emulation for simultaneous PC bootup process. With the optional IP-based remote console port you can control one or several computers locally at the server site or remotely via the Internet using a standard browser. You can securely gain BIOS level access to systems for maintenance, support, or failure recovery over the Internet. Communication is secure via SSL encryption. 1.1 Features • 8-port KVM switch • Support combo interface for connecting to computer ports conveniently • Support one local console plus one optional remote console (IP) • Support MS windows, Netware, Unix, and Linux • Support iMAC, Power MAC and Sun Micro Systems with USB port • No Software Required --- easy computer selection via On Screen Display (OSD) Menu, Push Buttons, and Hotkeys • P rovide various Hotkey (Scroll-Lock / Cap-Lock / Num-Lock / L-Alt / L-Ctrl / L-Win / R-Alt / R-Ctrl / R-Win) for switching computer port and other control functions, so Hotkey function can be used in various types of keyboards, and to avoid Hotkey duplicate problem. • Provide ACL (Access Control List) security function. Store up to 8 independent user accounts • Hot Plug --- add or remove connected computers without powering off the KVM switch or computers • Support two user layers, and search computer/server name • Plug-n-Play monitor support • Keyboard status restored when switching computer • Support Daisy Chain function with both Bus (8-layer) and Tree (2-layer) topologies 1.2 Package Contents Modular KVM Switch Unit – 1 PCS Quick Installation Guide – 1 PCS Bracket with thumb screw – 1 SET Screw – 4 PCS Table 1-1. Package Contents 1601 Jack McKay Blvd. • Ennis, Texas 75119 U.S.A. Telephone: 800.876.3333 • Fax: 800.765.3435 – 3 – Specifications are subject to change without notice. AtlasSound.com MMK-KVM8 Modular KVM Switch for LCD Console Use Owner’s Manual 1.3 Technical Specifications Feature Specification KVM Type PS/2 and USB interface KVM switch Console Ports Plus One Optional Remote Module PC Port Connector HDDB-15 PC Ports 8 Max. Distance (KVM switch -- Host) 10 m (32 feet) Video Resolution 1920 x 1440 (Local Console) 1280 x 1024 for IP-Based remote console IP-Based Remote Module (MMK-IPM) RJ-45 8P8C for 10/100M Ethernet, DB9 male for Modem, Null modem and serial power control, Mini USB 2.0 receptacle Daisy Chaining Support Daisy Chaining with both Bus (8-layer) and Tree (2-layer) topologies, DB15 Female Connector Computer port selection On Screen Display (OSD) Menu, Hot Key Hotkey Provide various Hotkey (Scroll-Lock/ Cap-Lock/ Num-Lock/ Alt/ Ctrl/ Win) Security Provide ACL (Access Control List) security function, store up to 8 independent controllable Computer lists Multilingual OSD (On Screen Display) control 8 languages (English, France, Germen, Spanish, Italian, Russian, Japanese, Simplified Chinese) Auto-Scan Intervals 5 ~ 99 Sec. Keyboard Emulation PS/2 or USB Mouse Emulation PS/2 or USB Housing Metal Power DC Power adapter : 12VDC, 1A Operation Temperature 0°c – 50°c Storage Temperature -20°c – 60°c Humidity 0 – 80%, Non-Condensing Mechanical For 1RU Rack Mount Modular Design LCD Console Use Dimension 16.5" x 6.7" x 1.7" (420mm x 170mm x 44 mm) Table 1-2. Technical Specifications 1.4 System Requirements Model 8-port modular KVM switch Computer Side 8 HDDB-15 pin male to one HDDB-15 pin, one Mini Din 6 pin, and one USB special cables IP Module One CAT5 cable, Network Access Environment Table 1-3. System Requirements 1601 Jack McKay Blvd. • Ennis, Texas 75119 U.S.A. Telephone: 800.876.3333 • Fax: 800.765.3435 AtlasSound.com – 4 – Specifications are subject to change without notice. Owner’s Manual MMK-KVM8 Modular KVM Switch for LCD Console Use 1.5 Cable Diagrams PC Port Special Cable HDDB-15 pin male to one HDDB-15 pin male, one Mini Din 6 pin and one USB special cable Figure 1-1. HDDB-15 / VGA + USB x 1 (3M) (MMK-DB10) Figure 1-2. HDDB-15 / VGA + PS/2 x 1 (3M) (MMK-DD10) Daisy Chain Cable VGA Cable HDDB-15 pin Male to Male Figure 1-3. Daisy Chain Cable Note: D aisy chain needs all 15 cable lines connected. This is a special VGA cable, normal VGA cable has unconnected lines. Do not use other VGA cable for daisy chain. CAT5/5E/6 Straight Through UTP/STP Cable Figure 1-4. CAT5/5E/6 Straight Through UTP/STP Cable (8P8C) 1601 Jack McKay Blvd. • Ennis, Texas 75119 U.S.A. Telephone: 800.876.3333 • Fax: 800.765.3435 – 5 – Specifications are subject to change without notice. AtlasSound.com MMK-KVM8 Modular KVM Switch for LCD Console Use Owner’s Manual 1.6 Rear Panel 8 port Modular Combo-free KVM Switch: 8 port Modular Combo-free KVM Switch with optional IP module (MMK-IPM): Remote Console Module (IP Module) Connector for Each Host Port Daisy Chain In DC Power Jack Figure 1-5. Rear Panel 2. Hardware Installation 1. P lease check all peripherals according to the list before installation, to make sure that the unit was not damaged during shipping. If you encounter any problem, please contact Atlas Sound. 2. Before installation, make sure all peripherals and console have been turned off. 2.1 Rack Mount Installation Hardware kits contents: 1. Bracket A with thumb screw x 2 2. Screw (length = 6 mm) x 4 Install modular KVM switch step: 1. Install two screws (length = 6 mm) to combine bracket A and KVM switch. (Both sides) 1601 Jack McKay Blvd. • Ennis, Texas 75119 U.S.A. Telephone: 800.876.3333 • Fax: 800.765.3435 AtlasSound.com – 6 – Specifications are subject to change without notice. MMK-KVM8 Owner’s Manual Modular KVM Switch for LCD Console Use 2. Push KVM switch into the rails from rear of cabinet. 3. Tighent thumb screw of bracket A to fix KVM switch to console and finish installation. (Both sides) 2.2 Computer / Server Installation Figure 2-1. Computer / Server Installation 1601 Jack McKay Blvd. • Ennis, Texas 75119 U.S.A. Telephone: 800.876.3333 • Fax: 800.765.3435 – 7 – Specifications are subject to change without notice. AtlasSound.com Modular KVM Switch for LCD Console Use MMK-KVM8 Owner’s Manual 3-in-1 HDDB-15 Cable Installation Each computer port connector is HDDB-15 type. Inspect the 3-in-1 DB15 cable. It will have a HDDB-15 male connector at one end. Plug it into computer port on the rear of KVM switch. The other end of input cable has three connectors: a HDDB-15 male type for computer video, a purple mini din 6-pin PS/2 connector for keyboard and a green mini din 6-pin PS/2 connector for mouse. Plug these three connectors into the respective ports on the computer. Repeat the same procedure for all other computers. a. PS/2 computer --- Plug PS/2 mouse connector to computer mouse port and PS/2 keyboard connector to computer keyboard port. Do not hot plug PS/2 port. If you must do that make sure PS/2 mouse is plugged in first then the PS/2 keyboard. Figure 2-2. 3-in-1 HDDB-15 Cable, 3m (MMK-DD10) b. USB computer --- Plug in USB connector. This single USB connector can handle both keyboard and mouse data, it work as a standard HID (Human Interface Device) no extra driver needed. Figure 2-3. HDDB-15 / VGA + USB Cable, 3m (MMK-DB10) 1601 Jack McKay Blvd. • Ennis, Texas 75119 U.S.A. Telephone: 800.876.3333 • Fax: 800.765.3435 AtlasSound.com – 8 – Specifications are subject to change without notice. MMK-KVM8 Owner’s Manual Modular KVM Switch for LCD Console Use 2.3 Optional Module Installation IP Module Please refer to “MMK-IPM Owner's Manual” for details. IP Remote Console Installation: Power off the KVM switch first. Remove the cover of the add-on slot, slide in the IP module and make sure the module is fully inserted into the slot. The IP module redirects local keyboard, mouse and video data to a remote administration console. It allows you to control one or many computers locally at the server site or remotely via the Internet using a standard browser. Figure 2-4. IP Module Installation 2.4 Power ON Check Connections and Plug In Power Supply Double check to ensure all cables / connectors are properly connected. Visually check the color of keyboard and mouse connector to make sure the keyboard and mouse cables are connected to the proper ports. Plug in the power supply to the KVM switch and plug the AC power plug into the electrical receptacle. Now you will see the LED of Port 1 light up and hear a "beep" sound. Recommend Power ON sequence as follows: Monitor, KVM Switch, finally Computer. 1601 Jack McKay Blvd. • Ennis, Texas 75119 U.S.A. Telephone: 800.876.3333 • Fax: 800.765.3435 – 9 – Specifications are subject to change without notice. AtlasSound.com MMK-KVM8 Modular KVM Switch for LCD Console Use Owner’s Manual 2.5 Daisy Chain Connection Use one end of the daisy chain cable to connect to the Daisy Chain port of Master KVM switch and connect the other end of the daisy chain cable to the Local Console port of the next Slave KVM switch. Please repeat the connection procedures for next Slave KVM switch. You can daisy chain a maximum of eight banks. Figure 2-6. Daisy Chain Connection The console OSD menu will show only the port information of the master KVM switch. When the master unit starts up, it will query all daisy chained Slave units, and automatically set up the Bank ID for each Slave unit. 1601 Jack McKay Blvd. • Ennis, Texas 75119 U.S.A. Telephone: 800.876.3333 • Fax: 800.765.3435 AtlasSound.com – 10 – Specifications are subject to change without notice. Owner’s Manual MMK-KVM8 Modular KVM Switch for LCD Console Use 3. Usage When you power on the KVM switch, it will prompt a Login window waiting for inputting user name and password. Please refer to “Hotkeys and OSD manual” for details. 3.1 Front panel PC port LED Indication: 8 Ports Figure 3-1. Front Panel There are two LEDs for each port: • “ P” power: the Green LED on indicating a Computer is connected to the port. Notice the PC99 Computer always power on the PS/2 ports even if the Computer is not powered on, so the Green LED will turn on. • “ O” online: the Red LED on indicates the port has been selected. The Red LED will flash if there is no Computer connected to the port. • Press the “BANK” button and the port button simultaneously to reset the KVM switch. 3.2 Hot plug The KVM Switch supports “Hot Plug” function for non-PS/2 connectors. You may Hot Plug the USB mouse or USB keyboard as you like. Note: • DO NOT hot plug PS/2 port. • S ome O.S. (Operation Systems) like SCO Unix or Linux do not support “Hot Plug” function. If you apply “Hot Plug” to this kind of O.S., it will cause unpredictable behavior or shut down the Computer. Before attempting to use “Hot Plug”, please make sure your O.S. and mouse software driver support the “Hot Plug” function. 1601 Jack McKay Blvd. • Ennis, Texas 75119 U.S.A. Telephone: 800.876.3333 • Fax: 800.765.3435 – 11 – Specifications are subject to change without notice. AtlasSound.com MMK-KVM8 Modular KVM Switch for LCD Console Use Owner’s Manual 4. Hotkey You can also conveniently command the KVM switch by switching ports through simple key sequences. The default hot key is SCROLL LOCK and the user can change the hot key at their convenience by accessing the OSD menu and changing the default hot key. To send commands to the KVM switch, the SCROLL LOCK key must be pressed twice within 2 seconds. You will hear a beep for confirmation and the keyboard will switch to Hotkey mode. Then enter a command in 2 seconds. If during Hotkey mode no key has been pressed in over 2 seconds the Hotkey mode will be aborted and return to Operation System control state. A Command should be issued in Hotkey mode in 2 seconds. Figure 4-1. Hotkey Command Function Space bar Active OSD Previous Channel Next Channel [1.2,…,8] bank, First digit bank number start with 1 Second and third digits port number start with “01” PgUp Previous bank PgDn Next bank “B” Turn on / off beeper “S” Auto Scan “U” Console Security “ON” to “OFF” “P” User logout / login “R” OSD setting back to factory default value “L” Turn on / off power saving Table 4-1. Hotkey Example: Hitting Scroll Lock twice then hitting key 1, key 0, and key 1 will switch to bank 1 port 01. The first port is local at bottom right at the back panel. Figure 4-1. Hotkey Example There are two methods to activate the OSD menu. 1. Activate OSD by Mouse Holding the left mouse button, pressing and releasing the ESC key will activate the Port Display. Holding the right mouse button, pressing and releasing the ESC key will activate the OSD. 2. Activate the OSD by pressing Hotkey twice, then pressing Space Bar. 1601 Jack McKay Blvd. • Ennis, Texas 75119 U.S.A. Telephone: 800.876.3333 • Fax: 800.765.3435 AtlasSound.com – 12 – Specifications are subject to change without notice. MMK-KVM8 Owner’s Manual Modular KVM Switch for LCD Console Use 5. OSD (On Screen Display) On Screen Display Menu provides a menu driven interface to handle a Multilingual Menu, Access Security, Computer switching process, naming a PC or server, setting up the password/window display time and to search a PC port name. It allows two console users to access the same PC but only one of the users will be linked to the PC, the others user can only view the same PC. This OSD Menu has a 3 tiered dialog window: 1. Login Window --- When powering on the MMK-KVM8 switch, it will prompt a login window and ask for user name and password. This KVM system can setup one SUPERVISOR and eight USERS. SUPERVISOR user name and password must be established before other USER accounts can be set-up and OSD access granted. When you login as SUPERVISOR, please go to USER SECURITY to set up one new SUPERVISOR or USERS. SUPERVISOR can access all Main menu options. USER can access PORT NAME and PORT SEARCH for switching. 2. Port Name--- port switching using OSD 3. Main Menu--- 8 menus to operate this KVM switch MAIN MENU Function 01 LANGUAGE OSD Language Change 02 PORT NAME EDIT PORT NAME Modification 03 PORT SEARCH Quick Searching By Port Name 04 USER SECURITY Change Password 05 ACCESS LIST Define User Access Authority 06 HOT KEY Change Hotkeys 07 TIME SETTINGS Modify SCAN Time Interval 08 OSD MOUSE Modify OSD MOUSE Speed Table 5-1. OSD Main Menu 1601 Jack McKay Blvd. • Ennis, Texas 75119 U.S.A. Telephone: 800.876.3333 • Fax: 800.765.3435 – 13 – Specifications are subject to change without notice. AtlasSound.com MMK-KVM8 Modular KVM Switch for LCD Console Use Owner’s Manual 5.1 Login Window Figure 5-1. Login Window Turn on local console monitor and there will be a login window on screen. No input for username and password over 1 minute at login window will cause the monitor’s signal to turn off. The default SUPERVISOR user name is eight zero digits “00000000 “. The password is eight zero digits “00000000 “. After login on or port switch either by panel button, OSD, or Hotkey, the screen will display the following information, one digit BANK NUMBER, two digit PORT NUMBER, PORT NAME and current Hotkey, any input or mouse movement will return the screen back to PC. Figure 5-2. Login Window Security Logout No input for username and password over 1 minute at the login window will cause the console monitor’s signal to turn off. At normal operation, no input from console keyboard or mouse movement over 10 minutes will cause the KVM switch to turn off the screen display then go to the Login Window and prompt user name and password. 1601 Jack McKay Blvd. • Ennis, Texas 75119 U.S.A. Telephone: 800.876.3333 • Fax: 800.765.3435 AtlasSound.com – 14 – Specifications are subject to change without notice. Owner’s Manual MMK-KVM8 Modular KVM Switch for LCD Console Use 5.2 Port Name Figure 5-3. Port Name OSD Function Key Description F1 Go to Main Menu F2 CONSOLE OFF F3 Previous Menu Enter Switch to Selected Port / Move Select PgUp Previous Bank PgDn Next bank Esc Quit 1 Show port 01 ~ 08 2 Show port 09 ~ 16 3 Show port 17 ~ 24 4 Show port 25 ~ 32 Table 5-2. OSD Function Key CONSOLE OFF – logout so the next person needs to enter user name and password in order to do operation on this KVM system USER: There are two type of user SUPERVISOR and USER. SUPERVISOR can setup the change the OSD settings at Main Menu. USER can do Port switch and Port Search only. 1601 Jack McKay Blvd. • Ennis, Texas 75119 U.S.A. Telephone: 800.876.3333 • Fax: 800.765.3435 – 15 – Specifications are subject to change without notice. AtlasSound.com MMK-KVM8 Modular KVM Switch for LCD Console Use Owner’s Manual 5.3 Main Menu Figure 5-4. Main Menu OSD Function Key Description Enter Select / Move F1 Go to Main Menu F2 Console off F3 Back Esc Exit Table 5-3. OSD Function Key 5.3.1 LANGUAGE The default language is ENGLISH. Move the cursor by keyboard -- "Up Arrow" key and the "Down Arrow" key – or mouse to select language as you need. Figure 5-5. Language 1601 Jack McKay Blvd. • Ennis, Texas 75119 U.S.A. Telephone: 800.876.3333 • Fax: 800.765.3435 AtlasSound.com – 16 – Specifications are subject to change without notice. Owner’s Manual MMK-KVM8 Modular KVM Switch for LCD Console Use 5.3.2 PORT NAME EDIT Figure 5-6. Port Name Edit OSD Function Key Description Enter Port Name Edit / Move F1 Go to Main Menu F2 Console off F3 Back Esc Exit 1 Show port 01 ~ 08 2 Show port 09 ~ 16 3 Show port 17 ~ 24 4 Show port 25 ~ 32 Table 5-4. OSD Function Key The first line bar is Bank number, following lines are the port name list. Use Up Arrow key “”, Down Arrow key “” or OSD MOUSE to move. After you have selected the PC port already, you can either press the ENTER Key, or Move the cursor to the PC name. Double click the left mouse button to switch the PC port immediately. Press PgUp key or PgDn key for selecting previous or next Bank. Press the Up Arrow key “” or the Down Arrow key ”” to select “SYSTEM 02“ Press the ENTER key to switch current PC port to PC port 2, or move the cursor to "SYSTEM 02" and double click the left mouse button to switch current PC port to PC port 2. Press the “INS” key or click the right mouse button for editing PC name. Press the “ESC” key to cancel editing PC name without any change or the ENTER key to complete the new PC name. 1601 Jack McKay Blvd. • Ennis, Texas 75119 U.S.A. Telephone: 800.876.3333 • Fax: 800.765.3435 – 17 – Specifications are subject to change without notice. AtlasSound.com MMK-KVM8 Modular KVM Switch for LCD Console Use Owner’s Manual 5.3.3 PORT SEARCH P O R T E N T E R S E A R C H N A M E X _ _ _ _ _ _ _ _ _ _ Figure 5-7. Port Search OSD Function Key Description Enter Start Port Search F1 Go to Main Menu F2 Console off F3 Back Esc Exit Table 5-5. OSD Function Key Search the computer by port name. Enter “*” to show all the port names. 5.3.4 USER SECURITY At USER SERCURITY of OSD can setup one SUPERVISOR and eight ADMINISTRATORS all with 8 digits name and password. Figure 5-8. User Security 1601 Jack McKay Blvd. • Ennis, Texas 75119 U.S.A. Telephone: 800.876.3333 • Fax: 800.765.3435 AtlasSound.com – 18 – Specifications are subject to change without notice. Owner’s Manual MMK-KVM8 OSD Function Key Description Enter Enter user name / Move F1 Go to Main Menu F2 Console off F3 Back Esc Exit Modular KVM Switch for LCD Console Use Table 5-6. OSD Function Key Press “ENTER” key to get USERS list. The left column “S” means SUPERVISOR and “1”, “2”,“3”,…., “8” mean ADMINISTRATOR. The maximum NAME is eight characters (A~Z and 0~9) and PASSWORD is eight characters maximum (A~Z and 0~9). 5.3.5 ACCESS LIST Figure 5-9. Access List OSD Function Key Description Enter Select / Move F1 Go to Main Menu F2 Console off F3 Back Esc Exit Table 5-7. OSD Function Key Only SUPERVISOR can set up the ACCESS LIST. The first column is the PC name list and the following 8 columns are the access rights of each ADMINISTRATOR. Use OSD MOUSE or ENTER key to activate / deactivate the access right of each port. “X” means access disabled and “O” means access enabled. 1601 Jack McKay Blvd. • Ennis, Texas 75119 U.S.A. Telephone: 800.876.3333 • Fax: 800.765.3435 – 19 – Specifications are subject to change without notice. AtlasSound.com MMK-KVM8 Modular KVM Switch for LCD Console Use Owner’s Manual 5.3.6 HOTKEY Figure 5-10. Hotkey OSD Function Key Description Enter Select / Move F1 Go to Main Menu F2 Console off F3 Back Esc Exit Table 5-8. OSD Function Key Some keyboards may not be equipped with all the special keys. Make sure the key you select is available in your keyboard. 1601 Jack McKay Blvd. • Ennis, Texas 75119 U.S.A. Telephone: 800.876.3333 • Fax: 800.765.3435 AtlasSound.com – 20 – Specifications are subject to change without notice. Owner’s Manual MMK-KVM8 Modular KVM Switch for LCD Console Use 5.3.7 TIME SETTINGS Figure 5-11. Time Settings OSD Function Key Description Enter Save F1 Go to Main Menu F2 Console off F3 Back Esc Exit Table 5-9. OSD Function Key The “SCAN TIME: 10 SEC” means that the scan interval from one PC port to the next PC port. The default SCAN time is 10 seconds and the maximum scan time is 99 seconds, and USER cannot use the number pad. Press “ENTER” key to save SCAN TIME 1601 Jack McKay Blvd. • Ennis, Texas 75119 U.S.A. Telephone: 800.876.3333 • Fax: 800.765.3435 – 21 – Specifications are subject to change without notice. AtlasSound.com MMK-KVM8 Modular KVM Switch for LCD Console Use Owner’s Manual 5.3.8 OSD MOUSE You can change the move speed of mouse cursor in this item. There are three levels you can choose in it. The fastest move speed is “FAST”, the second is “MIDDLE” and the slowest is “SLOW”. Using "” and “ ” key on keyboard to move highlight bar and select what move speed you want to use. After press ENTER Key, the mouse cursor move speed will change. Figure 5-12. OSD Mouse OSD Function Key Description Enter Save / Move F1 Go to Main Menu F2 Console off F3 Back Esc Exit Table 5-10. OSD Function Key 1601 Jack McKay Blvd. • Ennis, Texas 75119 U.S.A. Telephone: 800.876.3333 • Fax: 800.765.3435 AtlasSound.com – 22 – Specifications are subject to change without notice. Owner’s Manual MMK-KVM8 Modular KVM Switch for LCD Console Use 6. Troubleshooting 1.The computer boots up, but the keyboard doesn’t work • P S/2 keyboard or PS/2 mouse port is not designed for Hot Plug. USB mouse and keyboard can Hot Plug, but need to wait a few seconds for Computer bus emulations. • D on’t press any keys on the keyboard while the selected computer is booting up. Otherwise it might cause a keyboard error or keyboard is not detected at Host side. • Make sure the keyboard works when directly plugged into the computer. • Try a different keyboard, but use only 101, 102 or 104-key keyboard. 2.The Mouse is not detected during PC boot up • Make sure to plug in mouse first, then plug in keyboard. • Make sure the USB or PS/2 mouse works when directly plugged into the computer. • Avoid moving the mouse or pressing the mouse buttons when switching ports. 3.No video signal display on the remote monitor 4. VGA resolution output mismatch with the monitor’s • Check that all VGA cables & connectors, CAT5 cable & connector are firmly connected. • T he KVM switch will provide DDC information to all the PC VGA board. If both the local console’s monitor and KVM switch are turned on before the PC boot up, or if the PC boot up faster then the KVM switch, the PC miss the DDC (Data Display Channel) information that causes the VGA resolution output mismatch with the monitor’s. In this case, please turn off the PC wait few minute then turn on again. 7. Certifications FCC his equipment has been tested and found to comply with Part 15 of the FCC Rules. Operation is subject to the following two conT ditions: 1. This device may not cause harmful interference 2. This device must accept any interference received. Including interference that may cause undesired operation. CE This equipment is in compliance with the requirements of the following regulations: EN 55 022: CLASS B. RoHS All contents of this package, including products, packing materials and documentation comply with RoHS. 1601 Jack McKay Blvd. • Ennis, Texas 75119 U.S.A. Telephone: 800.876.3333 • Fax: 800.765.3435 – 23 – Specifications are subject to change without notice. AtlasSound.com MMK-KVM8 Modular KVM Switch for LCD Console Use Owner’s Manual Limited Warranty All products manufactured by Atlas Sound are warranted to the original dealer/installer, industrial or commercial purchaser to be free from defects in material and workmanship and to be in compliance with our published specifications, if any. This warranty shall extend from the date of purchase for a period of three years on all Atlas Sound products, including SOUNDOLIER brand, and ATLAS SOUND brand products except as follows: one year on electronics and control systems; one year on replacement parts; and one year on Musician Series stands and related accessories. Additionally, fuses and lamps carry no warranty. Atlas Sound will solely at its discretion, replace at no charge or repair free of charge defective parts or products when the product has been applied and used in accordance with our published operation and installation instructions. We will not be responsible for defects caused by improper storage, misuse (including failure to provide reasonable and necessary maintenance), accident, abnormal atmospheres, water immersion, lightning discharge, or malfunctions when products have been modified or operated in excess of rated power, altered, serviced or installed in other than a workman like manner. The original sales invoice should be retained as evidence of purchase under the terms of this warranty. All warranty returns must comply with our returns policy set forth below. When products returned to Atlas Sound do not qualify for repair or replacement under our warranty, repairs may be performed at prevailing costs for material and labor unless there is included with the returned product(s) a written request for an estimate of repair costs before any non-warranty work is performed. In the event of replacement or upon completion of repairs, return shipment will be made with the transportation charges collect. EXCEPT TO THE EXTENT THAT APPLICABLE LAW PREVENTS THE LIMITATION OF CONSEQUENTIAL DAMAGES FOR PERSONAL INJURY, ATLAS SOUND SHALL NOT BE LIABLE IN TORT OR CONTRACT FOR ANY DIRECT, CONSEQUENTIAL OR INCIDENTAL LOSS OR DAMAGE ARISING OUT OF THE INSTALLATION, USE OR INABILITY TO USE THE PRODUCTS. THE ABOVE WARRANTY IS IN LIEU OF ALL OTHER WARRANTIES INCLUDING BUT NOT LIMITED TO WARRANTIES OF MERCHANTABILITY AND FITNESS FOR A PARTICULAR PURPOSE. Atlas Sound does not assume, or does it authorize any other person to assume or extend on its behalf, any other warranty, obligation, or liability. This warranty gives you specific legal rights and you may have other rights which vary from state to state. Should your MMK-KVM8 require service, please contact the Atlas Sound warranty department at 1-877-689-8055, ext. 277 to obtain an RA number. Atlas Sound Tech Support can be reached at 1-800-876-3333. Visit our web site at www.AtlasSound.com to see other Atlas products. ©2008 Atlas Sound L.P. All rights reserved. Atlas Sound and Strategy Series are trademarks of Atlas Sound L.P. All other trademarks are the property of their respective owners. ATS003332 RevA 1/09 1601 Jack McKay Blvd. • Ennis, Texas 75119 U.S.A. Telephone: 800.876.3333 • Fax: 800.765.3435 AtlasSound.com – 24 – Specifications are subject to change without notice.