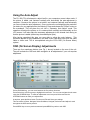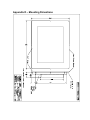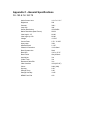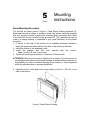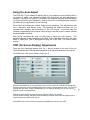
1
AutomationDirect.com
Industrial LCD Display
LCD Quick Setup Guide
15” and 12” LCD Monitors
Quick Setup Guide FPM-150 and FPM-150-TS Page 1 of 2
Unit Setup:
1. Remove the unit from its packaging.
The following parts should be included:
The FPM-150 or FPM-150T Panel Mount 15" LCD Display
• AC Power Cord
• Video [VGA] Cable For Connection To You PC
• RS-232 Cable [If the unit is fitted with a touch screen]
• Mounting Nuts
• CD ROM & 3.5” Floppy Disks
Pre Installation: We are assuming that you are going to try the unit on a bench before you
install it in your control panel. If you are operating this unit from an AutomationDirect. com
computer, it has been preadjusted at the factory and should require little or no further adjustment. If you are satisfied with the display leave it alone. If you are installing the touch driver,
see the Touch Screen Driver Quick Start Guide.
Place the unit face (screen) down on a clean smooth surface.
IMPORTANT: Attach the following cables to your PC FIRST. This will prevent the unit
from being tipped over if you pull on the cables.
Attach the following as described.
• Video: the High Density D15 Female Connector. (the heavier of the 2 cables).
• Touch: RS-232-D9 Female end to the PC, D9 Male end to the Monitor.
IMPORTANT: Note the Com port on the computer you are using for the touch
screen. This will be required during touch screen driver configuration.
• Plug the AC Power Cord into the display then into a standard power receptacle.
If the unit is not on, turn it on now. The power switch is located at the AC power connection on
the FPM-150. The fan should come on and you will see a “No Video” screen if the computer is
not running. After approximately 10 seconds, the unit will go into shutdown if there is no video
signal. The unit will turn itself back on once you power up your PC.
Running The Display:
At this time you can turn on your computer.
Your initial picture [from the computer] will normally be the computer POST information [looks
like DOS] and the computer will check its RAM.
The FPM-150 is capable of displaying any of several standard graphics modes. These are
what is referred to as VGA (640x480), SVGA (800x600) or XGA (1024x768) video modes. As
your computer boots, you will see the standard Microsoft Windows “Splash” screens as you
boot into the operating system. Once the computer has completely booted into Windows, you
will want to adjust the screen.
Adjusting the screen is a very simple procedure and is outlined in the next section.
AutomationDirect.com
Industrial LCD Display
Quick Setup Guide FPM-150 and FPM-150-TS Page 2 of 2
Adjusting The LCD:
The FPM-150 series displays incorporate a microprocessor-based converter card, which converts analog
video to what is termed digital RGB (Red, Green, Blue) for the LCD. This same microprocessor will automatically adjust the picture to the center of the LCD and resize to full screen.
Adjusting The LCD Video Settings:
•
•
•
Select “Menu” from rear membrane keypad. This will bring up the OSM (On Screen Menu)
“AutoAdjust” is the first selection.
Press the “+” or “-” key
The screen will go out temporarily. After the unit has completed adjusting, press the menu key to exit the
OSM. This will save the settings.
The Windows desktop should be centered, full screen, and stable. The unit is now ready for installation
of the touch screen driver installation, if the unit is so equipped. See the Touch Screen Driver Quick
Start Guide.
AutomationDirect.com
Industrial LCD Display
Quick Setup Guide FPM-120 and FPM-120-TS Page 1 of 2
Unit Setup:
1. Remove the unit from its packaging.
The following parts should be included:
The FPM-120 or FPM-120-TS Panel Mount 12.1" LCD Display
• AC Power Cord
• Video [VGA] Cable For Connection To You PC
• RS-232 Cable [If the unit is fitted with a touch screen]
• Mounting Nuts
• CD ROM & 3.5” Floppy Disks
Pre Installation: We are assuming that you are going to try the unit out on a bench before
you install it in your control panel. If you are operating this unit from an AutomationDirect. com
computer, it has been preadjusted at the factory and should require little or no further adjustment. If you are satisfied with the display leave it alone. If you are installing the touch driver
see the Touch Screen Driver Quick Start Guide.
Place the unit face (screen) down on a clean smooth surface.
IMPORTANT: Attach the following cables to your PC FIRST. This will prevent the unit
from being tipped over if you pull on the cables.
Attach the following as described;
• Video: the High Density D15 Female Connector. (the heavier of the 2 cables).
• Touch: RS-232-D9 Female end to the PC, D9 Male end to the Monitor.
IMPORTANT: Note the Com port on the computer you are using for the touch
screen. This will be required during touch screen driver configuration.
• Plug the AC Power Cord into the display then into a standard power receptacle.
If the unit is not on turn it on now. The power switch is located at the AC power connection on
the FPM-120. The fan should come on and you will see a “No Video” screen if the computer is
not running. After approximately 10 seconds the unit will go into shutdown if there is no video
signal applied. The unit will turn itself back on once you power up your PC.
Running The Display:
At this time you can turn on your computer.
Your initial picture [from the computer] will normally be the computer POST information [looks
like DOS] and the computer will check its RAM.
The FPM-120 is capable of displaying any of several standard graphics modes. These are
what is referred to as VGA (640 x 480) & SVGA (800 x 600) video modes. As your computer
boots, you will see the standard Microsoft Windows “Splash” screens as you boot into the operating system. Once the computer has completely booted into Windows, you may want to adjust the screen.
Adjusting the screen is a very simple procedure and is outlined in the next section.
AutomationDirect.com
Industrial LCD Display
Quick Setup Guide FPM-120 and FPM-120-TS Page 1 of 2
Adjusting The LCD:
The FPM-120 series displays incorporate a microprocessor-based converter card, which converts analog
video to what is termed digital RGB (Red, Green, Blue) for the LCD. This same microprocessor may require some minor adjustment to get a stable centered full screen display. If you are satisfied with the picture, you are done If not, please proceed to the next section.
Adjusting The LCD Video Settings:
The FPM-120 series displays are factory adjusted with an Automationdirect.com computer and should be
very close to optimal settings. The following procedure explains how to achieve a stable, centered full
screen display. This adjustment may be required to correct minor deviations between the LCD and your
video card.
Please follow these steps in sequence for the best results:
1
2
3
4
5
6
Close All Programs, leaving only the Windows Desktop.
Select “Menu” from rear membrane keypad. This will bring up the OSM (On Screen Menu)
Use the Up and Dn (Down) keys to select the function you wish to adjust.
Select Horizontal Position and use the + and - keys to position the left side of the picture with the left
edge of the LCD
Select Vertical Position and use the + and - keys to position the bottom of the picture with the bottom
edge of the LCD
Select Clock and use the + and - keys to position the right edge of the picture with the right edge of the
LCD.
There are several other selections that are available on the Menu, but these probably do not require further
adjustment.
•
•
•
•
Brightness - LCD White Levels
Contrast - LCD Black Levels
Clock Phase - Adjusts the analog sampling rate and is used for adjusting any minor banding. This would
be noticed if some vertical lines of text (Like a lower case L “l”) may look like 1 pixel wide in one area of
the screen and 2 pixels wide in a different area of the screen. This is adjusted at the factory and should
not require further adjustment.
Language - For international customers
After you have adjusted the unit to your satisfaction, allow the unit to display the OSM for approximately 15
seconds and the unit will automatically save all updated settings, and the OSM will go off.
Now the Windows desktop should be centered, full screen, and stable. The unit is now ready for installation
of the touch screen driver, if so equipped. See the Touch Screen Driver Quick Start Guide included with
your unit.
If you do not have a touch screen, setup is complete and the unit is ready for use.
Touch Screen Driver Quick Start Guide
Windows 98
AutomationDirect.com
3505 Hutchinson Rd
Cumming, GA 30040
Windows NT
Windows 2000
Telephone 800.633.0405
Fax 770.889.7876
[email protected]
www.AutomationDirect.com
AutomationDirect.com
Industrial LCD Display
Touch Screen Driver Installation Windows 98
Touch Screen Driver Installation:
If your display is fitted with the optional touch screen interface, the following section will outline installation
and set up. If the unit does not have a touch screen, your configuration is complete.
To Install The Touch Screen Driver:
Things you will need to know or have to install the Touch Driver.
• What Operating System you are using. Windows 98
• What Serial Port you are connected to. Com 1
Com 2
• The type of touch screen.
Smartset
• The CD ROM or Floppy disk included with the system.
Installing The Touch Screen Driver: Windows 98
Insert the 3 1/2” Floppy Marked Windows 98 / 2000 Touch Driver
Click “Start”
Run
Browse (A Drive)
Select the folder for Win98
Select the XXXXX.EXE
[Where XXXXX is the File Name. This will create
a folder and expand and copy the necessary files
into that folder.]
UnZip the XXXXX.exe file
Click “Start”
Run
Browse (Open the folder where you installed the drivers)
Select The Setup.exe - Then Run the the installation utility.
Select SmartSet Controller Com1 or
Select SmartSet Controller Com2
Restart the computer - When the system restarts you will will be prompted to calibrate the touch screen.
Touch each of the 3 targets as directed. If the unit does not does not respond to your calibration touches,
then you have probably selected the wrong Com port. If so, reinstall the driver and select the correct Com
port.
You are now ready to use your touch screen.
NOTE: The touch screen calibration information is maintained in the computer. If you change computers,
you will need to reinstall the touch screen driver software and recalibrate.
If for any reason the touch screen performance is unsatisfactory, you can recalibrate at any time. This is
done from the ELO icon under the Windows control panel
AutomationDirect.com
Industrial LCD Display
Touch Screen Driver Installation Windows NT 4.0
Touch Screen Driver Installation:
If your display is fitted with the optional touch screen interface, the following section will outline installation
and set up. If the unit does not have a touch screen, your configuration is complete.
To Install The Touch Screen Driver:
Things you will need to know or have to install the Touch Driver.
• What Operating System you are using. Windows NT 4.0
• What Serial Port you are connected to. Com 1
Com 2
• The type of touch screen.
Smartset
• The CD ROM or Floppy disk included with the system.
Installing The Touch Screen Driver: Windows NT 4.0
Insert the 3 1/2” Floppy Marked Windows NT 4.0 Touch Driver
Click “Start”
Run
Browse (A Drive)
Select the folder for WinNT
Select XXXXX.EXE [Where XXXXX is the File Name. This will create a
folder and expand and copy the necessary files into
that folder.]
UnZip the XXXXX.exe file
Click “Start”
Run
Browse (Open the folder where you installed the drivers)
Select The Setup.exe - Then Run the the installation utility.
Select Next
Select Yes - To the license agreement
Select Next - To the default installation folder
Select Next - For Single Monitor installation
Select the Com Port and Next
Select Finish to Restart the system
Restart the computer - When the system restarts you will will be prompted to calibrate the touch screen.
Touch each of the 3 targets as directed. If your system does not respond to your calibration touches, then
you have probably selected the wrong Com port. If so, press the Esc key on the keyboard. Go to the ELO
icon under Windows Control Panel. Select the correct Com Port, and Restart the computer. Once restarted,
select the ELO icon under Windows Control Panel, and select calibrate, then touch each of the 3 targets as
they are displayed.
You are now ready to use your touch screen.
NOTE: The touch screen calibration information is maintained in the computer. If you change computers,
you will need to reinstall the touch screen driver software and recalibrate.
If for any reason the touch screen performance is unsatisfactory, you can recalibrate at any time. This is
done from the ELO icon under the Windows control panel
AutomationDirect.com
Industrial LCD Display
Touch Screen Driver Installation Windows 2000
Touch Screen Driver Installation:
If your displays is fitted with the optional touch screen interface, the following section will outline the installation and set up. If the unit does not have a touch screen your configuration is complete.
To Install The Touch Screen Driver:
Things you will need to know or have to install the Touch Driver.
• What Operating System you are using. Windows 2000
• What Serial Port you are connected to. Com 1
Com 2
• The CD ROM or Floppy disk included with the system.
Installing The Touch Screen Driver: Windows 2000
Insert the 3 1/2” Floppy Marked Windows 95/98/2000 Touch Driver
Click “Start”
Run
Browse (A or B Drive)
Select the folder for Win2000
Select XXXXX.EXE [Where XXXXX is the 98 or 2000 File Name. This will
create a folder and expand and copy the necessary files
into that folder.]
UnZip the XXXXX.exe file
Click “Start”
Run
Browse (Go to the folder where you installed the drivers)
Select The Setup.exe - The RUN
The installation utility will now run.
Click Next
Click Yes To accept the license agreement
Select The COM Port that the touch screen is connected to
Select Next
The driver will now start to install
Select YES - To continue
Select Finish
Remove the floppy disk and restart the system. Select YES to restart
Touch each of the 3 targets as directed
When the system restarts touch each of the 3 targets as directed to calibrate (align) the touch screen.
If your system does not respond to your calibration touches, press the Esc key on the keyboard. Go to the
ELO icon under the Windows Control Panel. Select the correct Com Port, then Restart the computer. Select
the ELO icon again and select Align and calibrate the touch screen then touch each of the 3 targets as they
are displayed.
You are now ready to use your touch screen.
NOTE: The touch screen calibration information is maintained in the computer. If you change computers,
you will need to reinstall the touch screen driver software and recalibrate.
If for any reason the touch screen performance is unsatisfactory, you can recalibrate at any time. This is
done from the ELO icon under the Windows control panel
FLI-150
FLI-150-TS
LCD Monitor User Guide
Revised 12/02
FLI-150 & FLI-150-TS
Table Of Contents
Section 1 Introduction
About LCD Monitors
Product Safety Precautions
Section 2 Display Setup
Included Parts
Connecting Your Display
Section 3 Getting Started
Display Features
Getting Started
Adjusting the Display
Using the Auto-Adjust
OSD (On Screen Display) Adjustments
Section 4 Touch Screen Set up
Introduction to Touch Screens
Touch Screen Driver Installation
Windows 98
Windows NT 4.0
Windows 2000
Windows XP
Section 5 Mounting Instructions
Section 6 Trouble Shooting Tips
Section 7 Cleaning and Maintenance
Section 8 Appendices
A-VGA Pin Assignment
B-RS-232 Pin Assignment
C-General Specifications
D-Mounting Dimensions
1
Section
LCD
Introduction
About LCD Monitors
What you gain by using an LCD monitor for your industrial display is the future of display
technology. CRTs although they have dropped in cost significantly, do not offer the
performance, reliability, and mounting options available with LCDs. LCD monitors consist
primarily of an LCD, video board and a backlight. The LCD determines to a large extent the
viewing angle, brightness and contrast. Beyond that it is the function of the video board,
which converts the analog RGB (Red, Green, Blue) signals from a standard video card to a
high quality, digital RGB that the LCD can display.
LCD monitors can can be set for one or more of the following resolutions:
VGA: 640 x480
SVGA: 800x600
XGA 1024 x 768
SXGA 1280 x1024
UXGA 1600x 1200
Note: The VGA acronym stands for Video Graphics Adapter. It is used to describe both the
most common type of display interface used by PC’s and lowest resolution setting for this
interface. Originally only the VGA [640x480] resolution was available on a VGA interface.
Today all of the above interfaces are available on a VGA interface, but not all monitors
support all resolutions. . The native resolution of the LCD is normally the maxium resolution
that the LCD can display, and is the resolution that the LCD will exhibit the best display
charastics Check the monitor specifications (Appendix C) for the resolutions supported by this
monitor.
Recently the video card has taken on a new role. It is the responsibility of this device to
"scale" a particular video resolution to the "native" resolution of the LCD. This enables a
computer set to output a VGA [640x480] resolution signal to be properly displayed on an
XGA [1024x768] LCD screen. Without the scaling engine, the displayed picture would be in
the center 1/3 of the LCD. The scaling engine mathematically converts the 640x480 to
1024x768. This my sound simple but it is in fact a complex algorithm that adjusts for different
aspect ratios and pixel alignment, essentially smoothing text and graphics to produce a
picture that is pleasant to the eye.
All Automationdirect.com displays from 12.1" (800x600) to 18.1” (1280x1024) incorporate
scaling engines in the converter card.
Safety Precautions
CAUTION: SHUT OFF YOUR TOUCH SCREEN BEFORE CLEANING!!
IF YOUR DISPLAY IS A –TS MODEL, THAT IS A TOUCH SCREEN DISPLAY,
THE SCREEN WILL BE ACTUATED BY CLEANING. PRESSING ON THE
SCREEN WHILE CLEANING WILL BE SEEN AS A TOUCH TO THE SYSTEM
WHICH COULD CREATE A POTENTIALLY DANGEROUS CONDITION!!
Do not attempt to service this display yourself. The rear chassis has a seal so
that non qualified personal will not expose themselves to dangerous voltages or
other risks.
To protect from electrical shock, unplug the display power supply from the wall
before moving.
Do not use this display near water
Do not place any heavy objects on the power cords. Damage may cause
electrical shock.
Unplug the power supply from the wall or unit if one of the following conditions
exists.
o Power cord or plug is damaged or frayed
o Liquid is spilled into the display or the display is exposed to rain or water.
o The display does not operate normally when the operating instructions
are followed.
o The display has been dropped or the enclosure has been damaged.
o The display exhibits a distinct change in performance, indicating a need
for service.
Ensure that sufficient space is available around the display to provide air
circulation for cooling.
Ensure that the ambient air temperature will not exceed the specified maximum
temperature.
Do not expose the display to direct sunlight or heat.
2
Section
Display
Setup
Included Parts
Your LCD monitor package will consist of the primary components listed below.
Open shipping container and lay all components on a flat clean surface.
FLI-150(-TS) LCD Monitor
6 ft Video Cable
6 Ft DC Power Cable
6 ft RS232 Touch Interface Cable ( touch screen units only)
10-32 Mounting Hardware. (For use with Panel Mount)
Documentation and Driver CD ROM
Connecting Your Display
1. Connect all cables to the computer first. This includes the VGA cable, and if the unit
has a touch screen, the RS 232 serial touch screen connection.
2. After connecting the cables between the LCD monitor and the computer, connect DC
power (External power supply such AutomationDirect’s PS-MON is required). Turn
on the power.
4. If your computer is off, turn on your computer.
5. Your display should now operate as a normal computer display, displaying the
computers BIOS screens and booting into Windows or other operating system.
Note: If for any reason the display goes blank and/or displays “out of Range” or “No
Input Signal” message on the screen, your computer or video source may be putting out
a signal that is incompatible with the FLI-150(-TS). If this happens, reboot the computer
with the previous display and adjust the display settings to be within the FLI-150(-TS)
specifications (see Appendix C). Below is are the most common reasons a display may
not operate correctly:
1. The resolution is to high or low for the LCD.
2. The refresh rate is set to high. Refresh on an LCD is different than a CRT. Set the
refresh to 60Hz. CRT’s need a high refresh rate to avoid flicker. The refresh rate has
no impact on an LCD.
3. The power source is incorrect, or there is no power. Check if the rear LED is ON or
blinking. If the LED is not lit, check to be sure there is power to the unit.
4. The unit is malfunctioning. If you believe this to be true, disconnect the video cable
from the rear of the LCD and connect to a known good display. If the computer
display is working satisfactory and the video is within the appropriate range, then
contact AutomationDirect.com technical support.
3
Section
Getting
Started
Display Features
The FLI-150(-TS) is capable of displaying 16M (24 Bit) colors in a continuous
spectrum. The high contrast LCD enhances the image with no geometric distortion.
FLI-150(-TS) Series directly accepts an analog 3,4, or 5 wire RGB with separate H/V,
composit, or sync on green. This is the standard PC video signal.
The FLI-150(-TS) Series is auto synchronous adjusting the display to the appropriate
input between VGA and SXGA (Note: XGA is the displays native mode, SXGA is
interpolated).
The FLI 150(-TS) Series is supplied with a Anti-Glare Touch Screeen [TS models] or
an Anti-Glare impact window on non touch screen models.
The FLI-150(-TS) Requires an external 12 VDC power supply such
AutomationDirect’s PS-MON is required. Turn on the power.
Adjusting the Display
The FLI-150 (-TS) Series display has an embedded microprocessor on the converter
card [the electronics that drive the LCD], and has been recently updated with a more
powerful chip set. In most cases the unit will require very little if any user intervention to
operate correctly. That is, produce a sharp, stable picture.
The micoprocessor in the display has the capability to adjust itself to the computer to
which it is attached. This auto-adjustment will take place when the unit is first installed
and connected to a computer, if the video input changes, or the user initates it. If the
picture is not satisfactory, the first step is to allow the unit to attempt to re-adjust itself to
your computer.
Located on the rear of the unit is a membrane keypad used for adjusting the display..
See figure 1 below:
Figure 1
Menu
Select
Using the Auto-Adjust
The FLI-150(-TS) will attempt to adjust itself to your computers current video mode. If
the picture is stable, and centered vertically and horizontally the auto-adjustment is
complete. If however the picture is not stable, and centered vertically and horizontally
you can re-initate the auto adjustment. Once you have the unit displaying the resolution
you desire for your application do the following: Press and release the “Select” button on
the membrane. This will place the unit into a “Geometry Auto Adjust” mode. This
operation will adjust the picture so it is centered both vertically and horizontally on the
LCD screen. It will also make the necessary adjustments to the internal clock timing so
that the picture is stable (without any decernable pixel jitter).
After having completed this step you may wish to adjust the color balance. This
procedure adjusts for any imbalance in the Red, Green, and Blue levels from the video
cable or video card. This is accomplished using the LCDs OSD (On Screen Menu)
system.
OSD (On Screen Display) Adjustments
There are four membrane buttons (see Fig 1, above) located on the rear of the unit.
They will activate the OSD and allow navigation to all adjustments if your unit requires
adjustment.
Press MENU key,OSD screen appears. [See Figure 2]
Press UP/DOWN key, you can move between the five primary functions:
Press Select key at Picture group to highlight this sub menu. You can now navigate the sub menu
using the UP/DOWN keys. To make an adjustment to an item press Select and use the
UP/DOWN buttons to make your adjustments
At anytime, press the Menu button Two times to Exit and Save your settings.
This convention of Menu, Navigate, Select Sub Menu, Navigate, Select Item and adjust is used
throughout the OSD screen process.
Press MENU key to return previous state and press MENU key twice to exit OSD.
PICTURE
Press MENU key to bring up the OSD. Press UP/DOWN key, to move between the 5 primary
screen functions. Press the Select button at Picture, to select it. Press the UP/DOWN key, you
can now move between functions and press Select to adjust the value of each item with the
UP/DOWN key. Press MENU key to return previous state and press MENU key twice to exit
OSD.
BRIGHTNESS Function of adjusting main screen brightness.
CONTRAST
Function of adjusting main screen contrast.
FREQUENCY Function of adjusting main screen sampling clock frequency.
PHASE
Function of adjusting main screen sampling clock phase.
H POSITION Function of adjusting the horizontal position of main screen .
V POSITION Function of adjusting the vertical position of main screen .
ADVANCED
Press MENU key to bring up the OSD. Press UP/DOWN key, to move between the 5 primary
screen functions. Press the Select button at Advanced, to select it. Press the UP/DOWN key, you
can now move between functions and press Select to adjust the value of each item with the
UP/DOWN key. Press MENU key to return previous state and press MENU key twice to exit
OSD.
Color Temp
Function of setup of main color. (Bluish, Normal, Reddish)
User RED
Function of adjusting value of RED.
User BLUE
Function of adjusting value of BLUE.
User GREEN Function of adjusting value of GREEN.
Gamma
Function of adjusting value of color ratio.
COLOR WARP
Press MENU key to bring up the OSD. Press UP/DOWN key, to move between the 5 primary
screen functions. Press the Select button at Color Warp, to select it. Press the UP/DOWN key,
you can now move between functions and press Select to adjust the value of each item with the
UP/DOWN key. Press MENU key to return previous state and press MENU key twice to exit OSD
Color Warp
Function of adjusting curve on main screen.
Mode
Function of selecting curve on main screen.
Custom Center Function of adjusting color warp on center.
Custom range Function of adjusting range on color warp.
Saturation
Function of adjusting saturation warp on center.
Custom hue
Function of adjusting the tone of color.
OPTIONS
Press MENU key to bring up the OSD. Press UP/DOWN key, to move between the 5 primary
screen functions. Press the Select button at Options, to select it. Press the UP/DOWN key, you
can now move between functions and press Select to adjust the value of each item with the
UP/DOWN key. Press MENU key to return previous state and press MENU key twice to exit OSD
Osd V Pos
Function of adjusting the vertical position of OSD image .
Osd H Pos
Function of adjusting the horizontal position of OSD image.
Osd
Function of moving OSD image quickly.
UTILITIES
Press MENU key to bring up the OSD. Press UP/DOWN key, to move between the 5 primary
screen functions. Press the Select button at Utilities, to select it. Press the UP/DOWN key, you
can now move between functions and press Select to adjust the value of each item with the
UP/DOWN key. Press MENU key to return previous state and press MENU key twice to exit OSD
OSD Timeout Function of adjusting OSD disappear time .
OSD Bk ground Function of adjusting at transparancy on main screen to osd image.
Auto Adjust
Function of finding optimized main screen automatically.
Factory Reset Function of resetting all value on OSD.
Power On Time Function of indicating system on time.
Bklight OnTime Function of indicating panel on time.
4
Touch Screen
Setup
Section
Introduction to Touch Screens
Touch screen interfaces have become the standard interface in the past 5 years. They
are, rugged, reliable, extremely flexible and easier than ever to implement! The universal
acceptance of the Windows GUI [Graphical User Interface] along with the extensive use
of a mouse interface has significantly accelerated the use of a touch interface. Basically
think of your touch screen as if it were a mouse.
AutomationDirect.com touch systems are mouse emulators. By installing a software
driver and connecting to a serial port, the touch screen will support all the primary mouse
functions:
The FLI-150(-TS) touch screen interface, is a high resolution, analog resistive. Following
is a quick explanation of what all this means.
High Resolution: The touch screen resolution is 400 ppi [points per inch]
Analog Resistive: The actual touch glass is an analog device. Meaning there is a very
low voltage applied to the X and Y axis of the touch screen. This current is applied to
ITO [Iridium Tin Oxide] that is sputtered onto a polyester membrane. When you touch
the screen you are changing the resistance on both the X and Y axis, producing an
analog value that references a particular location.
This type of screen can be activated with a gloved finger or mechanical stylus.
The touch screen itself is connected to electronics [internal to the display unit] that
provide the Analog to Digital conversion. When the screen is touched, the electronics
convert the analog voltage to a digital value and add a "Mouse Click". This touch data is
sent out from the display serial port to the PC serial port where the touch driver presents
the data to the operating systems as if it were from a normal PC mouse. When the touch
is released the new XY location is sent along with a "Mouse Up Click".
The touch screen interface to the PC is RS-232, so the recommend maximum distance
from the PC is 50 feet., The driver and and interface have been tested to 50 Ft. using
high quality cables. High quaility cables and connectors are important, especially if field
connections are made. Poor quality cables will drastically reduce the performance of the
RS-232 interface. The touch driver default baud rate is 9600.
Touch Screen Setup and Configuration:
If the unit does not have a touch screen, your configuration is complete. If your display
is fitted with the optional touch screen interface, the following section will outline
installation and set up. This system requires no special software knowledge, and can be
installed and set up in minutes. The following section gives a detailed explanation of the
software setup and configuration
Touch Screen Driver Installation for Windows 98
Required items to know or have to install the Touch Driver.
What Operating System you are using. Windows 98
What Serial Port you are connected to. Usually COM 1 or COM 2
The type of touch screen.
Smartset
The CD-ROM or Floppy disk included with the system.
Touch Screen Driver Installation for Windows 98
Insert the provided CD
Select Link to the Windows 98 driver
Select Open from the Windows dialog box.
Select SmartSet Controller for Com1 or Com2
Remove the CD.
Restart the computer; you will be prompted to calibrate the touch screen.
Touch each of the 3 targets as directed. If the unit does not respond to
your calibration touches then you have probably selected the wrong
COM port. If so, reinstall the driver and selecting the correct COM port.
You are now ready to use your touch screen.
Note 1: The touch screen calibration information is maintained in the computer. If you
change computers, you will need to reinstall the touch screen driver software and
recalibrate.
Note 2: If for any reason the touch screen performance is unsatisfactory, you can
recalibrate at any time. This is done from the ELO icon under the Windows control panel
Touch Screen Driver Installation for Windows NT 4.0
Required items to know or have to install the Touch Driver.
What Operating System you are using. Windows NT 4.0
What Serial Port you are connected to. Usually COM 1 or COM 2
The type of touch screen.
Smartset
The CD-ROM or Floppy disk included with the system.
Touch Screen Driver Installation for Windows NT 4.0
Insert the provided CD
Select Link to the Windows NT driver
Select Open from the Windows dialog box.
Select Next
Select Yes - To the license agreement
Select Next - To the default installation folder
Select Next - For Single Monitor installation
Select the Com Port to which the touch interface is connected and Next
Select Finish
Remove the CD.
Restart the computer. You will be prompted to calibrate the touch screen.
Touch each of the 3 targets as directed. If the unit does not respond to
your calibration touches then you have probably selected the wrong
COM port. If so, press the Esc key on the keyboard to exit.
Go to the ELO icon under Windows Control Panel.
Select the correct Com Port, and Restart the computer.
If this fails, reinstall the driver and select the correct COM port
Once restarted, select the ELO icon under Windows Control Panel
Select Calibrate, and then touch each of the 3 targets as they are
displayed.
You are now ready to use your touch screen.
Note 1: The touch screen calibration information is maintained in the computer. If you
change computers, you will need to reinstall the touch screen driver software and
recalibrate.
Note 2: If for any reason the touch screen performance is unsatisfactory, you can
recalibrate at any time. This is done from the ELO icon under the Windows control panel
Touch Screen Driver Installation for Windows 2000
Required items to know or have to install the Touch Driver.
What Operating System you are using. Windows 2000
What Serial Port you are connected to. Usually COM 1 or COM 2
The type of touch screen.
Smartset
The CD-ROM or Floppy disk included with the system.
Touch Screen Driver Installation for Windows 2000
Insert the provided CD
Select Link to Windows 2000 driver
Select Open from the Windows dialog box.
Select Next
Select Yes - To the license agreement
Select the Com Port to which the touch interface is connected and Next
Select Next, the driver will now start to install.
Select YES - To continue
Select Finish
Remove the CD.
Select YES to Restart.
When the system restarts touch each of the 3 targets as directed.
If the unit does not respond to your calibration touches then you have
probably selected the wrong COM port. If so, press the Esc key to exit.
Go to the ELO icon under Windows Control Panel.
Select the correct Com port, and restart the computer.
Once restarted, select the ELO icon under Windows Control Panel
Select Align and Calibrate; then touch each of the 3 targets as directed.
You are now ready to use your touch screen.
Note 1: The touch screen calibration information is maintained in the computer. If you
change computers, you will need to reinstall the touch screen driver software and
recalibrate.
Note 2: If for any reason the touch screen performance is unsatisfactory, you can
recalibrate at any time. This is done from the ELO icon under the Windows control panel
Touch Screen Driver Installation for Windows XP
Required items to know or have to install the Touch Driver.
What Operating System you are using.
Windows XP
What Serial Port you are connected to.
Usually COM 1 or COM 2
The type of touch screen.
Smartset
The CD-ROM or Floppy disk included with the system.
Touch Screen Driver Installation for Windows XP
Insert the provided CD
Select Link to XP driver
Select Open from the Windows dialog box.
Select Yes - To the license agreement
Select the Com Port to which the touch interface is connected and Next
Select Next, the driver will now start to install.
Select YES - To continue
Select Finish
Remove the CD
Select YES to Restart
Go to the ELO icon under Windows Control Panel.
Verify the Com Port is correct
Select Align; then touch each of the 3 targets as directed.
If the unit does not respond to your calibration touches then you have
probably selected the wrong COM port. If so, press the Esc key to exit.
Select the correct Com port, and restart the computer, then align the touchscreen.
You are now ready to use your touch screen.
Note 1: The touch screen calibration information is maintained in the computer. If you
change computers, you will need to reinstall the touch screen driver software and
recalibrate.
Note 2: If for any reason the touch screen performance is unsatisfactory, you can
recalibrate at any time. This is done from the ELO icon under the Windows control panel
5
Section
Mounting
Instructions
Panel Mounting Procedure
1. Cut and drill the panel (refer to Figure 2; Panel Mount Drawing Appendix D).
Measurements are in inches. A template of the hole pattern has been
supplied with your monitor to assist in making the mounting holes accurately.
Also, there is an AutoCad .dxf file included on the provided CD. This
computer file can be used in a design drawing or forwarded to your panel
fabricator for the proper mounting
2. If access to the side of the monitor is not available following installation,
attach the power and video cables to the side of the monitor at this time.
3. Install the monitor in the prepared cutout.
4. Install the washers and lock nuts supplied with the monitor.
Note: Use #10-32 nuts for mounting.
5. Tighten all mounting nuts evenly to a torque of 24 inch-pounds.
ATTENTION: Mounting nuts must be tightened to a torque of 24 inch-pounds to
provide panel seal and avoid potential damage. AutomationDirect assumes no
responsibility for water or chemical damage to the monitor or other equipment
within the enclosure due to improper installation.
6. Attach the power, video and touch screen cables (if this is a –TS unit) to the
side of the monitor.
Figure 2: Panel Mount Drawing
6
Section
Troubleshooting
Tips
No Picture
Check that the signal cable is properly connected to the
display.
Try disconnecting the video cable from the display and
connecting to another display if available to confirm the
presence of proper video.
Make sure power is connected to a proper DC source and
that the AC supply to the DC source is ON.
Make sure the resolution mode is supported by the display
and check display settings of the PC
Confirm that the video cable is not defective.
Image Persistence
Image persistence occurs when a ghost of an image remains
on the screen after the screen image has been changed.
Unlike a CRT monitor, an LCD monitor’s image persistence is
not permanent. To erase an image ghost, turn the monitor off
for several hours. What happens is the the liquid crystals
after extened periods of operation with take a “set”. To avoid
this condition, install a screen saver progam on the computer
Picture Quality & Image
Stability
Check for proper video cable for proper grounding and
shielding.
Check the signal source for proper signal.
Check for proper adjustment of the Phase and Frequency
controls.
Check for proper recommended signal timing.
Green LED not lit
Check for proper power and power connections
Display image is not
properly sized
Press the “Select” button to Auto Adjust the display
Adjust the Vertical and Horizontal size controls via the OSD.
(Reference setup adjustments)
Ensure that a supported mode is selected on the display card
or system being used. Consult the display card or system
manual for proper video.
Image will not adjust
Video timing outside of range.
Use the on-screen menu to adjust the Clock Setting.
Make sure timing is within VESA standard.
Slight distortion in text or
Graphics
Not working in native resolution.
Display is present but
“bars” Appear or roll
across screen
Ground loop problem between computer and display
Vertical shaded bars on
Screen image
Horizontal size not properly adjusted. Adjust horizontal size
Image is not stable.
Monitor has incorrect or bad sync signals..
Interference from adjacent equipment.
Check for proper video cable installation.
Replace suspected faulty cable.
Check to ensure that video source is within the display’s
operating range.
7
Section
Cleaning &
Maintenance
Cleaning
CAUTION: SHUT OFF YOUR TOUCH SCREEN BEFORE CLEANING!!
IF YOUR DISPLAY IS A –TS MODEL, THAT IS A TOUCH SCREEN DISPLAY,
THE SCREEN WILL BE ACTUATED BY CLEANING. PRESSING ON THE
SCREEN WHILE CLEANING WILL BE SEEN AS A TOUCH TO THE SYSTEM
WHICH COULD CREATE A POTENTIALLY DANGEROUS CONDITION!!
Occasionally clean the display panel and cabinet with a soft cloth dampened (not
soaked) with a mild (non-abrasive) glass cleaner. Keep turning a fresh side of the
cloth toward the screen surface to avoid scratching it with accumulated grit.
Note: The solvent should be applied only to the cloth, and not directly on the
monitor screen.
Do not use paper products as they may scratch the surface. To minimize the risk
of abrasion, allow the screen to air dry. Special care should be taken when
cleaning a touch screen or polycarbonate shield that is installed over the screen.
Abrasive and certain chemical cleaners can damage the surface.
Never use alcoholic or ammoniac cleaners to clean the polycarbonate shield or a
touch screen.
Replacing a Line Cord
To avoid shock and fire hazards, the monitor’s power cord should be replaced if
the insulation becomes broken or if it develops a loose internal connection.
Other Maintenance
Qualified service personnel should perform all maintenance, except for
the power cord replacement described above.
8
Appendices
Section
Appendix A – Video Pin Assignments
Pin assignments for the HD15 video connector
Pin 1
Pin 2
Pin 3
Pin 4
Pin 5
Pin 6
Pin 7
Pin 8
Red Video
Green Video
Blue Video
Not Used
Return
Red Video Ground
Green Video Ground
Blue Video Ground
Pin 9
Pin 10
Pin 11
Pin 12
Pin 13
Pin 14
Pin 15
No Connection
Sync Ground
Not Used
Bi-Directional Data
Horizontal Sync
Vertical Sync
Data Clock (SCL)
Appendix B – RS-232 Pin Assignments
Pin assignment for 9 Pin Optional Touch Screen Connector
Pin 1
Pin 2
Pin 3
Pin 4
Pin 5
Pin 6
Pin 7
Pin 8
Pin 9
DCD
RD (Rx)
SD (Tx)
DTR
SG
DSR
RTS
CTS
NC
Data Carrier Detect
Receive Data
Transmit Data
Data Terminal Ready
Signal Ground
Data Set Ready
Request to Send
Clear to Send
No Connection
Appendix C –General Specifications
FLI-150 & FLI-150-TS
Active Screen Area
Brightness
Contrast
Lamp Life
Screen Resolutions
Native Resolution (Best Picture)
View Angle L / R
View Angle Up / Dn
Voltage
Current Draw
Input power
Installed Depth
Chassis Construction
Bezel Construction
Bezel OD
Bezel Finish
Auto Adjust
5 Wire Touch
Recessed Cable Exit
Video Interface
Colors
Operating Temp
Storage Temp
Storage Humidity
NEMA Front End
11.97" x 8.98"
250
300:1
35K
VGA-SXGA
XGA
70/70
55/65
12 VDC
2.0a / 12 VDC
25W
1.75"
16 Ga Steel
Steel
16.21" x 13.22"
Gray & Black
Yes, On Power Up
Yes
Yes
VGA (HD-15F)
24bit (16M)
0-50
0-60
10-95
4/12
Appendix D – Mounting Dimentions
NOTES
Model Number: _________________
Serial Number: _________________
FLI-180
FLI-180-TS
LCD Monitor User Guide
Revised 12/02
FLI-180 & FLI-180-TS
Table Of Contents
Section 1 Introduction
About LCD Monitors
Product Safety Precautions
Section 2 Display Setup
Included Parts
Connecting Your Display
Section 3 Getting Started
Display Features
Getting Started
Adjusting the Display
Using the Auto-Adjust
OSD (On Screen Display) Adjustments
Section 4 Touch Screen Set up
Introduction to Touch Screens
Touch Screen Driver Installation
Windows 98
Windows NT 4.0
Windows 2000
Windows XP
Section 5 Mounting Instructions
Section 6 Trouble Shooting Tips
Section 7 Cleaning and Maintenance
Section 8 Appendices
A-VGA Pin Assignment
B-RS-232 Pin Assignment
C-General Specifications
D-Mounting Dimensions
1
Section
LCD
Introduction
About LCD Monitors
What you gain by using an LCD monitor for your industrial display is the future of display
technology. CRTs although they have dropped in cost significantly, do not offer the
performance, reliability, and mounting options available with LCDs. LCD monitors consist
primarily of an LCD, video board and a backlight. The LCD determines to a large extent the
viewing angle, brightness and contrast. Beyond that it is the function of the video board,
which converts the analog RGB (Red, Green, Blue) signals from a standard video card to a
high quality, digital RGB that the LCD can display.
LCD monitors can can be set for one or more of the following resolutions:
VGA: 640 x480
SVGA: 800x600
XGA 1024 x 768
SXGA 1280 x1024
UXGA 1600x 1200
Note: The VGA acronym stands for Video Graphics Adapter. It is used to describe both the
most common type of display interface used by PC’s and lowest resolution setting for this
interface. Originally only the VGA [640x480] resolution was available on a VGA interface.
Today all of the above interfaces are available on a VGA interface, but not all monitors
support all resolutions. . The native resolution of the LCD is normally the maxium resolution
that the LCD can display, and is the resolution that the LCD will exhibit the best display
charastics Check the monitor specifications (Appendix C) for the resolutions supported by this
monitor.
Recently the video card has taken on a new role. It is the responsibility of this device to
"scale" a particular video resolution to the "native" resolution of the LCD. This enables a
computer set to output a VGA [640x480] resolution signal to be properly displayed on an
XGA [1024x768] LCD screen. Without the scaling engine, the displayed picture would be in
the center 1/3 of the LCD. The scaling engine mathematically converts the 640x480 to
1024x768. This my sound simple but it is in fact a complex algorithm that adjusts for different
aspect ratios and pixel alignment, essentially smoothing text and graphics to produce a
picture that is pleasant to the eye.
All Automationdirect.com displays from 12.1" (800x600) to 18.1” (1280x1024) incorporate
scaling engines in the converter card.
Safety Precautions
CAUTION: SHUT OFF YOUR TOUCH SCREEN BEFORE CLEANING!!
IF YOUR DISPLAY IS A –TS MODEL, THAT IS A TOUCH SCREEN DISPLAY,
THE SCREEN WILL BE ACTUATED BY CLEANING. PRESSING ON THE
SCREEN WHILE CLEANING WILL BE SEEN AS A TOUCH TO THE SYSTEM
WHICH COULD CREATE A POTENTIALLY DANGEROUS CONDITION!!
Do not attempt to service this display yourself. The rear chassis has a seal so
that non qualified personal will not expose themselves to dangerous voltages or
other risks.
To protect from electrical shock, unplug the display power supply from the wall
before moving.
Do not use this display near water
Do not place any heavy objects on the power cords. Damage may cause
electrical shock.
Unplug the power supply from the wall or unit if one of the following conditions
exists.
o Power cord or plug is damaged or frayed
o Liquid is spilled into the display or the display is exposed to rain or water.
o The display does not operate normally when the operating instructions
are followed.
o The display has been dropped or the enclosure has been damaged.
o The display exhibits a distinct change in performance, indicating a need
for service.
Ensure that sufficient space is available around the display to provide air
circulation for cooling.
Ensure that the ambient air temperature will not exceed the specified maximum
temperature.
Do not expose the display to direct sunlight or heat.
2
Section
Display
Setup
Included Parts
Your LCD monitor package will consist of the primary components listed below.
Open shipping container and lay all components on a flat clean surface.
FLI-180(-TS) LCD Monitor
6 ft Video Cable
6 Ft DC Power Cable
6 ft RS232 Touch Interface Cable ( touch screen units only)
10-32 Mounting Hardware. (For use with Panel Mount)
Documentation and Driver CD ROM
Connecting Your Display
1. Connect all cables to the computer first. This includes the VGA cable, and if the unit
has a touch screen, the RS 232 serial touch screen connection.
2. After connecting the cables between the LCD monitor and the computer, connect DC
power (External power supply such AutomationDirect’s PS-MON is required). Turn
on the power, the FLI series monitors Trun on the power.
4. If your computer is off, turn on your computer.
5. Your display should now operate as a normal computer display, displaying the
computers BIOS screens and booting into Windows or other operating system.
Note: If for any reason the display goes blank and/or displays “out of Range” or “No
Input Signal” message on the screen, your computer or video source may be putting out
a signal that is incompatible with the FLI-180(-TS). If this happens, reboot the computer
with the previous display and adjust the display settings to be within the FLI-180(-TS)
specifications (see Appendix C). Below is are the most common reasons a display may
not operate correctly:
1. The resolution is to high or low for the LCD.
2. The refresh rate is set to high. Refresh on an LCD is different than a CRT. Set the
refresh to 60Hz. CRT’s need a high refresh rate to avoid flicker. The refresh rate has
no impact on an LCD.
3. The power source is incorrect, or there is no power. Check if the rear LED is ON or
blinking. If the LED is not lit, check to be sure there is power to the unit.
4. The unit is malfunctioning. If you believe this to be true, disconnect the video cable
from the rear of the LCD and connect to a known good display. If the computer
display is working satisfactory and the video is within the appropriate range, then
contact AutomationDirect.com technical support.
3
Section
Getting
Started
Display Features
The FLI-180(-TS) is capable of displaying 16M (24 Bit) colors in a continuous
spectrum. The high contrast LCD enhances the image with no geometric distortion.
FLI-180(-TS) Series directly accepts an analog 5 wire RGB with separate H/V
(Horizontal / Vertical) sync. This is the standard PC video signal.The FLI-180(-TS)
Series is auto synchronous adjusting the display to the appropriate input between
VGA and SXGA.
The FLI-180(-TS) Series is supplied with a Anti-Glare Touch Screeen [TS models] or
an Anti-Glare impact window on non touch screen models.
Requires an external 12 VDC power supply such AutomationDirect’s PS-MON is
required. Turn on the power.
Adjusting the Display
The FLI-180 (-TS) Series display has an embedded microprocessor in the converter
card [this is the electronics that drives the LCD]. In most cases the unit will require very
little if any user intervention to operate correctly. That is, produce a sharp stable picture.
The micoprocessor in the display has the capability to adjust itself to the computer to
which it is attached. If the picture is not satisfactory, the first step is to allow the unit to
attempt to adjust itself to your computer.
Located on the rear of the unit is a membrane keypad used for adjusting the display.
See figure 1 below:
Menu
Select
Figure 1
Using the Auto-Adjust
Once you have the unit displaying the resolution you desire for your application do the
following:
Press and release the “Select” button on the membrane. This will place the unit into a
“Geometry Auto Adjust” mode. This operation will adjust the picture so it is centered both
vertically and horizontally on the LCD screen. It will also make the necessary
adjustments to the internal clock timing so that the picture is stable (without any
decernable pixel jitter).
After having completed this step you may wish to adjust the color balance. This
procedure adjusts for any imbalance in the Red, Green, and Blue levels from the video
cable or video card. This is accomplished using the LCDs OSD ( On Screen Menu)
system.
OSD (On Screen Display) Adjustments
There are four membrane buttons (see Fig 1, above) located on the rear of the unit.
They will activate the OSD and allow navigation to all adjustments if your unit requires
adjustment.
OSD Layout
Main Menu
Automatic Adjust
Horizontal Position
Vertical Position
Horizontal Size
Phase
Brightness
Contrast
Color
OSD Language
Advanced
Cancel
Component Being Adjusted
Geometry & Color Balance
Horizontal position
Vertical Position
Horizontal Size
Phase
Brightness
Contrast
Red, Green, Blue Levels
English, Espanol, Deutsch, Francais, Italiano
Factory Preset, OSD Hor. Pos., OSD Vert. POS.
All adjustment follows the basic adjustment procedure outlined below. If during
adjustment you encounter difficulity. Exit the Menu system by pressing the Menu button
and press the Select to Auto Adjust the unit.
To adjust the Auto Color Balance:
1. Press the Menu button.
2. Press Select to Highlight this Sub Menu
3. Press the
to highlight Auto Color Balance.
4. Press the Select button.
The unit will test your video color balance and adjust it accordingly. When complete
press Menu to Exit the OSD Menu system
When you press the “Menu” the new settings are saved and your setting will be stored in
the unit’s non-volatile memory.
Following are complete instructions on how to adjust each individual function on
the OSD menu:
Automatic Adjustment
Press Menu and the automatic adjustment will be the first item to appear on the OSD.
Hit Select and then press the Up/Down button to navigate to Geometry.
Press Select again and the display will automatically adjust the geometry.
Press the Up/Down button to Color Balance.
Hit Select again and the display will automatically preset the color balance to a factory
preset value.
Horizontal Position
Press Menu. Press the Up button to the second icon which is Horz. Pos
Hit Select and then press the Up/Down button to achieve the desired position. The
desired value will be graphically illustrated along with a digital value.
When complete press Select and you are ready to move to the next adjustment.
Vertical Position
Press Menu. Press the Up button to the third icon which is Vertical Position.
Hit Select and then press the Up/Down button to achieve the desired position. The
desired value will be graphically illustrated along with a digital value.
When complete press Select and you are ready to move to the next adjustment.
Horizontal Size
Press Menu. Press the Up button to the fourth icon which is Horizontal Size.
Hit Select and then press the Up/Down button to achieve the desired size. The
desired value will be graphically illustrated along with a digital value.
When complete press Select and you are ready to move to the next adjustment.
Phase
Press Menu. Press the Up button to the fifth icon which is Phase.
Hit Select and then press the Up/Down button to achieve the desired phase.
The phase should be adjusted until the screen image is sharp and there is no
When complete press Select and you are ready to move to the next adjustment.
Brightness
Press Menu. Press the Up button to the sixth icon which is Brightness. Hit Select
and then press the Up/Down button to achieve the desired brightness level. The
desired value will be graphically illustrated along with a digital value.
When complete press Select and you are ready to move to the next adjustment.
Contrast
Press Menu. Press the Up button to the seventh icon which is Contrast.
Hit Select and then press the Up/Down button to achieve the desired contrast level.
The desired value will be graphically illustrated along with a digital value.
When complete press Select and you are ready to move to the next adjustment.
Color
Color temperature adjustments allows the user to adjust for desired white balance.
This can be achieved by adjusting the Color Temperature control or adjusting the
individual Red, Green or Blue controls.
Press Menu. Press the Up button to the eight icon which is Color .
Hit Select and then press the Up/Down button to select the Color Temperature. Hit
Select again and adjust the Up/Down button and adjust to one of the desired six
digital values. The six digital values are graphically illustrated.
When complete press Select and you are ready to move to the next adjustment.
If your require a unique white balance, you can adjust the individual colors to achieve
this value by proceeding with the following adjustments.
Advanced Settings
Red
Press Menu. Press the Up button to the eight icon which is Color.
Hit Select and then press the Up/Down button to select Red.
Hit Select again and adjust the red value which is graphically illustrated along
with a digital value.
When complete press Select and you are ready to move to the next adjustment.
Blue
Press Menu. Press the Up button to the eight icon which is Color.
Hit Select and then press the Up/Down button to select Blue.
Hit Select again and adjust the blue value which is graphically illustrated along
with a digital value.
When complete press Select and you are ready to move to the next adjustment.
Green
Press Menu. Press the Up button to the eight icon which is Color.
Hit Select and then press the Up/Down button to select Green.
Hit Select again and adjust the green value which is graphically illustrated along
with a digital value.
When complete press Select and you are ready to move to the next adjustment.
Optional Settings
OSD Language
This function allows you to convert from English to the following languages.
Espanol, Deutsch, Francais, Italiano. If you desire one of these languages,
proceed to adjust as follows. Espanol will be used as an example.
Espanol
Press Menu. Press the Up button to the ninth icon which is OSD Language.
Hit Select and then press the Up/Down button to select Espanol.
Hit Select again and the display will convert all text to Espanol.
When complete press Select and you are ready to move to the next adjustment
4
Section
Touch Screen
Setup
Introduction to Touch Screens
Touch screen interfaces have become the standard interface in the past 5 years. They
are, rugged, reliable, extremely flexible and easier than ever to implement! The universal
acceptance of the Windows GUI [Graphical User Interface] along with the extensive use
of a mouse interface has significantly accelerated the use of a touch interface. Basically
think of your touch screen as if it were a mouse.
AutomationDirect.com touch systems are mouse emulators. By installing a software
driver and connecting to a serial port, the touch screen will support all the primary mouse
functions:
The FLI-180(-TS) touch screen interface, is a high resolution, analog resistive. Following
is a quick explanation of what all this means.
High Resolution: The touch screen resolution is 400 ppi [points per inch]
Analog Resistive: The actual touch glass is an analog device. Meaning there is a very
low voltage applied to the X and Y axis of the touch screen. This current is applied to
ITO [Iridium Tin Oxide] that is sputtered onto a polyester membrane. When you touch
the screen you are changing the resistance on both the X and Y axis, producing an
analog value that references a particular location.
This type of screen can be activated with a gloved finger or mechanical stylus.
The touch screen itself is connected to electronics [internal to the display unit] that
provide the Analog to Digital conversion. When the screen is touched, the electronics
convert the analog voltage to a digital value and add a "Mouse Click". This touch data is
sent out from the display serial port to the PC serial port where the touch driver presents
the data to the operating systems as if it were from a normal PC mouse. When the touch
is released the new XY location is sent along with a "Mouse Up Click".
The touch screen interface to the PC is RS-232, so the recommend maximum distance
from the PC is 50 feet., The driver and and interface have been tested to 50 Ft. using
high quality cables. High quaility cables and connectors are important, especially if field
connections are made. Poor quality cables will drastically reduce the performance of the
RS-232 interface. The touch driver default baud rate is 9600.
Touch Screen Setup and Configuration:
If the unit does not have a touch screen, your configuration is complete. If your display
is fitted with the optional touch screen interface, the following section will outline
installation and set up. This system requires no special software knowledge, and can be
installed and set up in minutes. The following section gives a detailed explanation of the
software setup and configuration
Touch Screen Driver Installation for Windows 98
Required items to know or have to install the Touch Driver.
What Operating System you are using. Windows 98
What Serial Port you are connected to. Usually COM 1 or COM 2
The type of touch screen.
Smartset
The CD-ROM or Floppy disk included with the system.
Touch Screen Driver Installation for Windows 98
Insert the provided CD
Select Link to the Windows 98 driver
Select Open from the Windows dialog box.
Select SmartSet Controller for Com1 or Com2
Remove the CD.
Restart the computer; you will be prompted to calibrate the touch screen.
Touch each of the 3 targets as directed. If the unit does not respond to
your calibration touches then you have probably selected the wrong
COM port. If so, reinstall the driver and selecting the correct COM port.
You are now ready to use your touch screen.
Note 1: The touch screen calibration information is maintained in the computer. If you
change computers, you will need to reinstall the touch screen driver software and
recalibrate.
Note 2: If for any reason the touch screen performance is unsatisfactory, you can
recalibrate at any time. This is done from the ELO icon under the Windows control panel
Touch Screen Driver Installation for Windows NT 4.0
Required items to know or have to install the Touch Driver.
What Operating System you are using. Windows NT 4.0
What Serial Port you are connected to. Usually COM 1 or COM 2
The type of touch screen.
Smartset
The CD-ROM or Floppy disk included with the system.
Touch Screen Driver Installation for Windows NT 4.0
Insert the provided CD
Select Link to the Windows NT driver
Select Open from the Windows dialog box.
Select Next
Select Yes - To the license agreement
Select Next - To the default installation folder
Select Next - For Single Monitor installation
Select the Com Port to which the touch interface is connected and Next
Select Finish
Remove the CD.
Restart the computer. You will be prompted to calibrate the touch screen.
Touch each of the 3 targets as directed. If the unit does not respond to
your calibration touches then you have probably selected the wrong
COM port. If so, press the Esc key on the keyboard to exit.
Go to the ELO icon under Windows Control Panel.
Select the correct Com Port, and Restart the computer.
If this fails, reinstall the driver and select the correct COM port
Once restarted, select the ELO icon under Windows Control Panel
Select Calibrate, and then touch each of the 3 targets as they are
displayed.
You are now ready to use your touch screen.
Note 1: The touch screen calibration information is maintained in the computer. If you
change computers, you will need to reinstall the touch screen driver software and
recalibrate.
Note 2: If for any reason the touch screen performance is unsatisfactory, you can
recalibrate at any time. This is done from the ELO icon under the Windows control panel
Touch Screen Driver Installation for Windows 2000
Required items to know or have to install the Touch Driver.
What Operating System you are using. Windows 2000
What Serial Port you are connected to. Usually COM 1 or COM 2
The type of touch screen.
Smartset
The CD-ROM or Floppy disk included with the system.
Touch Screen Driver Installation for Windows 2000
Insert the provided CD
Select Link to Windows 2000 driver
Select Open from the Windows dialog box.
Select Next
Select Yes - To the license agreement
Select the Com Port to which the touch interface is connected and Next
Select Next, the driver will now start to install.
Select YES - To continue
Select Finish
Remove the CD.
Select YES to Restart.
When the system restarts touch each of the 3 targets as directed.
If the unit does not respond to your calibration touches then you have
probably selected the wrong COM port. If so, press the Esc key to exit.
Go to the ELO icon under Windows Control Panel.
Select the correct Com port, and restart the computer.
Once restarted, select the ELO icon under Windows Control Panel
Select Align and Calibrate; then touch each of the 3 targets as directed.
You are now ready to use your touch screen.
Note 1: The touch screen calibration information is maintained in the computer. If you
change computers, you will need to reinstall the touch screen driver software and
recalibrate.
Note 2: If for any reason the touch screen performance is unsatisfactory, you can
recalibrate at any time. This is done from the ELO icon under the Windows control panel
Touch Screen Driver Installation for Windows XP
Required items to know or have to install the Touch Driver.
What Operating System you are using.
Windows XP
What Serial Port you are connected to.
Usually COM 1 or COM 2
The type of touch screen.
Smartset
The CD-ROM or Floppy disk included with the system.
Touch Screen Driver Installation for Windows XP
Insert the provided CD
Select Link to XP driver
Select Open from the Windows dialog box.
Select Yes - To the license agreement
Select the Com Port to which the touch interface is connected and Next
Select Next, the driver will now start to install.
Select YES - To continue
Select Finish
Remove the CD
Select YES to Restart
Go to the ELO icon under Windows Control Panel.
Verify the Com Port is correct
Select Align; then touch each of the 3 targets as directed.
If the unit does not respond to your calibration touches then you have
probably selected the wrong COM port. If so, press the Esc key to exit.
Select the correct Com port, and restart the computer, then align the touchscreen.
You are now ready to use your touch screen.
Note 1: The touch screen calibration information is maintained in the computer. If you
change computers, you will need to reinstall the touch screen driver software and
recalibrate.
Note 2: If for any reason the touch screen performance is unsatisfactory, you can
recalibrate at any time. This is done from the ELO icon under the Windows control panel
5
Section
Mounting
Instructions
Panel Mounting Procedure
1. Cut and drill the panel (refer to Figure 2; Panel Mount Drawing Appendix D).
Measurements are in inches. A template of the hole pattern has been
supplied with your monitor to assist in making the mounting holes accurately.
Also, there is an AutoCad .dxf file included on the provided CD. This
computer file can be used in a design drawing or forwarded to your panel
fabricator for the proper mounting
2. If access to the side of the monitor is not available following installation,
attach the power and video cables to the side of the monitor at this time.
3. Install the monitor in the prepared cutout.
4. Install the washers and lock nuts supplied with the monitor.
Note: Use #10-32 nuts for mounting.
5. Tighten all mounting nuts evenly to a torque of 24 inch-pounds.
ATTENTION: Mounting nuts must be tightened to a torque of 24 inch-pounds to
provide panel seal and avoid potential damage. AutomationDirect assumes no
responsibility for water or chemical damage to the monitor or other equipment
within the enclosure due to improper installation.
6. Attach the power, video and touch screen cables (if this is a –TS unit) to the
side of the monitor.
Figure 2: Panel Mount Drawing
6
Section
Troubleshooting
Tips
No Picture
Check that the signal cable is properly connected to the
display.
Try disconnecting the video cable from the display and
connecting to another display if available to confirm the
presence of proper video.
Make sure power is connected to a proper DC source and
that the AC supply to the DC source is ON.
Make sure the resolution mode is supported by the display
and check display settings of the PC
Confirm that the video cable is not defective.
Image Persistence
Image persistence occurs when a ghost of an image remains
on the screen after the screen image has been changed.
Unlike a CRT monitor, an LCD monitor’s image persistence is
not permanent. To erase an image ghost, turn the monitor off
for several hours. What happens is the the liquid crystals
after extened periods of operation with take a “set”. To avoid
this condition, install a screen saver progam l on the
computer
Picture Quality & Image
Stability
Check for proper video cable for proper grounding and
shielding.
Check the signal source for proper signal.
Check for proper adjustment of the Phase and Frequency
controls.
Check for proper recommended signal timing.
Green LED not lit
Check for proper power and power connections
Display image is not
properly sized
Press the “Select” button to Auto Adjust the display
Adjust the Vertical and Horizontal size controls via the OSD.
(Reference setup adjustments)
Ensure that a supported mode is selected on the display card
or system being used. Consult the display card or system
manual for proper video.
Image will not adjust
Video timing outside of range.
Use the on-screen menu to adjust the Clock Setting.
Make sure timing is within VESA standard.
Slight distortion in text or
Graphics
Not working in native resolution.
Display is present but
“bars” Appear or roll
across screen
Ground loop problem between computer and display
Vertical shaded bars on
Screen image
Horizontal size not properly adjusted. Adjust horizontal size
Image is not stable.
Monitor has incorrect or bad sync signals..
Interference from adjacent equipment.
Check for proper video cable installation.
Replace suspected faulty cable.
Check to ensure that video source is within the display’s
operating range.
7
Section
Cleaning &
Maintenance
Cleaning
CAUTION: SHUT OFF YOUR TOUCH SCREEN BEFORE CLEANING!!
IF YOUR DISPLAY IS A –TS MODEL, THAT IS A TOUCH SCREEN DISPLAY,
THE SCREEN WILL BE ACTUATED BY CLEANING. PRESSING ON THE
SCREEN WHILE CLEANING WILL BE SEEN AS A TOUCH TO THE SYSTEM
WHICH COULD CREATE A POTENTIALLY DANGEROUS CONDITION!!
Occasionally clean the display panel and cabinet with a soft cloth dampened (not
soaked) with a mild (non-abrasive) glass cleaner. Keep turning a fresh side of the
cloth toward the screen surface to avoid scratching it with accumulated grit.
Note: The solvent should be applied only to the cloth, and not directly on the
monitor screen.
Do not use paper products as they may scratch the surface. To minimize the risk
of abrasion, allow the screen to air dry. Special care should be taken when
cleaning a touch screen or polycarbonate shield that is installed over the screen.
Abrasive and certain chemical cleaners can damage the surface.
Never use alcoholic or ammoniac cleaners to clean the polycarbonate shield or a
touch screen.
Replacing a Line Cord
To avoid shock and fire hazards, the monitor’s power cord should be replaced if
the insulation becomes broken or if it develops a loose internal connection.
Other Maintenance
Qualified service personnel should perform all maintenance, except for
the power cord replacement described above.
8
Appendices
Section
Appendix A – Video Pin Assignments
Pin assignments for the HD15 video connector
Pin 1
Pin 2
Pin 3
Pin 4
Pin 5
Pin 6
Pin 7
Pin 8
Red Video
Green Video
Blue Video
Not Used
Return
Red Video Ground
Green Video Ground
Blue Video Ground
Pin 9
Pin 10
Pin 11
Pin 12
Pin 13
Pin 14
Pin 15
No Connection
Sync Ground
Not Used
Bi-Directional Data
Horizontal Sync
Vertical Sync
Data Clock (SCL)
Appendix B – RS-232 Pin Assignments
Pin assignment for 9 Pin Optional Touch Screen Connector
Pin 1
Pin 2
Pin 3
Pin 4
Pin 5
Pin 6
Pin 7
Pin 8
Pin 9
DCD
RD (Rx)
SD (Tx)
DTR
SG
DSR
RTS
CTS
NC
Data Carrier Detect
Receive Data
Transmit Data
Data Terminal Ready
Signal Ground
Data Set Ready
Request to Send
Clear to Send
No Connection
Appendix C –General Specifications
FLI-180 & FLI-180-TS
Active Screen Area
14.14" x 11.31"
Brightness
200
Contrast
300:1
Lamp Life
30K
Screen Resolutions
VGA-SXGA
Native Resolution (Best Picture)
View Angle L / R
SXGA
80 /80
View Angle Up / Dn
80 /80
Voltage
12 VDC
Current Draw
2.75 / 12 VDC
Input power
33W
Installed Depth
Chassis Construction
2.125”
16 Ga Steel
Bezel Construction
Steel
Bezel OD
19.0" x 15.72"
Bezel Finish
Gray & Black
Auto Adjust
Yes
5 Wire Touch
Recessed Cable Exit
Yes
Yes
Video Interface
VGA (HD-15F)
Colors
24bit (16M)
Op temp
0-50
Storage Temp
0-60
Storage Humidity
NEMA Front End
10-95
4/12
Appendix D – Mounting Dimentions
NOTES
Model Number: _________________
Serial Number: _________________
FPM-120
FPM-120-TS
LCD Monitor User Guide
Revised 12/02
FPM-120 & FPM-120-TS
Table Of Contents
Section 1 Introduction
About LCD Monitors
Product Safety Precautions
Section 2 Display Setup
Included Parts
Connecting Your Display
Section 3 Getting Started
Display Features
Getting Started
Adjusting the Display
Using the Auto-Adjust
OSD (On Screen Display) Adjustments
Section 4 Touch Screen Set up
Introduction to Touch Screens
Touch Screen Driver Installation
Windows 98
Windows NT 4.0
Windows 2000
Windows XP
Section 5 Mounting Instructions
Section 6 Trouble Shooting Tips
Section 7 Cleaning and Maintenance
Section 8 Appendices
A-VGA Pin Assignment
B-RS-232 Pin Assignment
C-General Specifications
D-Mounting Dimensions
1
Section
LCD
Introduction
About LCD Monitors
What you gain by using an LCD monitor for your industrial display is the future of display
technology. CRTs although they have dropped in cost significantly, do not offer the
performance, reliability, and mounting options available with LCDs. LCD monitors consist
primarily of an LCD, video board and a backlight. The LCD determines to a large extent the
viewing angle, brightness and contrast. Beyond that it is the function of the video board,
which converts the analog RGB (Red, Green, Blue) signals from a standard video card to a
high quality, digital RGB that the LCD can display.
LCD monitors can can be set for one or more of the following resolutions:
VGA: 640 x480
SVGA: 800x600
XGA 1024 x 768
SXGA 1280 x1024
UXGA 1600x 1200
Note: The VGA acronym stands for Video Graphics Adapter. It is used to describe both the
most common type of display interface used by PC’s and lowest resolution setting for this
interface. Originally only the VGA [640x480] resolution was available on a VGA interface.
Today all of the above interfaces are available on a VGA interface, but not all monitors
support all resolutions. . The native resolution of the LCD is normally the maxium resolution
that the LCD can display, and is the resolution that the LCD will exhibit the best display
charastics Check the monitor specifications (Appendix C) for the resolutions supported by this
monitor.
Recently the video card has taken on a new role. It is the responsibility of this device to
"scale" a particular video resolution to the "native" resolution of the LCD. This enables a
computer set to output a VGA [640x480] resolution signal to be properly displayed on an
XGA [1024x768] LCD screen. Without the scaling engine, the displayed picture would be in
the center 1/3 of the LCD. The scaling engine mathematically converts the 640x480 to
1024x768. This my sound simple but it is in fact a complex algorithm that adjusts for different
aspect ratios and pixel alignment, essentially smoothing text and graphics to produce a
picture that is pleasant to the eye.
All Automationdirect.com displays from 12.1" (800x600) to 18.1” (1280x1024) incorporate
scaling engines in the converter card.
Safety Precautions
CAUTION: SHUT OFF YOUR TOUCH SCREEN BEFORE CLEANING!!
IF YOUR DISPLAY IS A –TS MODEL, THAT IS A TOUCH SCREEN DISPLAY,
THE SCREEN WILL BE ACTUATED BY CLEANING. PRESSING ON THE
SCREEN WHILE CLEANING WILL BE SEEN AS A TOUCH TO THE SYSTEM
WHICH COULD CREATE A POTENTIALLY DANGEROUS CONDITION!!
Do not attempt to service this display yourself. The rear chassis has a seal so
that non qualified personal will not expose themselves to dangerous voltages or
other risks.
To protect from electrical shock, unplug the display power supply from the wall
before moving.
Do not use this display near water
Do not place any heavy objects on the power cords. Damage may cause
electrical shock.
Unplug the power supply from the wall or unit if one of the following conditions
exists.
o Power cord or plug is damaged or frayed
o Liquid is spilled into the display or the display is exposed to rain or water.
o The display does not operate normally when the operating instructions
are followed.
o The display has been dropped or the enclosure has been damaged.
o The display exhibits a distinct change in performance, indicating a need
for service.
Ensure that sufficient space is available around the display to provide air
circulation for cooling.
Ensure that the ambient air temperature will not exceed the specified maximum
temperature.
Do not expose the display to direct sunlight or heat.
2
Section
Display
Setup
Included Parts
Your LCD monitor package will consist of the primary components listed below.
Open shipping container and lay all components on a flat clean surface.
FPM-120(-TS) LCD Monitor
6 ft Video Cable
6 Ft AC Power Cable
6 ft RS232 Touch Interface Cable ( touch screen units only)
10-32 Mounting Hardware. (For use with Panel Mount)
Documentation and Driver CD ROM
Connecting Your Display
1. Connect all cables to the computer first. This includes the VGA cable, and if the unit
has a touch screen, the RS 232 serial touch screen connection.
2. After connecting the cables between the LCD monitor and the computer, plug
supplied AC power cord into a suitable AC outlet then into the LCD.
3. Power on the display. The On/Off switch is located where the AC power cord enters
the unit
4. If your computer is off, turn on your computer.
5. Your display should now operate as a normal computer display, displaying the
computers BIOS screens and booting into Windows or other operating system.
Note: If for any reason the display goes blank and/or displays “out of Range” or “No
Input Signal” message on the screen, your computer or video source may be putting out
a signal that is incompatible with the FPM-120(-TS). If this happens, reboot the computer
with the previous display and adjust the display settings to be within the FPM-120(-TS)
specifications (see Appendix C). Below is are the most common reasons a display may
not operate correctly:
1. The resolution is to high or low for the LCD.
2. The refresh rate is set to high. Refresh on an LCD is different than a CRT. Set the
refresh to 60Hz. CRT’s need a high refresh rate to avoid flicker. The refresh rate has
no impact on an LCD.
3. The power source is incorrect, or there is no power. Check if the rear LED is ON or
blinking. If the LED is not lit, check to be sure there is power to the unit.
4. The unit is malfunctioning. If you believe this to be true, disconnect the video cable
from the rear of the LCD and connect to a known good display. If the computer
display is working satisfactory and the video is within the appropriate range, then
contact AutomationDirect.com technical support.
3
Section
Getting
Started
Display Features
The FPM-120(-TS) is capable of displaying 256K colors in a continuous spectrum.
The high contrast LCD enhances the image with no geometric distortion.
FPM-120(-TS) Series directly accepts an analog 5 wire RGB with separate H/V. This
is the standard PC video signal.
The FPM-120(-TS) Series is auto synchronous adjusting the display to the
appropriate input between VGA or SVGA..
The FPM-120(-TS) Series is supplied with a Anti-Glare Touch Screeen [TS models]
or an Anti-Glare impact window on non touch screen models.
The FPM-120(-TS) Series has an integrated 115/220VAC power supply as standard
on all models.
Adjusting the Display
The FPM-120 (-TS) Series display has an embedded microprocessor in the converter
card [this is the electronics that drives the LCD]. In most cases the unit will require very
little if any user intervention to operate correctly. That is, produce a sharp stable picture.
The micoprocessor in the display has the capability to adjust itself to the computer to
which it is attached. If the picture is not satisfactory, the first step is to allow the unit to
attempt to adjust itself to your computer.
Located on the rear of the unit is a membrane keypad used for adjusting the display.
See figure 1 below:
Menu
Select
Figure 1
Using the Auto-Adjust
Once you have the unit displaying the resolution you desire for your application do the
following:
Press and release the “Select” button on the membrane. This will place the unit into a
“Geometry Auto Adjust” mode. This operation will adjust the picture so it is centered both
vertically and horizontally on the LCD screen. It will also make the necessary
adjustments to the internal clock timing so that the picture is stable (without any
decernable pixel jitter).
After having completed this step you may wish to adjust the color balance. This
procedure adjusts for any imbalance in the Red, Green, and Blue levels from the video
cable or video card. This is accomplished using the LCDs OSD ( On Screen Menu)
system.
OSD (On Screen Display) Adjustments
There are four membrane buttons (see Fig 1, above) located on the rear of the unit.
They will activate the OSD and allow navigation to all adjustments if your unit requires
adjustment.
OSD Layout
Main Menu
Automatic Adjust
Horizontal Position
Vertical Position
Horizontal Size
Phase
Brightness
Contrast
Color
OSD Language
Advanced
Cancel
Component Being Adjusted
Geometry & Color Balance
Horizontal position
Vertical Position
Horizontal Size
Phase
Brightness
Contrast
Red, Green, Blue Levels
English, Espanol, Deutsch, Francais, Italiano
Factory Preset, OSD Hor. Pos., OSD Vert. POS.
All adjustment follows the basic adjustment procedure outlined below. If during
adjustment you encounter difficulity. Exit the Menu system by pressing the Menu button
and press the Select to Auto Adjust the unit.
To adjust the Auto Color Balance:
1. Press the Menu button.
2. Press Select to Highlight this Sub Menu
3. Press the
to highlight Auto Color Balance.
4. Press the Select button.
The unit will test your video color balance and adjust it accordingly. When complete
press Menu to Exit the OSD Menu system
When you press the “Menu” the new settings are saved and your setting will be stored in
the unit’s non-volatile memory.
Following are complete instructions on how to adjust each individual function on
the OSD menu:
Automatic Adjustment
Press Menu and the automatic adjustment will be the first item to appear on the OSD.
Hit Select and then press the Up/Down button to navigate to Geometry.
Press Select again and the display will automatically adjust the geometry.
Press the Up/Down button to Color Balance.
Hit Select again and the display will automatically preset the color balance to a factory
preset value.
Horizontal Position
Press Menu. Press the Up button to the second icon which is Horz. Pos
Hit Select and then press the Up/Down button to achieve the desired position. The
desired value will be graphically illustrated along with a digital value.
When complete press Select and you are ready to move to the next adjustment.
Vertical Position
Press Menu. Press the Up button to the third icon which is Vertical Position.
Hit Select and then press the Up/Down button to achieve the desired position. The
desired value will be graphically illustrated along with a digital value.
When complete press Select and you are ready to move to the next adjustment.
Horizontal Size
Press Menu. Press the Up button to the fourth icon which is Horizontal Size.
Hit Select and then press the Up/Down button to achieve the desired size. The
desired value will be graphically illustrated along with a digital value.
When complete press Select and you are ready to move to the next adjustment.
Phase
Press Menu. Press the Up button to the fifth icon which is Phase.
Hit Select and then press the Up/Down button to achieve the desired phase.
The phase should be adjusted until the screen image is sharp and there is no
When complete press Select and you are ready to move to the next adjustment.
Brightness
Press Menu. Press the Up button to the sixth icon which is Brightness. Hit Select
and then press the Up/Down button to achieve the desired brightness level. The
desired value will be graphically illustrated along with a digital value.
When complete press Select and you are ready to move to the next adjustment.
Contrast
Press Menu. Press the Up button to the seventh icon which is Contrast.
Hit Select and then press the Up/Down button to achieve the desired contrast level.
The desired value will be graphically illustrated along with a digital value.
When complete press Select and you are ready to move to the next adjustment.
Color
Color temperature adjustments allows the user to adjust for desired white balance.
This can be achieved by adjusting the Color Temperature control or adjusting the
individual Red, Green or Blue controls.
Press Menu. Press the Up button to the eight icon which is Color .
Hit Select and then press the Up/Down button to select the Color Temperature. Hit
Select again and adjust the Up/Down button and adjust to one of the desired six
digital values. The six digital values are graphically illustrated.
When complete press Select and you are ready to move to the next adjustment.
If your require a unique white balance, you can adjust the individual colors to achieve
this value by proceeding with the following adjustments.
Advanced Settings
Red
Press Menu. Press the Up button to the eight icon which is Color.
Hit Select and then press the Up/Down button to select Red.
Hit Select again and adjust the red value which is graphically illustrated along
with a digital value.
When complete press Select and you are ready to move to the next adjustment.
Blue
Press Menu. Press the Up button to the eight icon which is Color.
Hit Select and then press the Up/Down button to select Blue.
Hit Select again and adjust the blue value which is graphically illustrated along
with a digital value.
When complete press Select and you are ready to move to the next adjustment.
Green
Press Menu. Press the Up button to the eight icon which is Color.
Hit Select and then press the Up/Down button to select Green.
Hit Select again and adjust the green value which is graphically illustrated along
with a digital value.
When complete press Select and you are ready to move to the next adjustment.
Optional Settings
OSD Language
This function allows you to convert from English to the following languages.
Espanol, Deutsch, Francais, Italiano. If you desire one of these languages,
proceed to adjust as follows. Espanol will be used as an example.
Espanol
Press Menu. Press the Up button to the ninth icon which is OSD Language.
Hit Select and then press the Up/Down button to select Espanol.
Hit Select again and the display will convert all text to Espanol.
When complete press Select and you are ready to move to the next adjustment
4
Section
Touch Screen
Setup
Introduction to Touch Screens
Touch screen interfaces have become the standard interface in the past 5 years. They
are, rugged, reliable, extremely flexible and easier than ever to implement! The universal
acceptance of the Windows GUI [Graphical User Interface] along with the extensive use
of a mouse interface has significantly accelerated the use of a touch interface. Basically
think of your touch screen as if it were a mouse.
AutomationDirect.com touch systems are mouse emulators. By installing a software
driver and connecting to a serial port, the touch screen will support all the primary mouse
functions:
The FPM-180(-TS) touch screen interface, is a high resolution, analog resistive.
Following is a quick explanation of what all this means.
High Resolution: The touch screen resolution is 400 ppi [points per inch]
Analog Resistive: The actual touch glass is an analog device. Meaning there is a very
low voltage applied to the X and Y axis of the touch screen. This current is applied to
ITO [Iridium Tin Oxide] that is sputtered onto a polyester membrane. When you touch
the screen you are changing the resistance on both the X and Y axis, producing an
analog value that references a particular location.
This type of screen can be activated with a gloved finger or mechanical stylus.
The touch screen itself is connected to electronics [internal to the display unit] that
provide the Analog to Digital conversion. When the screen is touched, the electronics
convert the analog voltage to a digital value and add a "Mouse Click". This touch data is
sent out from the display serial port to the PC serial port where the touch driver presents
the data to the operating systems as if it were from a normal PC mouse. When the touch
is released the new XY location is sent along with a "Mouse Up Click".
The touch screen interface to the PC is RS-232, so the recommend maximum distance
from the PC is 50 feet., The driver and and interface have been tested to 50 Ft. using
high quality cables. High quaility cables and connectors are important, especially if field
connections are made. Poor quality cables will drastically reduce the performance of the
RS-232 interface. The touch driver default baud rate is 9600.
Touch Screen Setup and Configuration:
If the unit does not have a touch screen, your configuration is complete. If your display
is fitted with the optional touch screen interface, the following section will outline
installation and set up. This system requires no special software knowledge, and can be
installed and set up in minutes. The following section gives a detailed explanation of the
software setup and configuration
Touch Screen Driver Installation for Windows 98
Required items to know or have to install the Touch Driver.
What Operating System you are using. Windows 98
What Serial Port you are connected to. Usually COM 1 or COM 2
The type of touch screen.
Smartset
The CD-ROM or Floppy disk included with the system.
Touch Screen Driver Installation for Windows 98
Insert the provided CD
Select Link to the Windows 98 driver
Select Open from the Windows dialog box.
Select SmartSet Controller for Com1 or Com2
Remove the CD.
Restart the computer; you will be prompted to calibrate the touch screen.
Touch each of the 3 targets as directed. If the unit does not respond to
your calibration touches then you have probably selected the wrong
COM port. If so, reinstall the driver and selecting the correct COM port.
You are now ready to use your touch screen.
Note 1: The touch screen calibration information is maintained in the computer. If you
change computers, you will need to reinstall the touch screen driver software and
recalibrate.
Note 2: If for any reason the touch screen performance is unsatisfactory, you can
recalibrate at any time. This is done from the ELO icon under the Windows control panel
Touch Screen Driver Installation for Windows NT 4.0
Required items to know or have to install the Touch Driver.
What Operating System you are using. Windows NT 4.0
What Serial Port you are connected to. Usually COM 1 or COM 2
The type of touch screen.
Smartset
The CD-ROM or Floppy disk included with the system.
Touch Screen Driver Installation for Windows NT 4.0
Insert the provided CD
Select Link to the Windows NT driver
Select Open from the Windows dialog box.
Select Next
Select Yes - To the license agreement
Select Next - To the default installation folder
Select Next - For Single Monitor installation
Select the Com Port to which the touch interface is connected and Next
Select Finish
Remove the CD.
Restart the computer. You will be prompted to calibrate the touch screen.
Touch each of the 3 targets as directed. If the unit does not respond to
your calibration touches then you have probably selected the wrong
COM port. If so, press the Esc key on the keyboard to exit.
Go to the ELO icon under Windows Control Panel.
Select the correct Com Port, and Restart the computer.
If this fails, reinstall the driver and select the correct COM port
Once restarted, select the ELO icon under Windows Control Panel
Select Calibrate, and then touch each of the 3 targets as they are
displayed.
You are now ready to use your touch screen.
Note 1: The touch screen calibration information is maintained in the computer. If you
change computers, you will need to reinstall the touch screen driver software and
recalibrate.
Note 2: If for any reason the touch screen performance is unsatisfactory, you can
recalibrate at any time. This is done from the ELO icon under the Windows control panel
Touch Screen Driver Installation for Windows 2000
Required items to know or have to install the Touch Driver.
What Operating System you are using. Windows 2000
What Serial Port you are connected to. Usually COM 1 or COM 2
The type of touch screen.
Smartset
The CD-ROM or Floppy disk included with the system.
Touch Screen Driver Installation for Windows 2000
Insert the provided CD
Select Link to Windows 2000 driver
Select Open from the Windows dialog box.
Select Next
Select Yes - To the license agreement
Select the Com Port to which the touch interface is connected and Next
Select Next, the driver will now start to install.
Select YES - To continue
Select Finish
Remove the CD.
Select YES to Restart.
When the system restarts touch each of the 3 targets as directed.
If the unit does not respond to your calibration touches then you have
probably selected the wrong COM port. If so, press the Esc key to exit.
Go to the ELO icon under Windows Control Panel.
Select the correct Com port, and restart the computer.
Once restarted, select the ELO icon under Windows Control Panel
Select Align and Calibrate; then touch each of the 3 targets as directed.
You are now ready to use your touch screen.
Note 1: The touch screen calibration information is maintained in the computer. If you
change computers, you will need to reinstall the touch screen driver software and
recalibrate.
Note 2: If for any reason the touch screen performance is unsatisfactory, you can
recalibrate at any time. This is done from the ELO icon under the Windows control panel
Touch Screen Driver Installation for Windows XP
Required items to know or have to install the Touch Driver.
What Operating System you are using.
Windows XP
What Serial Port you are connected to.
Usually COM 1 or COM 2
The type of touch screen.
Smartset
The CD-ROM or Floppy disk included with the system.
Touch Screen Driver Installation for Windows XP
Insert the provided CD
Select Link to XP driver
Select Open from the Windows dialog box.
Select Yes - To the license agreement
Select the Com Port to which the touch interface is connected and Next
Select Next, the driver will now start to install.
Select YES - To continue
Select Finish
Remove the CD
Select YES to Restart
Go to the ELO icon under Windows Control Panel.
Verify the Com Port is correct
Select Align; then touch each of the 3 targets as directed.
If the unit does not respond to your calibration touches then you have
probably selected the wrong COM port. If so, press the Esc key to exit.
Select the correct Com port, and restart the computer, then align the touchscreen.
You are now ready to use your touch screen.
Note 1: The touch screen calibration information is maintained in the computer. If you
change computers, you will need to reinstall the touch screen driver software and
recalibrate.
Note 2: If for any reason the touch screen performance is unsatisfactory, you can
recalibrate at any time. This is done from the ELO icon under the Windows control panel
5
Section
Mounting
Instructions
Panel Mounting Procedure
1. Cut and drill the panel (refer to Figure 2; Panel Mount Drawing Appendix D).
Measurements are in inches. A template of the hole pattern has been
supplied with your monitor to assist in making the mounting holes accurately.
Also, there is an AutoCad .dxf file included on the provided CD. This
computer file can be used in a design drawing or forwarded to your panel
fabricator for the proper mounting
2. If access to the side of the monitor is not available following installation,
attach the power and video cables to the side of the monitor at this time.
3. Install the monitor in the prepared cutout.
4. Install the washers and lock nuts supplied with the monitor.
Note: Use #10-32 nuts for mounting.
5. Tighten all mounting nuts evenly to a torque of 24 inch-pounds.
ATTENTION: Mounting nuts must be tightened to a torque of 24 inch-pounds to
provide panel seal and avoid potential damage. AutomationDirect.com
assumes no responsibility for water or chemical damage to the monitor or
other equipment within the enclosure due to improper installation.
6. Attach the power, video and touch screen cables (if this is a –TS unit) to the
side of the monitor.
Figure 2: Panel Mount Drawing
6
Section
No Picture
Troubleshooting
Tips
The signal cable should be properly connected to the
FPM-120(-TS) and computer.
Try disconnecting the video cable from the display and
connecting to another display if available to confirm the
presence of proper video.
Make sure power is connected to the proper AC source.
Make sure the resolution mode is supported by the display
and check display settings of the PC
Confirm that the video cable is not defective.
Image Persistence
Image persistence occurs when a ghost of an image remains
on the screen after the screen image has been changed.
Unlike a CRT monitor, an LCD monitor’s image persistence is
not permanent. To erase an image ghost, turn the monitor off
for several hours. What happens is the the liquid crystals
after extened periods of operation with take a “set”. To avoid
this condition, install a screen saver progam on the computer
Picture Quality & Image
Stability
Check for proper video cable for proper grounding and
shielding.
Check the signal source for proper signal.
Check for proper adjustment of the Phase and Frequency
controls.
Check for proper recommended signal timing.
Green LED not lit
Check for proper power and power connections
Display image is not
properly sized
Press the “Select” button to Auto Adjust the display
Adjust the Vertical and Horizontal size controls via the OSD.
(Reference setup adjustments)
Ensure that a supported mode is selected on the display card
or system being used. Consult the display card or system
manual for proper video.
Image will not adjust
Video timing outside of range.
Use the on-screen menu to adjust the Clock Setting.
Make sure timing is within VESA standard.
Slight distortion in text or
Graphics
Not working in native resolution.
Display is present but
“bars” Appear or roll
across screen
Ground loop problem between computer and display
Vertical shaded bars on
Screen image
Horizontal size not properly adjusted. Adjust horizontal size
Image is not stable.
Monitor has incorrect or bad sync signals..
Interference from adjacent equipment.
Check for proper video cable installation.
Replace suspected faulty cable.
Check to ensure that video source is within the display’s
operating range.
7
Section
Cleaning &
Maintenance
Cleaning
CAUTION: SHUT OFF YOUR TOUCH SCREEN BEFORE CLEANING!!
IF YOUR DISPLAY IS A –TS MODEL, THAT IS A TOUCH SCREEN DISPLAY,
THE SCREEN WILL BE ACTUATED BY CLEANING. PRESSING ON THE
SCREEN WHILE CLEANING WILL BE SEEN AS A TOUCH TO THE SYSTEM
WHICH COULD CREATE A POTENTIALLY DANGEROUS CONDITION!!
Occasionally clean the display panel and cabinet with a soft cloth dampened (not
soaked) with a mild (non-abrasive) glass cleaner. Keep turning a fresh side of the
cloth toward the screen surface to avoid scratching it with accumulated grit.
Note: The solvent should be applied only to the cloth, and not directly on the
monitor screen.
Do not use paper products as they may scratch the surface. To minimize the risk
of abrasion, allow the screen to air dry. Special care should be taken when
cleaning a touch screen or polycarbonate shield that is installed over the screen.
Abrasive and certain chemical cleaners can damage the surface.
Never use alcoholic or ammoniac cleaners to clean the polycarbonate shield or a
touch screen.
Replacing a Line Cord
To avoid shock and fire hazards, the monitor’s power cord should be replaced if
the insulation becomes broken or if it develops a loose internal connection.
Other Maintenance
Qualified service personnel should perform all maintenance, except for
the power cord replacement described above.
8
Appendices
Section
Appendix A – Video Pin Assignments
Pin assignments for the HD15 video connector
Pin 1
Pin 2
Pin 3
Pin 4
Pin 5
Pin 6
Pin 7
Pin 8
Red Video
Green Video
Blue Video
Not Used
Return
Red Video Ground
Green Video Ground
Blue Video Ground
Pin 9
Pin 10
Pin 11
Pin 12
Pin 13
Pin 14
Pin 15
No Connection
Sync Ground
Not Used
Bi-Directional Data
Horizontal Sync
Vertical Sync
Data Clock (SCL)
Appendix B – RS-232 Pin Assignments
Pin assignment for 9 Pin Optional Touch Screen Connector
Pin 1
Pin 2
Pin 3
Pin 4
Pin 5
Pin 6
Pin 7
Pin 8
Pin 9
DCD
RD (Rx)
SD (Tx)
DTR
SG
DSR
RTS
CTS
NC
Data Carrier Detect
Receive Data
Transmit Data
Data Terminal Ready
Signal Ground
Data Set Ready
Request to Send
Clear to Send
No Connection
Appendix C –General Specifications
FPM-120 & FPM-120-TS
Active Screen Area
Brightness
Contrast
Lamp Life
Max Screen Resolution
Native Resolution (Best Picture)
View Angle L / R
View Angle Up / Dn
Power Req.
Current Draw
Installed Depth
Chassis Construction
Bezel Construction
Bezel OD
Bezel Finish
Auto Adjust
5 Wire Touch
Recessed Cable Exit
Video Interface
Colors
Operating Temp
Storage Temp
Storage Humidity
NEMA Front End
Input power
9.69" x 7.25"
300
200:1
50K
VGA-SVGA
SVGA
55/55
40/45
90-264 VAC Auto-switching
.15 / 120 VAC
2.38"
16 Ga SS
Al Machined .250"
15" x 12.5"
Black Textured
Yes
Yes
Yes
VGA (HD-15F)
256,000
0-50
0-60
10-95
4/12
20W
Appendix D – Mounting Dimentions
NOTES
Model Number: _________________
Serial Number: _________________
FPM-150
FPM-150-TS
LCD Monitor User Guide
Revised 12/02
FPM-150 & FPM-TS
Table Of Contents
Section 1 Introduction
About LCD Monitors
Product Safety Precautions
Section 2 Display Setup
Included Parts
Connecting Your Display
Section 3 Getting Started
Display Features
Getting Started
Adjusting the Display
Using the Auto-Adjust
OSD (On Screen Display) Adjustments
Section 4 Touch Screen Set up
Introduction to Touch Screens
Touch Screen Driver Installation
Windows 98
Windows NT 4.0
Windows 2000
Windows XP
Section 5 Mounting Instructions
Section 6 Trouble Shooting Tips
Section 7 Cleaning and Maintenance
Section 8 Appendices
A-VGA Pin Assignment
B-RS-232 Pin Assignment
C-General Specifications
D-Mounting Dimensions
1
Section
LCD
Introduction
About LCD Monitors
What you gain by using an LCD monitor for your industrial display is the future of display
technology. CRTs although they have dropped in cost significantly, do not offer the
performance, reliability, and mounting options available with LCDs. LCD monitors consist
primarily of an LCD, video board and a backlight. The LCD determines to a large extent the
viewing angle, brightness and contrast. Beyond that it is the function of the video board,
which converts the analog RGB (Red, Green, Blue) signals from a standard video card to a
high quality, digital RGB that the LCD can display.
LCD monitors can can be set for one or more of the following resolutions:
VGA: 640 x480
SVGA: 800x600
XGA 1024 x 768
SXGA 1280 x1024
UXGA 1600x 1200
Note: The VGA acronym stands for Video Graphics Adapter. It is used to describe both the
most common type of display interface used by PC’s and lowest resolution setting for this
interface. Originally only the VGA [640x480] resolution was available on a VGA interface.
Today all of the above interfaces are available on a VGA interface, but not all monitors
support all resolutions. . The native resolution of the LCD is normally the maxium resolution
that the LCD can display, and is the resolution that the LCD will exhibit the best display
charastics Check the monitor specifications (Appendix C) for the resolutions supported by this
monitor.
Recently the video card has taken on a new role. It is the responsibility of this device to
"scale" a particular video resolution to the "native" resolution of the LCD. This enables a
computer set to output a VGA [640x480] resolution signal to be properly displayed on an
XGA [1024x768] LCD screen. Without the scaling engine, the displayed picture would be in
the center 1/3 of the LCD. The scaling engine mathematically converts the 640x480 to
1024x768. This my sound simple but it is in fact a complex algorithm that adjusts for different
aspect ratios and pixel alignment, essentially smoothing text and graphics to produce a
picture that is pleasant to the eye.
All Automationdirect.com displays from 12.1" (800x600) to 18.1” (1280x1024) incorporate
scaling engines in the converter card.
Safety Precautions
CAUTION: SHUT OFF YOUR TOUCH SCREEN BEFORE CLEANING!!
IF YOUR DISPLAY IS A –TS MODEL, THAT IS A TOUCH SCREEN DISPLAY,
THE SCREEN WILL BE ACTUATED BY CLEANING. PRESSING ON THE
SCREEN WHILE CLEANING WILL BE SEEN AS A TOUCH TO THE SYSTEM
WHICH COULD CREATE A POTENTIALLY DANGEROUS CONDITION!!
Do not attempt to service this display yourself. The rear chassis has a seal so
that non qualified personal will not expose themselves to dangerous voltages or
other risks.
To protect from electrical shock, unplug the display power supply from the wall
before moving.
Do not use this display near water
Do not place any heavy objects on the power cords. Damage may cause
electrical shock.
Unplug the power supply from the wall or unit if one of the following conditions
exists.
o Power cord or plug is damaged or frayed
o Liquid is spilled into the display or the display is exposed to rain or water.
o The display does not operate normally when the operating instructions
are followed.
o The display has been dropped or the enclosure has been damaged.
o The display exhibits a distinct change in performance, indicating a need
for service.
Ensure that sufficient space is available around the display to provide air
circulation for cooling.
Ensure that the ambient air temperature will not exceed the specified maximum
temperature.
Do not expose the display to direct sunlight or heat.
2
Section
Display
Setup
Your LCD monitor package will consist of the primary components listed below.
Open shipping container and lay all components on a flat clean surface.
FPM-150(-TS) LCD Monitor
6 ft Video Cable
6 Ft AC Power Cable
6 ft RS232 Touch Interface Cable ( touch screen units only)
10-32 Mounting Hardware. (For use with Panel Mount)
Documentation and Driver CD ROM
Connecting Your Display
1. Connect all cables to the computer first. This includes the VGA cable, and if the unit
has a touch screen, the RS 232 serial touch screen connection.
2. After connecting the cables between the LCD monitor and the computer, plug
supplied AC power cord into a suitable AC outlet then into the LCD.
3. Power on the display. The On/Off switch is located where the AC power cord enters
the unit
4. If your computer is off, turn on your computer.
5. Your display should now operate as a normal computer display, displaying the
computers BIOS screens and booting into Windows or other operating system.
Note: If for any reason the display goes blank and/or displays “out of Range” or “No
Input Signal” message on the screen, your computer or video source may be putting out
a signal that is incompatible with the FPM-150(-TS). If this happens, reboot the computer
with the previous display and adjust the display settings to be within the FPM-150(-TS)
specifications (see Appendix C). Below is are the most common reasons a display may
not operate correctly:
1. The resolution is to high or low for the LCD.
2. The refresh rate is set to high. Refresh on an LCD is different than a CRT. Set the
refresh to 60Hz. CRT’s need a high refresh rate to avoid flicker. The refresh rate has
no impact on an LCD.
3. The power source is incorrect, or there is no power. Check if the rear LED is ON or
blinking. If the LED is not lit, check to be sure there is power to the unit.
The unit is malfunctioning. If you believe this to be true, disconnect the video cable from
the rear of the LCD and connect to a known good display. If the computer display is
working satisfactory and the video is within the appropriate range, then contact
AutomationDirect.com technical support
3
Section
Getting
Started
Display Features
The FPM-150(-TS) is capable of displaying 16M (24 Bit) colors in a continuous
spectrum. The high contrast LCD enhances the image with no geometric distortion.
FPM-150(-TS) Series directly accepts an analog 3,4, or 5 wire RGB with separate
H/V, composit, or sync on green. This is the standard PC video signal.
The FPM-150(-TS) Series is auto synchronous adjusting the display to the
appropriate input between VGA and SXGA (Note: XGA is the displays native mode,
SXGA is interpolated).
The FPM-150(-TS) Series is supplied with a Anti-Glare Touch Screeen [TS models]
or an Anti-Glare impact window on non touch screen models.
The FPM-150(-TS) Series has an integrated 115/220VAC power supply as standard
on all models.
Adjusting the Display
The FPM-150 (-TS) Series display has an embedded microprocessor in the converter
card [this is the electronics that drives the LCD], and has been recently updated with a
more powerful chip set. In most cases the unit will require very little if any user
intervention to operate correctly. That is, produce a sharp stable picture.
The micoprocessor in the display has the capability to adjust itself to the computer to
which it is attached. This autoadjustment will take place when the unit is first installed
and connected to a computer and there after, if the video input changes, or is user
initated. If the picture is not satisfactory, the first step is to allow the unit to attempt to readjust itself to your computer.
Located on the rear of the unit is a membrane keypad used for adjusting the display.
See figure 1 below:
Figure 1
Menu
Select
Using the Auto-Adjust
The FPM-150(-TS) will attempt to adjust itself to your computers current video model. If
the picture is stable, and centered vertically and horizontally the automatic adjustment is
complete. If however the picture is not stable, and centered vertically and horizontally
you can re-initate the auto-adjustment. Once you have the unit displaying the resolution
you desire for your application do the following:
Press and release the “Select” button on the membrane. This will place the unit into a
“Geometry Auto Adjust” mode. This operation will adjust the picture so it is centered both
vertically and horizontally on the LCD screen. It will also make the necessary
adjustments to the internal clock timing so that the picture is stable (without any
decernable pixel jitter).
After having completed this step you may wish to adjust the color balance. This
procedure adjusts for any imbalance in the Red, Green, and Blue levels from the video
cable or video card. This is accomplished using the LCDs OSD ( On Screen Menu)
system.
OSD (On Screen Display) Adjustments
There are four membrane buttons (see Fig 1, above) located on the rear of the unit.
They will activate the OSD and allow navigation to all adjustments if your unit requires
adjustment.
Press MENU key,OSD screen appears. [See Figure 2]
Press UP/DOWN key, you can move between the five primary functions:
Press Select key at Picture group to highlight this sub menu. You can now navigate the sub menu
using the UP/DOWN keys. To make an adjustment to an item press Select and use the
UP/DOWN buttons to make your adjustments
At anytime, press the Menu button Two times to Exit and Save your settings.
This convention of Menu, Navigate, Select Sub Menu, Navigate, Select Item and adjust is used
throughout the OSD screen process.
Press MENU key to return previous state and press MENU key twice to exit OSD.
PICTURE
Press MENU key to bring up the OSD. Press UP/DOWN key, to move between the 5 primary
screen functions. Press the Select button at Picture, to select it. Press the UP/DOWN key, you
can now move between functions and press Select to adjust the value of each item with the
UP/DOWN key. Press MENU key to return previous state and press MENU key twice to exit
OSD.
BRIGHTNESS Function of adjusting main screen brightness.
CONTRAST
Function of adjusting main screen contrast.
FREQUENCY Function of adjusting main screen sampling clock frequency.
PHASE
Function of adjusting main screen sampling clock phase.
H POSITION Function of adjusting the horizontal position of main screen .
V POSITION Function of adjusting the vertical position of main screen .
ADVANCED
Press MENU key to bring up the OSD. Press UP/DOWN key, to move between the 5 primary
screen functions. Press the Select button at Advanced, to select it. Press the UP/DOWN key, you
can now move between functions and press Select to adjust the value of each item with the
UP/DOWN key. Press MENU key to return previous state and press MENU key twice to exit
OSD.
Color Temp
Function of setup of main color. (Bluish, Normal, Reddish)
User RED
Function of adjusting value of RED.
User BLUE
Function of adjusting value of BLUE.
User GREEN Function of adjusting value of GREEN.
Gamma
Function of adjusting value of color ratio.
COLOR WARP
Press MENU key to bring up the OSD. Press UP/DOWN key, to move between the 5 primary
screen functions. Press the Select button at Color Warp, to select it. Press the UP/DOWN key,
you can now move between functions and press Select to adjust the value of each item with the
UP/DOWN key. Press MENU key to return previous state and press MENU key twice to exit OSD
Color Warp
Function of adjusting curve on main screen.
Mode
Function of selecting curve on main screen.
Custom Center Function of adjusting color warp on center.
Custom range Function of adjusting range on color warp.
Saturation
Function of adjusting saturation warp on center.
Custom hue
Function of adjusting the tone of color.
OPTIONS
Press MENU key to bring up the OSD. Press UP/DOWN key, to move between the 5 primary
screen functions. Press the Select button at Options, to select it. Press the UP/DOWN key, you
can now move between functions and press Select to adjust the value of each item with the
UP/DOWN key. Press MENU key to return previous state and press MENU key twice to exit OSD
Osd V Pos
Function of adjusting the vertical position of OSD image .
Osd H Pos
Function of adjusting the horizontal position of OSD image.
Osd
Function of moving OSD image quickly.
UTILITIES
Press MENU key to bring up the OSD. Press UP/DOWN key, to move between the 5 primary
screen functions. Press the Select button at Utilities, to select it. Press the UP/DOWN key, you
can now move between functions and press Select to adjust the value of each item with the
UP/DOWN key. Press MENU key to return previous state and press MENU key twice to exit OSD
OSD Timeout Function of adjusting OSD disappear time .
OSD Bkground Function of adjusting at transparancy on main screen to osd image.
Auto Adjust
Function of finding optimized main screen automatically.
Factory Reset Function of resetting all value on OSD.
Power On Time Function of indicating system on time.
Bklight OnTime Function of indicating panel on time.
4
Section
Touch Screen
Setup
Introduction to Touch Screens
Touch screen interfaces have become the standard interface in the past 5 years. They
are, rugged, reliable, extremely flexible and easier than ever to implement! The universal
acceptance of the Windows GUI [Graphical User Interface] along with the extensive use
of a mouse interface has significantly accelerated the use of a touch interface. Basically
think of your touch screen as if it were a mouse.
AutomationDirect.com touch systems are mouse emulators. By installing a software
driver and connecting to a serial port, the touch screen will support all the primary mouse
functions:
The FPM-150(-TS) touch screen interface, is a high resolution, analog resistive.
Following is a quick explanation of what all this means.
High Resolution: The touch screen resolution is 400 ppi [points per inch]
Analog Resistive: The actual touch glass is an analog device. Meaning there is a very
low voltage applied to the X and Y axis of the touch screen. This current is applied to
ITO [Iridium Tin Oxide] that is sputtered onto a polyester membrane. When you touch
the screen you are changing the resistance on both the X and Y axis, producing an
analog value that references a particular location.
This type of screen can be activated with a gloved finger or mechanical stylus.
The touch screen itself is connected to electronics [internal to the display unit] that
provide the Analog to Digital conversion. When the screen is touched, the electronics
convert the analog voltage to a digital value and add a "Mouse Click". This touch data is
sent out from the display serial port to the PC serial port where the touch driver presents
the data to the operating systems as if it were from a normal PC mouse. When the touch
is released the new XY location is sent along with a "Mouse Up Click".
The touch screen interface to the PC is RS-232, so the recommend maximum distance
from the PC is 50 feet., The driver and and interface have been tested to 50 Ft. using
high quality cables. High quaility cables and connectors are important, especially if field
connections are made. Poor quality cables will drastically reduce the performance of the
RS-232 interface. The touch driver default baud rate is 9600.
Touch Screen Setup and Configuration:
If the unit does not have a touch screen, your configuration is complete. If your display
is fitted with the optional touch screen interface, the following section will outline
installation and set up. This system requires no special software knowledge, and can be
installed and set up in minutes. The following section gives a detailed explanation of the
software setup and configuration
Touch Screen Driver Installation for Windows 98
Required items to know or have to install the Touch Driver.
What Operating System you are using. Windows 98
What Serial Port you are connected to. Usually COM 1 or COM 2
The type of touch screen.
Smartset
The CD-ROM or Floppy disk included with the system.
Touch Screen Driver Installation for Windows 98
Insert the provided CD
Select Link to the Windows 98 driver
Select Open from the Windows dialog box.
Select SmartSet Controller for Com1 or Com2
Remove the CD.
Restart the computer; you will be prompted to calibrate the touch screen.
Touch each of the 3 targets as directed. If the unit does not respond to
your calibration touches then you have probably selected the wrong
COM port. If so, reinstall the driver and selecting the correct COM port.
You are now ready to use your touch screen.
Note 1: The touch screen calibration information is maintained in the computer. If you
change computers, you will need to reinstall the touch screen driver software and
recalibrate.
Note 2: If for any reason the touch screen performance is unsatisfactory, you can
recalibrate at any time. This is done from the ELO icon under the Windows control panel
Touch Screen Driver Installation for Windows NT 4.0
Required items to know or have to install the Touch Driver.
What Operating System you are using. Windows NT 4.0
What Serial Port you are connected to. Usually COM 1 or COM 2
The type of touch screen.
Smartset
The CD-ROM or Floppy disk included with the system.
Touch Screen Driver Installation for Windows NT 4.0
Insert the provided CD
Select Link to the Windows NT driver
Select Open from the Windows dialog box.
Select Next
Select Yes - To the license agreement
Select Next - To the default installation folder
Select Next - For Single Monitor installation
Select the Com Port to which the touch interface is connected and Next
Select Finish
Remove the CD.
Restart the computer. You will be prompted to calibrate the touch screen.
Touch each of the 3 targets as directed. If the unit does not respond to
your calibration touches then you have probably selected the wrong
COM port. If so, press the Esc key on the keyboard to exit.
Go to the ELO icon under Windows Control Panel.
Select the correct Com Port, and Restart the computer.
If this fails, reinstall the driver and select the correct COM port
Once restarted, select the ELO icon under Windows Control Panel
Select Calibrate, and then touch each of the 3 targets as they are
displayed.
You are now ready to use your touch screen.
Note 1: The touch screen calibration information is maintained in the computer. If you
change computers, you will need to reinstall the touch screen driver software and
recalibrate.
Note 2: If for any reason the touch screen performance is unsatisfactory, you can
recalibrate at any time. This is done from the ELO icon under the Windows control panel
Touch Screen Driver Installation for Windows 2000
Required items to know or have to install the Touch Driver.
What Operating System you are using. Windows 2000
What Serial Port you are connected to. Usually COM 1 or COM 2
The type of touch screen.
Smartset
The CD-ROM or Floppy disk included with the system.
Touch Screen Driver Installation for Windows 2000
Insert the provided CD
Select Link to Windows 2000 driver
Select Open from the Windows dialog box.
Select Next
Select Yes - To the license agreement
Select the Com Port to which the touch interface is connected and Next
Select Next, the driver will now start to install.
Select YES - To continue
Select Finish
Remove the CD.
Select YES to Restart.
When the system restarts touch each of the 3 targets as directed.
If the unit does not respond to your calibration touches then you have
probably selected the wrong COM port. If so, press the Esc key to exit.
Go to the ELO icon under Windows Control Panel.
Select the correct Com port, and restart the computer.
Once restarted, select the ELO icon under Windows Control Panel
Select Align and Calibrate; then touch each of the 3 targets as directed.
You are now ready to use your touch screen.
Note 1: The touch screen calibration information is maintained in the computer. If you
change computers, you will need to reinstall the touch screen driver software and
recalibrate.
Note 2: If for any reason the touch screen performance is unsatisfactory, you can
recalibrate at any time. This is done from the ELO icon under the Windows control panel
Touch Screen Driver Installation for Windows XP
Required items to know or have to install the Touch Driver.
What Operating System you are using.
Windows XP
What Serial Port you are connected to.
Usually COM 1 or COM 2
The type of touch screen.
Smartset
The CD-ROM or Floppy disk included with the system.
Touch Screen Driver Installation for Windows XP
Insert the provided CD
Select Link to XP driver
Select Open from the Windows dialog box.
Select Yes - To the license agreement
Select the Com Port to which the touch interface is connected and Next
Select Next, the driver will now start to install.
Select YES - To continue
Select Finish
Remove the CD
Select YES to Restart
Go to the ELO icon under Windows Control Panel.
Verify the Com Port is correct
Select Align; then touch each of the 3 targets as directed.
If the unit does not respond to your calibration touches then you have
probably selected the wrong COM port. If so, press the Esc key to exit.
Select the correct Com port, and restart the computer, then align the touchscreen.
You are now ready to use your touch screen.
Note 1: The touch screen calibration information is maintained in the computer. If you
change computers, you will need to reinstall the touch screen driver software and
recalibrate.
Note 2: If for any reason the touch screen performance is unsatisfactory, you can
recalibrate at any time. This is done from the ELO icon under the Windows control panel
5
Section
Mounting
Instructions
Panel Mounting Procedure
1. Cut and drill the panel (refer to Figure 2; Panel Mount Drawing).
Measurements are in inches. A template of the hole pattern has been
supplied with your monitor to assist in making the mounting holes accurately.
Also, there is an AutoCad .dxf file included on the provided CD. This
computer file can be used in a design drawing or forwarded to your panel
fabricator for the proper mounting
2. If access to the side of the monitor is not available following installation,
attach the power and video cables to the side of the monitor at this time.
3. Install the monitor in the prepared cutout.
4. Install the washers and lock nuts supplied with the monitor.
Note: Use #10-32 nuts for mounting.
5. Tighten all mounting nuts evenly to a torque of 24 inch-pounds.
ATTENTION: Mounting nuts must be tightened to a torque of 24 inch-pounds to
provide panel seal and avoid potential damage. AutomationDirect.com
assumes no responsibility for water or chemical damage to the monitor or
other equipment within the enclosure due to improper installation.
6. Attach the power, video and touch screen cables (if this is a –TS unit) to the
side of the monitor.
Figure 2: Panel Mount Drawing
6
Section
No Picture
Troubleshooting
Tips
Check that the signal cable is properly connected to the
display.
Try disconnecting the video cable from the display and
connecting to another display if available to confirm the
presence of proper video.
Make sure power is connected to the proper AC source.
Make sure the resolution mode is supported by the display
and check display settings of the PC
Confirm that the video cable is not defective.
Image Persistence
Image persistence occurs when a ghost of an image remains
on the screen after the screen image has been changed.
Unlike a CRT monitor, an LCD monitor’s image persistence is
not permanent. To erase an image ghost, turn the monitor off
for several hours. What happens is the the liquid crystals
after extened periods of operation with take a “set”. To avoid
this condition, install a screen saver progam on the computer
Picture Quality & Image
Stability
Check for proper video cable for proper grounding and
shielding.
Check the signal source for proper signal.
Check for proper adjustment of the Phase and Frequency
controls.
Check for proper recommended signal timing.
Green LED not lit
Check for proper power and power connections
Display image is not
properly sized
Press the “Select” button to Auto Adjust the display
Adjust the Vertical and Horizontal size controls via the OSD.
(Reference setup adjustments)
Ensure that a supported mode is selected on the display card
or system being used. Consult the display card or system
manual for proper video.
Image will not adjust
Video timing outside of range.
Use the on-screen menu to adjust the Clock Setting.
Make sure timing is within VESA standard.
Slight distortion in text or
Graphics
Not working in native resolution.
Display is present but
“bars” Appear or roll
across screen
Ground loop problem between computer and display
Vertical shaded bars on
Screen image
Horizontal size not properly adjusted. Adjust horizontal size
Image is not stable.
Monitor has incorrect or bad sync signals..
Interference from adjacent equipment.
Check for proper video cable installation.
Replace suspected faulty cable.
Check to ensure that video source is within the display’s
operating range.
7
Section
Cleaning &
Maintenance
Cleaning
CAUTION: SHUT OFF YOUR TOUCH SCREEN BEFORE CLEANING!!
IF YOUR DISPLAY IS A –TS MODEL, THAT IS A TOUCH SCREEN DISPLAY,
THE SCREEN WILL BE ACTUATED BY CLEANING. PRESSING ON THE
SCREEN WHILE CLEANING WILL BE SEEN AS A TOUCH TO THE SYSTEM
WHICH COULD CREATE A POTENTIALLY DANGEROUS CONDITION!!
Occasionally clean the display panel and cabinet with a soft cloth dampened (not
soaked) with a mild (non-abrasive) glass cleaner. Keep turning a fresh side of the
cloth toward the screen surface to avoid scratching it with accumulated grit.
Note: The solvent should be applied only to the cloth, and not directly on the
monitor screen.
Do not use paper products as they may scratch the surface. To minimize the risk
of abrasion, allow the screen to air dry. Special care should be taken when
cleaning a touch screen or polycarbonate shield that is installed over the screen.
Abrasive and certain chemical cleaners can damage the surface.
Never use alcoholic or ammoniac cleaners to clean the polycarbonate shield or a
touch screen.
Replacing a Line Cord
To avoid shock and fire hazards, the monitor’s power cord should be replaced if
the insulation becomes broken or if it develops a loose internal connection.
Other Maintenance
Qualified service personnel should perform all maintenance, except for
the power cord replacement described above.
8
Appendices
Section
Appendix A – Video Pin Assignments
Pin assignments for the HD15 video connector
Pin 1
Pin 2
Pin 3
Pin 4
Pin 5
Pin 6
Pin 7
Pin 8
Red Video
Green Video
Blue Video
Not Used
Return
Red Video Ground
Green Video Ground
Blue Video Ground
Pin 9
Pin 10
Pin 11
Pin 12
Pin 13
Pin 14
Pin 15
No Connection
Sync Ground
Not Used
Bi-Directional Data
Horizontal Sync
Vertical Sync
Data Clock (SCL)
Appendix B – RS-232 Pin Assignments
Pin assignment for 9 Pin Optional Touch Screen Connector
Pin 1
Pin 2
Pin 3
Pin 4
Pin 5
Pin 6
Pin 7
Pin 8
Pin 9
DCD
RD (Rx)
SD (Tx)
DTR
SB
DSR
RTS
CTS
NC
Data Carrier Detect
Receive Data
Transmit Data
Data Terminal Ready
Signal Ground
Data Set Ready
Request to Send
Clear to Send
No Connection
Appendix C –General Specifications
FPM-150 & FPM-150-TS
Bold - Indicates Up Dated Specification
Active Screen Area
Brightness
Contrast
Lamp Life
Screen Resolutions
Native Resolution (Best Picture)
View Angle L / R
View Angle Up / Dn
Input Voltage
Input power
Current Draw
Installed Depth
Chassis Construction
Bezel Construction
Bezel OD
Bezel Finish
Auto Adjust
5 Wire Touch
Recessed Cable Exit
Video Interface
Colors
Operating Temp
Storage Temp
Storage Humidity
NEMA Front End
14.14" x 11.31"
450 Nit
300:1
35K
VGA-SXGA
SXGA
70 / 70
55 / 65
90-264 VAC Auto-switching
25W
.20 /120VAC
2.68”
16 Ga SS
Al Machined .250"
17.56”x14.56”
Black Textured
Yes
Yes
Yes
VGA (HD-15F)
24bit (16M)
0-50
0-60
10-95
4/12
Appendix D – Mounting Dimentions
NOTES
Model Number: _________________
Serial Number: _________________
FPM-170
FPM-170-TS
LCD Monitor User Guide
Revised 12/02
FPM-170 & FPM-170-TS
Table Of Contents
Section 1 Introduction
About LCD Monitors
Product Safety Precautions
Section 2 Display Setup
Included Parts
Connecting Your Display
Section 3 Getting Started
Display Features
Getting Started
Adjusting the Display
Using the Auto-Adjust
OSD (On Screen Display) Adjustments
Section 4 Touch Screen Set up
Introduction to Touch Screens
Touch Screen Driver Installation
Windows 98
Windows NT 4.0
Windows 2000
Windows XP
Section 5 Mounting Instructions
Section 6 Trouble Shooting Tips
Section 7 Cleaning and Maintenance
Section 8 Appendices
A-VGA Pin Assignment
B-RS-232 Pin Assignment
C-DVI [Digital video Interface] Pin Assignments
D-S-Video
E-NTSC
F-General Specifications
G-Mounting Dimensions
1
Section
LCD
Introduction
About LCD Monitors
What you gain by using an LCD monitor for your industrial display is the future of display
technology. CRTs although they have dropped in cost significantly, do not offer the
performance, reliability, and mounting options available with LCDs. LCD monitors consist
primarily of an LCD, video board and a backlight. The LCD determines to a large extent the
viewing angle, brightness and contrast. Beyond that it is the function of the video board,
which converts the analog RGB (Red, Green, Blue) signals from a standard video card to a
high quality, digital RGB that the LCD can display.
LCD monitors can can be set for one or more of the following resolutions:
VGA: 640 x480
SVGA: 800x600
XGA 1024 x 768
SXGA 1280 x1024
UXGA 1600x 1200
Note: The VGA acronym stands for Video Graphics Adapter. It is used to describe both the
most common type of display interface used by PC’s and lowest resolution setting for this
interface. Originally only the VGA [640x480] resolution was available on a VGA interface.
Today all of the above interfaces are available on a VGA interface, but not all monitors
support all resolutions. . The native resolution of the LCD is normally the maxium resolution
that the LCD can display, and is the resolution that the LCD will exhibit the best display
charastics Check the monitor specifications (Appendix F) for the resolutions supported by this
monitor.
Recently the video card has taken on a new role. It is the responsibility of this device to
"scale" a particular video resolution to the "native" resolution of the LCD. This enables a
computer set to output a VGA [640x480] resolution signal to be properly displayed on an
XGA [1024x768] LCD screen. Without the scaling engine, the displayed picture would be in
the center 1/3 of the LCD. The scaling engine mathematically converts the 640x480 to
1024x768. This my sound simple but it is in fact a complex algorithm that adjusts for different
aspect ratios and pixel alignment, essentially smoothing text and graphics to produce a
picture that is pleasant to the eye.
All Automationdirect.com displays from 12.1" (800x600) to 18.1” (1280x1024) incorporate
scaling engines in the converter card.
Safety Precautions
CAUTION: SHUT OFF YOUR TOUCH SCREEN BEFORE CLEANING!!
IF YOUR DISPLAY IS A –TS MODEL, THAT IS A TOUCH SCREEN DISPLAY,
THE SCREEN WILL BE ACTUATED BY CLEANING. PRESSING ON THE
SCREEN WHILE CLEANING WILL BE SEEN AS A TOUCH TO THE SYSTEM
WHICH COULD CREATE A POTENTIALLY DANGEROUS CONDITION!!
Do not attempt to service this display yourself. The rear chassis has a seal so
that non qualified personal will not expose themselves to dangerous voltages or
other risks.
To protect from electrical shock, unplug the display power supply from the wall
before moving.
Do not use this display near water
Do not place any heavy objects on the power cords. Damage may cause
electrical shock.
Unplug the power supply from the wall or unit if one of the following conditions
exists.
o Power cord or plug is damaged or frayed
o Liquid is spilled into the display or the display is exposed to rain or water.
o The display does not operate normally when the operating instructions
are followed.
o The display has been dropped or the enclosure has been damaged.
o The display exhibits a distinct change in performance, indicating a need
for service.
Ensure that sufficient space is available around the display to provide air
circulation for cooling.
Ensure that the ambient air temperature will not exceed the specified maximum
temperature.
Do not expose the display to direct sunlight or heat.
2
Section
Display
Setup
Included Parts
Your LCD monitor package will consist of the primary components listed below.
Open shipping container and lay all components on a flat clean surface.
FPM-170(-TS) LCD Monitor
6 ft Video Cable
6 Ft AC Power Cable
6 ft RS232 Touch Interface Cable ( touch screen units only)
10-32 Mounting Hardware. (For use with Panel Mount)
Documentation and Driver CD ROM
Connecting Your Display
1. Connect all cables to the computer first. This includes the VGA cable, and if the unit
has a touch screen, the RS 232 serial touch screen connection.
2. After connecting the cables between the LCD monitor and the computer, plug
supplied AC power cord into a suitable AC outlet then into the LCD.
3. Power on the display. The On/Off switch is located where the AC power cord enters
the unit
4. If your computer is off, turn on your computer.
5. Your display should now operate as a normal computer display, displaying the
computers BIOS screens and booting into Windows or other operating system.
Note: If for any reason the display goes blank and/or displays “out of Range” or “No
Input Signal” message on the screen, your computer or video source may be putting out
a signal that is incompatible with the FPM-170(-TS). If this happens, reboot the computer
with the previous display and adjust the display settings to be within the FPM-170(-TS)
specifications (see Appendix F). Below is are the most common reasons a display may
not operate correctly:
1. The resolution is to high or low for the LCD.
2. The refresh rate is set to high. Refresh on an LCD is different than a CRT. Set the
refresh to 60Hz. CRT’s need a high refresh rate to avoid flicker. The refresh rate has
no impact on an LCD.
3. The power source is incorrect, or there is no power. Check if the rear LED is ON or
blinking. If the LED is not lit, check to be sure there is power to the unit.
4. The unit is malfunctioning. If you believe this to be true, disconnect the video cable
from the rear of the LCD and connect to a known good display. If the computer
display is working satisfactory and the video is within the appropriate range, then
contact AutomationDirect.com technical support.
3
Section
Getting
Started
Display Features
The FPM-170(-TS) is capable of displaying 16M (24 Bit) colors in a continuous
spectrum. The high contrast LCD enhances the image with no geometric distortion.
FPM-170(-TS) Series directly accepts an analog 5 wire RGB with separate H/V
(Horizontal / Vertical) sync. This is the standard PC video signal.The FPM-170(-TS)
Series is auto synchronous, adjusting the display to the appropriate input between
VGA and SXGA.
The FPM-170(-TS) Series is supplied with a Anti-Glare Touch Screeen [TS models]
or an Anti-Glare impact window on non touch screen models.
The FPM-170(-TS) Series has an integrated 115/220VAC power supply as standard
on all models.
Adjusting the Display
The FPM-170(-TS) Series display has an embedded microprocessor on the converter
card [the electronics that drive the LCD], and has been recently updated with a more
powerful chip set. In most cases the unit will require very little if any user intervention to
operate correctly. That is, produce a sharp, stable picture.
The micoprocessor in the display has the capability to adjust itself to the computer to
which it is attached. This auto-adjustment will take place when the unit is first installed
and connected to a computer, if the video input changes, or the user initates it. If the
picture is not satisfactory, the first step is to allow the unit to attempt to re-adjust itself to
your computer.
Located on the rear of the unit is a membrane keypad used for adjusting the display.
See figure 1 below:
Menu
Select
Down
Up
Figure 1
Source
Using the Auto-Adjust
The FPM-170(-TS) will attempt to adjust itself to your computers current video model. If
the picture is stable, and centered vertically and horizontally the auto-adjustment is
complete. If however the picture is not stable, and centered vertically and horizontally
you can re-initate the auto adjustment. Once you have the unit displaying the resolution
you desire for your application, do the following:
Press HOLD and release the “Select” button on the membrane. This will place the unit
into a “Geometry Auto Adjust” mode. This operation will adjust the picture so it is
centered both vertically and horizontally on the LCD screen. It will also make the
necessary adjustments to the internal clock timing so that the picture is stable (without
any decernable pixel jitter).
After having completed this step you may wish to adjust the color balance. This
procedure adjusts for any imbalance in the Red, Green, and Blue levels from the video
cable or video card. This is accomplished using the LCDs OSD ( On Screen Menu)
system.
OSD (On Screen Display) Adjustments
There are four membrane buttons (see Fig 1, above) located on the rear of the unit.
They will activate the OSD and allow navigation to all adjustments the unit may require.
Press MENU key, OSD screen appears. [See Figure 2]
Press the UP/DOWN key to move between the five primary functions. (Indicated by highlighting)
Press the Select key when highlighting the Picture group to activate this sub-menu. You can now
navigate the sub-menu using the UP/DOWN keys. To make an adjustment to an item use the
buttons to make your adjustments
At anytime, press the Menu button two times to Exit and Save your settings.
This convention of Menu, Navigate, Select Sub Menu, Navigate, Select Item and Adjust item is
used throughout the OSD screen set up.
Press MENU key to return previous state and press MENU key twice to exit OSD.
PICTURE
Press MENU key to bring up the OSD. Press UP/DOWN key to move between the 5 primary
screen functions. Press the Select button at Picture, to select it. Press the UP/DOWN key, you
can now move between functions and press Select to adjust the value of each item with the
key. Press MENU key to return previous state and press MENU key twice to exit OSD.
BRIGHTNESS Function of adjusting main screen brightness.
CONTRAST
Function of adjusting main screen contrast.
FREQUENCY Function of adjusting main screen sampling clock frequency.
PHASE
Function of adjusting main screen sampling clock phase.
H POSITION Function of adjusting the horizontal position of main screen.
V POSITION Function of adjusting the vertical position of main screen.
ADVANCED
Press MENU key to bring up the OSD. Press UP/DOWN key, to move between the 5 primary
screen functions. Press the Select button at Advanced, to select it. Press the UP/DOWN key, you
can now move between functions and press Select to adjust the value of each item with the
key. Press MENU key to return previous state and press MENU key twice to exit OSD.
Color Temp
Function of setup of main color. (Bluish, Normal, Reddish)
User RED
Function of adjusting value of RED.
User BLUE
Function of adjusting value of BLUE.
User GREEN Function of adjusting value of GREEN.
Gamma
Function of adjusting value of color ratio.
COLOR WARP
Press MENU key to bring up the OSD. Press UP/DOWN key to move between the 5 primary
screen functions. Press the Select button at Color Warp, to select it. Press the UP/DOWN key,
you can now move between functions and press Select to adjust the value of each item with the
key. Press MENU key to return previous state and press MENU key twice to exit OSD
Color Warp
Function of adjusting curve on main screen.
Mode
Function of selecting curve on main screen.
Custom Center Function of adjusting color warp on center.
Custom range Function of adjusting range on color warp.
Saturation
Function of adjusting saturation warp on center.
Custom hue
Function of adjusting the tone of color.
OPTIONS
Press MENU key to bring up the OSD. Press UP/DOWN key to move between the 5 primary
screen functions. Press the Select button at Options, to select it. Press the UP/DOWN key, you
can now move between functions and press Select to adjust the value of each item with the
key. Press MENU key to return previous state and press MENU key twice to exit OSD
OSD V Pos
Function of adjusting the vertical position of OSD image.
OSD H Pos
Function of adjusting the horizontal position of OSD image.
OSD
Function of moving OSD image quickly.
UTILITIES
Press MENU key to bring up the OSD. Press UP/DOWN key to move between the 5 primary
screen functions. Press the Select button at Utilities, to select it. Press the UP/DOWN key, you
can now move between functions and press Select to adjust the value of each item with the
key. Press MENU key to return previous state and press MENU key twice to exit OSD
OSD Timeout Function of adjusting OSD disappear time.
OSD Bkground Function of adjusting at transparency on main screen to OSD image.
Auto Adjust
Function of finding optimized main screen automatically.
Factory Reset Function of resetting all value on OSD.
Power On Time Function of indicating system on time.
Bklight OnTime Function of indicating panel on time.
NOTE: The OSD membrane has a Source button. This button is used to select other inputs to the
LCD, Such as DVI, S-Video, or NTSC.
4
Section
Touch Screen
Setup
Introduction to Touch Screens
Touch screen interfaces have become the standard interface in the past 5 years. They
are, rugged, reliable, extremely flexible and easier than ever to implement! The universal
acceptance of the Windows GUI [Graphical User Interface] along with the extensive use
of a mouse interface has significantly accelerated the use of a touch interface. Basically
think of your touch screen as if it were a mouse.
AutomationDirect.com touch systems are mouse emulators. By installing a software
driver and connecting to a serial port, the touch screen will support all the primary mouse
functions:
The FPM-170(-TS) touch screen interface, is a high resolution, analog resistive.
Following is a quick explanation of what all this means.
High Resolution: The touch screen resolution is 400 ppi [points per inch]
Analog Resistive: The actual touch glass is an analog device. Meaning there is a very
low voltage applied to the X and Y axis of the touch screen. This current is applied to
ITO [Iridium Tin Oxide] that is sputtered onto a polyester membrane. When you touch
the screen you are changing the resistance on both the X and Y axis, producing an
analog value that references a particular location.
This type of screen can be activated with a gloved finger or mechanical stylus.
The touch screen itself is connected to electronics [internal to the display unit] that
provide the Analog to Digital conversion. When the screen is touched, the electronics
convert the analog voltage to a digital value and add a "Mouse Click". This touch data is
sent out from the display serial port to the PC serial port where the touch driver presents
the data to the operating systems as if it were from a normal PC mouse. When the touch
is released the new XY location is sent along with a "Mouse Up Click".
The touch screen interface to the PC is RS-232, so the recommend maximum distance
from the PC is 50 feet., The driver and and interface have been tested to 50 Ft. using
high quality cables. High quaility cables and connectors are important, especially if field
connections are made. Poor quality cables will drastically reduce the performance of the
RS-232 interface. The touch driver default baud rate is 9600.
Touch Screen Setup and Configuration:
If the unit does not have a touch screen, your configuration is complete. If your display
is fitted with the optional touch screen interface, the following section will outline
installation and set up. This system requires no special software knowledge, and can be
installed and set up in minutes. The following section gives a detailed explanation of the
software setup and configuration
Touch Screen Driver Installation for Windows 98
Required items to know or have to install the Touch Driver.
What Operating System you are using. Windows 98
What Serial Port you are connected to. Usually COM 1 or COM 2
The type of touch screen.
Smartset
The CD-ROM or Floppy disk included with the system.
Touch Screen Driver Installation for Windows 98
Insert the provided CD
Select Link to the Windows 98 driver
Select Open from the Windows dialog box.
Select SmartSet Controller for Com1 or Com2
Remove the CD.
Restart the computer; you will be prompted to calibrate the touch screen.
Touch each of the 3 targets as directed. If the unit does not respond to
your calibration touches then you have probably selected the wrong
COM port. If so, reinstall the driver and selecting the correct COM port.
You are now ready to use your touch screen.
Note 1: The touch screen calibration information is maintained in the computer. If you
change computers, you will need to reinstall the touch screen driver software and
recalibrate.
Note 2: If for any reason the touch screen performance is unsatisfactory, you can
recalibrate at any time. This is done from the ELO icon under the Windows control panel
Touch Screen Driver Installation for Windows NT 4.0
Required items to know or have to install the Touch Driver.
What Operating System you are using. Windows NT 4.0
What Serial Port you are connected to. Usually COM 1 or COM 2
The type of touch screen.
Smartset
The CD-ROM or Floppy disk included with the system.
Touch Screen Driver Installation for Windows NT 4.0
Insert the provided CD
Select Link to the Windows NT driver
Select Open from the Windows dialog box.
Select Next
Select Yes - To the license agreement
Select Next - To the default installation folder
Select Next - For Single Monitor installation
Select the Com Port to which the touch interface is connected and Next
Select Finish
Remove the CD.
Restart the computer. You will be prompted to calibrate the touch screen.
Touch each of the 3 targets as directed. If the unit does not respond to
your calibration touches then you have probably selected the wrong
COM port. If so, press the Esc key on the keyboard to exit.
Go to the ELO icon under Windows Control Panel.
Select the correct Com Port, and Restart the computer.
If this fails, reinstall the driver and select the correct COM port
Once restarted, select the ELO icon under Windows Control Panel
Select Calibrate, and then touch each of the 3 targets as they are
displayed.
You are now ready to use your touch screen.
Note 1: The touch screen calibration information is maintained in the computer. If you
change computers, you will need to reinstall the touch screen driver software and
recalibrate.
Note 2: If for any reason the touch screen performance is unsatisfactory, you can
recalibrate at any time. This is done from the ELO icon under the Windows control panel
Touch Screen Driver Installation for Windows 2000
Required items to know or have to install the Touch Driver.
What Operating System you are using. Windows 2000
What Serial Port you are connected to. Usually COM 1 or COM 2
The type of touch screen.
Smartset
The CD-ROM or Floppy disk included with the system.
Touch Screen Driver Installation for Windows 2000
Insert the provided CD
Select Link to Windows 2000 driver
Select Open from the Windows dialog box.
Select Next
Select Yes - To the license agreement
Select the Com Port to which the touch interface is connected and Next
Select Next, the driver will now start to install.
Select YES - To continue
Select Finish
Remove the CD.
Select YES to Restart.
When the system restarts touch each of the 3 targets as directed.
If the unit does not respond to your calibration touches then you have
probably selected the wrong COM port. If so, press the Esc key to exit.
Go to the ELO icon under Windows Control Panel.
Select the correct Com port, and restart the computer.
Once restarted, select the ELO icon under Windows Control Panel
Select Align and Calibrate; then touch each of the 3 targets as directed.
You are now ready to use your touch screen.
Note 1: The touch screen calibration information is maintained in the computer. If you
change computers, you will need to reinstall the touch screen driver software and
recalibrate.
Note 2: If for any reason the touch screen performance is unsatisfactory, you can
recalibrate at any time. This is done from the ELO icon under the Windows control panel
Touch Screen Driver Installation for Windows XP
Required items to know or have to install the Touch Driver.
What Operating System you are using.
Windows XP
What Serial Port you are connected to.
Usually COM 1 or COM 2
The type of touch screen.
Smartset
The CD-ROM or Floppy disk included with the system.
Touch Screen Driver Installation for Windows XP
Insert the provided CD
Select Link to XP driver
Select Open from the Windows dialog box.
Select Yes - To the license agreement
Select the Com Port to which the touch interface is connected and Next
Select Next, the driver will now start to install.
Select YES - To continue
Select Finish
Remove the CD
Select YES to Restart
Go to the ELO icon under Windows Control Panel.
Verify the Com Port is correct
Select Align; then touch each of the 3 targets as directed.
If the unit does not respond to your calibration touches then you have
probably selected the wrong COM port. If so, press the Esc key to exit.
Select the correct Com port, and restart the computer, then align the touchscreen.
You are now ready to use your touch screen.
Note 1: The touch screen calibration information is maintained in the computer. If you
change computers, you will need to reinstall the touch screen driver software and
recalibrate.
Note 2: If for any reason the touch screen performance is unsatisfactory, you can
recalibrate at any time. This is done from the ELO icon under the Windows control panel
5
Section
Mounting
Instructions
Panel Mounting Procedure
Cut and drill the panel (refer to Figure 2; Panel Mount Drawing Appendix G).
Measurements are in inches. A template of the hole pattern has been supplied
with your monitor to assist in making the mounting holes accurately. Also, there
is an AutoCad .dxf file included on the provided CD. This computer file can be
used in a design drawing or forwarded to your panel fabricator for the proper
mounting
1. If access to the side of the monitor is not available following installation,
attach the power and video cables to the side of the monitor at this time.
2. Install the monitor in the prepared cutout.
3. Install the washers and lock nuts supplied with the monitor.
Note: Use #10-32 nuts for mounting.
4. Tighten all mounting nuts evenly to a torque of 24 inch-pounds.
ATTENTION: Mounting nuts must be tightened to a torque of 24 inch-pounds to
provide panel seal and avoid potential damage. AutomationDirect assumes no
responsibility for water or chemical damage to the monitor or other equipment
within the enclosure due to improper installation.
6. Attach the power, video and touch screen cables (if this is a –TS unit) to the
side of the monitor.
Figure 2: Panel Mount Drawing
6
Section
No Picture
Troubleshooting
Tips
Check that the signal cable is properly connected to the
display.
Try disconnecting the video cable from the display and
connecting to another display if available to confirm the
presence of proper video.
Make sure power is connected to the proper AC source.
Make sure the resolution mode is supported by the display
and check display settings of the PC
Confirm that the video cable is not defective.
Image Persistence
Image persistence occurs when a ghost of an image remains
on the screen after the screen image has been changed.
Unlike a CRT monitor, an LCD monitor’s image persistence is
not permanent. To erase an image ghost, turn the monitor off
for several hours. What happens is the the liquid crystals
after extened periods of operation with take a “set”. To avoid
this condition, install a screen saver progam on the computer
Picture Quality & Image
Stability
Check for proper video cable for proper grounding and
shielding.
Check the signal source for proper signal.
Check for proper adjustment of the Phase and Frequency
controls.
Check for proper recommended signal timing.
Green LED not lit
Check for proper power and power connections
Display image is not
properly sized
Press the “Select” button to Auto Adjust the display
Adjust the Vertical and Horizontal size controls via the OSD.
(Reference OSD Adjustments section)
Ensure that a supported mode is selected on the display card
or system being used. Consult the display card or system
manual for proper video.
Image will not adjust
Video timing outside of range.
Use the on-screen menu to adjust the Clock Setting.
Make sure timing is within VESA standard.
Slight distortion in text or
Graphics
Not working in native resolution.
Display is present but
“bars” Appear or roll
across screen
Ground loop problem between computer and display
Vertical shaded bars on
Screen image
Horizontal size not properly adjusted. Adjust horizontal size
Image is not stable.
Monitor has incorrect or bad sync signals..
Interference from adjacent equipment.
Check for proper video cable installation.
Replace suspected faulty cable.
Check to ensure that video source is within the display’s
operating range.
7
Section
Cleaning &
Maintenance
Cleaning
CAUTION: SHUT OFF YOUR TOUCH SCREEN BEFORE CLEANING!!
IF YOUR DISPLAY IS A –TS MODEL, THAT IS A TOUCH SCREEN DISPLAY,
THE SCREEN WILL BE ACTUATED BY CLEANING. PRESSING ON THE
SCREEN WHILE CLEANING WILL BE SEEN AS A TOUCH TO THE SYSTEM
WHICH COULD CREATE A POTENTIALLY DANGEROUS CONDITION!!
Occasionally clean the display panel and cabinet with a soft cloth dampened (not
soaked) with a mild (non-abrasive) glass cleaner. Keep turning a fresh side of the
cloth toward the screen surface to avoid scratching it with accumulated grit.
Note: The solvent should be applied only to the cloth, and not directly on the
monitor screen.
Do not use paper products as they may scratch the surface. To minimize the risk
of abrasion, allow the screen to air dry. Special care should be taken when
cleaning a touch screen or polycarbonate shield that is installed over the screen.
Abrasive and certain chemical cleaners can damage the surface.
Never use alcoholic or ammoniac cleaners to clean the polycarbonate shield or a
touch screen.
Replacing a Line Cord
To avoid shock and fire hazards, the monitor’s power cord should be replaced if
the insulation becomes broken or if it develops a loose internal connection.
Other Maintenance
Qualified service personnel should perform all maintenance, except for
the power cord replacement described above.
8
Appendices
Section
Appendix A – Video Pin Assignments
Pin assignments for the HD15 video connector
Pin 1
Pin 2
Pin 3
Pin 4
Pin 5
Pin 6
Pin 7
Pin 8
Red Video
Green Video
Blue Video
Not Used
Return
Red Video Ground
Green Video Ground
Blue Video Ground
Pin 9
Pin 10
Pin 11
Pin 12
Pin 13
Pin 14
Pin 15
No Connection
Sync Ground
Not Used
Bi-Directional Data
Horizontal Sync
Vertical Sync
Data Clock (SCL)
Appendix B – RS-232 Pin Assignments
Pin assignment for 9 Pin Optional Touch Screen Connector
Pin 1
Pin 2
Pin 3
Pin 4
Pin 5
Pin 6
Pin 7
Pin 8
Pin 9
DCD
RD (Rx)
SD (Tx)
DTR
SG
DSR
RTS
CTS
NC
Data Carrier Detect
Receive Data
Transmit Data
Data Terminal Ready
Signal Ground
Data Set Ready
Request to Send
Clear to Send
No Connection
Appendix C – DVI Video Pin Assignments
Pin 1
Pin 2
Pin 3
Pin 4
Pin 5
Pin 6
Pin 7
Pin 8
Pin 9
Pin 10
Pin 11
Pin 12
Pin 13
Pin 14
Pin 15
Pin 16
Pin 17
Pin 18
Pin 19
Pin 20
Pin 21
Pin 22
Pin 23
Pin 23
TMDS Data 2TMDS Data 2+
TMDS Data 2/4 Shield
TMDS Data 4- (NC)
TMDS Data 4+ (NC)
DDC Clock
DDC Data
NC
NC
No Connection
TMDS Data 1TMDS Data 1/3 Shield
TMDS Data 3- (NC)
TMDS Data 3+ (NC)
5V
Ground
Hot Plug Detect
TMDS Data 0TMDS Data 0+
TMDS Data 0/5 Shield
TMDS Data 5TMDS Data 5+
TMDS Clock Shield
TMDS Clock +
TMDS Clock -
Appendix D – S-Video
Pin 1
Pin 2
Pin 3
Pin 4
Ground
Ground
Chroma
Luma
Appendix E – NTSC
Pin 1
Pin 2
Composite Video
Ground
Appendix F –General Specifications
FPM-170 & FPM-170-TS
Bold - Indicates Up Dated Specification
Active Screen Area
Brightness
Contrast
Lamp Life
Screen Resolution
Vertical Frequency Range
Horizontal Frequency Range
PC Video Input
Video
Native Resolution (Best Picture)
View Angle L / R
View Angle Up / Dn
Input Voltage
Current Draw
Input power
Installed Depth
Chassis Construction
Bezel Construction
Bezel OD
Bezel Finish
Auto Adjust
Resistive Touch
5 Wire Touch
Touch Interface
Recessed Cable Exit
DVI Interface
PC Video Interface
S-Video
NTSC
Colors
Operating Temp
Storage Temp
Storage Humidity
NEMA Front End
13.3" x 10.64"
250
500:1
35K
VGA-SXGA
50-85 Hz.
15-80 KHz.
Separate Sync (5 Wire)
Composite Sync (4 Wire)
Sync On Green (3 Wire)
NTSC / PAL
SXGA
85 / 85
85 / 85
90-264 VAC Auto-switching
.25 / 120 VAC
30W
2.68"
16 Ga SS
Al Machined .250"
17.56" x 14.56"
Black Textured
Yes, on Power Up
Yes
Yes
RS-232 or USB
Yes
DVI-D Standard (Female)
VGA (HD-15F) (Female)
4 Pin Mini Din (Female)
RCA (Female)
24bit (16M)
0-50
0-60
10-95
4/12
Appendix G – Mounting Dimentions
NOTES
Model Number: _________________
Serial Number: _________________
Dear Customer:
Thank you for purchasing this flat panel industrial monitor from AutomationDirect.com.
The enclosed unit is our newest design and has been enhanced to offer you even more
great features. Here’s what’s new:
Brightness – Screen brightness has been increased to 300 nits from 200 nits.
Contrast – Contrast ratio has been increased to 350:1 from 300:1.
Lamp Life – The backlight half life has been extended to 40,000 hours from 30,000 hours.
Inputs – The unit now accepts DVI (Digital Video Interface), S-Video, and NTSC in addition
to the standard VGA.
Auto Adjust – The monitor will now Auto Adjust automatically on power up when it
receives a video signal from your computer
Video Scaling – A new scaling engine has been integrated to provide enhanced picture
quality in all video modes of the LCD up to the native mode of 1208x1024.
Installed Depth – Unfortunatly the installed depth of the unit has increased slightly to
2 15/16” from 2 9/16”
Power – The electrical demand has increased to 48 Watts [.4a at 120 VAC] from 35 Watts
[.3a at 120 VAC]
These enhancements make this flat panel monitor more user friendly and provide a
superior picture making your application look even better! Proving again the great value
you get from AutomationDirect.com products.
If you have any questions concerning this monitor please feel free to contact us at
1-800-633-0405
Sincerely,
Jim Allison
PC Control Products manager
AutomationDirect.Com
Your source for the most practical automation products at at almost-free pricing, delivered
by 11 AM, just by clicking a mouse.
www.AutomationDirect.com
(800) 633-0405
FPM-180
FPM-180-TS
LCD Monitor User Guide
Revised 12/02
FPM-180 & FPM-180-TS
Table Of Contents
Section 1 Introduction
About LCD Monitors
Product Safety Precautions
Section 2 Display Setup
Included Parts
Connecting Your Display
Section 3 Getting Started
Display Features
Getting Started
Adjusting the Display
Using the Auto-Adjust
OSD (On Screen Display) Adjustments
Section 4 Touch Screen Set up
Introduction to Touch Screens
Touch Screen Driver Installation
Windows 98
Windows NT 4.0
Windows 2000
Windows XP
Section 5 Mounting Instructions
Section 6 Trouble Shooting Tips
Section 7 Cleaning and Maintenance
Section 8 Appendices
A-VGA Pin Assignment
B-RS-232 Pin Assignment
C- DVI [Digital Video Interface] Pin Assignments
D- S-Video
E- NTSC
F-General Specifications
G-Mounting Dimensions
1
Section
LCD
Introduction
About LCD Monitors
What you gain by using an LCD monitor for your industrial display is the future of display
technology. CRTs although they have dropped in cost significantly, do not offer the
performance, reliability, and mounting options available with LCDs. LCD monitors consist
primarily of an LCD, video board and a backlight. The LCD determines to a large extent the
viewing angle, brightness and contrast. Beyond that it is the function of the video board,
which converts the analog RGB (Red, Green, Blue) signals from a standard video card to a
high quality, digital RGB that the LCD can display.
LCD monitors can can be set for one or more of the following resolutions:
VGA: 640 x480
SVGA: 800x600
XGA 1024 x 768
SXGA 1280 x1024
UXGA 1600x 1200
Note: The VGA acronym stands for Video Graphics Adapter. It is used to describe both the
most common type of display interface used by PC’s and lowest resolution setting for this
interface. Originally only the VGA [640x480] resolution was available on a VGA interface.
Today all of the above interfaces are available on a VGA interface, but not all monitors
support all resolutions. . The native resolution of the LCD is normally the maxium resolution
that the LCD can display, and is the resolution that the LCD will exhibit the best display
charastics Check the monitor specifications (Appendix F) for the resolutions supported by this
monitor.
Recently the video card has taken on a new role. It is the responsibility of this device to
"scale" a particular video resolution to the "native" resolution of the LCD. This enables a
computer set to output a VGA [640x480] resolution signal to be properly displayed on an
XGA [1024x768] LCD screen. Without the scaling engine, the displayed picture would be in
the center 1/3 of the LCD. The scaling engine mathematically converts the 640x480 to
1024x768. This my sound simple but it is in fact a complex algorithm that adjusts for different
aspect ratios and pixel alignment, essentially smoothing text and graphics to produce a
picture that is pleasant to the eye.
All Automationdirect.com displays from 12.1" (800x600) to 18.1” (1280x1024) incorporate
scaling engines in the converter card.
Safety Precautions
CAUTION: SHUT OFF YOUR TOUCH SCREEN BEFORE CLEANING!!
IF YOUR DISPLAY IS A –TS MODEL, THAT IS A TOUCH SCREEN DISPLAY,
THE SCREEN WILL BE ACTUATED BY CLEANING. PRESSING ON THE
SCREEN WHILE CLEANING WILL BE SEEN AS A TOUCH TO THE SYSTEM
WHICH COULD CREATE A POTENTIALLY DANGEROUS CONDITION!!
Do not attempt to service this display yourself. The rear chassis has a seal so
that non qualified personal will not expose themselves to dangerous voltages or
other risks.
To protect from electrical shock, unplug the display power supply from the wall
before moving.
Do not use this display near water
Do not place any heavy objects on the power cords. Damage may cause
electrical shock.
Unplug the power supply from the wall or unit if one of the following conditions
exists.
o Power cord or plug is damaged or frayed
o Liquid is spilled into the display or the display is exposed to rain or water.
o The display does not operate normally when the operating instructions
are followed.
o The display has been dropped or the enclosure has been damaged.
o The display exhibits a distinct change in performance, indicating a need
for service.
Ensure that sufficient space is available around the display to provide air
circulation for cooling.
Ensure that the ambient air temperature will not exceed the specified maximum
temperature.
Do not expose the display to direct sunlight or heat.
2
Section
Display
Setup
Included Parts
Your LCD monitor package will consist of the primary components listed below.
Open shipping container and lay all components on a flat clean surface.
FPM-180(-TS) LCD Monitor
6 ft Video Cable
6 Ft AC Power Cable
6 ft RS232 Touch Interface Cable ( touch screen units only)
10-32 Mounting Hardware. (For use with Panel Mount)
Documentation and Driver CD ROM
Connecting Your Display
1. Connect all cables to the computer first. This includes the VGA cable, and if the unit
has a touch screen, the RS 232 serial touch screen connection.
2. After connecting the cables between the LCD monitor and the computer, plug
supplied AC power cord into a suitable AC outlet then into the LCD.
3. Power on the display. The On/Off switch is located where the AC power cord enters
the unit
4. If your computer is off, turn on your computer.
5. Your display should now operate as a normal computer display, displaying the
computers BIOS screens and booting into Windows or other operating system.
Note: If for any reason the display goes blank and/or displays “out of Range” or “No
Input Signal” message on the screen, your computer or video source may be putting out
a signal that is incompatible with the FPM-180(-TS). If this happens, reboot the computer
with the previous display and adjust the display settings to be within the FPM-180(-TS)
specifications (see Appendix F). Below is are the most common reasons a display may
not operate correctly:
1. The resolution is to high or low for the LCD.
2. The refresh rate is set to high. Refresh on an LCD is different than a CRT. Set the
refresh to 60Hz. CRT’s need a high refresh rate to avoid flicker. The refresh rate has
no impact on an LCD.
3. The power source is incorrect, or there is no power. Check if the rear LED is ON or
blinking. If the LED is not lit, check to be sure there is power to the unit.
4. The unit is malfunctioning. If you believe this to be true, disconnect the video cable
from the rear of the LCD and connect to a known good display. If the computer
display is working satisfactory and the video is within the appropriate range, then
contact AutomationDirect.com technical support.
3
Section
Getting
Started
Display Features
The FPM-180(-TS) is capable of displaying 16M (24 Bit) colors in a continuous
spectrum. The high contrast LCD enhances the image with no geometric distortion.
FPM-180(-TS) Series directly accepts an analog 5 wire RGB with separate H/V
(Horizontal / Vertical) sync. This is the standard PC video signal.The FPM-180(-TS)
Series is auto synchronous, adjusting the display to the appropriate input between
VGA and SXGA.
The FPM-180(-TS) Series is supplied with a Anti-Glare Touch Screeen [TS models]
or an Anti-Glare impact window on non touch screen models.
The FPM-180(-TS) Series has an integrated 115/220VAC power supply as standard
on all models.
Adjusting the Display
The FPM-180(-TS) Series display has an embedded microprocessor on the converter
card [the electronics that drive the LCD], and has been recently updated with a more
powerful chip set. In most cases the unit will require very little if any user intervention to
operate correctly. That is, produce a sharp, stable picture.
The micoprocessor in the display has the capability to adjust itself to the computer to
which it is attached. This auto-adjustment will take place when the unit is first installed
and connected to a computer, if the video input changes, or the user initates it. If the
picture is not satisfactory, the first step is to allow the unit to attempt to re-adjust itself to
your computer.
Located on the rear of the unit is a membrane keypad used for adjusting the display.
See figure 1 below:
Menu
Select
Down
Up
Figure 1
Source
Using the Auto-Adjust
The FPM-180(-TS) will attempt to adjust itself to your computers current video model. If
the picture is stable, and centered vertically and horizontally the auto-adjustment is
complete. If however the picture is not stable, and centered vertically and horizontally
you can re-initate the auto adjustment. Once you have the unit displaying the resolution
you desire for your application, do the following:
Press HOLD and release the “Select” button on the membrane. This will place the unit
into a “Geometry Auto Adjust” mode. This operation will adjust the picture so it is
centered both vertically and horizontally on the LCD screen. It will also make the
necessary adjustments to the internal clock timing so that the picture is stable (without
any decernable pixel jitter).
After having completed this step you may wish to adjust the color balance. This
procedure adjusts for any imbalance in the Red, Green, and Blue levels from the video
cable or video card. This is accomplished using the LCDs OSD ( On Screen Menu)
system.
OSD (On Screen Display) Adjustments
There are four membrane buttons (see Fig 1, above) located on the rear of the unit.
They will activate the OSD and allow navigation to all adjustments the unit may require.
Press MENU key, OSD screen appears. [See Figure 2]
Press the UP/DOWN key to move between the five primary functions. (Indicated by highlighting)
Press the Select key when highlighting the Picture group to activate this sub-menu. You can now
navigate the sub-menu using the UP/DOWN keys. To make an adjustment to an item use the
buttons to make your adjustments
At anytime, press the Menu button two times to Exit and Save your settings.
This convention of Menu, Navigate, Select Sub Menu, Navigate, Select Item and Adjust item is
used throughout the OSD screen set up.
Press MENU key to return previous state and press MENU key twice to exit OSD.
PICTURE
Press MENU key to bring up the OSD. Press UP/DOWN key to move between the 5 primary
screen functions. Press the Select button at Picture, to select it. Press the UP/DOWN key, you
can now move between functions and press Select to adjust the value of each item with the
key. Press MENU key to return previous state and press MENU key twice to exit OSD.
BRIGHTNESS Function of adjusting main screen brightness.
CONTRAST
Function of adjusting main screen contrast.
FREQUENCY Function of adjusting main screen sampling clock frequency.
PHASE
Function of adjusting main screen sampling clock phase.
H POSITION Function of adjusting the horizontal position of main screen.
V POSITION Function of adjusting the vertical position of main screen.
ADVANCED
Press MENU key to bring up the OSD. Press UP/DOWN key, to move between the 5 primary
screen functions. Press the Select button at Advanced, to select it. Press the UP/DOWN key, you
can now move between functions and press Select to adjust the value of each item with the
key. Press MENU key to return previous state and press MENU key twice to exit OSD.
Color Temp
Function of setup of main color. (Bluish, Normal, Reddish)
User RED
Function of adjusting value of RED.
User BLUE
Function of adjusting value of BLUE.
User GREEN Function of adjusting value of GREEN.
Gamma
Function of adjusting value of color ratio.
COLOR WARP
Press MENU key to bring up the OSD. Press UP/DOWN key to move between the 5 primary
screen functions. Press the Select button at Color Warp, to select it. Press the UP/DOWN key,
you can now move between functions and press Select to adjust the value of each item with the
key. Press MENU key to return previous state and press MENU key twice to exit OSD
Color Warp
Function of adjusting curve on main screen.
Mode
Function of selecting curve on main screen.
Custom Center Function of adjusting color warp on center.
Custom range Function of adjusting range on color warp.
Saturation
Function of adjusting saturation warp on center.
Custom hue
Function of adjusting the tone of color.
OPTIONS
Press MENU key to bring up the OSD. Press UP/DOWN key to move between the 5 primary
screen functions. Press the Select button at Options, to select it. Press the UP/DOWN key, you
can now move between functions and press Select to adjust the value of each item with the
key. Press MENU key to return previous state and press MENU key twice to exit OSD
OSD V Pos
Function of adjusting the vertical position of OSD image.
OSD H Pos
Function of adjusting the horizontal position of OSD image.
OSD
Function of moving OSD image quickly.
UTILITIES
Press MENU key to bring up the OSD. Press UP/DOWN key to move between the 5 primary
screen functions. Press the Select button at Utilities, to select it. Press the UP/DOWN key, you
can now move between functions and press Select to adjust the value of each item with the
key. Press MENU key to return previous state and press MENU key twice to exit OSD
OSD Timeout Function of adjusting OSD disappear time.
OSD Bkground Function of adjusting at transparency on main screen to OSD image.
Auto Adjust
Function of finding optimized main screen automatically.
Factory Reset Function of resetting all value on OSD.
Power On Time Function of indicating system on time.
Bklight OnTime Function of indicating panel on time.
NOTE: The OSD membrane has a Source button. This button is used to select other inputs to the
LCD, Such as DVI, S-Video, or NTSC.
4
Section
Touch Screen
Setup
Introduction to Touch Screens
Touch screen interfaces have become the standard interface in the past 5 years. They
are, rugged, reliable, extremely flexible and easier than ever to implement! The universal
acceptance of the Windows GUI [Graphical User Interface] along with the extensive use
of a mouse interface has significantly accelerated the use of a touch interface. Basically
think of your touch screen as if it were a mouse.
AutomationDirect.com touch systems are mouse emulators. By installing a software
driver and connecting to a serial port, the touch screen will support all the primary mouse
functions:
The FPM-180(-TS) touch screen interface, is a high resolution, analog resistive.
Following is a quick explanation of what all this means.
High Resolution: The touch screen resolution is 400 ppi [points per inch]
Analog Resistive: The actual touch glass is an analog device. Meaning there is a very
low voltage applied to the X and Y axis of the touch screen. This current is applied to
ITO [Iridium Tin Oxide] that is sputtered onto a polyester membrane. When you touch
the screen you are changing the resistance on both the X and Y axis, producing an
analog value that references a particular location.
This type of screen can be activated with a gloved finger or mechanical stylus.
The touch screen itself is connected to electronics [internal to the display unit] that
provide the Analog to Digital conversion. When the screen is touched, the electronics
convert the analog voltage to a digital value and add a "Mouse Click". This touch data is
sent out from the display serial port to the PC serial port where the touch driver presents
the data to the operating systems as if it were from a normal PC mouse. When the touch
is released the new XY location is sent along with a "Mouse Up Click".
The touch screen interface to the PC is RS-232, so the recommend maximum distance
from the PC is 50 feet., The driver and and interface have been tested to 50 Ft. using
high quality cables. High quaility cables and connectors are important, especially if field
connections are made. Poor quality cables will drastically reduce the performance of the
RS-232 interface. The touch driver default baud rate is 9600.
Touch Screen Setup and Configuration:
If the unit does not have a touch screen, your configuration is complete. If your display
is fitted with the optional touch screen interface, the following section will outline
installation and set up. This system requires no special software knowledge, and can be
installed and set up in minutes. The following section gives a detailed explanation of the
software setup and configuration
Touch Screen Driver Installation for Windows 98
Required items to know or have to install the Touch Driver.
What Operating System you are using. Windows 98
What Serial Port you are connected to. Usually COM 1 or COM 2
The type of touch screen.
Smartset
The CD-ROM or Floppy disk included with the system.
Touch Screen Driver Installation for Windows 98
Insert the provided CD
Select Link to the Windows 98 driver
Select Open from the Windows dialog box.
Select SmartSet Controller for Com1 or Com2
Remove the CD.
Restart the computer; you will be prompted to calibrate the touch screen.
Touch each of the 3 targets as directed. If the unit does not respond to
your calibration touches then you have probably selected the wrong
COM port. If so, reinstall the driver and selecting the correct COM port.
You are now ready to use your touch screen.
Note 1: The touch screen calibration information is maintained in the computer. If you
change computers, you will need to reinstall the touch screen driver software and
recalibrate.
Note 2: If for any reason the touch screen performance is unsatisfactory, you can
recalibrate at any time. This is done from the ELO icon under the Windows control panel
Touch Screen Driver Installation for Windows NT 4.0
Required items to know or have to install the Touch Driver.
What Operating System you are using. Windows NT 4.0
What Serial Port you are connected to. Usually COM 1 or COM 2
The type of touch screen.
Smartset
The CD-ROM or Floppy disk included with the system.
Touch Screen Driver Installation for Windows NT 4.0
Insert the provided CD
Select Link to the Windows NT driver
Select Open from the Windows dialog box.
Select Next
Select Yes - To the license agreement
Select Next - To the default installation folder
Select Next - For Single Monitor installation
Select the Com Port to which the touch interface is connected and Next
Select Finish
Remove the CD.
Restart the computer. You will be prompted to calibrate the touch screen.
Touch each of the 3 targets as directed. If the unit does not respond to
your calibration touches then you have probably selected the wrong
COM port. If so, press the Esc key on the keyboard to exit.
Go to the ELO icon under Windows Control Panel.
Select the correct Com Port, and Restart the computer.
If this fails, reinstall the driver and select the correct COM port
Once restarted, select the ELO icon under Windows Control Panel
Select Calibrate, and then touch each of the 3 targets as they are
displayed.
You are now ready to use your touch screen.
Note 1: The touch screen calibration information is maintained in the computer. If you
change computers, you will need to reinstall the touch screen driver software and
recalibrate.
Note 2: If for any reason the touch screen performance is unsatisfactory, you can
recalibrate at any time. This is done from the ELO icon under the Windows control panel
Touch Screen Driver Installation for Windows 2000
Required items to know or have to install the Touch Driver.
What Operating System you are using. Windows 2000
What Serial Port you are connected to. Usually COM 1 or COM 2
The type of touch screen.
Smartset
The CD-ROM or Floppy disk included with the system.
Touch Screen Driver Installation for Windows 2000
Insert the provided CD
Select Link to Windows 2000 driver
Select Open from the Windows dialog box.
Select Next
Select Yes - To the license agreement
Select the Com Port to which the touch interface is connected and Next
Select Next, the driver will now start to install.
Select YES - To continue
Select Finish
Remove the CD.
Select YES to Restart.
When the system restarts touch each of the 3 targets as directed.
If the unit does not respond to your calibration touches then you have
probably selected the wrong COM port. If so, press the Esc key to exit.
Go to the ELO icon under Windows Control Panel.
Select the correct Com port, and restart the computer.
Once restarted, select the ELO icon under Windows Control Panel
Select Align and Calibrate; then touch each of the 3 targets as directed.
You are now ready to use your touch screen.
Note 1: The touch screen calibration information is maintained in the computer. If you
change computers, you will need to reinstall the touch screen driver software and
recalibrate.
Note 2: If for any reason the touch screen performance is unsatisfactory, you can
recalibrate at any time. This is done from the ELO icon under the Windows control panel
Touch Screen Driver Installation for Windows XP
Required items to know or have to install the Touch Driver.
What Operating System you are using.
Windows XP
What Serial Port you are connected to.
Usually COM 1 or COM 2
The type of touch screen.
Smartset
The CD-ROM or Floppy disk included with the system.
Touch Screen Driver Installation for Windows XP
Insert the provided CD
Select Link to XP driver
Select Open from the Windows dialog box.
Select Yes - To the license agreement
Select the Com Port to which the touch interface is connected and Next
Select Next, the driver will now start to install.
Select YES - To continue
Select Finish
Remove the CD
Select YES to Restart
Go to the ELO icon under Windows Control Panel.
Verify the Com Port is correct
Select Align; then touch each of the 3 targets as directed.
If the unit does not respond to your calibration touches then you have
probably selected the wrong COM port. If so, press the Esc key to exit.
Select the correct Com port, and restart the computer, then align the touchscreen.
You are now ready to use your touch screen.
Note 1: The touch screen calibration information is maintained in the computer. If you
change computers, you will need to reinstall the touch screen driver software and
recalibrate.
Note 2: If for any reason the touch screen performance is unsatisfactory, you can
recalibrate at any time. This is done from the ELO icon under the Windows control panel
5
Section
Mounting
Instructions
Panel Mounting Procedure
1. Cut and drill the panel (refer to Figure 2; Panel Mount Drawing Appendix G).
Measurements are in inches. A template of the hole pattern has been
supplied with your monitor to assist in making the mounting holes accurately.
Also, there is an AutoCad .dxf file included on the provided CD. This
computer file can be used in a design drawing or forwarded to your panel
fabricator for the proper mounting
2. If access to the side of the monitor is not available following installation,
attach the power and video cables to the side of the monitor at this time.
3. Install the monitor in the prepared cutout.
4. Install the washers and lock nuts supplied with the monitor.
Note: Use #10-32 nuts for mounting.
5. Tighten all mounting nuts evenly to a torque of 24 inch-pounds.
ATTENTION: Mounting nuts must be tightened to a torque of 24 inch-pounds to
provide panel seal and avoid potential damage. AutomationDirect assumes no
responsibility for water or chemical damage to the monitor or other equipment
within the enclosure due to improper installation.
6. Attach the power, video and touch screen cables (if this is a –TS unit) to the
side of the monitor.
Figure 2: Panel Mount Drawing
6
Section
No Picture
Troubleshooting
Tips
Check that the signal cable is properly connected to the
display.
Try disconnecting the video cable from the display and
connecting to another display if available to confirm the
presence of proper video.
Make sure power is connected to the proper AC source.
Make sure the resolution mode is supported by the display
and check display settings of the PC
Confirm that the video cable is not defective.
Image Persistence
Image persistence occurs when a ghost of an image remains
on the screen after the screen image has been changed.
Unlike a CRT monitor, an LCD monitor’s image persistence is
not permanent. To erase an image ghost, turn the monitor off
for several hours. What happens is the the liquid crystals
after extened periods of operation with take a “set”. To avoid
this condition, install a screen saver progam on the computer
Picture Quality & Image
Stability
Check for proper video cable for proper grounding and
shielding.
Check the signal source for proper signal.
Check for proper adjustment of the Phase and Frequency
controls.
Check for proper recommended signal timing.
Green LED not lit
Check for proper power and power connections
Display image is not
properly sized
Press the “Select” button to Auto Adjust the display
Adjust the Vertical and Horizontal size controls via the OSD.
(Reference OSD Adjustments section)
Ensure that a supported mode is selected on the display card
or system being used. Consult the display card or system
manual for proper video.
Image will not adjust
Video timing outside of range.
Use the on-screen menu to adjust the Clock Setting.
Make sure timing is within VESA standard.
Slight distortion in text or
Graphics
Not working in native resolution.
Display is present but
“bars” Appear or roll
across screen
Ground loop problem between computer and display
Vertical shaded bars on
Screen image
Horizontal size not properly adjusted. Adjust horizontal size
Image is not stable.
Monitor has incorrect or bad sync signals..
Interference from adjacent equipment.
Check for proper video cable installation.
Replace suspected faulty cable.
Check to ensure that video source is within the display’s
operating range.
7
Section
Cleaning &
Maintenance
Cleaning
CAUTION: SHUT OFF YOUR TOUCH SCREEN BEFORE CLEANING!!
IF YOUR DISPLAY IS A –TS MODEL, THAT IS A TOUCH SCREEN DISPLAY,
THE SCREEN WILL BE ACTUATED BY CLEANING. PRESSING ON THE
SCREEN WHILE CLEANING WILL BE SEEN AS A TOUCH TO THE SYSTEM
WHICH COULD CREATE A POTENTIALLY DANGEROUS CONDITION!!
Occasionally clean the display panel and cabinet with a soft cloth dampened (not
soaked) with a mild (non-abrasive) glass cleaner. Keep turning a fresh side of the
cloth toward the screen surface to avoid scratching it with accumulated grit.
Note: The solvent should be applied only to the cloth, and not directly on the
monitor screen.
Do not use paper products as they may scratch the surface. To minimize the risk
of abrasion, allow the screen to air dry. Special care should be taken when
cleaning a touch screen or polycarbonate shield that is installed over the screen.
Abrasive and certain chemical cleaners can damage the surface.
Never use alcoholic or ammoniac cleaners to clean the polycarbonate shield or a
touch screen.
Replacing a Line Cord
To avoid shock and fire hazards, the monitor’s power cord should be replaced if
the insulation becomes broken or if it develops a loose internal connection.
Other Maintenance
Qualified service personnel should perform all maintenance, except for
the power cord replacement described above.
8
Appendices
Section
Appendix A – Video Pin Assignments
Pin assignments for the HD15 video connector
Pin 1
Pin 2
Pin 3
Pin 4
Pin 5
Pin 6
Pin 7
Pin 8
Red Video
Green Video
Blue Video
Not Used
Return
Red Video Ground
Green Video Ground
Blue Video Ground
Pin 9
Pin 10
Pin 11
Pin 12
Pin 13
Pin 14
Pin 15
No Connection
Sync Ground
Not Used
Bi-Directional Data
Horizontal Sync
Vertical Sync
Data Clock (SCL)
Appendix B – RS-232 Pin Assignments
Pin assignment for 9 Pin Optional Touch Screen Connector
Pin 1
Pin 2
Pin 3
Pin 4
Pin 5
Pin 6
Pin 7
Pin 8
Pin 9
DCD
RD (Rx)
SD (Tx)
DTR
SG
DSR
RTS
CTS
NC
Data Carrier Detect
Receive Data
Transmit Data
Data Terminal Ready
Signal Ground
Data Set Ready
Request to Send
Clear to Send
No Connection
Appendix C – DVI Video Pin Assignments
Pin 1
Pin 2
Pin 3
Pin 4
Pin 5
Pin 6
Pin 7
Pin 8
Pin 9
Pin 10
Pin 11
Pin 12
Pin 13
Pin 14
Pin 15
Pin 16
Pin 17
Pin 18
Pin 19
Pin 20
Pin 21
Pin 22
Pin 23
Pin 23
TMDS Data 2TMDS Data 2+
TMDS Data 2/4 Shield
TMDS Data 4- (NC)
TMDS Data 4+ (NC)
DDC Clock
DDC Data
NC
NC
No Connection
TMDS Data 1TMDS Data 1/3 Shield
TMDS Data 3- (NC)
TMDS Data 3+ (NC)
5V
Ground
Hot Plug Detect
TMDS Data 0TMDS Data 0+
TMDS Data 0/5 Shield
TMDS Data 5TMDS Data 5+
TMDS Clock Shield
TMDS Clock +
TMDS Clock -
Appendix D – S-Video
Pin 1
Pin 2
Pin 3
Pin 4
Ground
Ground
Chroma
Luma
Appendix E – NTSC
Pin 1
Pin 2
Composite Video
Ground
Appendix F –General Specifications
FPM-180 & FPM-180-TS
Bold - Indicates Up Dated Specification
Active Screen Area
Brightness
Contrast
Lamp Life
Max Screen Resolution
Vertical Frequency Range
Horizontal Frequency Range
PC Video Input
Video
Native Resolution (Best Picture)
View Angle L / R
View Angle Up / Dn
Input Voltage
Current Draw
Input power
Installed Depth
Chassis Construction
Bezel Construction
Bezel OD
Bezel Finish
Auto Adjust
Resistive Touch
5 Wire Touch
Touch Interface
Recessed Cable Exit
DVI Interface
PC Video Interface
S-Video
NTSC
Colors
Operating Temp
Storage Temp
Storage Humidity
NEMA Front End
14.4" x 11.31"
300
350:1
40K
VGA-SXGA
50-85 Hz.
15-80 KHz.
Separate Sync (5 Wire)
Composite Sync (4 Wire)
Sync On Green (3 Wire)
NTSC / PAL
SXGA
80 / 80
80 / 80
90-264 VAC Auto-switching
.4 / 120 VAC
48W
2.937" Nominal (2 15/16”)
16 Ga SS
Al Machined .250"
19.0" x 15.72"
Black Textured
Yes, on Power Up
Yes
Yes
RS-232 or USB
Yes
DVI-D Standard (Female)
VGA (HD-15F) (Female)
4 Pin Mini Din (Female)
RCA (Female)
24bit (16M)
0-50
0-60
10-95
4/12
Appendix G – Mounting Dimentions
NOTES
Model Number: _________________
Serial Number: _________________