1
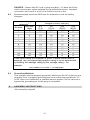
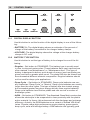
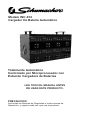
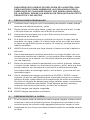
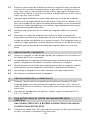
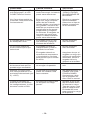
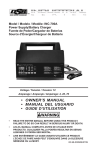
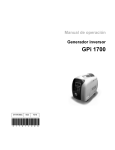
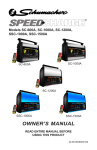
Model INC-812
Automatic Battery Charger
Fully Automatic
Microprocessor Controlled
Battery Charging Station
READ ENTIRE MANUAL BEFORE
USING THIS PRODUCT
CAUTION:
Read all Safety Rules and Operating Instructions,
and follow them with each use of this product.
00-99-000886/1208
TABLE OF Contents
sectionpage
IMPORTANT SAFETY INSTRUCTIONS
1
PERSONAL PRECAUTIONS
2
PREPARING TO CHARGE
2
CHARGER LOCATION
3
DC CONNECTION PRECAUTIONS
3
FOLLOW THESE STEPS WHEN BATTERY IS
INSTALLED INVEHICLE. 3
FOLLOW THESE STEPS WHEN BATTERY IS
OUTSIDE VEHICLE. 4
battery charging - ac connections
4
Assembly instructions
5
control panel
6
operating instructions
7
using the volt meter to test battery
state of charge
8
battery percent and charge time
9
maintenance instructions
10
storage instructions
10
troubleshooting
11
Limited warranty
12
IMPORTANT: read and save this safety and instruction manual.
1.
IMPORTANT SAFETY INSTRUCTIONS
1.1
SAVE THESE INSTRUCTIONS – This manual contains important safety
and operating instructions for battery charger Model INC-812A.
1.2
WARNING: This product contains chemicals known to the State of California to cause cancer and birth defects or other reproductive harm. Wash
hands after handling.
1.3
Do not expose charger to rain or snow.
1.4
Use of an attachment not recommended or sold by Schumacher® Electric
Corporation may result in a risk of fire, electric shock or injury to persons
or damage to property.
1.5
To reduce the risk of damage to electric plug or cord, pull by the plug
rather than the cord when disconnecting the charger.
1.6
An extension cord should not be used unless absolutely necessary. Use of
an improper extension cord could result in a risk of fire and electric shock.
If an extension cord must be used, make sure:
• That the pins on the plug of the extension cord are the same number,
size and shape as those of the plug on the charger.
• That the extension cord is properly wired and in good electrical condition
and;
• That the wire size is large enough for the AC ampere rating of the charger
as specified in section 8.
1.7
Do not operate the charger with a damaged cord or plug; take it to a qualified serviceman. (Call customer service at: 800-621-5485).
1.8
Do not operate the charger if it has received a sharp blow, been dropped
or otherwise damaged in any way; take it to a qualified serviceman. (Call
customer service at: 800-621-5485).
1.9
Do not disassemble the charger; take it to a qualified serviceman when
service or repair is required. Incorrect reassembly may result in a risk of
electric shock or fire. (Call customer service at: 800-621-5485).
1.10 To reduce the risk of electric shock, unplug the charger from the outlet
before attempting any maintenance or cleaning. Turning off the controls
will not reduce this risk.
WARNING – RISK OF EXPLOSIVE GASES.
WORKING IN THE VICINITY OF A LEAD-ACID BATTERY IS DANGEROUS. BATTERIES GENERATE EXPLOSIVE GASES DURING NORMAL BATTERY OPERATION. FOR THIS REASON, IT IS OF UTMOST
IMPORTANCE THAT YOU FOLLOW THE INSTRUCTIONS EACH TIME
YOU USE THE CHARGER.
•1•
TO REDUCE THE RISK OF BATTERY EXPLOSION, FOLLOW THESE
INSTRUCTIONS AND THOSE PUBLISHED BY THE BATTERY MANUFACTURER AND THE MANUFACTURER OF ANY EQUIPMENT YOU
INTEND TO USE IN THE VICINITY OF THE BATTERY. REVIEW THE
CAUTIONARY MARKINGS ON THESE PRODUCTS AND ON THE
ENGINE.
2.
PERSONAL PRECAUTIONS
2.1
Consider having someone close enough by to come to your aid when you
work near a lead-acid battery.
2.2
Have plenty of fresh water and soap nearby in case battery acid contacts
your skin, clothing or eyes.
2.3
Wear complete eye protection and clothing protection. Avoid touching your
eyes while working near the battery.
2.4
If battery acid contacts your skin or clothing, wash immediately with soap
and water. If acid enters your eye, immediately flood the eye with cold running water for at least 10 minutes and get medical attention immediately.
2.5
NEVER smoke or allow a spark or flame in the vicinity of a battery or
engine.
2.6
Be extra cautious to reduce the risk of dropping a metal tool onto the battery. It might spark or short-circuit the battery or other electrical part that
may cause an explosion.
2.7
Remove personal metal items such as rings, bracelets, necklaces and
watches when working with a lead-acid battery. A lead-acid battery can
produce a short-circuit current high enough to weld a ring or the like to
metal, causing a severe burn.
2.8
Use this charger for charging a LEAD-ACID battery only. It is not intended
to supply power to a low voltage electrical system other than in a startermotor application. Do not use this battery charger for charging dry-cell
batteries that are commonly used with home appliances. These batteries
may burst and cause injury to persons and damage to property.
2.9
NEVER charge a frozen battery.
2.10 NEVER overcharge a battery.
3.
PREPARING TO CHARGE
3.1
If it is necessary to remove the battery from the vehicle to charge it, always remove the grounded terminal from the battery first. Make sure all of
the accessories in the vehicle are off, so as not to cause an arc.
3.2
Be sure the area around the battery is well ventilated while the battery is
being charged.
•2•
3.3
Clean the battery terminals before charging the battery. During cleaning,
keep airborne corrosion from coming into contact with your eyes, nose
and mouth. Use baking soda and water to neutralize the battery acid and
help eliminate airborne corrosion. Do not touch your eyes, nose or mouth.
3.4
Add distilled water to each cell until the battery acid reaches the level
specified by the battery manufacturer. Do not overfill. For a battery without
removable cell caps, such as valve regulated lead-acid batteries, carefully
follow the manufacturer’s recharging instructions.
3.5
Study all of the battery manufacturer’s specific precautions while charging
and recommended rates of charge.
3.6
Determine the voltage of the battery by referring to the vehicle owner’s
manual and make sure that the output voltage selector switch is set to the
correct voltage. If the charger has an adjustable charge rate, charge the
battery at the lowest rate first.
4.
CHARGER LOCATION
4.1
Locate the charger as far away from the battery as the DC cables permit.
4.2
Never place the charger directly above the battery being charged; gases
from the battery will corrode and damage the charger.
4.3
Never allow battery acid to drip onto the charger when reading the electrolyte specific gravity or filling the battery.
4.4
Do not operate the charger in a closed-in area or restrict the ventilation in
any way.
4.5
Do not set a battery on top of the charger.
5.
DC CONNECTION PRECAUTIONS
5.1
Connect and disconnect the DC output clips only after setting all of the
charger switches to the “off” position and removing the AC plug from the
electrical outlet. Never allow the clips to touch each other.
5.2
Attach the clips to the battery and chassis, as indicated in steps 6.5, 6.6,
and 7.2 thru 7.4.
6.
FOLLOW THESE STEPS WHEN BATTERY IS INSTALLED IN
VEHICLE.
A SPARK NEAR THE BATTERY MAY CAUSE A BATTERY EXPLOSION. TO REDUCE THE RISK OF A SPARK NEAR THE BATTERY:
6.1
Position the AC and DC cables to reduce the risk of damage by the hood,
door, or moving engine parts.
6.2
Stay clear of fan blades, belts, pulleys and other parts that can cause
injury.
6.3
Check the polarity of the battery posts. The POSITIVE (POS, P, +) battery
post usually has a larger diameter than the NEGATIVE (NEG, N, -) post.
•3•
6.4
Determine which post of the battery is grounded (connected) to the chassis. If the negative post is grounded to the chassis (as in most vehicles),
see step 6.5. If the positive post is grounded to the chassis, see step 6.6.
6.5
For a negative-grounded vehicle, connect the POSITIVE (RED) clip from
the battery charger to the POSITIVE (POS, P, +) ungrounded post of the
battery. Connect the NEGATIVE (BLACK) clip to the vehicle chassis or
engine block away from the battery. Do not connect the clip to the carburetor, fuel lines or sheet-metal body parts. Connect to a heavy gauge metal
part of the frame or engine block.
6.6
For a positive-grounded vehicle, connect the NEGATIVE (BLACK) clip
from the battery charger to the NEGATIVE (NEG, N, -) ungrounded post
of the battery. Connect the POSITIVE (RED) clip to the vehicle chassis or
engine block away from the battery. Do not connect the clip to the carburetor, fuel lines or sheet-metal body parts. Connect to a heavy gauge metal
part of the frame or engine block.
6.7
When disconnecting the charger, turn all switches to off, disconnect the
AC cord, remove the clip from the vehicle chassis, and then remove the
clip from the battery terminal.
6.8
See OPERATING INSTRUCTIONS for length of charge information.
7.
FOLLOW THESE STEPS WHEN BATTERY IS OUTSIDE VEHICLE.
A SPARK NEAR THE BATTERY MAY CAUSE A BATTERY EXPLOSION. TO REDUCE THE RISK OF A SPARK NEAR THE BATTERY:
7.1
Check the polarity of the battery posts. The POSITIVE (POS, P, +) battery
post usually has a larger diameter than the NEGATIVE (NEG, N, -) post.
7.2
Attach at least a 24-inch-long 6-gauge (AWG) insulated battery cable to
the NEGATIVE (NEG, N, -) battery post.
7.3
Connect the POSITIVE (RED) charger clip to the POSITIVE (POS, P, +)
post of the battery.
7.4
Position yourself and the free end of the cable you previously attached to
the NEGATIVE (NEG, N, -) battery post as far away from the battery as
possible – then connect the NEGATIVE (BLACK) charger clip to the free
end of the cable.
7.5
Do not face the battery when making the final connection.
7.6
When disconnecting the charger, always do so in reverse sequence of
the connecting procedure and break the first connection while as far away
from the battery as practical.
7.7
A marine (boat) battery must be removed and charged on shore. To
charge it onboard requires equipment specially designed for marine use.
8.
8.1
battery charging - ac connections
This battery charge is for use on nominal 120 volt circuits and requires a
dedicated 20A circuit.
•4•
DANGER – Never alter AC cord or plug provided – if it does not fit the
outlet, have proper outlet installed by a qualified electrician. Improper
connection can result in a risk of an electric shock or fire.
8.2
Recommended minimum AWG size for extension cords for battery
chargers
AC input rating,
a
amperes
But less
At least
than
0
2
2
3
3
4
4
5
5
6
6
8
8
10
10
12
12
14
14
16
16
18
18
20
25
(7.6)
18
18
18
18
18
18
18
16
16
16
14
14
AWG size of cord
Length of cord, feet (m)
50
100
150
(15.2)
(30.5)
(45.6)
18
18
16
18
16
14
18
16
14
18
14
12
16
14
12
16
12
10
14
12
10
14
10
8
12
10
8
12
10
8
12
8
8
12
8
6
a
If the input rating of a charger is given in watts rather than in
amperes, the corresponding ampere rating is to be determined
by dividing the wattage rating by the voltage rating ± for
example:
1250 watts/125 volts = 10 amperes
8.3
9.
Grounding Methods
This charger must be properly grounded. Make sure the AC outlet you are
plugging it into is properly grounded per local codes and regulations. If it
is not, have one installed by a qualified service person. Do not remove or
bypass the grounding pin on the plug or receptacle.
Assembly instructions
• No assembly required
•5•
10. control panel
CHARGED
CHARGING
BATTERY %
STANDARD
ON
VOLTAGE
GEL
OFF
DISPLAY MODE
BATTERY TYPE
START / STOP
CONNECTED
10.1 DIGITAL DISPLAY BUTTON
Use this button to set the function of the digital display to one of the following:
• BATTERY %: The digital display shows an estimate of the percent of
charge of the battery connected to the charger battery clamps.
• VOLTAGE: The digital display shows the voltage at the charger battery
clamps in DC volts.
10.2 BATTERY TYPE BUTTON
Use this button to set the type of battery to be charged to one of the following:
• Regular – Set button to STANDARD. This battery type is usually used
in cars, trucks and motorcycles. These batteries have vent caps and are
often marked “Low Maintenance” or “Maintenance-free”. This type of
battery is designed to deliver quick bursts of energy (such as starting engines) and have a greater plate count. The plates will also be thinner and
have somewhat different material composition. Regular batteries should
not be used for deep cycle applications
• Deep-Cycle – Set button to STANDARD. Deep-cycle batteries are usually marked as “Deep-Cycle” or “Marine”. Deep-cycle batteries are usually
larger than the other types. This type of battery has less instant energy
but somewhat greater long-term energy delivery than regular batteries.
Deep cycle batteries have thicker plates and can survive a number of
discharge cycles.
• AGM – Set button to STANDARD. The Absorbed Glass Matt construction
allows the electrolyte to be suspended in close proximity with the plate’s
active material. In theory, this enhances both the discharge and recharge
efficiency. Actually, the AGM batteries are a variant of Sealed VRLA batteries. Popular usage high performance engine starting, power sports,
deep cycle, solar and storage battery. AGM batteries are typically good
•6•
deep cycle batteries and they deliver best life performance if recharged
before the battery drops below the 50 percent discharge rate. If these
AGM batteries are discharged to a rate of 100 percent the cycle life will
be 300 plus cycles and this is true of most AGM batteries rated as deep
cycle batteries.
• GEL – Set button to GEL CELL. The Gel Cell is similar to the AGM style
because the electrolyte is suspended, but different because technically
the AGM battery is still considered to be a wet cell. The electrolyte in a
GEL cell has a silica additive that causes it to set up or stiffen. The recharge voltages on this type of cell are lower than the other styles of lead
acid battery. This is probably the most sensitive cell in terms of adverse
reactions to over-voltage charging. Gel Batteries are best used in VERY
DEEP cycle application and may last a bit longer in hot weather applications. If the incorrect battery charger is used on a Gel Cell battery, poor
performance and premature failure is certain.
Gel Cell and some AGM batteries may require a special charging rate.
Batteries should be marked with their type. If charging a battery that is not
marked, check the manual of the item that uses the battery.
11.
operating instructions
11.1 OVERVIEW
To use this battery charger, first, select an unused outlet from the eight
available and connect the battery and AC power, if necessary, following
the precautions listed under sections 6 and 7. Then, select the appropriate
BATTERY TYPE for your battery and press START. This section explains
a few details.
11.2 CHARGING: The CONNECTED (red) LED will not light continuously until
a battery is detected. If the charger does not detect a properly connected
battery, the CONNECTED LED will not light. Charging will not begin until
the CONNECTED LED comes on. When charging begins, the CHARGING
(yellow) LED will be lit.
11.3 AUTOMATIC CHARGE: Once the battery type is selected, press the
START button and the charger automatically selects the charge rate
based on battery size and voltage. When an automatic charger is complete, the charger will switch to Maintain Mode and the CHARGED (green)
LED will be lit.
11.4 ABORTED CHARGE: If charging cannot be completed normally, charging
will abort. When charging is aborted, the charger’s output is shut off. The
CONNECTED LED will be lit and the display will read BAD BAT. In this
case, the charger ignores all buttons. To reset after an aborted charge,
press the START/STOP button to turn the charger off.
•7•
11.5 DESULFATION MODE: If a battery is left discharged for an extended
period of time, it could become sulfated and not accept a normal charge.
The CHARGING LED will blink when the special desulfation mode is activated. When blinking, the charger has switched to the Desulfation Mode
of operation. If successful, normal charging will resume after the battery is
desulfated. The CHARGING LED will then stop blinking and light continuously. Desulfation could take up to 10 hours. If desulfation fails, charging
will abort and the CONNECTED LED will remain lit and the display will
read BAD BAT.
11.6 COMPLETION OF CHARGING: Charge completion is indicated by the
CHARGED LED. When lit, the charger has stopped charging and has
switched to Maintain Mode of operation.
11.7 MAINTAIN MODE: When the CHARGED LED is lit, the charger has
started Maintain Mode. This mode of operation is known as Float-Mode
Monitoring. In this mode, the charger keeps the battery fully charged by
delivering a small current, when necessary. The voltage is maintained at a
level determined by the BATTERY TYPE selected. To finish the charging
cycle press the START/STOP button, and the OFF LED will light.
11.8 GENERAL CHARGING NOTES:
The fan runs whenever one or more batteries are being charged.
If the charge mode is changed after charging has started (by pressing the
BATTERY TYPE button), the charging process stops.
The voltage displayed during charging, is the charging voltage and usually
will be higher than the battery’s resting voltage.
12. using the volt meter to test battery state of charge
12.1 OVERVIEW
The charger has a built in volt meter to test your battery’s state of charge.
The charger does not have a built in load tester. As such, a recently
charged battery could have a temporarily high voltage due to what is
known as “surface charge”. The voltage of such a battery will eventually
drop during the period immediately after the charging system is disengaged. Consequently, the tester could display inconsistent values for such
a battery. For a more accurate reading, the surface charge should be
removed by temporarily creating a load on the battery by turning on the
lights or other accessories.
The battery tester is only designed to test 12V batteries. Testing a device
with a rapidly changing voltage could yield unexpected or inaccurate
results.
12.2 TESTING SEQUENCE: There are three basic steps required to test the
battery state of charge:
1. Connect the battery charger’s clips to the battery. Be sure to follow all
of the precautions listed under sections 6 and 7.
•8•
2. Connect the charger’s power cord to a 120 VAC outlet. Again, be sure
to follow all of the precautions listed under sections 6 and 7.
3. Read the voltage on the digital meter or press the DISPLAY MODE
button to set the tester to BATTERY % and read the battery percentage.
12.3 TESTER AND CHARGER: When first turned on, the charger operates
only as a tester, not as a charger. To continue to use it as only a tester,
avoid pressing the START/STOP button. The charger is always in tester
mode until the START/STOP button is pressed. Pressing the START/
STOP button activates the charger and deactivates the tester.
12.4 TESTING AFTER CHARGING: After the unit has been changed from tester to charger (by pressing the START/STOP button), it remains a charger
as long as it’s connected to a battery. Press the Start/Stop button again to
change back to tester mode.
13. battery percent and charge time
This charger adjusts the charging time in order to charge the battery completely, efficiently and safely. The microprocessor automatically makes the
necessary decisions. However, this section includes guidelines that can be
used to estimate charging times.
The duration of the charging process depends on three factors:
13.1 Battery State – If a battery has only been slightly discharged, it can be
charged in less than a few hours. The same battery could take up to 10
hours if very weak. The battery state can be estimated by using the built-in
tester. The lower the reading, the longer charging will take.
13.2 Battery Rating – A higher rated battery will take longer to charge than
a lower rated battery under the same conditions. A battery is rated in
Ampere-Hours (AH), Reserve Capacity (RC) and Cold Cranking Amps
(CCA). The lower the rating, the faster the battery will charge.
13.3 Battery Size – The charger automatically selects a charge rate up to 12
amps. The charger charges at the selected charge rate and eventually
reduces the charge rate in a controlled manner. After the charging process
has started, the digital display can be used to determine the charging
progress by selecting the BATTERY % mode.
There are some important facts to keep in mind when charging a
battery:
13.4 When the display indicates 77% charged, the battery has been charged
enough to start most vehicles.
13.5 The battery % shown in tester mode is an estimate based on the battery
voltage and a scale set by the Battery Council International. The battery %
shown in charger mode is an estimate of the relative charge in the battery
compared to the charge it should have if the charging process is allowed
to complete.
•9•
13.6 The battery % shown in tester mode can be used to estimate the relative
charge time. The lower the % shown, the longer the charge time for a
given battery.
13.7 The battery % shown in charger mode is an indication of the relative progress of the charging process. The higher the battery % displayed, the less
charge time remains.
13.8 The more a battery is discharged, the faster it absorbs a charge from the
charger. That means that the battery % increases faster at the beginning
of the charging process than at the end. In other words, it takes longer for
a battery to accept the last few percent of the charge than the first several
percent.
14. maintenance instructions
14.1 Before performing maintenance, unplug and disconnect battery charger
(see sections 6.7 and 7.6).
14.2 After use, use a dry cloth to wipe all battery corrosion and other dirt or oil
from terminals, cords, and the charger case.
14.3 Servicing does not require opening unit, as there are no user-serviceable
parts.
15. storage instructions
15.1 Store charger unplugged, in an upright position. The cord will still conduct
electricity until it is unplugged from outlet.
15.2 Store inside, in a dry, cool place (unless you’re using a UL Listed, onboard Marine Charger ).
15.3 Do not store clips on handle, clipped together, on or around metal, or
clipped to cables.
• 10 •
16. troubleshooting
PROBLEM
POSSIBLE CAUSE
SOLUTION
The battery is connected
and the charger is on, but is
not charging.
The charger is not in charger mode.
Press START/STOP
button for the battery
that is connected to
the charger.
The indicator lights are lit
in an erratic manner, not
explained in “Using Your
Battery Charger” section.
A button may have been
pressed when the charger
was plugged in.
Make sure nothing is
touching the control
panel, then unplug
the unit and plug it in
again.
“bAd bAt” in Display; CONNECTED LED lit.
The charger is in abort
mode. The battery may be
bad.
See the “USING
YOUR BATTERY
CHARGER” section.
See Aborted Charge in the
“Operating Instructions”
section.
This will happen if the
battery did not reach full
charge within 24 hours.
May be due to a very large
battery or bank of batteries
requiring more power than
the charger can deliver in
24 hours. The charger is
in abort mode. The battery
may also be faulty.
Reset the charger by
unplugging it. Select
the desired battery
type again, if necessary.
The charger is making an
audible clicking sound.
The charger has a relay that
turns the current on and off
to the battery.
No problem, this is a
normal condition.
The measured current is
much lower than what was
selected.
The charger reached the
maximum voltage and is
reducing the current.
No problem, this is a
normal condition.
The charger detected an
over-temperature condition
and has reduced the current
to allow the unit to cool.
Make sure the charger does not have the
side ventilation holes
blocked. Move the
charger out of the sun
and into the shade.
The charger was unplugged
from the wall but the display
is still on.
The battery is supplying the
power to the display.
Disconnect the battery.
While charging the battery,
the battery stays at a certain % (ex. <65%).
The % display may not
change at a steady rate.
DO NOT UNPLUG
OR CHANGE SETTING. Be patient and
let the charger finish.
This is normal.
When the charger is
unplugged or the settings
are changed, the number
increases or jumps to 100%.
The battery voltage is still
high from a partial charge.
Wait for the voltage to
settle before resuming the charge. Try
to charge at a lower
charge rate. Turn on
the lights to remove
the surface charge.
• 11 •
17.
limited warranty
SCHUMACHER ELECTRIC CORPORATION, 801 BUSINESS CENTER
DRIVE, MOUNT PROSPECT, IL 60056-2179, MAKES THIS LIMITED
WARRANTY TO THE ORIGINAL RETAIL PURCHASER OF THIS PRODUCT. THIS LIMITED WARRANTY IS NOT TRANSFERABLE
OR ASSIGNABLE.
Schumacher Electric Corporation (the “Manufacturer”) warrants this battery
charger for one years from the date of purchase at retail against defective
material or workmanship that may occur under normal use and care. If
your unit is not free from defective material or workmanship, Manufacturers
obligation under this warranty is solely to repair or replace your product,
with a new or reconditioned unit, at the option of the Manufacturer. It is the
obligation of the purchaser to forward the unit, along with mailing charges
prepaid to the Manufacturer or its authorized representatives in order for
repair or replacement to occur.
Manufacturer does not provide any warranty for any accessories used with
this product that are not manufactured by Schumacher Electric Corporation
and approved for use with this product. This Limited Warranty is void if the
product is misused, subjected to careless handling, repaired, or modified
by anyone other than Manufacturer or if this unit is resold through an unauthorized retailer.
Manufacturer makes no other warranties, including, but not limited to,
express, implied or statutory warranties, including without limitation, any
implied warranty of merchantability or implied warranty of fitness for a particular purpose. Further, Manufacturer shall not be liable for any incidental,
special or consequential damage claims incurred by purchasers, users or
others associated with this product, including, but not limited to, lost profits, revenues, anticipated sales, business opportunities, goodwill, business
interruption and any other injury or damage. Any and all such warranties,
other than the limited warranty included herein, are hereby expressly
disclaimed and excluded. Some states do not allow the exclusion or limitation of incidental or consequential damages or length of implied warranty,
so the above limitations or exclusions may not apply to you. This warranty
gives you specific legal rights and it is possible you may have other rights
which vary from this warranty.
THIS LIMITED WARRANTY IS THE ONLY EXPRESS LIMITED WARRANTY
AND THE MANUFACTURER NEITHER ASSUMES OR AUTHORIZES
ANYONE TO ASSUME OR MAKE ANY OTHER OBLIGATION TOWARDS
THE PRODUCT OTHER THAN THIS WARRANTY.
Call Customer Service at: 888-263-4906 Monday - Friday, 7 a.m. to 5 p.m. CST
Modelo INC-812
Cargador De Batería Automático
Totalmente Automático
Controlado por Microprocesador con
Estación Cargadora de Baterías
LEA TODO EL MANUAL ANTES
DE USAR ESTE PRODUCTO.
PRECAUCION:
Lea todas las Normas de Seguridad e Instrucciones de
Operación, y sígalas cada vez que use el producto.
TABLE OF CONTENTS
SECCIÓN
PÀGINA
INSTRUCCIONES DE SEGURIDAD IMPORTANTES
17
PRECAUCIONES PERSONALES
18
PREPARación de la carga
18
UBICACIÓN DEL CARGADOR
19
PRECAUCIONES DE LA CONEXIÓN CC
19
SIGA ESTOS PASOS AL INSTALAR UNA BATERÍA
EN EL VEHÍCULO. 19
SIGA ESTOS PASOS cuando la batería esté
afuera del vehículo. 20
BATERIA CARGANDO - CONEXIONES AC
21
INSTRUCCIONES DE ENSAMBLAJE
22
PANEL DE CONTROL
22
INSTRUCCIONES DE FUNCIONAMIENTO
24
CÓMO UTILIZAR EL VOLTÍMETRO PARA EVALUAR
EL ESTADO DE LA CARGA DE LA BATERÍA
25
PORCENTAJE DE BATERÍA Y TIEMPO DE CARGA
26
INSTRUCCIONES DE MANTENIMIENTO
27
INSTRUCCIONES DE ALMACENAJE
27
LOCALIZACIÓN Y SOLUCIÓN DE PROBLEMAS
27
GARANTÍA LIMITADA
29
IMPORTANTE: LEA Y CONSERVE ESTE MANUAL DE INSTRUCCIONES Y SEGURIDAD.
1.
INSTRUCCIONES DE SEGURIDAD IMPORTANTES
1.1
CONSERVE ESTAS INSTRUCCIONES – Este manual contiene instrucciones operativas y de seguridad importantes para el cargador de baterías
Modelo INC-812A.
1.2
PRECAUCION: De acuerdo a la Proposición 65 del California, este producto contiene químicos que de acuerdo al Estado de California son causantes
de cáncer, defectos de nacimiento u otro daño reproductor.
1.3
No exponga el cargador a lluvia ni a nieve.
1.4
El uso de un accesorio no recomendado o vendido por el fabricante del
cargador de baterías podría ocasionar riesgo de incendio, descarga eléctrica o lesión a las personas y un daño en los bienes.
1.5
Para reducir el riesgo de peligro del enchufe y cable eléctricos, cuando
desconecte el cargador, tire del enchufe y no del cable.
1.6
No se debería utilizar un alargue a menos que sea absolutamente necesario. El uso indebido del alargue podría ocasionar riesgo de incendio y
descarga eléctrica. Si debe utilizar un alargue, asegúrese de que:
• La cantidad, tamaño y la forma de los bornes del enchufe del alargue
coincidan con los del enchufe del cargador;
• El alargue esté adecuadamente conectado y en buena condición eléctrica; y
• El tamaño del cable sea lo suficientemente largo para el amperaje de CA
del cargador, según lo especificado en la Tabla 8.3.
1.7
No manipule el cargador si tiene el cable o el enchufe dañados – reemplácelos de inmediato. (Llame al servicio de atención al cliente: 800-6215485.)
1.8
No manipule el cargador si ha recibido un golpe fuerte, se ha caído o dañado de cualquier modo; llévelo a un técnico calificado. (Llame al servicio
de atención al cliente: 800-621-5485.)
1.9
No desarme el cargador, llévelo a un reparador calificado cuando sea
necesario algún tipo de servicio técnico o reparación. El reensamblado incorrecto podría ocasionar riesgo de descarga eléctrica o incendio. (Llame
al servicio de atención al cliente: 800-621-5485.)
1.10 Para reducir el riesgo de descarga eléctrica, desenchufe el cargador del
tomacorriente antes de intentar realizar alguna actividad de mantenimiento o limpieza. Los controles de apagado no reducirán este riesgo.
ADVERTENCIA – RIESGO DE GASES EXPLOSIVOS.
ES PELIGROSO TRABAJAR CERCA DE UNA BATERÍA DE PLOMO Y
ÁCIDO. LAS BATERÍAS GENERAN GASES EXPLOSIVOS DURANTE
SU FUNCIONAMIENTO NORMAL. POR ESO, ES DE SUMA IMPORTANCIA QUE SIGA LAS INSTRUCCIONES CADA VEZ QUE UTILICE
EL CARGADOR.
• 17 •
PARA REDUCIR EL RIESGO DE EXPLOSIÓN DE LA BATERÍA, SIGA
ESTAS INSTRUCCIONES ADEMÁS DE LAS PUBLICADAS POR EL
FABRICANTE DE CUALQUIER EQUIPO QUE QUIERA USAR CERCA
DE LA BATERÍA. ReviSe LAS MARCAS DE PRECAUCIÓN DE ESTOS
PRODUCTOS Y DEL MOTOR.
2.
PRECAUCIONES PERSONALES
2.1
Considere tener a alguien que lo acompañe para asistirlo cuando trabaje
cerca de una batería de plomo y ácido.
2.2
Tenga a mano mucha agua fresca y jabón en caso de que la piel, la ropa
o los ojos entren en contacto con el ácido de la batería.
2.3
Use protección total para ojos y ropa. Evite tocarse los ojos mientras
trabaja cerca de la batería.
2.4
Si el ácido de la batería entra en contacto con la piel o la ropa, lave de
inmediato con agua y jabón. Si el ácido entra en los ojos, deje que éstos
se llenen de agua fría corriente al menos 10 minutos y consiga atención
médica inmediata.
2.5
NUNCA fume ni permita que haya chispas o llamas cerca de la batería o
del motor.
2.6
Sea extremadamente cauteloso para reducir el riesgo de dejar caer una
herramienta metálica en la batería, ya que podría echar chispas o causar
un cortocircuito en la batería o en otra parte eléctrica que pudiera ocasionar una explosión.
2.7
Retire los artículos metálicos personales como anillos, pulseras, collares
y relojes cuando trabaje con una batería de plomo y ácido, dado que ésta
puede ocasionar una corriente de cortocircuito lo suficientemente alta
como para soldar al metal algún anillo u otro artículo, y provocar así una
quemadura grave.
2.8
Use el cargador para cargar una batería de PLOMO Y ÁCIDO, exclusivamente, ya que no está diseñado para suministrar energía a un sistema
eléctrico de bajo voltaje distinto de una aplicación de motor de arranque.
No utilice el cargador de batería para cargar baterías secas, comúnmente
utilizadas en artefactos domésticos. Estas baterías podrían explotar y
ocasionar una lesión en personas y un daño en los bienes.
2.9
NUNCA cargue una batería congelada.
2.10 NUNCA cargue demasiado una batería.
3.
PREPARación de la carga
3.1
Si es necesario quitar la batería del vehículo para cargarla, siempre retire
el terminal a tierra de la batería primero. Asegúrese de que todos los accesorios dentro del vehículo estén apagados para evitar causar un arco.
3.2
Asegúrese de que el área que rodea la batería esté bien ventilada durante
la carga.
• 18 •
3.3
Limpie los terminales de la batería antes de cargarla.Durante la limpieza,
evite que la corrosión transportada por el aire entre en contacto con sus
ojos, nariz o boca. Use bicarbonato de sodio y agua para neutralizar los
ácidos de la batería y eliminar la corrosión transportada por el aire. No se
toque los ojos, nariz o boca.
3.4
Agregue agua destilada en cada celda hasta que el ácido de la batería
alcance el nivel especificado por el fabricante. Evite que se rebase. En el
caso de una batería sin capas de celda desmontables, como las baterías
de plomo y ácido reguladas por una válvula, siga atentamente las instrucciones de recarga del fabricante.
3.5
Verifique que las pinzas de los cables del cargador estén en conexión
firme.
3.6
Determine el voltaje de la batería teniendo en cuenta el manual del
propietario del automóvil y asegúrese de que el interruptor del selector de
voltaje de salida está puesto en el voltaje correcto. Si el cargador tiene un
índice de carga ajustable, primero cargue la batería en el índice más bajo.
3.7
Verifique que las pinzas de los cables del cargador estén en conexión
firme.
4.
UBICACIÓN DEL CARGADOR
4.1
Ubique el cargador lo más alejado posible de la batería en la medida que
los cables de CC se lo permitan.
4.2
Nunca deposite el cargador directamente sobre la batería que se está cargando; los gases de la batería corroerán y dañarán el cargador.
4.3
Nunca permita que el ácido de la batería gotee sobre el cargador cuando
esté leyendo el peso específico electrolítico o llenando de la batería.
4.4
No maneje el cargador en un área cerrada o con poca ventilación.
4.5
No coloque una batería sobre el cargador.
5.
PRECAUCIONES DE LA CONEXIÓN CC
5.1
Conecte y desconecte los sujetadores de salida de corriente CC sólo
luego de apagar los interruptores del cargador (posición “off”) y retirar el
cable CA del enchufe eléctrico. Nunca deje que los sujetadores se toquen
entre ellos.
5.2
Coloque los sujetadores a la batería y chasis, según lo indicado en 6.5,
6.6, y 7.2 hasta 7.4.
6.
SIGA ESTOS PASOS AL INSTALAR UNA BATERÍA EN EL
VEHÍCULO.
UNA CHISPA CERCA DE LA BATERÍA PODRÍA PROVOCAR UNA EXPLOSIÓN. PARA EVITAR ESTO:
6.1
Coloque los cables CA y CC para reducir el riesgo de daño provocado por
el capó, la puerta o una parte móvil del motor.
• 19 •
6.2
Manténgase alejado de paletas de ventiladores, cinturones, poleas y
demás partes que puedan causar una lesión a las personas.
6.3
Revise la polaridad de los terminales de la batería. El terminal de la batería de polaridad POSITIVA (POS, P, +) por lo general tiene un diámetro
mayor que el terminal de polaridad NEGATIVA (NEG, N,–).
6.4
Determine qué terminal tiene conexión a tierra (conectado) con el chasis.
Si el terminal negativo está conectado al chasis (como en la mayoría de
los vehículos), véase (6.5). Si el terminal positivo es el que está conectado al chasis, véase (6.6).
6.5
Para un vehículo de conexión a tierra negativa, conecte el sujetador
POSITIVO (ROJO) desde el cargador de la batería hacia el terminal sin
conexión a tierra POSITIVO (POS, P, +). Conecte el sujetador NEGATIVO
(NEGRO) al chasis del vehículo o bloque del motor, lejos de la batería.
No conecte el sujetador al carburador, a las mangueras de combustible
o planchas de metal de la carrocería. Conecte a una parte metálica del
calibre pesado de la estructura o bloque del motor.
6.6
Para un vehículo de conexión a tierra positiva, conecte el sujetador
NEGATIVO (NEGRO) desde el cargador de la batería hacia el terminal sin
conexión a tierra NEGATIVO (NEG, N, –). Conecte el sujetador POSITIVO (ROJO) al chasis de vehículo o bloque del motor, lejos de la batería.
No conecte el sujetador al carburador, a las mangueras de combustible
o planchas de metal de la carrocería. Conecte a una parte metálica del
calibre pesado de la estructura o bloque del motor.
6.7
Al desconectar el cargador, desenchufe los interruptores, desconecte el
cable de corriente alterna, retire los sujetadores del chasis del vehículo y
luego el del terminal de la batería.
6.8
Vea las CALCULANDO EL TIEMPO DE CARGA para mayor información
sobre la carga.
7.
SIGA ESTOS PASOS cuando la batería esté afuera del
vehículo.
UNA CHISPA CERCA DE LA BATERÍA PODRÍA PROVOCAR SU EXPLOSIÓN. PARA EVITAR ESTO:
7.1
Revise la polaridad de los terminales de la batería. El terminal de la batería de polaridad POSITIVA (POS, P, +) por lo general tiene un diámetro
mayor que el terminal de polaridad NEGATIVA (NEG, N,–).
7.2
Añada por lo menos un cable de batería aislado calibre (AWG – calibre
estadounidense de cable) 6 de 24 pulgadas al terminal de la batería con
polaridad NEGATIVA (NEG, N, -).
7.3
Conecte el sujetador del cargador POSITIVO (ROJO) al terminal POSITIVO (POS, P, +).
7.4
Ubíquese y libere el extremo del cable lo más lejos posible de la batería –
luego conecte el sujetador del cargador NEGATIVO (NEGRO) para liberar
el extremo del cable.
• 20 •
7.5
No se acerque a la batería cuando realice la conexión final.
7.6
Cuando desconecte el cargador, hágalo siempre en la secuencia inversa
al procedimiento de conexión y primero interrumpa la conexión mientras
esté tan lejos de la batería como sea posible.
7.7
Una batería marítimo (de barco) se debe retirar y cargar en tierra. Su
carga a bordo requiere un equipo especialmente diseñado para el uso
marítimo.
8.
8.1
BATERIA CARGANDO - CONEXIONES AC
Este cargador de batería es para usar en un circuito nominal de 120 voltiosy requiere de un circuito funcional de 20A.
PELIGRO – Nunca cambie un cable CA o enchufe suministrados – si no
entra en el tomacorriente, solicite la instalación adecuada de un electricista calificado. La conexión inadecuada puede resultar en riesgo de
descarga eléctrica.
8.2
Extensión mínima de medida de cables para cargadores de baterías
recomendada por la AWG
Entrada de corriente
a
alterna en amperios
A no
De
menos de
0
2
2
3
3
4
4
5
5
6
6
8
8
10
10
12
12
14
14
16
16
18
18
20
Medida del cable segun la AWG
Longitud del cable, pies (m)
25
50
100
150
(7.6)
(15.2)
(30.5)
(45.6)
18
18
18
16
18
18
16
14
18
18
16
14
18
18
14
12
18
16
14
12
18
16
12
10
18
14
12
10
16
14
10
8
16
12
10
8
16
12
10
8
14
12
8
8
14
12
8
6
a
Si la cantidad de entrada de un cargador es dada en vatios en
vez de amperios, la medida correspondiente de amperios es
determinada si se dividen los vatios por la cantidad de voltaje ±
Por ejemplo:
1250 vatios/125 voltios = 10 amperios
• 21 •
8.3
9.
9.1
Métodos a tierra
Este cargador debe conectarse a tierra correctamente. Asegúrese que
la salida del tomacorriente CA donde se enchufe este correctamente
conectado a tierra y de acuerdo a los códigos y reglamentos locales. Si no
lo está, haga que un técnico calificado lo instale. No quite ni abra el perno
que pone a tierra o en el receptáculo.
INSTRUCCIONES DE ENSAMBLAJE
No se requiere ensamblaje
10. PANEL DE CONTROL
CHARGED
CHARGING
BATTERY %
STANDARD
ON
VOLTAGE
GEL
OFF
DISPLAY MODE
BATTERY TYPE
START / STOP
CONNECTED
10.1 DIGITAL DISPLAY BUTTON (BOTÓN DE VISOR DIGITAL)
Use este botón para fijar la función de visor digital, conforme a uno de los
siguientes:
• BATTERY % (% de BATERÍA): el visor digital muestra un cálculo del
porcentaje de carga de la batería conectada a las abrazaderas de la
batería del cargador.
• VOLTAGE (VOLTAJE): el visor digital muestra el voltaje en las abrazaderas de la batería del cargador en voltios de corriente continua.
10.2 Botón de “Battery Type”
Se usa este botón para fijar el tipo de batería a cargarse en STANDARD
o GEL CELL.
• Regular—Fije este botón en STANDARD . Este tipo de batería por lo
general se usa en carros, camiones y motocicletas. Dichas baterías
tienen tapas respiraderas y a menudo son marcadas “Low Maintenance”
o “Maintenance-free”. Este tipo de batería se diseña para entregar descargas rápidas de energía (como para arrancar motores) y tienen mayor
número de placas. Las placas también son más delgadas y tienen una
composición material algo diferente. Las baterías regulares no deben
usarse para aplicaciones de ciclo profundo.
• 22 •
• Deep-Cycle – Fije el botón en STANDARD . Las baterías de ciclo profundo normalmente vienen marcadas “Deep Cycle” o “Marine” y por lo
general son más grandes que los demás tipos. Este tipo de batería tiene
menos energía instante pero una entrega de larga duración algo mayor
• que las baterías regulares. Las baterías de ciclo profundo tienen placas
más gruesas y pueden aguantar varios ciclos de descarga.
• AGM – Fije el botón en STANDARD. La construcción de “Absorbed
Glass Matt” permite que el electrolito se suspenda bien cerca del material
activo de la placa. En teoría, esto aumenta la eficacia tanto de descarga
y de recarga. En realidad, las baterías AGM son variación de las baterías “Sealed VRLA”. Usos populares: arranque de motores de alto rendimiento, deportes a motor y como batería de ciclo profundo, solar y de
acumuladores. Las baterías AGM típicamente sirven bien como baterías
de ciclo profundo y entregan la mejor vida de rendimiento si se recargan
antes de que la batería se baje a menos de la tasa de descarga del 50
por ciento. Si estas baterías AGM se descargan hasta una tasa del 100
por ciento, la vida de ciclo será de 300 ciclos y más, y esto se aplica a la
mayoría de las baterías AGM con nómina de baterías de ciclo profundo.
• GEL –Fije el botón en GEL CELL. La “Gel Cell” se parece al estilo
“AGM “porque el electrolito queda suspendido, pero se defiere en que
técnicamente la batería “AGM” aún se considera de pila hidroeléctrica.
El electrolito en un gel cell tiene aditivo de sílice que lo hace endurecer.
Los voltajes de recarga en este tipo de célula son más bajos que con
otros tipos de baterías de plomo-ácido. Es probablemente la célula más
sensible en términos de reacciones adversas a carga de sobrevoltaje.
Las Baterías tipo Gel tienen su mejor uso en aplicaciones de ciclo MUY
PROFUNDO y pueden durar un poco más en aplicaciones en tiempo de
calor. Si se usa un cargador incorrecto en una batería Gel Cell, el resultado seguro será mal rendimiento y falla prematura
Las baterías de “Gel Cell” y algunas tipos “AGM” pueden necesitar una
tasa de carga especial.
Las baterías deberían identificarse con su tipo. Si está cargando una batería sin identificación, revise el manual del artículo que la utiliza.
• 23 •
11.
INSTRUCCIONES DE FUNCIONAMIENTO
11.1 ASPECTOS GENERALES
Para utilizar el cargador de baterías, primero seleccione un toma eléctrico
que no esté en uso de los ocho disponibles y conecte la batería a la corriente CA, de ser necesario, tomando las precauciones enumeradas en las
secciones 6 y 7. Luego seleccione BATTERY TYPE (TIPO DE BATERÍA)
apropiado para su batería y presione START (COMENZAR). Esta sección
le proporcionará más información.
11.2 CARGA: El LED CONECTADO (rojo) no se iluminará en forma continua
hasta que se detecte una batería. Si el cargador no detecta una batería
correctamente conectada, el LED CONECTADO no se iluminará. La carga
no comenzará hasta que el LED CONECTADO se encienda. Cuando la
carga comienza, el LED DE CARGA (amarillo) se encenderá.
11.3 CARGA AUTOMÁTICA: Una vez seleccionado el tipo de batería, presione el botón COMENZAR y el cargador automáticamente selecciona la
tasa de carga según el tamaño y el voltaje de la batería. Cuando la carga
automática se ha completado, el cargador pasará al Modo de mantenimiento y se encenderá el LED CARGA COMPLETA (verde).
11.4 CARGA INTERRUMPIDA: Si la carga no puede completarse en forma
normal, ésta se interrumpirá. Cuando se interrumpe la carga, la salida del
cargador se cierra. El LED CONECTADO estará encendido y la pantalla
mostrará BATERÍA DEFECTUOSA (BAD BAT). En este caso, el cargador
ignora todos los botones. Para reiniciar luego de una carga interrumpida,
presione el botón COMENZAR/DETENER para apagar el cargador.
11.5 MODO DESULFATACIÓN: Si una batería se deja sin carga por un largo
período, ésta puede sulfatarse y no aceptar una carga normal. El LED
DE CARGA parpadeará cuando el modo desulfatación especial esté
activado. Cuando parpadea, el cargador ha pasado al modo de funcionamiento Desulfatación. Si todo funciona correctamente, se retomará la
carga normal y la batería será desulfatada. El LED DE CARGA dejará de
parpadear y se iluminará en forma continua. La desulfatación puede llevar
hasta 10 horas. Si la desulfatación falla, la carga se interrumpirá y el LED
CONECTADO permanecerá encendido y en la pantalla leerá BATERÍA
DEFECTUOSA.
11.6 FINALIZACIÓN DE LA CARGA: La finalización de la carga se indica con
el LED CARGA COMPLETA. Cuando se ilumina, el cargador ha detenido
la carga y ha pasado al Modo de operación Mantener.
11.7 MODO MANTENER: Cuando el LED CARGA COMPLETA está iluminado,
el cargador ha comenzado el Modo Mantener. Este modo de funcionamiento se conoce como Control de Modo Flotante. En este modo, el cargador mantiene la batería cargada por completo enviando una pequeña
corriente cuando resulta necesario. El voltaje se mantiene a un nivel
determinado según el TIPO DE BATERÍA seleccionado. Para finalizar el
ciclo de carga, presione el botón COMENZAR/DETENER y el LED APAGADO se iluminará.
• 24 •
11.8 NOTAS GENERALES RELACIONADAS CON LA CARGA:
El ventilador se pone en funcionamiento siempre que se esté cargando
una o más baterías.
Si el modo de carga se cambia luego de que ha comenzado la carga (presionando el botón TIPO DE BATERÍA), el proceso de carga se detiene.
El voltaje que se muestra durante la carga es el voltaje de carga y por lo
general es más elevado que el voltaje en reposo de la batería.
12. CÓMO UTILIZAR EL VOLTÍMETRO PARA EVALUAR EL ESTADO DE
LA CARGA DE LA BATERÍA
12.1 ASPECTOS GENERALES
El cargador posee un voltímetro incorporado para evaluar el estado de
la carga de su batería. El cargador no cuenta con un probador de carga
incorporado. Como tal, una batería recientemente cargada puede tener un
voltaje temporalmente alto debido a lo que se conoce como “carga de superficie”. Eventualmente, el voltaje de esa batería caerá durante el período inmediatamente posterior a que el sistema de carga se desconecte.
Como consecuencia, el tester podría mostrar valores inconsistentes para
dicha batería. Para una lectura más precisa, la carga de superficie debe
ser removida creando de manera temporaria una carga en la batería
encendiendo las luces u otros accesorios.
El tester de batería está diseñado para probar baterías de 12V solamente.
Probar un dispositivo con un voltaje rápidamente cambiante podría arrojar
resultados inesperados o inexactos.
12.2 SECUENCIA DE PRUEBA: Hay tres pasos básicos necesarios para probar el estado de carga de la batería:
1. Conecte las horquillas del cargador de baterías a la batería. Asegúrese
de tomar todas las precauciones enumeradas en las secciones 6 y 7.
2. Conecte el cable de corriente del cargador a un toma de 120 VCA.
Nuevamente, asegúrese de tomar todas las precauciones enumeradas
en las secciones 6 y 7.
3. Lea el voltaje en el medidor digital o presione el botón DISPLAY
MODE (MODO MOSTRAR) para configurar el tester a % DE BATERÍA
y lea el porcentaje de la batería.
12.3 TESTER Y CARGADOR: Cuando se enciende por primera vez, el cargador funciona sólo como tester, no como cargador. Para continuar utilizándolo como tester solamente, evite presionar el botón COMENZAR/DETENER. El cargador está siempre en modo tester hasta que se presiona
el botón COMENZAR/DETENER. Cuando se presiona el botón COMENZAR/DETENER, se activa el cargador y se desactiva el tester.
• 25 •
12.4 PRUEBA LUEGO DE LA CARGA: Luego de que se ha cambiado la
unidad de tester a cargador (presionando el botón COMENZAR/DETENER), el dispositivo sigue funcionando como cargador siempre que esté
conectado a una batería. Vuelva a presionar el botón Comenzar/Detener
para cambiar al modo tester.
13. PORCENTAJE DE BATERÍA Y TIEMPO DE CARGA
Este cargador ajusta el tiempo de carga a fin de cargar la batería por
completo, en forma eficiente y segura. El microprocesador automáticamente toma las decisiones necesarias. Sin embargo, esta sección incluye
pautas que pueden usarse para estimar los tiempos de carga.
La duración del proceso de carga depende de tres factores:
13.1 Estado de la batería: Si una batería apenas se ha descargado, se puede
cargar en menos de unas pocas horas. La carga de la misma batería
podría llevar hasta 10 horas si se encuentra muy descargada. El estado
de la batería puede determinarse utilizando el tester incorporado. Cuanto
más baja sea la lectura, más tiempo llevará la carga.
13.2 Clasificación de la batería: Una batería de clasificación más alta llevará
más tiempo de carga que una batería de clasificación más baja en las
mismas condiciones. Las baterías se clasifican en amperes/hora (AH),
capacidad de reserva (CR) y amperios de arranque en frío (AAF). Cuanto
más baja sea la clasificación, más rápido se cargará la batería.
13.3 Tamaño de la batería: El cargador selecciona, en forma automática, una
tasa de carga de hasta 12 amperes. El cargador carga a la tasa seleccionada y eventualmente reduce la tasa de carga en forma controlada.
Luego de que el proceso de carga ha comenzado, la pantalla digital
puede utilizarse para determinar el progreso de la carga seleccionando el
modo % DE BATERÍA.
Existen algunos puntos importantes a tener en cuenta cuando se
carga una batería:
13.4 Cuando la pantalla indica que se ha cargado el 77%, la batería ya cuenta
con la carga suficiente para arrancar la mayoría de los vehículos.
13.5 El % de batería que se muestra en modo tester es un estimado basado en
el voltaje de la batería y una escala determinada por el Consejo Internacional de Baterías. El % de batería que se muestra en modo cargador es
un estimado de la carga relativa en la batería comparado con la carga que
debería tener si se permite que se complete el proceso de carga.
13.6 El % de batería que se muestra en modo tester puede utilizarse para estimar el tiempo relativo de carga. Cuanto más bajo sea el porcentaje que
se muestra, más tiempo llevará la carga de la batería.
13.7 El porcentaje de batería que se muestra en modo cargador es una indicación del progreso relativo del proceso de carga. Cuanto más alto sea
el porcentaje de batería que se muestra, menor será el tiempo de carga
restante.
• 26 •
13.8 Cuanto más se descarga una batería, más rápido ésta absorbe la carga
proveniente del cargador. Esto significa que el porcentaje de batería aumenta en forma más rápida al comienzo del proceso de carga que al final
de éste. En otras palabras, lleva más tiempo que una batería acepte los
últimos pocos porcentajes de carga que los primeros.
14. INSTRUCCIONES DE MANTENIMIENTO
14.1 Antes de efectuar mantenimiento, desenchufe y desconecte el cargador
de baterías (vea secciones 6.7 y 7.6)
14.2 Después de usar, desenchufar y limpie toda corrosión de la batería y otra
suciedad o aceite de los terminales, cordones y el estuche del cargador,
con un trapo seco.
14.3 No se requiere abrir la unidad para servicio, ya que no hay piezas que el
usuario puede atender.
15. INSTRUCCIONES DE ALMACENAJE
15.1 Guarde el cargador desenchufado, en posición recta. El cordón seguirá
conduciendo electricidad hasta no quedar desenchufado del tomacorriente.
15.2 Guarde el cargador adentro, en un sitio seco y fresco (a no ser que esté
usando un Cargador Marino a bordo.
15.3 No guarde las pinzas sobre el asa, conectadas entre sobre o alrededor de
metal, o conectadas a los cables.
16. LOCALIZACIÓN Y SOLUCIÓN DE PROBLEMAS
PROBLEMA
CAUSA POSIBLE
SOLUCIÓN
La batería está conectada y
el cargador está encendido
pero no está cargando.
El cargador no está en
modo cargador.
Presione el botón
COMENZAR/DETENER para la batería
que está conectada al
cargador.
Las luces del indicador
se encienden en forma
errática, no se explica en
la sección “Cómo usar su
cargador de baterías”.
Se pudo haber presionado
un botón cuando el cargador estaba enchufado.
Asegúrese de que
nada esté tocando
el panel de control,
luego desenchufe
la unidad y vuelva a
enchufarla.
• 27 •
PROBLEMA
CAUSA POSIBLE
SOLUCIÓN
En la pantalla aparece “Batería Defectuosa”; el LED
CONECTADO se ilumina.
El cargador se encuentra en
modo interrumpir. La batería
puede estar defectuosa.
Diríjase a la sección
“CÓMO UTILIZAR
SU CARGADOR DE
BATERÍAS”.
Ver Carga interrumpida en
la sección “Instrucciones de
funcionamiento”.
Esto sucede si la batería no
llega a su carga completa
dentro de las 24 horas.
Quizás debido a una batería
muy grande o un banco de
baterías que requieren más
energía que la que puede
proporcionar el cargador
en 24 horas. El cargador se
encuentra en modo interrumpir. La batería también
puede estar defectuosa.
Reinicie su cargador
desenchufándolo.
Seleccione el tipo de
batería nuevamente,
de ser necesario.
El cargador hace un ruido
de chasquido fuerte..
El cargador tiene un relé
que enciende y apaga la
corriente de la batería.
No hay problema,
esto es normal.
La corriente medida es
mucho menos que la que
seleccioné.
El cargador alcanzó el
voltaje máximo y está reduciendo la corriente.
No hay problema,
esto es normal.
El cargador detectó un
excedente de temperatura
y ha reducido la corriente
para permitir que la unidad
se enfríe.
Asegúrese de que el
cargador no tenga los
orificios de ventilación
obstruidos. Retire el
cargador del sol y
ubíquelo a la sombra.
Se desenchufó el cargador
del tomacorriente pero la
pantalla sigue encendida.
La batería está suministrando energía a la pantalla.
Desconecte la batería.
Mientras se carga la batería, ésta permanece a un
porcentaje determinado (por
ej.: <65%).
La pantalla de porcentaje
puede no cambiar a una
tasa constante.
NO DESENCHUFE O
CAMBIE LAS CONFIGURACIONES.
Sea paciente y deje
que el cargador termine. Esto es normal.
Cuando el cargador se
desenchufa o se cambian
las configuraciones, la cifra
aumenta o salta a 100%.
El voltaje de la batería aún
es alto para una carga
parcial..
Aguarde a que el voltaje se asiente antes
de retomar la carga.
Trate de cargar a una
tasa de carga menor.
Encienda las luces
para remover la carga
de superficie.
• 28 •
17.
GARANTÍA LIMITADA
SCHUMACHER ELECTRIC CORPORATION,
801 BUSINESS CENTER DRIVE,
MOUNT PROSPECT, ILLINOIS 60056-2179
OTORGA ESTA GARANTÍA LIMITADA AL COMPRADOR ORIGINAL AL
MOMENTO DE LA VENTA DE ESTE PRODUCTO. ESTA GARANTÍA
LIMITADA NO ES TRANSFERIBLE.
Schumacher Electric Corporation garantiza este cargador de baterías durante un año desde la fecha de su venta minorista en cuanto a materiales
y mano de obra defectuosos. Si esto ocurriera, se reparará o reemplazará
la unidad según lo decida el fabricante. Es obligación del comprador enviar al fabricante o al representante autorizado la unidad con el comprobante de compra, y los gastos de transporte o envío pagos con antelación.
Esta garantía limitada es nula en el caso de que exista un mal uso del
producto, debido a un manejo descuidado o porque haya sido reparado
por alguien que no haya sido el fabricante o el representante autorizado.
El fabricante no realiza otra garantía además de esta garantía limitada y
excluye expresamente cualquier otro tipo de garantía implícita incluyendo
cualquier garantía con daños consecuentes esta es la única garantía
limitada expresa y el fabricante no asume ni autoriza que otra persona
asuma o realice otro tipo de obligación hacia el producto que no sea esta
garantía limitada expresa. El fabricante no garantiza la comerciabilidad
o conveniencia del producto y excluye expresamente esto de la garantía
limitada. Algunos estados no permiten la exclusión o limitación de daños
incidentales o consecuentes o la duración de la garantía implícita, es
por eso que las limitaciones o exclusiones mencionadas anteriormente
pueden no aplicarse a usted.
ESTA GARANTÍA LE CONCEDE DERECHOS LEGALES ESPECÍFICOS,
USTED PUEDE POSEER OTROS DERECHOS QUE VARÍAN DEPENDIENDO DEL ESTADO.
Llame a Servicios al Cliente al: 800-621-5485 de lunes a viernes de
7 a.m. a 5 p.m. CST