1
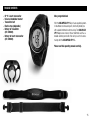
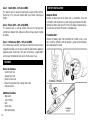
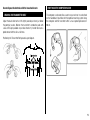
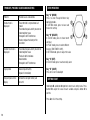
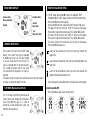
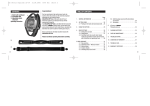
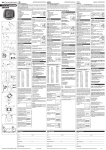
Herzfrequenzmesser mit 11 Funktionen
Heart rate monitor with 11 functions
BEDIENUNGSANLEITUNG
OWNERS’ MANUAL
D
GB
USA
F
E
NL
PL
I
PACKAGE CONTENTS
-
CP 11 L heart rate monitor
Universal handlebar bracket
Transmitter belt
Elastic strap (adjustable)
Battery for transmitter
(3V / CR2032)
- Battery for heart rate monitor
(3V / CR2032)
Many congratulations!
With the CICLOPULS CP 11 L you have acquired a powerful heartbeat rate measuring unit, which will provide you
with valuable information when training. The CICLOPULS
CP 11 L possesses state-of-the-art electronics and has a
durable and long service life. We wish you a lot of success
training with the CICLOPULS CP 11 L.
Please read this operating manual carefully.
15
TABLE OF CONTENTS
Page
16
INTRODUCTION
17
PULSE MODE DISPLAY
22
USE A PRECISE TRAINING METHOD
17
CURRENT HEART RATE
22
PERSONAL EXERCISE ZONE
17
% OF MHR (MAXIMUM HEART RATE)
22
EXERCISE ZONE (BPM)
17
HEART RATE ALARM SETTING
22
FEATURES
18
TOTAL EXERCISE TIMER(TIMER)
23
BATTERY INSTALLATION
18
AVERAGE HEART RATE (AV HR)
23
WEARING THE TRANSMITTER BELT
19
STOPWATCH MODE
23
HOW TO USE THE COMPUTER WATCH
19
DAILY ALARM TIME SETTING
24
PROBLEMS, POSSIBLE CAUSES AND SOLUTIONS
20
BACKLIGHT
24
KEYS OPERATION
20
GUARANTEE CONDITIONS
24
GETTING START
20
REPAIR
24
ENTER THE DATE
21
GUARANTEE CERTIFICATE
25
CLOCK SETTING
21
USE A PRECISE TRAINING METHOD
All the experts agree: the heart is the most important muscle in the body
and, like all muscles, should be exercised regularly to remain strong and
efficient. But how can you determine whether you are exercising your
heart both safely and effectively? Fortunately, the heart itself provides you
with key information that will help you to examine the effectiveness and
the degree of safety of your training method. Your heart rate, which is
expressed in a single number (Beats Per Minute), gives a constant account
of your body‘s state of health.
Your heart rate will tell you how fast you are using energy or whether you
are exercising too hard or too lax. Obviously, your body does not benefit
from a training method, if your heart rate is too low. If it is too high, you run
the risk of injury and you will suffer from fatigue. It does not matter whether
your goal is to win athletics meetings, lose weight or simply to improve your
overall health.
What is important is that you can refine your training method by keeping
your heart rate within a certain target zone. In order to accomplish this, you
would obviously need to know your precise heart rate at any given moment
throughout your training session. Modern technology has now enabled us
to present you with wireless electronic pulse computers. Monitoring your
heart rate with one of these computers is easy and fun to do.
Exercise zones are established by setting Upper and Lower Heart Rate
Limits. These limits constitute a certain percentage of your Maximum
Heart Rate (MHR). You may already know your MHR if you are an avid
athlete or if you have already taken a Max. Heart Rate test.
If not, the following formula will help you to make an educated guess:
MHR
= 220 – (Your age)
e.g. Age:
= 20
MHR:
= 220 – 20 = 200
For instance, the current heart rate is 150, then 75% will be shown.
EXERCISE ZONE (BPM)
Burning Glycogen
WARNING: Always consult your physician before starting a fitness
programme. A pulse computer is not a medical device. It is a training
tool designed to measure and display your heart rate.
KNOW YOUR LIMITS AND DETERMINE YOUR
PERSONAL EXERCISE ZONE
Burning Fat
INTRODUCTION
Age
20 25 30 35 40 45 50 55 60 65
Zone 3
Performance
80-95 % MHR
190 185 180 175 171 166 161 156 152 147
– –
– – – –
–
–
–
–
160 156 152 148 144 140 136 132 128 124
Zone 2
Fitness
65-80 % MHR
160 156 152 148 144 140 136 132 128 124
– –
– – – –
–
–
–
–
130 126 123 120 117 113 110 107 104 100
Zone 1
Health
130 126 123 120 117 113 110 107 104 100
– –
– – – –
–
–
–
–
50-65 % MHR
100 97
95 92 90 87
85 82
80
77
17
Zone 1 Health (50% – 65% of the MHR)
This exercise zone is meant for long training sessions of low intensity.
Exercising in this zone will improve both your mental and physical
healthy.
Zone 2 Fitness (65% – 80% of the MHR)
This exercise zone is used by athletes who wish to increase their
strength and improve their endurance while burning a greater number
of calories.
Zone 3 Performance (80% – 95% of the MHR)
This training zone is ideal for short and very intensive training sessions.
Competitive athletes use this zone in order to build greater speed and
explosive power. Exercising in this zone will create an „oxygen debt“
and increase the degree of lactic acid in the muscular tissue.
FEATURES
Heart rate functions
- Current heart rate
- Average heart rate
- Maximum heart rate
- Manual training zone (incl. training zone alarm)
- Auto pulse timer
Additional functions
- Stop watch
- Time (12/24h)
- Date
- Alarm clock
- Night light display
18
BATTERY INSTALLATION
Computer Watch
Remove the back cover of the watch with a screwdriver, install the
3.OV battery with the positive (+) pole facing up and replace the cover.
Remove the battery and reinsert it if the LCD displays irregular figures.
This will clear and restart the watch‘s microprocessor.
Transmitter Belt
Remove the battery cover from the bottom of the belt using a small
coin. Install the 3V battery with the positive (+) pole facing the battery
cover and replace the cover.
Do not dispose the batteries with the household waste
WEARING THE TRANSMITTER BELT
Adjust the elastic belt so that it fits tightly around your chest just below
the pectoral muscles. Moisten the transmitter‘s conductive pads with
saliva or ECG gel (available at your local chemist‘s) in order to ensure a
good contact with the skin at all times.
HOW TO USE THE COMPUTER WATCH
The computer can be worn like a watch on your wrist or it can be fixed
on the handlebar of your bike with the optional mounting system. Keep
the computer and the transmitter within a max. operating distance of
60 cm.
Positioning the Transmitter Belt upward as per diagram.
19
PROBLEMS, POSSIBLE CAUSES AND SOLUTIONS
Problem
Possible causes and solutions
No heart rate is
displayed
Transmitter belt is not positioned as it
should.
The conductive pads are dirty or were not
moistened prior to use.
Atmospheric of RE interference.
Check or replace the battery of the
transmitter.
Incorrect heart rate is
displayed
The conductive pads are dirty or were not
moistened prior to use.
The elastic belt is too loose.
Weak batteries.
Atmospheric or RF interference.
Display fades
Weak computer battery.
Replace it immediately
Irregular figures on the
display
Remove the computer battery and
reinsert it.
KEYS OPERATION
Key “A” (MODE)
Press to scroll through different key
operating modes.
In SETTING mode, press to leave and
finalize the setting.
Key “B” (SELECT)
In CLOCK mode, press to show month
and year.
In PULSE mode, press to select different
features (TIME/TIMER/ AVHR).
In SETTING mode, press to adjust the value.
Key “C” (SET)
In CLOCK mode, press to activate daily alarm.
Key “D” (LIGHT)
Press to turn on the backlight
GETTING START
Hold button B and button C together to enter main setting menu. Press
button B to adjust the value of each variable and press button C to
confirm.
Press A to finish the setting.
20
CLOCK SETTING
In clock mode, hold button C to enter the
clock setting mode.
- Press button B to select 12 hour or 24 hour
format
- Press button C to confirm setting.
For the calendar clock setting, press button C to adjust the digits and
then press button B to confirm setting.
Enter the DATE
The pre-set date is displayed. Press the button B to adjust the digits
and acknowledge with the button C.
After setting press button A to confirm
setting and exit setting mode.
Hour setting
Minute setting
Second setting
Year setting
Month setting
Date setting
After setting press button A to confirm setting and exit setting mode.
21
PULSE MODE DISPLAY
Exercise Zone
Alarm Activation
Symbol
HEART RATE ALARM SETTING
Function State
Current
Heart Rate
% of
Max. Heart Rate
CURRENT HEART RATE
Press button A to return to the PULSE mode
display. The current heart rate is displayed
on Middle line of the LCD. The heart-symbol
on the left hand side will start to flash if a
signal is received from the transmission belt.
The symbol will freeze and the last heart
rate record will be displayed if no signal is
received.
For power saving, the watch will automatically return to clock mode if
no signal is received for about 2 minutes.
% OF MHR (Maximum Heart Rate)
This is the data showing the percentage of
Current Heart Rate comparing to Maximum
Heart Rate (MHR by age). It is useful to
monitor your heart performance safely and
effectively during exercise
22
In “PULSE” mode, press button B to enter into submode “TIME”
- Hold button C until “AGE” appear to enter into PULSE mode setting.
- Press button B to increment age by 1
- Press button C to confirm and go into ZONE setting for High zone
- The upper limit for the heart rate “ZONE HI” flashes on the display.
Press button to go to the desired value. Press button C to confirm
- The lower limit for the heart rate “ZONE LO” flashes on the display.
Press button to go to the desired value. Press button C to confirm
- The alarm symbol of the heart rate alarm flashes on the display.
Press button B to choose one
alarm will be activated only when your heart rate exceeds the
upper limit.
alarm will be activated only when your heart rate drops below the
lower limit.
alarm will be activated both when your heart rate exceeds the
upper or drops below the lower limit.
- After setting press button A to confirm setting and exit setting mode
Alarm Sound On/Off
- Press Button C to select alarm sound on or off.
TOTAL EXERCISE TIMER(TIMER) - 9 hour 59 min 59 sec
- In pulse mode, press button B to enter the timer mode(TIMER).
- The timer is activated automatically whenever pulse signal is
received.
- To reset average heart rate and timer, press button B to enter timer
mode (TIMER) and then hold button C until data is clear.
AVERAGE HEART RATE (AV HR)
- In pulse mode, press button B to enter the average heart mode.
The heart rate monitor automatically calculates
your maximum heart rate(MHR) on the basis
of your age as well as your personal upper
and lower limits of the 3 present training zones
(Zone 1: 50-65 % of the MHR, Zone 2: 65-80 %
of the MHR, Zone 3: 80-95 % of the MHR)
STOPWATCH MODE
Press the button A to enter stopwatch mode
(STW).
Press the button C to start or stop the stopwatch.
Press the button B to reset when the stopwatch
is stopped.
- Press C to start.
- While the stopwatch running, press B button “SPLIT” appears on
the display, the split is for 5 seconds on the display, the timing runs
in the background further. This process can be continued as many
times.
- Press C to stop the timing.
- Press B to clear the data (CLR appears on the top)
The heart rate monitor now returns automatically to the time mode.
23
DAILY ALARM TIME SETTING
Alarm Time Setting
- Press button A to enter ALARM mode.
- Hold button C to enter alarm time setting
mode and the hour digits will then flash
- Press button B to adjust the digits and
press button C to confirm.
- Repeat the same process to set minute
digits
To stop alarm sound, press any button or
wait one minute for automatically stopp.
Daily Alarm on / off
- In CLOCK mode, press button C to ON/
OFF ALARM.
- In alarm mode, press button C to turn the
alarm on or off.
BACKLIGHT
- Press button D to turn on the light.
GUARANTEE CONDITIONS
We offer a guarantee for 24 months from the date of purchase on the
CICLOPULS CP 11 L. The guarantee is limited to material and
processing faults. The batteries are excluded from the guarantee.
The guarantee is valid only if the computer, with accessories, has been
handled and maintained carefully and according to operating
instructions. To return the CICLOPULS CP 11 L under conditions/terms
of the guarantee, please refer to your dealer, your local distributor or
send the computer with the proof of purchase(date) and all
accessories, and with sufficient postage, to:
CICLOSPORT SERVICE
K.W. Hochschorner GmbH
Konrad-Zuse-Bogen 8
D-82152 Krailling
Fax: +49 89 / 859 63 01
www.ciclosport.de
[email protected]
Please read through the operating manual again carefully before
sending in the device and check the battery.
In case of valid guarantee claims, the repaired device or a replacement
device will be returned free of charge.
REPAIR
If the device is sent for repair, or the warranty claim is not accepted, repairs up to the value of 19 Euros will be carried out automatically. If the
cost of the repairs exceeds this amount, the owner of the device will be
notified in advance. The repaired device will be returned against payment.
24
GUARANTEE CERTIFICATE
Reason for sending in:
Sender:
Name
First Name
Street, No.
Code / Location
Telephone (during the day)
E-Mail
After expiry of the guarantee period:
Repairs should be carried out up to the amount of EURO __________
25
Disposal of Old Electrical & Electronic Equipment
(Applicable in the European Union and other
European countries with separate collection
systems).
This symbol on the product or on its packaging
indicates that this product shall not be treated as
household waste. Instead it shall be handed over to the
applicable collection point for the recycling of electrical and electronic
equipment. By ensuring this product is disposed of correctly, you will
help prevent potential negative consequences for the environment
and human health, which could otherwise be caused by inappropriate
waste handling of this product. The recycling of materials will help
to conserve natural resources. For more detailed information about
recycling of this product, please contact your local city office, your
household waste disposal service or the shop where you purchased
the product.
26
K.W. Hochschorner GmbH
Konrad-Zuse-Bogen 8
D-82152 Krailling
E-mail: [email protected]
Tel.: 0900 / 123 5000
Euro 0,99 / min. aus dem deutschen Festnetz
Euro 1,99 / min. aus dem deutschen Mobilfunknetz
Mobilfunkpreise können variieren