1
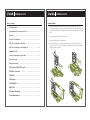
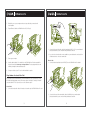
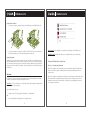
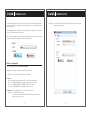
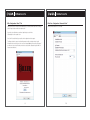
Gaming
Imaging
3D
Video
Entertainment
Photos
Graphics
KILLER XENO PRO
TM
EVGA Corp.
128-P2-KN01
●
2900 Saturn Street, Suite B
●
Brea, CA 92821
●
www.evga.com
Installation Guide
Table of contents
Installation Guide
1.
Remove the current network driver installed on your computer. In Windows Vista, go to Start >
Control Panel > Programs and features > Uninstall a Program. NOTE: if using an onboard network
controller, it is recommended to first disable the onboard network controller from within your system
BIOS.
Overview ................................................................................................ 5
2.
Turn off your computer and disconnect the power cord.
Killer Xeno Configuration ...................................................................... 7
3.
Remove any existing network cards if applicable.
Killer Xeno Configuration “About Tab”.................................................. 9
4.
Install the EVGA Killer Xeno Pro Gaming network card into a 1x PCI-E slot. NOTE: If you do not
have an empty 1x PCI-E slot, you can install the card into any open PCI-E slot. The below images
show both methods of installation.
Installation Guide .................................................................................. 2
Using Hardware Accelerated Voice Chat ............................................. 3
Killer Xeno Configuration “Advanced Mode” .................................... 10
Bandwidth Control .............................................................................. 12
Common Troubleshooting Tips & Hints ............................................. 14
Technical Support ............................................................................... 15
Warranty Information .......................................................................... 15
EVGA Advanced RMA (EAR) Program ............................................... 15
EVGA Online Community .................................................................... 15
EVGA FAQ ............................................................................................ 15
EVGA Gaming ...................................................................................... 16
FOLDING@EVGA ................................................................................. 16
MODS RIGS ......................................................................................... 16
Compliance Information .................................................................... 16
Trademark Information ...................................................................... 16
1
2
5.
Reinstall the cover on your computer and reconnect any cables that you removed earlier
in the installation.
6.
Plug an Ethernet Cable into the EVGA Killer Xeno Pro. (RJ-45 port)
7.
Power up your computer.
8.
Insert the driver installation CD or double click on the EVGA Killer Xeno Pro driver executable file
that can be downloaded at www.evga.com/support/drivers. The setup program takes over and
will walk you through the driver installation process.
9.
You may need to reboot your PC once the driver installation is complete.
2.
Connect the other end of the audio cable to the input labeled “AUX” or “CD” on your motherboard
(if using onboard audio) or your soundcard if using a dedicated sound card.
3.
If you do not have a four-pin audio connector available on your motherboard or sound card, follow
the directions below to connect an external cable.
External Cable:
1.
Connect the external audio cable to the LINE OUT jack on the EVGA Killer Xeno Pro bracket.
2.
Connect the other end of the external audio cable to the MIC IN jack on your motherboard
(if using onboard audio) or your sound card if using a dedicated sound card.
Using Hardware Accelerated Voice Chat
If you are going to use the EVGA Killer Xeno Pro’s built in hardware voice chat, you will need to connect
the included audio input/outputs correctly. There are two options for doing this, consisting of an internal
or external cable. NOTE: You only need to use one of the below two options.
Internal Cable:
1.
Connect the four-pin audio cable to the four-pin socket near the top of the EVGA Killer Xeno Pro card.
3
4
Headset / MIC connection:
1.
Connect your microphone or headset microphone to the MIC IN jack on the EVGA Killer Xeno Pro.
2.
Connect your headphones or speakers to the LINE OUT or AUDIO OUT jack on your motherboard
(if using onboard audio) or your sound card if using a dedicated sound card.
XenoConfig.exe – Xeno Configuration is accessible from the Start Menu or via the KillerTray icon.
Bandwidth Control – A feature which allows you to set different priorities for your Internet traffic.
Headset Only Option:
A third option is to use your headset exclusively for Xeno voice chat, and leave your speakers for game
audio without mixing the two in your sound card’s control panel. To do this, connect the microphone plug
on your headset to the microphone jack on your Killer Xeno, and the headphone plug on your headset to
the audio-out jack on the Killer Xeno. Remember – this option will leave the voice chat audio exclusively on
the Killer Xeno.
Overview:
The Killer Xeno™ software suite installs several programs to help configure and maintain your Killer Xeno
in addition to the basic driver system files which operate the card.
XenoTray.exe - This is your interface to access Killer Xeno features. After installing the software package
the icon will appear in your system tray.
Selecting LLR Game Mode or App Mode:
LLR stands for Lag and Latency Reduction.
When LLR is configured to run in Game Mode, your Xeno is optimized for gaming! LLR Game Mode
enables your Killer Xeno to bypass the Windows® Network Stack, prioritize game data and free up
system resources.
When LLR is configured to run in App Mode, your Killer Xeno is functioning as an optimized, but “normal”,
NIC (network interface card). App Mode can be viewed as a ‘fail-safe’ mode that can be used to run
programs which cannot function in Game Mode or to troubleshoot any compatibility issues that may
occur for games in Game Mode.
You can right-click the tray icon to:
1.
Change the state of LLR by selecting “LLR Game Mode” or “LLR App Mode”
OR
2.
Access installed features, FNA programs or the configuration menu:
5
6
For example: programs like VPN clients require access to the Windows® Network Stack which would be
bypassed in game mode. So, depending on the types of programs you use, you would switch between
modes when needed.
Half-Duplex = Forces the link to Half Duplex only (the TX and RX cannot happen at the same time,
and the signal may be shared).
Game and App Mode can be changed at any time by right clicking on your Killer Tray icon and selecting
a mode. It also appears in the Killer Configuration.
Note: Other network adapters may not function properly with LLR Game Mode. It is recommended that
you disable all other network adapters if you wish to use LLR Game Mode.
Killer Xeno Configuration
Killer Xeno Configuration has 2 modes: Normal and Advanced.
By default, Killer Configuration is installed “Auto-Optimized” for your system.
In normal mode it is also possible to configure Link Speed, Link Duplex.
Link Speed:
Auto = Auto-negotiates the fastest speed available. This is the recommended setting!
1000 = Forces gigabit (REQUIRES the link to support 1Gigabit or the NIC won’t work)
100 = Forces 100Megabit (REQUIRES 100Megabit link or the NIC won’t work)
10 = Forces 10Megabit (REQUIRES 10Megabit link or the NIC won’t work)
Link Duplex: (This setting only matters if 100 or 10 is selected in Link Speed)
Full Duplex = Forces the link to Full Duplex only
(e.g. the Ethernet cable is DEDICATED and TX and RX are not shared: and TX can
happen at the same time as RX).
7
8
Killer Configuration “About” Tab
Killer Xeno Configuration “Advanced Mode”
Visible from any of the 2 modes, the About tab displays your current software suite version; card type,
card ID, Diagnose button and the auto update option.
Advanced mode adds the TCP control tab.
If you wish to be notified when a new driver is published, put a check in the
“Automatically check for updates” box.
Your Card ID is used to identify your specific card for registration and tech support.
The Diagnose button is a support tool that will generate a text file containing a variety of useful
information in the event that you need to contact tech support. Note: if you have pressed “Diagnose”
you will need to close the text file that opens before accessing Killer configuration again (it will be in
a paused, unusable state).
9
10
"TCP No Delay" creates the registry entry:
Bandwidth Control:
HKEY_LOCAL_MACHINE\SOFTWARE\Microsoft\MSMQ\Parameters\TCPNoDelay
- Setting the DWORD value to 1 disables the Nagle algorithm
While the Killer Xeno’s drivers and configuration tools are designed to seamlessly speed up your game
performance, the Bandwidth Control feature allows you to take a step beyond this and set aside the
bandwidth used by individual programs.
The Nagle algorithm delays sending a data packet until that packet is full, this is to prevent poorly
written programs from flooding a network. Turning it off may improve TCP latency at the risk of flooding
the local network.
"Ack Frequency" creates the registry entry:
Settings Tab:
To begin using bandwidth controls, first set your average
internet connection speed:
HKEY_LOCAL_MACHINE\SYSTEM\CurrentControlSet\Services\Tcpip\Parameters\Interfaces\
[YOUR INTERFACE ID HERE]\TcpAckFrequency
- Determines the frequency at which recieved data packets are acknowledged
- the DWORD value is frequency rate (eg. 2 means every second packet will be acknowledged.
A DWORD value of 1 means every packet is acknowledged)
Changing ack frequency should only be done if you are selectively attempting to change latency behavior
in specific programs. But you should be very aware of its potential harm in other applications and you
may need to change it back to default to achieve normal behavior in standard programs.
MTU - Maximum Transmision Unit
This is the maximum size of a data packet you will broadcast.
Finding an optimial size for your internet conditions may improve performance. Consult your internet
service provider for their recommended MTU (or test the MTU for the maximum size that you can send
without fragmentation in your location)
11
12
With Bandwidth Control enabled, programs are automatically added to the Priority and Bandwidth Tabs
as they connect to the internet.
New Connections: You can choose if you want to be notified each time a program is added to the list.
Or simply let it be added under default settings for you to tweak later.
Hint: Novice users should begin by only using the priority page and try to get their Internet speed average
as accurate as possible in settings. Leave the bandwidth tab alone until you are prepared to spend time
tweaking the settings for your needs.
Options (defaults): these settings can be used to define the priority and bandwidth of new applications as
they are automatically added to the list.
Reset All: Your fail-safe button to clear all programs from the lists (also deletes Internet speed entry).
Common Troubleshooting Tips & Hints
CANNOT CONNECT TO INTERNET:
First verify that your network cable is plugged into the Ethernet port of the Killer Xeno, and that you are
getting a link light. The Killer Xeno does not broadcast network data to your “other” network ports or USB
ports. If you are not getting a link light, verify the other end of the cable is secured in your modem/router,
or try another cable if neither is lit.
OTHER NETWORK CARDS DO NOT WORK:
If you wish to use 2 network cards, you may need to switch to LLR App mode (using the Killer Tray or
Xeno Config Tool). When LLR Game Mode is enabled, it is recommended that the other NICs in the
system be disabled.
KILLER XENO DRIVER PROBLEMS:
Priority Tab: The easiest method to get some benefit from Bandwidth Control is to simply set the priority
of a program and let the Killer Xeno auto-manage the amount of bandwidth it uses based on your defined
priority level. Note: Priority “1” is the highest.
You do not need to set bandwidth limits; simply setting the priority numbers will let Xeno auto-manage the
bandwidth used. Note: the more accurate your average Internet speed on the settings page, the more
accurately Xeno can auto-manage your bandwidth usage.
If you are having problems with the Killer Xeno Drivers, ensure you are running the correct software suite
for your operating system. These can be found in the ‘downloads’ section of www.evga.com/support.
Windows 2000 and older is not supported.
KILLER LIGHTS NOT WORKING or KILLER NOT DETECTED:
Power off the PC and reseat the card in the PCIe slot. Ensure that the Killer Xeno is firmly seated into the
PCIe slot, and securely fastened to the PC case. If you move the Killer Xeno to another PCIe slot, you must
re-run the Killer Xeno installation software. Try reinstalling the Killer Xeno Drivers after reseating the card.
BfLLR.dll “warnings” from security software:
Bandwidth Tab: You can further manage the connection by tweaking individual bandwidth caps for
programs. These limits work in addition to the priority setting.
13
This file is used to install a Layered Service Provider (LSP) into the Windows® Network Stack to provide
Network Stack bypass. Some virus scanners or spyware blockers may detect this file as dangerous
because it is ‘hooking’ into the network stack (and has access to all packets sent and received).
This is normal, and BfLLR.dll should NOT be removed or blocked by your security software.
14
EVGA Gaming:
FIRMWARE OUT OF SYNC:
If a firmware warning is ever shown, indicating that your firmware does not match your driver: First verify
you have a Killer Xeno installed (you may have removed it or knocked it loose from the PCIe slot), and if it
is installed and the lights are working, and clicking “yes” to the prompt has not solved the issue, navigate
to C:\Program Files\Bigfoot Networks\Killer Driver and run the file KillerFlash.exe (You will need to reboot
before the new firmware takes effect).
If you live to game, this is the place for you! We have the best tournaments, prizes and game servers,
visit http://evga.com/gaming
FOLDING@EVGA:
Distributed computing for the greater good. Did you know you could turn your graphics card into a shared
super computer? Visit http://evga.com/folding
Technical Support:
EVGA is dedicated to supporting our products. If you need to contact Customer Service, please have
your system configuration ready, as well as your model number and serial number ready. You will need to
register your product before a support technician can assist you. You may register your product online
at: http://evga.com/register, or when you call for support, a staff member will register you.
•
Hours of Operation: 24/7 Technical Phone Support
•
Phone Support: (888) 880-EVGA (3842)
•
Fax Support: (714) 528-4501
•
Tech Support Web Site: http://evga.com/support
MODS RIGS:
$1k Sponsorships for every 200 posts. Come show off your rig and join in on one of the biggest things
happening at EVGA, visit http://modsrigs.com
Compliance Information
FCC Compliance Information
Warranty Information:
For warranty information on this product, please visit: http://evga.com/warranty/. As a valued EVGA
customer; you will be sure to receive a warranty that will fit your needs.
EVGA Advanced RMA (EAR) Program:
The EVGA Advanced RMA (EAR) Program is a program to protect yourself and your product in the case
of product failure. For more details please visit: http://evga.com/EAR
EVGA Online Community:
To visit the EVGA community message boards, please visit: http://forums.evga.com
This device complies with FCC Riles Part 15. Operation is subject to the following two conditions:
This device may not cause harmful interference, and this device must accept any interference received, including interference that may
cause undesired operation. This equipment has been tested and found to comply with the limits for a Class B digital device, pursuant to
Part 15 of the FCC Rules. These limits are deigned to provide reasonable protection against harmful interference in a residential
installation. This equipment generates, uses and can radiate radio frequency energy and, if not installed and used in accordance with
the manufacturer’s instructions, may cause harmful interference to radio communications. However, there is no guarantee that
interference will not occur in a particular installation.
If this equipment does cause harmful interference to radio or television reception, which can be determined by turning the equipment
off and on, the user is encouraged to try to correct the interference by one or more of the following measures:
Increase the separation between the equipment and signal source. Connect the equipment to an outlet on a circuit different from that
to which the signal source is connected.
Consult the dealer or an experienced computer technician for help. The use of shielded cables for connection of the monitor to the
graphics card is required to ensure compliance with FCC regulations. Changes or modifications to this unit not expressly approved by
the party responsible for compliance could void the user’s authority to operate the equipment.
CE Compliance Information
EMC Directive 89/336/EEC and Amendment 92/31/EEC, Class B Digital Device EN 50081-14, Generic Emissions Standard for
Residential, Commercial and Light Industrial Products (EN 55022/CISPR 22, Limits and Methods of measurement of Radio).
(EN 55022/CISPR 22, Limits and Method of Measurement of Radio Interference Characteristics Information Technology
Equipment) Warning: This is a Class B product. In a domestic environment this product may cause radio interference in
which case the user may be required to take adequate measure. EN 50082-1, Generic Immunity Standard for Residential,
Commercial and Light Industrial Products (IEC 801-2, IEC 801-3, IEC 801-4)
EVGA FAQ:
Trademark Information
To search our knowledge base and product FAQ please visit http://evga.com/FAQ
2000-2009 EVGA Corp. EVGA, the EVGA logo and combinations thereof are trademarks of EVGA Corp. Bigfoot Networks, the Bigfoot Networks
Logo, Killer and the Killer logo are trademarks of Bigfoot Networks, Inc. All brands, products and companies are trademarks or registered
trademarks of their respective companies. EVGA Corp. reserves the right to change product specifications without prior notice.
15
16