1
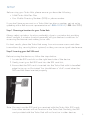
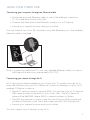
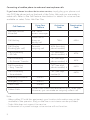
Getting started guide
Turbo Hub
70234
Welcome and thanks for choosing Bell. Your new
Turbo Hub will enable you to connect to the Internet
and make voice calls via a landline phone. This
guide will provide you with an overview of your
Turbo Hub and steps for getting started.
A Turbo Hub User Guide CD is included in the box
for additional installation information. You can also
visit bell.ca/turbohub for additional support.
SETUP
1. Choosing a location
2.Inserting your Bell SIM card
3.Connecting the power cord
4.Start-up
using your Turbo Hub
Connecting:
1. a computer through Ethernet
2.a device through Wi-Fi
3.a Landline phone
Troubleshooting
1. LED indicator Legend
2. FAQs
1
SETUP
Before using your Turbo Hub, please ensure you have the following:
•A Bell Turbo Hub Flex Plan
• Your Mobile Directory Number (MDN) or phone number
If you don’t have an account or a Turbo Hub flex plan or number, get set up by
speaking with a Bell account representative at 1-888-4MOBILE (1-888-466-2453).
Step 1: Choosing a location for your Turbo Hub
Always select an indoor location, preferably close to a window but avoiding
direct sunlight. A window location generally will give the best conditions for
accessing the Internet and making voice calls.
For best results, place the Turbo Hub away from microwave ovens and other
transmitters (e.g. security/alarm systems) as they can cause signal interference.
Step 2: Inserting your Bell SIM card
Before turning the device on, follow the steps below:
1. Locate the SIM card slot on the right hand side of the device.
2.Gently insert your Bell SIM card into the SIM card slot.
3.Ensure that the SIM card is inserted into the Turbo Hub with its bevelled
edge facing up, as illustrated. You should hear a “click” sound when the
SIM card has been inserted properly.
Note: Y
ou must use the SIM card you received with the Turbo Hub. SIM cards
from other devices will not function in the Turbo Hub. Similarly, the SIM
card provided with the Turbo Hub will not function in other devices.
2
Step 3: Connecting the power cord
•Connect the cable from the enclosed power supply adapter to the power
input (10-28VDC) on the back of the Turbo Hub.
•Connect the power cord to the power supply adapter and then insert the
plug into an outlet.
Note: The device will turn on automatically.
Step 4: Start-up
•Allow approximately one minute for the Turbo Hub to boot/start-up.
When the start-up procedure is finished, the Standby button
will
show steady blue. The LED indicators on the front of the unit will show if
the Wireless LAN
is activated and a connection to the Internet
has been made.
•The signal quality indicator shows the quality of
the signal from the Bell HSPA+ network. The more bars that are lit up, the
stronger the signal. The symbol “ ” in the centre of the graph is blinking
when searching for a network connection. When a high-speed connection
is established to the Bell HSPA+ network, the 3G with a plus (+) sign icon
is displayed.
3
USING YOUR TURBO HUB
Connecting your computer through an Ethernet cable
•Attach the enclosed Ethernet cable to one of the Ethernet connectors
(1 – 4) on the back of the Turbo Hub.
• Connect the other end of the Ethernet connector to a PC/laptop.
• Launch your Internet browser and you’re online!
You can connect up to four (4) computers using the Ethernet ports. One shielded
Ethernet cable is included.
Note: If connecting additional PCs, use only shielded Ethernet cables in order to
fulfill electrical emissions requirements (CE, FCC).
Connecting your device through Wi-Fi
Wi-Fi security has been enabled on your Turbo Hub. To connect through Wi-Fi,
enter the following into your Wi-Fi Network Connection Manager on your Wi-Fi
enabled PC/laptop or device:
•The Wi-Fi network name or network SSID. You can find your Wi-Fi network
SSID name printed on the back of your Turbo Hub. The Wi-Fi network
name will be BellXXXX, where XXXX is random numbers or letters.
•The WPA passphrase or access code. You can find your WPA passphrase
printed on the back of the Turbo Hub, under the title “WPA Passphrase.”
• Launch your Internet browser and you’re online!
You can connect up to 11 devices using Wi-Fi.
4
Connecting a Landline phone to make and receive phone calls
If you have chosen to subscribe to voice service, simply plug your phone cord
into (RJ11) the phone jack on the back of the Turbo Hub and you are ready to
make calls. Refer to the Call Feature chart below for details on voice services
available on select Turbo Hub Flex Plan.
Call Features
Using Your
Feature
Message Centre/
Voicemail
Dial *98 to
access messages
Call Waiting
Flash/Link or
Hang-up
during call
Call Display
Blocking (per call)
Per each
outgoing call
Activation
Code
Deactivation
Code
*43#
#43#
#31# (ten-digit
phone number)
Call Forwarding
– All Calls
*21* [ten-digit
phone number] #
#21#
Call Forwarding
– No Answer Transfer
*61* [ten-digit
phone number] #
#61#
Call Forwarding
– Busy Transfer
*67* [ten-digit
phone number] #
#67#
Call Forwarding
– Unreachable
*62* [ten-digit
number]#
#62#
Directory Assistance
Dial 411
Emergency Call
Dial 911
Client Care
Dial 611
Collect Calls
Collect calls cannot be received on your Turbo Hub.
However, you can make an outgoing collect call.
Note: - When calling 911 with this equipment, your location information may not be
available to the operator. Stay on the line so assistance can be provided.
- Turbo Hub does not support fax service.
- In the event of a power outage, voice service will not function.
5
TROUBLESHOOTING
LED indicator Legend
Symbol
Status
Description
Blinking (blue)
New voice mail message(s) is
available
Blinking (blue)
Various conditions exist that make it
impossible to establish a connection
to the Internet via the Bell HSPA+
network
On (blue)
The wireless LAN (Local Area
Network) is activated
On (blue)
A connection to the Internet is
established
On (blue)
A connected landline telephone
is in use
On (steady blue)
The Turbo Hub has finished start-up
procedure and is active
Red
This button can be pressed to switch
to standby (low-power) mode. The
colour changes from blue to red.
Only voice service is available in
this mode.
Blue
Strength of signal from the Bell
HSPA+ network. The more bars that
are lit up, the stronger the signal.
6
FAQs
Q: I inserted the SIM card and powered the unit on, but the Internet light ‘globe’
doesn’t come on.
You must use the SIM card you received with the Turbo Hub. SIM cards from
other devices will not function in the Turbo Hub, and the Turbo Hub SIM card
will not function in other devices.
Q: I can’t connect to the Internet or make voice calls and my Turbo Hub has a
flashing PC-like indicator.
Unplug the power cable to the Turbo Hub. Remove the SIM card and then
reinsert the SIM card (ensure it is inserted correctly). Plug the power cable back
in and wait for the Turbo Hub to restart. If this doesn’t clear the flashing PC
indicator, you may need to call Bell Technical support at 1-800-667-0123.
Q: My caller ID only shows the phone number, and not the person’s name.
Name Display is not offered, and so only the number will display.
Q: Is the Turbo Hub Wi-Fi turned on automatically?
The Turbo Hub has the Wi-Fi functionality turned on by default. You’ll need to
configure your device to connect to the Turbo Hub Wi-Fi. (Refer to page 4)
Q: Does the Turbo Hub offer a secure Wi-Fi setup?
Yes, the Turbo Hub Wi-Fi connection has been secured using the WPA protocol.
Your Wi-Fi network name (SSID) and passphrase (password or access key) have
been printed on the back of your Turbo Hub.
Q: The Turbo Hub only shows one or two connection indicators. What does this mean?
This means that you may not be receiving a very strong signal. An external
antenna may be required in areas with low signal strength. See bell.ca/turbohub
for more details or to speak to Bell Technical support call 1-800-667-0123.
Q: How do I set up a wireless LAN?
The wireless LAN (Local Area Network) configuration wizard can be used for
each setup, including recommended security settings to protect your wireless
LAN. To start the wizard, start a web browser on the PC connected to your
Turbo Hub, type http://192.168.1.1 in the address field, and press the Enter key.
The “Enter password” page is displayed. From this page you can log in to the
web pages and check for any alarm conditions and/or configure the Wireless
LAN. Type user in the “Password” text field and click the Log In button. Follow
the steps to have the wireless LAN set up.
7
Wi-Fi is a trademark of the Wi-Fi Alliance. Bell Canada product or service names or logos referenced in this document are trade-marks or
registered trade-marks of Bell Canada or its related companies.
8