1
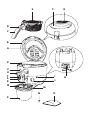
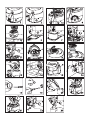
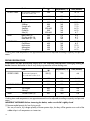
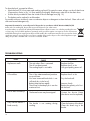
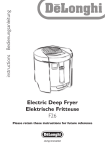
FRIGGITRICE ELETTRICA ELECTRIC DEEP FRYER FRITEUSE ÉLECTRIQUE ELEKTRISCHE FRITTEUSE ELEKTRISCHE FRITEUSE FREIDORA ELÉCTRICA FRITADEIRA ELÉCTRICA ∏§∂∫∆ƒπ∫∏ ºƒπ∆∂∑∞ ùãÖäíêàóÖëäÄü îêàíûêçàñÄ ELEKTROMOS OLAJSÜTŐ ELEKTRICKÁ FRITÉZA FRYTKOWNICA ELEKTRYCZNA ELEKTRISK FRITYRGRYTE ELEKTRISK FRITÖS ELEKTRISK FRITUREGRYDE SÄHKÖRASVAKEITIN Istruzioni per l'uso Instructions Mode d’emploi Bedienungsanleitung Gebruiksaanwijzingen Instrucciones para el uso Instruções de utilização √‰ËÁ›Â˜ ¯Ú‹Û˘ àÌÒÚÛ͈ËË ÔÓ ˝ÍÒÔÎÛ‡Ú‡ˆËË Használati utasítás Návod k pouÏití Instrukcja obs∏ugi Bruksanvisning Bruksanvisning Brugsanvisninger Käyttöohjeet 10 ELECTRICAL CONNECTION (U.K. ONLY) A) If your appliance comes fitted with a plug, it will incorporate a 13 Amp fuse. If it does not fit your socket, the plug should be cut off from the mains lead, and on appropriate plug fitted, as below. warning: Very carefully dispose of the cut off plug after removing the fuse: do not insert in a 13 Amp socket elsewhere in the house as this could cause a shock hazard. With alternative plugs not incorporating a fuse, the circuit must be protected by a 15 Amp fuse. If the plug is a moulded-on type, the fuse cover must be re-fitted when changing the fuse using a 13 Amp Asta approved fuse to BS 1362. In the event of losing the fuse cover, the plug must NOT be used until a replacement fuse cover can be obtained from your nearest electrical dealer. The colour of the correct replacement fuse cover is that as marked on the base of the plug. B) If your appliance is not fitted with a plug, please follow the instructins provided below: WARNING - THIS APPLIANCE MUST BE EARTHED IMPORTANT The wires in the mains lead are coloured in accordance with the following code: Green and yellow Earth Blue Neutral Brown Live E L N As the colours of the wires in the mains lead may not correspond with the coloured markings identifying the terminals in your plug, proceed as follows: The green and yellow wire must be connected to the terminal in the plug marked with the letter E or the earth symbol or coloured green or green and yellow. The blue wire must be connected to the terminal marked with the letter N or coloured black. The brown wire must be connected to the terminal marked with the letter L or coloured red. E F G D C B A Z V U T S I L R Q M N P O H 2 A 1 Read this manual thoroughly before installing and using the appliance. This is the only way to ensure best results and maximum safety for the user. DESCRIPTION (see drawing on page 3) A. B. C. D. E. F. G. H. I. L. Filter spy hole Lid Basket handle Handle slide Basket Viewing window (certain models only) Filter cover Cable compartment Indicator light Thermostat and OFF knob M. N. O. P. Q. R. S. T. U. V. Z. Oil container drawer (certain models only) Drain hose cap (certain models only) Oil container lid (certain models only) Oil container (certain models only) Oil filter (certain models only) Oil drain hose (certain models only) Timer button (certain models only) Timer display (certain models only) Hose compartment door (certain models only) Release button Bowl RECOMMENDATIONS • Before using the appliance, check that the voltage of the mains power supply corresponds to the value indicated on the appliance rating plate. • Connect the appliance to an earthed power supply and sockets with a minimum current rating of 10 A only. (If the plug fitted to the appliance does not match the power socket, have the socket replaced with a suitable type by a qualified professional). • Never locate the appliance near sources of heat. • The power cable of this appliance must not be replaced by the user as the operation requires the use of special tools. If the supply cord is damaged, it must be replaced by the manufacturer, its service agent or similarly qualified persons in order to avoid a hazard. DO NOT LEAVE WITHIN REACH OF CHILDREN. • Do not move the deep fryer when the oil is hot as this may cause serious burns. • Never use the deep fryer without oil. • If oil leaks from the deep fryer, contact a technical service centre or personnel authorised by the manufacturer. • The basket fits automatically onto the central pin in the bowl. To avoid damage, never rotate it manually to find the right position. • Before using the deep fryer for the first time, wash the bowl (Z), basket (E), lid (B) (after removing the filters) and oil saver set (O, P and Q) in hot water and washing up liquid. To empty the water, use the oil drain hose as shown in fig. 14. At the end of the operation, dry everything thoroughly and remove any water left in the bottom of the bowl and inside the oil drain hose. This prevents dangerous splashes of hot oil during operation. • During operation, the drain hose must always be closed and in its compartment. • The appliance must not be used by children or unfit persons without supervision. Do not allow children to play with the appliance. • Never move the appliance while the oil is still hot. • Move the appliance by the handles provided. (Never move the appliance using the basket handle). • It is normal for the appliance to give off a "new" smell when used for the first time. Ventilate the room. Materials and accessories coming into contact with food conform to EEC directive 89/109. 10 OPERATING INSTRUCTIONS Pour the oil into the bowl - 1.4 litres maximum capacity (1.2 kg of fat) or 1 litre minimum capacity (0,9 kg of fat). IMPORTANT: The level of oil should always be between the maximum and minimum marks. Never use the deep fryer with the oil below the "min" level as this could cause the thermal cutout to trip. To replace it, contact an authorised service centre. For best results, use good quality peanut oil. Never mix different oils together. If you are using solid fat, cut into small pieces to avoid the deep fryer heating up without liquid for the first few minutes. The temperature must be set to 150°C until the fat has melted completely. You can then set the required temperature. STARTING FRYING Turn the appliance on by placing the thermostat regulator on the temperature required. When the thermostat light has gone out, place the basket (containing the food) in the bowl in the raised position and close the lid. Lower the basket. Do not overfill (1.2 kg max. of fresh potatoes). Immediately after the basket has been lowered, it is normal for a considerable quantity of very hot steam to be given off from the filter cover (G) and drops of condensation to form near the basket handgrip. At the end of the cooking time, raise the basket and check the degree of cooking. MODELS WITH ELECTRONIC TIMER 1. Set the cooking time by pressing the button (S). The minutes set appear on the display (T). 2. Immediately afterwards, the numbers begin to flash. This means the cooking time has begun. The last minute is displayed in seconds. 3. If you make a mistake, you can set the new cooking time by holding the button down for more than two seconds. When the display has reset, repeat the operation. 4. The timer indicates the end of cooking time with two series of “beeps” separated by a 20 second gap.To turn off the signal, just press the timer button (S). IMPORTANT: the timer does not turn the appliance off FRYING NON-FROZEN FOOD • The food being fried must not be immersed in the oil until the oil has reached the correct temperature and the light has gone off. • Never over fill the basket. This could cause a sudden drop in the temperature of the oil and therefore greasier and less uniform frying. • Make sure the food is sliced into thin, even pieces. If the slices are too thick, the food will not be well cooked inside. • When cooking food in batter, you should first immerse the basket empty. Then, when the set temperature has been reached (the light goes out), immerse the food directly in the hot oil to avoid the batter sticking to the basket. • Dry the food thoroughly before immersing it in the oil or fat as moist foods will be less crispy after cooking (especially potatoes). Foods with a high water content (fish, meat, vegetables) should ideally be coated in breadcrumbs or flour before frying. Make sure to remove excess flour or breadcrumbs before immersing the food in the oil. 11 Food POTATO CHIPS Recommended quantity for best Max. quantity (g) 600 Temperature (°C) Time (minutes) 190 10-12 results with 1.5 litres of oil Maximum quantity with 1.1 litre of oil 1000 190 20-22 Maximum quantity with 1.5 litres of oil 1200 190 20-22 500 500 600 500-600 500 500-600 160 160 160 170 160 160 9-10 9-10 7-10 8-10 8-10 6-7 FISH Squid Scallops Scampi tails Sardines Cuttlefish Sole (3) MEAT Beef cutlets (2) Chicken cutlets (3) Meat balls (8 - 10) 250 300 400 170 170 160 5-6 6-7 7-9 VEGETABLES Artichokes Cauliflower Mushrooms Aubergines Courgettes 250 400 400 300 200 150 160 150 170 170 10-12 8-9 9-10 11-12 8-10 Cooking times and temperatures are approximate and must be adjusted according to quantity and personal tastes. FRYING FROZEN FOOD Frozen foods are often covered with a layer of ice. This should be removed before cooking by shaking the basket. Immerse the basket in the oil very slowly to prevent the oil from boiling over. Max. quantity (g) Temperature (°C) 200 (*) 190 4-6 Maximum quantity with 1.1 litres of oil 600 190 14-16 Maximum quantity with 1.5 litres of oil 1000 190 21-23 POTATO CROQUETTES 500 190 7-8 FISH Fish fingers Shrimps 300 300 190 190 4-6 4-6 MEAT Chicken cutlets (3) 200 180 6-8 Food POTATO CHIPS Recommended quantity for Time (minutes) best results with 1.5 litres of oil Cooking times and temperatures are approximate and must be adjusted according to quantity and personal tastes. IMPORTANT SAFEGUARD: Before immersing the basket, make sure the lid is tightly closed. (*) Recommended quantity for best frying results. You can, of course, fry a larger quantity of frozen potato chips, but they will be greasier as a result of the sudden drop in oil temperature on immersion. 12 FILTERING THE OIL OR FAT You should filter the oil or fat each time you fry, especially if you cook food in breadcrumbs or flour. Make sure the oil is sufficiently cold (wait about two hours). MODELS WITHOUT DRAIN HOSE (R) AND OIL CONTAINER (P) 1. After removing the lid (fig. 10), empty the bowl as shown in fig. 19. 2. Hook the basket to the edge of the bowl and place the filter supplied in the bottom of the basket (fig. 20). Filters are available from your local dealer or one of our service centres. 3. Then pour the oil or fat back into the deep fryer very slowly to avoid it overflowing from the filter (fig. 21). MODELS WITH DRAIN HOSE (R) AND OIL CONTAINER (P) 1. Pull the drawer (M) outwards as shown in fig. 6. 2. Place the oil container (P) without the lid (O) in the special housing (fig. 7) and insert the oil filter (Q). 3. Open the door (U) as shown in fig. 8, remove the drain hose (R), remove the cap (N) (in models without oil container, use any suitable recipient). 4. When you have finished, close the drain hose with the cap, replace in its housing and close the door. For models without oil container, repeat operations 2-3 described in the above paragraph. HOW LONG THE OIL OR FAT LASTS Every now and then it must be completely changed. As with any deep fryer, the oil deteriorates after being heated a number of times! Even if used and filtered correctly, it should therefore be changed completely on a regular basis. You should ideally change the oil completely after frying for 5/8 times and always in the event of: • unpleasant smells • smoke during frying • if the oil becomes dark coloured. Thanks to the rotating basket, the appliance fries with little oil. This means you save about half the oil used by other deep fryers on the market. REPLACING THE ANTI-ODOUR FILTER With time, the anti-odour filters inside the lid will lose their efficiency. When the filter changes colour (visible through the spy hole (A, fig. 10) in the inside cover), this indicates the filter must be replaced. To replace, remove the plastic filter cover (G) (fig. 11). IMPORTANT: The white filter must rest against the metal part (fig. 12) and the coloured part must face upwards (towards the black filter). CLEANING Before cleaning, always unplug from the mains socket. Never immerse the deep fryer in water and never place it under running tap water. To remove the lid, proceed as follows: push it backwards and at the same time pull it upwards (see arrows “1” and "2", fig. 10). Never immerse the lid in water without removing the filters first. If water gets into the appliance, it could cause electric shock. After leaving to cool down for about two hours, empty the oil or fat as described in the paragraph "filtering the oil or fat". 13 To clean the bowl, proceed as follows: • Wash the bowl (Z) in hot water and washing up liquid. To empty the water, always use the oil drain hose (if present) as shown in fig. 14. Rinse and dry thoroughly. Remove any water left in the drain hose. • Use the brush provided to clean the inside of the oil drainage hose (fig. 13). • The basket can be washed in a dishwasher. For models with non-stick bowl, never use abrasive objects or detergents to clean the bowl. Clean with a soft cloth and neutral detergent only. Important information for correct disposal of the product in accordance with EC Directive 2002/96/EC. At the end of its working life, the product must not be disposed of as urban waste. It must be taken to a special local authority differentiated waste collection centre or to a dealer providing this service. Disposing of a household appliance separately avoids possible negative consequences for the environment and health deriving from inappropriate disposal and enables the constituent materials to be recovered to obtain significant savings in energy and resources.As a reminder of the need to dispose of household appliances separately, the product is marked with a crossed-out wheeled dustbin. TROUBLESHOOTING FAULT 14 CAUSE SOLUTION Unpleasant smells The anti-odour filter is saturated. The oil has deteriorated. The cooking liquid is unsuitable. Replace the filter. Replace the oil or fat. Use good quality peanut oil. Oil overflows The oil has deteriorated and produces too much foam. You have immersed food which is not sufficiently dry in the hot oil. Basket immersed too rapidly. The oil level in the deep fryer is over the maximum limit. Replace the oil or fat. The oil does not heat up The thermal cutout may have tripped. Contact the Service Centre (the device must be replaced). Only half the basket is fried correctly The basket is not rotating during cooking. Clean the bottom of the bowl. Clean the wheel ring in the basket. Dry the food well. Immerse slowly. Reduce the quantity of oil inside the bowl.