1
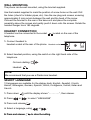
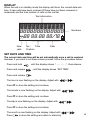
New
Zealand
SENSOR 500
Dedicated Network services telephone
User guide
The SENSOR 500 is a dedicated network services telephone. SENSOR 500 is
compatible with Caller ID, Call Answer and message waiting network services. In
addition it is also pre-programmed for access to other optional services.
Up to 10-speed dial memories and 20 name and number phonebook add to its
versatility
Other features include: headset socket, on-hook dialling and a choice of 12
languages for the display text.
Note: Caller display, Call Answer and other optional services are usually
subscription services.
1
SENSOR 500
Installation.................................. 3
Location of controls............... 3
Connection............................ 4
Wall mounting........................ 5
Headset..................................5
Select language..................... 5
Display....................................6
Set date and time...................6
Using the telephone................... 7
Making a call.......................... 7
On the hook dialing................7
Using a headset..................... 7
Last number redial................. 8
Volume control....................... 8
Mute....................................... 8
Pause..................................... 8
Telephone ringer.................... 8
Caller display.............................. 9
New number(s)...................... 9
Reviewing the call list.............10
List information.......................10
Erase phone number(s)......... 11
If the call list is full.................. 11
Dialling from the call list......... 11
Speed dial memories................. 12
Store number/name............... 12
Phonebook..................................13
Store.......................................14
Erase...................................... 14
Dial......................................... 14
Call Answering............................15
Miscellaneous.............................16
Trouble shooting.................... 17
Guarantee...............................18
2
LOCATION OF CONTROLS
1
2
3
4
5
6
7
8
9
10
11
12
13
3
Handset
Curly cord socket
Wall mounting hook
Hook switch
Dial-Up key
Scroll call list/phonebook, replay
Line cord socket (rear)
Display
Message waiting indicator
Play/Pause messages
Headset socket (rear)
Switch between speaker/headset
Switch for ringer level
14
15
16
17
18
19
20
21
22
23
24
25
Erase key
Scroll call list/phonebook, save
Speed-dial/pre-programmed keys
Volume control for handset
Volume control for speaker
Mute key
Key/indicator for speaker/headset
Dial keys 0-9, *, #
Programming key
Redial key
Recall-key
Phonebook access
CONNECTION TO THE TELEPHONE NETWORK
· Connect the curly cord to the left-hand side of the telephone and to the
bottom of the handset.
· Connet the power cord to middle socket of telephone and plug into power
outlet.
· Connect the telephone line cord to the socket entitled “LINE” on the rear of
the telephone and then connect the cord to the network wall outlet. The
display will show: NO CALLS.
Line
Headset socket
Line cord socket
Plug pack power
To connect headset, see page 4.
Do not place the unit in direct sunlight or in an area of high humidity.
In very rare situations the rubber feet on the base of the telephone may discolour
a surface.
It is recommended that you disconnect the base unit from the mains power during a thunderstorm.
Do not use in the rain, near a bath or with wet hands.
To clean the product, use a damp cloth or antistatic wipe. Never spray cleaner
fluid directly onto the handset or base unit.
4
WALL MOUNTING
The phone can be wall mounted, using the bracket supplied.
Use the bracket supplied to mark the position of screw holes on the wall. Drill
the holes (check for hidden pipes, etc). Use the raw plug and screws, ensuring
approximately 3 mm remain between the wall and the head of the screw.
Connect the bracket to the rear of the base unit and place the complete
assembly above the screws and gently push it down onto the screws. Rotate the
handset hanger hook 180 degrees.
HEADSET CONNECTION
A headset can be connected to the socket
telephone.
located on the rear of the
1. Connect headset to
headset socket at the rear of the phone
Headset socket
Line
2. Select headset position, using the switch on the right hand side of the
telephone.
On-hook dialling:
Headset:
NOTE!
We recommend that you use a Plantronics headset.
SELECT LANGUAGE
12 languages are available for the dislpay texts: English, Swedish, Finnish,
Danish, Norwegian, German, Spanish, Dutch, Portuguese, Turkish, Italian and
French.
1. Press down
2. Press
until the display shows ”- - - - - - - -”, then release.
or
3. Press and release
to select “LANGUAGE”
.
4. Select a language, using
5. Press and release
or
.
to store the setting.
DISPLAY
When the unit is in standby mode the display will show: the current date and
time, if new calls have been received (if these have not been reviewed or
answered) and the total number of calls on the call list.
Text information
8888888888888
Numbers
88 88 :88 88/18
New
calls
No./
Time
Position
Date
SET DATE AND TIME
The current date and time will be set automatically once a call is received.
However, if you want to set these values yourself, follow the procedure below:
· Press and hold
until the display shows ”- - - - - - - -”., then release.
· Press and release
· Press and release
, until the display shows ”SET TIME”.
.
· The hour is now flashing on the display. Adjust with
or
.
· Press C to store the setting and continue.
· The minute is now flashing on the display. Adjust with
or
.
· Press C to store the setting and continue.
· The day is now flashing on the display. Adjust with
or
.
· Press C to store the setting and continue.
· The month is now flashing on the display. Adjust with
Press
to store the setting and return to stand-by
or
.
6
MAKING A CALL
A call can be made in several different ways, using the handset, on-hook dialling
or headset.
USING the HANDSET
1. Lift the handset and wait for dial tone.
2. Dial the phone number required.
· To terminate the call replace the handset.
You can change to speaker/headset during a call by pressing
and replacing
the handset.
Note: Ensure the switch on the right hand side is set to the desired function
headset/speaker.
USING the ON-HOOK DIALING
1. Ensure that the switch on the right hand side of the phone is set to
.
2. Press and release
. Use the volume control on the right hand side to
adjust the sound level.
3. Dial the number required.
4. When the called party answers, lift the handset.
· To terminate the call replace the handset.
USING a HEADSET
1. Ensure that the switch on the right side of the phone is set to:
2. Press and release
. Dial tone is heard in the headset.
3. Dial the number required.
· Press and release
7
to terminate the call.
.
LAST NUMBER REDIAL
If the last number dialled was engaged or the call was not answered, it is
possible to redial the number using the
button.
· Press and release
. The telephone number will be dialled automatically.
· When the called party answers, lift the handset (or headset) to converse. If
the call is not answered, press and release
It’s also possible to lift the handset and then press the redial key.
VOLUME CONTROL
The sound volume in the handset or headset can be adjusted using the
[VOL
] to increase the volume , and [VOL
] to decrease the volume.
MUTE
If during a telephone conversation, you wish to talk privately to a third party
without the caller overhearing: Press the
button (the word MUTE will appear
on the display). To resume the conversation, press the
button again.
PAUSE
A short pause to numbers stored in the phone book and the speed-dial
memories, using this
button. This may be required if the phone is
connected to a PABX or if used with some network services.
TELEPHONE RINGER
The telephone ringer volume can be set to either high, low or off which is
represented by this symbol
.
8
CALLER DISPLAY
Caller display allows you to see who is calling before you answer a call and to
see who has called in your absense. When the service is implemented on your
telephone line, seconds before your telephone rings the number of the
incomming caller will appear on the display. Up to 60 incomming numbers can
be stored in the call list. When the list is full, the oldest number will be deleted
automatically.
It is not possible to view the call list and take a new call at the same time.
NOTE!
Caller Display is an optional telephone Network service. If the caller Display
service is not implemented on your telephone line, incomming call information
will not be displayed.
NEW NUMBERS
The words NEW CALL and the number of calls will appear on the display. The
envelope symbol on the display will flash. Once the number(s) have been
reviewed, NEW CALL will disappear and the indicator will stop flashing.
When an incoming number is received it is assigned a call sequence number
which appears on the top left hand side of the display, commencing with 01
(oldest call) up to 60 (latest call).
9
REVIEWING PHONE NUMBER
Scroll the memory with the keys
or
.
The key
Scrolls from the oldest number.
The key
Scrolls from the latest number.
The time and date each call is received is shown on the display. If the number is
stored iin the phonebook the corresponding name is also shown.
9 - 2805000
17 10 :56 14/10
Phone number 9-2805000, received at 10:56 the 14th October. Position number
17.
LIST INFORMATION
The display will also provide the following information:
10
ERASE PHONE NUMBER(S)
You may erase a single number or all numbers on the call list.
ERASE A NUMBER
· Scroll the call list until the number to be erased is shown on the display.
· Press C twice quickly, then release
ERASE ALL NUMBERS
· Scroll the call list until a number is shown on the display.
· Press and hold C until the display shows ”ERASE ALL?”., then release.
· Press and release C again. All phone numbers are now erased.
IF THE CALL LIST IS FULL
The call list memory capacity is 60 telephone numbers. When the memory is
full, each new coming call will replace the oldest stored number, the principle
“first in’ first out” applies. The new number receives the highest number, 60, and
all other numbers are moved one step up in the memory order.
DIALLING A NUMBER FROM THE CALL LIST
· Scroll the call list with
displayed.
or
until the desired phone number is
· Lift the handset and press and release
It is also possible to first press and release
the called party answers.
NOTE!
.
and then lift the handset when
If a charge for local calls is unacceptable, the “Dial Button” should not be used for
local calls when using some Service providers. Only the 7-digits of the local number
should be dialled from your telephone. Do not dial the area code or the “0” prefix
11
SPEED-DIAL MEMORIES
Ten ‘One-touch’ speed dial memories are available. Memories 1 & 2, 6 & 7 have
been pre-programmed for easy access to and set of for select services. If
required these memories can be re-programmed with numbers of your own
choice following the procedure below.
Memroy 1 = Call waiting answer / Call hold
Memory 2 = Stop your telephone number being displayed for this call
Memory 6 = Program call foward always
Memory 7 = Turn Call foward always off
STORE NUMBER/NAME
1. Press
.
2. Dial the phone number to wish to store (16 digits maximum).
3. Press and release
.
4. Enter a (15 letters maximum) by pressing the relevant keypad digit buttons
once or several times (see page 13)
- If the same letter is you want to go to the next position press
.
- For edit, press
.
- To make a space, press 0.
5. Press and release the required speed-dial key to store the entry.
If you want to erase a speed-dial number, replace it with a new number.
DIALLING
1. Press and release the desired speed-dial key. The number is dialled
automatically.
2. Lift the handset when the other person answers (or use a headset).
It’s also possible to lift the handset first and then press the speed-dial key.
SPEED-DIAL RINGER SOUND
When any of the numbers that are stored in the one touch memories call you,
an alternative ringer tone is heard, this feature allows you to distinguish between
callers, without looking at the display.
12
STORE NUMBER/NAME
The telephone has a phone book where you can store 20 names and telephone
numbers for easy access and fast dialling.
When one of these phone numbers calls, both name and number will be
displayed. In stand-by display will alternate between NEW CALLS and VIP on
the upper line. This ensures that you see when a call that matches a number in
the phone book (or speed-dial memory) is received.
9 - 2805000
:08 16/10
20
18
Incoming call/reviewing
-03-
::08 18/10
22
20
Stand-by
LETTERS
The keypad digit buttons are also used to store letters in the phone book.
Printed on each keypad button are a number of letters which in total make up
the english alphabet. Other letters and some special symbols for example ! and
& exist in the memory even though they are not printed on the buttons, the table
below indicates where you will find them.
13
STORE NUMBER/NAME
1. Press and release
. The display shows how many numbers/ names are
stored in the phonebook.
2. Press
.
3. Dial the full number to be stored as you would manually dial that number
(16 digits maximum).
4. Press and release
.
5. Enter a name. (15 letters maximum) by pressing the relevant keypad digit
buttons once or several times (see page 13)
- If you have to enter the same letter twice, press and release
onto the next position
- For edit, press
.
- To make a space, press 0.
6. Press and release
to move
.
· Continue to store numbers from point 1 above or press and release
to exit.
ERASE NUMBER/NAME IN THE PHONEBOOK
· Press
, the display shows the amount of stored numbers in the
phonebook.
· Use
or
to scroll the desired number.
· Press C twice to erase the number.
· Continue to erase numbers or press
to return to standby mode.
DIALLING FROM THE PHONEBOOK
1. Press
, the display shows the amount of stored numbers in the
phonebook.
2. Select the number required with
3. Press and release
or
.
.
4. Lift the handset when the called party answers (or talk in a headset).
14
CALL ANSWERING
To check your messages, simply press Play and your messages will be played
to you.
Whilst listening to your messages you can use the keys featured below to
operate various options.
Backwards
Pause/Play
Forward
Erase current message
To use the other features of the network service, press the corresponding key.
Message waiting indicators
The LED indicator will flash
The display will alternate ‘NEW CALLS’ and ‘MSG WAITING’
These indicators will only work when you have subscribed to a network voice
message service. (Telecom Call Minder)
You will have to retrieve all your messages before they are extinguished.
Note: These indicators will be reset to off when the phone is disconnected or
during a power failure.
15
RE-PROGRAM FOR ALTERNATIVE CALL ANSWERING SERVICE
If the pre-programmed keys are not compatible with your network operators
answering service, it is possible to re-program the keys.
· Press.
· Press and hold down
until the display shows text, then release
· Enter digit (s) to store
· Press the key required.
· Press
· Press
to store
to finish.
16
TROUBLE SHOOTING
THE RED LED INDICATOR ON THE BASE UNIT IS FLASHING
· There is a message waiting in your Network voice message system.
INCOMING NUMBERS ARE NOT VISIBLE ON THE DISPLAY
· Have you subscribed to the caller display service?
· If “Out of area” or “Withheld Secret” are displayed, it either means that no
information of the number is available or that the caller has withheld their
number.
· Is the phone connected to a PABX? Caller display is not available when
connected to a PABX.
THE TELEPHONE DOES NOT WORK
· Check that the ringer is switched on.
· Does the total of RN numbers exceed 4? If it does, disconnect other
equipment until 4 is achieved.
NO DIALLING TONE
· Is the telephone line cord plugged into a telephone network wall socket?
MEMORY DIALLING DOES NOT WORK
· Store a number and try again.
RN
The RN (Ringer Equivalance Number) is of significance only if you wish to
connect more than 1 telephone to your telephone line. Your telephone line has a
maximum RN capacity of 5. Your Audioline Sensor500 has a RN of 0.5, thus it is
feasible to connect 4 more telephones of a value of 1 to your system. You
should not exceed a value of 5 on the complete system, otherwise the volume of
the ringer in any phone will decrease and one telephone may not ring at all.
17
GUARANTEE
If you believe your SENSOR 500 is malfunctioning, please refer to the relevant
section and/or consult the troubleshooting guide in this manual to ensure that
you have followed the instructions carefully.
The SENSOR 500 is warranted for a period of 12 months from the date of
purchase by you, the end user. In the unlikely event of a fault during this period.
please contact our Helpline for assistance. If the product is then found to be
faulty you will be asked to return it directly to the service agent, ATLAS
GENTECH (NZ) LIMITED with a copy of the purchase receipt.
ATLAS GENTECH (NZ) LIMITED
87 Carbine Road,
Mt Wellington,
Auckland
Service & Spare Parts (Toll Call): 0900 50 025
Fax: (09) 574-2722
Email: [email protected]
NOTE: The guarantee does not extend to damage caused by misuse,
negligence, excessive voltage, faults on the telephone line or lighting. This
guarantee in no way affects your statutory right. DORO is the trade mark of
DORO AB.
The grant of a Telepermit for any item of terminal equipment indicates only that
Telecom has accepted that the item complies with minimum condition for
connection to its network. It indicates no endorsement of the product by Telecom,
nor does it provide any sort of warranty. Above all, it provides no assurance that any
item will work correctly in all respects with another item of Telepermitted equipment
of a different make or model, nor does it imply that any product is compatible with
all of Telecom’s network services.
Warning:
This equipment may not provide for the effective hand-over of a call to another
device on the same line.
This equipment shall not be set to make automatic calls to the Telecom ‘111’
Emergency Service.
18