1
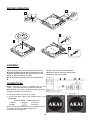
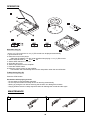
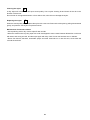
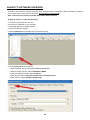
Operating manual
Professional Belt Driver USB Turntable
ATT01U
Operating manual
(GB) 41-50
IMPORTANT
CAUTION
DO NOT OPEN
RISK OF ELECTRIC SHOCK
CAUTION: To reduce the risk of electric shock, do not remove
any cover. No user-serviceable parts inside. Refer servicing to
qualified service personnel only.
This symbol is intended to alert you to the presence of dangerous voltage inside the product that
presents a risk of electric shock. Do not open the product’s case.
The exclamation point within the equilateral triangle is intended to alert the user to the presence of
important operation and maintenance (servicing) instructions in the literature accompanying this
appliance.
POWER-CORD CAUTION
Handle the power cord by the plug. Do not pull out the plug by tugging the cord and never touch the power cord
when your hands are wet as this could cause a short circuit or electric shock. Do not place the unit, a piece of
furniture, etc., on the power cord, or pinch the cord, Never make a knot in the cord or tie with other cords. The
power cords should be routed such that they are not likely are not likely to be stepped on. A damaged power cord
can cause a fire or give you an electrical shock. Check the power cord once in a while. When you find it damaged,
ask your nearest authorized service center or your dealer for a replacement.
HANDLING PRECAUTIONS
1.Install on a solid, flat surface - but not on top of a speaker.
2.Install away from high heat, moisture, or direct sunlight. Avoid dust, dirt, smoke and steam.
3.Install away from a TV set and tuner, To avoid interference. use an outdoor antenna or turn off the TV set and
tuner.
4.Moisture may condense on the turntable if it is brought from a cold area to a warm room, or if room temperature
increases rapidly. If so, do not use until moisture evaporates:
5.To clean records, use an antistatic spray or cleaning fluid and soft cloth. Wiping with a dry cloth or brush may
cause static noise.
BEFORE USE
Check for the following parts included in the package with the main unit:
• Operating instructions
• 45 rpm adaptor
• Turntable Platter
• Slipmat
• Dust cover
• USB cable
42
• Software CD
SAFETY INSTRUCTIONS
• Read Instructions - All the safety and operating instructions should be read before the appliance is operated.
• Retain Instructions - The safety and operating instructions should be retained for future reference.
• Heed Warnings - All warnings on the appliance and in the operating instructions should be adhered to.
• Follow Instructions - All operating and use instructions should be followed.
• Water and Moisture - The appliance should not be used near water - for example, near a bathtub, washbowl,
kitchen sink, laundry tub, in a wet basement, or near a swimming pool, and the like.
• Carts and Stands - The appliance should be used only with a cart or stand that is recommended by the
manufacturer.
An appliance and cart combination should be moved with care Quick stops, excessive force,
and uneven surfaces may cause the appliance and cart combination to overturn.
• Wall or Ceiling Mounting - The appliance should be mounted to a wall or ceiling only as recommended by the
manufacturer.
• Ventilation - The appliance should be situated so that its location or position does not interfere with its proper
ventilation. For example, the appliance should not be situated on a bed, sofa, rug, or similar surface that may
block the ventilation openings; or, placed in a built-in installation, such as a bookcase or cabinet that may
impede the flow of air through the ventilation openings
• Heat - The appliance should be situated away from heat sources such as radiators, heat registers, stoves, or
other appliances (including amplifiers) that produce heat.
• Power Sources - The appliance should be connected to a power supply only of the type described in the
operating instructions or as marked on the appliance.
• Grounding or Polarization - Precautions should be taken so that the grounding or polarization means of an
appliance is not defeated.
• Power-Cord Protection - Power-supply cords should be routed so that they are not likely to be walked on or
pinched by items placed upon or against them, paying particular attention to cords at plugs, convenience
receptacles, and the point where they exit from the appliance.
• Cleaning - The appliance should be cleaned only as recommended by the manufacturer
Clean by wiping with a cloth slightly damp with water. Avoid getting water inside the appliance.
• Disconnect power cord before servicing.
• Replace critical components
only with factory parts or recommended equivalents.
• For AC line powered units - Before returning repaired unit to user, use an ohmmeter to measure iron both AC
•
•
•
•
plug badges to all exposed metallic parts. The resistance should be more than 100,000ohms.
Nonuser Periods - The power cord of the appliance should be unplugged from the outlet when left unused for a
long period of time.
Object and Liquid Entry - Care should be taken so that objects do not fall and liquids are not spilled into the
enclosure through openings.
Damage Requiring Service - The appliance should be serviced by qualified service personnel when:
- The power-supply cord or the plug has been damaged; or
- Objects have fallen, or liquid has been spilled into the appliance; or
- The appliance has been exposed to rain; or
- The appliance does not appear to operate normally or exhibits a marked change in performance; or
- The appliance has been dropped, or the enclosure damaged
Servicing - The user should not attempt to service the appliance beyond that described in the operating
instructions. All other servicing should be referred to qualified service personnel.
43
CONDENSATION
When the turntable is brought into a warm room from previously cold surroundings or when the room temperature
is suddenly increased, condensation may form inside and the turntable may not be able to attain its full
performance. In cases like this, use the turntable after allowing it to stand for about an hour or after raising the
room temperature gradually.
NAMES OF PARTS
3
5
2
4
12
6
7
11
10
8
9
AC
14
13
1
1. AC power cord
8. SIZE select (30/17)
2. Turntable platter
9. Arm-elevation button (
3. Dust cover
10. STOP button
4 . RCA output jack
11. START button
5 . Platter mat
12. SPEED button (
6. Tonearm
13. USB socket (USB cable limit within 3M)
7. Cartridge
14. Phono/line switch
44
UP/
33/
DOWN)
45)
BEFORE OPERATION
2
1
A
A
C
B
4
3
5
ASSEMBLY
p Place the mat on top of the platter.
q Remove the tie securing the tonearm.
r Remove the stylus guard.
Please install the accessory turntable on the main unit.
n Hold the ribbon tape A which is attached to the
turntable belt B and loop the belt over the motor
pulley C. Be sure it does not twist.
o Pull the ribbon tapes A out of the turntable belt
B.
CONNECTIONS
Before connecting the unit it is advised that you also
consult your current equipment instruction manual.
Note: Be sure to turn off the equipment before you make
changes to the different connections.
1. Connect the power cord to an AC outlet.
2. Connect the RCA cable to the PHONO input of your
AMPLIFIER.
Output terminals Amplifier(Receiver)
L (White)
L Channel
R (Red)
R Channel
NOTE: You can also use a line input by setting the phono
/ line switch at the rear of the turntable to line.
3. Connect PC via USB cord.
45
OPERATION
A
1
2
4
30
2
s iz
3
4
7
3
7
B
Automatic Play (A)
B
• 30-cm (12”) LP records and 17-cm (7”) EP records can be played automatically.
1. Open the dust cover.
2. Place the record on the player
• Place the EP adaptor over the center spindle when playing 17-cm (7”) EP records.
45 or
33.
3. Set the SPEED button to
4. Set the SIZE selector to 17 or 30.
5. Close the dust cover.
6. Set the input selector on the amplifier.
7. Press the START button.
8. Adjust the volume control on the amplifier.
• The tonearm will automatically return to the rest position when the record finishes.
To Stop During Play (B)
Press the STOP button.
Precautions when playing records
• Do not rotate or stop the platter manually.
• Do not stop the tonearm manually when it is returning automatically.
• Moving or jarring the unit without securing the tonearm can damage the tonearm.
• Playing flexible records or badly warped records can damage the records and the stylus.
MAINTENANCE
A
B
46
es
17
e le
ct
Cleaning the stylus
A
A dirty stylus will cause noise and poor sound quality. Use a stylus cleaning kit and brush off the dirt in the
direction of the arrow.
Do not brush in the opposite direction or from side to side, since this can damage the stylus.
Replacing the stylus
B
When the sound quality drops, replace the stylus with a new one. Remove the old stylus by pulling it downwards
gently, and push the new stylus into place as shown.
Maintenance of external surfaces
• Use a polishing cloth or dry cloth to wipe off dust and dirt.
• When the surfaces are very dirty, wipe with a soft cloth dipped in some neutral cleanser diluted five or six times
with water, and wrung out well, and then wipe again with a dry cloth. Do not use furniture wax or cleaners.
• Never use thinners, benzene, insecticide sprays and other chemicals on or near this unit, since these will
corrode the surfaces.
47
AUDACITY SOFTWARE OVERVIEW
Audacity is free software, licensed under the GNU General Public License(GPL). More information as well as
open source code can be found on the web at http://audacity.sourceforge.net/
Note : Please ensure you have installed the software before starting.
Setting up your PC to work with Audacity
1. Connect an input source to the unit
2 Connect the USB lead to your computer
3. Install the Audacity recording software
4. Open the Audacity program
5. Select Preference from the Edit tab in the Audacity menu
6. Select Audio I/O tab at the top left
• Under Playback, Device, select your internal sound card
• Under Recording, Device, select USB Audio CODEC
• Under Recording, Channels, select 2 (Stereo)
• Check the box marked Play other tracks while recording new one
• Check the box marked Software Playthrough
48
AUDACITY SOFTWARE OVERVIEW
Recording Albums with Audacity
1. Saving a project
• Audacity writes all the changed and recorded audio to a directory called Projectname_data, which is located
right where you saved the project file itself
• Thus, select Save project as from your Audacity File tab and choose a location and filename for your project
• Please note that when you startup Audacity fresh, only the “Save As...” menu option is available.
2. How to record
• Set your USB turntable up to play the song or album you want to record
•
Click on the red Record button to begin recording.
• Lower tone arm on USB turntable onto album and track you want to record.
•
Click on the blue Pause button to pause the recording. Press it again to continue.
y
Click on the yellow Stop button
That's it. You can now play around with your recording and explore the editing capabilities of Audacity.
Remember that you can use the Undo function almost without limits while the project is open.
NOTE: CD's cannot be burned directly from the Audacity application. Other CD burning applications should be
used.
49
SPECIFICATIONS
GENERAL
Model:
Dimension:
Weight:
Power supply:
Power consumption:
TURNTABLE SECTION
Type
Motor
Driving method
Turntable platter
Speeds
Wow and flutter
S/N ratio
Speed tolerance
USB function
ATT01U Professional Belt Drive USB turntable
350(W) x 348(D) x 95.4(H)mm
2.47 kg
AC230V/50Hz
3W
2-speed full-auto
DC motor
Belt drive
195 mm dia. Plastic
331/3 and 45 rpm
Less than 0,25% (WTD) at 3KHz (JIS)
More than 50dB (DIN-B)
3000Hz +3%,-2%
USB rec. function
A/D, D/A
16 bit 44.1KHz or 48KHz USB selectable
Computer interface
TONEARM SECTION
Type
Effective arm length
Phono output level
Line output level
Channel Separation
Channel Balance
USB 1.1 compliant, Windows XP or MAC OSX
Dynamic balanced straight shaped arm w/soft damping control
195 mm
1,5~3,6 mV at 1KHz 5cm/sec (HP-4005)
90~216mV at 1KHz 5cm/sec (HP-4005)
More than 15dB at 1KHz
Within 2.5 dB at 1KHz
Note:
Corrosion, oxidation, battery-leakage and any other gradually acidic defect of this nature will invalidate the
guarantee.
DISPOSAL
Disposal of Used Electrical & Electronic Equipment
The meaning of the symbol on the product, its accessory or packaging indicates that this product
shall not be treated as household waste. Please, dispose of this equipment at your applicable
collection point for the recycling of electrical & electronic equipments waste. In the European
Union and Other European countries which there are separate collection systems for used
electrical and electronic product. By ensuring the correct disposal of this product, you will help
prevent potentially hazardous to the environment and to human health, which could otherwise be caused by
unsuitable waste handling of this product. The recycling of materials will help conserve natural resources. Please
do not therefore dispose of your old electrical and electronic equipment with your household waste. For more
detailed information about recycling of this product, please contact your local city office, your household waste
disposal service or the shop where you purchased the product.
For more information and warranty conditions, please visit : www.akai.eu
50