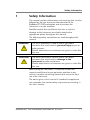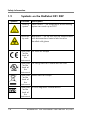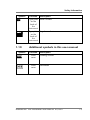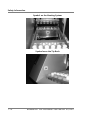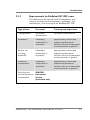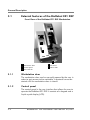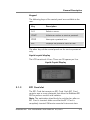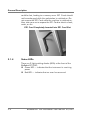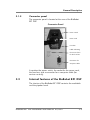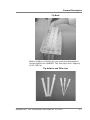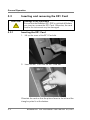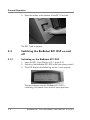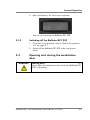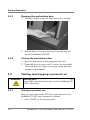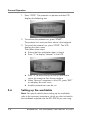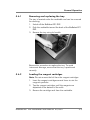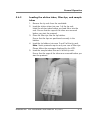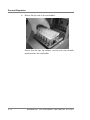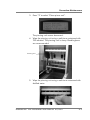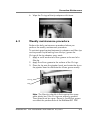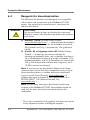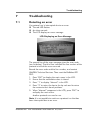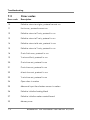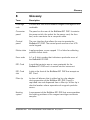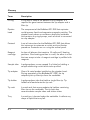
1
Version 1 February 2007 BioRobot® EZ1 DSP Workstation User Manual 9001360 9001360 1037181 1037181 QIAGEN QIAGEN GmbH, GmbH,D-40724 D-40724Hilden Hilden R1 Sample & Assay Technologies Trademarks: QIAGEN®, BioRobot® (QIAGEN Group); Gigasept®, Lysetol®, Mikrozid® (Schülke & Mayr GmbH); DECON-QUAT® (Veltek Associates, Inc.). © 2007 QIAGEN, all rights reserved. Contents Contents 1 Safety Information 1-1 1.1 Proper use 1-2 1.2 Electrical safety 1-2 1.3 Environment 1-4 1.4 Biological safety 1-5 1.5 Chemicals 1-6 1.6 Waste disposal 1-6 1.7 Mechanical hazards 1-7 1.8 Heat hazard 1-7 1.9 Symbols on the BioRobot EZ1 DSP 1-8 1.10 Additional symbols in this user manual 1-9 2 Introduction 2-1 2.1 About this user manual 2-1 2.2 2.2.1 2.2.2 2.2.3 General information Technical assistance Policy statement Version management 2-1 2-1 2-2 2-2 2.3 2.3.1 Intended use of the BioRobot EZ1 DSP Requirements for BioRobot EZ1 DSP users 2-2 2-3 3 3.1 3.1.1 3.1.2 3.1.3 3.1.4 3.1.5 General Description External features of the BioRobot EZ1 DSP Workstation door Control panel EZ1 Card slot Status LEDs Connector panel BioRobot EZ1 DSP Workstation User Manual 02/2007 3-1 3-2 3-2 3-2 3-3 3-4 3-5 Contents-1 Contents 3.2 3.2.1 3.2.2 4 Internal features of the BioRobot EZ1 DSP Worktable Pipettor head Installation Procedures 3-5 3-6 3-9 4-1 4.1 Requirements 4-1 4.2 AC power connection 4-1 4.3 Hardware installation 4-3 5 General Operation 5-1 5.1 Overview 5-1 5.2 5.2.1 5.2.2 Inserting and removing the EZ1 Card Inserting the EZ1 Card Removing the EZ1 Card 5-2 5-2 5-3 5.3 5.3.1 5.3.2 Switching the BioRobot EZ1 DSP on and off Switching on the BioRobot EZ1 DSP Switching off the BioRobot EZ1 DSP 5-4 5-4 5-5 5.4 5.4.1 5.4.2 Opening and closing the workstation door Opening the workstation door Closing the workstation door 5-5 5-6 5-6 5.5 5.5.1 5.5.2 Starting and stopping a protocol run Starting a protocol run Stopping a protocol run 5-6 5-6 5-7 5.6 5.6.1 5.6.2 5.6.3 Setting up the worktable 5-8 Removing and replacing the tray 5-9 Loading the reagent cartridges 5-9 Loading the elution tubes, filter-tips, and sample tubes 5-11 6 Preventive Maintenance 6-1 6.1 Regular maintenance procedure 6-2 6.2 Daily maintenance procedure 6-4 Contents-2 BioRobot EZ1 DSP Workstation User Manual 02/2007 Contents 6.3 Weekly maintenance procedure 6-5 6.4 Reagents for decontamination 6-6 7 Troubleshooting 7-1 7.1 Detecting an error 7-1 7.2 Error codes 7-2 8 Glossary 8-1 Appendix A A-1 Technical data A-1 Waste Electrical and Electronic Equipment (WEEE) A-4 Appendix B B-1 Warranty statement B-1 Liability clause B-2 Index BioRobot EZ1 DSP Workstation User Manual 02/2007 Index-1 Contents-3 Contents This page intentionally left blank Contents-4 BioRobot EZ1 DSP Workstation User Manual 02/2007 Safety Information 1 Safety Information This manual contains information and warnings that must be followed by the user to ensure safe operation of the BioRobot EZ1 DSP workstation and to maintain the instrument in a safe condition. Possible hazards that could harm the user or result in damage to the instrument are clearly stated at the appropriate places throughout this manual. The following safety conventions are used throughout this manual. WARNING The term WARNING is used to inform you about situations that could result in personal injury to you or other persons. Details about these circumstances are given in a box like this one. CAUTION The term CAUTION is used to inform you about situations that could result in damage to the instrument or other equipment. Details about these circumstances are given in a box like this one. Before using the instrument, it is essential to read this manual carefully and to pay particular attention to any advice it contains concerning hazards that may arise from use of the instrument. The advice given in this manual is intended to supplement, not supersede, the normal safety requirements prevailing in the user’s country. BioRobot EZ1 DSP Workstation User Manual 02/2007 1-1 Safety Information 1.1 WARNING Proper use Risk of personal injury and material damage [W1] Improper use of the BioRobot EZ1 DSP may cause personal injuries or damage to the instrument. The BioRobot EZ1 DSP must only be operated by qualified personnel who have been appropriately trained. Servicing of the BioRobot EZ1 DSP must only be performed by QIAGEN Instrument Service Specialists. Use only QIAGEN® components, otherwise your right to make a claim under the guarantee may be invalidated. Carry out the maintenance regularly in accordance with the operating instructions. QIAGEN charges for repairs that prove to be required due to incorrect maintenance. CAUTION Damage to the instrument [C1] Avoid spilling water or chemicals onto the BioRobot EZ1 DSP. Instrument damage caused by water or chemical spillage will void your warranty. In case of an emergency, switch off the BioRobot EZ1 DSP at the power switch on the rear of the instrument and unplug the power cord from the wall power outlet. CAUTION 1.2 Damage to the instrument [C2] Ensure that the BioRobot EZ1 DSP is switched off before you manually move the mechanical components of the instrument. Electrical safety To ensure satisfactory and safe operation of the BioRobot EZ1 DSP, it is essential that the line power cord is connected to true electrical earth (ground). 1-2 BioRobot EZ1 DSP Workstation User Manual 02/2007 Safety Information WARNING Electrical hazard [W2] Any interruption of the protective conductor (earth/ground lead) inside or outside the instrument or disconnection of the protective conductor terminal is likely to make the instrument dangerous. Intentional interruption is prohibited. Lethal voltages inside the instrument When the instrument is connected to line power, terminals may be live, and opening covers or removing parts is likely to expose live parts. When working with the BioRobot EZ1 DSP: Make sure the line power cord is connected to a line power outlet that has a protective conductor (earth/ ground). Do not attempt to make any internal adjustments or replacements. Do not operate the instrument with any covers or parts removed. If water or reagent has spilled inside the instrument, switch off the instrument and disconnect it from the line power supply. Call QIAGEN Technical Services. Servicing should be carried out only by QIAGEN Instrument Service Specialists. If the instrument becomes electrically unsafe for use, make the instrument inoperative and secure it against unauthorized or unintentional operation. Call QIAGEN Technical Services. The instrument is likely to be electrically unsafe when: It shows visible damage The line power cord shows signs of damage It has been stored under unfavorable conditions for a prolonged period It has been subjected to severe transport stresses WARNING Risk of electric shock Do not touch the BioRobot EZ1 DSP with wet hands. BioRobot EZ1 DSP Workstation User Manual 02/2007 [W3] 1-3 Safety Information Voltage rating label The following label appears on the back of the BioRobot EZ1 DSP. Ensure that the voltage rating specified on the label matches the voltage available at the installation site. 1.3 Environment Operating conditions WARNING Explosive atmosphere The BioRobot EZ1 DSP is not designed for use in an explosive atmosphere. [W4] The BioRobot EZ1 DSP will operate correctly under the following conditions: Indoors Ambient temperature of 5–40ºC (41–104ºF) Ambient relative humidity of <80% at <31ºC (88ºF) (no condensation) Storage conditions If you intend to store the instrument for a prolonged period of time, unplug the power cord from the wall power outlet. The instrument can be stored at –25ºC to 70ºC (–13ºF to 158ºF). 1-4 BioRobot EZ1 DSP Workstation User Manual 02/2007 Safety Information 1.4 Biological safety Specimens and reagents containing materials from humans should be treated as potentially infectious. Use safe laboratory procedures as outlined in publications such as Biosafety in Microbiological and Biomedical Laboratories, HHS (www.cdc.gov/od/ohs/biosfty/biosfty.htm). Samples Samples may contain infectious agents. You should be aware of the health hazard presented by such agents and should use, store, and dispose of such samples in accordance with the required safety regulations. WARNING Samples containing infectious agents [W5] Some samples used with this instrument may contain infectious agents. Handle such samples with the greatest of care and in accordance with the required safety regulations. Always wear safety glasses, two pairs of gloves, and a lab coat. The responsible body (e.g., laboratory manager) must take the necessary precautions to ensure that the surrounding workplace is safe, and that the instrument operators are suitably trained and not exposed to hazardous levels of infectious agents as defined in the applicable Material Safety Data Sheets (MSDSs) or OSHA, ACGIH, or COSHH documents. Venting for fumes and disposal of wastes must be in accordance with all national, state, and local health and safety regulations and laws. OSHA: Occupational Safety and Health Administration (United States of America). ACGIH: American Conference of Government Industrial Hygienists (United States of America). COSHH: Control of Substances Hazardous to Health (United Kingdom). BioRobot EZ1 DSP Workstation User Manual 02/2007 1-5 Safety Information 1.5 Chemicals WARNING Hazardous chemicals [W6] Some chemicals used with this instrument may be hazardous or may become hazardous after completion of the protocol run. Always wear safety glasses, gloves, and a lab coat. The responsible body (e.g., laboratory manager) must take the necessary precautions to ensure that the surrounding workplace is safe and that the instrument operators are not exposed to hazardous levels of toxic substances (chemical or biological) as defined in the applicable Material Safety Data Sheets (MSDSs) or OSHA, ACGIH, or COSHH documents. Venting for fumes and disposal of wastes must be in accordance with all national, state, and local health and safety regulations and laws. OSHA: Occupational Safety and Health Administration (United States of America). ACGIH: American Conference of Government Industrial Hygienists (United States of America). COSHH: Control of Substances Hazardous to Health (United Kingdom). Toxic fumes If you work with volatile solvents, toxic substances, etc., you must provide an efficient laboratory ventilation system to remove vapors that may be produced. 1.6 Waste disposal Used labware, such as reagent cartridges and filter-tips, may contain hazardous chemicals or infectious agents from the purification process. Such wastes must be collected and disposed of properly in accordance with the local safety regulations. For disposal of waste electrical and electronic equipment (WEEE), see page A-4. 1-6 BioRobot EZ1 DSP Workstation User Manual 02/2007 Safety Information 1.7 Mechanical hazards The worktable of the BioRobot EZ1 DSP moves during operation of the instrument. WARNING Moving parts [W7] Never open the workstation door while the BioRobot EZ1 DSP is operating. WARNING Risk of overheating [W8] To ensure proper ventilation, maintain a minimum clearance of 15 cm and 30 cm at the rear and sides of the BioRobot EZ1 DSP, respectively. Slits and openings which ensure the ventilation of the BioRobot EZ1 DSP must not be covered. 1.8 Heat hazard The BioRobot EZ1 DSP worktable contains a heating system. WARNING Hot surface [W9] The heating system can reach high temperatures. Avoid touching it when it is hot. BioRobot EZ1 DSP Workstation User Manual 02/2007 1-7 Safety Information 1.9 Symbol 1-8 Symbols on the BioRobot EZ1 DSP Location Description Heating system Heat hazard — the temperature of the heating system can reach up to 95ºC Near the tip rack Biohazard — the tip rack may be contaminated with biohazardous material and must be handled with gloves Type plate on the back of the instrument CE mark for Europe Type plate on the back of the instrument UL listing mark for Canada and the USA Type plate on the back of the instrument WEEE mark for Europe Type plate on the back of the instrument In vitro diagnostic medical device BioRobot EZ1 DSP Workstation User Manual 02/2007 Safety Information Symbol SN 1.10 Symbol Location Description Type plate on the back of the instrument Serial number Type plate on the back of the instrument Legal manufacturer Additional symbols in this user manual Location Description Front cover Catalog number Front cover Handbook BioRobot EZ1 DSP Workstation User Manual 02/2007 1-9 Safety Information Symbol on the Heating System Symbol near the Tip Rack 1-10 BioRobot EZ1 DSP Workstation User Manual 02/2007 Introduction 2 Introduction Thank you for choosing the QIAGEN BioRobot EZ1 DSP workstation. We are confident it will become an integral part of your laboratory. Before using the instrument, it is essential to read this manual carefully and to pay particular attention to any advice it contains concerning hazards that may arise from use of this instrument. 2.1 About this user manual This manual provides information about the BioRobot EZ1 DSP. It guides you systematically through the following sections: 1. Safety Information 2. Introduction 3. BioRobot EZ1 DSP — General Description 4. Installation Procedures 5. General Operation 6. Preventive Maintenance 7. Troubleshooting 8. Glossary Appendices The Appendices contain the following: Contact information for technical assistance Technical data Warranty terms 2.2 General information 2.2.1 Technical assistance At QIAGEN we pride ourselves on the quality and availability of our technical support. Our Technical Service Departments are staffed by experienced scientists with extensive practical and theoretical expertise in molecular biology and the use of BioRobot EZ1 DSP Workstation User Manual 02/2007 2-1 Introduction QIAGEN products. If you have any questions regarding the BioRobot EZ1 DSP or QIAGEN products in general, please do not hesitate to contact us. QIAGEN customers are a major source of information regarding advanced or specialized uses of our products. This information is helpful to other scientists as well as to the researchers at QIAGEN. We therefore encourage you to contact us if you have any suggestions about product performance or new applications and techniques. For technical assistance and more information please call one of the QIAGEN Technical Service Departments or local distributors (see back cover). 2.2.2 Policy statement It is the policy of QIAGEN to improve products as new techniques and components become available. QIAGEN reserves the right to change specifications at any time. In an effort to produce useful and appropriate documentation, we appreciate your comments on this publication. Please contact QIAGEN Technical Services. 2.2.3 Version management This document is the BioRobot EZ1 DSP Workstation User Manual version 1, revision R1. 2.3 Intended use of the BioRobot EZ1 DSP The BioRobot EZ1 DSP workstation is designed to perform automated purification of nucleic acids for in vitro diagnostic purposes. The system is intended for use by professional users, such as technicians and physicians trained in molecular biological techniques and the operation of the BioRobot EZ1 DSP. Any diagnostic results that are generated using the sample preparation procedure in conjunction with any downstream diagnostic assay must be interpreted in conjunction with other clinical or laboratory findings. 2-2 BioRobot EZ1 DSP Workstation User Manual 02/2007 Introduction 2.3.1 Requirements for BioRobot EZ1 DSP users This table covers the general level of competence and training necessary for transportation, installation, use, maintenance, and servicing of the BioRobot EZ1 DSP. Type of task Personnel Training and experience Transportation No special requirements No special requirements Installation Laboratory technicians or equivalent Appropriately trained and experienced personnel familiar with use of computers and automation in general Routine use (running protocols) Laboratory technicians or equivalent Appropriately trained and experienced personnel familiar with use of computers and automation in general Preventive maintenance Laboratory technicians or equivalent Appropriately trained and experienced personnel familiar with use of computers and automation in general Servicing and annual preventive maintenance QIAGEN Instrument Service Specialists only BioRobot EZ1 DSP Workstation User Manual 02/2007 2-3 Introduction This page intentionally left blank 2-4 BioRobot EZ1 DSP Workstation User Manual 02/2007 General Description 3 General Description The BioRobot EZ1 DSP workstation performs fully automated nucleic acid purification from up to 6 samples using magnetic particles. The automated steps include: Lysis of samples Binding of nucleic acids to magnetic particles Washing and elution of nucleic acids The user inserts an EZ1 Card containing protocol(s) into the BioRobot EZ1 DSP. After starting worktable setup using the control panel, the user loads samples, reagent cartridges, filter-tips in tip holders, and elution tubes onto the BioRobot EZ1 DSP worktable. The user then closes the workstation door and starts the protocol. The protocol provides all the necessary instructions for the BioRobot EZ1 DSP to carry out automated nucleic acid purification. The aspiration and dispensing of samples and reagents and the separation of magnetic particles are performed by the 6-channel pipettor head. The temperature of samples is regulated by a heating system. BioRobot EZ1 DSP Workstation User Manual 02/2007 3-1 General Description 3.1 External features of the BioRobot EZ1 DSP Front View of the BioRobot EZ1 DSP Workstation 1 5 2 3 4 3.1.1 1 Workstation door 4 EZ1 Card 2 Control panel 5 Status LEDs 3 EZ1 Card slot Workstation door The workstation door can be manually opened by the user in order to gain access to the worktable. A protocol cannot be started until the workstation door is closed. 3.1.2 Control panel The control panel is the user interface that allows the user to operate the BioRobot EZ1 DSP. It consists of a keypad and a liquid-crystal display (LCD). 3-2 BioRobot EZ1 DSP Workstation User Manual 02/2007 General Description Keypad The following keys of the control panel are available to the user. Key Description 0–9 Selects a menu. START Initiates an action or starts a protocol. STOP Interrupts a protocol run. ESC Displays the previous menu or text. The other keys of the control panel are for service personnel only. Liquid-crystal display The LCD consists of 4 lines. There are 20 spaces per line. Liquid-Crystal Display 3.1.3 EZ1 Card slot The EZ1 Card slot accepts an EZ1 Card. Each EZ1 Card contains one or more protocols that allow the BioRobot EZ1 DSP to perform nucleic acid isolation. Note: The workstation should only be switched on after an EZ1 Card is inserted. Make sure that the EZ1 Card is completely inserted! Otherwise essential instrument data BioRobot EZ1 DSP Workstation User Manual 02/2007 3-3 General Description could be lost, leading to a memory error. EZ1 Cards should not be exchanged while the workstation is switched on. Do not remove the EZ1 Card while the machine is switched on. Also, take care not to expose the EZ1 Card to electric shock, water, or dirt. EZ1 Card Completely Inserted into EZ1 Card Slot 3.1.4 Status LEDs There are 2 light-emitting diodes (LEDs) at the front of the BioRobot EZ1 DSP: Green LED — indicates that the instrument is receiving power Red LED — indicates that an error has occurred 3-4 BioRobot EZ1 DSP Workstation User Manual 02/2007 General Description 3.1.5 Connector panel The connector panel is located at the rear of the BioRobot EZ1 DSP. Connector Panel Power switch Power cord Fuse box Label indicating the correct fuses for the fuse box Connector for computer cable It contains the power switch, the socket for the power cord, the fuse box, and a connector for a computer cable (for service use only). 3.2 Internal features of the BioRobot EZ1 DSP The interior of the BioRobot EZ1 DSP contains the worktable and the pipettor head. BioRobot EZ1 DSP Workstation User Manual 02/2007 3-5 General Description 3.2.1 Worktable The worktable contains various racks for holding the labware, samples, and reagent cartridges that are required for the protocol run. The worktable also contains a heating system for controlling the temperature of samples. The BioRobot EZ1 DSP Worktable Pipettor head Heating system Sample tubes Reagent cartridges in cartridge rack Sample tubes Tip holders with tips in tip rack Elution tubes Tip rack This rack is located in the front of the worktable. The front row holds up to 1.5 ml elution tubes. The recommended elution tubes are screw-capped, made of polypropylene, and supplied by Sarstedt (cat. no. 72.692). The next 2 rows hold up to 12 tip holders containing filtertips. (Note: Some protocols require only one row of filtertips.) The remaining row holds up to 6 sample tubes. Sample tubes are 2 ml in volume, screw-capped, made of polypropylene, and available from Sarstedt (cat. no. 72.693). 3-6 BioRobot EZ1 DSP Workstation User Manual 02/2007 General Description Tip Rack Both tip holders and filter-tips are made of polypropylene and available from QIAGEN. The filter-tips have a capacity of 50–1000 μl. Tip Holders and Filter-tips BioRobot EZ1 DSP Workstation User Manual 02/2007 3-7 General Description Cartridge rack This rack is located behind the tip rack and holds up to 6 reagent cartridges. Cartridge Rack Reagent cartridges are made of polypropylene, contain prefilled reagents, and are available from QIAGEN. Reagent Cartridges Heating positions Reagent wells A reagent cartridge consists of 10 reagent wells and 2 heating positions. One heating position is a well, the other is a slot that can accept a tube. 3-8 BioRobot EZ1 DSP Workstation User Manual 02/2007 General Description Heating system The heating system is located under the far end of the cartridge rack. It holds the heating positions of the reagent cartridges. Tray The tray is located under the racks and collects any drops of liquid that may fall. Tray 3.2.2 Pipettor head The pipettor head is mounted above the worktable and moves in the Z direction (i.e., up and down) in order to reach the samples and reagents on the worktable. The worktable itself moves in the Y direction (i.e., front to back) in order to present different samples and reagents under the pipettor head. The pipettor head contains 6 high-precision syringe pumps that are connected to tip adapters that can be attached to filter-tips. The syringe pumps operate simultaneously to allow aspiration or dispensing of small volumes of liquid (50–1000 μl) via the filter-tips. The pipettor head also contains a magnet whose distance from the attached filter-tips can be varied. This feature allows the capture of magnetic particles that are present in the liquid aspirated into the filter-tips. Located behind the tip adapters is the piercing unit, a row of 6 metal spikes for puncturing the foil that covers the reagent cartridges. BioRobot EZ1 DSP Workstation User Manual 02/2007 3-9 General Description During operation of the BioRobot EZ1 DSP, the piercing unit first exposes the reagents in the reagent cartridges. The pipettor head then picks up filter-tips from the tip rack, and performs aspiration and dispensing operations at different locations on the worktable before ejecting the tips back into the tip rack. 3-10 BioRobot EZ1 DSP Workstation User Manual 02/2007 Installation Procedures 4 Installation Procedures The BioRobot EZ1 DSP is a plug-and-play instrument, making unpacking and installation easy. A member of your group who is familiar with laboratory equipment should oversee the installation. 4.1 Requirements Site The BioRobot EZ1 DSP must be located out of direct sunlight, away from heat sources, and away from sources of vibration and electrical interference. Refer to Appendix A for the operating conditions (temperature and humidity). Use a level workbench that is large and strong enough to accommodate the BioRobot EZ1 DSP. Refer to Appendix A for the weight and dimensions of the BioRobot EZ1 DSP. The BioRobot EZ1 DSP must be placed near to a properly grounded (earthed) AC power outlet. The power line to the instrument should be voltage regulated and surge protected. 4.2 AC power connection Power requirements The BioRobot EZ1 DSP operates at: 200–240 V AC ± 10%, 50/60 Hz, 300 VA 100–120 V AC ± 10%, 50/60 Hz, 300 VA Make sure the voltage rating of the BioRobot EZ1 DSP is compatible with the AC voltage available at the installation site. Grounding requirements To protect operating personnel, the BioRobot EZ1 DSP must be correctly grounded (earthed). The workstation is equipped with a 3-conductor AC power cord that, when connected to an appropriate AC power outlet, grounds (earths) the BioRobot EZ1 DSP Workstation User Manual 02/2007 4-1 Installation Procedures workstation. To preserve this protection feature, do not operate the workstation from an AC power outlet that has no ground (earth) connection. Installation of AC power cord Connect one end of the AC power cord to the socket located on the rear of the BioRobot EZ1 DSP, and the other end to the AC power outlet. The fuse box of the BioRobot EZ1 DSP is located under the socket for the power cord and contains 2 fuses which are labeled as follows: 110–120 V — a 6.3 A (250 V) fuse compatible with 110–120 V power supplies 220–240 V — a 3.15 A (250 V) fuse compatible with 220–240 V power supplies Before connecting the instrument to the power supply, you may need to rotate the fuse box in order to select the correct fuse. A fuse is correctly selected when its label is readable and closer to the bottom of the instrument. Selecting the Correct Fuse for a 110–120 V Power Supply 4-2 BioRobot EZ1 DSP Workstation User Manual 02/2007 Installation Procedures WARNING 4.3 Electrical hazard [W12] Never install a fuse different from that specified in the user manual. Hardware installation The following items are delivered: BioRobot EZ1 DSP workstation Power cord (8 pieces) BioRobot EZ1 DSP accessories BioRobot EZ1 DSP Workstation User Manual 6GC teaching data sheet The BioRobot EZ1 DSP accessories include: Cartridge rack Tip rack Tray O-ring (pack of 6) and silicon grease Fuses (1 each: 6.3 A and 3.15 A) Unpacking the BioRobot EZ1 DSP 1. Cut and remove the plastic straps. Plastic straps BioRobot EZ1 DSP Workstation User Manual 02/2007 4-3 Installation Procedures 2. Remove the outer top cardboard. Outer top cardboard Disposables and accessories Cardboard tray Corner shock absorbers Outer cardboard box Wrapped BioRobot EZ1 DSP Aluminum strap Corner shock absorbers Outer bottom cardboard 3. Take out the packages with the disposables and accessories. 4. Remove the cardboard tray. 5. Pull out the 4 corner shock absorbers at the top, and remove the outer cardboard box by pulling it up. 6. Take out the wrapped BioRobot EZ1 DSP, and remove the aluminum strap. 4-4 BioRobot EZ1 DSP Workstation User Manual 02/2007 Installation Procedures 7. Remove the inner top cardboard, and remove the BioRobot EZ1 DSP from the inner cardboard box. Inner top cardboard BioRobot EZ1 DSP Inner cardboard box 8. Remove all plastic sheets. BioRobot EZ1 DSP Plastic sheets Inner bottom cardboard Note: Be careful not to damage the surface of the BioRobot EZ1 DSP after removing the plastic sheets. Note: It is recommended to save the original packaging material for later transportation of the BioRobot EZ1 DSP. Removing the protectors for the Y- and Z-axes During transportation, protectors prevent the moveable parts of the BioRobot EZ1 DSP from moving along the Y- and Z-axes. Before using the instrument, these protectors must be removed. BioRobot EZ1 DSP Workstation User Manual 02/2007 4-5 Installation Procedures 1. Cut and remove the cable tie. Silica gel Cable tie Bubble wrap 2. Remove the bubble wrap and the silica gel. 3. Push the pipettor head upward. Pipettor head 4. Remove the bag of foam packaging material. Bag 4-6 BioRobot EZ1 DSP Workstation User Manual 02/2007 Installation Procedures Note: It is recommended to save the original packaging material for later transportation of the BioRobot EZ1 DSP. Installing the BioRobot EZ1 DSP 1. Adjust the fuse box if necessary (Section 4.2, page 4-1). 2. Connect the BioRobot EZ1 DSP to the power cord. BioRobot EZ1 DSP Workstation User Manual 02/2007 4-7 Installation Procedures This page intentionally left blank 4-8 BioRobot EZ1 DSP Workstation User Manual 02/2007 General Operation 5 General Operation This section describes how to operate the BioRobot EZ1 DSP. Before proceeding, it is recommended that you familiarize yourself with the features of the BioRobot EZ1 DSP by referring to Section 3. 5.1 Overview The steps for operating the BioRobot EZ1 DSP are presented below. Further details are provided later in this section. 1. Insert the EZ1 Card completely into the EZ1 Card slot. 2. Switch on the BioRobot EZ1 DSP. 3. Press “START” to start worktable setup, and press any key to proceed through the messages displayed by the LCD. 4. Open the workstation door. 5. Set up the worktable according to the messages displayed by the LCD: Load the reagent cartridges into the cartridge rack; then load the rack onto the worktable Load elution tubes into the tip rack Load filter-tips and sample tubes into the tip rack; then load the rack onto the worktable 6. Close the workstation door. 7. Press “START” to start the protocol. 8. At the end of the protocol run: Press “STOP” twice if you do not want to run another protocol Press “ESC” if you want to run another protocol 9. Remove the purified nucleic acid samples. 10. Clean the BioRobot EZ1 DSP. 11. Run another protocol or switch off the BioRobot EZ1 DSP. BioRobot EZ1 DSP Workstation User Manual 02/2007 5-1 General Operation 5.2 CAUTION 5.2.1 Inserting and removing the EZ1 Card Damage to the instrument [C3] Ensure that the BioRobot EZ1 DSP is switched off before you insert or remove the EZ1 Card. Otherwise, the card and/or the instrument may be damaged. Inserting the EZ1 Card 1. Lift up the cover of the EZ1 Card slot. 2. Insert the EZ1 Card into the EZ1 Card slot. Orientate the card so that the picture faces to the left and the triangle symbol is at the bottom. 5-2 BioRobot EZ1 DSP Workstation User Manual 02/2007 General Operation Ensure that the card is completely inserted into the slot. It is extremely important that the EZ1 Card is completely inserted to avoid memory error and loss of essential instrument data. 3. Close the cover of the EZ1 Card slot. 4. Switch on the BioRobot EZ1 DSP (Section 5.3.1, page 5-4). Note: Do not remove the EZ1 Card while the machine is switched on. 5.2.2 Removing the EZ1 Card 1. Switch off the BioRobot EZ1 DSP (Section 5.3.2, page 5-5). 2. Lift up the cover of the EZ1 Card slot. BioRobot EZ1 DSP Workstation User Manual 02/2007 5-3 General Operation 3. Press the button at the bottom of the EZ1 Card slot. The EZ1 Card is ejected. 5.3 Switching the BioRobot EZ1 DSP on and off 5.3.1 Switching on the BioRobot EZ1 DSP 1. Insert the EZ1 Card (Section 5.2.1, page 5-2). 2. Switch on the BioRobot EZ1 DSP at the rear power switch. 3. The LCD displays the following text for a few seconds. This text indicates that the BioRobot EZ1 DSP is initializing. All motors move to their home positions. 5-4 BioRobot EZ1 DSP Workstation User Manual 02/2007 General Operation 4. After initialization, the main menu appears. You can now operate the BioRobot EZ1 DSP. 5.3.2 Switching off the BioRobot EZ1 DSP 1. If you had run a protocol, refer to “End of the protocol run” on page 5-7. 2. Switch off the BioRobot EZ1 DSP at the rear power switch. 5.4 WARNING Opening and closing the workstation door Moving parts [W7] Never open the workstation door while the BioRobot EZ1 DSP is operating. BioRobot EZ1 DSP Workstation User Manual 02/2007 5-5 General Operation 5.4.1 Opening the workstation door 1. Slide your fingers under the door and push it upward. 2. Rest the door on the door lock that is located near the top of the BioRobot EZ1 DSP. 5.4.2 Closing the workstation door 1. Press the door down to disengage the door lock. 2. Gradually lower the door until it rests on the worktable. Take care that your fingers do not get caught between the door and worktable. 5.5 WARNING 5.5.1 Starting and stopping a protocol run Moving parts [W7] Never open the workstation door while the BioRobot EZ1 DSP is operating. Starting a protocol run After you have inserted the EZ1 Card and switched on the BioRobot EZ1 DSP, start a protocol as follows: 1. Press “START” on the control panel. 5-6 BioRobot EZ1 DSP Workstation User Manual 02/2007 General Operation 2. Start worktable setup by pressing the appropriate number key (e.g., “1” or “2”). For details, refer to the handbook supplied with the EZ1 DSP Kit you are using. 3. Follow the instructions displayed by the LCD. 4. Open the workstation door and set up the worktable according to the messages displayed by the LCD (Section 5.6, page 5-8). 5. Close the workstation door. The protocol run cannot start until the door is closed. 6. Press “START” to start the protocol run. End of the protocol run After a protocol run ends, the LCD displays “Finished”: 1. Press “STOP” twice if you are not running another protocol. The LCD displays the main menu and the motors return to their home positions. Alternatively, press “ESC” if you are running another protocol. The LCD displays “Protocols”, from which you can start the next worktable setup. 2. Check that the BioRobot EZ1 DSP is no longer operating. Then open the workstation door and remove the elution tubes, which contain the purified nucleic acid samples. 3. Clean the workstation (Section 6, page 6-1). 4. Run another protocol or switch off the BioRobot EZ1 DSP. 5.5.2 Stopping a protocol run When a protocol is running, you have the option of either pausing or canceling it: BioRobot EZ1 DSP Workstation User Manual 02/2007 5-7 General Operation 1. Press “STOP”. The protocol run pauses and the LCD displays the following text. 2. To continue the protocol run, press “START”. The protocol run continues from where it had stopped. 3. To cancel the protocol run, press “STOP”. The LCD displays the main menu. Then follow these steps: Ensure that the workstation door is closed Press “1” to display “Manual” in the LCD 5.6 Press “2” to return the tips to the tip rack and to return the motors to their home positions When “Manual” reappears in the LCD, press “ESC” to redisplay the main menu Another protocol can now be run Setting up the worktable Note: For specific details about setting up the worktable, refer to the onscreen instructions, which are also included in the handbook supplied with the EZ1 DSP Kit you are using. 5-8 BioRobot EZ1 DSP Workstation User Manual 02/2007 General Operation 5.6.1 Removing and replacing the tray The tray is located under the worktable and can be removed for cleaning: 1. Switch off the BioRobot EZ1 DSP. 2. Push the worktable toward the back of the BioRobot EZ1 DSP. 3. Remove the tray using its handle. Reverse this procedure to replace the tray. To avoid instrument damage, ensure that the tray is positioned correctly. 5.6.2 Loading the reagent cartridges Note: Do not remove the foil from the reagent cartridges. 1. Invert the reagent cartridges several times to mix the magnetic particles. 2. Tap the reagent cartridges until the reagents are deposited at the bottom of the wells. 3. Remove the cartridge rack from the worktable. BioRobot EZ1 DSP Workstation User Manual 02/2007 5-9 General Operation 4. Slide the reagent cartridges into the cartridge rack in the direction of the arrow, as shown below, until you feel resistance. Press down the cartridges until they click into place. 5. Return the cartridge rack to the worktable. Ensure that the 2 heating positions of each cartridge fit into the heating system. 5-10 BioRobot EZ1 DSP Workstation User Manual 02/2007 General Operation 5.6.3 Loading the elution tubes, filter-tips, and sample tubes 1. Remove the tip rack from the worktable. 2. Load the elution tubes into row 1 of the tip rack. Label the elution tubes before you load them into the rack. Ensure that the caps of the tubes are removed before you start the protocol. 3. Place the filter-tips into the tip holders. Ensure that the tips are positioned correctly in the holders. 4. Load the tip holders into rows 2 and 3 of the tip rack. Note: Some protocols require only one row of filter-tips. Please follow the messages displayed by the LCD. 5. Load the sample tubes into row 4 of the tip rack. Ensure that the caps of the tubes are removed before you start the protocol. BioRobot EZ1 DSP Workstation User Manual 02/2007 5-11 General Operation 6. Return the tip rack to the worktable. Ensure that the tips, tip holders, and tip rack are correctly positioned on the worktable. 5-12 BioRobot EZ1 DSP Workstation User Manual 02/2007 Preventive Maintenance 6 Preventive Maintenance The following preventive maintenance procedures must be carried out to ensure reliable operation of the BioRobot EZ1 DSP: Regular preventive maintenance — after each protocol run Daily preventive maintenance — after the last protocol run of the day Weekly preventive maintenance — every week Annual preventive maintenance — every year; removal and replacement of parts are carried out by QIAGEN Instrument Service Specialists only WARNING Risk of electric shock Do not open any panels on the BioRobot EZ1 DSP. Risk of personal injury and material damage Only perform maintenance which is specifically described in this manual. [W10] Servicing Each BioRobot EZ1 DSP workstation is supplied with a oneyear warranty that includes all repairs due to mechanical breakdown. Worldwide, the maximum time for response to a breakdown is 5 days. Application development, software upgrades, worktable accessories, disposable items, and replacement of spare parts such as syringes, tubing, and pipet tips are not included in the warranty. QIAGEN offers comprehensive Service Support Agreements, including IQ/OQ, Warranty Extensions, Full Cover Support Agreements, and Preventive Maintenance Agreements. Service Support Agreements ensure high performance from your workstation. In addition, service histories are fully documented and all parts are certified and guaranteed. Contact your local QIAGEN Instrument Service representative, or your local distributor for more information about flexible Service Support Agreements from QIAGEN. BioRobot EZ1 DSP Workstation User Manual 02/2007 6-1 Preventive Maintenance 6.1 Regular maintenance procedure WARNING Risk of personal injury and material damage [W1] Improper use of the BioRobot EZ1 DSP may cause personal injuries or damage to the instrument. The BioRobot EZ1 DSP must only be operated by qualified personnel who have been appropriately trained. Servicing of the BioRobot EZ1 DSP must only be performed by QIAGEN Instrument Service Specialists. WARNING Hazardous chemicals and infectious agents [W11] The waste contains samples and reagents. This waste may contain toxic or infectious material and must be disposed of properly. Refer to your local safety regulations for proper disposal procedures. If working with potentially infectious materials, such as human blood, serum, or plasma, the BioRobot EZ1 DSP system should be decontaminated after use (Section 6.4, page 6-6). After running a protocol, clean the piercing unit of the pipettor head: 1. Remove used disposable labware and unwanted samples and reagents. Discard them according to your local safety regulations. 2. In the main menu, press “1” to display “Tools”. 6-2 BioRobot EZ1 DSP Workstation User Manual 02/2007 Preventive Maintenance 3. Press “3” to select “Clean pierce unit”. The piercing unit moves downward. 4. Wipe the piercing unit using a soft tissue moistened with 70% ethanol. The piercing unit is sharp. Double gloves are recommended. Piercing unit 5. Wipe the piercing unit using a soft tissue moistened with distilled water. BioRobot EZ1 DSP Workstation User Manual 02/2007 6-3 Preventive Maintenance 6. Press “ESC” to return the piercing unit to its original position. 7. Clean the tray and racks with 70% ethanol and then with distilled water. 8. Clean the BioRobot EZ1 DSP worktable with 70% ethanol and then with distilled water. 9. Wipe the other surfaces of the workatable with a diluted neutral soap solution and then with distilled water. You can now run another protocol or switch off the BioRobot EZ1 DSP. 6.2 WARNING Daily maintenance procedure Hazardous chemicals and infectious agents [W11] The waste contains samples and reagents. This waste may contain toxic or infectious material and must be disposed of properly. Refer to your local safety regulations for proper disposal procedures. After running the last protocol of the day, perform the daily maintenance procedure: 1. Clean the piercing unit (Section 6.1, page 6-2). 2. Remove used disposable labware and unwanted samples and reagents, and discard them according to your local safety regulations. 3. Check that the tray is clean. If necessary, clean it with 70% ethanol, and then with distilled water. 4. Clean the worktable and its racks with 70% ethanol, and then with distilled water. 5. Wipe the other surfaces of the workstation with diluted neutral soap solution, and then with water. 6-4 BioRobot EZ1 DSP Workstation User Manual 02/2007 Preventive Maintenance 6. Wipe the O-rings of the tip adapters with tissue. 6.3 Weekly maintenance procedure Perform the daily maintenance procedure before you perform the weekly maintenance procedure. To maintain good contact between tip adapters and filter-tips and to prevent liquid leaking from the tips, grease the O-rings of the tip adapters every week: 1. Apply a small amount of silicon grease to the end of a filter-tip. 2. Apply the silicon grease to the surface of the O-rings. 3. Place the tip onto the pipettor head, and rotate the tip on the pipettor head to distribute the silicon grease evenly. O-ring Gap Note: The filter-tips should sit flush against the upper white plastic bar if the O-rings are properly greased. There should not be a gap. Excess or insufficient grease can affect the performance of the BioRobot EZ1 DSP. BioRobot EZ1 DSP Workstation User Manual 02/2007 6-5 Preventive Maintenance 6.4 Reagents for decontamination The following disinfectants and detergents are compatible with surfaces and components of the BioRobot EZ1 DSP system. Use according to manufacturers’ instructions for effective disinfection. WARNING Toxic fumes [W13] Do not use bleach to clean or disinfect the instrument. Bleach in contact with salts from the buffers can produce toxic fumes. Mikrozid® Liquid (Schülke & Mayr GmbH; www.schuelke-mayr.com )* — ethanol-based disinfectant for cleaning surfaces, such as the worktable (consists of 25 g ethanol and 35 g 1-propanol per 100 g Mikrozid Liquid) Lysetol® AF or Gigasept® Instru AF (Schülke & Mayr GmbH)* — quaternary ammonium solution for submerging worktable items, such as holders (consists of 14 g cocospropylene-diamine-guanidine diacetate, 35 g phenoxypropanols, and 2.5 g benzalkonium chloride per 100 g, with anticorrosion components, fragrance, and 15–30% nonionic surfactants) Note: If you want to use disinfectants different from those recommended, ensure that their compositions are similar to those described above. A suitable alternative to Mikrozid Liquid is Incidin Liquid (EcoLab; www.ecolab.com ). A suitable alternative to Lysetol AF or Gigasept Instru AF is DECON-QUAT® 100 (Veltek Associates, Inc.; www.sterile.com ).* Note: Do not spray cleaning or disinfectant liquids onto surfaces of the BioRobot EZ1 DSP. Spray bottles should be used only for items that have been removed from the workstation. * This is not a complete list of suppliers and does not include many important vendors of biological supplies. 6-6 BioRobot EZ1 DSP Workstation User Manual 02/2007 Troubleshooting 7 Troubleshooting 7.1 Detecting an error If a protocol run is interrupted due to an error: The red LED flashes An alarm sounds The LCD displays an error message LCD Displaying an Error Message The second line of the error message gives the error code (see list below). The third line indicates the line number of the protocol at which the error occurred. Record the error code and the line number, and contact QIAGEN Technical Services. Then reset the BioRobot EZ1 DSP: 1. Press “ESC” to display the main menu in the LCD. 2. Ensure that the workstation door is closed. 3. Press “1” to display “Manual” in the LCD. 4. Press “2” to return the tips to the tip rack and to return the motors to their home positions. 5. When “Manual” reappears in the LCD, press “ESC” to redisplay the main menu. Another protocol can now be run. Note: It is not possible to continue a protocol run that has been interrupted due to an error. BioRobot EZ1 DSP Workstation User Manual 02/2007 7-1 Troubleshooting 7.2 Error codes Error code Description 10 Failed to return to origins, protocol cannot run 11 Limit error, protocol cannot run 12 Failed to return to Z axis, protocol in run 13 Failed to return to P axis, protocol in run 14 Failed to return to M axis, protocol in run 15 Failed to return to Y axis, protocol in run 16 Z axis limit error, protocol in run 19 Y axis end limit, protocol in run 20 Z axis time-out, protocol in run 21 P axis time-out, protocol in run 22 M axis time-out, protocol in run 23 Y axis time-out, protocol in run 24 Open door in motion 25 Abnormal input from bottom sensor in motion 26 Failed to initialize heating block 27 Failed to initialize motion control board 29 Memory error 7-2 BioRobot EZ1 DSP Workstation User Manual 02/2007 Glossary 8 Glossary Term Description Cartridge rack A metal rack that accommodates reagent cartridges on the worktable. Connector panel The panel on the rear of the BioRobot EZ1 DSP. It contains the power switch, the socket for the power cord, the fuse box, and a connector for a computer cable. Control panel The user interface that allows the user to operate the BioRobot EZ1 DSP. The control panel consists of an LCD and a keypad. Elution tube A polypropylene, screw-capped 1.5 ml tube for collecting purified nucleic acids. Error code A 1 or 2 digit number that indicates a particular error of the BioRobot EZ1 DSP. EZ1 Card A card that contains one or more protocols for the BioRobot EZ1 DSP and is inserted into the instrument. EZ1 Card slot A slot at the front of the BioRobot EZ1 DSP that accepts an EZ1 Card. Filter-tip An item of labware that is picked up by a tip adapter during operation of the BioRobot EZ1 DSP. Liquid is aspirated into and dispensed from a filter-tip. A filter-tip is also the location where separation of magnetic particles occurs. Heating system A component of the BioRobot EZ1 DSP that accommodates the heating positions of the reagent cartridges and heats samples. BioRobot EZ1 DSP Workstation User Manual 02/2007 8-1 Glossary Term Description O-ring A ring that is fitted at the bottom of a tip adapter. It is required for good contact between the tip adapter and a filter-tip. Pipettor head The component of the BioRobot EZ1 DSP that aspirates and dispenses liquid and separates magnetic particles. The pipettor head moves up and down above the worktable and contains 6 syringe pumps, each of which is connected to a tip adapter. Protocol A set of instructions for the BioRobot EZ1 DSP that allows the instrument to automate a nucleic acid purification procedure. Protocols are run using the control panel. Reagent cartridge An item of labware that contains 10 wells and 2 heating positions. One heating position is a well, the other is a slot that can accept a tube. A reagent cartridge is prefilled with reagents. Sample tube A polypropylene, screw-capped 2 ml tube for holding a sample containing nucleic acids to be purified. Tip adapter One of 6 metal probes installed on the pipettor head. During operation of the BioRobot EZ1 DSP, the tip adapters pick up filter-tips from the worktable. Tip holder A polypropylene tube that holds a single filter-tip. Tip holders are loaded onto the tip rack. Tip rack A metal rack that accommodates tip holders containing filter-tips on the worktable. The tip rack also accommodates sample tubes and elution tubes. Tray A metal tray is located under the worktable. It collects any drops of liquid that may fall. 8-2 BioRobot EZ1 DSP Workstation User Manual 02/2007 Glossary Term Description Workstation door The main door at the front of the BioRobot EZ1 DSP. When open, it provides complete access to the worktable. Worktable The surface of the BioRobot EZ1 DSP that contains racks and is where samples, reagent cartridges, and disposable labware are loaded. The worktable moves backwards and forwards to present different samples and reagents under the pipettor head. BioRobot EZ1 DSP Workstation User Manual 02/2007 8-3 Glossary This page intentionally left blank 8-4 BioRobot EZ1 DSP Workstation User Manual 02/2007 Appendix A Appendix A Technical data Environmental conditions Power 100–120/200–240 V AC ± 10%, 50/60 Hz, 300 VA Fuses 6.3 A (250 V) (for 110–120 V AC) 3.15 A (250 V) (for 220–240 V AC) WARNING Electrical hazard [W12] Never install a fuse different from that specified in the user manual. Operating temperature 5–40ºC (41–104ºF) Humidity Maximum 80% relative humidity for temperatures up to 31ºC (88ºF), decreasing linearly to 50% humidity at 40°C (104°F) (no condensation) Altitude Up to 2000 m (6500 ft.) Place of operation For indoor use only Storage temperature –25ºC to 70ºC (–13ºF to 158ºF) Pollution level 2 Overvoltage category II BioRobot EZ1 DSP Workstation User Manual 02/2007 A-1 Appendix A Mechanical data and hardware features Dimensions Width: 0.32 m (13 in.) Height: 0.54 m (21 in.) with door closed 0.73 m (29 in.) with door open Depth: 0.50 m (20 in.) Mass 25.8 kg (57 lb.) Instrument features Automated nucleic acid isolation using magnetic particles Desktop instrument Protocols stored on EZ1 Cards Aspirates and dispenses 6 samples or reagents simultaneously using a 6-channel pipettor head Separates magnetic particles using patented technology Processes up to 6 samples in one run Controlled through LCD user interface Temperature control through a heating system A-2 BioRobot EZ1 DSP Workstation User Manual 02/2007 Appendix A Pipettor head Contains 6 high-precision syringe pumps, each containing a tip adapter which attaches to filter-tips. Each tip aspirates and dispenses 50–1000 μl liquid. Pipetting accuracy is as follows: 50–100 μl ± 5% 100–1000 μl: ± 2% Syringe pumps are air-filled. Liquids containing salts, alcohol, solvents, and/or magnetic particles can be aspirated and dispensed. Air gaps can be aspirated to prevent aspirated liquid from dripping. The pipettor head contains a magnet that allows separation of magnetic particles from the aspirated liquid. Filter-tips are picked up from the tip rack and ejected back into the tip rack. The pipettor head moves in the Z direction above the worktable. Heating system Accommodates the heating positions of reagent cartridges and has a temperature range of between ambient temperature and 95ºC (203ºF). Heating block accuracy at 60°C is ± 2°C. Filter-tips Attach to the tip adapters of the pipettor head to allow liquid aspiration and dispensing. Capacity of 50–1000 μl. The BioRobot EZ1 DSP accommodates up to 12 tip holders, each containing a filter-tip, in the tip rack on the worktable. BioRobot EZ1 DSP Workstation User Manual 02/2007 A-3 Appendix A Labware Reagents are loaded onto the worktable using the reagent cartridges. These cartridges are already prefilled with reagents by QIAGEN. Several reagent cartridges are accommodated together on the worktable by a cartridge rack. Samples are loaded onto the worktable using 2 ml sample tubes. Steps which require heating occur on the heating system, which accommodates the heating positions of the reagent cartridges. Purified nucleic acids are collected in 1.5 ml elution tubes. Waste Electrical and Electronic Equipment (WEEE) This section provides information about disposal of waste electrical and electronic equipment by users in the European Union. The European Directive 2002/96/EC on WEEE requires proper disposal of electrical and electronic equipment when it reaches its end of life. The crossed-out wheeled bin symbol (see below) indicates that this product must not be disposed of with other waste; it must be taken to an approved treatment facility or to a designated collection point for recycling, according to local legislation. The separate collection and recycling of waste electronic equipment at the time of disposal helps to conserve natural resources and ensures that the product is recycled in a manner that protects human health and the environment. A-4 BioRobot EZ1 DSP Workstation User Manual 02/2007 Appendix A QIAGEN accepts its responsibility in accordance with the specific WEEE recycling requirements and, where a replacement product is being supplied by QIAGEN, provides free recycling of its WEEE-marked electronic equipment in Europe. If a replacement product is not being purchased from QIAGEN, recycling can be provided upon request at additional cost. To recycle electronic equipment, contact your local QIAGEN sales office for the required return form. Once the form is submitted, you will be contacted by QIAGEN either to request follow-up information for scheduling collection of the electronic waste or to provide you with an individual quote. BioRobot EZ1 DSP Workstation User Manual 02/2007 A-5 Appendix A This page intentionally left blank A-6 BioRobot EZ1 DSP Workstation User Manual 02/2007 Appendix B Appendix B Warranty statement Thank you for your purchase of QIAGEN instrumentation. Your instrument has been carefully tested to ensure optimum operating efficiency and reproducibility of results. QIAGEN warrants that all new instrumentation manufactured by QIAGEN will correspond to the product specifications and be free from defects in workmanship and materials for a period of twelve (12) months from the original date of shipment. Repair or replacement of defective parts will be provided to the purchaser during this time period provided the QIAGEN instrumentation is operated under conditions of normal and proper use, but not for damage caused by the customer. If any part or subassembly proves to be defective, it will be repaired or replaced at QIAGEN’s sole option, subsequent to inspection at the factory, or in the field by an authorized factory representative, provided that such defect manifested under normal and proper use. The shipper will pay all transport fees. Limitation of warranties and remedies THE FOREGOING WARRANTY IS QIAGEN’S SOLE AND EXCLUSIVE WARRANTY, AND REPAIR OR REPLACEMENT OF DEFECTIVE PARTS IS THE SOLE AND EXCLUSIVE REMEDY. THERE ARE NO OTHER WARRANTIES OR GUARANTEES, EXPRESS OR IMPLIED. THE IMPLIED WARRANTIES OF MERCHANTABILITY AND FITNESS FOR A PARTICULAR PURPOSE ARE EXPRESSLY EXCLUDED, TO THE FULLEST EXTENT PERMITTED BY LAW. (NOTE: SOME STATES DO NOT PERMIT DISCLAIMERS OF IMPLIED WARRANTIES SO THIS LIMITATION MAY NOT APPLY TO YOU). WITH THE EXCEPTION OF THE ABOVE-REFERENCED REPAIR OR REPLACEMENT REMEDY, QIAGEN SHALL HAVE NO OBLIGATION OR LIABILITY OF ANY NATURE WHATSOEVER WITH RESPECT TO THE QIAGEN INSTRUMENTATION, WHETHER ARISING IN CONTRACT, TORT, STRICT LIABILITY, OR OTHERWISE, INCLUDING BUT NOT LIMITED TO, LIABILITY FOR INDIRECT, CONSEQUENTIAL, INCIDENTAL AND/OR SPECIAL, PUNITIVE, MULTIPLE AND/OR EXEMPLARY DAMAGES AND/OR OTHER LOSSES (INCLUDING LOSS OF USE, LOST REVENUES, LOST PROFITS AND DAMAGE TO REPUTATION), EVEN IF SUCH DAMAGES WERE FORESEEN OR FORSEEABLE, OR WERE BROUGHT TO QIAGEN’S ATTENTION. IN NO EVENT SHALL QIAGEN’S LIABILITY TO YOU EXCEED THE PURCHASE PRICE OF THE PRODUCT. BioRobot EZ1 DSP Workstation User Manual 02/2007 B-1 Appendix B Liability clause QIAGEN shall be released from all obligations under its warranty in the event repairs or modifications are made by persons other than its own personnel, except in cases where the Company has given its written consent to perform such repairs or modifications. All materials replaced under this warranty will be warranted only for the duration of the original warranty period, and in no case beyond the original expiration date of original warranty unless authorized in writing by an officer of the Company. Read-out devices, interfacing devices and associated software will be warranted only for the period offered by the original manufacturer of these products. Representations and warranties made by any person, including representatives of QIAGEN, which are inconsistent or in conflict with the conditions in this warranty shall not be binding upon the Company unless produced in writing and approved by an officer of QIAGEN. B-2 BioRobot EZ1 DSP Workstation User Manual 02/2007 Index Index C Cartridge rack, 3-8 Connector panel, 3-5 Control panel, 3-1, 3-2 E Elution tubes, 3-6 loading, 5-11 EZ1 Card, 3-1, 3-2 inserting, 5-2 removing, 5-3 slot, 3-2, 3-3 F Filter-tips, 3-6 loading, 5-11 Fuse box, 3-5, 4-2 H Heating positions, 3-8 Heating system, 3-1, 3-9 L LCD, 3-2 M Magnet, 3-9 Magnetic particles, 3-1 Maintenance, 6-1 daily, 6-4 decontamination, 6-6 weekly, 6-5 O Operating conditions, 1-4 P Piercing unit, 3-10 Pipettor head, 3-1, 3-9 Power cord, 3-5 Power requirements, 4-1 Power switch, 3-5 Protocol, 3-1 end, 5-7 starting, 5-6 stopping, 5-7 R Racks, 3-5 Reagent cartridges, 3-1, 3-8 loading, 5-9 Reagent wells, 3-8 S Safety biological, 1-5 chemical, 1-6 electrical, 1-2 heat hazard, 1-7 mechanical hazards, 1-7 proper use, 1-2 symbols, 1-8 Sample tubes, 3-6 loading, 5-11 Servicing, 6-1 Status LEDs, 3-2, 3-4 Storage conditions, 1-4 Switching off, 5-5 Switching on, 5-4 Symbols, 1-8, 1-9 Syringe pumps, 3-9 T Tip adapters, 3-9 Tip holders, 3-1, 3-6 BioRobot EZ1 DSP Workstation User Manual 02/2007 Index-1 Index Tip rack, 3-6 Tips, 3-6 loading, 5-11 Tray, 3-9 removing, 5-9 Troubleshooting, 7-1 Index-2 W Waste disposal, 1-6, A-4 Workstation door, 3-1, 3-2 closing, 5-6 opening, 5-6 Worktable, 3-1, 3-5 setting up, 5-8 BioRobot EZ1 DSP Workstation User Manual 02/2007 QIAGEN Distributors and Importers Please see the back cover for contact information for your local QIAGEN office. Argentina Tecnolab S.A. Tel: (011) 4555 0010 Fax: (011) 4553 3331 E-mail: [email protected] Estonia Quantum Eesti AS Tel: +372 7301321 Fax: +372 7304310 E-mail: [email protected] Malaysia RESEARCH BIOLABS SDN. BHD. Tel: (603)-8070 3101 Fax: (603)-8070 5101 E-mail: [email protected] Bosnia-Herzegovina MEDILINE d.o.o. Tel.: +386 1 830-80-40 Fax: +386 1 830-80-70 +386 1 830-80-63 E-mail: [email protected] Greece BioAnalytica S.A. Tel: (210)-640 03 18 Fax: (210)-646 27 48 E-mail: [email protected] Mexico Quimica Valaner S.A. de C.V. Tel: (55) 55 25 57 25 Fax: (55) 55 25 56 25 E-mail: [email protected] Hong Kong SAR Gene Company Limited Tel: +852-2896-6283 Fax: +852-2515-9371 E-mail: [email protected] New Zealand Biolab Ltd Tel: (09) 980 6700 0800 933 966 Fax: (09) 980 6788 E-mail: [email protected] Brazil Uniscience do Brasil Tel: 011 3622 2320 Fax: 011 3622 2323 E-mail: [email protected] Chile Biosonda SA Tel: +562 209 6770 Fax: +562 274 5462 E-mail: [email protected] China Eastwin Scientific, Inc. Order: +86-400-8182168 Tel: +86-10-51663168 Fax: +86-10-82898283 E-mail: [email protected] Gene Company Limited Tel: +86-21-64951899 Fax: +86-21-64955468 E-mail: [email protected] (Beijing) [email protected] (Shanghai) [email protected] (Chengdu) [email protected] (Guangzhou) Genetimes Technology, Inc. Order: 800-820-5565 Tel: +86-21-54262677 Fax: +86-21-64398855 E-mail: [email protected] Genetimes Technology International Holding Ltd. Tel: +852-2385-2818 Fax: +852-2385-1308 E-mail: [email protected] Hungary BioMarker Kft. Tel: +36 28 419 986 Fax: +36 28 422 319 E-mail: [email protected] India Genetix Tel: +91-11-51427031 Fax: +91-11-25419631 E-mail: [email protected] Oman Al Mazouri Medical & Chemical Supplies Tel: +971 4 266 1272 (ext. 301, 310, 311) Fax: +971 4 269 0612 (ATTN: LAB DIVISION) E-mail: [email protected] Pakistan Pakistan Microbiological Associates Tel: +92-51-5567953 Fax: +92-51-5514134 E-mail: [email protected] Peru INMUNOCHEM S.A.C. Indonesia Tel: +51 1 4409678 PT Research Biolabs Fax: +51 1 4223701 Tel: +62 21 5865357 E-mail: [email protected] E-mail: [email protected] Iran Zist Baran (BIORAIN) Tel: +98 (21) 88066348 or +98 (21) 88066349 Fax: +98 (21) 88214107 E-mail: [email protected] Colombia GENTECH – Genetics & Technology Tel: (+57)(4)2519037 Fax: (+57)(4)2516555 E-mail: [email protected] [email protected] Israel Eldan Electronic Instruments Co. Ltd. Tel: +972-3-937 1133 Fax: +972-3-937 1121 E-mail: [email protected] Croatia INEL Medicinska Tehnika d.o.o. Tel: (01) 2984-898 Fax: (01) 6520-966 E-mail: [email protected] Jordan SAHOURY GROUP Tel: +962 6 4633290-111 Fax: +962 6 4633290-110 E-mail: [email protected] Cyprus Scientronics Ltd Tel: +357 22 467880/90 Fax: +357 22 764614 E-mail: [email protected] Korea LRS Laboratories, Inc. Tel: (02) 924-86 97 Fax: (02) 924-86 96 E-mail: [email protected] Czech Republic BIO-CONSULT spol. s.r.o. Tel/Fax: (+420) 2 417 29 792 E-mail: [email protected] Philekorea Technology, Inc. Tel: (02) 576-6540 Fax: (02) 576-6541 E-mail: [email protected] Ecuador INMUNOCHEM S.A.C. Tel: +51 1 4409678 Fax: +51 1 4223701 E-mail: [email protected] Latvia SIA “J.I.M.” Tel: 7136393 Fax: 7136394 E-mail: [email protected] Egypt Clinilab Tel: 52 57 212 Fax: 52 57 210 E-mail: [email protected] Lithuania INTERLUX Tel: +370-5-2786850 Fax: +370-5-2796728 E-mail: [email protected] Poland Syngen Biotech Sp.z.o.o. Tel: (071) 798 58 50 - 52 Fax: (071) 798 58 53 E-mail: [email protected] Portugal IZASA PORTUGAL, LDA Tel: (21) 424 7312 Fax: (21) 417 2674 E-mail: [email protected] Qatar Sedeer Medical Tel: +974 - 488 5218 Fax: +974 - 488 1988 E-mail: [email protected] Romania Zyrcon Medical S. R. L. Tel: +40 21 2245607 Fax: +40 21 2245608 E-mail: [email protected] [email protected] Saudi Arabia Abdulla Fouad Holding Company Tel: (03) 8324400 Fax: (03) 8346174 E-mail: [email protected] Singapore Research Biolabs Pte Ltd Tel: 6777 5366 Fax: 6778 5177 E-mail: [email protected] Slovak Republic BIO-CONSULT Slovakia spol. s.r.o. Tel/Fax: (02) 5022 1336 E-mail: [email protected] Slovenia MEDILINE d.o.o. Tel: (01) 830-80-40 Fax: (01) 830-80-70 (01) 830-80-63 E-mail: [email protected] South Africa Southern Cross Biotechnology (Pty) Ltd Tel: (021) 671 5166 Fax: (021) 671 7734 E-mail: [email protected] Spain IZASA, S.A. Tel: (93) 902.20.30.90 Fax: (93) 902.22.33.66 E-mail: [email protected] Taiwan TAIGEN Bioscience Corporation Tel: (02) 2880 2913 Fax: (02) 2880 2916 E-mail: [email protected] Thailand Theera Trading Co. Ltd. Tel: (02) 412-5672 Fax: (02) 412-3244 E-mail: [email protected] Turkey Medek Medikal Ürünler ve Saglik Hizmetleri A. S. Tel: (216) 302 15 80 Fax: (216) 302 15 88 E-mail: [email protected] United Arab Emirates Al Mazouri Medical & Chemical Supplies Tel: +971 4 266 1272 (ext. 301, 310, 311) Fax: +971 4 269 0612 (ATTN: LAB DIVISION) E-mail: [email protected] Uruguay Bionova Ltda Tel: +598 2 6130442 Fax : +598 2 6142592 E-mail: [email protected] Venezuela SAIXX Technologies c.a. Tel: +58212 3248518 +58212 7616143 +58212 3255838 Fax: +58212 7615945 E-mail: [email protected] [email protected] Vietnam Viet Anh Instruments Co., Ltd. Tel: +84-4-5119452 Fax: +84-4-5119453 E-mail: [email protected] All other countries QIAGEN GmbH, Germany www.qiagen.com Australia Orders 03-9840-9800 Austria Orders 0800/28-10-10 Belgium Orders 0800-79612 Canada Orders 800-572-9613 China Fax 0800-79611 Finland Orders 0800-914416 France Orders 01-60-920-926 Germany Ireland Italy Fax 800-713-5951 Fax 80-885944 Japan Fax 02-33430426 Orders 800-18859 Sweden Orders 020-790282 Switzerland Orders 01293-422-911 USA Orders 800-426-8157 1037181 124102347 Technical 02103-29-12400 Technical 1800-555-061 Technical 03-5547-0811 Technical 8002-2067 Fax 0800-0229593 Fax 800-18817 Technical 0800-0229602 Technical 800-18712 Fax 020-790582 Technical 020-798328 Fax 055-254-22-13 Fax 01293-422-922 Fax 800-718-2056 Offers 01-60-920-928 Technical 800-787980 Fax 8002-2073 Orders 055-254-22-11 UK Technical 01-60-920-930 Fax 03-5547-0818 Orders 0800-0229592 Norway Technical 0800-914413 Fax 1800-555-048 Orders 8002-2076 The Netherlands Technical 80-885942 Fax 02103-29-22000 Telephone 03-5547-0811 Luxembourg Technical 021-51345678 Fax 01-60-920-925 Orders 1800-555-049 Orders 02-33430411 Technical 800-DNA-PREP (800-362-7737) Fax 0800-914415 Orders 02103-29-12000 Technical 0800/28-10-11 Technical 0800-79556 Fax 021-51342500 Orders 80-885945 Technical 1-800-243-066 Fax 0800/28-10-19 Orders 021-51345678 Denmark Fax 03-9840-9888 Technical 055-254-22-12 Technical 01293-422-999 Technical 800-DNA-PREP (800-362-7737) Sample & Assay Technologies