1
Copyright (C) 1982
by Saturn Systems, Inc.
Apple is a registered trademark of Apple Computer, Inc.
Applesoft is a registered trademark of Apple Computer, Inc.
VisiCaLc is a registered trademark of Personal Software, Inc.
CP/M is a registered trademark of Digital Research, Inc.
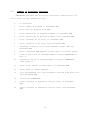
TABLE OF CONTENTS
Registration Card
Service
4
4
Chapter 1: Introduction
5
Chapter 2: Installation Instructions
I. Recommended Location
II. Installation
III. Installing additional RAM boards
6
6
7
Chapter 3: Using The Saturn 64K and 128K RAM Board
I. Use with Applesoft and Integer BASIC
A. Apple II
B. Apple II plus
II. Operation with DOS 3.3
III. Treatment for Apple Language Card
IV. Overview of Software
A. MOVEDOS
B. RAMEXPAND
C. DOS PSEUDO—DISK
D. PASCAL PSEUDO—DISK
E. CP/M PSEUDO-DISK
8
9
9
9
10
11
11
11
11
12
12
Chapter 4: MOVEDOS — DOS Relocation Software
I. Features of the Relocated DOS
II. Using MOVEDOS
A. Running with DOS 3.2
B. Running with DOS 3.3
III. Using an Applesoft or Integer card
IV. Compatiblilty of relocated DOS
A. Modification of FID and MUFFIN
B. Modification of BOOTl3
V. Technical information: Software details
A. Relocated DOS operation
B. Memory usage
C. More Details concerning MOVEDOS
D. Miscellaneous routines, pointers, etc.
14
14
15
15
16
17
17
18
18
18
19
22
23
Chapter 5: RAMEXPAND
I. Characteristics of RAMEXPAND
A. Terminology
B. Requirements and Memory Usage
C. Data Structure
D. Memory Allocation
1. 16K and 32K boards
2. 64K and 128K boards
E. Requirement if Language Card Present
1
24
24
24
25
25
25
26
28
II.
III.
IV.
V.
VI.
VII.
VIII.
Use of RAMEXPAND
A. Installation
B. Command Set—up
C. Calling RAMEXPAND
D. Initializing RAMEXPAND
E. Attaching Memory Blocks
1. 16K and 32K boards
2. 64K and 128K boards
F. Reserving Space for BASIC
G. Using a Firmware Card
Precautions
A. Protecting RAMEXPAND
B. Setting MAXFILES
C. Reloading RAMEXPAND
D. Switching BASIC’s
E. Resetting RAMEXPAND Entry Points
F. Declaring Variables
Error Handling
A. Description
B. Error Summary
Current Limitations
Example Program
A. Executing Program
B. Program Operation
Summary of Available Functions
Command Syntax and Description
28
28
29
30
30
30
31
31
33
33
33
33
33
33
33
34
34
34
34
35
35
35
36
36
38
39
Chapter 6: DOS Pseudo—Disk
I.
II.
III.
IV.
V.
VI.
VII.
Features and Requirements
Setting up the Pseudo—Disk
Using the Pseudo—Disk
Re—connecting after Boot
Precautions
Using the Pseudo Disk
How it Works
46
47
48
49
49
50
50
Chapter 7: PASCAL Pseudo—Disk
I. PASCAL Pseudo—Disk System Requirements
A. Hardware Requirements
B. Software Requirements
II. Volume Assignment and Disk Capacity
III. Setting up the Pascal Pseudo—Disk
A. Back Up Diskette
B. Using Pseudo.code to Configure
IV. Details of Installation Process
V. Using FASTCOPY
A. Program Description
B. Intended Use
C. Executing FASTCOPY
D. Notes on Use
E. Error Conditions
VI. Using FILEMARKER
A. Program Description
2
53
53
53
53
54
54
54
56
56
56
56
57
57
58
58
58
B. Executing FILEMARKER
C. Error Conditions
VII. Using FILEMOVER
A. Program Description
B. Executing FILEMOVER
C. Notes Concerning Use
D. Error Conditions
VIII. Using the Graphics Demo Programs
A. Executing SLIDESHOW
B. Using the Graphics Program
58
59
60
60
60
60
61
61
62
62
Chapter 8: CP/M Pseudo—Disk
I.
II.
III.
IV.
Setting up the Pseudo—Disk
Installing the Pseudo—Disk
Using the Pseudo—Disk
Limitations and Requirements
64
66
67
67
Chapter 9: Technical Information
I. Addressing the Saturn 64K and 128K boards
II. Controlling the 64K and 128K RAM board
III. RAM board memory use
A. Relocated DOS
B. Alternate BASIC
C. LED Indicators
D. Diagnostic Programs
IV. Specifications
A. Memory
B. Power Consumption
C. Compatible Parts
3
68
70
72
72
72
72
73
74
74
74
74
REGISTRATION CARD:
Please fill out and return at your earliest convenience, the
enclosed registration card. This will enable Saturn Systems to
notify you concerning future updates and new software releases
relating to the Saturn 64K and 128K RAM boards.
SERVICE:
If your Saturn RAM board should require service, please
return it to the dealer from whom it was purchased, or send it
postage paid directly to Saturn Systems, Inc. Be sure to include
proof of purchase.
Ship to:
Saturn Systems, Inc.
3990 Varsity Drive
Ann Arbor, MI 48104
4
Chapter 1
INTRODUCTION
The Saturn 64K and 128K Ram Boards are expansion plug—in
cards designed to provide an extra 64K or 128K bytes of random
access memory for Apple II and Apple II plus computers. To make
use of the additional memory, Saturn Systems provides a package of
applications software at no additional charge. The Saturn RAM
boards
and
accompanying
software
require
that
the
Apple
be
outfitted with a full 48K of main board RAM, as most Apples are
today.
The 64K and 128K Ram boards are compatible with software
designed to run with Apple’s Language Card (PASCAL, FORTRAN, LISA
ver 2, etc.) as well as Microsoft’s RamCard and Z80 Softcard
(CP/M,
COBOL—80,
FORTRAN—80,
etc.).
This
compatibility
is
possible due to its unique organization. The boards consist of
16K banks of memory (4 banks for the 64K board, 8 banks for the
128K), accessed one at a time. In this sense, the Saturn 64K or
128K board can be thought of as several 16K Ram boards occupying
the same slot. The first of these 16K banks is controlled
through software in exactly the same manner as Apple’s Language
Card and other 16K memory cards. As a result, existing software
designed to run with the 16K memory boards and Apple Language
Card will operate on the Saturn 64K or 128K board without modification.
Using DOS 3.3, the version of BASIC not resident in ROM
(Integer for an Apple II plus or Applesoft for an Apple II) will
automatically be loaded into the first 1.6K of the Saturn RAM
board upon boot. This enables easy access to either BASIC (via
INT or FP). In this respect the Saturn 64K or 128K board appears
as a 16K RAM board. However, in addition to this first bank of
16K, higher banks are available as well. The software provided
with the 64K and 128K boards takes advantage of the additional
memory, allowing you to:
1.
Relocate DOS to free up user memory.
2.
Emulate a disk drive under DOS, PASCAL, or CP/M.
3.
Store arrays
Basic.
and
subroutines
5
from
Applesoft
or
Integer
Chapter 2
INSTALLATION INSTRUCTIONS
I.
RECOMMENDED LOCATION
The recommended location for the Saturn 64K or
board depends upon whether an Apple Language card,
card, or firmware card is already present in the system.
1. If a Language card or 16K board is in slot 0,
Saturn 64K or 128K RAM board in any available slot.
128K
16K
install
RAM
RAM
the
2. If an Applesoft or Integer firmware card is already present
in slot 0, remove it from the system or move it to another slot.
Install the Saturn RAM board in slot 0.
3. If no card is present in slot 0, install the Saturn board in
slot 0.
II.
INSTALLATION
1.
Turn off the power to
insure that it is not on)
the
Apple
(check
the
power
light
to
2.
Remove the cover by pulling on the right and left rear
corners of the case, until both fasteners are released (popping
sound); slide the cover back until the front edge clears the lip
of the case, and lift up.
3.
Find the desired slot. Slot number designations are printed
on the Apple’s main circuit board along the back edge near the
cutouts in the case. The leftmost slot is slot zero (closest to
the power supply, which is a long metal box).
4.
Before
touching
any
component
or
board
in
the
Apple,
discharge any static charges, by touching the power supply cover
(long metal box at left side of Apple) immediately prior to
touching the component or card in the Apple.
5. Unpack the memory board. The memory board is packed in a bag
made of specially treated antistatic material to prevent damage
during shipment. It should be stored in this bag when not
installed in the Apple, or if transported outside the Apple.
6.
Install the board in the desired slot:
A. Touch
charges.
B.
the
power
supply
cover
to
discharge
any
static
Grasp the board at its edges and position over the slot.
6
C. Align the gold edge connector fingers
the socket, centering the card in the
insertion.
with the slot
socket prior
of
to
D. Apply gentle downward pressure with slight front to back
rocking until the card seats fully.
7. Replace the cover by placing over opening, sliding forward
until properly aligned, and applying pressure at the back until
it snaps into place. Be careful not to apply pressure to the
front of the Saturn RAM board as this may unseat the card.
III.
INSTALLING ADDITIONAL SATURN 64K and 128K RAM BOARDS
The same procedure is followed for installation of multiple
Saturn 64K or 128K RAM boards, as was used to install the first.
7
Chapter 3
USING THE SATURN 64K AND 128K BOARDS
Procedures for using the Saturn 64K and 128K RAM boards are
described in this chapter, with particular emphasis being given
to the operation of the card with APPLESOFT and INTEGER BASIC
under DOS DOS 3.3.
As indicated in the introduction to this manual, the Saturn
64K and 128K RAM boards have been designed to be compatible with
existing software which runs on Apple’s Language card and other
manufacturers
16K
memory
boards.
Compatibility
is
maintained
because the first bank of 16K on each of these cards is accessed
in the same manner as the language card, and therefore appears as
such to the software.
In most instances, the operation of the memory boards is
transparent to the user, i.e., when the particular software
system being used is booted, this software recognizes the first
16K of the memory board and uses it automatically.(Provided that
the memory board is in slot 0.) Much of this software is only
provided on 16 sector disk (DOS 3.3), for example Apple FORTRAN,
PASCAL, CPM56 (for upgrading CP/M systems to take advantage of
the memory board), and thus requires a 16 sector system (DOS 3.3)
for operation. Where use of this software is required, upgrading
to a 16 sector system is recommended.
Examples of software which will use this first 16K of the
Saturn 64K and 128K RAM Boards, when in slot 0, are given below:
Personal Software’s VisiCalc
Apple’s PASCAL
Apple’s FORTRAN
Integer BASIC
Applesoft BASIC
CP/M
Microsoft’s FORTRAN—80
Microsoft’s COBOL—80
etc.
For further details concerning booting these systems and
operating them, consult the respective instruction manuals.
I.
USE WITH APPLESOFT AND INTEGER BASIC
One of the features which is available with the Saturn 64K
and 128K RAM Boards is the ability to have Applesoft or Integer
BASIC present in the Ram Board and access these in a similar
manner as one does using an Apple Firmware card (Integer card or
Applesoft card).
8
A.
APPLE II:
Since Apple II’s are provided with Integer BASIC in ROM,
Applesoft can be made available by loading it into the Saturn 64K
and 128K RAM Board (first 16K bank of this card). When Applesoft
is required, it can be accessed by typing FP. The portion of the
first bank of the Saturn RAM Board containing Applesoft is then
enabled, which brings APPLESOFT into the machine in place of the
main board ROM Basic (INTEGER).
B.
APPLE II PLUS:
Apple II plus’ have Applesoft in ROM. Integer BASIC can be
loaded into the Saturn 64K or 128K board and accessed later by
typing INT. This results in enabling the portion of the RAM
board which contains Integer, bringing it into the Apple in place
of Applesoft. In either case, as far as this application is
concerned, the Saturn RAM Board operates as either an Integer
card (for Apple II Plus) or an Applesoft card (for Apple II).
For the above operation to occur,the Saturn card MUST be
located in slot 0, and, as a result, an Integer or Applesoft card
previously in slot 0 is no longer used, once the Saturn RAM Board
has been located in this slot. There is no provision in the
standard DOS 3.2 or 3.3 for accessing an Applesoft or Integer
card which is located in a slot other than zero. However, this
capability has been provided in the DOS relocation software
(MOVEDOS) included with the Saturn 64K and 128K RAM Boards (see
Chapter 4).
II.
SATURN RAM BOARD OPERATION WITH DOS 3.3
DOS 3.3 is designed to take advantage of an Apple Language
card,
16K
memory
card,
or
Apple
Firmware
card
(INTEGER
or
APPLESOFT card). The HELLO program provided on the distribution
copy of DOS 3.3 tests for the presence of an Integer or Applesoft
card, or language card (16K memory card) in slot 0, and if the
latter is present, loads the required language (Applesoft in an
Apple II, or Integer in an Apple II Plus) from disk into the
memory card. The distribution copy of DOS 3.3 contains copies of
the ROM versions of both Applesoft and Integer BASIC, saved as
binary files. Whenever DOS 3.3 is booted, this loading process
is repeated, provided that the HELLO program as well as the
required BASIC (binary file) is present on the particular disk
being booted.
In this respect the Saturn 64K or 128K RAM board operates as
a language card, and appears to DOS as such. If placed in slot
0, the required Basic will be automatically loaded upon boot,
just as occurs with the Apple Language card, or other 16K memory
boards.
9
Although the Saturn 64K and 128K boards will appear as a 16K
RAM board to much existing software, allowing this software to
take advantage of this portion of the memory board, its real
utility lies in the ability to use the additional memory on the
board. Five software packages are provided with the 64K and 128K
RAM boards, which are designed specifically to utilize all of the
memory on these boards. In fact, more than one board (as well as
a variety of other RAM boards) may be used with this software.
Any combination of the following, up to a total of 256K of
external RAM, are supported.
1.
2.
3.
4.
III.
Saturn 64K RAM Boards
Saturn 128K RAM Boards
Saturn 32K RAM Boards
Standard 16K RAM Boards
SPECIAL TREATMENT FOR THE APPLE LANGUAGE CARD
The Apple Language Card must be given special consideration.
The reason for this is because it contains an Autostart ROM which
is always enabled (on) whenever the RAM on the card is disabled.
This results in a conflict when any other memory card is present
in the system in addition to the language card. A special
provision has been made in the MOVEDOS, RAMEXPAND and PASCAL
PSEUDO—DISK software packages to accomodate this conflict.
What actually occurs in these cases is that the memory space
occupied by the AUTO—START ROM ($F800 — $FFFF) is specifically
avoided by the above software so that a memory conflict will
never occur. Avoiding this space results in the inability to use
2K out of every 16K bank of every memory card in the system.
For example:
Memory Cards Present
(exclusive of language card)
Available Memory with
Apple Language Card present
1 Saturn 32K RAM (2 — 16K banks)
1 Saturn 64K RAM (4 — 16K banks)
1 Saturn 128K RAM (8 — 16K banks)
44K
72K
128K
Thus, when an Apple Language card is added to a system
containing a 128K board, the increase in space (16K) is exactly
matched by the space made unavailable on the 128K board (8 x 2K)
due to the presence of the language card. As a result, no
benefit is gained by having the language card in the system at
this point.
The current versions of the DOS and CP/M pseudo—Disks
(Chapters 6 and 8) DO NOT have the necessary special provisions
so as to avoid this address conflict and therefore cannot be used
in a system which contains the Apple Language Card in addition to
10
other expansion RAM boards (Saturn 32K, 64K, 128K) Removal of
the Apple Language Card is required for operation in these cases.
Support of the language card is expected in a future release
of the CP/M and DOS Pseudo—Disks, which will be made available to
Saturn RAM board users at minimal cost.
An alternate solution to the multi—board Language card
memory conflict problem involves a hardware modification to the
Apple Language card. This modification is described in the Dec.
1981
issue
of
Softalk
Magazine
(vol.
2),
p.
184.
This
modification will result in the elimination of the ROM address
conflict, so that the Language card can be used just like any
other 16K RAM board, in as far as the software supplied with the
Saturn 64K and 128K boards is concerned.
IV.
OVERVIEW OF SOFTWARE
The following is a brief description of the software
included with the Saturn ~4K and 128K RAM boards:
packages
A. MOVEDOS (Chapter 4)
This program will relocate DOS 3.2 or 3.3 into the second
16K bank of the 64K or 128K RAM board, freeing up approximately
10K of memory. Integer or Applesoft Basic can be loaded into the
RAM board and accessed from the card as well as DOS. This
program is very useful in applications where memory is a
limitation.
B. RAMEXPAND (Chapter 5)
This package consists of a set of utility subroutines
accessible from Applesoft or Integer Basic which enable one to
accomplish very rapid data transfer from program memory to the
memory on expansion RAM boards (32K, 64K, and 128K boards).
Arrays, subroutines, and parts of programs can be saved and
loaded from the memory on the expansion boards very rapidly so as
to maintain ready access to this information. This package will
work in the relocated DOS environment as well as with a normal
DOS.
C.
DOS PSEUDO—DISK
(Chapter 6)
This package allows you to use one or more Saturn RAM boards
to emulate a standard disk drive. The software works with a
normal DOS as well as a relocated DOS on Saturn 32K, 64K, and
128K RAM boards, and 16K boards.
11
D.
PASCAL PSEUDO—DISK (Chapter 7)
This package allows you to emulate a disk drive under the
PASCAL operating system. This results in increased throughput
and faster system operation. Included are utilities for quickly
moving files up onto the PSEUDO—DISK, etc.
E.
CP/M PSEUDO—DISK (Chapter 8)
This package patches CP/M so that it can use the Saturn RAM
board(s) as a fast disk drive.
12
Chapter 4
MOVEDOS DOS RELOCATION SOFTWARE
The software provided with
enables one to take advantage of
these cards by moving DOS (DOS
thus freeing up approximately 10K
the Saturn 64K and 128K boards
a portion of the RAM present on
3.2 or 3.3) up into the board,
of memory for user programs.
In a 48K system, DOS normally resides at the top of the
48K of RAM, occupying 10.5K of RAM (from $9~00 to $BFFF). HIMEM
is set to reflect the presence of DOS (HIMEM = $9600). As long
as DOS is resident, the memory occupied by it is not available
for program use. The program MOVEDOS, provided with the Saturn
64K and 128K boards, frees up 10K of the memory space normally
occupied by DOS, while at the same time keeping DOS in the
system,
and
available.
This
is
accomplished
by
relocating
(moving) DOS up into the Saturn RAM board and making appropriate
modifications to the system so as to be able to communicate with
this relocated DOS. DOS is kept in the 64K or 128K memory board,
and used when required.
Essentially DOS is stored in a portion of the Saturn 64K or
128K board which is disabled (turned off) until it is needed.
As a result, when DOS is not being used, it isn’t sitting in
lower memory, taking up valuable space. When DOS is required, it
is used in the following manner.
1.
The part of the Saturn 64K or 128K board which contains
DOS is enabled (turned on). This results in BASIC (Integer
or Applesoft) being disabled (turned off) and no longer
resident.* This poses no problem, since BASIC is not
required by DOS during the time a DOS command is being
executed.
2.
The desired DOS command is executed by the relocated
DOS, now resident in the system.
3.
The portion of the Saturn RAM board which contains DOS
is disabled (turned off) . The BASIC which had been
present prior to the call to DOS is re—enabled, and
control is returned to the program from which DOS was
called.
In this way, as far as the user is concerned, DOS is present
in the system and there is 10K more memory available for program
use. In addition, the user has access to either BASIC (Integer
or Applesoft), since either of these can be present in the Saturn
-----------------------------------------------------------------*
Note: This occurs because the relocated DOS actually shares
the memory space occupied by BASIC. ($DOOO—$FFFF)
13
64K or 128K board as well as the relocated DOS. Also, through
the use of the DOS PSEUDO—DISK, the rest of the RAM board may be
used as a fast RAM—DISK, greatly improving disk access and
overall system performance (see Chapter 6)
I.
FEATURES OF THE RELOCATED DOS
All the features of normal DOS are retained in this relocated DOS, including the ability to initialize disks. When a
disk is initialized, the relocated DOS is written to the disk
from the Saturn 64K or 128K board. When this disk is later
booted, the relocated DOS is brought into the RAM board properly,
with everything set up to use it. Thus the program which does
the actual relocation (MOVEDOS) only needs to be run once.
The capability of using an Integer or Applesoft card in a
slot other than 0 has been added to this relocated DOS. This
enables one to take advantage of one of these cards if present,
as well as the Saturn RAM Board. Details of how to configure the
system to take advantage of this are given later.
MOVEDOS has been designed to operate with a 54K or 128K RAM
board in a slot other than 0, and properly relocate DOS into this
slot. MOVEDOS actually searches for the first 64K or 128K card
it finds starting at slot 0 and moving upward.
The language card and address conflict (see Chapter 3) has
been accomodated for in a special version of the MOVEDOS program
provided on the distribution diskette. This version of movedos
(MOVEDOS.LANG) has been designed to avoid the upper 2K of address
space on Saturn 64K or 128K RAM boards.
II.
USING MOVEDOS
The software provided with the Saturn 64K or 128K RAM Board
is distributed on a 16—sector disk. It can be used directly with
DOS 3.3, however it is recommended that a back—up be made as soon
as possible. When using the software with DOS 3.2 it is suggested that the programs be converted to 16 sector format using a
program such as DEMUFFIN prior to use. Again, a backup should be
maintained.
In order to relocate DOS, the program MOVEDOS is used. This
program moves the existing copy of DOS (3.3 or 3.2) resident at
the top of the 48K of user memory ($9600—$BFFF) into the second
16K bank of the Saturn 64K or 128K board and makes appropriate
changes to enable communication with this relocated DOS, in place
of the normal DOS. As stated previously, MOVEDOS does not
require that the Saturn RAM Board be present in slot fl, however
this positioning is recommended so that other software such as
PASCAL, VisiCalc, etc., will be able to find it.
14
A.
B.
C.
Running MOVEDOS with DOS 3.2
1.
Boot a standard DOS 3.2 system.
2.
Run the DEMUFFIN or similar program to convert the
file MOVEDOS to 13 sector format.
3.
Run MOVEDOS by typing BRUN MOVEDOS. The system will
respond by displaying a message indicating that DOS is
being loaded into the RAM board, the relocation will
take place, and control will return to BASIC.
4.
A blank disk can be initialized in the normal manner,
if desired, resulting in a copy of the relocated DOS
which can later be booted, as with any disk that has
been initialized. It is recommended that any disks
initialized with the relocated DOS be labeled as such,
to prevent possible confusion with normal DOS initialized disks.
5.
Integer BASIC (Apple II plus) or Applesoft (Apple II)
can be loaded into the first 16K bank of the Saturn 64K
or 128 K board as described previously (chapter 3, part
III) using a HELLO program, if desired.
Running MOVEDOS with DOS 3.3
1.
Boot a standard DOS 3.3 system.
2.
Insert a 16—sector disk containing a copy of the
MOVEDOS program (or the master itself — CAUTION!) and
type BRUN MOVEDOS. The system will respond by displaying a message indicating that DOS is being loaded into
the RAM board, the relocation will take place, and
control will return to BASIC.
3.
A blank disk can be initialized with a copy of the
relocated DOS which can be later booted, if desired,
by following normal initialization procedures. It is
recommended however, that any disks initialized with
the relocated DOS be labeled as such to avoid possible
confusion with normal DOS initialized disks.
4.
Integer BASIC (for an Apple II plus) or Applesoft (for
an Apple II) can be loaded into the first 16K bank of the
Saturn board (unused by the relocated DOS) by
running the standard HELLO program provided on the
distribution copy of DOS 3.3.
Running MOVEDOS on a system containing an Apple Language Card
If an Apple Language Card is being used, a special
version of MOVEDOS must be used. This is provided on the distribution disk as MOVEDOS.LANG. The previous discussion regarding
15
the running of MOVEDOS also applies to MOVEDOS.LANG (sections A &
B; above).
III.
USING AN APPLESOFT OR INTEGER CARD
As indicated previously, a provision has been made in the
relocated DOS to enable the use of an Apple Firmware card
(Integer card or Applesoft card) from a slot other than 0. The
relocated DOS is set up (as default) to look for the alternate
BASIC (Applesoft in an Apple II and Integer in an Apple II plus)
in the slot which contains the Saturn 64K or 128K RAM board. It
actually looks at the first 16K bank of the board for the
presence of the desired BASIC (the second 16K bank of this board
contains the relocated DOS).
This default can be easily changed using one of the configuration programs provided with the Saturn 64K or 128K board, so
that a different slot will be used for BASIC. One can then place
the desired Apple Firmware card in this slot (Applesoft card for
an Apple II; IntegEr card for an Apple II plus) and gain access
to it.
The following is a step by step procedure for making this
change.
1.
2.
Do one of the following:
a)
Boot a standard DOS (3.2 or 3.3) and run MOVEDOS
b)
Boot a relocated DOS from a previously initialized disk.
Run the appropriate configuration program:
a)
b)
RUN SET INTEGER SLOT ——— on an Apple IT plus
RUN SET APPLESOFT SLOT — on an Apple II
3.
Enter the slot number containing the firmware card (Integer
or Applesoft card) when prompted. The program will make the
required changes to the relocated DOS currently resident so
as to use this card.
4.
The relocated DOS with configuration intact can be saved at
this point for future use by initializing a disk with this
DOS.
NOTE:
The HELLO program used with this modified DOS should he
changed so that it does not test for the presence of a language
card in slot 0, anc load Basic. Otherwise a copy of this Basic
will be loaded into the first half of the RAM card in slot 0, as
well as being present on the firmware card, from which it will be
accessed when requested (by typing FP on an Apple II and INT on
16
Apple II Plus).
PRECAUTIONS CONCERNING BOOTING DISKS:
This precaution applies to systems which have been configured (using the configuration program) to use an Integer or
Applesoft firmware card with the relocated DOS. In this situation, it is recommended that booting (via PR#6, etc.) be accomplished from the main board ROM BASIC (i.e. Applesoft in an Apple
II plus; Integer [or monitor] in an Apple II), and not from the
BASIC present in the Apple Firmware card. This is to insure that
the firmware card is not left on after the boot.
The relocated DOS has been designed to operate properly with
an Applesoft or Integer card during the boot process, and can
therefore be booted from either Integer or Applesoft. However,
the standard DOS 3.3 or 3.2 (such as that present on the system
master) does not have a provision for use of an Integer or
Applesoft card from a slot other than 0, with the relocated DOS.
If the precaution is not taken to return to the main board ROM
BASIC prior to the boot in this case, the firmware card will be
left on after the boot with no way for DOS to turn it off, and the
system will hang.
In summary:
When operating under the relocated
Applesoft card in a slot other than 0,
with
an
Integer
or
1.
Boot a relocated DOS as usual, either from Applesoft or
integer
2.
Boot a standard DOS only from the main board ROM BASIC,
a)
b)
IV.
DOS
Integer (or monitor] on an Apple II.
Applesoft on an Apple II plus.
COMPATIBILITY OF RELOCATED DOS WITH EXISTING SOFTWARE
In many respects the relocated DOS can be treated just as a
normal DOS 3.2 or 3.3. In some instances however, problems arise
where a particular application program attempts to make internal
modifications to DOS. Such programs may not operate properly
since DOS is no longer located where it is expected by the
program (i.e. at the top of the 48K of RAM). In these instances
a modification of the particular program involved may be required
to permit operation with the relocated DOS.
A.
MODIFICATION OF FID AND MUFFIN
Two programs provided on the DOS 3.3 system master, FID and
MUFFIN contain a minor bug which arises when an attempt is made
17
to run these programs with the relocated DOS. The program called
MOD, included in the software package with the Saturn 64K and
128K boards will repair this bug so that both FID and MUFFIN will
run with the relocated DOS as well as the normal DOS.
In addition to modifying FID for use with the relocated DOS,
MOD will also make necessary changes to FID so that it can be
used with the DOS PSEUDO—DISK (see Chapter 6). The modified FID
can be used as a direct replacement for FID (as distributed on
the DOS 3.3 system master), with or without the PSEUDO—DISK, or
the relocated DOS.
B.
MODIFICATION OF BOOTl3
Modification of the program BOOTl3, provided on the DOS 3.3
system master, is required for proper operation with DOS 3.2
disks initialized under the relocated DOS. MOD will make the
required changes to BOOTl3 to allow use with the relocated DOS.
V.
TECHNICAL INFORMATION
A.
RELOCATED DOS OPERATION
As described previously, the program called MOVEDOS does
exactly what its name implies; it moves the existing DOS (ver 3.2
or 3.3) present at the top of the 48K of user RAM ($9~OO—$BFFF)
into the Saturn 64K or 128K board. In addition to being able to
maintain DOS in the RAM board, the alternate BASIC may reside
there as well (Integer BASIC on an Apple II plus, Applesoft on an
Apple II). This is possible because DOS is moved (by MOVEDOS)
into the second 16K bank of the RAM card (not used by BASIC). All
but 4K of this 16K bank is used by the relocated DOS and
associated monitor routines. The unused 4K portion of the second
16K bank of the Saturn board will be used by future software
packages supporting the 64K and 128K RAM boards.
Now, when a DOS command is invoked from Applesoft, Integer
BASIC, a machine language routine or the keyboard, it is executed
by the relocated DOS present in the Saturn RAM board. A small
portion of DOS is maintained within the lower 48K of RAM from
$BEOO to $BFFF. This part of DOS includes a short routine which
serves to enable (turn on) the required part of the Saturn 64K or
128K board which contains most of DOS, when DOS is called. The
DOS command is then executed by the relocated DOS in the RAM
board, after which time this part of the Saturn RAM board is
disabled, and the s/stem is returned to the state it was in prior
to the call to DOS. The routines which enable the second bank of
the Saturn 64K and 128K boards (containing DOS), as well as
disable it when through, are located at the top of the user RAM
from $BEOO to $BFFF, occupying 1/2 K. HIMEM is set to reflect
this.
18
B.
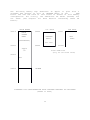
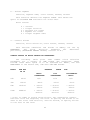
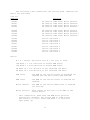
MEMORY USAGE
The memory maps presented on the following two pages illustrate how the system is organized with the relocated DOS present
in the Saturn 64K or 128K RAM board, as compared to the standard
DOS memory configuration. For sake of simplicity, the configuration applies to an Apple II plus (Applesoft in ROM). For Apple
II configuration, exchange the contents of main board ROMS with
that of the first bank of the Saturn RAM board, in each diagram.
19
The following memory map describes an Apple II plus with a
standard DOS present as well as INTEGER BASIC in the
RAM
board. The 2nd 16K bank of this board is unused in this memory
configuration. For clarity, the additional 4K banks (unused) are
not shown (see Chapter for more details concerninq these 4K
banks).
MAIN BOARD
$FFFF
1st Bank
$FFFF
MAIN
BOARD
ROMS
2nd Bank
$FFFF
MONITOR
INTEGER
BASIC
NOT
USED
(APPLESOFT)
PR. AID
$DOOO
$DOOO
$DOOO
Apple
I/O
Saturn RAM board
(only 1st two banks shown)
$C000
DOS
$9600
=HIMEM
STANDARD DOS CONFIGURATION WITH INTEGER PRESENT IN RAM BOARD
{APPLE II PLUS]
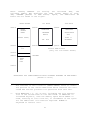
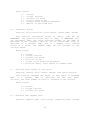
20
After
running
MOVEDOS
(or
booting
the
relocated
DOS),
the
following memory map describes the same system (Apple II plus,
48K, INTEGER present in RAM board). Again, the additional 4K
banks are not shown in the figure.
MAIN BOARD
$FFFF
1st Bank
$FFFF
MAIN
BOARD
ROMS
2nd Bank
$FFFF
MONITOR
MONITOR
INTEGER
BASIC
RELOCATED
DOS
PR. AID
FILE **
BUFFERS
(APPLE SOFT)
$DOOO
$DOOO
$DOOO
Apple
I/O
Saturn RAM board
(only 1st two banks shown)
$C000
DOS *
$BEOO
=HIMEM
FREE
FOR
USE
$9600
RELOCATED DOS CONFIGURATION WITH INTEGER PRESENT IN RAM BOARD
[APPLE II PLUS]
__________________________________________________________________
*
The routines in this location ($BEOO-$BFFF) serve to enable
the portion of the Saturn RAM board which contains the relocated DOS and set pointers for operation with this DOS.
**
With MAXFILES = 3, all of DOS, including the file buffers
fits in the second bank of the ram board. If MAXFILES is
increased beyond 3, then the memory space below $BEOO is
used, starting at this location, in increments of 595 bytes
for the additional file buffers required. HIMEM is
adjusted to reflect this.
21
C.
MORE DETAILS CONCERNING MOVEDOS
When MOVEDOS is executed, the following occurs:
1.
A search is made starting at slot 0, and incrementing
upward, for a Saturn 64K or 128K board. if it is not
found, the program halts with an appropriate message.
2.
The version of DOS present in RAM is determined (DOS
3.2 or 3.3) and the appropriate modifications are made
to allow it to run (when relocated) up in the RAM
board. The boot routine is modified to allow loading
of DOS from disk directly into the memory card.
INIT is also changed to enable initialization with
the relocated DOS.
3.
The modified DOS is then loaded into the Saturn 54K or
128K RAM board.
4.
The necessary routines which allow communication with
the relocated DOS are put up at the top of the user
RAM space (occupying 1/2K from $BEOO to $8FFF), and
HIMEM is set to $BEOO.
5.
The pointers in page 3 are changed indicating the new
entry points to DOS.
22
D.
MISCELLANEOUS ROUTINES, POINTERS, ETC.
Location
Function
$BFOO
Routine which enables the 16K bank of
Saturn 64K or 128K board which contains DOS
(called prior to entering relocated DOS)
This routine also disables card containing
alternate BASIC.
$BF17
Routine which disables 16K bank of
Saturn 64K or 128K board which contains DOS.
(called upon exit from relocated DOS)
This routine also enables the alternate
BASIC, if required.
$BF72, $BF73
BLOAD/BRUN start address (formerly at
$AA72, $AA73)
$BF6O, $BF6l
BLOAD/BRUN length (formerly at $AA6O,
$AA6l)
$BF66 — $BF73
DOS command parameter buffer (formerly
at $AA66 — $AA73)
$BFB8
DOS I/O paramter area (formerly $B5BB)
$BFE8
DOS I/O block for RWTS (formerly $B7E8)
$4C, $4D (INTEGER) HIMEM = $BEOO (formerly $9600)
$73, $74 (APPLESOFT)
$3D0
$BEE4 — $BEE8
Routine to re—connect DOS = $BF28
(formerly at $9DBF).
Routine which effectively wipes out
BASIC in Saturn 64K or 128K board upon
boot of relocated DOS (slot 0 only) by
writing 0 at location $EOOO. Change
to NOP’s to defeat this feature.
23
Chapter 5
RAMEXPAND
RAMEXPAND
is a software package consisting of a set of
functions for extending the amount of RAM available to Applesoft
and Integer programs. RAMEXPAND will use the memory on one or
more Saturn 32K, 64K or 128K RAM Boards as well as that on any
16K board present in the system. Information in the form of data
and programs or subroutines can be saved on these extension RAM
boards
for
later
retrieval.
RAMEXPAND
allows
one
to
save
complete programs which can later be loaded and run, overlay and
chain subroutines and program segments, or save and recall arrays.
Flexibility has been incorporated into RAMEXPAND to allow
portions of the memory board(s) (Saturn 32K, 64K, 128K RAM
Boards, 16K board) to be reserved for such things as the
alternate BASIC (Applesoft in Apple II, Integer in Apple II
Plus). This memory can be reclaimed for use by RAMEXPAND at any
time it is desired.
I. CHARACTERISTICS OF RAMEXPAND
A.
TERMINOLOGY
Throughout this chapter, the term “extended RAM” will be
used to describe the total memory present in the system contained
on expansion RAM boards (Saturn 32K, 64K, 128K RAM Board(s), 16K
expansion RAM board(s)). It should be noted that it is NOT
necessary to have a 16K RAM board for any of the software
provided by Saturn Systems; however, our software will take
advantage of any 16K card which you may have purchased prior to
the introduction of the Saturn RAM Board(s).
B.
REQUIREMENTS AND MEMORY USAGE
RAMEXPAND occupies two portions of memory. Most of the
RAMEXPAND system is located in the Saturn 32K, 64K, or 128K board
which contains the relocated DOS and occupies the unused 4K bank
within the second 16K bank of the board (bank which contains the
relocated DOS). This is 4K bank 2B (see Technical Information
section, Chapter 9). One page of memory from $BDOO to $BDFF (just
below the interface routines to the relocated DOS) is also used
by RAMEXPAND and HIMEM is set to protect this portion.
The
RAMEXPAND
system
consists
of
three
files,
RAMEXPAND,
RAMEXPAND.LOW, and RAMEXPA.LOAD. The program RAMEXPA.LOAD serves
to load the RAMEXPAND system into memory and set various poin—
24
ters. The file RAMEXPAND is the portion of the system which
resides in the Saturn RAM board. RAMEXPAND.LOW is the portion
which resides in low RAM (normally at HIMEM). This low RAM
portion of RAMEXPAND can actually be loaded and executed anywhere
in low RAM (0 — 48K), although it is normally located at HIMEM,
with HIMEM being lowered to protect it.
C.
DATA STRUCTURE
RAMEXPAND saves and recalls selected parts of program text
or data. Each portion is saved in an independent area in
extended RAM. These areas are called segments. Each segment can
contain a program, a part of a program, or the contents of an
array. When information is saved in a segment, it must be given
a name. When the information is retrieved, it is identified with
this
name.
The
“names”
are
in
fact
integers,
and
can
be
specified as variables which contain the segment names when
calling RAMEXPAND, if desired. Segment names may be integers
between 1 and 32,767. Zero, negative numbers, or numbers greater
than 32,767 are illegal segment names.
D.
MEMORY ALLOCATION
RAMEXPAND
uses
areas
of
the
memory
indicated
as
being
available on one or more Saturn 32K, 64K, or 128K RAM Boards as
well as on a 16K RAM board. RAMEXPAND treats each 16K bank of a
given memory card as consisting of two blocks of memory, one
which is 12K in size, and the other 4K. Thus a Saturn 32K board
consists of 4 blocks, two 12K blocks and two 4K blocks, a 64K
card consists of 8 blocks, and a 128K card consists of 16 blocks.
On the other hand, a 16K board contains only 2 blocks, one 12K
and one 4K.
Specific numbers have been assigned to these blocks and are
used for specifying a particular block. Numbers are used to
identify the blocks to be used by RAMEXPAND when the system is
initialized.
The RAM boards can be divided into two groups based on the
block designation numbers. The first group consists of 16K RAM
boards and the Saturn 32K RAM board, and the second group, the
Saturn 64K and 128K boards.
1.
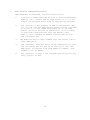
SATURN 32K RAM Board and 16K RAM Board
The memory organization of a Saturn 32K RAM board is given
in the following figure. The particular number used to designate
the depicted block is shown in brackets.
25
$FFFF
-------------------
12k
$EOOO
12k
[8]
-------
[16]
4k
[32]
$DOOO
4k
[64]
-------
16K Bank 1
16K Bank 2
The following table gives the relationship between RAMEXPAND
block designations and the bank designations established in the
Technical Information Chapter of the Saturn 32K RAM board manual.
16K bank
Size
RAMEXPAND
DESIGNATION
1
12K
8
4K Bank lA + memory in region
$EOOO — $FFFF
1
4K
32
4K Bank lB
2
12K
16
4K Bank 2A + memory in region
$EOOO — $FFFF
2
4K
64
4K Bank 2B
The
RAMEXPAND
block
designations
for
a
15K
RAM
board
correspond to those which are used to describe the first l6K bank
in the above figure. Thus,
12K block = RAMEXPAND block designation 8
4K block = RAMEXPAND block designation 32
2.
SATURN 64K and 128K RAM Boards
The Saturn 128K RAM board can be thought of as consisting of
four 32K RAM boards (or sections), whereas the 64K board can be
described in terms of two 32K sections. The block designation
numbers for each bank within these 32K sections is the same as
given above for the Saturn 32K board. Thus the designation
numbers for the 12K blocks within the “32K sections” are 8 and
16, and the 4K blocks are 32 and 64.
In
addition
to
this
block
specification
number,
the
particular “32K section” which contains the desired block must
also be specified. These are indicated using the “32K section”
designation numbers given in the following figure.
26
$FFFF
-----------------------12K
12K
[8]
"32K Section”
DESIGNATION
[16]
$EOOO
--------4K
[32]
4K
[64]
256
$DOOO
16K Bank 1
$FFFF
-----------------------16K Bank 2
-----------------------12K
12K
[8]
------
[16]
$EOOO
$DOOO
$FFFF
4K
[32]
-------- ----16K Bank 3
4K
[64]
16K Bank 4
-----------------------12K
[8]
$EOOO
12K
[16]
-------------4K
[32]
$DOOO
16K Bank 5
$FFFF
$EOOO
$DOOO
512
4K
[64]
1024
-----------------------16K Bank 6
-----------------------12K
12K
[8]
[16]
---------------------4K
4K
[32]
[64]
-----------------------16 K Bank 7
16 K Bank 8
27
2048
Thus, in order to specify a given block of memory in a 64K
or 128K board, the block designation number (8, 16, 32 or 64)
must be provided as well as the designation assigned to the
particular “32K section” of the board (256 = 1st 32K section, 512
=
2nd
32K
section,
1024
3rd
32K
section,
2048
4th
32K
section). Refer to section II.E for the actual procedure used to
tell RAMEXPAND which memory block to use.
E.
SPECIAL REQUIREMENT IF LANGUAGE CARD IS PRESENT
The Apple Language Card requires special treatment for use
with RAMEXPAND. This is due to the presence of the Autostart ROM
on the Language Card (see Chapter 3, section III). The memory
allocation for RAMEXPAND has been modified slightly in order to
accomodate the language card. The RAMEXPAND block specification
numbers remain the same, with the only difference being that the
top 2K of each 12K block is not used by the RAMEXPAND system. As
a result the blocks corresponding to the numbers 8 and 16 are 10K
in size rather than 12K, when an Apple Language Card is used.
RAMEXPAND is told that a language card is present at the
initialization and installation step, when the system is being set
up.
II. USE OF RAMEXPAND
A.
INSTALLING RAMEXPAND
The following procedure describes the steps
taken in order to install RAMEXPAND in the system.
which
must
be
2. First load RAMEXPAND by running the loading program:
RAMEX PA. LOAD
This program loads the two portions of the RAMEXPAND system (the
portion which resides in the Saturn 64K and l2~?K RAM Board as
well as the “low” RAM portion residing at $BDOO to $BDFF). It
then sets HIMEM to protect the “low” RAM portion and sets up
locations 10 — 12 to point to the entry point of RAMEXPAND. Thus
RAMEXPAND can be called by simply using a CALL 10 or the USR
function (Applesoft).
When run, RAMEXPA.LOAD will ask for the slot into which
RAMEXPAND is to be loaded.
ENTER SLOT TO LOAD RAMEXPAND INTO:
28
Respond by entering the slot number containing the memory
card (32K, 64K or 128K RAM board) into which RAMEXPAND is to be
loaded
ENTER TYPE OF CARD YOU ARE LOADING
1=
2=
3=
4=
128K (or 64K)
32K
128K (or 64K) , Language card present
32K, Language card present
Responses:
1. Enter 1 if RAMEXPAND is being loaded into a Saturn 128K
or 64K card and an Apple Language card is not present in the
system.
2. Enter 2 if RAMEXPAND is being loaded into a Saturn
card and no Apple Language card is present in the system.
32K
3. Enter 3 if the system contains an Apple Language card
and RAMEXPAND is to be loaded into a Saturn 128K or 64K board.
4. Enter 4 if an Apple Language card is present in
system and RAMEXPAND is to be loaded into a Saturn 32K board.
the
RAMEXPAND is now installed in the system and ready for use.
Two initialization and set—up procedures are generally required
prior to actually moving programs and data into extended RAM by
using the appropriate RAMEXPAND functions.
Before
discussing
these
initialization
procedures,
method of calling and communicating with RAMEXPAND will be
ribed.
B.
the
desc-
COMMAND SET-UP
Prior to calling RAMEXPAND, a command must be set up. This
command tells RAMEXPAND what function is to be performed as well
as any necessary parameters. The command must be placed in the
string CM$. RAMEXPAND will always look at CM$ for its command
when called.
The command should contain 5 values, separated by commas.
Each value may be a number or the name of a variable. In several
cases the value must be a variable name. A sample command is as
follows:
CM$ = “A,B,C,D,E”
29
In general the values represent the following:
A.
FUNCTION. The first value identifies the function
performed. This must be an integer in the range 0 to 14.
B.
SEGMENT NAME. The second value gives the
segment to use. (values: integer 1 — 32,767)
name
of
to
the
be
RAM
C.
ERROR STATUS. The third value must be a variable name.
RAMEXPAND will store a status value in the variable upon completion of the function. This can be used to determine if the
function was performed successfully.
D.
START.
The
function. It may
array name.
fourth
value
depends
represent the start of
upon
the
particular
a program area, or an
E.
END.
The fifth value also depends upon the
function. It may represent the end of a program area.
C.
particular
CALLING RAMEXPAND
RAMEXPAND is called from BASIC programs using the CALL
statement. Since locations 10 — 12 ($A — $C) are set to point to
RAMEXPAND, a CALL 10 statement and in Applesoft the USR function
both serve to call RAMEXPAND.
Thus, in summary, in order to execute a RAMEXPAND command,
the command string CM$ is first set up, and then RAMEXPAND is
called through a CALL 10, etc. This process is repeated for each
command to be executed.
0.
INITIALIZING RAMEXPAND
After RAMEXPAND has been installed (see previous section,
INSTALLING
RAMEXPAND),
it
must
be
initialized.
This
is
accomplished
through
the
RAMEXPAND
initialization
function
(function code = 14). The command string to initialize RAMEXPAND
is as follows:
CM$ = “14,0,A,0,0”
where A = error status variable.
E.
ATTACHING MEMORY BLOCKS
Following initialization, the extended RAM memory to be used
by RANlEXPAND should be specified. The connect function (#9) is
used to attach blocks of memory to the system by indicating to
RAMEXPAND which blocks of memory are to be used in a particular
expansion RAM board (Saturn 32K, 64K, 128 RAM Board or 16K RAM
board). This function can be used to “attach” a single block of
memory or multiple blocks of memory within a given expansion
30
memory board.
1.
Saturn 32K and standard 16K RAM boards:
The following procedure is used for attaching
memory on a Saturn 32K board, or a 16K RAM card.
blocks
of
To attach a single block to RAMEXPAND, the chosen block and
slot number containing the memory card are stipulated as follows:
a)
A block selection parameter is calculated by adding the
slot # of the memory card to the block designation # (given
in section I.D.l). For example, the block selection parameter of the first 12K block of a Saturn 32K RAM board in
slot 2 is 2 [slot #3 + 8 [block designation #] = 10.
b)
This block selection parameter is supplied as the second
parameter in CM$ when the connect function (#9) is executed.
Thus in above example, CM$ = “9,lO,A,O,O” where A= error
status variable.
Additional calls to RAMEXPAND may be used to connect other
blocks of memory as desired. More than one block within a given
memory card can be attached with a single call to RAMEXPAND, by
merely adding the corresponding block numbers along with the
slot#
to
generate
the
block
selection
parameter.
Thus,
to
specify the first and second 12K block of a Saturn 32K board in
slot #2, the block selection parameter is:
2
+
|
slot#
8
+
|
12K
block
16
|
12K
block
=
26
|
block
selection
parameter
and CM$ = “9,26,A,0,0”.
2.
Saturn 64K and 128K RAM boards:
The following procedure is used for attaching
memory on a Saturn 64k or 128K RAM board to RAMEXPAND.
blocks
of
To attach a single block to RAMEXPAND, the chosen block and
slot number containing the memory card are stipulated as follows:
a)
A block selection parameter is calculated by adding the
slot # +128 to the block designation # and the “32K section”
designation given in I.D.2. Thus, for example, the block
selection parameter of the 1st 12K block of a Saturn 64K
(or 128K) board in slot 2 is calculated:
31
2 [slot #] + 128 [to indicate that this is a 54K or 128K
board] + 8 F 12K block designation #1 + 256 [ 1st “32K
section” designation #] = 394.
b)
This block selection parameter is supplied as the second
parameter in CM$ when the connect function (#9) is
executed. Thus in the above example, CM$ “9,394,A,0,0”,
where A = error status variable
Additional calls to RAMEXPAND (function #9) may be used to
connect other blocks of memory as desired. More than one block
within in a given memory card can be attached with a single call
to RAMEXPAND, by adding the corresponding block numbers, “32K
section” designation numbers along with the slot # +l28 to
generate the block selection parameter. Thus, to specify the
first and second 12K blocks of a Saturn 128K RAM board in slot
#2, the block selection parameter is:
2 +
|
slot#
128
+
8 +
16 + 256 =
410
|
|
|
|
12K
12K
1st
block
block block
32K
selection
section parameter
and CM$ + “9,410,A,0,0”
As a second example, to specify the first four 12K blocks of
a Saturn 128K board in slot #2, the block selection parameter is:
2 +
|
slot#
128
+
8 + 16 +
|
|
12K
12K
block block
256 + 512
=
922
|
|
|
1st
2nd
block
32k
32K
selection
section section parameter
and CM$ = “9,922,A,0,0”
When the connect function (#9) is executed, these blocks
will be attached to RAMEXPAND. Additional connect function calls
to RAMEXPAND should be executed for each expansion memory board
to be used by RAMEXPAND. Some of the more common block selection
parameter values are given in section VIII, under the subsection
describing the “connect” function (#9) syntax.
32
F.
RESERVING SPACE FOR BASIC
Space in a Saturn 32K, 64K or 128K RAM Board can be reserved
for the alternate BASIC (Integer BASIC in Apple TI Plus; by not
attaching the first 12K block (block designation #8) of the
Saturn RAM board. The 4K block (designation #32) may be used for
storage by RAMEXPAND without disturbing BASIC in the 12K block.
G.
USING A FIRMWARE CARD
If An Apple Firmware card is present in the system, the
RAMEXPAND system can be accessed from it as well. This is accomplished by first configuring the relocated DOS to access the
language in the firmware card (see Chapter 4). Operation in this
manner will enable one to gain maximum benefit of the extended
RAM from both Applesoft and Integer BASIC.
III.
A.
PRECAUTIONS
PROTECTING RAMEXPAND
Since RAMEXPAND occupies the block with designation number
64, this block should not be specified for use by RAMEXPAND. If
the relocated DOS is being used, the block containing it should
also not be specified (#16).
B.
SETTING MAXFILES
Once the low RAM portion of RAMEXPAND (RAMEXPAND.LOW) has
been installed, it cannot be moved. As a result, MAXFILES must
not be increased after RAMEXPAND has been installed. What should
be done is to declare the largest value of MAXFILES required
prior to running RAMEXPA.LOAD.
C.
RELOADING RAMEXPAND
Everytime
RAMEXPA.LOAD
is
run,
the
low
RAM
portion
of
RAMEXPAND is loaded and MAXFILES is lowered to protect it. By
simply
re—running
this
program,
HIMEM
will
continue
to
be
lowered. To prevent this from happening, execute a MAXFILES
command to reset HIMEM before re—loading RAMEXPAND.
D.
SWITCHING BETWEEN BASICS (FP OR INT)
Whenever FP or INT is executed (used when switching BASICS,
etc), HIMEM must be declared so as to protect the low RAM portion
of RAMEXPAND. If this is not done, then the data saved by
RAMEXPAND will be lost. The required value for HIMEM is given
when RAMEXPA.LOAD is run.
33
E.
RESETTING RAMEXPAND ENTRY POINTS
The entry point into RAMEXPAND that is used when calling it
is normally stored in locations 11—12. This entry point corresponds to the first location of the low RAM portion of RAMEXPAND,
which is normally at HIMEM. If locations 11—12 are changed or
clobbered, they must be reset before using RAMEXPAND from BASIC
programs through a CALL 10 or the Applesoft USR function.
F.
DECLARING VARIABLES
Variables to be used as parameters in RAMEXPAND command
strings should be declared before use. This can be accomplished
by simply assigning a value to the variable, prior to calling
RAMEXPAND.
If
this
precaution
is
not
taken,
RAMEXPAND
will
either not return the value expected or flag an error. (see
section IV.A.3.)
IV.
ERROR HANDLING
A.
DESCRIPTION
Each RAMEXPAND function has an associated error status which
is generally passed to a variable stipulated in the command
string CM$. The following characteristics describe the error
handling process under a variety of conditions.
1.
If the command string CM$ is not found, there is no command
string to indicate an error status variable. In this case, there
is no indication of any error.
2.
If no variable is specified for the error status, no error
status is returned and the function continues. If no other error
occurs, the function will be successful.
3. If a non—existent variable (i.e., a variable which was not
declared previously) is specified for error status, there is no
indication of any error, even if one occurs. This can be quite
confusing in the event that an error does occur, since no
indication of this error will be given via the error status
variable.
4. If an error status variable is found, but some other variable
is not found, an error is returned. No other action takes place.
5. Actions occuring when other errors take place depend upon the
situation and the error. In most (but not all) cases, no action
will have taken place, after an error condition is encountered.
34
B.
ERROR SUMMARY
1
2
3
4
5
6
7
8
9
10
=
=
=
=
=
=
=
=
=
=
11
12
13
14
=
=
=
=
illegal function
variable not found
memory block already in use
memory block not found
illegal block selection parameter
memory block is not RAM
segment name already in use
segment not found
illegal segment name
no program is specified (ending line number precedes
starting line number)
no array specified
not enough room in extended RAM to store data
not enough room in normal (low) RAM to recall program
not enough room in normal (low) RAM to load string
V.
CURRENT LIMITATIONS
A.
The Fetch and Run function (#2) always uses the same BASIC as
the calling program used.
B.
Overlays must not be larger than the original space, i.e. the
space where these overlays will be loaded in the program.
As a result, some care must be exercised when overlaying;
RAMEXPAND does not currently change “end of program” pointers
or move variable tables.
C.
The Store array (#5, #15) and Fetch array (#5, #16) functions
pass one array at a time, and use the whole array.
VI.
1.
For the Fetch function, if the saved segment is
smaller than the target array, the end of the target
array is unchanged, and the data in the segment will
overlay the existing data in the array only up to the
point where the source data ends.
2.
If the the saved segment is larger than the target
array, not all of the segment is retrieved. Only
data up to the end of the target array is transferred.
EXAMPLE PROGRAM
An
Applesoft
demonstration
program
has
been
provided
to
illustrate
some
of
the
RAMEXPAND
functions.
This
program
consists of the following files.
DEMO
DEMO2
APPEND1
APPEND2
APPEND3
DEMOUTPUT
35
The program will demonstrate the operation of the following
functions.
1.
2.
3.
4.
Store
Fetch
Store
Fetch
array (#5)
array (#6)
subroutine or program segment (#3)
subroutine or program segment (#4)
In addition, several support functions are used.
1.
2.
A.
Initialize RAMEXPAND (#14)
Connect Blocks (#9)
To execute the demonstration program,
1.
Relocate DOS (BRUN MOVEDOS or boot a relocated DOS)
2.
Run the loading program, RAMEXPA.LOAD.
3.
Run DEMO
(note: This program will not use the
Saturn RAM board where the alternate
loaded. As a result, one can run the
Applesoft in the Saturn RAM board on
B.
space in the
BASIC is normally
program from
an Apple II.)
PROGRAM OPERATION
1.
The demonstration program will first initialize
RAMEXPAND (function #14) and attach the 4K bank with
block designation #32 to the system using the connect
function (#9). In this way, the space normally occupied
by the alternate BASIC is reserved, in the event that
it is required.
2.
The program will then set up some custom driver
routines (used for PROGRAM LISTING menu option) by
BRUNing DEMOUTPUT.
3.
Three program segments will then be loaded from disk
(APPEND1, APPEND2 and APPEND3) and saved by RAMEXPAND
in extended RAM using the Store subroutine or program
segment funtion (#3)
4.
The main portion of the demonstration program (DEMO2)
will be loaded and a menu displayed. The following
options are available.
a)
LIST — This option will serve to list the program
36
b)
ARRAY DEMO — This option will demonstrate the
saving and loading of an array from extended RAM
using RAMEXPAND functions.
c)
LOAD PROGRAM SEGMENT 1 — This will load the
previously stored program segment starting at
statement number 5000.
d)
LOAD PROGRAM SEGMENT 2 (same as in c)
e)
LOAD PROGRAM SEGMENT 3 (same as in C)
f)
EXECUTE PROGRAM CURRENTLY IN MEMORY - This will
run the program segment which was loaded last.
While the demonstration program may serve as an example of a
few of the available RAMEXPAND functions, it by no means exhausts
all of the possibilities.
37
VII.
SUMMARY OF AVAILABLE FUNCTIONS
RAMEXPAND provides the following functions (specified as the
first value in the command string)
0
— no operation
1
— store complete program in extended RAM
2
— fetch and run program from RAM
3
— store subroutine or program segment in extended RAM
4
— fetch subroutine or program segment from extended RAM
5
— store contents of an array in extended RAM
6
— fetch contents of an array from extended RAM
7
—
8
— delete extended RAM segment (makes space available again)
9
— connect new block of extended RAM to enable RAMEXPAND to
use it.
10 —
exchange contents of an array between normal RAM and
extended RAM
disconnect block of extended RAM to prevent RAMEXPAND
from using it.
11
— fetch total amount of free space in extended RAM
12
— fetch name of “next” segment
13
— (not implemented yet) preload BASIC program from disk file
into extended RAM
14
— initialize RAMEXPAND
15
— store contents of Applesoft string array in extended
RAM
16
— fetch contents of Applesoft string array from extended
RAM
38
VIII.
COMMAND SYNTAX AND DESCRIPTION
0 — No—op
No values other than function.
1 — Store program
function, segment name, error status, unused, unused
This function stores all of the current program in a new
segment. The new segment is given the name specified in the
second value. The segment name may not already exist.
Error status:
0
1
2
7
9
12
=
=
=
=
=
=
success
illegal function
variable not found
name already exists
illegal segment name
not enough room in extended RAM
2 — Fetch and run program
function, segment name, error status, unused, unused
This function retrieves the named segment as a new program.
It then runs the new program. If it succeeds, then RAMEXPAND
doesn’t return to the calling program.
Error status:
0
1
2
8
9
13
3
=
=
=
=
=
=
success
illegal function
variable not found
segment not found
illegal segment name
memory full
— Store subroutine or program segment
function, segment name, error status, starting line number,
ending line number
This function stores a portion of a program in a
segment. The new segment is given the name specified in
second value. The new segment name must not exist. The portion
39
new
the
of the program from the starting line number up to and including
the ending line number is saved.
Error status:
0
1
2
7
9
10
12
=
=
=
=
=
=
=
success
illegal function
variable not found
segment already exists
illegal segment name
no program area specified
not enough room in extended RAM
4 — Fetch subroutine or program segment
function, segment name, error status, start line number, unused
This function retrieves the named segment. It overwrites the
portion of the current program beginning at the starting line
number. Thus it overlays part of the existing program.
Error status:
0 =
1 =
2 =
8 =
9 =
13=
success
illegal function
variable not found
segment not found
illegal segment name
not enough room in normal memory
5 — Store array
function, segment name, error status, array name, unused
This function stores the contents of a reel, integer,or
string arrays (Integer Basic only) in a new segment. The new
segment is given the specified name. The array must be specified
by name; i.e., this value may not be a number. For storing
Applesoft string arrays, use function #15.
Error status:
0
1
2
7
9
11
12
=
=
=
=
=
=
=
success
illegal function
variable not found
segment name already exists
illegal segment name
no array specified
not enough room in extended RAM
40
6 — Fetch contents of array
function, segment name, error status, array name, array
length
This function retrieves the named segment and stores the
contents in the named real, integer, or string array Integer Basic
only). The array must be specified by name. If the array length
value is specified, it must be a variable name. If it is
specified, RAMEXPAND will return the number of bytes actually
stored in the array in this variable. This can be used to determine how much data was returned. The number must be divided by
the size of an array element to determine how many elements it
represents. For integers, the size is 2 bytes. For reals, the
size is 6 bytes. For fetching Applesoft string arrays, use
function #16.
Error status:
0
1
2
8
9
11
= success
illegal function
= variable not found
= segment not found
= illegal segment name
= no array specified
7 — Exchange array
function, segment name, error status, array name, array
length
This function exchanges the contents of an array in normal
RAM with the contents of an array in extended RAM. Other than
the exchange, this function acts just like the Fetch Array
function. The array must be specified by name. If the array
length value is specified, it must be a variable name. If if is
specified, RAMEXPAND will return the actual number of bytes
stored in the array in this variable. This can be used to
determine how much data was returned. This number should be
divided by the number of bytes per array element to determine how
many elements it represents. For integers, the size is 2 bytes.
For reals, the size is 6 bytes.
Error status:
0
1
2
8
9
11
=
=
=
=
=
=
success
illegal function
variable not found
segment not found
illegal segment name
no array specified
41
8 — Delete segment
function, segment name, error status, unused, unused
This function deletes the segment named. This makes the
space in extended RAM available for other uses.
Error status:
0
1
2
8
9
=
=
=
=
=
success
illegal function
variable not found
segment not found
illegal segment name
9 — Connect blocks
function, block selection, error status, unused, unused
This function identifies new blocks of memory for use by
RAMEXPAND.
The
block
selection
parameter
was
described
previously (ATTACHING MEMORY BLOCKS, section II.E.)
COMMON VALUES OF BLOCK SELECTION PARAMETER:
The
following
table
gives
some
common
block
selection
parameters for a variety of RAM boards and situations. These
include cases where space is to be reserved for BASIC, DOS and
RAMEXPAND in the Saturn 32K, 64K and 128K RAM boards.
BOARD
USE ALL
OF IT
RESERVE
BASIC
+RAMEXPAND
16K
40+sl
32K
SPACE
DOS
+RAMEXPAND
FOR:
DOS+RAMEXP.
+ BASIC
N/A
N/A
N/A
120+sl
48+sl
40+sl
32+sl
64K
1016+sl
* 432+sl
760+s1
* 424+sl
760+sl
* 416+sl
760+sl
128K
4088+sl
* 432+sl
3832+s1
* 424+sl
3832+sl
* 416+sl
3832+sl
* note: in order to attach these blocks, two consecutive connect
function calls are required, the first to specify the blocks to be
used in the first “32K section”, and the second, to specify blocks
in the rest of the card.
42
Error status:
0
1
2
3
5
6
=
=
=
=
=
=
success
illegal function
variable not found
block already in use
illegal block selection parameter
RAM not in specified slot
10 — Disconnect blocks
function, block selection, error status, return—name, unused
This function disconnects blocks of memory from use by
RAMEXPAND. The specified blocks must be empty or RAMEXPAND will
not disconnect them. The block selection format is the same as
specified in the “connect” function. If the return—name value is
specified as a variable name, and if a segment still remains
stored in a block, the segment name will be returned in the
variable named.
Error status:
0
1
2
4
5
?
=
=
=
=
=
=
success
illegal function
variable not found
block not in use
illegal block selection parameter
block not empty. error status is segment name.
11 — Retrieve total amount of free space
function, unused, error status, unused, free space variable
This function computes the amount of free space in extended
RAM.
If
a
variable
name
is
specified
for
the
free
space
variable, the total number of bytes is returned in the variable.
Error status:
0 = success
1 = illegal function
2 = variable not found
12 — Retrieve next segment name
function, segment name, error status, length variable, unused
43
This function looks up an existing segment name. It then
returns the next name following the specified name. This may be
used to step through all the segments to see which names are
used. The segment name value must be a variable name to have a
new name returned. If the length variable is specified, the
length of the new segment will be returned in the length
variable.
To
get
the
first
segment
name,
zero
should
be
specified for the starting segment name. If no segments follow
the specified segment, the name returned will be zero.
Error status:
0
1
2
8
9
=
=
=
=
=
success
illegil function
variable not found
segmetit name not found
illegal segment name
13 — Preload program from disk file
(not implemented at this time)
14 - Initialize RAMEXPAND
function, unused, error status, unused, unused
This function restarts RAMEXPAND from scratch.
are disconnected, and any existing data is lost.
All
blocks
Error status:
0 = success
1 = illegal function
15 - STORE APPLESOFT STRING ARRAY
function, segment name, error status, array name, unused
This
function
stores
the
contents
of
a
string
array
(Applesoft only) in a new segment. The new segment is given the
specified name. The array must be specified by name, i.e. This
value may not be a number.
Error Status:
0
1
2
7
9
=
=
=
=
=
success
illegal function
variable not found
segment name already exists
illegal segment name
44
11 = no array specified
12 = not enough room in extended RAM
16 — Fetch contents of Applesoft String array
function, segment name, error status, array name, unused
(For use with Applesoft string arrays only!)
This function retrieves the named segment and stores the
contents in the named Applesoft sring array. The array must be
specified by name.
Error Status:
0
1
2
8
9
11
14
=
=
=
=
=
=
=
success
illegal function
variable not found
segment not found
illegal segment name
no array specified
memory full
45
Chapter 6
DOS PSEUDO—DISK
This software package enables one to use the Saturn RAM
Board(s) for storing programs and data in a very similar manner
as is done on disk, Of course, the RAM board does not in any way
resemble a disk drive; however, through appropriate software, DOS
can be fooled into thinking that the card(s) is just another disk
drive. As a result, applications programs which use DOS for
saving and loading programs and data will also see the Saturn RAM
board as a disk drive.
In order to be able to use the Saturn RAM Board as a pseudo—
disk, controlling software routines must be loaded and some
initialization
accomplished.
The
DOS
PSEUDO
DISK
package
consists of three programs which serve to perform this loading and
initialization of the PSEUDO DISK. These files must be present
on the same disk in order to set—up and install the PSEUDO DISK.
PSEUDO DISK —
Menu driver Applesoft program which is used to
set up the PSEUDO DISK parameters and install
the pseudo disk.
PSEUDO.NRM
—
Binary program which contain the disk drivers
and patches to DOS for operation with a normal
(not relocated DOS)
PSEUDO.MVD
—
Binary program which consists of driver software and patches to DOS for operation with the
relocated DOS.
PSEUDO
PARAMETERS-
I.
File updated by PSEUDO DISK program with
system parameters, location, and type of memory
boards present, etc.
FEATURES AND REQUIREMENTS OF THE PSEUDO DISK SYSTEM
The pseudo—disk is designed to operate with both standard
and relocated DOS 3.3 or 3.2.
The pseudo—disk system will work with one or more Saturn
RAM boards, making available all of this memory for storage. A
maximum of 256K can be used for the PSEUDO DISK.
A feature has been provided which allows reservation of
space in the RAM board for BASIC, if access to the alternate
BASIC (Integer on an Apple II plus; Applesoft on an Apple II) is
desired.
46
There are two basic steps which must be taken in order to be
able to use the PSEUDO DISK. These are:
1.
Set up the PSEUDO DISK
2.
Install the PSEUDO DISK
These must be performed in the order given above.
II.
SETTING UP THE PSEUDO DISK
This step primarily involves telling the system where the
memory cards are, and what portions, if not all, are to be used.
To set it up, Run the Applesoft program PSEUDODISK. Both
PSEUDO.NRM and PSEUDO.MVD must be present on the disk along
PSEUDO—DISK.
A menu will be displayed:
DOS PSEUDO DISK
COPYRIGHT (1982), SATURN SYSTEMS, INC.
<1>
<2>
<3>
<4>
<5>
LOOK AT PSEUDO DISK SET—UP
SET—UP PSEUDO DISK
INSTALL PSEUDO DISK
RECONNECT PSEUDO DISK
EXIT
Select option 2. The screen will display:
SLOT 5
DRIVE 1
DIR.
BANK
SLOT
12345678
SLOT
0
4
1
5
2
6
3
7
SECS 4
BANK
12345678
--------------------------------------------------------------------------------------------B
=
BASIC
Y
= USED
N
=
NOT USED
--------------------------------------------------------------------------------------------<1> CHANGE SLOT CONTENTS
<2> CHANGE DISK PARAMETERS
<3> EXIT
Enter 1 to tell the system where the memory cards are.
47
WHICH SLOT?
Enter the slot of the first memory card. The system will
prompt for the type of card present 128K, 64K, 32K, 16K.
Enter the card type (ex. 128K)
If this card was in slot 0 the system will ask:
DO YOU WANT TO SAVE ROOM FOR BASIC?
Enter the appropriate response. If N, the system will ask,
one bank at a time, whether you want to use this bank. If the
relocated DOS is being used, be sure to reserve Bank 2 of the 64K
or 128K board which contains the relocated DOS.
Repeat
the system.
this
procedure
for
all
the
Next, select option 2 to change
following options will be displayed:
memory
the
disk
cards
present
parameters.
in
The
<1> CHANGE SLOT AND DRIVE
<2> CHANGE DIRECTORY SIZE
<3> EXIT
Select the appropriate option.
1)
To change the slot and drive for the PSEUDO DISK. The current
values are displayed at the top of the screen just under the
Copyright notice.
2)
To change the number of directory sectors to be allocated for
the PSEUDO DISK (default = 4 sectors)
Once all the parameters have been entered, exit
Then, to exit back to the main menu select option 3.
this
menu.
The file PSEUDO PARAMETERS will then be updated with the new
parameters, etc., and the main menu displayed. The PSEUDO DISK is
not active at this time.
III.
INSTALLING THE PSEUDO DISK
Once the disk parameters, location and type of memory boards
have been entered (above), the PSEUDO DISK is ready to be
installed.
Select option 3.
The system will load the appropriate Binary program PSEUDO
NRM or PSEUDO MVD, depending upon whether a normal or relocated
DOS is being used and initialize the PSEUDO DISK with an empty
48
directory. The PSEUDO DISK can be accessed in the same manner as
a real disk, using the slot and drive designation previously
specified (default slot 5, Dl). Example: CATALOG S5, Dl will
display the catalog of the PSEUDO DISK.
IV.
RECONNECTING THE PSEUDO DISK
Because the PSEUDO DISK system consists of special drivers
and some patches to DOS, every time the system is re—booted after
the PSEUDO DISK has been installed, these patches are overwritten, resulting in disconnection of the PSEUDO DISK. Any files
placed on the PSEUDO DISK are still present there, after the reboot (as long as the power remains on), however they are inacces—
sable until the driver routines and patches to DOS are re—installed.
Installation of these patches can be accomplished using
option 3 of the PSEUDO DISK program, however this will result in
the directory being initialized, and any files present on the
PSEUDO DISK being wiped out. The patches can be re—installed
without disturbing the PSEUDO DISK directory by selecting option
4 of the menu in the PSEUDO DISK program.
V.
PRECAUTIONS:
A.
Although checks have been placed in the installation and
reconnection routines in order to prevent some conflicts
between
memory
usage
by
the
PSEUDO
DISK
and
the
relocated DOS, care should be taken not to inadvertently
destroy data on the PSEUDO DISK by loading programs or
data into portions of the card(s) being used by the
PSEUDO DISK (ex. loading BASIC into Bank 1 of the board
in slot 0, when this bank is being used by the PSEUDO
DISK.
B.
INITIALIZING DISKS
Since the RWTS subroutine within the DOS present in
memory has been patched to operate with the pseudo—disk.
Care must be taken when initializing disks. When a
diskette is initialized (using INIT function) with the
pseudo—disk installed, a copy of the patched DOS is
written to the diskette. This diskette will not boot
properly because of the patches to DOS. It is therefore
recommended that diskettes be initialized only under a
standard DOS, prior to installation of the pseudo—disk,
so as to avoid this problem.
C.
It is not necessary to run the set—up portion of the
PSEUDO DISK every time it is installed, but only when
a change in configuration is desired (when the memory
card(s) location(s) are changed).
49
VI.
USING THE PSEUDO DISK
Once the pseudo—disk has been initialized and installed(by
running the appropriate BASIC program or BRUNing the SATURN DISK
program), it can be used as a standard disk drive. Its directory
will be empty and files can be saved on it like a real disk
drive. The number of files that can be stored on the pseudo—disk
is limited to the amount of memory being used for it. (Saturn 32K
boards, 64K, 128K and 16K cards)
Due to the unique organization of the PSEUDO—DISK (32
sectors/track), standard track and nibble copy programs cannot
generally be used to copy data to or from it. In fact, FID must
be modified to enable it to transfer files properly from a real
disk drive (16 sectors) to the pseudo disk (32 sectors). This
modification is accomplished by running the program, MOD, provided on the distribution diskette included with the Saturn 64K
and 128K RAM boards.
MOD will modify FID so that it can be used with the PSEUDO—
DISK, as well as with the relocated DOS (see Chapter 4). The
modified FID can be used as a direct replacement for FID (as
distributed on the DOS 3.3 system master), with or without a
PSEUDO—DISK or the relocated DOS.
The data will remain on the pseudo—disk as long as power is
applied, or until the data is deleted. The data is still present
even after a re—boot on the system.
VII.
HOW IT WORKS
The PSEUDO DISK system consists of the following programs:
1.
PSEUDO DISK— This is an Applesoft program which provides
the interface between the user and the machine language
programs (PSEUDO.NRM, PSEUDO.MVD) that do the actual
patching of DOS and installation of the driver routines
for the PSEUDO DISK, for emulation of a disk drive. The
program generates a binary data file PSEUDO PARAMETERS
which contains information regarding the location and
types of RAM boards in the system as well as the slot
and drive specified for the PSEUDO DISK. This file is
updated whenever the PSEUDO DISK is set—up (option 2 of
the main menu.
2.
PSEUDO.NRM— This program does the actual installation of
the
PSEUDO
DISK
and
initialization
of
the
system
(including
the
directory,
if
desired).
The
driver
routines for the PSEUDO DISK are located between the
file butters and start of DOS, with HIMEM being adjusted
downward.
3. PSEUDO.MVD— This program does the actual installation
50
(and is executed by the BASIC program, PSEUDO DISK) and
initialization of the PSEUDO DISK when the relocated
DOS is used. The driver routines for the PSEUDO DISK
are located just below the interface routines to the
relocated DOS ($BEOO) with HIMEM set to protect it
from being overwritten.
51
Chapter 7
PASCAL PSEUDO—DISK
The enclosed SATURN SYSTEMS PASCAL diskette includes the following
programs for use with Apple PASCAL version 1.1:
PSEUDO:
A program to configure the system. (i.e. to tell
the system where the memory cards are located,
This needs to be run only upon installation, unless
your memory card(s) are moved.)
ATTACH:
A set of programs which automatically install the
PASCAL PSEUDO—DISK upon booting, if desired. If it
is already installed, it leaves it in place upon rebooting.
*FASTCOPY:
A program to make a fast copy, from any drive to or
from the PSEUDO—DISK.
*FILEMARKER: A program to select (“mark”) the names of files to
be “fast copied” to the PSEUDO—DISK upon booting.
This is done while viewing the directory.
*FILEMOVER:
A program to move “marked “ files from any drive to
the PSEUDO—DISK with “fast copy” speed.
Intended for use as a SYSTEM STARTUP program,
provision has been made for the following:
1.
Chaining to a user STARTUP CODE program.
2.
Loading only those files desired, leaving files
required only for booting on the boot drive.
3.
Not over—writing files on PSEUDO—DISK during
rebooting.
4.
Extensive error checking during file transfer.
(The following include source textfiles.)
* SLIDESHOW: A demonstration program that reads several
“pictures” from the PSEUDO—DISK and displays them
on the high resolution screen.
GRAPHICS:
A demonstration program which illustrats saving
graphics generated within a program.
*Copyright (1982) CUSTOM DATA SYSTEMS, Madison, WT
52
I.
PASCAL PSEUDO—DISK SYSTEM REQUIREMENTS:
A.
HARDWARE REQUIREMENTS:
An Apple II with 48K of on board memory, a least one disk
drive (1—5 drives may be used) and a Saturn Systems Inc. 32K,
64K or 128K RAM Board, are the minimum hardware requirements, for
PASCAL pseudo—disk operation.
Any of the following expansion RAM cards may be used in slot
zero:
A) Apple Language Card
B) 16K RAM card
C) Any Saturn RAM Board (32K, 64K, 128K)
Additional Saturn RAM Boards may also be placed in additional slots. The memory on these cards (up to a maximum of
256K) may be used as a PSEUDO DISK.
B.
SOFTWARE REQUIREMENTS:
The PASCAL Operating
Systems PASCAL Diskette.
II.
System
version
2.1,
and
the
Saturn
VOLUME ASSIGNMENT AND DISK CAPACITY:
The PASCAL Operating System, version 2.1 assigns volume
numbers to disk drives in the following order: 4,5,11,12,9,10.
The Saturn PSEUDO DISK is installed as Volume #10, leaving room
for up to five additional drives to be installed.
Unlike normal disk drives, PSEUDO DISK memory boards
installed in any available slot. A maximum of 256K may be
lled as a Saturn PSEUDO DISK yielding 506 blocks available
user (after allowing 4 blocks for the disk directory and
the boot strap).
may be
instato the
2 for
The following table shows the amount of available memory for
various memory configurations.
Language Card Note:
An article in the December 1981 issue of “SOFTALK” magazine
entitled “Make your Apple More Flexible” describes a method of
modifying the Apple Language Card in such a manner as to disable
the Autostart ROM. With this modification, the capacities listed
for a 16K card may be obtained while using an Apple Language
Card.
53
AVAILABLE CAPACITY IN BLOCKS
(After allowing 4 blocks for the directory and 2 boot blocks)
Saturn Boards Installed with the following:
Saturn Systems
Board Type:
One Board,
Slot Zero:
+Language
Card:
+16K
Card:
+32K
Card:
32K Board:
26
50
58
90
64K Board:
90
106
122
154
128K Board:
218
218
250
284
32K Board:
90
106
122
154
64K Board:
218
218
250
284
128K Board:
474
474
506
506
Using Two:
III.
A.
SETTING UP THE PASCAL PSEUDO—DISK :
(configuration)
BACK UP YOUR PASCAL DISKETTE BEFORE PROCEEDING:
The Saturn Systems PASCAL Diskette is your key to using your
Saturn RAM Board under PASCAL. For this reason we believe you
should format a diskette and make a backup copy. This is easily
done using the SYSTEM FILER and the “wild card” provision.
B.
USING PSEUDO.CODE TO CONFIGURE THE SYSTEM:
All reference to the boot diskette in this chapter will
refer to the diskette with SYSTEM.PASCAL on it. For a two stage
boot, this will be the second stage diskette. (This one with
SYSTEM • PASCAL.)
1.
With the SYSTEM FILER, transfer the following files from the
Saturn Systems PASCAL Diskette to your boot diskette.
a)
b)
c)
d)
PSEUDO.CODE
(The configuration program)
ATTACH.DATA
(Used by SYSTEM.ATTACH)
ATTACH.DRIVERS
(Used by SYSTEM.ATTACH)
PARAM.DATA (Used by PSEUDO.CODE)
54
2.
Execute the file PSEUDO.
A menu will be displayed:
APPLE PASCAL PSEUDO DISK
COPYRIGHT 1982 Kenneth Roe
COPYRIGHT 1982 Saturn Systems, Inc.
<1>
<2>
<3>
<4>
LOOK AT CONFIGURATION
CHANGE CONFIGURATION
PUT CONFIGURATION IN
ATTACH.DRIVERS AND EXIT
EXIT
a)
Select option 2 and modify the slot contents to match your
system configuration, entering the location and type of all the
memory cards in the system. Next, modify the parameters to set
the directory block count (default=4). NOTE: The directory block
count does not include the boot blocks. Thus, 6 blocks are not
available for file storage.
b)
Select option 3 of the main menu to install the configuration
in ATTACH.DRIVERS and to write out the
configuration parameters
to PARAM.DATA. ATTACH.DRIVERS will then be set up for the given
system configuration.
3.
Now transfer the files, SYSTEM.ATTACH (from the distribution
diskette), ATTACH.DRIVERS (from your boot disk) and ATTACH.DATA
(also from your boot disk) to a separate boot disk. These are
all the files that are necessary for installation of the pseudo—
disk.
4.
Now cold boot this disk, by turning the power off and back
on
again
with
the
newly
created
boot
disk
containing
SYSTEM.ATTACH,
ATTACH.DRIVERS,
and
ATTACH.DATA.
SYSTEM.ATTACH
will install the pseudo—disk using the files ATTACH.DRIVERS and
ATTACH.DATA which have been set up for it.
5.
Now go to the SYSTEM.FILER , by typing “F”. When the
SYSTEM.FILER prompt line appears, type “V” to get a list of
volumes on line. If all has gone well, you should observe that
the PSEUDO DISK is installed as volume #10, with the volume name
“PSEUDO”.
Every time you boot with your modified root volume diskette,
the PSEUDO DISK will be installed automatically for you. By
transferring the files SYSTEM.ATTACH, ATTACH.DRIVERS and ATTACH
DATA another diskette you will be able to install the PSEUDO DISK
using that diskette.
If any of the memory cards are removed or their locations
changed, it will be necessary to run PSEUDO.CODE again to reconfigure the system. Go back to the original boot disk which
contains PSEUDO.CODE, PARAM.DATA, ATTACH.DRIVERS and ATTACH.DATA,
and repeat steps 2 - 4 above.
55
SUMMARY:
IV.
1.
Make sure that the files listed on the proceding page,
are present on the boot diskette.
2.
Run PSEUDO, from the boot diskette. This will insure
PSEUDO will write out ATTACH.DRIVERS on the boot
diskette.
3.
Transfer ATTACH.DRIVERS and ATTACH.DATA from this disk
to a new boot disk.
4.
Transfer SYSTEM.ATTACH to this new boot disk.
5.
Install the new boot disk in drive #4 and turn the power
off, then turn the power on again to install the PSEUDO
DISK.
DETAILS OF THE INSTALLATION PROCESS :
The PASCAL Operating System looks for a SYSTEM.ATTACH file
during one stage of execution of SYSTEM.PASCAL during the boot
process. If SYSTEM.ATTACH is found, it is executed prior to
running SYSTEM STARTUP. The Saturn Systems program, PSEUDO is
designed to modify the ATTACH DRIVERS code file, for permitting
transfer of information about memory card locations, etc. SYSTEM
ATTACH then uses the ATTACH DRIVERS file along with the ATTACH
DATA file to install the PSEUDO DISK. The Operating System then
looks for a SYSTEM STARTUP file to execute next. If SYSTEM
STARTUP is not found, the process ends by displaying the command
line prompt.
V.
USING FASTCOPY
A.
PROGRAM DESCRIPTION:
FASTCOPY is a very fast loader program designed for use with
the Saturn PSEUDO DISK under PASCAL.
Uploading a
minifloppy to the
seconds.
full diskette (280 blocks) from an Apple
PSEUDO DISK may be accomplished in about 20
Downloading a
DISK to an Apple
seconds.
full diskette (280 blocks) from the PSEUDO—
minifloppy may be accomplished in about 30
B.
INTENDED USE:
FASTCOPY was designed to be used to quickly transfer the
56
contents of a minifloppy diskette to the PSEUDO DISK.
The fast access times of the PSEUDO DISK may be utilized for files
thus transferred.
C.
EXECUTING FASTCOPY
Warning:
Fastcopy
is
designed
to
over—write
any
existing on the destination diskette. (See “intended use”
and “notes” below.)
FASTCOPY may be executed from any Volume or Drive.
Upon execution, FASTCOPY will present
select U)ploading or D)ownloading or Q)uit.
a
menu
for
files
above
you
to
FASTCOPY will then ask for source or destination volume, as
appropriate, and perform the task indicated by your answers.
D.
NOTES ON THE USE OF FASTCOPY:
FASTCOPY transfers the directory of the source and all the
blocks on the source or all the blocks that will fit on the
destination, whichever is the smaller number. FASTCOPY will then
modify the directory of the destination to show only those files
transferred in the event the source volume contained more files
than would fit on the destination volume.
FASTCOPY makes a block for block transfer, moving the
directory and used and unused blocks, just as they appear on the
source. Thus, it is important that the source volume be crunched
(or have no unused blocks between files) in order to transfer as
many files as possible. If the destination is larger than the
source volume, then complete transfer will always be obtained.
FASTCOPY makes changes to the directory of the destination
volume after the transfer to show the names of the files
transferred.
If
all
the
files
had
not
been
transferred
as
expected, based on the file space available on the destination
volume, it is probably because unused blocks were transferred.
The solution to this problem is to crunch the source and run
FASTCOPY again.
FASTCOPY does not change the name of the PSEUDO DISK to that
of the source volume name. Thus the Pseudo—disk will retain the
volume name “Pseudo” to distinguish it from the source volume
that you may desire to leave on line. When the contents of
PSEUDO are transferred back to a minifloppy, the original name of
the source volume is restored on the directory of that diskette.
This eliminates any problems that might otherwise be encountered
by having two volumes on line with the same name.
57
E.
ERROR CONDITIONS FLAGGED BY FASTCOPY:
FASTCOPY will inform the operator when the following
conditions exist:
Condition:
Action taken:
Source volume not on line:
Message displayed:
“Error reading source volume.”
“Press any key to return to
the menu”
Destination volume not on line:
Similar action is taken, with
destination volume cited in
message.
Boot volume not on line at exit: Message displayed:
“Place Boot Disk in drive #4”
“Press any key to return to menu”
VI. USING FILEMARKER:
A.
PROGRAM DESCRIPTION AND INTENDED USE:
FILEMARKER is a program that displays the directory of a
particular diskette and permits “marking” of files for transfer
by the program FILEMOVER. FILEMARKER builds a file of the
selected file names along with the volume name of the source
diskette and writes it to the Prefix Volume in a file named
FILEMARKER.DATA.
FILEMARKER displays the source and destination volume names
along with the contents of the source directory and the current
amount of space available in blocks on the destination.
The intended use of FILEMARKER is to build a list of files
to be moved by FILEMOVER automatically upon booting.
B.
EXECUTING FILEMARKER:
FILEMARKER may be executed from any drive or volume. The
program will ask for the source drive number and display the
contents
of
the
directory
in
the
drive
indicated
by
your
response. (The drive must be either 4 or 5.) Eleven filenames
of the directory are displayed at a time, along with the name of
the source volume and the destination volume. The destination
is assumed to be “Pseudo” on volume #10. This is built into the
program, as the purpose of FILEMARKER and FILEMOVER is to move
files to the Pseudo—disk automatically. (It is presumed that
this will be desired upon booting, to put the PASCAL system or
application software on Pseudo—disk,)
58
Along with the above information, FILEMARKER displays a
indicator which points to a file in the directory. This pointer
may be moved up or down the list of files with the Left and Right
Arrow keys. A file may be selected for transfer or removed from
the list to be transferred by pressing the spacebar, while the
indicator is pointing to its name in the directory.
The amount of space left on Pseudo—disk after each file
selection is made is indicated in the upper right corner of the
screen. The file’s number position in the directory is indicated
at the bottom of the screen along with the indication of the
file’s status as being “marked” or “unmarked” for transfer.
Also, an asterisk is printed by the file’s name to indicate this
condition.
The Left and Right arrow keys can be used to scroll
display so as to be able to display all of the files in
directory.
the
the
A “Help” screen is provided and will appear when FILEMARKER
is executed. In order to see the directory it will be necessary
to press Control A. The Help screen may be viewed at any time by
pressing Control A.
C.
ERROR CONDITIONS FLAGGED BY FILEMARKER:
FILEMARKER will inform the operator if the following error
conditions
exist:
(After
displaying
the
appropriate
message,
FILEMARKER will exit if the boot volume is on line or prompt for
the boot volume and then exit.)
Condition:
No disk in source drive:
Action taken:
Message displayed:
“Source volume is off line”
Pseudo—disk not installed:
Message displayed:
“Pseudo is not installed”
No files on source disk:
Message displayed:
“Source directory is empty”
No files marked by operator:
Message displayed:
“No files marked from source
Prefix volume not on line:
Message displayed:
“Insert program disk in any
drive, press Space to create
file” (At this point)
Pressing the Escape key will
exit the program without
creating a file.
59
VII. USING FILEMOVER :
A.
PROGRAM DESCRIPTION AND INTENDED USE:
FILEMOVER is a utility program designed to read a data file
(FILEMARKER.DATA) containing a list of filenames that reside on a
floppy diskette and transfer these files from that disk up to the
Pseudo—Disk. It has been designed to be a startup program whose
function is to pre—load the Pseudo—Disk with files that are
regularly required by the user when the system is first turned
on. A provision has been made for execution of a user startup
program when FILEMOVER has finished.
B.
EXECUTING FILEMOVER:
If FILEMOVER is renamed SYSTEM.STARTUP, it will be run
automatically at boot—time. (Providing it is on the diskette you
are using to boot the system.) However, if this is not desired
it may be started by executing the program whenever the Command
prompt is displayed. This may be done with FILEMOVER on any
volume or drive. FILEMOVER has no menu options, it will run
automatically requiring operator response only when a condition
is
detected
that
requires
operator
intervention.
(These
conditions are listed below.)
If you desire another program to be run upon completion of
FILEMOVER, such as a startup program, merely name your program
STARTUP.CODE.
FILEMOVER
attempts
to
execute
a
file
named
STARTUP.CODE as it finishes. Finding none, it exits normally,
and the Command line appears.
C.
NOTES ON THE USE OF FILEMOVER:
(The file FILEMARKER.DATA
program FILEMARKER.)
mentioned
below
is
created
by
the
FILEMOVER attempts to read FILEMARKER.DATA from the prefix
volume. (This will be the same as the Root Volume name at boot
time.)
FILEMOVER
reads
the
volume
name
contained
in
FILEMARKER.DATA.
This
volume
name
points
to
the
diskette
containing the files to be transferred. FILEMOVER then looks at
that volume for the files and transfers them to Pseudo—disk if
they are present. A report is made to the screen as each file is
transferred and notice is given of each file requested but not
found.
If a file with the same name is already present on Pseudo—
disk, as may be the case when rebooting, then no transfer takes
place. The file present on Pseudo—disk is not over—written.
FILEMOVER then continues moving files not already present but
requested, if there are such files.
60
Except for system files, if a file suffix
or .CODE, that file will be copied as a data file.
is
not
.TEXT,
Stating the last paragraph another way:
SYSTEM.EDITOR,
SYSTEM:FILER, etc. will be moved properly as will files ending in
PROGRAM will be transferred, but will be marked in the disk
directory as a data file. A file labelled as such cannot be
executed by the system. Without moralizing unduly, let it be said
that if the file suffix reflects the type of file that it
represents you should have no problems.
D.
ERROR CONDITIONS FLAGGED BY FILEMOVER:
Condition:
Pseudo not installed:
Action taken:
Message displayed:
“Pseudo not installed” “Pressing
any key will exit program
File FILEMARKER not found:
Message displayed:
“List of files not found on disk”
“Pressing any key will exit program
Source volume not on line:
Message displayed:
“Insert data diskette in any drive”
A file is not found:
Message displayed:
“File name not found on source disk”
(No transfer is attempted)
File handling error:
(Opening or closing error)
Message displayed:
“Error in copying file”
“Pressing any key will exit”
(We beat a hasty retreat!)
Boot Volume is not on line:
(As we attempt to exit)
Message displayed:
“Insert boot disk in boot
drive and hit any key.”
VIII. USING THE GRAPHICS DEMONSTRATION PROGRAMS :
The
following
demonstration
programs
as
supplied
on
diskette, are designed to run in a system with a minimum of two
drives. For Slideshow, an additional requirement is that of a
pseudo—disk with at least 64 blocks free to hold the 4 high
resolution screens. In practical terms, at least two 32K cards
or a 64K card or larger must be installed.
These programs are included for their tutorial value only
and well—documented source is provided. It should be possible to
modify the programs to show one slide at a time with a single
drive system and a single 32K card, if desired.
61
The graphics demonstration programs provided on the Saturn
Systems PASCAL diskette are meant to illustrate the way in which
graphics programs may move graphics to and from the Pseudo—disk.
A.
EXECUTING SLIDESHOW:
(The following expects that a boot volume has been prepared
according to instruction in this chapter regarding installation a
Pseudo—disk automatically upon boot up, and sufficient memory
and drives are available.)
1.
Boot up a two—drive system using Applel.
2.
Place the Saturn Systems PASCAL diskette in drive number 2.
(This is volume #5 under PASCAL)
3.
When the Command line prompt appears, type: “X”.
4.
In answer to the question “Execute what file?”, type:
“#5:SLIDESHOW”
5.
Press the SpacEbar to begin the show, repeated pressing of
of the Escape key will eventually exit the program.
IX.
USING THE GRAPHICS PROGRAM:
The graphics program may be run with
installed in slot 0 and a boot diskette set
as a PASCAL Pseudo—disk.
a single 32K
up to install
1.
Complete
SHOW.
under
2.
Answer the question “Execute What File?” by typing: “#5:
GRAPHICS”.
3.
As GRAPHICS begins, a single pixel is presented on the
screen and you may have to turn the brightness and contrast
up on your monitor to see it.
4.
Holding down the button on Paddle 1, you may draw lines on
the screen using the control knobs on the two paddles. (One
is for horizontal, the other vertical.)
5.
When you are quite content with your doodle, you may press
the button on Paddle 0 to watch the contents of the screen
be stored to the Pseudo—disk and return to the screen.
6.
The purpose of GRAPHICS is to present a program that may be
easily modified by the user to store graphics generated
within a program to the Pseudo—disk. This is a different
situation than attempting to load a binary file that represents a “Picture”. This program has been provided (along with
a well—documented text file) solely for its tutorial value.
steps
one
through
62
five
listed
USING
card
this
SLIDE—
CHAPTER 8
CP/M
PSEUDO DISK
The CP/M PSEUDO DISK is a software package which sets up
Saturn RAM boards for use as a fast “RAM” disk drive under the
CP/M operating system. It will operate with Saturn 32K, 64K,
128K RAM boards, as well as standard 16K RAM cards. Patches are
made to the BIOS portion of CP/M to fool it into thinking that
the memory on the board(s) is just another disk drive. In this
respect the RAM board is made to emulate a disk drive, and as a
result, applications programs are be able to take advantage of
dramatically increased data transfer rate and throughput.
The software included in this package serves to set up the
PSEUDO
DISK
system,
patch
CP/M
and
install
the
controlling
routines. These functions are performed by the following programs:
PSEUDO.BAS
This program is used to set up the PSEUDO
DISK and includes a facility for telling the
system where the memory cards are, as well as
the entry of disk parameters. The program
patches these parameters into the PSEUDO DISK
installation programs INIT.COM and INIT2.COM.
PSEUDO.COM
This machine language program actually sets
up the PSEUDO DISK driver routines with
appropriate parameters entered during the
set—up procedure. The program is loaded and
executed by PSEUDO.BAS. INIT.COM and
INIT2.COM are created from PSEUDO.COM.
INIT . COM
When this program is executed, it patches the
routines. It then initializes the PSEUDO DISK
INIT2.COM
This program performs the same function as
INIT.COM, except that it does not erase the
directory after installing the PSEUDO DISK
driver routines.
PARAM.DAT
This file contains the parameters entered
during the set—up procedure (drive for PSEUDO
DISK, location and types of memory cards,
etc) and is used by PSEUDO.BAS to generate
INIT.COM and INIT2.COM.
There are two basic steps which must be taken prior to using
the PSEUDO DISK:
63
I.
1.
The PSEUDO DISK must be set up.
2.
The PSEUDO DISK drivers must be installed and the
system initialized.
SETTING UP THE PSEUDO DISK
This step involves telling the system where the memory cards
are (which slots) and what portions of these are to be used. In
addition, the drive to be assigned as the PSEUDO DISK and the
number of directory blocks to be allocated is also specified.
The following files are required in order to set up the
PSEUDO DISK.
PSEUDO.BAS
PSEUDO .COM
INIT. COM
INIT2 .COM
PARAM. PAT
These files should be transferred to a disk containing the
CP/M operating system, and installed in drive A.
1.
Load MBASIC and RUN “PSEUDO”.
2.
The following menu will be displayed:
CP/M PSEUDO DISK
COPYRIGHT 1982, SATURN SYSTEMS, INC
<1> LOOK AT PSEUDO DISK SET—UP
<2> SET UP THE PSEUDO DISK
<3> SET UP INIT.COM AND INIT2.COM
AND EXIT
<4> EXIT
WHICH OPTION?
At this point, select option #2. The system will then
display:
64
CP/M PSEUPO DISK
DRIVE C:
SLOT
DIRECTORY BLOCKS 1
BANK
12345678
SLOT
0
1
2
3
BANK
12345678
4
5
6
7
------------------------------------------------------------------------------------------------------------------------------------------------------------
Y=USED
N=NOT USED
C=RESERVED FOR CP/M
(1> CHANGE SLOT CONTENTS
<2> CHANGE DISK PARAMETERS
<3> EXIT
WHICH OPTION?
Now select option 1 to enter slot contents. The system will then
prompt:
WHICH SLOT?
At this point, enter the slot # of the first memory card.
The system will then prompt for the type of card present (16K,
32K, 64K, 128K) Select the appropriate type.
The system will then ask for the banks to be
Enter Y for each bank to be used, N for
reserved. If the card is in slot 0, a request
whether space should be reserved for CP/M (i.e.
Repeat this sequence
DISK are specified.
until
all
cards
to
be
used in this card.
those banks to be
will be made as to
56K CP/M)
used
by
the
PSEUDO
Next, enter the disk parameters by selecting option 2.
The option will display:
<1> CHANGE DRIVE
<2> CHANGE NUMBER OF DIRECTORY BLOCKS
<3> EXIT
1.
Select option 1 to change the drive to be assigned as the
PSEUDO DISK (Default = C:)
65
2.
Select option
(Default = 1)
2
to
change
the
number
of
directory
blocks
NOTE: Each directory block can hold 32 directory entries.
Once all of the cards have been specified and the parameters
entered, select 3 to exit and 3 once again to exit back to the
main menu. The system will update the PARAM.DAT file with the
new parameters.
The last thing that must be done prior to installation
the PSEUDO DISK is to set up the INIT.COM and INIT2.COM files.
of
These programs are what are used to install the PSEUDO DISK
by patching CP/M. They are set up with the parameters entered
during the set—up procedure (option 2).
Select option 3 at this time
INIT2.COM. The system will access the
during this set up procedure.
to set up INIT.COM and
disk and pause frequently
Once
these
files
have
been
set
up,
terminate, exiting back to CP/M system level.
the
program
will
II. INSTALLING THE PSEUDO DISK
After the PSEUDO DISK has been set up, it is installed by
simply executing the file INIT.COM. This action results in the
driver routines to the PSEUDO DISK being loaded into the I/O
configuration block and CP/M BIOS being patched to utilize these
drivers. The last step in this initialization involves erasing
the directory of the PSEUDO DISK.
The program INIT2.COM is identical to
the fact that the directory is not erased.
INIT.COM
except
for
This is useful if CP/M had been COLD Booted after the PSEUDO
DISK had been installed, and access to the files present on the
PSEUDO DISK prior to the boot is desired. INIT2.COM will not
wipe out these files, whereas INIT.COM would destroy them because
it would erase the directory.
NOTE:
It is not necessary to run the set—up portion of the
PSEUDO DISK every time the PSEUDO DISK is to be installed. It is
only necessary to set up the PSEUDO DISK when a change in the
configuration is desired. (i.e. when the memory card locations
are changed or the disk parameters are modified) In fact, the
only files which are necessary for installation of the PSEUDO
DISK
(after
set—up
has
been
accomplished)
are
INIT.COM
and
INIT2.COM.
66
III.
USING THE PSEUDO DISK
After the PSEUDO DISK has been installed, it is accessed
just
like
another
disk
drive,
using
the
drive
designation
assigned to it (default = C:). Files can be transferred to and
from it using standard file copy programs such as PIP.
In fact, a submit file can be used to:
1.
Install the PSEUDO DISK.
2.
Copy several files.
by using a single command.
FOR
EXAMPLE,
the
following
submit
file,
XFER.SUB,
will
install the PSEUDO DISK (Drive C:) and then copy files from Drive
B to it simply by typing, SUBMIT XFER.
-----------------------------------------------------------------file XFER.SUB:
INIT
PIP C:=B:*.*
-----------------------------------------------------------------IV.
LIMITATIONS AND REQUIREMENTS
1.
The CP/M PSEUDO DISK will utilize up to 256K of RAM in
the form of SATURN 32K, 64K, or 128K RAM Boards as well
as 16K RAM Boards.
2.
The PSEUDO DISK driver routines reside in the portion of
the I/O configuration block reserved for user I/O
Driver Software. As a result, this space is unavailable
for
user
drivers
after
the
PSEUDO
DISK
has
been
installed.
67
Chapter 9
TECHNICAL INFORMATION
I.
ADDRESSING THE SATURN 64K AND 128K RAM BOARDS
The Saturn 64K RAM board contains 64K bytes(and the 128K RAM
board, 128K bytes) of RAM memory, divided into 16K byte banks.
These banks are selected independently of each other, and in many
respects appear as four 16K RAM boards (for the 64K RAM board) or
eight 16K RAM boards (for the Saturn 128K board) occupying a
single slot.
All of the 16K banks occupy the same memory space as the
Apple main board ROMS, from $DOOO to $FFFF. In this respect,
they share the same memory space as the ROMS. At any given time,
either the main board ROMS are accessed, or one of the 16K banks,
but not both. Since the ROM space from $DOOO to $FFFF is only
12K long, and each bank on the Saturn RAM board is 16K bytes in
size, only 12K each of these banks can be accessed at any given
time. This is because the 4K memory space from $COOO to $CFFF is
used by the Apple II for I/O and cannot be shared by the RAM on
the Saturn 64K or 128K boards.
In order to access the full 16K bytes of each bank on the
Saturn board, the lower 4K of the RAM board address space is used
twice. Each 16K bank of the Saturn RAM board is divided into two
4K banks occupying the memory space from $DOOO to $DFFF, and one
8K block from $EOOO to $FFFF. Within a given 16K bank, one may
select either of the two 4K banks to occupy the space from $DOOO
to $DFFF.
One has access to the full 64K on the Saturn 64K board (128K
on the Saturn 128K board) by selecting it in 12K segments. To
define a given segment, two things must be designated.
1.
The 16K bank to be accessed.
2.
The 4K bank to be used within this 16K bank.
The following convention has been established to describe the
Saturn 64K board. The four 16K banks are denoted 16K Bank 1, 16K
Bank 2, 16K Bank 3 and 16K Bank 4. Within each 16K bank, the
4K banks are described as 4K Bank A and 4K Bank B. In order to
distinguish the 4K banks within 16K Bank 1 from those in 16K Bank
2, 16K Bank 3 or 16K Bank 4, the 4K bank designation is preceded
by 1, 2, 3 or 4, indicating the 16K bank to which it belongs.
Thus, 4K Bank lA describes the first 4K bank within 16K Bank 1.
The Saturn 128K RAM board is described in the same manner as
the 64K board, with the exception that it contains eight 16K
banks, rather than 4. These banks are denoted 16K Bank 1 through
16K Bank 8.
68
The following memory map depicts
present on the 128K RAM board. Only
displayed are present on the 64K board.
$FFFF
--------------------------------------8K
$E000
8K
--------------------------------------4K
$D000
4K
4K
16K Bank 2
--------------------------------------8K
$E000
8K
--------------------------------------4K
$D000
4K
4K
16K BANK 4
--------------------------------------8K
$E000
8K
--------------------------------------4K
4K
4K
$D000
--------------------------------------16K BANK 5
16K BANK 6
$FFFF
--------------------------------------8K
$E000
4K
8K
--------------------------------------4K
$D000
4K
--------------------------------------16K-BANK 3
$FFFF
4K
--------------------------------------16K Bank 1
$FFFF
schematically
the first 4
4K
4K
--------------------------------------16K BANK 7
16K BANK 8
69
4K
the
16K
Banks
banks
II.
CONTROLLING THE SATURN 64K and 128K RAM BOARD
The Saturn 64K and 128K boards are controlled using 16
locations in the range $CONO — $CONF, where N = 8 + Saturn board
slot #. Thus for slot zero operation, the control addresses are
in the range $C080 to $C08F. These locations are in the Apple’s
peripheral I/O space as described in Apple II reference manual,
p. 80. They are used by the Saturn 64K and 128K boards to
control
the following functions:
1.
Select the Saturn RAM board or the Apple main board
ROM.
2.
Select the desired 16K bank to access.
3.
Determine which 4K bank (A or B) within each 16K bank is
to be used.
4.
Write enable or write protect RAM.
In order to set the Saturn 64K or 128K board in a given
state, a memory access to the particular location corresponding
to the desired state is all that is required. This can be accomplished by either reading or writing to the location. From
BASIC, a POKE or PEEK will accomplish this memory access. A
machine language load or store will also serve the same purpose.
The lower 4 bits of the control address selects the mode of
operation
of
the
Saturn
64K
and
128K
boards,
as
well
as
determines which 16K bank is to be accessed.
A.
When address line 2 is low (A2=0) state selection is enabled.
In this case address lines 0, 1 and 3 determine the state which
is set as follows.
1. Address line 0 determines whether the board will be write
enabled or write protected. (AO = 0 for write protect; AO = 1 for
write enable)
2. Address lines 0 and 1 are used to determine whether
main board ROMs are accessed, or the RAM on the Saturn board.
the
3. Address
line
3
determines
which
4K
bank
within
the
selected 16K bank to use. (A3 = 0 for 4K bank A; A3 = 1 for 4K
bank B)
B.
On the other hand when address line 2 is high (A2=l) 16K Bank
selection is enabled. The address lines 0, 1 and 3 determine
which 16K bank is selected.
70
The following table summarizes the various mode combinations
which are available.
Control
Address
Function
$C0N0
$C0Nl
$C0N2
$C0N3
4K
4K
4K
4K
Bank
Bank
Bank
Bank
A;
A;
A;
A;
RAM
ROM
ROM
RAM
read;
read;
read;
read;
Write
Write
Write
Write
protect
enabled
protect *
enabled
$C0N8
$C0N9
$C0NA
$C0NB
4K
4K
4K
4K
Bank
Bank
Bank
Bank
B;
B;
B;
B;
RAM
ROM
ROM
RAM
read;
read;
read;
read;
Write
Write
Write
Write
protect
enabled
protect *
enabled
$C0N4
$C0N5
$C0N6
$C0N7
select
select
select
select
16K
16K
16K
16K
Bank
Bank
Bank
Bank
1
2
3
4
$C0NC
$C0ND
$C0NE
$C0NF
select
select
select
select
16K
16K
16K
16K
Bank
Bank
Bank
Bank
5
6
7
8
Notes:
N = 8 + Saturn 32K board slot # ( for slot 0, N=8).
16K Bank 1 = 1st 16K bank of Saturn RAM board
16K Bank 2 = 2nd 16K bank of Saturn RAM board
4K Bank lA = 1st 4K bank of the selected 16K Bank
4K Bank lB = 2nd 4K bank of the selected 16K Bank
ROM read:
The RAM on the Saturn board is disabled for
reading and the main board ROM enabled.
RAM read:
The RAM on the Saturn board is enabled for
reading.
Write enable:
The RAM on the Saturn RAM board is enabled
for writing.
Write protect: Data cannot be written to the RAM on the
Saturn Board.
*
This combination (ROM read and RAM write protect)
effectively disables the Saturn 64K or 128K board.
The board is in this state and Bank 1 is selected
upon power up.
71
Using the appropriate mode combination (previous table), any
given byte of memory on the Saturn RAM board can be accessed. In
fact, in several modes (CON1, CON9) the main board ROM’s are
accessed during a read from $DOOO
$FFFF, whereas the RAM on the
Saturn RAM board is written to during a write operation. This
enables one to write to the RAM while running BASIC in ROM which
occupies the same address space. This is possible since BASIC is
being read from ROM while the program may in fact be writing to
RAM (via POKES).
—
Note Concerning Write Enabling the RAM:
In order to enable the Saturn 64K or 128K RAM board for
writing to RAM, the corresponding control address (for mode
desired) must be accessed twice. This is required for any of the
write enable modes. If the board is already in a write enabled
state (e.g. $CONl), and another mode is desired which is write
enabled as well (e.g. $CON3), then only one access to the control
address corresponding to this new mode is required. If on the
other hand, the board is in a write protected state (e.g. C0N0)
prior to the change, two access to the control address are
required to write enable the board.
III.
A.
SATURN 64K and 128K RAM BOARD MEMORY USE
RELOCATED DOS
The relocated DOS occupies 16K Bank 2 and 4K Bank 2A, using
the full 12K of memory space from $DOOO
$FFFF, for DOS, monitor
routines and associated file buffers. This bank is enabled using
control address $CON3 and Bank select address $CON5. The 4K Bank
2B is not used by the relocated DOS.
—
B.
ALTERNATE BASIC
When the alternate BASIC (INTEGER for an Apple II plus;
Applesoft for an Apple II) is present in the Saturn RAM board, it
occupies 16K Bank 1 and 4K Bank lA, and is enabled for reading
using control address $CONO and bank select $CON4. The 4K Bank
lB is not used by this BASIC.
C.
LED INDICATORS:
The Saturn 64K and 128K RAM boards contain 4 light emitting
diodes (LEDs) which provide some visual indication of the state
of the card. Three of the LEDs indicate which bank is selected
and the fourth whether the board is read enabled (RAM READ state)
72
The LEDs are defined as follows (left to right when board is
oriented face up, with LEDs a the top of the board), A3, Al, AO,
RAM READ. When the board is read enabled ($CONO, $CON3, $CONS,
$CONB) the RAM READ LED is "on"
There are 16 possible states for the LEDS:
BANK, STATE
16K
16K
16K
16K
16K
16K
16K
16K
16K
16K
16K
16K
16K
16K
16K
16K
bank
bank
bank
bank
bank
bank
bank
bank
bank
bank
bank
bank
bank
bank
bank
bank
1,
2,
3,
4,
5,
6,
7,
8,
1,
2,
3,
4,
5,
6,
7,
8,
ROM
ROM
ROM
ROM
ROM
ROM
ROM
ROM
RAM
RAM
RAM
RAM
RAM
RAM
RAM
RAM
READ
READ
READ
READ
READ
READ
READ
READ
READ
READ
READ
READ
READ
READ
READ
READ
A3
Al
A0
off
off
off
off
on
on
on
on
off
off
off
off
on
on
on
on
off
off
on
on
off
off
on
on
off
off
on
on
off
off
on
on
off
on
off
on
off
on
off
on
off
on
off
on
off
on
off
on
D. DIAGNOSTIC PROGRAMS:
A memory test/diagnostic program is provided with the Saturn
64K and 128K RAM boards. The program RAMTEST64K is used for
testing the memory on a Saturn 64K board, and the program
RAMTEST128K is used for testing a Saturn 128K board. Program
operation is identical in both versions.
1.
BRUN the appropriate RAMTEST program.
2.
The program will ask for the slot number to test.
Respond with the slot # of the RAM board to be tested.
3.
If an extensive memory test, including refresh tests,
is desired follow the slot * with a “F”.
for example, if the RAM board is in slot 0, then enter:
OF<CR>
to start the test.
4.
The diagnostic test will run for several minutes, and
upon successful completion will display the prompt line:
ENTER SLOT NUMBERS TO TEST:
73
IV.
SPECIFICATIONS
A.
Memory
Type:
Access time:
Refresh:
dynamic
200ns
7 bit
B.
Power consumption (average)
+5V
l6Oma
C.
Compatible Parts
Motorola
Fugitsu
NEC
Hitachi
Oki
74
SATURN RAM BOARD WARRANTY
Saturn Systems, Inc. (551) warrants this product to be free
of defects in material and workmanship for a period of one (1)
year from the original date of purchase to the original user
only. During this period, 551 will repair (or, at its option,
replace)
this
product
free
of
charge,
provided
that
it
is returned with dated proof of purchase to Saturn Systems, Inc.,
3990 Varsity Dr., Ann Arbor, MI 48104. This warranty does not
apply, if in the opinion of SSI, the product has been damaged by
accident,
misuse,
neglect
or
misapplication
as
a
result
of
service or modification by other than Saturn Systems.
THIS WARRANTY IS IN LIEU OF ALL OTHER EXPRESS WARRANTIES, STATEMENTS OR REPRESENTATIONS, AND UNLESS STATED HEREIN, ALL SUCH
WARRANTIES,
STATEMENTS
OR
REPRESENTATIONS
MADE
BY
ANY
OTHER
PERSON OR FIRM ARE VOID. ALL IMPLIED WARRANTIES IN CONNECTION
WITH THIS SALE, INCLUDING THE WARRANTY OF MERCHANTABILITY, SHALL
BE OF THE SAME DURATION AS THE WARRANTY PERIOD STATED ABOVE.
SOME STATES DO NOT ALLOW LIMITATIONS ON HOW LONG AN IMPLIED
WARRANTY LASTS, SO THE ABOVE LIMITATION MAY NOT APPLY TO YOU.
IN THE EVENT THAT THIS PRODUCT SHALL PROVE DEFECTIVE IN WORKMANSHIP OR MATERIALS, YOUR SOLE REMEDY SHALL BE THE REPAIR OR
REPLACEMENT AS STATED IN THIS WARRANTY, AND UNDER NO CIRCUMSTANCES SHALL SATURN SYSTEMS BE LIABLE FOR ANY LOSS OR DAMAGE,
DIRECT, INCIDENTAL OR CONSEQUENTIAL, ARISING OUT OF THE USE OF,
OR INABILITY TO USE, THIS PRODUCT. SOME STATES DO NOT ALLOW THE
EXCLUSION OR LIMITATION OF INCIDENTAL OR CONSEQUENTIAL DAMAGES,
SO THE ABOVE LIMITATION OR EXCLUSION MAY NOT APPLY TO YOU.
Saturn System, Inc.
3990 Varsity Dr.
Ann Arbor, MI 48104
Phone: (313)973—8422