1
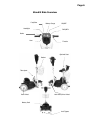
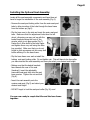
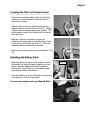
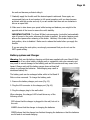
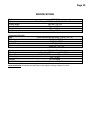
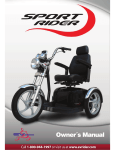
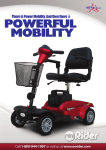
IMPORTANT SAFETY NOTICE
It is important to read and follow all the instructions and safety information contained in
this Owner's Manual prior to use.
-
Always wear a safety helmet (which is provided with each SNR scooter).
-
Do not operate at night.
-
Comply with all local laws and regulations.
-
Do not use in wet conditions.
-
Do not use off road. This device is designed for hard surfaces only.
-
Recommended for riders 16 years of age or older.
-
Check all take-apart locks before each use.
-
Ensure battery pack is properly charged before use.
-
Using the half-speed mode, practice in a large, open area, free of vehicles,
obstacles and pedestrians.
-
Do not use the full-speed mode when using the scooter with the optional seat.
-
Send your warranty registration card as soon as possible.
TABLE OF CONTENTS
PAGE
Important Safety Information
General Information
Riding Terrain
Mechanical Systems
About the Batteries
Additional Safety Information
3
3
3
4
4
5
Stand N Ride Overview Diagram
6
Assembly Instructions
Tiller Assembly
Base Frame Assembly
Installing the Optional Seat Assembly
Coupling the Tiller to the Base Frame
Installing the Battery Pack
7
7
7
8
9
9
Before You Ride Checklist
10
How to Ride the Stand N Ride
10
Battery System and Charger
11
Basic Maintenance
12
Trouble Shooting
12
Specifications
13
Warranty Information
14
Page 3
IMPORTANT SAFETY INFORMATION
It is important to read and follow the instructions and the safety information contained
within this owner's manual prior to use.
General Information
The SNR is a recreational battery-operated vehicle. It is not a mobility device for
medically prescribed use and should not be used as such.
Always wear a helmet when riding the SNR. For your convenience and safety, EV Rider
provides a helmet with each SNR scooter.
This product is not recommended for users younger than 16 years old.
Operators must comply with local laws and regulations. Check with your local Police
Department or the Dept. of Motor Vehicles to determine your local requirements with
respect to the SNR.
SNR scooters require skill to operate safely. Practice starting, stopping and turning in a
large open area, free of vehicles, obstacles and pedestrians.
Do not operate the SNR at night. The SNR is not equipped to be operated outdoors at
night or in low light conditions. It may not be visible to other vehicles or pedestrians in
these conditions.
Do not operate the vehicle near children. When approaching pedestrians, announce
your presence to minimize sudden, unexpected moves by pedestrians.
This product is designed to be used only by one rider. Do not carry any additional
people. Do not carry any items on the SNR unless they securely placed in the basket.
Do not tow or pull the SNR electric scooter behind a vehicle, bicycle or pedestrian.
Do not use the SNR to tow or pull anything.
Riding Terrain
Ride only on smooth, hard, flat surfaces. The SNR is not intended for off-road or hilly
terrain conditions.
Use caution when approaching curbs, uneven pavement, potholes or similar conditions.
The wheels are not intended to go over more than 3” obstacles. You may fall when
running over these obstacles.
Do not ride the Stand N Ride downhill for extended periods of time. This may increase
the wear of the brake lining and adversely affect the ability to stop the unit.
Page 4
Mechanical Systems
Check all joints, hinges and quick releases to ensure that the Stand N Ride is properly
assembled. Stop using the product immediately if any joint, hinge or quick release
becomes loose. Re-tighten the joint, hinge or quick release prior to resuming the ride.
The electric motor, batteries and controls can get damaged if exposed to water. Do not
use the Stand N Ride in the rain and do not drive through water puddles.
If the brake lever touches the handle bar grip, stop using the unit until the brake lever is
adjusted or replaced.
About the Batteries
The batteries (two 18 Ah batteries) are contained in the battery box, which also houses
a circuit breaker and the charger port.
While the batteries are charged before shipping from the manufacturer, we recommend
that you charge the batteries fully before the first use (at least 4 hours).
Use caution when recharging the batteries. Do not charge the batteries in an area
prone to becoming wet.
Recharge the batteries only in an area that is well ventilated.
Keep children away from the Stand N Ride while it is being recharged.
Do not use an extension cord to plug the charger to the wall outlet.
Stop using the charger if the power cord or the charger connector (XLR connector)
becomes worn, broken or damaged in any way. Have the product inspected and
repaired by an authorized/qualified dealer.
Do not modify the electrical controls or wiring. Any attempt to do this may result in
injury and will void the warranty immediately. Use only motors, batteries and charging
units supplied or approved for the Stand N Ride scooter.
Do not use the Stand N Ride batteries to power any other battery-operated equipment.
Page 5
Additional Safety Information
Adjust the handle bar height to provide a comfortable and secure riding position on the
Stand N Ride scooter. The rider's hands should be able to easily grasp the handle bar
controls (throttle and brake lever). They should not be higher than the waist or lower to
ensure proper posture and riding control of the unit.
If using the seat option, the handle bar should be lower to compensate for the seating
height of the user. The seat height should be such that both feet should rest on the
floorboard comfortably and the hands must be able to grasp the handle bar controls.
Handle bar and seat height positions should be locked and tightened.
When finished riding the Stand N Ride scooter, remove the key and take it with you.
This prevents unauthorized use of the product, especially by children.
After taking the product apart for transportation, be certain to protect the handle bar
controls from accidental damage and make sure that you balance the components,
particularly on stairs to avoid falls.
If service is necessary, contact your authorized Stand N Ride electric scooter service. Do
not attempt to service the electric scooter yourself. Service by anyone other than an
authorized service center will void the product's warranty.
For service information call 1-800-944-1997 or visit our website at
www.evrider.com.
Page 6
Stand N Ride Overview
Fast/Slow
Battery Gauge
ON/OFF
Headlight
FWD/REV
Brake
Horn
Throttle
Optional Seat
Basket
Take-Apart
Rear Wheel
Hub Motor/Drive Wheel
Battery Pack
Anti-Tippers
Page 7
Assembly Instructions
Your Stand N Ride is shipped in two boxes: 1 containing the tiller and 1 containing the
base frame.
After you have removed the Stand N Ride components from the protective packaging,
you are ready to set up your scooter for riding by following these steps:
Tiller Assembly:
- Loosen the tiller height lock to allow for the
insertion of the upper portion of the tiller/handle
bar (Fig 1 and Fig 2).
- Making sure that the main wire harness and the
brake cable are not caught by the tubing, insert the
upper tiller section and slide it to your desired
height. Fasten the center guide screw so the tiller
stays centered and then lock it in place by tightening the
collar lock with the Allen key provided. You can always
loosen it and re-adjust the height if your initial height is
not comfortable.
Fig 1
- Make sure that the tiller is centered and securely fastened
before you move to the next step.
Base Frame Assembly:
Remove the battery pack from the main base component to
ease the task of installing the wheels.
Fig 2
- Slide a washer on the rear wheel shaft (Fig 3).
- Now install the wheel followed by the other washer and the
Nylock nut. Tighten it by hand.
Fig 3
- Repeat the process on the other side for the remaining wheel.
- Using a 22 mm wrench (or a 7/8 wrench), tighten the nut to
secure the wheels in place. DO NOT over-tighten the nut and
make sure that the wheel turns freely but is securely fastened
to the shaft (Fig 4).
- Repeat the process for the other side.
Fig 4
Page 8
Installing the Optional Seat Assembly:
Locate all the seat assembly components and have them at
hand to begin the installation of the seat assembly (Fig 5).
Main
Seat-Post
Seat
- Remove the seat-post locking collar from the main seat-post
tube to allow insertion of the tube through the base frame
from the bottom up (fig 6).
- Flip the base over to the side and insert the main seat-post
tube. Make sure that the adjustment holes face the left
wheel, otherwise you may end up with the
basket brackets facing the front of the
scooter, which is not appropriate (Fig 7).
Fasten the 4 Allen bolts to the base frame
and tighten them very well using the Allen
key provided. Make sure that you do not
forget to slide a pressure nut into every bolt
before affixing it to the base frame.
Fig 6
Fig 5
Fig 7
- Flip the base frame over and re-install the
locking seat-post locking collar. Do not tighten yet. This will have to be done after
you have inserted the seat assembly and once you select your desired seat height.
- Making sure that the basket brackets
face towards the rear of the seat
(backrest), insert the adjustable,
removable seat-post tube into the seat
base receiver. Tighten the nut and bolt
(Fig 8).
- Insert the seat assembly onto the
receiver seat-post (Fig 9) and select your
desired seat height.
Fig 8
Fig 9
- DO NOT forget to lock the seat-post collar (Fig 10) now!
You are now ready to couple the tiller and the base frame
together.
Fig10
Page 9
Coupling the Tiller to the Base Frame:
- Remove the secondary safety knob from the tiller
coupler pin to allow the pin to slide through the
base frame receiver.
- Align the tiller coupler pin with the base receiver
tube and slide it over the tiller pin (Fig 11). Wiggle
it lightly until the locking spring locks in place. The
wire connector would have locked itself in place at
the same time.
Fig 11
- Make sure that the connection is secure by
deflecting the spring lock and verifying that it rests
on the groove of the tiller pin (Fig 12). This is an
indication that the connection is secured.
- Attach the secondary safety knob and tighten it (Fig
13).
Installing the Battery Pack:
- With the battery connector at the bottom of the of
the battery box facing forward (towards the front
wheel), slide the battery pack onto the battery
housing (Fig 14) until the top of the battery pack
lines itself up with the floorboard.
Fig 12
Fig 13
- Turn the ignition key to the ON position and tap the
horn button to verify the connection.
You are now ready to test your Stand N Ride!
Fig 14
Page 10
Before You Ride Checklist
Before riding the Stand N Ride electric scooter, be sure to carefully follow the checklist
below:
- Read and understand the Important Safety information section of your Owner’s
Manual.
- Make sure that the battery pack has been fully charged.
- Check that the battery pack connection to the base frame is tight.
- Check that the tiller and the base unit components are securely connected and that
the secondary safety knob is in place and securely fastened.
- Make sure that the handle bars height (and the seat height if you are using this
option) are adjusted to your preference .
- Carefully check all joints, quick release levers, locking buttons and latches to ensure
each is secured.
- Check that your tires are properly inflated if not fitted with the flat-free option.
- Check the brake lever for proper function.
- Most importantly, make sure to have your helmet ready to be worn.
How to ride the Stand N Ride Scooter
It is important that you understand how to operate the scooter, so carefully follow these
steps:
1. Mount the unit and position yourself behind the handle bars with your feet resting on
the floorboard.
2. Check that the brake is not locked. Squeeze it to disengage it if it were locked.
3. Turn the key to ON position (clockwise).
4. Check to see if the battery gauge is in the green zone.
5. Make sure that the speed direction switch (FWD/REV) is set to go forward or reverse
depending on the direction that you want to go to.
6. Select the speed setting (Fast or Half Speed) as desired. We recommend that you
begin using the Stand N Ride scooter only in half speed until you get acquainted with
Page 11
the unit and become proficient riding it.
7. Gradually apply the throttle until the desired speed is achieved. Once again, we
recommend that you do not venture to full speed operation until you have become
proficient with the scooter and only if you are certain that there are no obstacles in
site on an open field.
8. Make sure to slow down your speed while turning and balance your weight to the
opposite side of the turns to ensure the unit’s stability.
IMPORTANT NOTICE: The Stand N Ride’s microcomputer (controller) automatically
cuts off power to the motor whenever the brake is applied. the motor regains power
after a short pause after releasing of the brake. Likewise, if the brake is set to the
lock position, drive is disabled. Make sure to release the brake before you apply the
throttle.
If you are using the seat option, we strongly recommend that you do not use the
FAST speed setting.
Battery system and Charger
Warning: Only use the battery charging unit that was supplied with your Stand N Ride
scooter. Use of any other battery charging unit or equipment voids your warranty and
may result in severe damage to the battery pack and the scooter and may cause a fire
hazard. Always wait until the battery gauge shows at least half
charge to recharge the batteries. Overcharging may result in
decreased battery life.
The battery pack can be recharged either while in the Stand N
Ride or when removed. To charge the battery pack:
1. Remove the battery charger port cover (Fig 15).
Fig 15
2. Plug the XLR connector to the charger port (Fig 16).
3. Plug the charger plug to the wall outlet.
When charging, the charger’s LED should show any of the
following colors:
RED shows that the charger is plugged to the wall, but not to
the unit.
AMBER shows that the charger is charging the batteries
Fig 16
GREEN shows that the charger has finished charging the batteries or that the batteries
are full and do not need charging.
Page 12
Basic Maintenance
The Stand N Ride has been designed to provide years of trouble-free riding enjoyment,
provided that the user takes care of it by not leaving it exposed to the elements, neglecting to
charge it or by using it in any way that is not recommended.
Due to the Stand N Ride’s modular design, there are virtually no user serviceable parts.
Attempting to service or modify any of the scooter’s internal components may result in
permanent damage to the scooter and will void the warranty. For service and repair, contact
your nearest EV Rider dealer.
It is always best to check before each ride the condition of the cables, brakes and folding
latches to ensure their proper settings and tightness.
Occasionally lubricate exposed latches, cables and fittings to keep proper function.
Trouble Shooting
Below are tips on how to handle technical situations that you may encounter:
PROBLEM
The key is turned to the ON position, but
there is no drive.
PROBABLE CAUSE(S)
1. The battery pack may not be fully engaged. Check that the floorboard and the top
of the battery pack are at level with each other.
2. The battery charge may be too low to drive and may need charging.
The key is turned to the ON position, the
batteries are fully charged and the brake
lever is not locked.
1. You probably have the charger plugged to the unit or to the unit and the wall. The
controller disables drive if it detects the charger connected to the unit.
The key is turned to the ON position, the
battery gauge shows charge, but there is
no drive.
1. The brake may be engaged, which disables the controller. Depress and unlock the
brake.
The tiller/base frame coupler doesn't lock
in place.
1. The power connector is probably not aligned to allow for the tube to slide over the
pin completely. Make sure that this is aligned and fully connected.
The unit takes too long to brake and it
doesn't brake completely.
1. The brake needs adjusting. Rotate the brake cable adjuster away from the brake
lever.
The unit drives, but stops after a while.
1. The battery charge may be low. Charge the batteries until full charge is shown.
2. One of both of the batteries may be bad. Have the batteries tested with a load
tester to determine if they hold charge.
The scooter drives, but suddenly stops
during riding.
1. The batteries are probably low.
2. An over load current was detected by the controller.
3. Overheat condition detected by the controller
Page 13
SPECIFICATIONS
Model number
Color
Overall length
Overall width
Ground clearance
Weight capacity
Component Weights:
Base
Tiller
Battery Pack
Seat & Charger
Total
Top speed
Motor type
Tire size
Battery type
Charger
Optional Seat type
SNR-1000
Black Textured ABS Plastic & Metallic Silver Frame
992 mm / 36.3 in
642 mm / 25.3 in
75 mm / 3 in
136kg / 300 lb
(With optional flat-free tires) 19.8 kg / 43.5 lb
18.42 kg / 40.5 lb
12.59 kg / 27.7 lb
5.85 kg / 11 lb
56.66 kg / 122.7 lb
24 km/h / 15 mph
Brushless DC hub motor, 24V, 500W
12.5” X 2.25” Pneumatic Optional flat-free
12V - 18 AH
2A Off Board
Oversized bicycle base with built-in backrest
Important Notice: Dimensions and specifications are subject to change without prior notice.
WARRANTY TERMS – SNR SCOOTER
SIX (6) MONTH LIMITED WARRANTY FROM THE DATE OF PURCHASE:
• Structural - All structural frame components; including tiller, base frame and seat post (if
purchased with this option).
•
Electronics - If any part or electronic component of the Scooter is found upon examination to be
defective in material and/or workmanship, it will be repaired or replaced, at EV Rider's option,
without charge.
•
Labor - Labor charges are NOT provided under warranty. The purchaser is responsible for the
delivery to the authorized repair facility. Satisfactory proof of purchase, serial number and the date
of purchase are always required. For warranty service, please contact the retail establishment from
whom you purchased your EV Rider product.
SIX (6) MONTH LIMITED WARRANTY EXCEPTIONS:
• Motor - In cases where there is an increase in the operational noise level, the warranty does not
apply. (The increase in operational noise level usually occurs due to abusive and excessive strain on
the scooter).
•
Service - Warranty service can be performed by EV Rider or by an authorized EV Rider service
facility. Do not return faulty parts to EV Rider without prior consent. All transportation costs and
shipping damage incurred while submitting parts for repair or replacement are the responsibility of
the original purchaser.
WARRANTY EXCLUSIONS – GIVEN ONLY TO THE ORIGINAL PURCHASER:
The EV Rider, LLC Warranty excludes:
•
Consumable Use – Not under warranty are items which may need replacing due to normal wear
and tear (tires, tubes, belts, bulbs, upholstery and seating, motor brushes, fuses, plastic shrouds
and footrest covers, etc.).
•
Damage – Warranty is void if damage caused by: battery fluid spillage or leakage, abuse, misuse,
accident, or negligence, improper operation, excessive loading, maintenance, or storage, commercial
use or use other than normal.
•
Purpose – Warranty is void if the unit is used other than for the purpose of the purchaser's mobility.
•
Repairs and/or modifications – Warranty is void if made to any part of the scooter without
specific and prior consent from EV Rider, LLC.
•
Repair of Product - Labor, service calls, shipping, and other charges incurred for repair of the
product not expressly approved by EV Rider.
•
Batteries - Batteries carry a limited warranty which is subject to a stringent wear and tear clause.
If batteries are bought from EV Rider in addition to the product (not provided free of charge), then
any battery faults due to a defect in the original manufacture will normally become obvious within
the first two months of use. Any gradual deterioration in performance after this period is normally
associated with fair wear and tear, misuse, or accidental damage and as such, is not covered by the
manufacturer's warranty. The batteries that are shipped with the unit are free. They are tested and
fully charged at the time of shipment. They do not carry a warranty and must be replaced when
they do not hold a charge.
There are no other express warranties. Implied warranties, including those of merchantability and fitness for
a particular purpose, are limited to six (6) months from the date of the original purchase and to the extent
permitted by law.
Any and all implied warranties are excluded. This is the exclusive remedy. Liabilities for consequential
damages under any and all warranties are excluded.
C:\Documents and Settings\mauro\Local Settings\Temporary Internet Files\Content.Outlook\FYJIVOXT\WARRANTY-SNR 08-01-08.doc