1
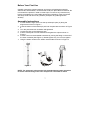
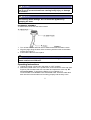
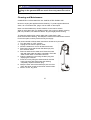
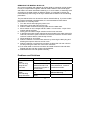
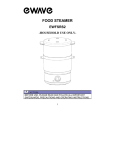
GARMENT STEAMER
EWGS1B
-HOUSEHOLD USE ONLY-
CAUTION:
BEFORE USE, PLEASE READ AND FOLLOW ALL IMPORTANT
SAFEGUARDS, PRECAUTIONS AND OPERATING INSTRUCTIONS.
1
Table of Contents
Safety Instructions -------------------------------------------- 3-5
Parts and Features -------------------------------------------- 6
Assembling & Operating Instructions ------------------ 7-10
Cleaning and Maintenance --------------------------------- 10-11
Problem Solving ----------------------------------------------- 11-12
Warranty ---------------------------------------------------------- 13
2
What You Need to Know About Safety Instructions
Warning and Important Safety Instructions appearing in this manual are not
meant to cover all possible conditions and situations that may occur. Common
sense, caution and care must be exercised when installing, maintaining, or
operating appliance.
Always contact your dealer, distributor, service agent or manufacturer about
problems or conditions you do not understand.
When using electrical appliances, basic safety precaution should always be
followed, including the following:
IMPORTANT SAFEGUARDS
1) Read all instructions.
2)
3)
4)
5)
6)
7)
This appliance is for household use only. Do not use outdoors.
Do not use this appliance for other than its intended use.
Before using for the first time, check if voltage indicated on the base
of the appliance corresponds to the voltage in your home.
Do not turn the power on unless this appliance is properly assembled.
Close supervision is necessary when any appliance is used by or
near children.
Do not operate any appliance with a damaged cord or plug, or after
the appliance malfunctions or has been damaged in any manner.
3
8)
9)
10)
11)
12)
13)
14)
15)
16)
17)
18)
19)
20)
21)
22)
23)
24)
Return appliance to authorized service center for examination, repair
or adjustment.
The use of attachments or accessories not recommended or sold by
the manufacturer may result in fire, electric shock or injury.
Unplug the appliance from the outlet when not in use, assembling
and disassembling, and before cleaning. Make sure the appliance
cools down completely before assembling, disassembling and
cleaning.
Do not let cord hang over edge of table or counter, or touch hot
surfaces.
Do not use outdoors.
Do not operate the steamer without filling the water reservoir. Always
check the water level before and during operation.
Do not lay the hose on the ground or wind it.
Do not touch the hot metal parts, hot water or steam to avoid burns.
Use care when turning a steamer upside down, there may be hot
water in the reservoir.
Allow the appliance to cool completely for at least 30 minutes and
drain the water tank and water reservoir before storage.
Move the appliance by grasping the telescopic pole. Do not force the
casters if they are stuck. Turn off the unit, drain the water tank and
water reservoir before inspecting the casters.
Always disconnect the appliance from the outlet before filling or
draining water and when not in use. Be careful to avoid excess water
spilling from the water reservoir.
Unplug the unit from the outlet when not in use, when moving unit
from one location to another and before cleaning.
Do not place the unit or any parts near an open flame, cooking or
other heating appliance.
Do not use extension cords to avoid overheating and risk of fire.
No detergent can be added into the water tank or it will cause
damage. Distilled or de-mineralized water is recommended.
To reduce the risk of contact with hot water emitting from steam
vents, check appliance before each use by holding it away from body
and operating steam button.
Do not allow cord to touch hot surfaces. Let appliance cool
completely before putting away loop cord loosely around appliance
when storing.
To reduce the likelihood of circuit overload, do not operate another
high wattage appliance on the same circuit.
4
25) If extended cord is absolutely necessary, a 13 ampere rated cord
should be used. Cords rated for less amperage may over heat. Care
should be taken to arrange the cord so that the cord cannot be pulled
or tripped over.
WARNING:
To protect against electric shock, fire, and injury to persons, do
not immerse main cord, plug or unit in water or any other liquid.
WARNING:
This product is equipped with a polarized plug (one blade is wider
than the other blade) as a safety feature to reduce the risk of
electrical shock. This plug will fit into a polarized outlet only one
way. This is a safety feature. If you are unable to insert the plug
into the electrical outlet, try reversing the plug. If the plug still
does not fit, contact a qualified electrician.
Never use the plug with an extension cord unless the plug can be
fully inserted into the extension cord. Do not alter the plug of the
appliance or any extension cord used with this appliance. Do not
attempt to defeat the safety purpose of the polarized plug.
SAVE THESE INSTRUCTIONS
5
Parts and Features
1.
2.
3.
4.
5.
6.
7.
8.
9.
10.
11.
12.
13.
14.
(A) Steam Nozzle Holder (B) Clothes Hanger Hook
Telescopic Pole
Steam Nozzle
Handle
Hose
Water Tank
Water Reservoir
Switch
Rolling Casters
Drain Plug
Hose Base
Pole Base
Indicating Lamps
Fabric Brush
SPECIFICATIONS:
•
•
•
•
Power Rating: 1000 - 1200 Watts
Voltage Rating: 120V 60Hz
Steam Output Time: 45 Seconds
Unit Weight: 13 lbs
6
Before Your First Use
Carefully unpack the garment steamer and remove all packaging materials.
Select a flat, heat-resistant, non-flammable surface to place the food steamer. Do
not immerse the product in water or other liquid. To remove any dust that may
have accumulated on the removable parts during packaging, clean the surface
with damp cloth and remove any stickers (except for any warning/caution
stickers)
Assembly Instructions
1. Put the clothes hanger hook onto the top telescopic pole (A) along the
alignment as shown in Figure 1.
2. Insert the bottom of the telescopic pole into the pole base as shown in Figure
2.
3. Turn the pole base lock clockwise until tightened.
4. Loosen the clips on the telescopic pole.
5. Pull the whole pole to its full extension and tighten the clips as shown in
Figure 1.
6. Put the hose onto the threaded hose base by turning the fitting on the end of
the hose clockwise (See Figure 2). Hands tighten only. Do not over-tighten.
7. Hang the steam nozzle on the steam nozzle holder as shown in Figure 3.
Figure 1
Figure 2
Figure 3
NOTE: The telescopic pole must be fully extended during steam operation
to ensure smooth lining of the hose and provide a free flow of steam.
7
CAUTION:
Always hang the steam nozzle on the steam nozzle holder when
not in use to prevent steam from causing bodily injury or damage
to surfaces.
WARNING:
Do not pull the hose with excessive force or damage will occur
and causing steam leakage. Do not move the appliance by
grasping the hose.
ACCESSORY ASSEMBLY
To attach fabric brush onto the steam nozzle:
Figure 4
1. Turn off the steamer and wait until no steam emits from the steam nozzle.
2. Align the pegs along the back of the accessory with the holes on the steam
nozzle. See Figure 4.
3. Push until the brush is firm in place.
CAUTION:
Do not install the accessory while steam is emitting from the
steam nozzle to avoid burns.
Operating Instructions
1. Unplug the power cord and turn the switch to “OFF” position.
2. Remove the water tank, turn it upside down, and unscrew the valve cap (See
Figure 5). Fill the water tank with cool water and replace the valve cap. Do
not use hot water. To prolong the lifetime of your steamer, it is
recommended to use distilled or de-mineralized water. Place the water tank
back into the unit and make sure it is sitting properly and securely in the
8
cavity. (See Figure 6) Do not let the steamer operate with a dry water
tank, or the damage to the unit could occur.
3. Plug the unit into an outlet.
4. Turn on the switch. Verify that the light on the switch is illuminated. Steam
should start flowing from the nozzle in approximately 45 seconds.
5. When finishing with the steaming session place the switch to the “OFF”
position and remove the plug from the outlet.
Figure 5
Figure 6
PRESSING WITH STEAM
1. To steam a garment, place it on a clean, rust-free clothes hanger and place
the hanger on the clothes hanger hook.
2. Grasp the handle and place the steam nozzle at the bottom of the garment.
Steam will rise along the inside and outside of the fabric, removing the
wrinkles. Slowly slide the nozzle vertically from the bottom to the top of the
garment (See Figure 7). Do not allow kinks to form in the hose at any time.
3. Remove the nozzle from bottom to top on the garment and smooth the fabric
with your free hand.
4. Repeat steps 2 and 3 as necessary until the fabric is wrinkle free.
5. Curtains and draperies can be steamed while still hanging (See Figure 8).
6. Heavier fabrics may require repeated steaming.
7. To remove stubborn wrinkles, the fabric brush may also be used.
Figure 7
Figure 8
9
CAUTION:
Be careful when handling garments on the clothes hanger hook.
Pulling on the garment with too much force may cause the unit to
tip.
Cleaning and Maintenance
COMPLETELY CLEAN AND DRY ALL PARTS AFTER EVERY USE.
Be sure to unplug the appliance before cleaning. To protect against electrical
shock, do not immerse cord, plug or unit in water or other liquid.
Never use harsh abrasives, caustic cleaners on the interior surface.
Wipe dry with clean cloth. For stubborn stains, use a nylon or plastic scouring
pad or a powdered, non-abrasive cleaner. Dry thoroughly before closing.
To clean the exterior finish, simply wipe with a clean damp, cloth.
Re-fit the bowl after cleaning. This keeps the mechanism underneath covered.
For all other parts, wash by hands and dry thoroughly.
It is recommended to follow these instructions at least once per week:
1. Turn the switch to “OFF” position.
2. Unplug the unit from the power outlet.
3. Allow the steamer to cool for at least 30 minutes.
4. Remove the hose and shorten the telescopic pole,
then set them aside.
5. Remove and drain the water tank. Rinse the water
tank with fresh water and drain completely. Place the
water fill tank back on the water reservoir.
6. Drain the steamer by removing the drain plug and
emptying the contents.
7. Flush the u nit by filling the water reservoir and the
hose connector with fresh water and draining
completely. Replace the drain plug.
8. Wrap the hose around the telescopic pole one time.
Place the steam nozzle on the steam nozzle holder.
9. Store in a cool, dry place.
10
REMOVING THE MINERAL BUILD-UP
One common problem with steamer is mineral build-up caused by a high mineral
in many municipal water suppliers. Mineral residue inside of the internal pipes
and heater can cause intermittent steaming or, in some cases, no steaming at all.
According to the water quality in different regions, it is advised to remove the
mineral build-up after using 15-30 days. Please take a reference of the following
procedures.
The procedures below can be used to reduce mineral build-up. If you are unable
to use de-mineralized or distilled water, it is recommended to follow these
procedures on a monthly basis.
1. Turn the unit off and unplug the power cord.
2. Remove the hose and pole from the unit.
3. Drain the water reservoir and empty water from the water tank.
4. Mix a solution of 50% vinegar and 50% water. In most cases, 2 cups of this
solution will be sufficient.
5. Slowly pour the water-vinegar solution into the hose connector.
6. If standing the water-vinegar solution becomes visible in the water reservoir’s
inlet hole, continue to pour to solution into the hose connector until the water
reservoir is about half-full, near the top of hose.
7. Allow standing for 40 minutes.
8. Drain the solution out of the water reservoir by removing the drain plug and
allowing the liquid to drain into a sink or tub.
9. Drain the solution out of the hose connector by tilting the unit over a sink or
tub and pouring the water out of the hose connector.
10. Pour clean water in the hose connector and water reservoir inlet and drain.
Repeat this step until the vinegar odor dissipates.
11. Reassemble the unit and operate normally.
Problems and Solutions
PROBLEM
The unit fails to
steam.
Two Indicating
lamps do not
illuminate.
The unit fails to
steam.
Two Indicating
lamps illuminate.
REASON
Steamer is not plugged
in.
Household Circuit
Breaker/Ground Fault
Interrupter is tripped or
Fuse is blown.
Mineral build-up in the
unit.
The Water Tank is
empty.
11
SOLUTION
Plug into electrical outlet.
Check the power outlet. If you
need assistance, contact a
qualified electrician.
Follow the Removing
Mineral Build-up.
Refill the Water Tank.
Excessive gurgling
of Hose and Steam
Nozzle.
Steam is
intermittent.
Condensation in hose.
Mineral build-up in the
unit.
Some gurgling is a natural
effect of the steam process.
For excessive gurgling,
extend the hose vertically to
allow water to drain back into
the Water Reservoir.
It’s normal for the unit to
periodically stop steaming for
a few seconds. If the steam
stays off for longer periods,
follow the Removing Mineral
Build-up procedure.
SAVE THESE INSTRUCTIONS
.
12
Limited Warranty
This Ewave product is warranted, to the original purchaser or gift recipient, to be
free from any manufacturing defects under normal use and conditions for a
period of one (1) year from the date of purchase as shown on retailer’s receipt.
The obligation of MC Appliance under this warranty shall be limited to repair or
replacement (at our option) during the warranty period, of any part that proves to
be defective in material or workmanship under normal installation and use. The
product is to be returned to MC Appliance or an Authorized Service Center
POSTAGE PREPAID. A copy of the original receipt along with your name,
address and phone number must accompany products returned. Include a
description of the defect along with the date you purchased the product.
This warranty shall be invalid if the product is damaged as a result of misuse,
abuse, negligence, defacement, destruction, accident, fire or other casualties or
alterations in any manner. Improper repair, improper use of electrical voltages or
currents, alteration of serial number, maintenance by any person or entity other
than our own Service Facility or Center, or any use not in conformity with product
instruction, shall render this warranty invalid.
MC Appliance assumes no responsibility for damage resulting from the use of
this product in a manner or location other than that for which it was intended.
WARRANTY CONDITIONAL TO NORMAL AND NON-COMMERCIAL USE OF
THIS APPLIANCE FOR DOMESTIC USE ONLY.
For the nearest Authorized Service Center, contact:
Ewave Customer Service: 1-888-775-0202
Or visit our website at www.mcappliance.com
13